🎨✨💻 Stay ahead of the curve with handpicked, high-quality frontend development and design news, picked freshly every single day. No fluff, no filler—just the most relevant insights, inspiring reads, and updates to keep you in the know.
Prefer a weekly digest in your inbox? No problem, we got you covered. Just subscribe here.
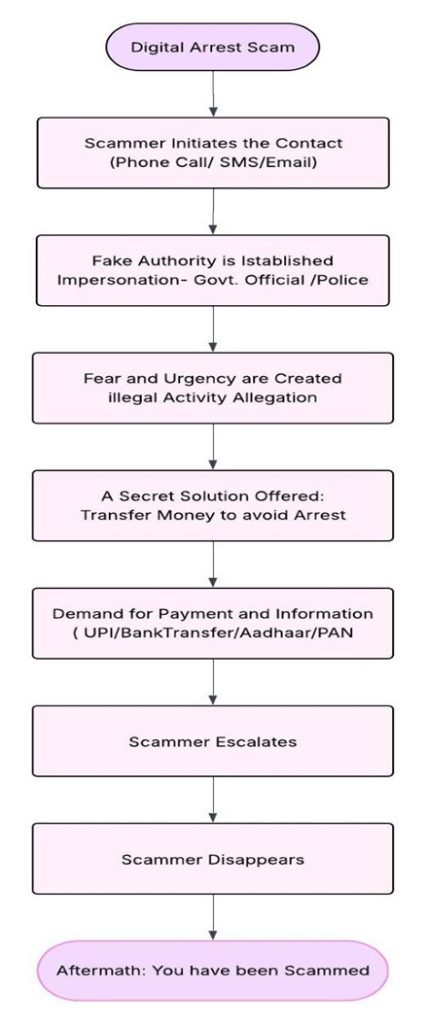
It all starts with a phone call that seems routine at first—measured, official-sounding, and unexpectedly serious. On the other end is someone claiming to represent a government body, calmly accusing you of crimes you’ve never committed—drug trafficking, money laundering, or something just as alarming. They mention your name, address, and other personal details with unnerving accuracy, making the whole exchange feel disturbingly real. This is the unsettling face of what is now known as the “digital arrest” scam—a new and fast-evolving form of cyber fraud that feeds fear and trust.
Data Aquisition:
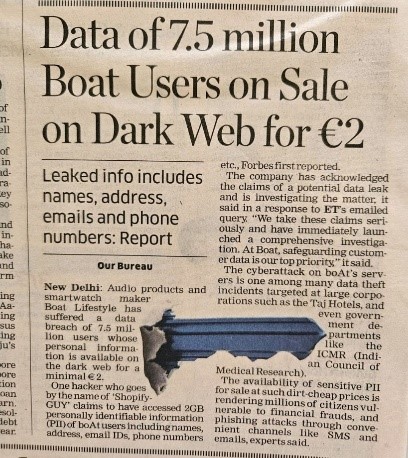
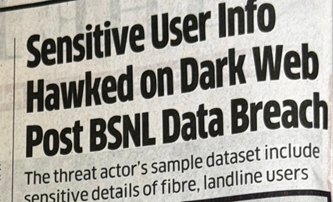
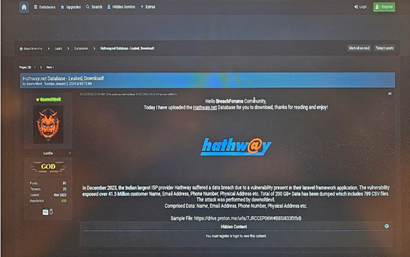
Scammers are capitalizing on massive data breaches to obtain IMSI numbers and SIM details, leveraging Home Location Register data to create meticulously crafted victim profiles. This precise profiling lends digital arrest scams an air of authenticity, making them disturbingly plausible. The April 2024 BoAt breach exposed a staggering 7.5 million customers’ data, including names and contact information, which subsequently surfaced on the dark web. Similarly, Hathway’s system was compromised via a Laravel vulnerability, resulting in the leak of sensitive customer data, including Aadhaar numbers, passport details, and KYC documents. As this personal data circulates, the threat of identity theft and targeted scams becomes increasingly palpable.
PHYSICAL DATA SUBMISSION and LOCAL LEAKS:
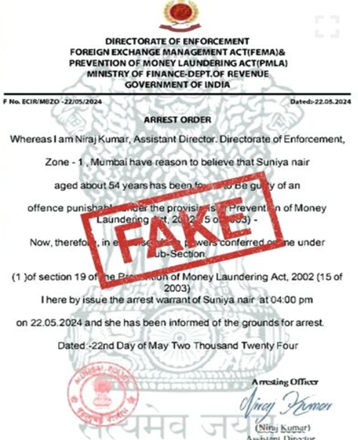
You submit your passport, it gets digitized and stored without proper security. Later, those exact documents are emailed back to you with fake police letterheads, claiming they were found in a drug bust. It’s a terrifying scam, turning your own physically submitted, insecurely stored data into a weapon used to threaten and coerce you.
Medium of Communication:
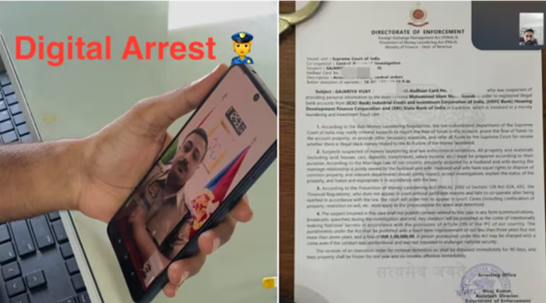
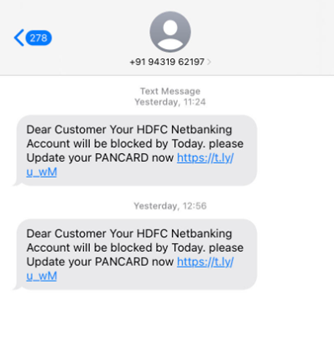
Scammers hit you via voice calls, spoofing numbers to look like “Delhi Police” or “Govt of India” with high-pressure scripts. They also use video calls on platforms like WhatsApp or Zoom, complete with fake police station backgrounds and uniforms to appear legitimate. Beyond that, watch out for fake SMS with tricky links, and especially emails impersonating government domains with forged court summons or FIRs attached—often even showing your own leaked ID. It’s all designed to look incredibly official and scare you into compliance.
FAKE KYC UPDATES
FAKE ARREST WARRANT MAILED TO VICTIM
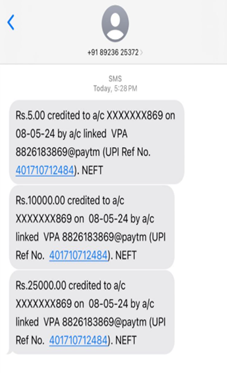
Payment Reference Number is always unique to a transaction !
PAN Updating!! Must Come from Income Tax Authority, India
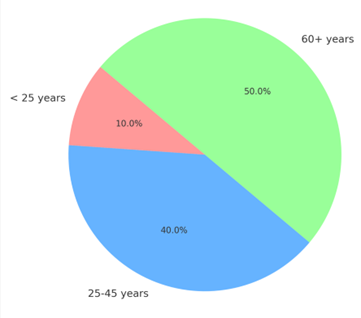
Different Age Groups Victims of the Scam:
Scammers target all ages, but differently. Elderly folks often fall victim due to less familiarity with cyber tricks and more trust in digital authority. Young adults and students are hit hard too, fearing career defamation, especially since their strong social media presence makes their digital footprints easy to trace. Finally, working professionals are exploited through fears of job loss or social humiliation, playing on their reputation.
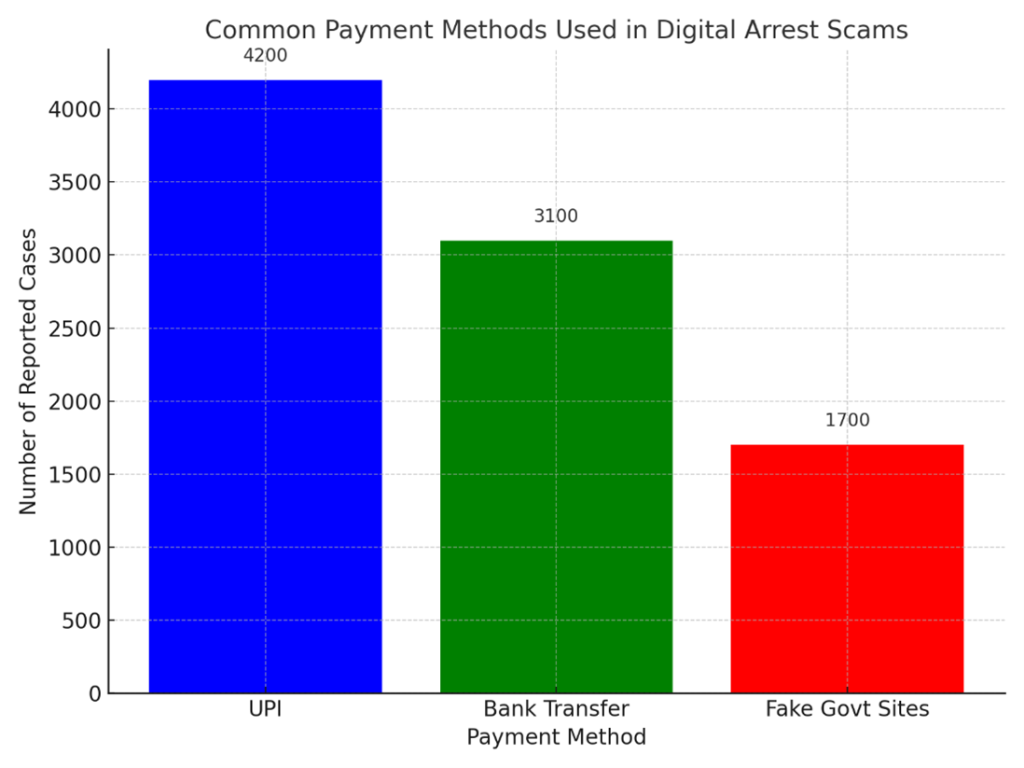
Common Payment Methods and Measures to Claim Authentic Payment:
Scammers ensure payment authenticity by mimicking well-known Indian bank gateways, even accepting card or UPI details. They go as far as buying valid SSL certificates for that “secure lock” icon. Plus, they manipulate domain names with typosquatting, making fake sites look almost identical to real government URLs. It’s all designed to trick you into believing their payment methods are legitimate.
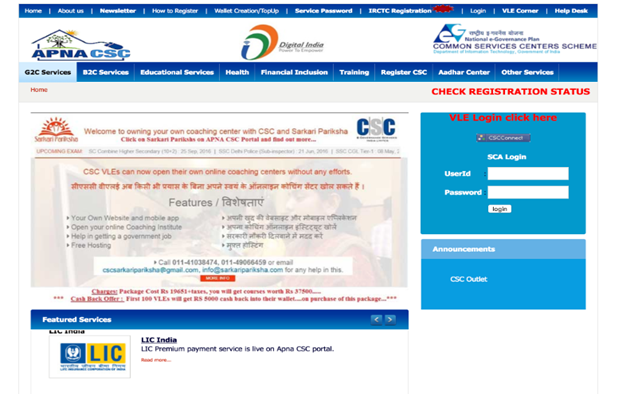
It’s a Fake Website: Non- Government Email Address
Official government websites always use @gov.in or @nic.in domains.
How Quick Heal AntiFraud.AI Detects & Blocks Digital Arrest Scams
1. Scam Call Detection (Before You Pick Up)
🔔 Feature: Fraud Call Alert + Scam Protection
AI uses AI and global scam databases to flag known fraud numbers.
If a scammer is spoofing a number (e.g., police, government, bank), you’ll see an on-screen Fraud Risk Alert before answering—helping you avoid the trap early.
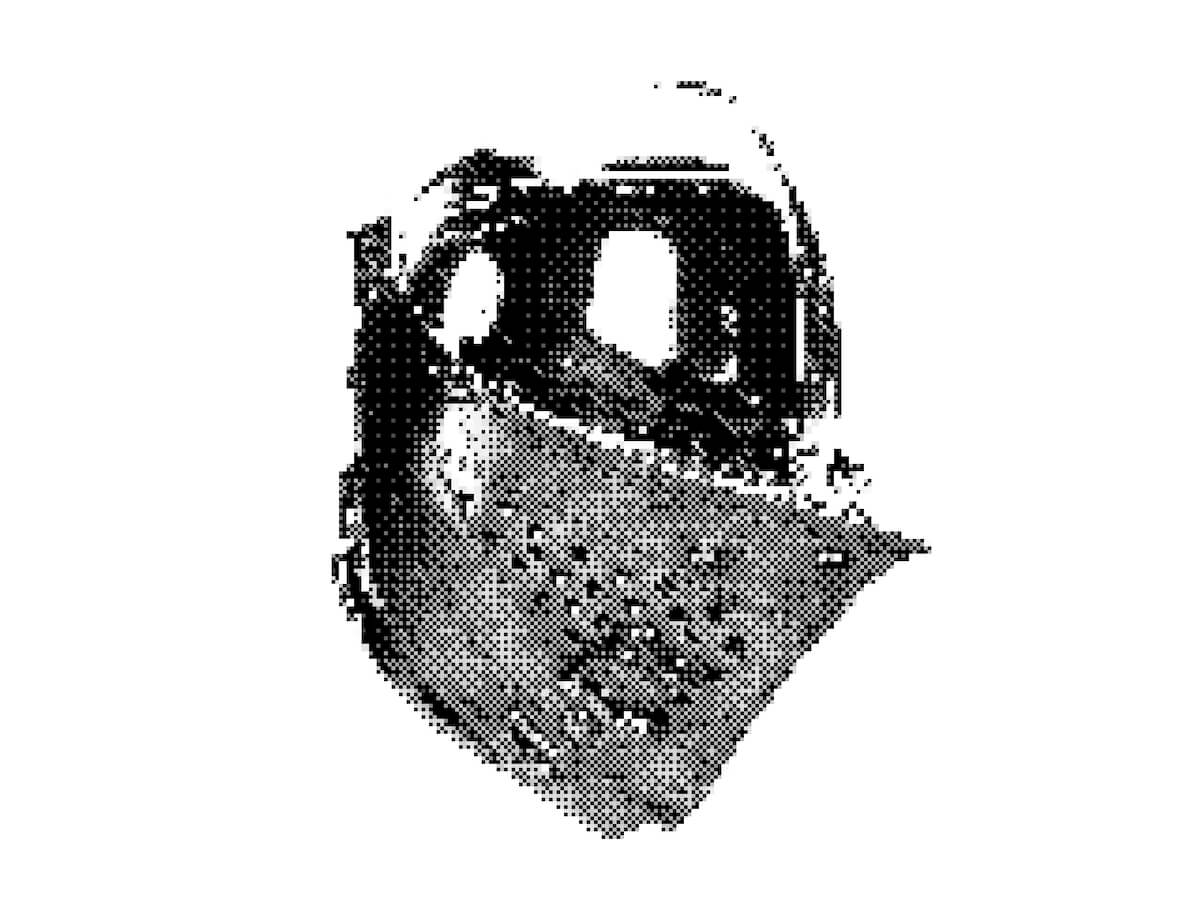
In this post, we’ll take a closer look at the dithering-shader project: a minimal, real-time ordered dithering effect built using GLSL and the Post Processing library.
Rather than just creating a one-off visual effect, the goal was to build something clean, composable, and extendable: a drop-in shader pass that brings pixel-based texture into modern WebGL pipelines.
What It Does
This shader applies ordered dithering as a postprocessing effect. It transforms smooth gradients into stylized, binary (or quantized) pixel patterns, simulating the visual language of early bitmap displays, dot matrix printers, and 8-bit games.
It supports:
Dynamic resolution via pixelSize
Optional grayscale mode
Composability with bloom, blur, or other passes
Easy integration via postprocessing‘s Effect class
Fragment Shader
Our dithering shader implementation consists of two main components:
1. The Core Shader
The heart of the effect lies in the GLSL fragment shader that implements ordered dithering:
bool getValue(float brightness, vec2 pos) {

// Early return for extreme values
if (brightness > 16.0 / 17.0) return false;
if (brightness < 1.0 / 17.0) return true;

// Calculate position in 4x4 dither matrix
vec2 pixel = floor(mod(pos.xy / gridSize, 4.0));
int x = int(pixel.x);
int y = int(pixel.y);

// 4x4 Bayer matrix threshold map
// ... threshold comparisons based on matrix position

}
The getValue function is the core of the dithering algorithm. It:
Takes brightness and position: Uses the pixel’s luminance value and screen position
Maps to dither matrix: Calculates which cell of the 4×4 Bayer matrix the pixel belongs to
Applies threshold: Compares the brightness against a predetermined threshold for that matrix position
Returns binary decision: Whether the pixel should be black or colored
Key Shader Features
gridSize: Controls the size of the dithering pattern
pixelSizeRatio: Adds pixelation effect for enhanced retro feel
grayscaleOnly: Converts the image to grayscale before dithering
invertColor: Inverts the final colors for different aesthetic effects
The shader combines dithering with optional pixelation, creating a compound retro effect that’s perfect for game-like visuals.
Creating a Custom Postprocessing Effect
The shader is wrapped using the Effect base class from the postprocessing library. This abstracts away the boilerplate of managing framebuffers and passes, allowing the shader to be dropped into a scene with minimal setup.
export class DitheringEffect extends Effect {
  uniforms: Map<string, THREE.Uniform<number | THREE.Vector2>>;

  constructor({
    time = 0,
    resolution = new THREE.Vector2(1, 1),
    gridSize = 4.0,
    luminanceMethod = 0,
    invertColor = false,
    pixelSizeRatio = 1,
    grayscaleOnly = false
  }: DitheringEffectOptions = {}) {
    const uniforms = new Map<string, THREE.Uniform<number | THREE.Vector2>>([
      ["time", new THREE.Uniform(time)],
      ["resolution", new THREE.Uniform(resolution)],
      ["gridSize", new THREE.Uniform(gridSize)],
      ["luminanceMethod", new THREE.Uniform(luminanceMethod)],
      ["invertColor", new THREE.Uniform(invertColor ? 1 : 0)],
      ["ditheringEnabled", new THREE.Uniform(1)],
      ["pixelSizeRatio", new THREE.Uniform(pixelSizeRatio)],
      ["grayscaleOnly", new THREE.Uniform(grayscaleOnly ? 1 : 0)]
    ]);

    super("DitheringEffect", ditheringShader, { uniforms });
    this.uniforms = uniforms;
  }

 ...

}
Optional: Integrating with React Three Fiber
Once defined, the effect is registered and applied using @react-three/postprocessing. Here’s a minimal usage example with bloom and dithering:
<Canvas>
  {/* ... your scene ... */}
  <EffectComposer>
    <Bloom intensity={0.5} />
    <Dithering pixelSize={2} grayscale />
  </EffectComposer>
</Canvas>
You can also tweak pixelSize dynamically to scale the effect with resolution, or toggle grayscale mode based on UI controls or scene context.
Extending the Shader
This shader is intentionally kept simple, a foundation rather than a full system. It’s easy to customize or extend. Here are some ideas you can try:
Add color quantization: convert color.rgb to indexed palettes
Pack depth-based dither layers for fake shadows
Animate the pattern for VHS-like shimmer
Interactive pixelation: use mouse proximity to affect u_pixelSize
Why Not Use a Texture?
Some dithering shaders rely on threshold maps or pre-baked noise textures. This one doesn’t. The matrix pattern is deterministic and screen-space based, which means:
No texture loading required
Fully procedural
Clean pixel alignment
It’s not meant for photorealism. It’s for styling and flattening. Think more zine than render farm.
Final Thoughts
This project started as a side experiment to explore what it would look like to bring tactile, stylized “non-photorealism” back into postprocessing workflows. But I found it had broader use cases, especially in cases where design direction favors abstraction or controlled distortion.
If you’re building UIs, games, or interactive 3D scenes where “perfect” isn’t the goal, maybe a little pixel grit is exactly what you need.
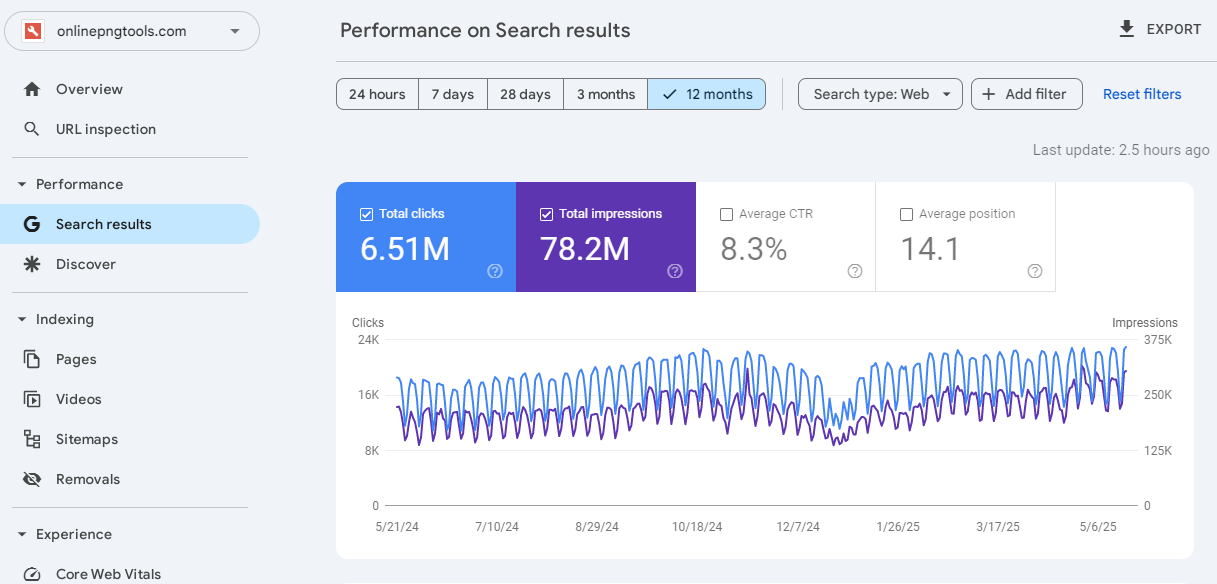
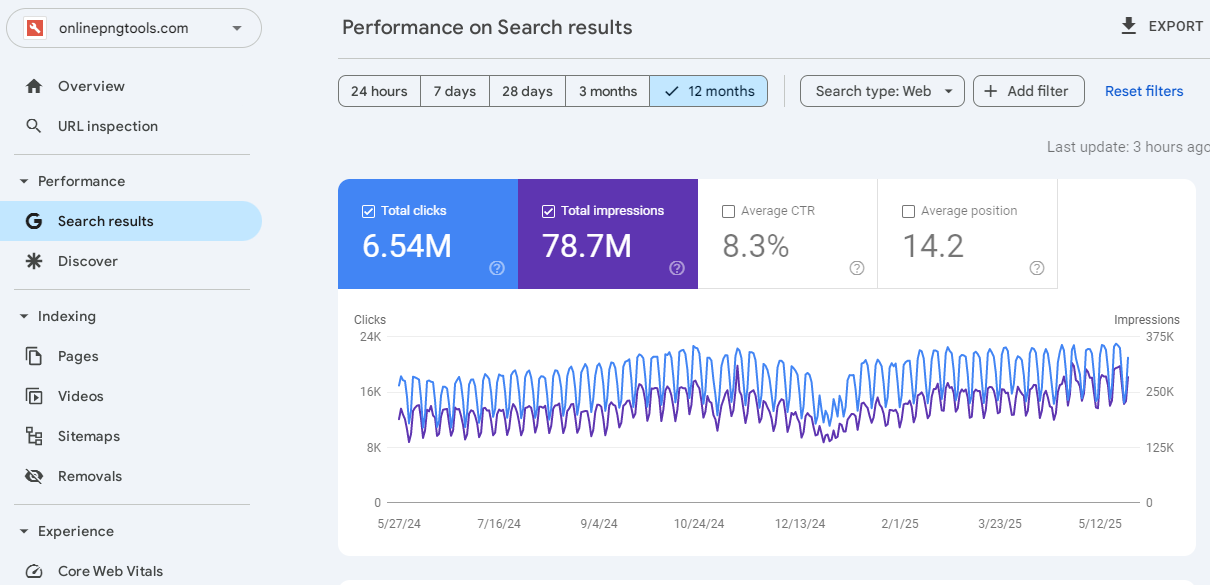
Yesterday Online PNG Tools smashed through 6.50M Google clicks and today it’s smashed through 6.51M Google clicks! That’s 10,000 new clicks in a single day – the smash train keeps on rollin’!
What Are Online PNG Tools?
Online PNG Tools offers a collection of easy-to-use web apps that help you work with PNG images right in your browser. It’s like a Swiss Army Knife for anything PNG-related. On this site, you can create transparent PNGs, edit icons, clean up logos, crop stamps, change colors of signatures, and customize stickers – there’s a tool for it all. The best part is that you don’t need to install anything or be a graphic designer. All tools are made for regular people who just want to get stuff done with their images. No sign-ups, no downloads – just quick and easy PNG editing tools.
Who Created Online PNG Tools?
Online PNG Tools were created by me and my team at Browserling. We’ve build simple, browser-based tools that anyone can use without needing to download or install anything. Along with PNG tools, we also work on cross-browser testing to help developers make sure their websites work great on all web browsers. Our mission is to make online tools that are fast, easy to use, and that are helpful for everyday tasks like editing icons, logos, and signatures.
Who Uses Online PNG Tools?
Online PNG Tools and Browserling are used by everyone – from casual users to professionals and even Fortune 100 companies. Casual users often use them to make memes, edit profile pictures, or remove backgrounds. Professionals use them to clean up logos, design icons, or prepare images for websites and apps.
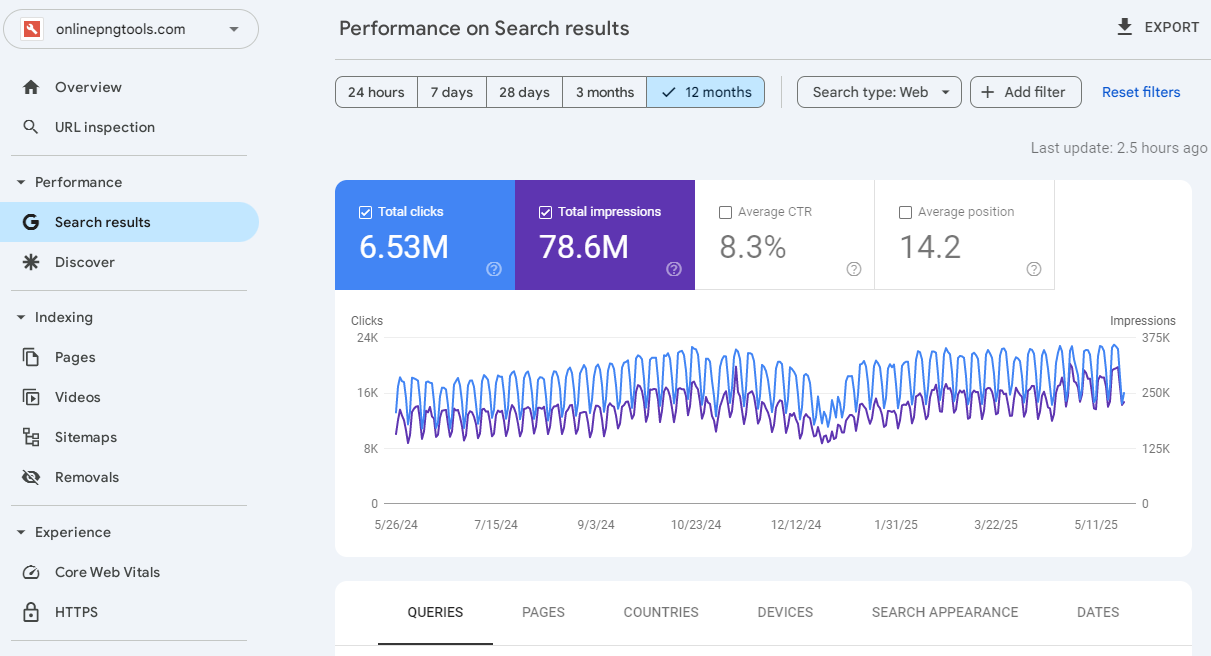
Yesterday Online PNG Tools smashed through 6.52M Google clicks and today it’s smashed through 6.53M Google clicks! That’s 10,000 new clicks in a single day – the smash train keeps on rollin’!
What Are Online PNG Tools?
Online PNG Tools offers a collection of easy-to-use web apps that help you work with PNG images right in your browser. It’s like a Swiss Army Knife for anything PNG-related. On this site, you can create transparent PNGs, edit icons, clean up logos, crop stamps, change colors of signatures, and customize stickers – there’s a tool for it all. The best part is that you don’t need to install anything or be a graphic designer. All tools are made for regular people who just want to get stuff done with their images. No sign-ups, no downloads – just quick and easy PNG editing tools.
Who Created Online PNG Tools?
Online PNG Tools were created by me and my team at Browserling. We’ve build simple, browser-based tools that anyone can use without needing to download or install anything. Along with PNG tools, we also work on cross-browser testing to help developers make sure their websites work great on all web browsers. Our mission is to make online tools that are fast, easy to use, and that are helpful for everyday tasks like editing icons, logos, and signatures.
Who Uses Online PNG Tools?
Online PNG Tools and Browserling are used by everyone – from casual users to professionals and even Fortune 100 companies. Casual users often use them to make memes, edit profile pictures, or remove backgrounds. Professionals use them to clean up logos, design icons, or prepare images for websites and apps.
You’ve probably seen this kind of scroll effect before, even if it doesn’t have a name yet. (Honestly, we need a dictionary for all these weird and wonderful web interactions. If you’ve got a talent for naming things…do it. Seriously. The internet is waiting.)
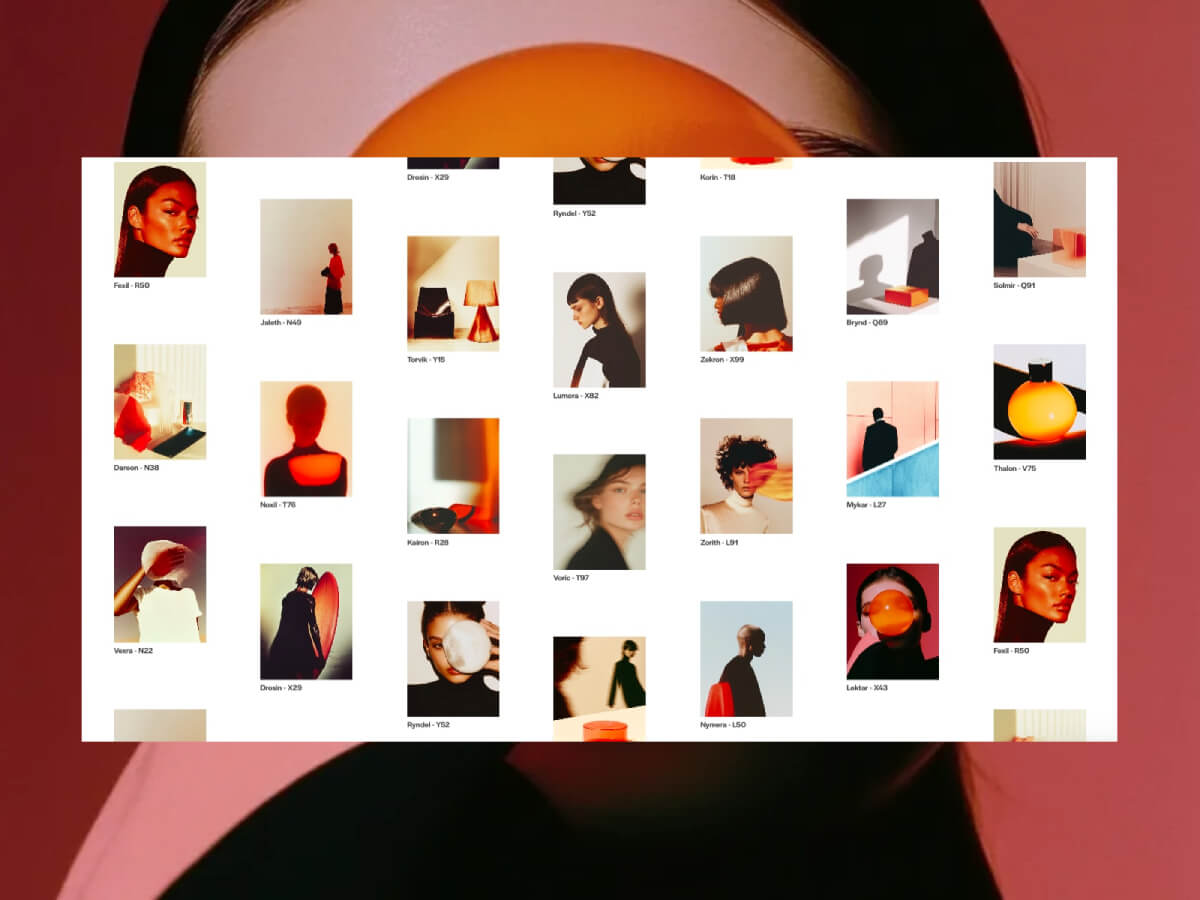
Imagine a grid of images. As you scroll, the columns don’t move uniformly but instead, the center columns react faster, while those on the edges trail behind slightly. It feels soft, elastic, and physical, almost like scrolling with weight, or elasticity.
You can see this amazing effect on sites like yzavoku.com (and I’m sure there’s a lot more!).
So what better excuse to use the now-free GSAP ScrollSmoother? We can recreate it easily, with great performance and full control. Let’s have a look!
What We’re Building
We’ll take CSS grid based layout and add some magic:
Inertia-based scrolling using ScrollSmoother
Per-column lag, calculated dynamically based on distance from the center
A layout that adapts to column changes
HTML Structure
Let’s set up the markup with figures in a grid:
<div class="grid">
  <figure class="grid__item">
    <div class="grid__item-img" style="background-image: url(assets/1.webp)"></div>
    <figcaption class="grid__item-caption">Zorith - L91</figcaption>
  </figure>
  <!-- Repeat for more items -->
</div>
Inside the grid, we have many .grid__item figures, each with a background image and a label. These will be dynamically grouped into columns by JavaScript, based on how many columns CSS defines.
In our JavaScript then, we’ll change the DOM structure by inserting .grid__column wrappers around groups of items, one per colum, so we can control their motion individually. Why are we doing this? It’s a bit lighter to move columns rather then each individual item.
This method groups your grid items into arrays, one for each visual column, using the actual number of columns calculated from the CSS.
3. Create Column Wrappers and Assign Lag
const buildGrid = (columns, numColumns) => {

  const fragment = document.createDocumentFragment(); // Efficient DOM batch insertion
  const mid = (numColumns - 1) / 2; // Center index (can be fractional)
  const columnContainers = [];

  // Loop over each column
  columns.forEach((column, i) => {
    const distance = Math.abs(i - mid); // Distance from center column
    const lag = baseLag + distance * lagScale; // Lag based on distance from center

    const columnContainer = document.createElement('div'); // New column wrapper
    columnContainer.className = 'grid__column';

    // Append items to column container
    column.forEach((item) => columnContainer.appendChild(item));

    fragment.appendChild(columnContainer); // Add to fragment
    columnContainers.push({ element: columnContainer, lag }); // Save for lag effect setup
  });

  grid.appendChild(fragment); // Add all columns to DOM at once
  return columnContainers;
};
The lag value increases the further a column is from the center, creating that elastic “catch up” feel during scroll.
4. Apply Lag Effects to Each Column
const applyLagEffects = (columnContainers) => {
  columnContainers.forEach(({ element, lag }) => {
    smoother.effects(element, { speed: 1, lag }); // Apply individual lag per column
  });
};
ScrollSmoother handles all the heavy lifting, we just pass the desired lag.
5. Handle Layout on Resize
// Rebuild the layout only if the number of columns has changed on window resize
window.addEventListener('resize', () => {
  const newColumnCount = getColumnCount();
  if (newColumnCount !== currentColumnCount) {
    init();
  }
});
This ensures our layout stays correct across breakpoints and column count changes (handled via CSS).
Now, there’s lots of ways to build upon this and add more jazz!
For example, you could:
add scroll-triggered opacity or scale animations
use scroll velocity to control effects (see demo 2)
adapt this pattern for horizontal scroll layouts
Exploring Variations
Once you have the core concept in place, there are four demo variations you can explore. Each one shows how different lag values and scroll-based interactions can influence the experience.
You can adjust which columns respond faster, or play with subtle scaling and transforms based on scroll velocity. Even small changes can shift the rhythm and tone of the layout in interesting ways. And don’t forget: changing the look of the grid itself, like the image ratio or gaps, will give this a whole different feel!
Now it’s your turn. Tweak it, break it, rebuild it, and make something cool.
I really hope you enjoy this effect! Thanks for checking by 🙂
Yesterday Online PNG Tools smashed through 6.53M Google clicks and today it’s smashed through 6.54M Google clicks! That’s 10,000 new clicks in a single day – the smash train keeps on rollin’!
What Are Online PNG Tools?
Online PNG Tools offers a collection of easy-to-use web apps that help you work with PNG images right in your browser. It’s like a Swiss Army Knife for anything PNG-related. On this site, you can create transparent PNGs, edit icons, clean up logos, crop stamps, change colors of signatures, and customize stickers – there’s a tool for it all. The best part is that you don’t need to install anything or be a graphic designer. All tools are made for regular people who just want to get stuff done with their images. No sign-ups, no downloads – just quick and easy PNG editing tools.
Who Created Online PNG Tools?
Online PNG Tools were created by me and my team at Browserling. We’ve build simple, browser-based tools that anyone can use without needing to download or install anything. Along with PNG tools, we also work on cross-browser testing to help developers make sure their websites work great on all web browsers. Our mission is to make online tools that are fast, easy to use, and that are helpful for everyday tasks like editing icons, logos, and signatures.
Who Uses Online PNG Tools?
Online PNG Tools and Browserling are used by everyone – from casual users to professionals and even Fortune 100 companies. Casual users often use them to make memes, edit profile pictures, or remove backgrounds. Professionals use them to clean up logos, design icons, or prepare images for websites and apps.
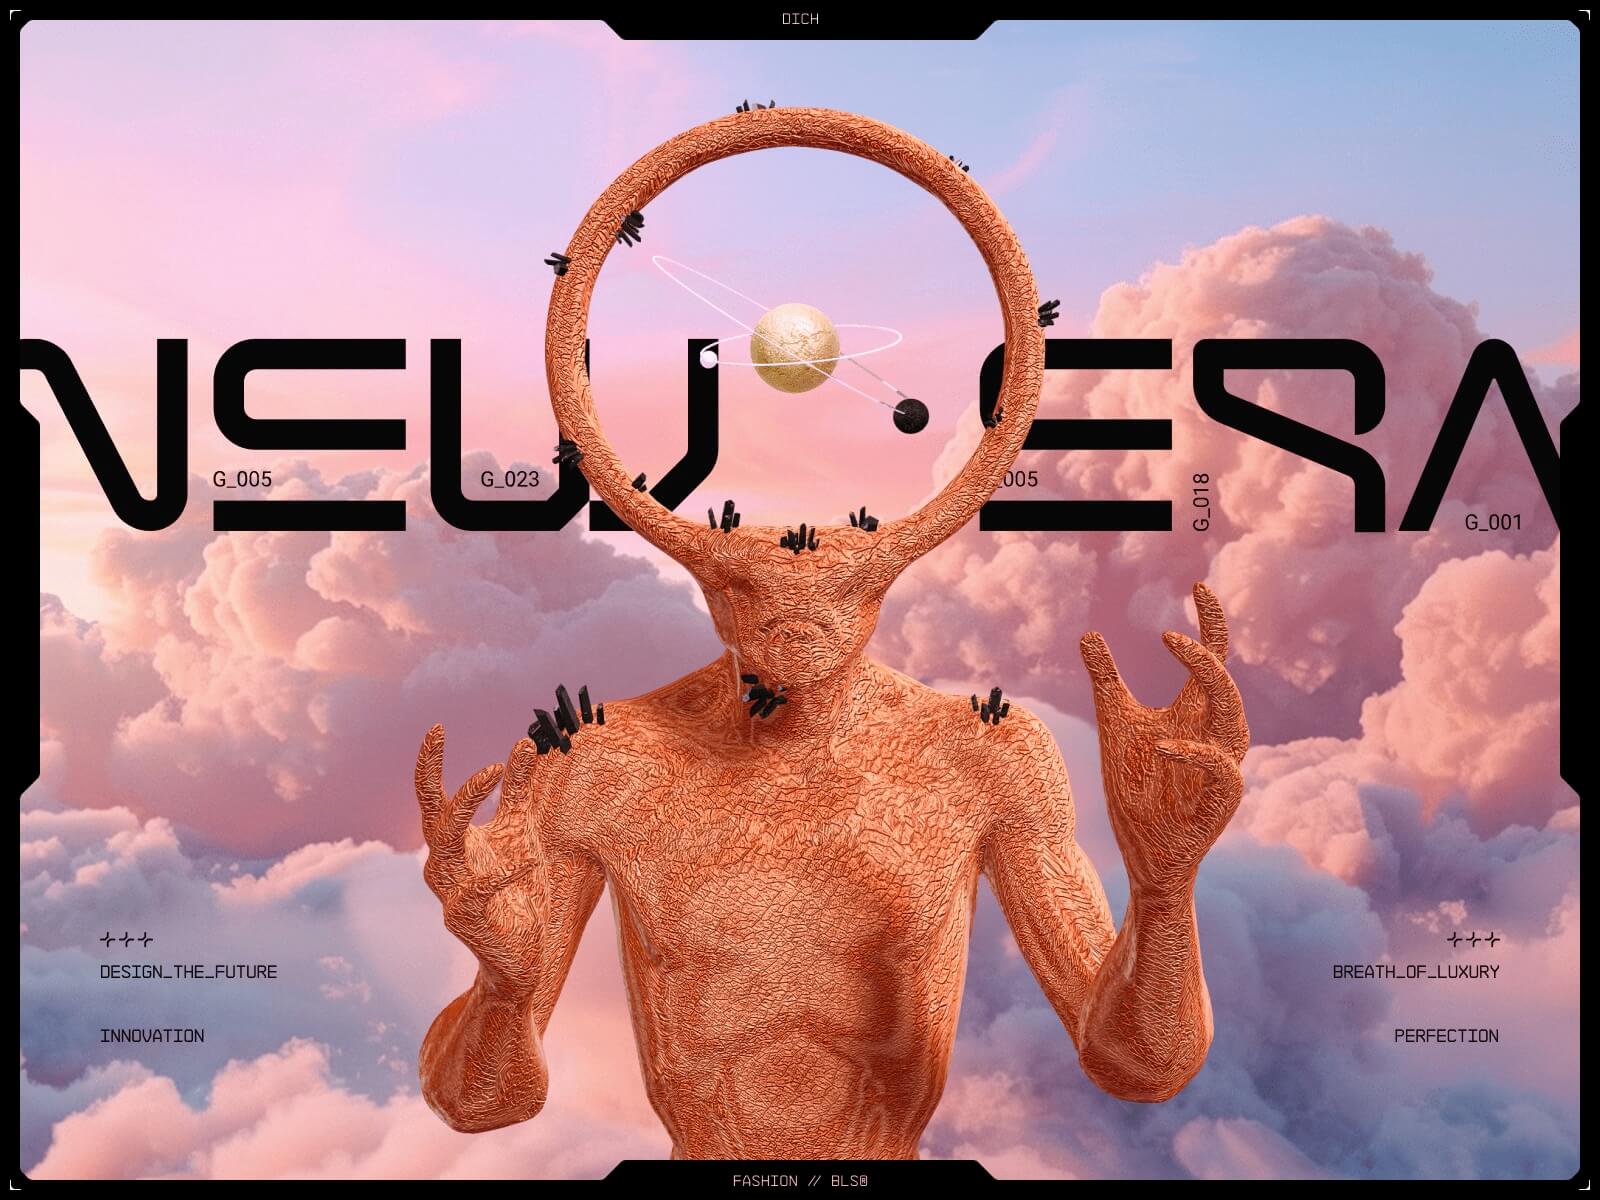
I hadn’t planned on creating a fashion interface. I just needed a reboot. At the time, I was leading art direction at the studio, juggling multiple projects, and emotionally, I was simply exhausted. I joined an Awwwards Masterclass to rediscover the joy of playing with design. I wanted to learn Webflow. I wanted to explore GSAP. But more than that, I wanted to create something unapologetically weird and beautiful.
That seed grew into DICH™, Design Independent Creative House. What started as a design playground became a statement.
We began with light. Not darkness. No glitch, no noise. Just a breath of fresh air.
Designing the Unfuturistic Future
We made a conscious decision: no dark mode. No glitch filters. Most futuristic UIs feel cold. We wanted warmth, softness, a vision of the future that is poetic, not synthetic.
Each section had its own visual temperature. Soft gradients, air, pastel dust. Typography was crucial. The T-12 font had those strange numeric ligatures that felt alien but elegant. Video, color, typography — all speaking the same language.
Each color palette tells a chapter of DICH — sunlit, strange, alive.
We built moodboards, UX pillars, and rhythm plans. That process, taught in the Masterclass, changed how we approached layout. It wasn’t about grids. It was about flow.
Building the Entry Ritual (Preloader)
The preloader wasn’t just an aesthetic flex. It solved three key problems:
Our media-heavy site needed time to load
Browsers block autoplaying audio without user interaction
We wanted to introduce mood and rhythm before the scroll even began
It was animated in After Effects and exported to Lottie, then embedded into Webflow and animated using GSAP.
The Enter button also triggered sound. It was our “permission point” for browser playback.
Live coordinate HUD under the cursor — perfectly suited to our site’s theme, so we decided to include it.
document.addEventListener('DOMContentLoaded', function () {
  if (window.innerWidth <= 768) return;
  const xCoord = document.getElementById('x-coordinate');
  const yCoord = document.getElementById('y-coordinate');
  let mouseX = 0;
  let mouseY = 0;
  let lastX = -1;
  let lastY = -1;
  let ticking = false;
  function formatNumber(num) {
    return num.toString().padStart(4, '0');
  }
  function updateCoordinates() {
    if (mouseX !== lastX || mouseY !== lastY) {
      xCoord.textContent = formatNumber(mouseX % 10000);
      yCoord.textContent = formatNumber(mouseY % 10000);
      lastX = mouseX;
      lastY = mouseY;
    }
    ticking = false;
  }
  document.addEventListener('mousemove', (event) => {
    mouseX = event.clientX;
    mouseY = event.clientY;
    if (!ticking) {
      ticking = true;
      requestAnimationFrame(updateCoordinates);
    }
  });
});
Stones That Scroll
We placed a 3D stone (also from Blender) into Spline, gave it orbital motion, and connected it to scroll using Webflow Interactions.
It felt like motion with gravity — guided, yet organic.
Pixel Tracer
With coordinate tracking already in place, we easily applied it to our section and later enhanced it with a pixel tracer inspired by Jean Mazouni’s displacement effect.
Unicorn Everywhere
The cursor wasn’t just a pointer, it became a vibe.
We used Unicorn Studio to create custom cursor trails and animations that followed the user like echoes of intent. Three variations in total:
One for the landing screen — minimal, hypnotic.
One for the project case study — denser, electric.
One for transitions — barely-there glimmer, like a memory.
Each version added tension and curiosity. It wasn’t flashy for the sake of it — it gave rhythm to hovering, a pulse to the interaction. Suddenly, the cursor wasn’t just a tool. It was part of the interface’s voice.
Footer Letters with Physics
Our footer was a personal moment. We wanted the word “DICH” to be hidden inside animated lines and revealed on hover using canvas and brightness sampling.
This one took the longest. We tried Perlin noise, sine curves, and springs, but none worked as we’d hoped or produced results that were sufficiently readable — until we found an old Domestika course that showed getImageData() logic.
Every visual block was lazy-loaded using IntersectionObserver
Safari compatibility issues — reworked unsupported animations for Safari and added fallbacks for AVIF images (even lighter than WebP) to maximize optimization.
Heavy sections only rendered after the preloader finished
We treated the error page like a runway — not a dead-end, but an invitation. Instead of a sad emoji or a bland “page not found,” you get a full-screen glitch-dream: warped typography, soft scans, and a single message that flickers like a memory.
Technically, it was simple — a standalone Webflow page. But visually, it extended the DICH world: same typographic tension, same surreal softness. We even debated adding background audio, but silence won — it made the page feel like a moment suspended in time.
What We Learned
File formats matter more than you think
Glitches aren’t as magical as thoughtful motion
GSAP is our best friend
Webflow is powerful when paired with code
You don’t need a big plan to make something that matters
Closing
I almost gave up. More than once. But every time the team cracked a bug, designed a transition, or made a visual more strange — it reminded me why we build.
DICH™ was a challenge, a love letter, and a reset. And now it’s yours to explore.