Just a second! 🫷 If you are here, it means that you are a software developer.
So, you know that storage, networking, and domain management have a cost .
If you want to support this blog, please ensure that you have disabled the adblocker for this site. I configured Google AdSense to show as few ADS as possible – I don’t want to bother you with lots of ads, but I still need to add some to pay for the resources for my site.
Thank you for your understanding. – Davide
Ok, you write code. Maybe alone. But what happens when you have to talk about the code with someone else? To help clear communication, you should always use easily pronounceable name.
Choosing names with this characteristic is underrated, but often a game-changer.
No, I don’t think so. That’s unnatural. Even worse for the other field, Awbtu. Aw-b-too or a-w-b-t-u? Neither of them makes sense when speaking aloud. That’s because this is a meaningless abbreviation.
Avoid using uncommon acronyms or unreadable abbreviations: this helps readers understand better the meaning of your code, helps you communicate by voice with your colleagues or searching for a specific field using your IDE
Code is meant to be read by humans, computers do not care about the length of a field name. Don’t be afraid of using long names to help clarity.
Use full names, like in this example:
classDisneyPlusContent{
int VideoID { get; set; }
long VideoDurationInMs { get; set; }
bool AlreadyWatchedByThisUser { get; set; }
}
Yes, ID and Ms are still abbreviations for Identifier and Milliseconds. But they are obvious, so you don’t have to use complete words.
Of course, all those considerations are valid not only for pronouncing names but also for searching (and remembering) them. Would you rather search VideoID or Vid in your text editor?
What do you prefer? Short or long names?
👉 Let’s discuss it on Twitter or on the comment section below!
In any application, writing code that is clean and performant is crucial. But we often can’t have both. What to choose?
Table of Contents
Just a second! 🫷 If you are here, it means that you are a software developer.
So, you know that storage, networking, and domain management have a cost .
If you want to support this blog, please ensure that you have disabled the adblocker for this site. I configured Google AdSense to show as few ADS as possible – I don’t want to bother you with lots of ads, but I still need to add some to pay for the resources for my site.
A condition statement with multiple booleans makes your code harder to read.
The longer a piece of code is, the more difficult it is to understand.
It’s better to extract the condition into a well-named function that reveals the intent.
with an example that showed how much easier is to understand an if statement when the condition evaluation is moved to a different, well-named function, rather than keeping the same condition directly in the if statement.
I totally agree with him. But then, I noticed Visakh’s point of view:
If this thing runs in a loop, it just got a whole lot more function calls which is basically an added operation of stack push-pop.
He’s actually right! Clearly, the way we write our code affects our application’s performance.
So, what should be a developer’s focus? Performance or Clean code?
In my opinion, clean code. But let’s see the different points of view.
In favor of performance
Obviously, an application of whichever type must be performant. Would you use prefer a slower or a faster application?
So, we should optimize performance to the limit because:
every nanosecond is important
memory is a finite resource
final users are the most important users of our application
This means that every useless stack allocation, variable, loop iteration, should be avoided. We should bring our applications to the limits.
Another Visakh’s good point from that thread was that
You don’t keep reading something every day … The code gets executed every day though. I would prefer performance over readability any day. Obviously with decent readability tho.
And, again, that is true: we often write our code, test it, and never touch it again; but the application generated by our code is used every day by end-users, so our choices impact their day-by-day experience with the application.
Visakh’s points are true. But yet I don’t agree with him. Let’s see why.
In favor of clean code
First of all, let’s break a myth: end user is not the final user of our code: the dev team is. A user can totally ignore how the dev team implemented their application. C#, JavaScript, Python? TDD, BDD, AOD? They will never know (unless the source code is online). So, end users are not affected by our code: they are affected by the result of the compilation of our code.
This means that we should not write good code for them, but for ourselves.
But, to retain users in the long run, we should focus on another aspect: maintainability.
a program is maintainable if it meets the following two conditions:
• There is a high probability of determining the cause of a problem in a timely manner the first time it occurs,
• There is a high probability of being able to modify the program without causing an error in some other part of the program.
so, simplifying the definition, we should be able to:
easily identify and fix bugs
easily add new features
In particular, splitting the code into different methods helps you identify bugs because:
the code is easier to read, as if it was a novel;
in C#, we can easily identify which method threw an Exception, by looking at the stack trace details.
To demonstrate the first point, let’s read again the two snippets at the beginning of this article.
When skimming the code, you may incur in this code:
if(hasValidAge(user)){...}
or in this one:
if(user.Age>= 18 && user.Age < 100){...}
The former gives you clearly the idea of what’s going on. If you are interested in the details, you can simply jump to the definition of hasValidAge.
The latter forces you to understand the meaning of that condition, even if it’s not important to you – without reading it first, how would you know if it is important to you?
And what if user was null and an exception is thrown? With the first way, the stack trace info will hint you to look at the hasValidAge method. With the second way, you have to debug the whole application to get to those breaking instructions.
So, clean code helps you fixing bugs and then providing a more reliable application to your users.
But they will lose some ns because of stack allocation. Do they?
Benchmarking inline instructions vs nested methods
The best thing to do when in doubt about performance is… to run a benchmark.
As usual, I’ve created a benchmark with BenchmarkDotNet. I’ve already explained how to get started with it in this article, and I’ve used it to benchmark loops performances in C# in this other article.
So, let’s see the two benchmarked methods.
Note: those operations actually do not make any sense. They are there only to see how the stack allocation affects performance.
The first method under test is the one with all the operations on a single level, without nested methods:
[Benchmark][ArgumentsSource(nameof(Arrays))]publicvoid WithSingleLevel(int[] array)
{
PerformOperationsWithSingleLevel(array);
}
privatevoid PerformOperationsWithSingleLevel(int[] array)
{
int[] filteredNumbers = array.Where(n => n % 12 != 0).ToArray();
foreach (var number in filteredNumbers)
{
string status = "";
var isOnDb = number % 3 == 0;
if (isOnDb)
{
status = "onDB";
}
else {
var isOnCache = (number + 1) % 7 == 0;
if (isOnCache)
{
status = "onCache";
}
else {
status = "toBeCreated";
}
}
}
}
No additional calls, no stack allocations.
The other method under test does the same thing, but exaggerating the method calls:
As you see, by increasing the size of the input array, the difference between using nested levels and staying on a single level increases too.
But for arrays with 10 items, the difference is 7 nanoseconds (0.000000007 seconds).
For arrays with 10000 items, the difference is 12528 nanoseconds (0.000012528 seconds).
I don’t think the end user will ever notice that every operation is performed without calling nested methods. But the developer that has to maintain the code, he surely will.
Conclusion
As always, we must find a balance between clean code and performance: you should not write an incredibly elegant piece of code that takes 3 seconds to complete an operation that, using a dirtier approach, would have taken a bunch of milliseconds.
Also, remember that the quality of the code affects the dev team, which must maintain that code. If the application uses every ns available, but it’s full of bugs, users will surely complain (and stop using it).
So, write code for your future self and for your team, not for the average user.
Of course, that is my opinion. Drop a message in the comment section, or reach me on Twitter!
TLDR: Want to see how your site looks in different browsers without installing them all? Try a free online browser emulator at browserling.com/browse. It runs in your browser. No installs, no downloads.
What’s a Browser Emulator?
A browser emulator is a special browser that works like the real thing but runs on another computer in a virtual machine. You control it from your screen and can test sites in different browsers (Chrome, Firefox, Saferi, Edge, etc) without installing them. This makes it easy to spot issues and see how websites look for different users.
Why Do Developers Use It?
Web developers need their sites to look good everywhere: in Chrome, Firefox, Edge, Safari, even Internet Explorer (yep, some people still use it). A browser emulator lets you check your site across all these browsers quickly. You can spot layout issues, broken buttons, or weird CSS problems without multi-browser installs.
Is It Just for Developers?
Nope. Regular users can try it too. Say you want to see how a site behaves in another browser, or you’re curious why something looks strange in Safari but not in Chrome. Instead of downloading new browsers, you can just launch them in the emulator.
Can I Use It for Cross-Browser Testing?
Totally. That’s the main point. Browser emulators are built for cross-browser testing. You can load your website in multiple browsers and see exactly what users see. If your site looks great in Chrome but breaks in Firefox, the emulator shows you that.
Can I Test Websites on Mobile Browsers Too?
Yes. With a browser emulator you can try mobile versions of browsers like Android Chrome. This helps you see how your site looks on phones and tablets without needing to buy extra devices.
Do Browser Emulators Have Developer Tools?
All emulators give you access to tools like “Inspect Element”, so you can dig into code, check CSS, and test changes live.
What’s the Difference Between a Browser Emulator and a Browser Sandbox?
A browser emulator is for testing how sites look and act in different browsers. A browser sandbox is more for safe browsing and security, keeping dangerous stuff away from your device. Both run on remote computers, but they solve different problems.
Is It Safe?
Yes. Since the browsers run on remote computers, nothing touches your real device. If a site tries to crash a browser or run buggy code, it only affects the emulator, not your machine.
Do I Need to Download Anything?
Nope. Just open the browserling.com/browse, pick a browser, and start testing. It runs on HTML5, JavaScript, and WebSockets right inside your own browser.
Can I Try Older Browsers?
Yep! That’s one of the best parts. Developers can test old browser versions that people still use but don’t want to install locally. This helps with bug fixing, design tweaks, and checking compatibility.
Is It Free?
There’s a free browser emulator with limited time. If you need more testing time or access to more browsers, you can upgrade to paid plans. Paid users get longer sessions, more browser options, mobile IPs, and file transfers.
What Is Browserling?
Browserling is a free online browser emulator and testing platform. It helps developers test websites across browsers, and it helps regular users open sites safely without downloading extra software.
Who Uses Browserling?
Web developers, designers, QA testers, cybersecurity folks, schools, and big companies. Anyone who needs to test websites or check how they behave in different browsers. Millions of people use Browserling to make the web safer and better.
TLDR: Want your team to browse the web safely without risking company devices or networks? Try free Remote Browser Isolation at browserling.com/browse. It runs right in your browser. No installs, no downloads.
What’s Remote Browser Isolation (RBI)?
Think of RBI as a “browser in the cloud”. Instead of running websites directly on your laptop or office PC, RBI loads them on a secure server somewhere else. You just see a clean, safe video stream of the website. Any risky code or malware stays far away from your company systems.
Why Should Managers Care?
One bad click from an employee can cost thousands in lost time, ransomware, or data leaks. RBI reduces that risk to almost zero. With RBI, your staff can open links, check supplier sites, or even handle suspicious web apps without bringing danger onto the corporate network.
Will RBI Slow Down My Employees?
Not really. Modern RBI is built to be fast. Websites load almost instantly, and employees barely notice they’re browsing through a secure remote session. For management, this means stronger security without hurting productivity.
Will Employees Push Back Against It?
Unlikely. Since RBI looks and feels like a normal browser, most employees won’t even notice the difference. For managers, that’s a win: stronger security without resistance or complaints about “new software”.
Can RBI Help with Compliance and Regulations?
Yes. Many industries (finance, healthcare, government) require strict data protection. RBI helps by keeping risky code and malware away from local systems. This reduces compliance headaches and shows auditors that you’re serious about security.
How Does RBI Compare to Firewalls and Antivirus?
Firewalls and antivirus tools are like locks on the door. RBI is like moving the door itself into a safe building across the street. Even if malware tries to sneak in, it never reaches your office network. Managers can think of RBI as another strong layer in the security stack.
Is It Safe for Regular Users?
Yes. Users don’t need to install anything complicated. RBI runs in the browser they already use. If a sketchy site tries to drop malware, it gets stuck in the isolated environment. Employees just see the site like normal, but nothing dangerous touches their device.
Can RBI Help with Phishing Emails?
Definitely. Your team can click on links from suspicious emails inside RBI. If the site is a phishing trap or hides malicious scripts, it can’t escape the isolated session. The real endpoint stays clean.
What About IT and Security Teams?
RBI is great for IT departments. Security teams can safely open suspicious URLs, test untrusted web apps, or check malware samples without spinning up a separate VM every time. It saves time and lowers the chance of accidents.
Do We Need Special Hardware or Software?
Nope. Just go to browserling.com/browse in your normal browser. It uses modern web tech (HTML5, JavaScript, WebSockets) to stream the remote session. No downloads, no installs, no admin rights needed.
Can Employees Use Different Browsers?
Yes. RBI services let you switch between Chrome, Firefox, Edge, Opera, and even older versions. This is useful for testing apps across multiple browsers without risking the actual machine.
Is It Free?
There’s a free version you can try right now with time limits. Paid plans are available for longer sessions, advanced controls, and enterprise features like policy enforcement and logging.
Is RBI Expensive to Roll Out?
Not at all. There are free trials and affordable enterprise plans. Because RBI runs from the employees’ existing browsers, there’s no big setup cost, no new servers, and almost no need for extra staff training. Managers can start small, then scale up if the company needs more seats or features.
What Is Browserling?
Browserling is a pioneer in online RBI technology. It lets individuals and companies run browsers safely in the cloud. Enterprises use it for:
Securing employee browsing
Testing apps and websites
Opening suspicious files and URLs
Protecting against phishing and malware
Who Uses Browserling?
Everyone from small businesses to Fortune 500 companies. IT managers, government agencies, financial firms, schools, and healthcare providers use Browserling’s RBI solution to keep employees safe online. RBI is especially popular in industries where compliance and data security really matter.
TLDR: Need to see how your site or app works on Android without buying a phone? Fire up a free online Android emulator at browserling.com/android. The emulator runs right in your browser – no downloads, no installs, no setup.
What’s an Online Android Emulator?
An Android emulator is like a “phone inside your computer”. It runs on a server in the cloud, and you control it through your browser. You can tap, swipe, and test apps or websites exactly like you would on a real phone.
Is It Safe to Use?
Yep! The emulator runs remotely, so anything you test stays contained. You don’t risk messing up your computer or your personal phone. Even if an app has bugs or hidden malware, it can’t escape the emulator.
Can I Test My Mobile Website?
Absolutely. Just load your site inside the emulator and see how it looks on an Android device. You’ll notice if text is too small, buttons don’t line up, or if your layout breaks on different screen sizes.
What About Cross-Browser Testing?
You can use the emulator to try your site in Chrome for Android, Firefox for Android, and other mobile browsers. It’s super handy for web developers who need to make sure their site works everywhere, not just on desktop.
Can I Use It for App Testing?
Yes! You can install APK files and see how your app behaves. This helps developers and testers find bugs before shipping updates to real users. It’s also great for QA teams who need to check features across different Android versions.
Do I Need to Download Anything?
Nope. Just open the browserling.com/android in your browser. It works with HTML5, JavaScript, and WebSockets to stream the Android screen to you. No software, no setup, no stress.
Does It Work on Any Computer?
Yep. Since everything runs in your browser, you can use it on Windows, Mac, Linux, or even a Chromebook. No need for special hardware or software.
Can I Share My Test Sessions?
Totally. You can grab screenshots or record short clips right from the emulator. This makes it easy to share bugs with your team or show clients how their site looks on Android.
Can I Try Different Android Versions?
Totally. You can switch between Android versions and devices to see how your app or site looks on older and newer phones. This is useful for compatibility testing and catching weird bugs that only show up on certain systems.
Is It Free?
There’s a free Android emulator version with limited time. If you need longer sessions, more devices, or advanced features, there are paid plans available. The paid plans are built for developers, QA teams, and anyone doing serious testing.
What Is Browserling?
Browserling is a free online Android emulator and browser testing platform. It lets you run Android phones and web browsers straight from the cloud, right inside your browser. No downloads, no setup, no extra devices. Developers use it to test websites, QA teams use it to check mobile apps, and everyday users try it out to see how things look on Android without needing an actual phone.
Who Uses Browserling?
Web developers, mobile app testers, QA teams, and even governments use Browserling’s emulators. Big companies trust it for cross-device testing. It’s super handy if you’d rather test in the cloud than keep an Android lab on your desk.
Just a second! 🫷 If you are here, it means that you are a software developer.
So, you know that storage, networking, and domain management have a cost .
If you want to support this blog, please ensure that you have disabled the adblocker for this site. I configured Google AdSense to show as few ADS as possible – I don’t want to bother you with lots of ads, but I still need to add some to pay for the resources for my site.
Thank you for your understanding. – Davide
One of the most common issues we face when developing applications is handling dates, times, and time zones.
Let’s say that we need the date for January 1st, 2020, exactly 30 minutes after midnight. We would be tempted to do something like:
var plainDate = new DateTime(2020, 1, 1, 0, 30, 0);
It makes sense. And plainDate.ToString() returns 2020/1/1 0:30:00, which is correct.
But, as I explained in a previous article, while ToString does not care about time zone, when you use ToUniversalTime and ToLocalTime, the results differ, according to your time zone.
Let’s use a real example. Please, note that I live in UTC+1, so pay attention to what happens to the hour!
var plainDate = new DateTime(2020, 1, 1, 0, 30, 0);
Console.WriteLine(plainDate); // 2020-01-01 00:30:00Console.WriteLine(plainDate.ToUniversalTime()); // 2019-12-31 23:30:00Console.WriteLine(plainDate.ToLocalTime()); // 2020-01-01 01:30:00
This means that ToUniversalTime considers plainDate as Local, so, in my case, it subtracts 1 hour.
On the contrary, ToLocalTime considers plainDate as UTC, so it adds one hour.
So what to do?
Always specify the DateTimeKind parameter when creating DateTimes__. This helps the application understanding which kind of date is it managing.
var specificDate = new DateTime(2020, 1, 1, 0, 30, 0, DateTimeKind.Utc);
Console.WriteLine(specificDate); //2020-01-01 00:30:00Console.WriteLine(specificDate.ToUniversalTime()); //2020-01-01 00:30:00Console.WriteLine(specificDate.ToLocalTime()); //2020-01-01 00:30:00
As you see, it’s always the same date.
Ah, right! DateTimeKind has only 3 possible values:
publicenum DateTimeKind
{
Unspecified,
Utc,
Local
}
So, my suggestion is to always specify the DateTimeKind parameter when creating a new DateTime.
You should not add the caching logic in the same component used for retrieving data from external sources: you’d better use the Decorator Pattern. We’ll see how to use it, what benefits it brings to your application, and how to use Scrutor to add it to your .NET projects.
Table of Contents
Just a second! 🫷 If you are here, it means that you are a software developer.
So, you know that storage, networking, and domain management have a cost .
If you want to support this blog, please ensure that you have disabled the adblocker for this site. I configured Google AdSense to show as few ADS as possible – I don’t want to bother you with lots of ads, but I still need to add some to pay for the resources for my site.
Thank you for your understanding. – Davide
When fetching external resources – like performing a GET on some remote APIs – you often need to cache the result. Even a simple caching mechanism can boost the performance of your application: the fewer actual calls to the external system, the faster the response time of the overall application.
We should not add the caching layer directly to the classes that get the data we want to cache, because it will make our code less extensible and testable. On the contrary, we might want to decorate those classes with a specific caching layer.
In this article, we will see how we can use the Decorator Pattern to add a cache layer to our repositories (external APIs, database access, or whatever else) by using Scrutor, a NuGet package that allows you to decorate services.
Before understanding what is the Decorator Pattern and how we can use it to add a cache layer, let me explain the context of our simple application.
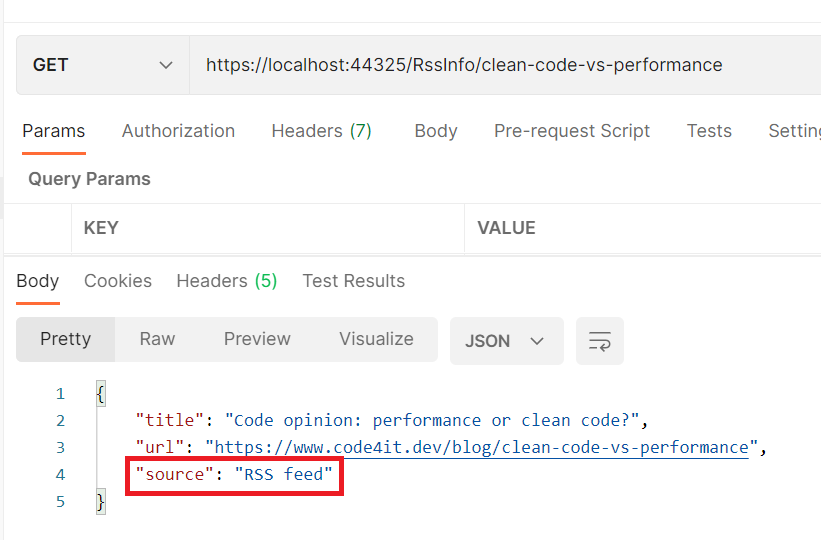
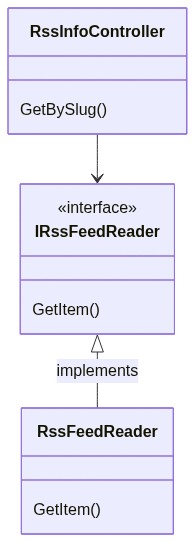
We are exposing an API with only a single endpoint, GetBySlug, which returns some data about the RSS item with the specified slug if present on my blog.
That interface is implemented by the RssFeedReader class, which uses the SyndicationFeed class (that comes from the System.ServiceModel.Syndication namespace) to get the correct item from my RSS feed:
publicclassRssFeedReader : IRssFeedReader
{
public RssItem GetItem(string slug)
{
var url = "https://www.code4it.dev/rss.xml";
using var reader = XmlReader.Create(url);
var feed = SyndicationFeed.Load(reader);
SyndicationItem item = feed.Items.FirstOrDefault(item => item.Id.EndsWith(slug));
if (item == null)
returnnull;
returnnew RssItem
{
Title = item.Title.Text,
Url = item.Links.First().Uri.AbsoluteUri,
Source = "RSS feed" };
}
}
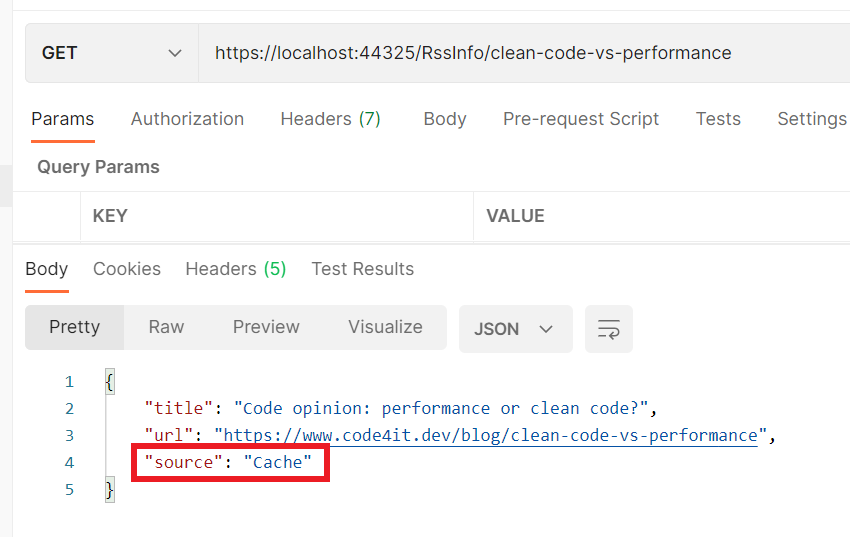
When we run the application and try to find an article I published, we retrieve the data directly from the RSS feed (as you can see from the value of Source).
The application is quite easy, right?
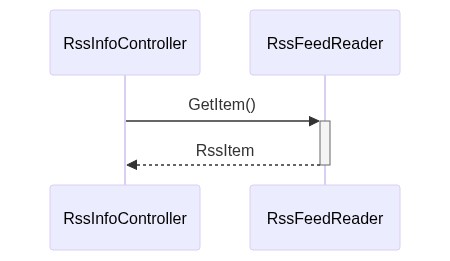
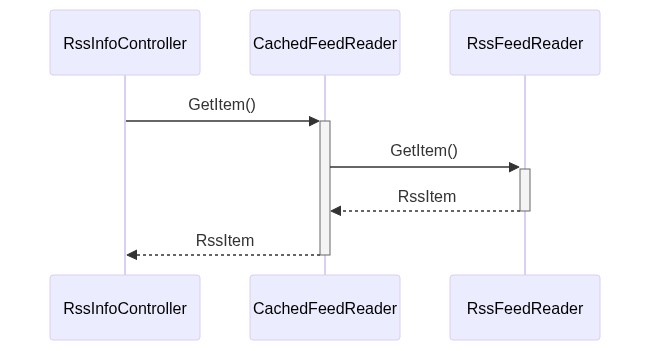
Let’s translate it into a simple diagram:
The sequence diagram is simple as well- it’s almost obvious!
Now it’s time to see what is the Decorator pattern, and how we can apply it to our situation.
Introducing the Decorator pattern
The Decorator pattern is a design pattern that allows you to add behavior to a class at runtime, without modifying that class. Since the caller works with interfaces and ignores the type of the concrete class, it’s easy to “trick” it into believing it is using the simple class: all we have to do is to add a new class that implements the expected interface, make it call the original class, and add new functionalities to that.
Quite confusing, uh?
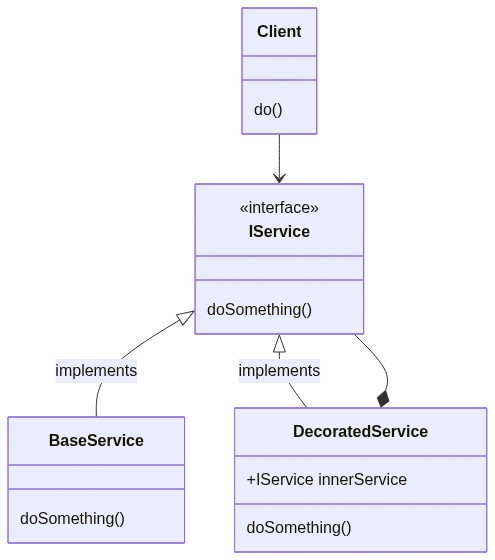
To make it easier to understand, I’ll show you a simplified version of the pattern:
In short, the Client needs to use an IService. Instead of passing a BaseService to it (as usual, via Dependency Injection), we pass the Client an instance of DecoratedService (which implements IService as well). DecoratedService contains a reference to another IService (this time, the actual type is BaseService), and calls it to perform the doSomething operation. But DecoratedService not only calls IService.doSomething(), but enriches its behavior with new capabilities (like caching, logging, and so on).
In this way, our services are focused on a single aspect (Single Responsibility Principle) and can be extended with new functionalities (Open-close Principle).
Enough theory! There are plenty of online resources about the Decorator pattern, so now let’s see how the pattern can help us adding a cache layer.
Ah, I forgot to mention that the original pattern defines another object between IService and DecoratedService, but it’s useless for the purpose of this article, so we are fine anyway.
Implementing the Decorator with Scrutor
Have you noticed that we almost have all our pieces already in place?
If we compare the Decorator pattern objects with our application’s classes can notice that:
Client corresponds to our RssInfoController controller: it’s the one that calls our services
IService corresponds to IRssFeedReader: it’s the interface consumed by the Client
BaseService corresponds to RssFeedReader: it’s the class that implements the operations from its interface, and that we want to decorate.
So, we need a class that decorates RssFeedReader. Let’s call it CachedFeedReader: it checks if the searched item has already been processed, and, if not, calls the decorated class to perform the base operation.
There are a few points you have to notice in the previous snippet:
this class implements the IRssFeedReader interface;
we are passing an instance of IRssFeedReader in the constructor, which is the class that we are decorating;
we are performing other operations both before and after calling the base operation (so, calling _rssFeedReader.GetItem(slug));
we are setting the value of the Source property to Cache if the object is already in cache – its value is RSS feed the first time we retrieve this item;
Open your project and install it via UI or using the command line by running dotnet add package Scrutor.
Now head to the ConfigureServices method and use the Decorate extension method to decorate a specific interface with a new service:
services.AddSingleton<IRssFeedReader, RssFeedReader>(); // this one was already presentservices.Decorate<IRssFeedReader, CachedFeedReader>(); // add a new decorator to IRssFeedReader
… and that’s it! You don’t have to update any other classes; everything is transparent for the clients.
If we run the application again, we can see that the first call to the endpoint returns the data from the RSS Feed, and all the followings return data from the cache.
We can now update our class diagram to add the new CachedFeedReader class
And, of course, the sequence diagram changed a bit too.
Benefits of the Decorator pattern
Using the Decorator pattern brings many benefits.
Every component is focused on only one thing: we are separating responsibilities across different components so that every single component does only one thing and does it well. RssFeedReader fetches RSS data, CachedFeedReader defines caching mechanisms.
Every component is easily testable: we can test our caching strategy by mocking the IRssFeedReader dependency, without the worrying of the concrete classes called by the RssFeedReader class. On the contrary, if we put cache and RSS fetching functionalities in the RssFeedReader class, we would have many troubles testing our caching strategies, since we cannot mock the XmlReader.Create and SyndicationFeed.Load methods.
We can easily add new decorators: say that we want to log the duration of every call. Instead of putting the logging in the RssFeedReader class or in the CachedFeedReader class, we can simply create a new class that implements IRssFeedReader and add it to the list of decorators.
An example of Decorator outside the programming world? The following video from YouTube, where you can see that each cup (component) has only one responsibility, and can be easily decorated with many other cups.
In this article, we’ve seen that the Decorator pattern allows us to write better code by focusing each component on a single task and by making them easy to compose and extend.
We’ve done it thanks to Scrutor, a NuGet package that allows you to decorate services with just a simple configuration.
Smaller functions help us write better code, but have also a nice side effect: they help us to understand where an exception was thrown. Let’s see how!
Table of Contents
Just a second! 🫷 If you are here, it means that you are a software developer.
So, you know that storage, networking, and domain management have a cost .
If you want to support this blog, please ensure that you have disabled the adblocker for this site. I configured Google AdSense to show as few ADS as possible – I don’t want to bother you with lots of ads, but I still need to add some to pay for the resources for my site.
Thank you for your understanding. – Davide
Small functions not only improve your code readability but also help to debug faster your applications in case of unhandled exceptions.
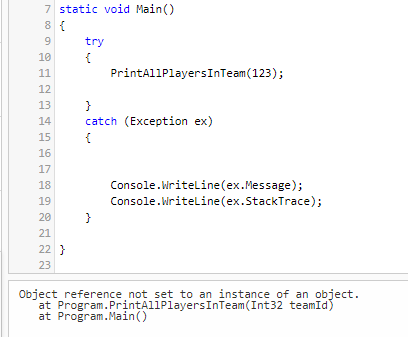
Take as an example the program listed below: what would happen if a NullReferenceException is thrown? Would you be able to easily understand which statement caused that exception?
With one, single, huge function, we lose the context of our exception. The catch block intercepts an error that occurred in the PrintAllPlayersInTeam function. But where? Maybe in teamFeed.Content.ToLower(), or maybe in player.FirstName.ToLower().
Even the exception’s details won’t help!
Object reference not set to an instance of an object.
   at Program.PrintAllPlayersInTeam(Int32 teamId)
   at Program.Main()
Yes, it says that the error occurred in the PrintAllPlayersInTeam. But where, exactly? Not a clue!
By putting all together inside a single function, PrintAllPlayersInTeam, we are losing the context of our exceptions.
So, a good idea is to split the method into smaller, well-scoped methods:
Of course, this is not a perfect code, but it give you the idea!.
As you can see, I’ve split the PrintAllPlayersInTeam method into smaller ones.
If now we run the code again, we get a slightly more interesting stack trace:
Object reference not set to an instance of an object.
   at Program.GetTeamDetails(Int32 teamId)
   at Program.PrintAllPlayersInTeam(Int32 teamId)
   at Program.Main()
Now we know that the exception is thrown on the GetTeamDetails method, so we reduced the scope of our investigations to the following lines:
Feed teamFeed = _sportClient.GetFeedForTeam(teamId);
Team currentTeam = _feedParser.ParseTeamFeed(teamFeed.Content.ToLower());
return currentTeam;
It’s easy to understand that the most probable culprits are teamFeed and teamFeed.Content!
Of course, you must not exaggerate! Don’t create a method for every single operation you do: in that way, you’ll just clutter the code without adding any value.
Downsides
Yes, adding new functions can slightly impact the application performance. In fact, every time we call a function, a stack operation is performed. This means that the more nested methods we call, the more stack operations we perform. But does it really impact the application performance? Or is it better to write cleaner code, even if we lose some nanoseconds? If you want to see the different standpoints, head to my article Code opinion: performance or clean code?
Conclusion
Writing smaller functions not only boosts the code readability but also helps us debug faster (and smarter). As usual, we must not move every statement in its own function: just find the right level of readability that works for you.
👉 Let’s discuss it on Twitter or on the comment section below!
Every time you ask Visual Studio to generate properties for you, it creates them with a simple, default format. But we can customize them by updating some options on our IDE. Let’s learn how!
Table of Contents
Just a second! 🫷 If you are here, it means that you are a software developer.
So, you know that storage, networking, and domain management have a cost .
If you want to support this blog, please ensure that you have disabled the adblocker for this site. I configured Google AdSense to show as few ADS as possible – I don’t want to bother you with lots of ads, but I still need to add some to pay for the resources for my site.
Thank you for your understanding. – Davide
We, as developers, hate repetitive tasks, isn’t it? In fact, we often auto-generate code by using our IDE’s capabilities. Yet, sometimes the auto-generated code does not follow our team rules or our personal taste, so we have to rename stuff every single time.
For instance, say that your golden rule is to have your readonly properties named with a _ prefix: private readonly IService _myService instead of private readonly IService myService. Renaming the properties every time is… boring!
In this article, you will learn how to customize Visual Studio 2019 to get the most out of the auto-generated code. In particular, we will customize the names of the readonly properties generated when we add a dependency in a class constructor.
The usual autocomplete
If you work properly, you do heavy use of Dependency Injection. And, if you do it, you will often define dependencies in a class’ constructor.
Now, let’s have two simple actors: a class, MyService, and an interface, IMyDependency. We want to inject the IMyDependency service into the MyService constructor.
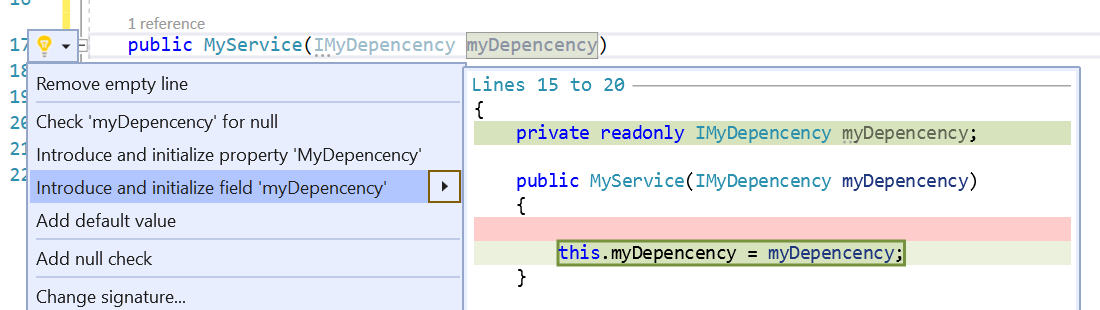
public MyService(IMyDependency myDependency)
{

}
To store somewhere the reference to IMyDependency, you usually click on the lightbulb that appears on the left navigation or hit CTRL+. This command will prompt you with some actions, like creating and initializing a new field:
This automatic task then creates a private readonly IMyDependency myDependency and assigns to this value the dependency defined in the constructor.
Now, let’s say that we want our properties to have an underscore as a prefix: so we must manually rename myDependency to _myDependency. Ok, not that big issue, but we can still save some time just by avoiding doing it manually.
Setting up the right configurations
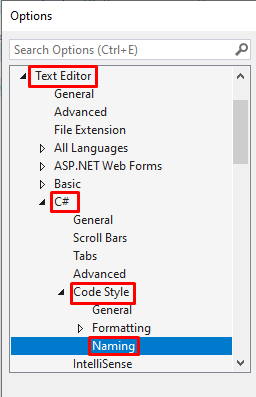
To configure how automatic properties are generated, head to Visual Studio, and, in the top menu, navigate to Tools and then Options.
Then, browse to Text Editor > C# > Code Style > Naming
Here we have all the symbols that we can customize.
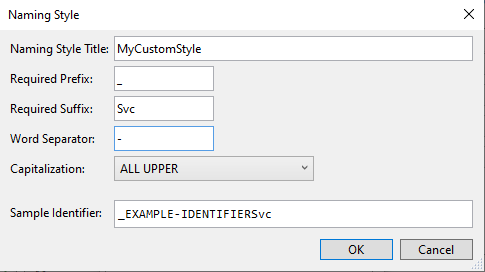
The first thing to do is to create a custom naming style. On the right side of the options panel, click on the “Manage naming styles” button, and then on the “+” button. You will see a form that you can fill with your custom styles; the Sample Identifier field shows you the result of the generated fields.
In the following picture you can see the result you can obtain if you fill all the fields: our properties will have a _ prefix, an Svc suffix, the words will be separated by a - symbol, and the name will be uppercase. As a result, the property name will be _EXAMPLE-IDENTIFIERSvc
Since we’re only interested in adding a _ prefix and making the text in camelCase, well… just add those settings! And don’t forget to specify a style name, like _fieldName.
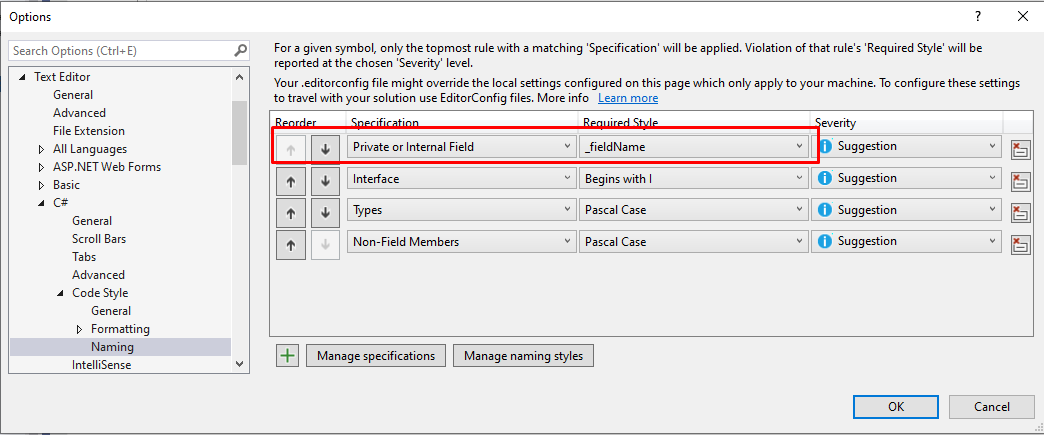
Close the form, and add a new Specification on the list: define that the new style must be applied to every Private or Internal Field, assign to it the newly created style (in my case, _fieldName). And… we’re done!
Final result
Now that we have everything in place, we can try adding a dependency to our MyService class:
As you can see, now the generated property is named _myDependency instead of myDependency.
And the same happens when you instantiate a new instance of MyService and then you pass a new dependency in the constructor: Visual Studio automatically creates a new constructor with the missing dependency and assigns it to a private property (but, in this case, is not defined as readonly).
Wrapping up
In this article, we’ve learned how to configure Visual Studio 2019 to create private properties in a custom format, like adding a prefix to the property name.
In my opinion, knowing the capabilities and possible customizations of your IDEs is one of the most underrated stuff. We spend most of our time working on an IDE – in my case, Visual Studio – so we should get to know it better to get the best from it and simplify our dev life.
Are there any other smart customizations that you want to share? Tell us about it in the comment section below!
Sometimes we need to use objects with the same name but from different namespaces. How to remove that ambiguity? By Using Aliases!
Table of Contents
Just a second! 🫷 If you are here, it means that you are a software developer.
So, you know that storage, networking, and domain management have a cost .
If you want to support this blog, please ensure that you have disabled the adblocker for this site. I configured Google AdSense to show as few ADS as possible – I don’t want to bother you with lots of ads, but I still need to add some to pay for the resources for my site.
Thank you for your understanding. – Davide
You may have to reference classes or services that come from different namespaces or packages, but that have the same name. It may become tricky to understand which reference refers to a specific type.
Yes, you could use the fully qualified name of the class. Or, you could use namespace aliases to write cleaner and easier-to-understand code.
It’s just a matter of modifying your using statements. Let’s see how!
The general approach
Say that you are working on an application that receives info about football matches from different sources using NuGet packages, and then manipulates the data to follow some business rules.
Both services, ShinyData and JuanStatistics (totally random names!), provide an object called Match. Of course, those objects live in their specific namespaces.
Since you are using the native implementation you cannot rename the classes to avoid ambiguity. So you’ll end up with code like this:
void Main()
{
    var shinyMatch = new ShinyData.Football.Statistics.Match();
    var juanMatch = new JuanStatistics.Stats.Football.Objects.Match();
}
Writing the fully qualified namespace every time can easily become boring. The code becomes less readable too!
Luckily we have 2 solutions. Or, better, a solution that we can apply in two different ways.
Namespace aliases – a cleaner solution
The following solution will not work:
using ShinyData.Football.Statistics;
using JuanStatistics.Stats.Football.Objects;

void Main()
{
    var shinyMatch = new Match();
    var juanMatch = new Match();
}
because, of course, the compiler is not able to understand the exact type of shinyMatch and juanMatch.
But we can use a nice functionality of C#: namespace aliases. It simply means that we can name an imported namespace and use the alias to reference the related classes.
Using alias for the whole namespace
using Shiny = ShinyData.Football.Statistics;
using Juan = JuanStatistics.Stats.Football.Objects;

void Main()
{
    var shinyMatch = new Shiny.Match();
    var juanMatch = new Juan.Match();
}
This simple trick boosts the readability of your code.
Using alias for a specific class
Can we go another step further? Yes! We can even specify aliases for a specific class!
using ShinyMatch = ShinyData.Football.Statistics.Match;
using JuanMatch = JuanStatistics.Stats.Football.Objects.Match;

void Main()
{
    var shinyMatch = new ShinyMatch();
    var juanMatch = new JuanMatch();
}
Now we can create an instance of ShinyMatch which, since it is an alias listed among the using statements, is of type ShinyData.Football.Statistics.Match.
Define alias for generics
Not only you can use it to specify a simple class, but only for generics.
Say that the ShinyData namespace defines a generic class, like CustomDictionary<T>. You can reference it just as you did before!
using ShinyMatch = ShinyData.Football.Statistics.Match;
using JuanMatch = JuanStatistics.Stats.Football.Objects.Match;
using ShinyDictionary = ShinyData.Football.Statistics.CustomDictionary<int>;

void Main()
{
    var shinyMatch = new ShinyMatch();
    var juanMatch = new JuanMatch();

    var dictionary = new ShinyDictionary();
}
Unluckily we have some limitations:
we must always specify the inner type of the generic: CustomDictionary<int> is valid, but CustomDictionary<T> is not valid
we cannot use as inner type a class defined with an alias: CustomDictionary<ShinyMatch> is invalid, unless we use the fully qualified name
Conclusion
We’ve seen how we can define namespace aliases to simplify our C# code: just add a name to an imported namespace in the using statement, and reference it on your code.
What would you reference, the namespace or the specific class?
👉 Let’s discuss it on Twitter or on the comment section below.