بلاگ

  • Seeding in-memory Entity Framework with realistic data with Bogus | Code4IT

    Seeding in-memory Entity Framework with realistic data with Bogus | Code4IT


    You don’t need a physical database to experiment with ORMs. You can use an in-memory DB and seed the database with realistic data generated with Bogus.

    Table of Contents

    Just a second! 🫷
    If you are here, it means that you are a software developer.
    So, you know that storage, networking, and domain management have a cost .

    If you want to support this blog, please ensure that you have disabled the adblocker for this site.
    I configured Google AdSense to show as few ADS as possible – I don’t want to bother you with lots of ads, but I still need to add some to pay for the resources for my site.

    Thank you for your understanding.
    Davide

    Sometimes, you want to experiment with some features or create a demo project, but you don’t want to instantiate a real database instance.

    Also, you might want to use some realistic data – not just “test1”, 123, and so on. These values are easy to set but not very practical when demonstrating functionalities.

    In this article, we’re going to solve this problem by using Bogus and Entity Framework: you will learn how to generate realistic data and how to store them in an in-memory database.

    Bogus, a C# library for generating realistic data

    Bogus is a popular library for generating realistic data for your tests. It allows you to choose the category of dummy data that best suits your needs.

    It all starts by installing Bogus via NuGet by running Install-Package Bogus.

    From here, you can define the so-called Fakers, whose purpose is to generate dummy instances of your classes by auto-populating their fields.

    Let’s see a simple example. We have this POCO class named Book:

    public class Book
    {
        public Guid Id { get; set; }
        public string Title { get; set; }
        public int PagesCount { get; set; }
        public Genre[] Genres { get; set; }
        public DateOnly PublicationDate { get; set; }
        public string AuthorFirstName { get; set; }
        public string AuthorLastName { get; set; }
    }
    
    public enum Genre
    {
        Thriller, Fantasy, Romance, Biography
    }
    

    Note: for the sake of simplicity, I used a dumb approach: author’s first and last name are part of the Book info itself, and the Genres property is treated as an array of enums and not as a flagged enum.

    From here, we can start creating our Faker by specifying the referenced type:

    Faker<Book> bookFaker = new Faker<Book>();
    

    We can add one or more RuleFor methods to create rules used to generate each property.

    The simplest approach is to use the overload where the first parameter is a Function pointing to the property to be populated, and the second is a Function that calls the methods provided by Bogus to create dummy data.

    Think of it as this pseudocode:

    faker.RuleFor(sm => sm.SomeProperty, f => f.SomeKindOfGenerator.GenerateSomething());
    

    Another approach is to pass as the first argument the name of the property like this:

    faker.RuleFor("myName", f=> f.SomeKindOfGenerator.GenerateSomething())
    

    A third approach is to define a generator for a specific type, saying “every time you’re trying to map a property with this type, use this generator”:

    bookFaker.RuleForType(typeof(DateOnly), f => f.Date.PastDateOnly());
    

    Let’s dive deeper into Bogus, generating data for common types.

    Generate random IDs with Bogus

    We can generate random GUIDs like this:

    bookFaker.RuleFor(b => b.Id, f => f.Random.Guid());
    

    In a similar way, you can generate Uuid by calling f.Random.Uuid().

    Generate random text with Bogus

    We can generate random text, following the Lorem Ipsum structure, to pick a single word or a longer text:

    Using Text you generate random text:

    bookFaker.RuleFor(b => b.Title, f => f.Lorem.Text());
    

    However, you can use several other methods to generate text with different lengths, such as Letter, Word, Paragraphs, Sentences, and more.

    Working with Enums with Bogus

    If you have an enum, you can rely again on the Random property of the Faker and get a random subset of the enums like this:

    bookFaker.RuleFor(b => b.Genres, f => f.Random.EnumValues<Genre>(2));
    

    As you can see, I specified the number of random items to use (in this case, 2). If you don’t set it, it will take a random number of items.

    However, the previous method returns an array of elements. If you want to get a single enum, you should use f.Random.Enum<Genre>().

    One of the most exciting features of Bogus is the ability to generate realistic data for common entities, such as a person.

    In particular, you can use the Person property to generate data related to the first name, last name, Gender, UserName, Phone, Website, and much more.

    You can use it this way:

    bookFaker.RuleFor(b => b.AuthorFirstName, f => f.Person.FirstName);
    bookFaker.RuleFor(b => b.AuthorLastName, f => f.Person.LastName);
    

    Generate final class instances with Bogus

    We can generate the actual items now that we’ve defined our rules.

    You just need to call the Generate method; you can also specify the number of items to generate by passing a number as a first parameter:

    List<Book> books = bookFaker.Generate(2);
    

    Suppose you want to generate a random quantity of items. In that case, you can use the GenerateBetween method, specifying the top and bottom limit:

    List<Book> books = bookFaker.GenerateBetween(2, 5);
    

    Wrapping up the Faker example

    Now that we’ve learned how to generate a Faker, we can refactor the code to make it easier to read:

    private List<Book> GenerateBooks(int count)
    {
        Faker<Book> bookFaker = new Faker<Book>()
            .RuleFor(b => b.Id, f => f.Random.Guid())
            .RuleFor(b => b.Title, f => f.Lorem.Text())
            .RuleFor(b => b.Genres, f => f.Random.EnumValues<Genre>())
            .RuleFor(b => b.AuthorFirstName, f => f.Person.FirstName)
            .RuleFor(b => b.AuthorLastName, f => f.Person.LastName)
            .RuleFor(nameof(Book.PagesCount), f => f.Random.Number(100, 800))
            .RuleForType(typeof(DateOnly), f => f.Date.PastDateOnly());
    
        return bookFaker.Generate(count);
    }
    

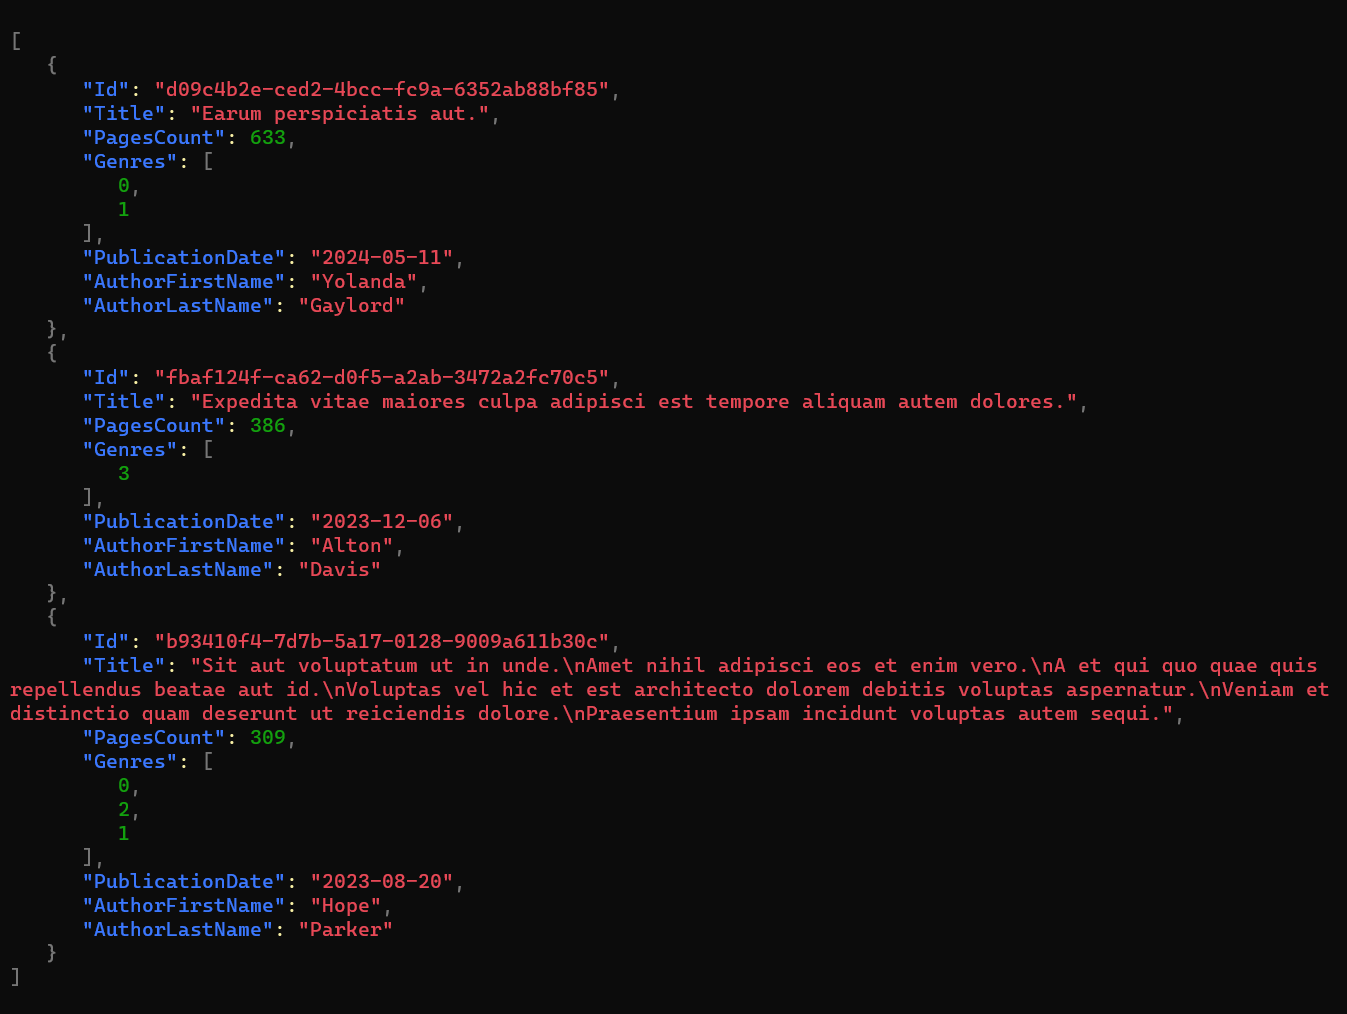
    If we run it, we can see it generates the following items:

    Bogus-generated data

    Seeding InMemory Entity Framework with dummy data

    Entity Framework is among the most famous ORMs in the .NET ecosystem. Even though it supports many integrations, sometimes you just want to store your items in memory without relying on any specific database implementation.

    Using Entity Framework InMemory provider

    To add this in-memory provider, you must install the Microsoft.EntityFrameworkCore.InMemory NuGet Package.

    Now you can add a new DbContext – which is a sort of container of all the types you store in your database – ensuring that the class inherits from DbContext.

    public class BooksDbContext : DbContext
    {
        public DbSet<Book> Books { get; set; }
    }
    

    You then have to declare the type of database you want to use by defining it the int OnConfiguring method:

    protected override void OnConfiguring(DbContextOptionsBuilder optionsBuilder)
    {
        optionsBuilder.UseInMemoryDatabase("BooksDatabase");
    }
    

    Note: even though it’s an in-memory database, you still need to declare the database name.

    Seeding the database with data generated with Bogus

    You can seed the database using the data generated by Bogus by overriding the OnModelCreating method:

    protected override void OnModelCreating(ModelBuilder modelBuilder)
    {
        base.OnModelCreating(modelBuilder);
    
        var booksFromBogus = BogusBookGenerator.GenerateBooks(15);
    
        modelBuilder.Entity<Book>().HasData(booksFromBogus);
    }
    

    Notice that we first create the items and then, using modelBuilder.Entity<Book>().HasData(booksFromBogus), we set the newly generated items as content for the Books DbSet.

    Consume dummy data generated with EF Core

    To wrap up, here’s the complete implementation of the DbContext:

    public class BooksDbContext : DbContext
    {
        public DbSet<Book> Books { get; set; }
    
        protected override void OnConfiguring(DbContextOptionsBuilder optionsBuilder)
        {
          optionsBuilder.UseInMemoryDatabase("BooksDatabase");
        }
    
        protected override void OnModelCreating(ModelBuilder modelBuilder)
        {
            base.OnModelCreating(modelBuilder);
    
            var booksFromBogus = BogusBookGenerator.GenerateBooks(15);
    
            modelBuilder.Entity<Book>().HasData(booksFromBogus);
        }
    }
    

    We are now ready to instantiate the DbContext, ensure that the Database has been created and seeded with the correct data, and perform the operations needed.

    using var dbContext = new BooksDbContext();
    dbContext.Database.EnsureCreated();
    
    var allBooks = await dbContext.Books.ToListAsync();
    
    var thrillerBooks = dbContext.Books
            .Where(b => b.Genres.Contains(Genre.Thriller))
            .ToList();
    

    Further readings

    In this blog, we’ve already discussed the Entity Framework. In particular, we used it to perform CRUD operations on a PostgreSQL database.

    🔗 How to perform CRUD operations with Entity Framework Core and PostgreSQL | Code4IT

    This article first appeared on Code4IT 🐧

    I suggest you explore the potentialities of Bogus: there are a lot of functionalities that I didn’t cover in this article, and they may make your tests and experiments meaningful and easier to understand.

    🔗 Bogus repository | GitHub

    Wrapping up

    Bogus is a great library for creating unit and integration tests. However, I find it useful to generate dummy data for several purposes, like creating a stub of a service, populating a UI with realistic data, or trying out other tools and functionalities.

    I hope you enjoyed this article! Let’s keep in touch on Twitter or LinkedIn! 🤜🤛

    Happy coding!

    🐧


    Source link

  • Mark a class as Sealed to prevent subclasses creation &vert; Code4IT

    Mark a class as Sealed to prevent subclasses creation | Code4IT


    Just a second! 🫷
    If you are here, it means that you are a software developer.
    So, you know that storage, networking, and domain management have a cost .

    If you want to support this blog, please ensure that you have disabled the adblocker for this site.
    I configured Google AdSense to show as few ADS as possible – I don’t want to bother you with lots of ads, but I still need to add some to pay for the resources for my site.

    Thank you for your understanding.
    Davide

    The O in SOLID stands for the Open-closed principle: according to the official definition, “software entities (classes, modules, functions, etc.) should be open for extension, but closed for modification.”

    To extend a class, you usually create a subclass, overriding or implementing methods from the parent class.

    Extend functionalities by using subclasses

    The most common way to extend a class is to mark it as abstract :

    public abstract class MyBaseClass
    {
      public DateOnly Date { get; init; }
      public string Title { get; init; }
    
      public abstract string GetFormattedString();
    
      public virtual string FormatDate() => Date.ToString("yyyy-MM-dd");
    }
    

    Then, to extend it you create a subclass and define the internal implementations of the extention points in the parent class:

    public class ConcreteClass : MyBaseClass
    {
      public override string GetFormattedString() => $"{Title} | {FormatDate()}";
    }
    

    As you know, this is the simplest example: overriding and implementing methods from an abstract class.

    You can override methods from a concrete class:

    public class MyBaseClass2
    {
      public DateOnly Date { get; init; }
      public string Title { get; init; }
    
      public string GetFormattedString() => $"{Title} ( {FormatDate()} )";
    
      public string FormatDate() => Date.ToString("yyyy-MM-dd");
    }
    
    public class ConcreteClass2 : MyBaseClass2
    {
      public new string GetFormattedString() => $"{Title} | {FormatDate()}";
    }
    

    Notice that even though there are no abstract methods in the base class, you can override the content of a method by using the new keyword.

    Prevent the creation of subclasses using the sealed keyword

    Especially when exposing classes via NuGet, you want to prevent consumers from creating subclasses and accessing the internal status of the structures you have defined.

    To prevent classes from being extended, you must mark your class as sealed:

    public sealed class MyBaseClass3
    {
      public DateOnly Date { get; init; }
      public string Title { get; init; }
    
      public string GetFormattedString() => $"{Title} ( {FormatDate()} )";
    
      public string FormatDate() => Date.ToString("yyyy-MM-dd");
    }
    
    public class ConcreteClass3 : MyBaseClass3
    {
    }
    

    This way, even if you declare ConcreteClass3 as a subclass of MyBaseClass3, you won’t be able to compile the application:

    Compilation error when trying to extend a sealed class

    4 reasons to mark a class as sealed

    Ok, it’s easy to prevent a class from being extended by a subclass. But what are the benefits of having a sealed class?

    Marking a C# class as sealed can be beneficial for several reasons:

    1. Security by design: By marking a class as sealed, you prevent consumers from creating subclasses that can alter or extend critical functionalities of the base class in unintended ways.
    2. Performance improvements: The compiler can optimize sealed classes more effectively because it knows there are no subclasses. This will not bring substantial performance improvements, but it can still help if every nanosecond is important.
    3. Explicit design intent: Sealing the class communicates to other developers that the class is not intended to be extended or modified. If they want to use it, they accept they cannot modify or extend it, as it has been designed in that way by purpose.

    This article first appeared on Code4IT 🐧

    Wrapping up

    I hope you enjoyed this article! Let’s keep in touch on Twitter or LinkedIn! 🤜🤛

    Happy coding!

    🐧


    Source link

  • Developer Spotlight: Rogier de Boevé

    Developer Spotlight: Rogier de Boevé


    Hi! I’m Rogier de Boevé, an independent creative developer based in Belgium. Over the years, I’ve had the opportunity to collaborate with leading studios and agencies such as Dogstudio, Immersive Garden, North Kingdom, and Reflektor to craft immersive digital experiences for clients ranging from global tech platforms and luxury watchmakers to national broadcasters and iconic consumer brands.

    Following Wildfire

    Following Wildfire showcases an innovative project that uses artificial intelligence (AI) to detect early signs of wildfires by analyzing real-time images shared on social media. As wildfires become more frequent and devastating, tools like this are becoming essential.

    I focused primarily on the storytelling intro animation, which featured five WebGL scenes crafted entirely from particles. The response from the community was incredible as it earned two Webby Awards, a Clio, and was nominated for honors like FWA’s Site of the Year.

    Agency: Reflektor Digital

    Rogier de Boevé Portfolio (2024)

    Unlike client work, where you’re adapting to a brand or working closely with a team, my portfolio was a chance to take full creative control from start to finish. I handled both the design and development, which meant I could follow ideas that matched my artistic vision, without compromise. The result is something that feels fully mine.

    I wrote more about the process in a Codrops case study, where I shared some of the technical choices and visual thinking behind it. But what makes this project special to me is that it represents who I am, not just as a creative developer, but also as a digital designer and visual artist.

    Sprite × Marvel – Hall of Zero Limits

    The Hall of Zero Limits is an immersive, exploratory experience built in partnership with Black Panther: Wakanda Forever, to help creators find inspiration.

    Working with Dogstudio is always exciting and being part of the Sprite × Marvel collaboration even more so. It was easily one of the most prestigious and ambitious projects I’ve worked on to date. We created a virtual hall where users could explore, discover behind-the-scenes stories, and immerse themselves in the world of Wakanda.

    Agency: Dogstudio/DEPT

    The Roger

    Campaign site ‘The Roger’ for On Running. A performance shoe sportswear brand tailored to both casual and athletic needs.

    As a massive sports enthusiast and fan of Roger Federer, it was a privilege to be part of this project. I was commissioned by North Kingdom to develop a range of WebGL components promoting On Running’s new collection, The Roger. These included immersive storytelling scenes and a virtual showroom showcasing the entire collection.

    Agency: North Kingdom

    Philosophy

    Don’t approach a technical difficulty as an insurmountable burden, but as a creative challenge that starts with close collaboration.

    Make a point to experiment and research a lot before saying “this can’t be done.” Many times, what seems impossible just needs a creative workaround or a fresh perspective. I’ve learned that by sitting down with designers early and hashing out ideas together, often result in finding the smartest approach to bring the concepts to life.

    Tools & Tech

    I don’t always get to choose which framework I have to work with, so I try to keep up with most of the popular frameworks as much as possible. When I do have the freedom to build from scratch, I often choose Astro.js because it’s simple, flexible, and customisable without imposing too many conventions or adding unnecessary complexity. If I’m just building a prototype and don’t need any content-driven pages, I use Vite, which is also the frontend tooling that Astro uses.

    Regardless of the framework, I often use open-source libraries that have a big impact on my work.

    • Three.js – JavaScript 3D library.
    • GSAP – Animation toolkit.
    • Theatre.js – Timeline-based motion library.

    Final thoughts

    At the end of the day, it’s not about how fancy the code is or whether you’re using the latest framework. It’s about crafting experiences that spark curiosity, interaction, and leave a lasting impression.

    Thanks for reading and if you ever want to collaborate, feel free to reach out.


    Source link

  • Create PDF in PHP Using FPDF.

    Create PDF in PHP Using FPDF.


    In this post, I  will explain how to create a pdf file in php. To create a PDF file in PHP we will use the FPDF library. It is a PHP library that is used to generate a PDF. FPDF is an open-source library. It is the best server-side PDF generation PHP library. It has rich features right from adding a PDF page to creating grids and more.

    Example:

    <?Php
    require('fpdf/fpdf.php');
    $pdf = new FPDF(); 
    $pdf->AddPage();
    $pdf->SetFont('Arial','B',16);
    $pdf->Cell(80,10,'Hello World From FPDF!');
    $pdf->Output('test.pdf','I'); // Send to browser and display
    ?>

    Output:


    Source link

  • Operation Sindoor: Anatomy of a High-Stakes Cyber Siege

    Operation Sindoor: Anatomy of a High-Stakes Cyber Siege


    Overview

    Seqrite Labs,  India’s largest Malware Analysis lab, has identified multiple cyber events linked to Operation Sindoor, involving state-sponsored APT activity and coordinated hacktivist operations. Observed tactics included spear phishing, deployment of malicious scripts, website defacements, and unauthorized data leaks. The campaign exhibited a combination of cyber espionage tactics, hacktivist-driven disruptions, and elements of hybrid warfare. It targeted high-value Indian sectors, including defense, government IT infrastructure, healthcare, telecom, and education. Some of the activities were attributed to APT36 and Sidecopy, Pakistan-aligned threat groups known for leveraging spoofed domains, malware payloads, and credential harvesting techniques against Indian military and government entities.

    Trigger Point: Initial Access Vector

    On April 17, 2025, Indian cyber telemetry started to light up. Across the threat detection landscape, anomalies directed towards government mail servers and defence infrastructures. Lure files carried names that mimicked urgency and legitimacy:

    These weren’t ordinary files. They were precision-guided attacks—documents laden with macros, shortcuts, and scripts that triggered covert command-and-control (C2) communications and malware deployments. Each lure played on public fear and national tragedy, weaponizing recent headlines like the Pahalgam Terror Attack. Further technical details can be found at :

    Following the initiation of Operation Sindoor on May 7th, a surge in hacktivist activities was observed, including coordinated defacements, data leaks, and disruptive cyber campaigns.

    Activity Timeline Graph – Operation Sindoor

    APT36: Evolution of a Digital Predator

    APT36, long associated with the use of Crimson RAT and social engineering, had evolved. Gone were the older Poseidon loaders—Ares, a modular, evasive malware framework, now formed the new spearhead.

    Tools & File Types:

    • .ppam, .xlam, .lnk, .xlsb, .msi
    • Macros triggering web queries:
      fogomyart[.]com/random.php
    • Payload delivery through spoofed Indian entities:
      zohidsindia[.]com, nationaldefensecollege[.]com, nationaldefencebackup[.]xyz
    • Callback C2 IP: 86.97[.]58:17854

    APT36 used advanced TTPs during Operation Sindoor for stealthy infection, persistence, and command and control. Initial access was via spear phishing attachments (T1566.001) using malicious file types (.ppam, .xlam, .lnk, .xlsb, .msi). These triggered macros executed web queries (T1059.005) to domains like fogomyart[.]com. Payloads were delivered through spoofed Indian domains such as zohidsindia[.]com and nationaldefensecollege[.]com, with C2 communication via application layer protocols (T1071.001) to 167.86.97[.]58:17854. For execution and persistence, APT36 leveraged LOLBins (T1218), scheduled tasks (T1053.005), UAC bypasses (T1548.002), and obfuscated PowerShell scripts (T1059.001, T1027), enabling prolonged access while evading detection.

    Ares RAT grants full control over the compromised host, offering capabilities such as keylogging, screen capturing, file manipulation, credential theft, and remote command execution—similar to commercial RATs but tailored for stealth and evasion.

    Digital Infrastructure: Domains of Deception

    The operation’s domain arsenal resembled a covert intelligence operation:

    • pahalgamattack[.]com
    • operationsindoor2025[.]in
    • sindoor[.]website
    • sindoor[.]live

    These domains mimicked military and government entities, exploiting user trust and leveraging geo-political narratives for social engineering.

    Hacktivism in Tandem: The Shadow Battalion

    APT36 did not act alone. In parallel, hacktivist collectives coordinated disruptive attacks—DDoS, defacements, and data leaks—across key Indian sectors. Telegram groups synchronized actions under hashtags like #OpIndia, #OperationSindoor, and #PahalgamAttack, as portrayed in the image below.


    A quick timeline recap

    Most Targeted Sectors:

    The Operation Sindoor campaign strategically targeted India’s critical sectors, focusing on Defense entities like the MoD, Army, Navy, and DRDO. The hactivists claimed to have disrupted Government IT infrastructure, including NIC and GSTN with evidences of DDoS and data leak, while attempting breaches in healthcare institutions such as AIIMS and DRDO Hospitals. Telecom giants like Jio and BSNL were probed, alongside multiple state-level educational and government portals, showcasing the breadth and coordination of the cyber offensive.

    Post-Campaign Threat Landscape

    From May 7–10, Seqrite telemetry reported:

    • 650+ confirmed DDoS/defacement events
    • 35+ hacktivist groups involved, 7 newly emerged
    • 26 custom detection signatures deployed across XDR

    Detection Signatures:

    Signature Name Description
    BAT.Sidecopy.49534.GC SideCopy loader script
    LNK.Sidecopy.49535.GC Macro-enabled shortcut
    MSI.Trojan.49537.GC MSI-based Trojan dropper
    HTML.Trojan.49539.GC HTML credential phisher
    Bat.downloader.49517 Download utility for RAT
    Txt.Enc.Sidecopy.49538.GC Obfuscated loader


    IOCs: Indicators of Compromise

    Malicious Domains:

    • pahalgamattack[.]com
    • sindoor[.]live
    • operationsindoor2025[.]in
    • nationaldefensecollege[.]com
    • fogomyart[.]com/random.php

    Malicious Files:

    Callback IP:

    • 86.97[.]58:17854 (Crimson RAT C2)

    VPS Traffic Origination:

    • Russia 🇷🇺
    • Germany 🇩🇪
    • Indonesia 🇮🇩
    • Singapore 🇸🇬

    The Mind Map of Chaos: Coordinated Disruption

    The hierarchy of the campaign looked more like a digital alliance than a lone operation:

    Seqrite’s Response

    To counteract the operation, Seqrite Labs deployed:

    • 26 detection rules across product lines
    • YARA signatures and correlation into STIP/MISP
    • XDR-wide alerting for SideCopy and Ares variants
    • Dark web and Telegram monitoring
    • Threat advisory dissemination to Indian entities


    Researcher’s Reflection

    Operation Sindoor revealed the blueprint of modern cyber warfare. It showcased how nation-state actors now collaborate with non-state hacktivists, merging technical intrusion with psychological operations. The evolution of APT36—especially the move from Poseidon to Ares—and the simultaneous hacktivist attacks signal a deliberate convergence of cyber espionage and ideological warfare.

    Instead of isolated malware campaigns, we now face digitally coordinated war games. The tools may change—macros, MSI files, DDoS scripts—but the objectives remain: destabilize, disinform, and disrupt.

    Conclusion

    Operation Sindoor represents a significant escalation in the cyber conflict landscape between India and Pakistan. The campaign, orchestrated by APT36 and allied hacktivist groups, leveraged a blend of advanced malware, spoofed infrastructure, and deceptive social engineering to infiltrate key Indian sectors.

    The strategic targeting of defense, government IT, healthcare, education, and telecom sectors underscores an intent to not just gather intelligence but also disrupt national operations. With the deployment of tools like Ares RAT, attackers gained complete remote access to infected systems—opening the door to surveillance, data theft, and potential sabotage of critical services.

    From an impact standpoint, this operation has:

    • Undermined trust in official digital communication by spoofing credible Indian domains.
    • Increased operational risks for sensitive departments by exposing infrastructure weaknesses.
    • Compromised public perception of cybersecurity readiness in government and defense.
    • Amplified geopolitical tension by using cyber means to project influence and provoke instability.

    The impact of this campaign on national cybersecurity and trust has been significant:

    • Data Exfiltration: Sensitive internal documents, credentials, and user information were exfiltrated from key organizations. This compromises operational security, strategic decision-making, and opens pathways for follow-up intrusions.
    • DDoS Attacks: Targeted denial-of-service attacks disrupted availability of critical government and public-facing services, affecting both internal workflows and citizen access during sensitive geopolitical periods.
    • Website Defacement: Several Indian government and institutional websites were defaced, undermining public confidence and serving as a psychological warfare tactic to project influence and cyber superiority.

    These developments highlight the urgent need for enhanced threat intelligence capabilities, robust incident response frameworks, and strategic public-private collaboration to counter such evolving hybrid threats.


    Source link

  • 6.50 Million Google Clicks! 💰

    6.50 Million Google Clicks! 💰


    Yesterday Online PNG Tools smashed through 6.49M Google clicks and today it’s smashed through 6.50M Google clicks! That’s 10,000 new clicks in a single day – the smash train keeps on rollin’!

    What Are Online PNG Tools?

    Online PNG Tools offers a collection of easy-to-use web apps that help you work with PNG images right in your browser. It’s like a Swiss Army Knife for anything PNG-related. On this site, you can create transparent PNGs, edit icons, clean up logos, crop stamps, change colors of signatures, and customize stickers – there’s a tool for it all. The best part is that you don’t need to install anything or be a graphic designer. All tools are made for regular people who just want to get stuff done with their images. No sign-ups, no downloads – just quick and easy PNG editing tools.

    Who Created Online PNG Tools?

    Online PNG Tools were created by me and my team at Browserling. We’ve build simple, browser-based tools that anyone can use without needing to download or install anything. Along with PNG tools, we also work on cross-browser testing to help developers make sure their websites work great on all web browsers. Our mission is to make online tools that are fast, easy to use, and that are helpful for everyday tasks like editing icons, logos, and signatures.

    Who Uses Online PNG Tools?

    Online PNG Tools and Browserling are used by everyone – from casual users to professionals and even Fortune 100 companies. Casual users often use them to make memes, edit profile pictures, or remove backgrounds. Professionals use them to clean up logos, design icons, or prepare images for websites and apps.

    Smash too and see you tomorrow at 6.51M clicks! 📈

    PS. Use coupon code SMASHLING for a 30% discount on these tools at onlinePNGtools.com/pricing. 💸


    Source link

  • Bolt.new: Web Creation at the Speed of Thought

    Bolt.new: Web Creation at the Speed of Thought


    What Is Bolt.new?

    Bolt.new is a browser-based AI web development agent focused on speed and simplicity. It lets anyone prototype, test, and publish web apps instantly—without any dev experience required.

    Designed for anyone with an idea, Bolt empowers users to create fully functional websites and apps using just plain language. No coding experience? No problem. By combining real-time feedback with prompt-based development, Bolt turns your words into working code right in the browser. Whether you’re a designer, marketer, educator, or curious first-timer, Bolt.new offers an intuitive, AI-assisted playground where you can build, iterate, and launch at the speed of thought.

    Core Features:

    • Instantly live: Bolt creates your code as you type—no server setup needed.
    • Web-native: Write in HTML, CSS, and JavaScript; no frameworks required.
    • Live preview: Real-time output without reloads or delays.
    • One-click sharing: Publish your project with a single URL.

    A Lean Coding Playground

    Bolt is a lightweight workspace that allows anyone to become an engineer without knowing how to code. Bolt presents users with a simple, chat-based environment in which you can prompt your agent to create anything you can imagine. Features include:

    • Split view: Code editor and preview side by side.
    • Multiple files: Organize HTML, CSS, and JS independently.
    • ES module support: Structure your scripts cleanly and modularly.
    • Live interaction testing: Great for animations and frontend logic.

    Beyond the Frontend

    With integrated AI and full-stack support via WebContainers (from StackBlitz), Bolt.new can handle backend tasks right in the browser.

    • Full-stack ready: Run Node.js servers, install npm packages, and test APIs—all in-browser.
    • AI-assisted dev: Use natural-language prompts for setup and changes.
    • Quick deployment: Push to production with a single click, directly from the editor.

    Design-to-Code with Figma

    For designers, Bolt.new is more than a dev tool, it’s a creative enabler. By eliminating the need to write code, it opens the door to hands-on prototyping, faster iteration, and tighter collaboration. With just a prompt, designers can bring interfaces to life, experiment with interactivity, and see their ideas in action – without leaving the browser. Whether you’re translating a Figma file into responsive HTML or testing a new UX flow, Bolt gives you the freedom to move from concept to clickable with zero friction.

    Key Features:

    • Bolt.new connects directly with Figma, translating design components into working web code ideal for fast iteration and developer-designer collaboration.
    • Enable real-time collaboration between teams.
    • Use it for prototyping, handoff, or production-ready builds.

    Trying it Out

    To put Bolt.new to the test, we set out to build a Daily Coding Challenge Planner. Here’s the prompt we used:

    Web App Request: Daily Frontend Coding Challenge Planner

    I’d like a web app that helps me plan and keep track of one coding challenge each day. The main part of the app should be a calendar that shows the whole month. I want to be able to click on a day and add a challenge to it — only one challenge per day.

    Each challenge should have:

    • A title (what the challenge is)
    • A category (like “CSS”, “JavaScript”, “React”, etc.)
    • A way to mark it as “completed” once I finish it
    • Optionally, a link to a tutorial or resource I’m using

    I want to be able to:

    • Move challenges from one day to another by dragging and dropping them
    • Add new categories or rename existing ones
    • Easily delete or edit a challenge if I need to

    There should also be a side panel or settings area to manage my list of categories.

    The app should:

    • Look clean and modern
    • Work well on both computer and mobile
    • Offer light/dark mode switch
    • Automatically save data—no login required

    This is a tool to help me stay consistent with daily practice and see my progress over time.

    Building with Bolt.new

    We handed the prompt to Bolt.new and watched it go to work.

    • Visual feedback while the app was being generated.
    • The initial result included key features: adding, editing, deleting challenges, and drag-and-drop.
    • Prompts like “fix dark mode switch” and “add category colors” helped refine the UI.

    Integrated shadcn/ui components gave the interface a polished finish.

    Screenshots

    The Daily Frontend Coding Challenge Planner app, built using just a few prompts
    Adding a new challenge to the planner

    With everything in place, we deployed the app in one click.

    👉 See the live version here
    👉 View the source code on GitHub

    Verdict

    We were genuinely impressed by how quickly Bolt.new generated a working app from just a prompt. Minor tweaks were easy, and even a small bug resolved itself with minimal guidance.

    Try it yourself—you might be surprised by how much you can build with so little effort.

    🔗 Try Bolt.new

    Final Thoughts

    The future of the web feels more accessible, creative, and immediate—and tools like Bolt.new are helping shape it. In a landscape full of complex tooling and steep learning curves, Bolt.new offers a refreshing alternative: an intelligent, intuitive space where ideas take form instantly.

    Bolt lowers the barrier to building for the web. Its prompt-based interface, real-time feedback, and seamless deployment turn what used to be hours of setup into minutes of creativity. With support for full-stack workflows, Figma integration, and AI-assisted editing, Bolt.new isn’t just another code editor, it’s a glimpse into a more accessible, collaborative, and accelerated future for web creation.

    What will you create?


    Source link

  • Angular Code Review Checklist. – PHPFOREVER

    Angular Code Review Checklist. – PHPFOREVER


    Introduction:

    Code review is a process where developers have their work reviewed by their peers to check the code’s quality and functionality. In the case of Angular, there are specific points that we must check to ensure code effectiveness, which we will be discussing in detail in our upcoming blog post. Effective code reviews are crucial to delivering high-quality applications to end-users. This process involves a peer review of developers’ work. The main aim of this evaluation is to detect any bugs, syntax issues, and other factors that could impact the application’s performance. However, code reviews can be time-consuming. Therefore, we have created a comprehensive list of the most crucial elements to consider during your Angular code reviews.

    Imports Organization:

    You should group your imports by source and arrange them alphabetically, which will help keep your import section organized and tidy.

    Bad Code Example:
    import { Component, OnInit, Input } from '@angular/core';
    import { FormsModule } from '@angular/forms';
    
    import { AuthService } from '../services/auth.service';
    import { BehaviorSubject, Observable, Subject, timer } from 'rxjs';
    import { UserService } from '../services/user.service';
    import { SomeOtherService } from '../services/some-other.service';
    import { SomeComponent } from '../some-component/some-component.component';
    import { AnotherComponent } from '../another-component/another-component.component';
    import { SharedModule } from '../shared/shared.module';
    import { ActivatedRoute, Router } from '@angular/router';
    import { HttpClient, HttpHeaders } from '@angular/common/http';
    
    @Component({
      selector: 'app-component',
      templateUrl: './app.component.html',
      styleUrls: ['./app.component.css']
    })
    export class AppComponent implements OnInit {
      // ...
    }


    Good Example (Organized imports order) 

    // Organize Angular modules separately
    import { Component, OnInit, Input } from '@angular/core';
    import { ActivatedRoute, Router } from '@angular/router';
    import { HttpClient, HttpHeaders } from '@angular/common/http';
    import { FormsModule } from '@angular/forms'; 
    
    
    // Organize Rxjs imports separetly 
    import { BehaviorSubject, Observable, Subject, timer } from 'rxjs';
    
    // Organize services imports separetly
    import { AuthService } from '../services/auth.service';
    import { UserService } from '../services/user.service';
    import { SomeOtherService } from '../services/some-other.service';
    
    import { SomeComponent } from '../some-component/some-component.component';
    import { AnotherComponent } from '../another-component/another-component.component';
    
    Service Injection:

    It is recommended to review dependency injection in components and utilize TypeScript’s access modifiers (public, private, etc.).

    Bad Code Example:
    @Component({
      selector: 'app-example',
      templateUrl: './example.component.html',
      styleUrls: ['./example.component.css']
    })
    export class ExampleComponent implements OnInit {
      // ...
     constructor(
        public dialog: MatDialog,
        authService: JobService,
        userService,
        public ref: ChangeDetectorRef,
    
      ) {
      }
    }
    
    Good Example (With private access modifier ):
    @Component({
      selector: 'app-example',
      templateUrl: './example.component.html',
      styleUrls: ['./example.component.css']
    })
    export class ExampleComponent implements OnInit {
      // ...
     constructor(
        private dialog: MatDialog,
        private authService: JobService,
        private userService,
        private ref: ChangeDetectorRef,
    
      ) {
      }
    }


    Observable Cleanup:

    Use the async pipe to simplify the component code instead of etching data with observables, doing the subscribe and cleanup in ngOnDestroy.

    Bad Code Example:
    import { Component, OnDestroy, OnInit } from '@angular/core';
    import { Subscription } from 'rxjs';
    import { DataService } from './data.service';
    
    @Component({
      selector: 'app-data-list',
      template: `
        <h2>Data List</h2>
        <ul>
          <li *ngFor="let item of data">{{ item }}</li>
        </ul>
      `,
    })
    export class DataListComponent implements OnInit, OnDestroy {
      data: string[] = [];
      private dataSubscription: Subscription;
    
      constructor(private dataService: DataService) {}
    
      ngOnInit() {
        this.dataSubscription = this.dataService.getData().subscribe((result) => {
          this.data = result;
        });
      }
    
      ngOnDestroy() {
        if (this.dataSubscription) {
          this.dataSubscription.unsubscribe();
        }
      }
    }
    Good Example ( With async pipe):
    import { Component } from '@angular/core';
    import { Observable } from 'rxjs';
    import { DataService } from './data.service';
    
    @Component({
      selector: 'app-data-list',
      template: `
        <h2>Data List</h2>
        <ul>
          <li *ngFor="let item of data$ | async">{{ item }}</li>
        </ul>
      `,
    })
    export class DataListComponent {
      data$: Observable<string[]>;
    
      constructor(private dataService: DataService) {
        this.data$ = this.dataService.getData();
      }
    }
    Property Initialization:

    It is considered a best practice to set default values for properties to prevent runtime errors.

    Bad Code Example ():
    import { Component } from '@angular/core';
    
    @Component({
      selector: 'app-data-grid',
      template: `
        <!-- Data grid rendering code -->
      `,
    })
    export class DataGridComponent {
      data; // No initialization
    
      constructor() {
        // Imagine some logic to populate dataArray dynamically.
      }
    }
    Good Example:
    import { Component } from '@angular/core';
    
    @Component({
      selector: 'app-data-grid',
      template: `
        <!-- Data grid rendering code -->
      `,
    })
    export class DataGridComponent {
      data: any[] = []; // Initialize with an empty array
    
      constructor() {
        // Logic to populate dataArray dynamically.
      }
    }


    Component Initialization:

    I recommend reviewing the ngOnInit  method, don’t make it too long. Try to break it into smaller methods for better readability and maintainability.

    Bad Code Example :

    import { Component, OnInit } from '@angular/core';
    import { DataService } from './data.service';
    
    @Component({
      selector: 'app-data-list',
      template: `
        <h2>Data List</h2>
        <ul>
          <li *ngFor="let item of data">{{ item }}</li>
        </ul>
      `,
    })
    export class DataListComponent implements OnInit {
      data: string[] = [];
    
      constructor(private dataService: DataService) {}
    
      ngOnInit() {
        // Fetch data from the service
        this.dataService.getData().subscribe((result) => {
          // Filter and transform the data
          const filteredData = result.filter((item) => item.length > 5);
          const transformedData = filteredData.map((item) => item.toUpperCase());
    
          // Sort the data
          transformedData.sort();
    
          // Set the component data
          this.data = transformedData;
        });
      }
    }

    Good Example (Breaking Down ngOnInit)


    import { Component, OnInit } from '@angular/core';
    import { DataService } from './data.service';
    
    @Component({
      selector: 'app-data-list',
      template: `
        <h2>Data List</h2>
        <ul>
          <li *ngFor="let item of data">{{ item }}</li>
        </ul>
      `,
    })
    export class DataListComponent implements OnInit {
      data: string[] = [];
    
      constructor(private dataService: DataService) {}
    
      ngOnInit() {
        this.loadData();
      }
    
      private loadData() {
        this.dataService.getData().subscribe((result) => {
          const filteredData = this.filterData(result);
          const transformedData = this.transformData(filteredData);
          this.data = this.sortData(transformedData);
        });
      }
    
      private filterData(data: string[]): string[] {
        return data.filter((item) => item.length > 5);
      }
    
      private transformData(data: string[]): string[] {
        return data.map((item) => item.toUpperCase());
      }
    
      private sortData(data: string[]): string[] {
        return [...data].sort();
      }
    }
    Consider Extracting Logic to Services:

    If a component logic can be reused in multiple places, we can extract it into services for better code organization and reusability.

    Bad Code Example:

    import { Component } from '@angular/core';
    import { User } from './user.model'; // Assuming User model is imported
    
    @Component({
      selector: 'app-user-management',
      template: `
        <h2>User Management</h2>
        <button Angular Code Review Checklist. - PHPFOREVER="generateTooltipForEditButton(currentUser)">Edit User</button>
      `,
    })
    export class UserManagementComponent {
      currentUser: User;
    
      constructor() {
        // Initialize the currentUser based on user data retrieval
        this.currentUser = this.getUser(/* specify user ID or other criteria */);
      }
    
      generateTooltipForEditButton(user: User): string {
        if (user) {
          if (user.state === 'SUSPENDED') {
            return 'This user is suspended and cannot be edited';
          } else if (user.state === 'INACTIVE') {
            return 'This user is inactive and cannot be edited';
          } else if (!user.authorizedToUpdate) {
            return 'You are not authorized to edit this user';
          } else {
            return 'Edit';
          }
        }
        return 'Edit';
      }
    
      // Simulated method to retrieve a user, replace with actual logic
      getUser(userId: number): User {
        return {
          id: userId,
          name: 'John Doe',
          state: 'ACTIVE',
          authorizedToUpdate: true,
        };
      }
    }


    Good Example:

    import { Injectable } from '@angular/core';
    
    @Injectable({
      providedIn: 'root',
    })
    export class UserService {
      // Other user-related methods and properties
    // move the component fucntion to the service 
      getEditUserButtonTooltip(user: User): string {
        if (user) {
          if (user.state === 'SUSPENDED') {
            return 'This user is suspended and cannot be edited';
          } else if (user.state === 'INACTIVE') {
            return 'This user is inactive and cannot be edited';
          } else if (!user.authorizedToUpdate) {
            return 'You are not authorized to edit this user';
          } else {
            return 'Edit';
          }
        }
        return 'Edit';
      }
    }


    import { Component } from '@angular/core';
    import { UserService, User } from '../user.service';
    
    @Component({
      selector: 'app-user-management',
      template: `
        <h2>User Management</h2>
        <button Angular Code Review Checklist. - PHPFOREVER="generateTooltipForEditButton(currentUser)">Edit User</button>
      `,
    })
    export class UserManagementComponent {
      currentUser: User;
    
      constructor(private userService: UserService) {
        // Initialize the currentUser based on user data retrieval
        this.currentUser = this.userService.getUser(/* specify user ID or other criteria */);
      }
    
      generateTooltipForEditButton(user: User): string {
        return this.userService.generateTooltipForEditButton(user);
      }
    }
    Hard-Coded Styles:

    It’s important to avoid using inline styles as they can be difficult to maintain. Instead, it’s recommended to define appropriate styling classes.

    Bad Example (Hard-Coded Styles in Template):

    <!-- bad-example.component.html -->
    <div>
      <h2 style="font-size: 24px; color: red;">Welcome to our website</h2>
      <p style="font-size: 18px; color: blue;">This is some text with hard-coded styles.</p>
      <button style="background-color: green; color: white;">Click me</button>
    </div>

    Good Example (Separate Styles in a CSS File) :

    <!-- good-example.component.html -->
    <div>
      <h2>Welcome to our website</h2>
      <p>This is some text with Angular-applied styles.</p>
      <button (click)="onButtonClick()">Click me</button>
    </div>
    
    /* styles.css or component-specific styles file */
    h2 {
      font-size: 24px;
      color: red;
    }
    
    p {
      font-size: 18px;
      color: blue;
    }
    
    button {
      background-color: green;
      color: white;
    }


    Angular Dropdown With Search And Multi Select.   Quiz App In Angular.


    Source link

  • India Cyber Threat Report Insights for Healthcare Industry

    India Cyber Threat Report Insights for Healthcare Industry


    In 2024, one industry stood out in the India Cyber Threat Report—not for its technological advancements but for its vulnerability: healthcare. According to India Cyber Threat Report 2025, the healthcare sector accounted for 21.82% of all cyberattacks, making it the most targeted industry in India.

    But why is healthcare such a lucrative target for cybercriminals?

    The Perfect Storm of Opportunity

    Healthcare organizations are in a uniquely precarious position. They house vast amounts of sensitive personal and medical data, operate mission-critical systems, and often lack mature cybersecurity infrastructure. In India, the rapid digitization of healthcare — from hospital management systems to telemedicine — has outpaced the sector’s ability to secure these new digital touchpoints.

    This creates a perfect storm: high-value data, low resilience, and high urgency. Threat actors know that healthcare providers are more likely to pay ransoms quickly to restore operations, especially when patient care is on the line.

    How Cybercriminals are Attacking

    The India Cyber Threat Report highlights a mix of attack vectors used against healthcare organizations:

    • Ransomware: Threat groups such as LockBit 3.0 and RansomHub deploy advanced ransomware strains that encrypt data and disrupt services. These strains are often delivered through phishing campaigns or unpatched vulnerabilities.
    • Trojans and Infectious Malware: Malware masquerading as legitimate software is a standard tool for gaining backdoor access to healthcare networks.
    • Social Engineering and Phishing: Fake communications from supposed government health departments or insurance providers lure healthcare staff into compromising systems.

    What Needs to Change

    The key takeaway is clear: India’s healthcare organizations need to treat cybersecurity as a core operational function, not an IT side task. Here’s how they can begin to strengthen their cyber posture:

    1. Invest in Behavior-Based Threat Detection: Traditional signature-based antivirus tools are insufficient. As seen in the rise from 12.5% to 14.5% of all malware detections, behavior-based detection is becoming critical to identifying unknown or evolving threats.
    2. Harden Endpoint Security: With 8.44 million endpoints analyzed in the report, it’s evident that endpoint defense is a frontline priority. Solutions like Seqrite Endpoint Security offer real-time protection, ransomware rollback, and web filtering tailored for sensitive environments like hospitals.
    3. Educate and Train Staff: Many successful attacks begin with a simple phishing email. Healthcare workers need regular training on identifying suspicious communications and maintaining cyber hygiene.
    4. Backup and Response Plans: Ensure regular, encrypted backups of critical systems and have an incident response plan ready to reduce downtime and mitigate damage during an attack.

    Looking Ahead

    The India Cyber Threat Report 2025 is a wake-up call. As threat actors grow more sophisticated — using generative AI for deepfake scams and exploiting cloud misconfigurations — the time for reactive cybersecurity is over.

    At Seqrite, we are committed to helping Indian enterprises build proactive, resilient, and adaptive security frameworks, especially in vital sectors like healthcare. Solutions like our Seqrite Threat Intel platform and Malware Analysis Platform (SMAP) are built to give defenders the needed edge.

    Cyber safety is not just a technical concern — it’s a human one. Let’s secure healthcare, one system at a time.

    Click to read the full India Cyber Threat Report 2025


    Source link

  • 6.49 Million Google Clicks! 💰

    6.49 Million Google Clicks! 💰


    Yesterday Online PNG Tools smashed through 6.48M Google clicks and today it’s smashed through 6.49M Google clicks! That’s 10,000 new clicks in a single day – the smash train keeps on rollin’!

    What Are Online PNG Tools?

    Online PNG Tools offers a collection of easy-to-use web apps that help you work with PNG images right in your browser. It’s like a Swiss Army Knife for anything PNG-related. On this site, you can create transparent PNGs, edit icons, clean up logos, crop stamps, change colors of signatures, and customize stickers – there’s a tool for it all. The best part is that you don’t need to install anything or be a graphic designer. All tools are made for regular people who just want to get stuff done with their images. No sign-ups, no downloads – just quick and easy PNG editing tools.

    Who Created Online PNG Tools?

    Online PNG Tools were created by me and my team at Browserling. We’ve build simple, browser-based tools that anyone can use without needing to download or install anything. Along with PNG tools, we also work on cross-browser testing to help developers make sure their websites work great on all web browsers. Our mission is to make online tools that are fast, easy to use, and that are helpful for everyday tasks like editing icons, logos, and signatures.

    Who Uses Online PNG Tools?

    Online PNG Tools and Browserling are used by everyone – from casual users to professionals and even Fortune 100 companies. Casual users often use them to make memes, edit profile pictures, or remove backgrounds. Professionals use them to clean up logos, design icons, or prepare images for websites and apps.

    Smash too and see you tomorrow at 6.50M clicks! 📈

    PS. Use coupon code SMASHLING for a 30% discount on these tools at onlinePNGtools.com/pricing. 💸


    Source link