You should not add the caching logic in the same component used for retrieving data from external sources: you’d better use the Decorator Pattern. We’ll see how to use it, what benefits it brings to your application, and how to use Scrutor to add it to your .NET projects.
Table of Contents
Just a second! 🫷
If you are here, it means that you are a software developer.
So, you know that storage, networking, and domain management have a cost .If you want to support this blog, please ensure that you have disabled the adblocker for this site.
I configured Google AdSense to show as few ADS as possible – I don’t want to bother you with lots of ads, but I still need to add some to pay for the resources for my site.Thank you for your understanding.
– Davide
When fetching external resources – like performing a GET on some remote APIs – you often need to cache the result. Even a simple caching mechanism can boost the performance of your application: the fewer actual calls to the external system, the faster the response time of the overall application.
We should not add the caching layer directly to the classes that get the data we want to cache, because it will make our code less extensible and testable. On the contrary, we might want to decorate those classes with a specific caching layer.
In this article, we will see how we can use the Decorator Pattern to add a cache layer to our repositories (external APIs, database access, or whatever else) by using Scrutor, a NuGet package that allows you to decorate services.
Before understanding what is the Decorator Pattern and how we can use it to add a cache layer, let me explain the context of our simple application.
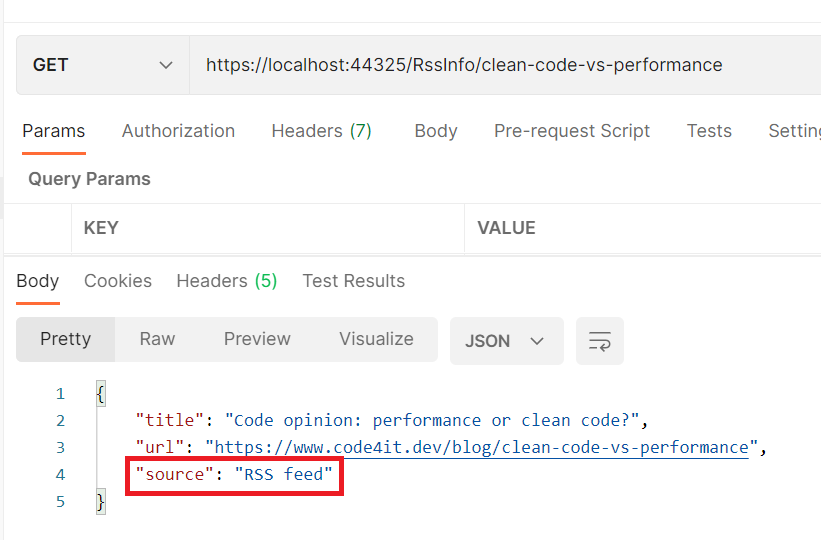
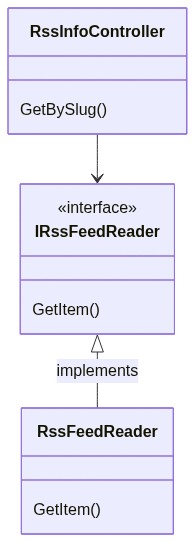
We are exposing an API with only a single endpoint, GetBySlug, which returns some data about the RSS item with the specified slug if present on my blog.
To do that, we have defined a simple interface:
public interface IRssFeedReader
{
    RssItem GetItem(string slug);
}
That interface is implemented by the RssFeedReader class, which uses the SyndicationFeed class (that comes from the System.ServiceModel.Syndication namespace) to get the correct item from my RSS feed:
public class RssFeedReader : IRssFeedReader
{
    public RssItem GetItem(string slug)
    {
        var url = "https://www.code4it.dev/rss.xml";
        using var reader = XmlReader.Create(url);
        var feed = SyndicationFeed.Load(reader);

        SyndicationItem item = feed.Items.FirstOrDefault(item => item.Id.EndsWith(slug));

        if (item == null)
            return null;

        return new RssItem
        {
            Title = item.Title.Text,
            Url = item.Links.First().Uri.AbsoluteUri,
            Source = "RSS feed"
        };
    }
}
The RssItem class is incredibly simple:
public class RssItem
{
    public string Title { get; set; }
    public string Url { get; set; }
    public string Source { get; set; }
}
Pay attention to the Source property: we’re gonna use it later.
Then, in the ConfigureServices method, we need to register the service:
services.AddSingleton<IRssFeedReader, RssFeedReader>();
Singleton, Scoped, or Transient? If you don’t know the difference, here’s an article for you!
Lastly, our endpoint will use the IRssFeedReader interface to perform the operations, without knowing the actual type:
public class RssInfoController : ControllerBase
{
    private readonly IRssFeedReader _rssFeedReader;

    public RssInfoController(IRssFeedReader rssFeedReader)
    {
        _rssFeedReader = rssFeedReader;
    }

    [HttpGet("{slug}")]
    public ActionResult<RssItem> GetBySlug(string slug)
    {
        var item = _rssFeedReader.GetItem(slug);

        if (item != null)
            return Ok(item);
        else
            return NotFound();
    }
}
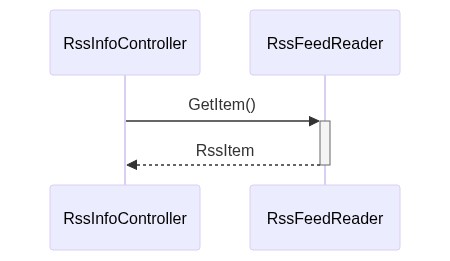
When we run the application and try to find an article I published, we retrieve the data directly from the RSS feed (as you can see from the value of Source).
The application is quite easy, right?
Let’s translate it into a simple diagram:
The sequence diagram is simple as well- it’s almost obvious!
Now it’s time to see what is the Decorator pattern, and how we can apply it to our situation.
Introducing the Decorator pattern
The Decorator pattern is a design pattern that allows you to add behavior to a class at runtime, without modifying that class. Since the caller works with interfaces and ignores the type of the concrete class, it’s easy to “trick” it into believing it is using the simple class: all we have to do is to add a new class that implements the expected interface, make it call the original class, and add new functionalities to that.
Quite confusing, uh?
To make it easier to understand, I’ll show you a simplified version of the pattern:
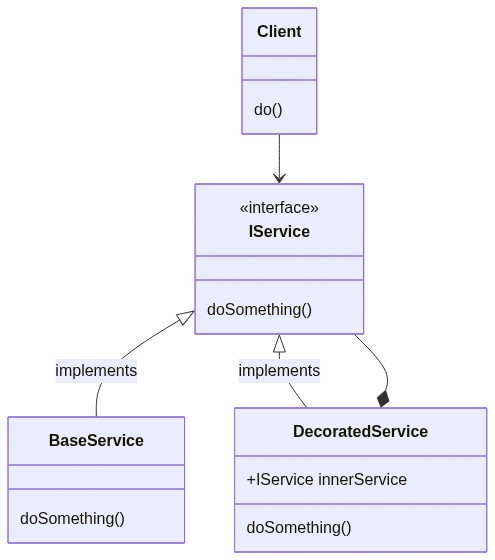
In short, the Client needs to use an IService. Instead of passing a BaseService to it (as usual, via Dependency Injection), we pass the Client an instance of DecoratedService (which implements IService as well). DecoratedService contains a reference to another IService (this time, the actual type is BaseService), and calls it to perform the doSomething operation. But DecoratedService not only calls IService.doSomething(), but enriches its behavior with new capabilities (like caching, logging, and so on).
In this way, our services are focused on a single aspect (Single Responsibility Principle) and can be extended with new functionalities (Open-close Principle).
Enough theory! There are plenty of online resources about the Decorator pattern, so now let’s see how the pattern can help us adding a cache layer.
Ah, I forgot to mention that the original pattern defines another object between IService and DecoratedService, but it’s useless for the purpose of this article, so we are fine anyway.
Implementing the Decorator with Scrutor
Have you noticed that we almost have all our pieces already in place?
If we compare the Decorator pattern objects with our application’s classes can notice that:
Clientcorresponds to ourRssInfoControllercontroller: it’s the one that calls our servicesIServicecorresponds toIRssFeedReader: it’s the interface consumed by the ClientBaseServicecorresponds toRssFeedReader: it’s the class that implements the operations from its interface, and that we want to decorate.
So, we need a class that decorates RssFeedReader. Let’s call it CachedFeedReader: it checks if the searched item has already been processed, and, if not, calls the decorated class to perform the base operation.
public class CachedFeedReader : IRssFeedReader
{
    private readonly IRssFeedReader _rssFeedReader;
    private readonly IMemoryCache _memoryCache;

    public CachedFeedReader(IRssFeedReader rssFeedReader, IMemoryCache memoryCache)
    {
        _rssFeedReader = rssFeedReader;
        _memoryCache = memoryCache;
    }

    public RssItem GetItem(string slug)
    {
        var isFromCache = _memoryCache.TryGetValue(slug, out RssItem item);
        if (!isFromCache)
        {
            item = _rssFeedReader.GetItem(slug);
        }
        else
        {
            item.Source = "Cache";
        }

        _memoryCache.Set(slug, item);
        return item;
    }
}
There are a few points you have to notice in the previous snippet:
- this class implements the
IRssFeedReaderinterface; - we are passing an instance of
IRssFeedReaderin the constructor, which is the class that we are decorating; - we are performing other operations both before and after calling the base operation (so, calling
_rssFeedReader.GetItem(slug)); - we are setting the value of the
Sourceproperty to Cache if the object is already in cache – its value is RSS feed the first time we retrieve this item;
Now we have all the parts in place.
To decorate the RssFeedReader with this new class, you have to install a NuGet package called Scrutor.
Open your project and install it via UI or using the command line by running dotnet add package Scrutor.
Now head to the ConfigureServices method and use the Decorate extension method to decorate a specific interface with a new service:
services.AddSingleton<IRssFeedReader, RssFeedReader>(); // this one was already present
services.Decorate<IRssFeedReader, CachedFeedReader>(); // add a new decorator to IRssFeedReader
… and that’s it! You don’t have to update any other classes; everything is transparent for the clients.
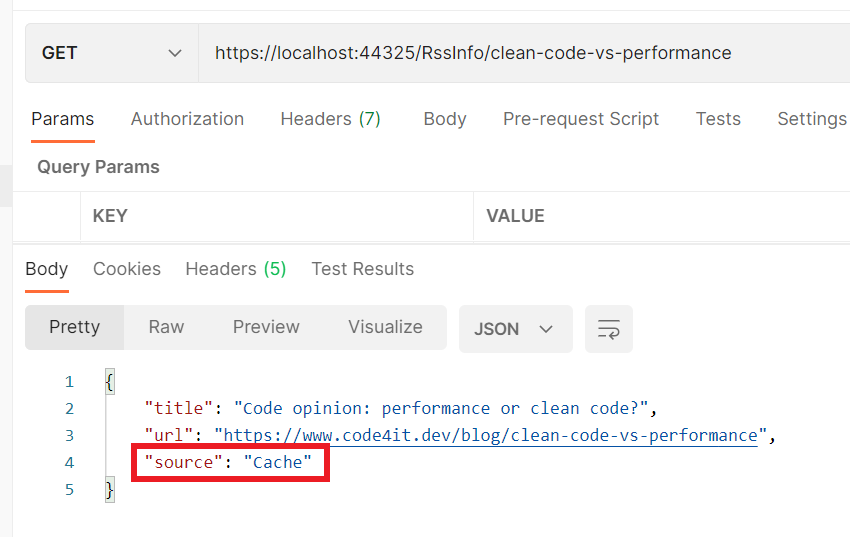
If we run the application again, we can see that the first call to the endpoint returns the data from the RSS Feed, and all the followings return data from the cache.
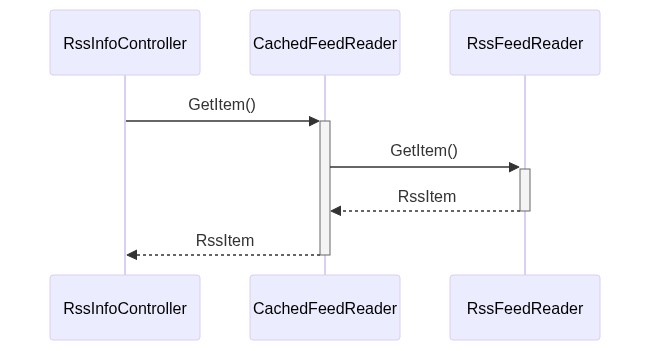
We can now update our class diagram to add the new CachedFeedReader class

And, of course, the sequence diagram changed a bit too.
Benefits of the Decorator pattern
Using the Decorator pattern brings many benefits.
Every component is focused on only one thing: we are separating responsibilities across different components so that every single component does only one thing and does it well. RssFeedReader fetches RSS data, CachedFeedReader defines caching mechanisms.
Every component is easily testable: we can test our caching strategy by mocking the IRssFeedReader dependency, without the worrying of the concrete classes called by the RssFeedReader class. On the contrary, if we put cache and RSS fetching functionalities in the RssFeedReader class, we would have many troubles testing our caching strategies, since we cannot mock the XmlReader.Create and SyndicationFeed.Load methods.
We can easily add new decorators: say that we want to log the duration of every call. Instead of putting the logging in the RssFeedReader class or in the CachedFeedReader class, we can simply create a new class that implements IRssFeedReader and add it to the list of decorators.
An example of Decorator outside the programming world? The following video from YouTube, where you can see that each cup (component) has only one responsibility, and can be easily decorated with many other cups.
https://www.youtube.com/watch?v=T_7aVZZDGNM
Additional links
🔗An Atypical ASP.NET Core 5 Design Patterns Guide | Carl-Hugo Marcotte
🔗GitHub repository for this article
Wrapping up
In this article, we’ve seen that the Decorator pattern allows us to write better code by focusing each component on a single task and by making them easy to compose and extend.
We’ve done it thanks to Scrutor, a NuGet package that allows you to decorate services with just a simple configuration.
I hope you liked this article.
Happy coding! 🐧