We all need to parse strings as integers. Most of the time, we use int.TryParse(string, out int). But there’s a more advanced overload that we can use for complex parsing.
Table of Contents
Just a second! 🫷 If you are here, it means that you are a software developer.
So, you know that storage, networking, and domain management have a cost .
If you want to support this blog, please ensure that you have disabled the adblocker for this site. I configured Google AdSense to show as few ADS as possible – I don’t want to bother you with lots of ads, but I still need to add some to pay for the resources for my site.
Thank you for your understanding. – Davide
You have probably used the int.TryParse method with this signature:
That C# method accepts a string, s, which, if it can be parsed, will be converted to an int value and whose integer value will be stored in the result parameter; at the same time, the method returns true to notify that the parsing was successful.
As an example, this snippet:
if (int.TryParse("100", outint result))
{
Console.WriteLine(result + 2); // correctly parsed as an integer}
else{
Console.WriteLine("Failed");
}
prints 102.
Does it work? Yes. Is this the best we can do? No!
How to parse complex strings with int.TryParse
What if you wanted to parse 100€? There is a less-known overload that does the job:
NumberStyles.AllowThousands | NumberStyles.AllowCurrencySymbol does the trick.
Conclusion
We all use the simple int.TryParse method, but when parsing the input string requires more complex calculations, we can rely on those overloads. Of course, if it’s still not enough, you should create your custom parsers (or, as a simpler approach, you can use regular expressions).
Are there any methods that have overloads that nobody uses? Share them in the comments!
We all use switch statements in our code. Do you use them at their full potential?
Table of Contents
Just a second! 🫷 If you are here, it means that you are a software developer.
So, you know that storage, networking, and domain management have a cost .
If you want to support this blog, please ensure that you have disabled the adblocker for this site. I configured Google AdSense to show as few ADS as possible – I don’t want to bother you with lots of ads, but I still need to add some to pay for the resources for my site.
Thank you for your understanding. – Davide
We all use switch statements in our code: they are a helpful way to run different code paths based on an check on a variable.
In this short article, we’re gonna learn different ways to write switch blocks, and some nice tricks to create clean and easy-to-read filters on such statements.
For the sake of this example, we will use a dummy hierarchy of types: a base User record with three subtypes: Player, Gamer, and Dancer.
Let’s see different usages of switch statements and switch expressions.
Switch statements
Switch statements are those with the standard switch (something) block. They allow for different executions of paths, acting as a list of if – else if blocks.
They can be used to return a value, but it’s not mandatory: you can simply use switch statements to execute code that does not return any value.
Switch statements with checks on the type
The most simple example we can have is the plain check on the type.
User user = new Gamer(30, "Nintendo Switch");

string message = "";

switch (user)
{
    case Gamer:
    {
        message = "I'm a gamer";
        break;
    }
    case Player:
    {
        message = "I'm a player";
        break;
    }
    default:
    {
        message = "My type is not handled!";
        break;
    }
}

Console.WriteLine(message); // I'm a player
Here we execute a different path based on the value the user variable has at runtime.
We can also have an automatic casting to the actual type, and then use the runtime data within the case block:
User user = new Gamer(30, "Nintendo Switch");

string message = "";

switch (user)
{
    case Gamer g:
    {
        message = "I'm a gamer, and I have a " + g.Console;
        break;
    }
    case Player:
    {
        message = "I'm a player";
        break;
    }
    default:
    {
        message = "My type is not handled!";
        break;
    }
}

Console.WriteLine(message); //I'm a gamer, and I have a Nintendo Switch
As you can see, since useris aGamer, within the related branch we cast the user to Gamer in a variable named g, so that we can use its public properties and methods.
Filtering using the WHEN keyword
We can add additional filters on the actual value of the variable by using the when clause:
User user = new Gamer(3, "Nintendo");

string message = "";

switch (user)
{
    case Gamer g when g.Age < 10:
    {
        message = "I'm a gamer, but too young";
        break;
    }
    case Gamer g:
    {
        message = "I'm a gamer, and I have a " + g.Console;
        break;
    }
    case Player:
    {
        message = "I'm a player";
        break;
    }
    default:
    {
        message = "My type is not handled!";
        break;
    }
}

Console.WriteLine(message); // I'm a gamer, but too young
Here we have the when g.Age < 10 filter applied to the Gamer g variable.
Clearly, if we set the age to 30, we will see I’m a gamer, and I have a Nintendo Switch.
Switch Expression
Switch expressions act like Switch Statements, but they return a value that can be assigned to a variable or, in general, used immediately.
They look like a lightweight, inline version of Switch Statements, and have a slightly different syntax.
To reach the same result we saw before, we can write:
User user = new Gamer(30, "Nintendo Switch");
string message = user switch{
Gamer g => "I'm a gamer, and I have a " + g.Console,
Player => "I'm a player",
_ => "My type is not handled!"};
Console.WriteLine(message);
By looking at the syntax, we can notice a few things:
instead of having switch(variable_name){}, we now have variable_name switch {};
we use the arrow notation => to define the cases;
we don’t have the default keyword, but we use the discard value _.
When keyword vs Property Pattern in Switch Expressions
Similarly, we can use the when keyword to define better filters on the cases.
string message = user switch{
Gamer gg when gg.Age < 10 => "I'm a gamer, but too young",
Gamer g => "I'm a gamer, and I have a " + g.Console,
Player => "I'm a player",
_ => "My type is not handled!"};
You can finally use a slightly different syntax to achieve the same result. Instead of using when gg.Age < 10 you can write Gamer { Age: < 10 }. This is called Property Pattern
string message = user switch{
Gamer { Age: < 10 } => "I'm a gamer, but too young",
Gamer g => "I'm a gamer, and I have a " + g.Console,
Player => "I'm a player",
_ => "My type is not handled!"};
Further readings
We actually just scratched the surface of all the functionalities provided by the C# language.
First of all, you can learn more about how to use Relational Patterns in a switch expression.
Integration Tests are incredibly useful: a few Integration Tests are often more useful than lots of Unit Tests. Let’s learn some advanced capabilities of WebApplicationFactory.
Table of Contents
Just a second! 🫷 If you are here, it means that you are a software developer.
So, you know that storage, networking, and domain management have a cost .
If you want to support this blog, please ensure that you have disabled the adblocker for this site. I configured Google AdSense to show as few ADS as possible – I don’t want to bother you with lots of ads, but I still need to add some to pay for the resources for my site.
Thank you for your understanding. – Davide
In a previous article, we learned a quick way to create Integration Tests for ASP.NET API by using WebApplicationFactory. That was a nice introductory article. But now we will delve into more complex topics and examples.
In my opinion, a few Integration Tests and just the necessary number of Unit tests are better than hundreds of Unit Tests and no Integration Tests at all. In general, the Testing Diamond should be preferred over the Testing Pyramid (well, in most cases).
In this article, we are going to create advanced Integration Tests by defining custom application settings, customizing dependencies to be used only during tests, defining custom logging, and performing complex operations in our tests.
For the sake of this article, I created a sample API application that exposes one single endpoint whose purpose is to retrieve some info about the URL passed in the query string. For example,
GET /SocialPostLink?uri=https%3A%2F%2Ftwitter.com%2FBelloneDavide%2Fstatus%2F1682305491785973760
For completeness, instanceName is a value coming from the appsettings.json file, while info is an object that holds some info about the social post URL passed as input.
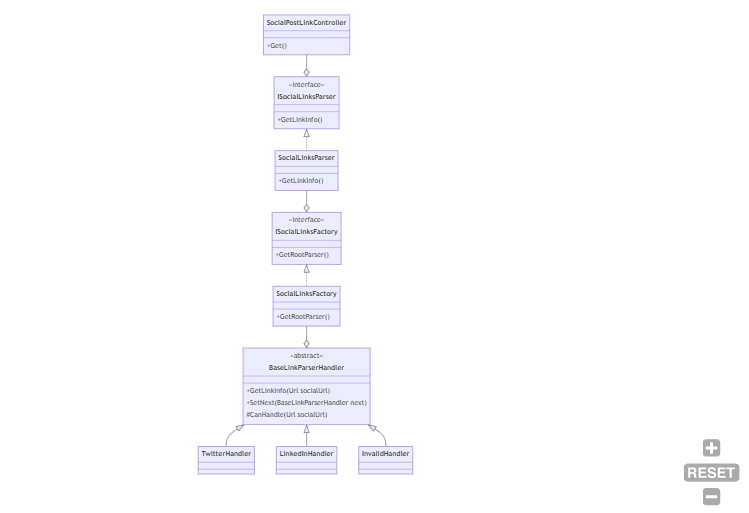
Internally, the code is using the Chain of Responsibility pattern: there is a handler that “knows” if it can handle a specific URL; if so, it just elaborates the input; otherwise, it calls the next handler.
There is also a Factory that builds the chain, and finally, a Service that instantiates the Factory and then resolves the dependencies.
As you can see, this solution can become complex. We could run lots of Unit Tests to validate that the Chain of Responsibility works as expected. We can even write a Unit Tests suite for the Factory.
But, at the end of the day, we don’t really care about the internal structure of the project: as long as it works as expected, we could even use a huge switch block (clearly, with all the consequences of this choice). So, let’s write some Integration Tests.
How to create a custom WebApplicationFactory in .NET
When creating Integration Tests for .NET APIs you have to instantiate a new instance of WebApplicationFactory, a class coming from the Microsoft.AspNetCore.Mvc.Testing NuGet Package.
Since we are going to define it once and reuse it across all the tests, let’s create a new class that extends WebApplicationFactory, and add some custom behavior to it.
Let’s focus on the Program class: as you can see, the WebApplicationFactory class requires an entry point. Generally speaking, it’s the Program class of our application.
If you hover on WebApplicationFactory<Program> and hit CTRL+. on Visual Studio, the autocomplete proposes two alternatives: one is the Program class defined in your APIs, while the other one is the Program class defined in Microsoft.VisualStudio.TestPlatform.TestHost. Choose the one for your API application! The WebApplicationFactory class will then instantiate your API following the instructions defined in your Program class, thus resolving all the dependencies and configurations as if you were running your application locally.
What to do if you don’t have the Program class? If you use top-level statements, you don’t have the Program class, because it’s “implicit”. So you cannot reference the whole class. Unless… You have to create a new partial class named Program, and leave it empty: this way, you have a class name that can be used to reference the API definition:
publicpartialclassProgram { }
Here you can override some definitions of the WebHost to be created by calling ConfigureWebHost:
How to use WebApplicationFactory in your NUnit tests
It’s time to start working on some real Integration Tests!
As we said before, we have only one HTTP endpoint, defined like this:
privatereadonly ISocialLinkParser _parser;
privatereadonly ILogger<SocialPostLinkController> _logger;
privatereadonly IConfiguration _config;
public SocialPostLinkController(ISocialLinkParser parser, ILogger<SocialPostLinkController> logger, IConfiguration config)
{
_parser = parser;
_logger = logger;
_config = config;
}
[HttpGet]public IActionResult Get([FromQuery] string uri)
{
_logger.LogInformation("Received uri {Uri}", uri);
if (Uri.TryCreate(uri, new UriCreationOptions { }, out Uri _uri))
{
var linkInfo = _parser.GetLinkInfo(_uri);
_logger.LogInformation("Uri {Uri} is of type {Type}", uri, linkInfo.SocialNetworkName);
var instance = new Instance
{
InstanceName = _config.GetValue<string>("InstanceName"),
Info = linkInfo
};
return Ok(instance);
}
else {
_logger.LogWarning("Uri {Uri} is not a valid Uri", uri);
return BadRequest();
}
}
We have 2 flows to validate:
If the input URI is valid, the HTTP Status code should be 200;
If the input URI is invalid, the HTTP Status code should be 400;
We could simply write Unit Tests for this purpose, but let me write Integration Tests instead.
First of all, we have to create a test class and create a new instance of IntegrationTestWebApplicationFactory. Then, we will create a new HttpClient every time a test is run that will automatically include all the services and configurations defined in the API application.
As you can see, the test class implements IDisposable so that we can call Dispose() on the IntegrationTestWebApplicationFactory instance.
From now on, we can use the _client instance to work with the in-memory instance of the API.
One of the best parts of it is that, since it’s an in-memory instance, we can even debug our API application. When you create a test and put a breakpoint in the production code, you can hit it and see the actual values as if you were running the application in a browser.
Now that we have the instance of HttpClient, we can create two tests to ensure that the two cases we defined before are valid. If the input string is a valid URI, return 200:
[Test]publicasync Task Should_ReturnHttp200_When_UrlIsValid()
{
string inputUrl = "https://twitter.com/BelloneDavide/status/1682305491785973760";
var result = await _client.GetAsync($"SocialPostLink?uri={inputUrl}");
Assert.That(result.StatusCode, Is.EqualTo(HttpStatusCode.OK));
}
Otherwise, return Bad Request:
[Test]publicasync Task Should_ReturnBadRequest_When_UrlIsNotValid()
{
string inputUrl = "invalid-url";
var result = await _client.GetAsync($"/SocialPostLink?uri={inputUrl}");
Assert.That(result.StatusCode, Is.EqualTo(HttpStatusCode.BadRequest));
}
How to create test-specific configurations using InMemoryCollection
WebApplicationFactory is highly configurable thanks to the ConfigureWebHost method. For instance, you can customize the settings injected into your services.
Usually, you want to rely on the exact same configurations defined in your appsettings.json file to ensure that the system behaves correctly with the “real” configurations.
For example, I defined the key “InstanceName” in the appsettings.json file whose value is “Real”, and whose value is used to create the returned Instance object. We can validate that that value is being read from that source as validated thanks to this test:
[Test]publicasync Task Should_ReadInstanceNameFromSettings()
{
string inputUrl = "https://twitter.com/BelloneDavide/status/1682305491785973760";
var result = await _client.GetFromJsonAsync<Instance>($"/SocialPostLink?uri={inputUrl}");
Assert.That(result.InstanceName, Is.EqualTo("Real"));
}
But some other times you might want to override a specific configuration key.
The ConfigureAppConfiguration method allows you to customize how you manage Configurations by adding or removing sources.
If you want to add some configurations specific to the WebApplicationFactory, you can use AddInMemoryCollection, a method that allows you to add configurations in a key-value format:
protectedoverridevoid ConfigureWebHost(IWebHostBuilder builder)
{
builder.ConfigureAppConfiguration((host, configurationBuilder) =>
{
configurationBuilder.AddInMemoryCollection(
new List<KeyValuePair<string, string?>>
{
new KeyValuePair<string, string?>("InstanceName", "FromTests")
});
});
}
Even if you had the InstanceName configured in your appsettings.json file, the value is now overridden and set to FromTests.
You can validate this change by simply replacing the expected value in the previous test:
[Test]publicasync Task Should_ReadInstanceNameFromSettings()
{
string inputUrl = "https://twitter.com/BelloneDavide/status/1682305491785973760";
var result = await _client.GetFromJsonAsync<Instance>($"/SocialPostLink?uri={inputUrl}");
Assert.That(result.InstanceName, Is.EqualTo("FromTests"));
}
If you also want to discard all the other existing configuration sources, you can call configurationBuilder.Sources.Clear() before AddInMemoryCollection and remove all the other existing configurations.
How to set up custom dependencies for your tests
Maybe you don’t want to resolve all the existing dependencies, but just a subset of them. For example, you might not want to call external APIs with a limited number of free API calls to avoid paying for the test-related calls. You can then rely on Stub classes that simulate the dependency by giving you full control of the behavior.
We want to replace an existing class with a Stub one: we are going to create a stub class that will be used instead of SocialLinkParser:
publicclassStubSocialLinkParser : ISocialLinkParser
{
public LinkInfo GetLinkInfo(Uri postUri) => new LinkInfo
{
SocialNetworkName = "test from stub",
Id = "test id",
SourceUrl = postUri,
Username = "test username" };
}
We can then customize Dependency Injection to use StubSocialLinkParser in place of SocialLinkParser by specifying the dependency within the ConfigureTestServices method:
Finally, we can create a method to validate this change:
[Test]publicasync Task Should_UseStubName()
{
string inputUrl = "https://twitter.com/BelloneDavide/status/1682305491785973760";
var result = await _client.GetFromJsonAsync<Instance>($"/SocialPostLink?uri={inputUrl}");
Assert.That(result.Info.SocialNetworkName, Is.EqualTo("test from stub"));
}
How to create Integration Tests on specific resolved dependencies
Now we are going to test that the SocialLinkParser does its job, regardless of the internal implementation. Right now we have used the Chain of Responsibility pattern, and we rely on the ISocialLinksFactory interface to create the correct sequence of handlers. But we don’t know in the future how we will define the code: maybe we will replace it all with a huge if-else sequence – the most important part is that the code works, regardless of the internal implementation.
We can proceed in two ways: writing tests on the interface or writing tests on the concrete class.
For the sake of this article, we are going to run tests on the SocialLinkParser class. Not the interface, but the concrete class. The first step is to add the class to the DI engine in the Program class:
builder.Services.AddScoped<SocialLinkParser>();
Now we can create a test to validate that it is working:
[Test]publicasync Task Should_ResolveDependency()
{
using (var _scope = _factory.Services.CreateScope())
{
var service = _scope.ServiceProvider.GetRequiredService<SocialLinkParser>();
Assert.That(service, Is.Not.Null);
Assert.That(service, Is.AssignableTo<SocialLinkParser>());
}
}
As you can see, we are creating an IServiceScope by calling _factory.Services.CreateScope(). Since we have to discard this scope after the test run, we have to place it within a using block. Then, we can create a new instance of SocialLinkParser by calling _scope.ServiceProvider.GetRequiredService<SocialLinkParser>() and create all the tests we want on the concrete implementation of the class.
The benefit of this approach is that you have all the internal dependencies already resolved, without relying on mocks. You can then ensure that everything, from that point on, works as you expect.
Here I created the scope within a using block. There is another approach that I prefer: create the scope instance in the SetUp method, and call Dispose() on it the the TearDown phase:
Sometimes you just want to see the logs generated by your application to help you debug an issue (yes, you can simply debug the application!). But, unless properly configured, the application logs will not be available to you.
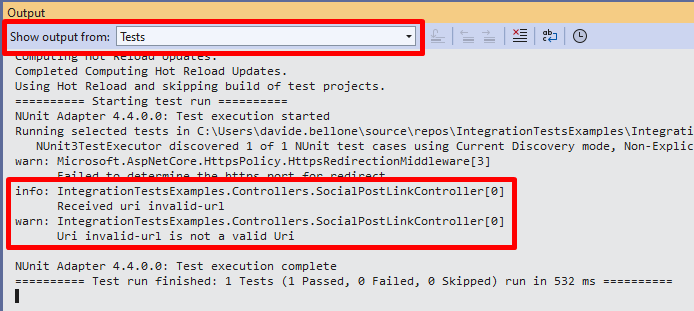
But you can add logs to the console easily by customizing the adding the Console sink in your ConfigureTestServices method:
Now you will be able to see all the logs you generated in the Output panel of Visual Studio by selecting the Tests source:
Beware that you are still reading the configurations for logging from the appsettings file! If you have specified in your project to log directly to a sink (such as DataDog or SEQ), your tests will send those logs to the specified sinks. Therefore, you should get rid of all the other logging sources by calling ClearProviders():
As I often say, a few Integration Tests are often more useful than a ton of Unit Tests. Focusing on Integration Tests instead that on Unit Tests has the benefit of ensuring that the system behaves correctly regardless of the internal implementation.
In this article, I used the Chain of Responsibility pattern, so Unit Tests would be tightly coupled to the Handlers. If we decided to move to another pattern, we would have to delete all the existing tests and rewrite everything from scratch.
Therefore, in my opinion, the Testing Diamond is often more efficient than the Testing Pyramid, as I explained here:
In today’s competitive business environment, leveraging advanced technology is not just advantageous but often essential for staying ahead. From improving operational efficiency to enhancing customer experiences, advanced gadgets play a crucial role in driving business success. Despite the challenges businesses face, such as the statistic that up to 70% of all business partnerships fail, integrating advanced gadgets can mitigate risks and propel growth.
Enhancing Operational Efficiency
One of the primary benefits of advanced gadgets in business is their ability to streamline operations and boost productivity. Whether it’s through automation tools, smart devices, or advanced software solutions, technology empowers businesses to automate repetitive tasks, optimize workflows, and allocate resources more effectively. By reducing manual errors and accelerating processes, businesses can achieve greater efficiency and operational excellence.
Ensuring Workplace Safety
The safety and security of employees and assets are paramount concerns for any business. According to the National Fire Protection Association, an average of 3,340 fires occur in offices every year, highlighting the importance of robust safety measures. Advanced gadgets such as smart fire detection systems, CCTV cameras with AI-powered analytics, and automated emergency response systems can significantly enhance workplace safety. These technologies not only detect potential hazards early but also enable swift responses, mitigating risks and minimizing damage.
Navigating Regulatory Compliance
Navigating regulatory requirements and tax obligations is another critical aspect of business operations. For example, in New Jersey, the State Treasury imposes a 6.625% Sales Tax on sales of most tangible personal property, specified digital products, and certain services unless exempt under state law. Advanced gadgets equipped with financial management software can automate tax calculations, ensure compliance with regulatory standards, and facilitate accurate reporting. By reducing the burden of manual compliance tasks, businesses can avoid penalties and optimize financial processes.
Empowering Customer Engagement
Customer engagement and satisfaction are fundamental drivers of business growth. Advanced gadgets such as customer relationship management (CRM) systems, personalized marketing automation tools, and AI-powered chatbots enable businesses to deliver tailored experiences and responsive customer service. These technologies analyze customer data in real-time, anticipate needs, and personalize interactions, fostering long-term customer loyalty and driving revenue growth.
Harnessing Data for Strategic Insights
In today’s data-driven economy, insights derived from data analytics can provide businesses with a competitive edge. Advanced gadgets equipped with analytics tools collect, analyze, and visualize data from various sources, offering valuable insights into market trends, customer behavior, and operational performance. By making informed decisions based on data-driven insights, businesses can identify opportunities, mitigate risks, and optimize strategies for sustainable growth.
Improving Decision-Making with Real-Time Analytics
Advanced gadgets are invaluable in empowering businesses with real-time data analytics capabilities. These tools enable organizations to gather and analyze data swiftly, providing deep insights into market dynamics, consumer preferences, and operational efficiencies. By harnessing these insights, businesses can make informed decisions promptly, adapt strategies proactively, and capitalize on emerging opportunities. Real-time analytics not only enhances strategic planning but also optimizes resource allocation, driving sustained growth and competitiveness in today’s fast-paced business landscape.
Conclusion
In conclusion, integrating advanced gadgets into business operations can significantly enhance efficiency, safety, compliance, customer engagement, and strategic decision-making. Despite the challenges highlighted by statistics showing high business partnership failure rates and the prevalence of office fires, advanced technology offers solutions to mitigate risks and drive success. By leveraging automation, enhancing safety measures, ensuring regulatory compliance, empowering customer engagement, and harnessing data-driven insights, businesses can navigate challenges more effectively and capitalize on opportunities in a rapidly evolving marketplace.
As technology continues to evolve, businesses that embrace advanced gadgets not only position themselves for current success but also future-proof their operations against emerging challenges. By investing in the right technology solutions and adapting them to meet specific business needs, organizations can innovate, grow, and thrive in an increasingly competitive landscape. Embracing the transformative potential of advanced gadgets is not merely advantageous but imperative for businesses striving to achieve sustainable success and leadership in their respective industries.
Carousels are a fairly common UI pattern (there are many excellent carousel and slider examples available on Codrops). While carousel designs vary depending on the use case, the following demos explore how the GreenSock Animation Platform (GSAP) can be used to achieve seamless looping, smooth animations, and ultimately, a better user experience.
This article is for frontend designers and developers interested in enhancing the functionality and visual appeal of a standard horizontal carousel. Familiarity with JavaScript and basic GSAP methods will be helpful, but anyone looking for inspiration and practical examples may find the following content useful.
What You’ll Learn
Basic carousel implementation using HTML and CSS
How to use gsap.utils.wrap() and horizontalLoop()
Advanced animation techniques, including image parallax and function-based values
Our Basic Carousel
Let’s start with a horizontally scrolling carousel using only HTML and CSS:
It uses scroll snapping and some custom styling on the scrollbar. Nothing fancy, but it works even when JavaScript is disabled.
Note that the HTML above is intentionally concise. However, in production, it’s important to follow accessibility best practices, including using alt text on images and descriptive ARIA attributes for screen reader users.
Building on the Foundation – GSAP Demo 1A
To see how GSAP can enhance a carousel, we’ll explore two different approaches—the first using gsap.utils.wrap(). Wrap is one of several handy utility methods included in gsap.js—no plugin required! Given a min/max range, it returns a value within that range:
gsap.utils.wrap(5, 10, 12); // min 5, max 10, value to wrap 12: returns 7
The example above returns 7 because 12 is 2 more than the maximum of 10, so it wraps around to the start and moves 2 steps forward from there. In a carousel, this can be used to loop infinitely through the slides.
Here’s a simple demo of how it can be applied:
In the HTML, a <nav> block has been added that contains previous/next buttons and progress text:
In the JS, we override the carousel’s scroll-snap-type and display the <nav> block. Since we no longer have a scrollable area, the buttons are necessary to maintain keyboard accessibility. Safari requires tabindex="0" to allow users to tab to them. Additionally, aria-labels are important since the buttons have no visible text content.
We apply the new class to each slide, which effectively stacks them all in the center. We also set the initial opacity: 1 for the first slide and 0 for the rest:
Next, we need a function that transitions to the previous or next slide. changeSlide() is passed a direction parameter of either positive or negative 1. Inside this function, we:
Fade out the current slide
Update the current slide index using gsap.utils.wrap()
Fade in the new current slide
Update the progress text
The different easing on the outro and intro tweens helps prevent excessive overlapping opacity during the crossfade.
Easing and staggers help smooth out and space the movement. The dir parameter modifies the rotationY, adding a subtly unique motion to previous and next actions.
This basic setup can be easily customized further. Animating a clip-path, applying a blur filter, or experimenting with additional 3D transforms could all produce interesting results.
A Different Approach – GSAP Demo 2A
Another way to create a seamless looping carousel with GSAP is to use the horizontalLoop() helper function. Although GSAP helper functions aren’t officially part of the core library, they’re a handy collection of code snippets and shortcuts. They also serve as great learning resources for writing more advanced GSAP code.
This specific helper function animates elements along their x-axis and repositions them once they’re out of view to create an infinite loop. Here’s a basic implementation:
Again, we override the CSS and display the <nav> element. Then we call horizontalLoop(), which takes two parameters: an array of the carousel slides and a config object for setting various options.
const loop = horizontalLoop(slides, {
  paused: true,       // no auto-scroll
  paddingRight: 10,   // match the 10px flex gap
  center: true,       // snap the active slide to the center
  onChange: (slide, index) => { // called when the active slide changes
    if (activeSlide) {
      gsap.to(".active", { opacity: 0.3 });
      activeSlide.classList.remove("active");
    }
    slide.classList.add("active");
    activeSlide = slide;
    gsap.to(".active", { opacity: 1, ease: "power2.inOut" });
    gsap.set(".carousel-nav div", { innerText: `${index + 1}/${slides.length}` });
  }
});
The most notable of these options is the onChange callback, where we can write code that executes each time the active slide changes. In this example, we’re removing and adding the “active” class name and tweening the opacity to draw more focus to the center slide.
The helper function returns a timeline with several useful added methods, including next(), previous(), and toIndex(). We’ll use these to add navigation functionality to our previous/next buttons, as well as to the individual slides:
next.addEventListener("click", () => loop.next({ duration: 1, ease: "expo" }));
prev.addEventListener("click", () => loop.previous({ duration: 1, ease: "expo" }));

// each slide can function as a button to activate itself
slides.forEach((slide, i) => {
  slide.addEventListener("click", () => loop.toIndex(i, {duration: 1, ease: "expo"}))
});
Finally, we set the initial carousel state by adjusting the opacity of each slide and calling toIndex() with no tween duration, which centers the active slide.
If you’re unfamiliar with function-based values in GSAP, this is an amazing feature—definitely check out that link to learn how they work. Here, we’re iterating through each element with the class name “carousel-slide,” returning an opacity value of 1 for the first slide and 0.3 for the rest.
The remainder of the JS is just the helper function, copied and pasted from the GSAP docs demo. In most cases, you won’t need to modify anything inside it. (We’ll look at an exception in Demo 2C.)
Add Draggable & InertiaPlugin – GSAP Demo 2B
To make the carousel move on drag, we’ll need two plugins: Draggable and the Inertia Plugin. Once those scripts are included, you can set draggable: true in the config object.
In addition to drag behavior, this iteration includes some text animation, with logic to prevent it from running on the first load (plus hover in/out animations on the nav buttons).
onChange: (slide, index) => { // called when the active slide changes
  if (activeSlide) {
    gsap.to(".carousel h2, .carousel h5", { overwrite: true, opacity: 0, ease: "power3" });
    gsap.to(".active", { opacity: 0.3 });
    activeSlide.classList.remove("active");
  }
  slide.classList.add("active");
  activeSlide = slide;

  // intro animation for new active slide
  gsap.timeline({ defaults:{ ease:"power1.inOut" } })

    // fade in the new active slide
    .to(".active", { opacity: 1, ease: "power2.inOut" }, 0)

    // fade out the progress text, change its value, fade it back in
    .to(".carousel-nav div", { duration: 0.2, opacity: 0, ease: "power1.in" }, 0)
    .set(".carousel-nav div", { innerText: `${index + 1}/${slides.length}` }, 0.2)
    .to(".carousel-nav div", { duration: 0.4, opacity: 0.5, ease: "power1.inOut" }, 0.2)

    // fade in the text elements and translate them vertically
    .to(".active h2, .active h5", { opacity: 1, ease: "power1.inOut" }, 0.3)
    .fromTo(".active h2, .active h5", { y:(i)=>[40,60][i] },{ duration: 1.5, y: 0, ease: "expo" }, 0.3)

    // skip active slide animation on first run
    .progress( firstRun? 1: 0 )
}
Adding Parallax – GSAP Demo 2C
To make the movement more engaging, let’s calculate each slide’s horizontal progress and use it to create a parallax effect.
Until now, we haven’t modified the helper function. However, to calculate slide progress, this version includes one change insidehorizontalLoop().
Now, every time the carousel timeline updates, slideImgUpdate() is called. This function sets each image’s xPercent based on the progress of its parent slide. Progress is 0 when the slide is offstage to the left, and 1 when it’s offstage to the right.
GSAP utility functions mapRange(), interpolate(), and clamp() make the progress calculation much easier. Note, in the CSS, the width of .carousel-slide img is increased to 150%, so there will be enough image for a 50% horizontal movement.
Taking It Further
There are endless ways you could build on these demos, customizing both appearance and functionality. A few ideas include:
Modify how many slides are shown at once—a single, full-frame version could be interesting, as could several smaller slides to create a cover flow effect. In both of those examples, the progress indicator also became a fun area for experimentation.
Additional details could be added by calling custom functions inside the helper function’s onPress, onRelease, or onThrowComplete callbacks. Here’s one more iteration on Demo 2, where the entire carousel shrinks while the pointer is held down.
The carousel could even serve as navigation for a separate animated page element, like on Nite Riot.
If you want the carousel to respond to mouse wheel movements, GSAP’s Observer plugin offers an easy way to handle those events.