In today’s world, organizations are rapidly embracing cloud security to safeguard their data and operations. However, as cloud adoption grows, so do the risks. In this post, we highlight the top cloud security challenges and show how Seqrite can help you tackle them with ease.
1. Misconfigurations
One of the simplest yet most dangerous mistakes is misconfiguring cloud workloads think storage buckets left public, weak IAM settings, or missing encryption. Cybercriminals actively scan for these mistakes. A small misconfiguration can lead to significant data leakage or worst-case, ransomware deployment. Seqrite Endpoint Protection Cloud ensure your cloud environment adheres to best-practice security settings before threats even strike.
2. Shared Responsibility Confusion
The cloud model operates on shared responsibility: providers secure infrastructure, you manage your data and configurations. Too many teams skip this second part. Inadequate control over access, authentication, and setup drives serious risks. With Seqrite’s unified dashboard for access control, IAM, and policy enforcement, you stay firmly in control without getting overwhelmed.
3. Expanded Attack Surface
More cloud services, more code, more APIs, more opportunities for attacks. Whether it’s serverless functions or public API endpoints, the number of access points grows quickly. Seqrite tackles this with integrated API scanning, vulnerability assessment, and real-time threat detection. Every service, even ephemeral ones is continuously monitored.
4. Unauthorized Access & Account Hijacking
Attackers often gain entry via stolen credentials, especially in shared or multi-cloud environments. Once inside, they move laterally and hijack more resources. Seqrite’s multi-factor authentication, adaptive risk scoring, and real-time anomaly detection lock out illicit access and alert you instantly.
5. Insufficient Data Encryption
Unencrypted data whether at rest or in transit is a gold mine for attackers. Industries with sensitive or regulated information, like healthcare or finance, simply can’t afford this. Seqrite ensures enterprise-grade encryption everywhere you store or transmit data and handles key management so that it’s secure and hassle-free.
6. Poor Visibility and Monitoring
Without centralized visibility, security teams rely on manual cloud consoles and piecemeal logs. That slows response and leaves gaps. Seqrite solves this with a unified monitoring layer that aggregates logs and events across all your cloud environments. You get complete oversight and lightning-fast detection.
7. Regulatory Compliance Pressures
Compliance with GDPR, HIPAA, PCI-DSS, DPDPA and other regulations is mandatory—but complex in multi-cloud environments. Seqrite Data Privacy simplifies compliance with continuous audits, policy enforcement, and detailed reports, helping you reduce audit stress and regulatory risk.
8. Staffing & Skills Gap
Hiring cloud-native, security-savvy experts is tough. Many teams lack the expertise to monitor and secure dynamic cloud environments. Seqrite’s intuitive interface, automation, and policy templates remove much of the manual work, allowing lean IT teams to punch above their weight.
9. Multi-cloud Management Challenges
Working across AWS, Azure, Google Cloud and maybe even private clouds? Each has its own models and configurations. This fragmentation creates blind spots and policy drift. Seqrite consolidates everything into one seamless dashboard, ensuring consistent cloud security policies across all environments.
10. Compliance in Hybrid & Multi-cloud Setups
Hybrid cloud setups introduce additional risks, cross-environment data flows, networking complexities, and inconsistent controls. Seqrite supports consistent security policy application across on-premises, private clouds, and public clouds, no matter where a workload lives.
Bring in Seqrite to secure your cloud journey, safe, compliant, and hassle-free.
In today’s always-connected, mobile-first world, employees are working on the go—from airports, cafes, living rooms, and everywhere in between. That’s great for flexibility and productivity—but what about security? How do you protect sensitive business data when it’s spread across dozens or hundreds of mobile devices? This is where Mobile Device Management (MDM) steps in. Let’s see what is MDM.
What is MDM?
MDM, short for Mobile Device Management, is a system that allows IT teams to monitor, manage, and secure employees’ mobile devices—whether company-issued or BYOD (Bring Your Own Device).
It’s like a smart control panel for your organization’s phones and tablets. From pushing software updates and managing apps to enforcing security policies and wiping lost devices—MDM gives you full visibility and control, all from a central dashboard.
MDM helps ensure that only secure, compliant, and authorized devices can access your company’s network and data.
Why is MDM Important?
As the modern workforce becomes more mobile, data security risks also rise. Devices can be lost, stolen, or compromised. Employees may install risky apps or access corporate files from unsecured networks. Without MDM, IT teams are essentially blind to these risks.
A few common use cases of MDM:
A lost smartphone with access to business emails.
An employee downloading malware-infected apps.
Data breaches due to unsecured Wi-Fi use on personal devices.
Non-compliance with industry regulations due to lack of control.
MDM helps mitigate all these risks while still enabling flexibility.
Key Benefits of MDM Solution
Enhanced Security
Remotely lock, wipe, or locate lost devices. Prevent unauthorized access, enforce passcodes, and control which apps are installed.
Centralized Management
Manage all mobile devices, iOS and Android from a single dashboard. Push updates, install apps, and apply policies in bulk.
Improved Productivity
Set devices in kiosk mode for focused app usage. Push documents, apps, and files on the go. No downtime, no waiting.
Compliance & Monitoring
Track usage, enforce encryption, and maintain audit trails. Ensure your devices meet industry compliance standards at all times.
Choosing the Right MDM Solution
There are many MDM solutions out there, but the right one should go beyond basic management. It should make your life easier, offer deep control, and scale with your organization’s needs—without compromising user experience.
Why Seqrite MDM is Built for Today’s Mobile Workforce
Unified Management Console: Manage all enrolled mobile devices in one place—track location, group devices, apply custom policies, and more.
AI-Driven Security: Built-in antivirus, anti-theft features, phishing protection, and real-time web monitoring powered by artificial intelligence.
Virtual Fencing: Set geo, Wi-Fi, and time-based restrictions to control device access and usage great for field teams and remote employees.
App & Kiosk Mode Management: Push apps, lock devices into single- or multi-app kiosk mode, and publish custom apps to your enterprise app store.
Remote File Transfer & Troubleshooting: Send files to one or multiple devices instantly and troubleshoot issues remotely to reduce device downtime.
Automation & Reporting: Get visual dashboards, schedule regular exports, and access real-time logs and audit reports to stay ahead of compliance.
Final Thoughts
As work continues to shift beyond the boundaries of the office, MDM is no longer a luxury, it’s a necessity. Whether you’re a growing startup or a large enterprise, protecting your mobile workforce is key to maintaining both productivity and security.
With solutions like Seqrite Enterprise Mobility Management, businesses get the best of both worlds powerful control and seamless management, all wrapped in a user-friendly experience.
TrueKind approached us with a clear but ambitious goal: they wanted a skincare website that stood out—not just in the Indian skincare space, but globally.
The challenge? Most skincare websites (especially local ones) lean heavily commercial. They emphasize offers, discounts, and aggressive product pushes. But TrueKind wanted something gentler, more thoughtful, and centered on one message: honest skincare.
From the very first conversation, I knew this would require a delicate balance. We wanted to create a site that was visually fresh and a little unconventional, but not so experimental that it alienated everyday customers.
We set aside around 1–2 months for the design phase, allowing time for multiple iterations and careful refinement. One of the best parts of this project was the incredibly trusting, supportive client team—working with people who are genuinely open to creativity makes all the difference.
Crafting the Visual Direction
Every project I work on begins with listening. Before touching any design tools, I immersed myself in the client’s vision, mood, and tone.
I created a moodboard to align with their aesthetic, making sure the images I pulled weren’t just random “nice” visuals. This is something I see many younger designers overlook: it’s not just about curating pretty pictures; it’s about curating pictures that match the brand’s energy, saturation, color language, and atmosphere.
🌟 When building moodboards, don’t be afraid to tweak image properties. Adjust exposure, warmth, contrast, and saturation until they feel cohesive. You’re not just grabbing references—you’re crafting a controlled atmosphere.
For the typefaces, I leaned on my go-to foundry, Pangram Pangram. Their fonts are beautifully made and (for personal projects) wonderfully accessible. For TrueKind, we selected PP Mori (for a modern, clean backbone) and Editorial Neue (to bring in an elegant, editorial touch).
Even though the client wanted something unconventional, I knew we had to keep the animation and interaction design balanced. Too much movement can be overwhelming. So, we built the visual experience primarily around typography—letting type choices and layouts carry the creative weight.
On Working Before AI Image Tools
This project dates back to around 2021, before the surge of AI image generation tools. So when it came to placeholders and visual exploration, I often turned to Behance or similar platforms to source reference imagery that fit the vibe.
Of course, for the final launch, we didn’t want any copyright issues—so we conducted a professional photoshoot in Worli, Mumbai, capturing clean, fresh product imagery. For the Awwwards showcase, we’ve swapped in AI-generated images purely for display purposes.
Iteration and Evolution
Here’s a personal moment of honesty: The first version I designed? I wasn’t thrilled with it.
It lacked the polish, elegance, and depth I knew the brand deserved. But instead of settling, I went back, refined, iterated, and kept pushing. That’s something I’d tell any designer reading this:
🌟 Don’t be afraid to walk away from your early drafts. You can feel when something’s not hitting the mark—trust that instinct, and give yourself room to improve.
Animation & Interaction Design
I’m a sucker for scroll-based animations. Smooth scrolling, layered reveals, subtle movement—these elements can elevate a static design a hundredfold if used thoughtfully.
For TrueKind, I didn’t want unnecessary flash. The scroll interactions enhance the content flow without overpowering it. The text reveals, section transitions, and layered elements were designed to add just enough dynamism to keep the user engaged while still respecting the calm, honest tone of the brand.
Bringing in Reksa: Development Insights
At a certain point, I knew I needed help to fully do justice to the design. That’s when I reached out to Reksa—a developer I deeply admire, not just for his technical skill but for his meticulous creative eye.
Handing over a design like this isn’t always easy. But with Reksa, it felt seamless. He understood the nuances, respected the design intention, and delivered 1000%.
In the dev section below, Reksa will walk you through the stack, architecture, key challenges, and how he brought the design to life with care and precision.
Tech Stack & Challenges
Nuxt.js 3 for the frontend: This project was built with Nuxt.js 3 as the frontend framework. It’s my main tech stack and a powerful choice, especially for creative websites. I find Nuxt.js offers far more flexibility than other frameworks.
SCSS for styling: While many developers prefer CSS frameworks, I lean toward vanilla CSS as my primary approach. SCSS is used here mainly for class scoping and maintainability, but the overall syntax remains vanilla. Writing custom CSS makes the most sense for my needs—especially in creative development, where unique layouts and their connection to animation/motion often demand full styling control.
Vercel for hosting: It provides a simple, plug-and-play experience for hosting Nuxt.js 3 projects.
Prismic as CMS: I use Prismic as the headless CMS. It’s my go-to for most projects—straightforward and well-suited to this project’s needs.
GSAP for animations: For smooth motion experiences, GSAP is unmatched. Its exceptional plugins—like SplitText and DrawSVG—allow me to craft fantastic animations that elevate the design.
Lenis for smooth scrolling: To enhance the motion and animation quality, implementing smooth scroll is a must. It ensures that animations flow beautifully in sync with the scroll timeline.
The key challenges for this project were implementing the “floating” layout and ensuring it remained responsive across all screen sizes. Abhishek’s design was beautifully unique, though that uniqueness also posed its own set of difficulties. To bring it to life, I had to carefully apply techniques like position: absolute in CSS to achieve the right structure and layering.
My favorite part of developing this project was the page transitions and micro-interactions.
The page transition to the product view uses a solid color from the product background, expands it to full screen, and then switches the page seamlessly. Meanwhile, micro-interactions—like SVG draw motions, button hovers, and click animations—add small but impactful details. These make the site feel more alive and engaging for users.
Awards & Recognition
We’re incredibly happy that the project received such a positive response. Some of the awards and recognitions include:
Awwwards – Site of the Day & Developer Award
Awwwards – E-commerce Honors (Nominee)
FWA – FWA of the Day
CSSDA – Website of the Day
GSAP – Site of the Day
Muz.li – Picks Honor
Made With GSAP – Showcase Feature
Reflections
This project was a joy. Not just because of the outcome, but because of the process: working with thoughtful clients, collaborating with talented partners, and building something that felt true to its mission.
There was, however, an interesting twist. While the final site looked and felt fresh and unconventional, over time, the client gradually shifted toward simpler, more familiar designs—closer to what everyday users are used to.
And here’s a reflection for all creatives:
🌟 Creative websites are a feast for the eyes, but they don’t always convert perfectly. As designers, we thrive on bold, experimental ideas. But businesses often need to balance creativity with practicality. And that’s okay.
This project left a lasting impression—not just on the client, but on us as creators. It reminded me why we do this work: not just to make things look good, but to tell stories, evoke feelings, and bring meaningful ideas into the world.
Final Thoughts
If you’re a young creative reading this: Keep learning, keep experimenting, and keep collaborating. It’s not about chasing perfection—it’s about chasing truth in your work.
And when you find a team that shares that vision? That’s where the magic happens.
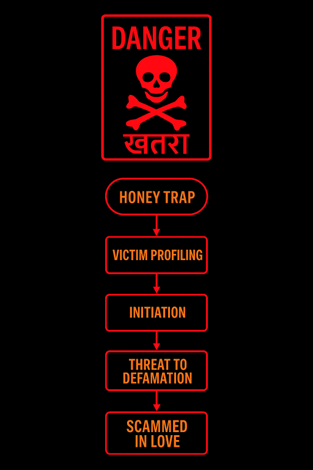
Behind the screen, a delicate balance of trust and deception plays out. Honey traps, once the preserve of espionage, have now insidiously spread into the digital realm, capitalizing on human emotions. What starts as a harmless-looking chat or friend request can unexpectedly spiral into blackmail, extortion, or theft. The truth is, vulnerability knows no bounds – whether you’re an ordinary citizen or a high-profile target, you could be at risk. Let’s delve into the complex world of digital honey traps, understand their destructive power, and uncover vital strategies to safeguard ourselves. Attackers do break the firewall, but an insider threat bypasses it.
Who Gets Targeted?
Government officers with access to classified documents
Employees in IT, finance, defense, or research divisions
Anyone with access credentials or decision-making power
Takeaway #1: If someone online gets close fast and wants details about your work or sends flirty messages too soon — that’s a red flag.
Fake romantic relationships are used to manipulate officials into breaching confidentiality, exploiting emotions rather than digital systems. Attackers gain unauthorized access through clever deception, luring victims into sharing sensitive data. This sophisticated social engineering tactic preys on human vulnerabilities, making it a potent threat. It’s catfishing with a malicious intent, targeting high-stakes individuals for data extraction. Emotional manipulation is the key to this clever attack.
Anatomy of the crime
Targeting / victim profiling : Takeaway #2: Social Media is the First Door
Scammers often target individuals in authoritative positions with access to sensitive corporate or government data. They collect personal info like marital status and job profile to identify vulnerabilities. The primary vulnerability they exploit is emotional weakness, which can lead to further digital breaches. Social media is often the starting point for gathering this information.
Initiation:
Scammers use social media platforms like Facebook, LinkedIn, and dating apps to establish initial contact with their victims. They trace the victim’s online footprint and create a connection, often shifting the conversation from public platforms to private ones like WhatsApp. As communication progresses, the tone of messages changes from professional to friendly and eventually to romantic, marking a significant escalation in the scammer’s approach.
Takeaway #3: Verify Before You Trust
Gaining the trust: Takeaway #4: Flattery is the Oldest Trap
Scammers build trust with their victims through flattery, regular chats, and video calls, giving them unnecessary attention and care. They exchange photos, which are later used as leverage to threaten the victim if they try to expose the scammer. The scammer coerces the victim by threatening to damage their public image or spread defamatory content.
🚨 Enterprise Alert: A sudden behavioral shift in an employee — secrecy, emotional distraction, or odd online behavior — may hint at psychological compromise.
Exploitation:
In the final stage of the scam, the scammer reveals their true intentions and asks the victim for confidential data, such as project details or passwords to encrypted workplace domains. This stolen information can pose a serious threat to national security and is often sold on the black market, leading to further exploitation and deeper security breaches.
Threat to defamation:Takeaway #5: Silence Helps the Scammer
If the victim tries to expose the scam, the scammer misuses private data like photos, chats, and recordings to threaten public defamation. This threat coerces the victim into silence, preventing them from reporting the crime due to fear of reputational damage.
Enterprise Tip: Conduct employee awareness sessions focused on psychological manipulation and emotional engineering.
Psychological Manipulation
Takeaway #6: Cybersecurity is Emotional, Not Just Technical
Love Bombing: intense attention and flattering messages.
Induction of Fear: Threathen to leak the private images / chats unless the confidential data is presented .
Takeaway #7: Real Love Doesn’t Ask for Passwords
Guilt-tripping: Push the victim into a state of guilt using expressions such as “ Dont you trust me anymore?”
Takeaway #8: The ‘Urgency’ Card Is a Red Flag
Urgency: The urgent need of money is presented to gain the sympathy of the victim
Isolation: Preventing the victim from being in contact with others and thus maintaining the identity of the scammer , not exposed.
Risk to Corporate and National Security
Takeaway #9: Corporate Security Starts With Personal Awareness
These scams can lead to severe consequences, including insider threats where employees leak confidential data, espionage by state-sponsored actors targeting government officials, and intellectual property loss that can compromise national security. Additionally, exposure of scandalous content can result in reputation damage, tarnishing brands and causing long-lasting harm.
Detection: Takeaway #10: Watch the Behavioral Shift
Suspicious behaviors include a sudden shift from a friendly to romantic tone, refusal to real-time video calls, controlling communication terms, sharing personal life details to evoke pity, and requesting huge financial support – all potential warning signs of a scam.
Prevention
Protect yourself by avoiding sharing personal info, verifying profile photos via reverse image search, and refraining from sending money or explicit content. Also, be cautious with unknown links and files, and enforce zero-trust access control.
Legal Horizon
Honey traps can lead to serious offenses like extortion, privacy violation, and transmission of obscene material. Victims can report such cases to cybercrime cells for action.
Proof in Action
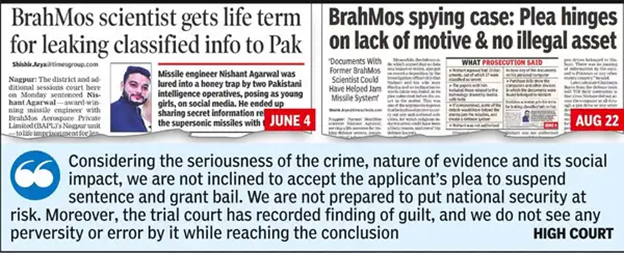
1. Indian Army Honey Trap Case (2023)
A 2023 case involved an Army Jawan arrested for leaking sensitive military information to a Pakistani intelligence operative posing as a woman on Facebook. The jawan was lured through romantic conversations and later blackmailed. Such incidents highlight the threat of honey traps to national security.
2. DRDO Scientist Arrested (2023)
Similarly, a senior DRDO scientist was honey-trapped by a foreign spy posing as a woman, leading to the sharing of classified defense research material. The interaction occurred via WhatsApp and social media, highlighting the risks of online espionage.
3. Pakistan ISI Honey Traps in Indian Navy (2019–2022)
Indian Navy personnel were arrested for being honey-trapped by ISI agents using fake female profiles on Facebook and WhatsApp. The agents gathered sensitive naval movement data through romantic exchanges.
Conclusion
Honey traps prey on emotions, not just systems. Stay vigilant and protect yourself from emotional manipulation. Real love doesn’t ask for passwords. Be cautious of strangers online and keep personal info private. Awareness is key to staying safe. Lock down your digital life.
Learn how to zip and unzip compressed files with C#. Beware: it’s not as obvious as it might seem!
Table of Contents
Just a second! 🫷 If you are here, it means that you are a software developer.
So, you know that storage, networking, and domain management have a cost .
If you want to support this blog, please ensure that you have disabled the adblocker for this site. I configured Google AdSense to show as few ADS as possible – I don’t want to bother you with lots of ads, but I still need to add some to pay for the resources for my site.
Thank you for your understanding. – Davide
When working with local files, you might need to open, create, or update Zip files.
In this article, we will learn how to work with Zip files in C#. We will learn how to perform basic operations such as opening, extracting, and creating a Zip file.
The main class we will use is named ZipFile, and comes from the System.IO.Compression namespace. It’s been present in C# since .NET Framework 4.5, so we can say it’s pretty stable 😉 Nevertheless, there are some tricky points that you need to know before using this class. Let’s learn!
Using C# to list all items in a Zip file
Once you have a Zip file, you can access the internal items without extracting the whole Zip.
You can use the ZipFile.Open method.
using ZipArchive archive = ZipFile.Open(zipFilePath, ZipArchiveMode.Read);
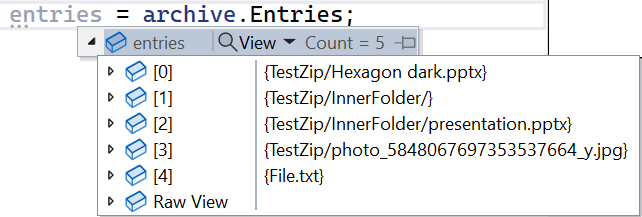
System.Collections.ObjectModel.ReadOnlyCollection<ZipArchiveEntry> entries = archive.Entries;
Notice that I specified the ZipArchiveMode. This is an Enum whose values are Read, Create, and Update.
Using the Entries property of the ZipArchive, you can access the whole list of files stored within the Zip folder, each represented by a ZipArchiveEntry instance.
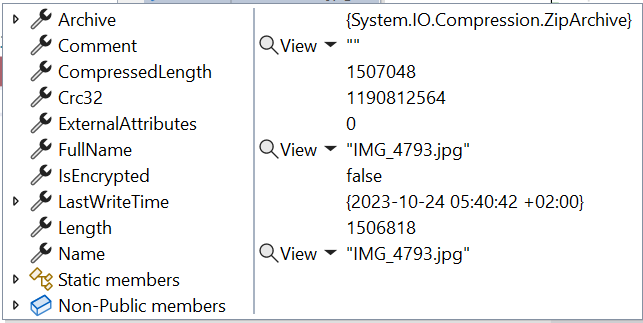
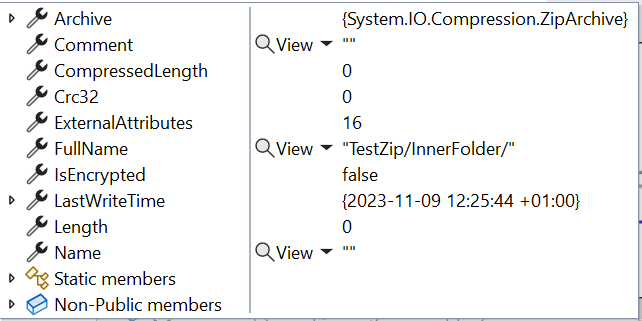
The ZipArchiveEntry object contains several fields, like the file’s name and the full path from the root archive.
There are a few key points to remember about the entries listed in the ZipArchiveEntry.
It is a ReadOnlyCollection<ZipArchiveEntry>: it means that even if you find a way to add or update the items in memory, the changes are not applied to the actual files;
It lists all files and folders, not only those at the root level. As you can see from the image above, it lists both the files at the root level, like File.txt, and those in inner folders, such as TestZip/InnerFolder/presentation.pptx;
Each file is characterized by two similar but different properties: Name is the actual file name (like presentation.pptx), while FullName contains the path from the root of the archive (e.g. TestZip/InnerFolder/presentation.pptx);
It lists folders as if they were files: in the image above, you can see TestZip/InnerFolder. You can recognize them because their Name property is empty and their Length is 0;
Lastly, remember that ZipFile.Open returns an IDisposable, so you should place the operations within a using statement.
❓❓A question for you! Why do we see an item for the TestZip/InnerFolder folder, but there is no reference to the TestZip folder? Drop a comment below 📩
Extracting a Zip folder is easy but not obvious.
We have only one way to do that: by calling the ZipFile.ExtractToDirectory method.
It accepts as mandatory parameters the path of the Zip file to be extracted and the path to the destination:
var zipPath = @"C:\Users\d.bellone\Desktop\TestZip.zip";
var destinationPath = @"C:\Users\d.bellone\Desktop\MyDestination";
ZipFile.ExtractToDirectory(zipPath, destinationPath);
Once you run it, you will see the content of the Zip copied and extracted to the MyDestination folder.
Note that this method creates the destination folder if it does not exist.
This method accepts two more parameters:
entryNameEncoding, by which you can specify the encoding. The default value is UTF-8.
overwriteFiles allows you to specify whether it must overwrite existing files. The default value is false. If set to false and the destination files already exist, this method throws a System.IO.IOException saying that the file already exists.
Using C# to create a Zip from a folder
The key method here is ZipFile.CreateFromDirectory, which allows you to create Zip files in a flexible way.
The first mandatory value is, of course, the source directory path.
The second mandatory parameter is the destination of the resulting Zip file.
Or it can be a Stream that you can use later for other operations:
using (MemoryStream memStream = new MemoryStream())
{
string sourceFolderPath = @"\Desktop\myFolder";
ZipFile.CreateFromDirectory(sourceFolderPath, memStream);
var lenght = memStream.Length;// here the Stream is populated}
You can finally add some optional parameters:
compressionLevel, whose values are Optimal, Fastest, NoCompression, SmallestSize.
includeBaseDirectory: a flag that defines if you have to copy only the first-level files or also the root folder.
A quick comparison of the four Compression Levels
As we just saw, we have four compression levels: Optimal, Fastest, NoCompression, and SmallestSize.
What happens if I use the different values to zip all the photos and videos of my latest trip?
Fastest compression generates a smaller file than Smallest compression.
Fastest compression is way slower than Smallest compression.
Optimal lies in the middle.
This is to say: don’t trust the names; remember to benchmark the parts where you need performance, even with a test as simple as this.
Wrapping up
This was a quick article about one specific class in the .NET ecosystem.
As we saw, even though the class is simple and it’s all about three methods, there are some things you should keep in mind before using this class in your code.
I hope you enjoyed this article! Let’s keep in touch on Twitter or LinkedIn! 🤜🤛
Hey! Jorge Toloza again, Co-Founder and Creative Director at DDS Studio. In this tutorial, we’re going to build a visually rich, infinitely scrolling grid where images move with a parallax effect based on scroll and drag interactions.
We’ll use GSAP for buttery-smooth animations, add a sprinkle of math to achieve infinite tiling, and bring it all together with dynamic visibility animations and a staggered intro reveal.
Let’s get started!
Setting Up the HTML Container
To start, we only need a single container to hold all the tiled image elements. Since we’ll be generating and positioning each tile dynamically with JavaScript, there’s no need for any static markup inside. This keeps our HTML clean and scalable as we duplicate tiles for infinite scrolling.
<div id="images"></div>
Basic Styling for the Grid Items
Now that we have our container, let’s give it the foundational styles it needs to hold and animate a large set of tiles.
We’ll use absolute positioning for each tile so we can freely place them anywhere in the grid. The outer container (#images) is set to relative so that all child .item elements are positioned correctly inside it. Each image fills its tile, and we’ll use will-change: transform to optimize animation performance.
To control the visual layout of our grid, we’ll use design data exported directly from Figma. This gives us pixel-perfect placement while keeping layout logic separate from our code.
I created a quick layout in Figma using rectangles to represent tile positions and dimensions. Then I exported that data into a JSON file, giving us a simple array of objects containing x, y, w, and h values for each tile.
With the layout data defined, the next step is to dynamically generate our tile grid in the DOM and enable it to scroll infinitely in both directions.
This involves three main steps:
Compute the scaled tile dimensions based on the viewport and the original Figma layout’s aspect ratio.
Duplicate the grid in both the X and Y axes so that as one tile set moves out of view, another seamlessly takes its place.
Store metadata for each tile, such as its original position and a random easing value, which we’ll use to vary the parallax animation slightly for a more organic effect.
The infinite scroll illusion is achieved by duplicating the entire tile set horizontally and vertically. This 2×2 tiling approach ensures there’s always a full set of tiles ready to slide into view as the user scrolls or drags.
onResize() {
  // Get current viewport dimensions
  this.winW = window.innerWidth;
  this.winH = window.innerHeight;

  // Scale tile size to match viewport width while keeping original aspect ratio
  this.tileSize = {
    w: this.winW,
    h: this.winW * (this.originalSize.h / this.originalSize.w),
  };

  // Reset scroll state
  this.scroll.current = { x: 0, y: 0 };
  this.scroll.target = { x: 0, y: 0 };
  this.scroll.last = { x: 0, y: 0 };

  // Clear existing tiles from container
  this.$container.innerHTML = '';

  // Scale item positions and sizes based on new tile size
  const baseItems = this.data.map((d, i) => {
    const scaleX = this.tileSize.w / this.originalSize.w;
    const scaleY = this.tileSize.h / this.originalSize.h;
    const source = this.sources[i % this.sources.length];
    return {
      src: source.src,
      caption: source.caption,
      x: d.x * scaleX,
      y: d.y * scaleY,
      w: d.w * scaleX,
      h: d.h * scaleY,
    };
  });

  this.items = [];

  // Offsets to duplicate the grid in X and Y for seamless looping (2x2 tiling)
  const repsX = [0, this.tileSize.w];
  const repsY = [0, this.tileSize.h];

  baseItems.forEach((base) => {
    repsX.forEach((offsetX) => {
      repsY.forEach((offsetY) => {
        // Create item DOM structure
        const el = document.createElement('div');
        el.classList.add('item');
        el.style.width = `${base.w}px`;

        const wrapper = document.createElement('div');
        wrapper.classList.add('item-wrapper');
        el.appendChild(wrapper);

        const itemImage = document.createElement('div');
        itemImage.classList.add('item-image');
        itemImage.style.width = `${base.w}px`;
        itemImage.style.height = `${base.h}px`;
        wrapper.appendChild(itemImage);

        const img = new Image();
        img.src = `./img/${base.src}`;
        itemImage.appendChild(img);

        const caption = document.createElement('small');
        caption.innerHTML = base.caption;

        // Split caption into lines for staggered animation
        const split = new SplitText(caption, {
          type: 'lines',
          mask: 'lines',
          linesClass: 'line'
        });
        split.lines.forEach((line, i) => {
          line.style.transitionDelay = `${i * 0.15}s`;
          line.parentElement.style.transitionDelay = `${i * 0.15}s`;
        });

        wrapper.appendChild(caption);
        this.$container.appendChild(el);

        // Observe caption visibility for animation triggering
        this.observer.observe(caption);

        // Store item metadata including offset, easing, and bounding box
        this.items.push({
          el,
          container: itemImage,
          wrapper,
          img,
          x: base.x + offsetX,
          y: base.y + offsetY,
          w: base.w,
          h: base.h,
          extraX: 0,
          extraY: 0,
          rect: el.getBoundingClientRect(),
          ease: Math.random() * 0.5 + 0.5, // Random parallax easing for organic movement
        });
      });
    });
  });

  // Double the tile area to account for 2x2 duplication
  this.tileSize.w *= 2;
  this.tileSize.h *= 2;

  // Set initial scroll position slightly off-center for visual balance
  this.scroll.current.x = this.scroll.target.x = this.scroll.last.x = -this.winW * 0.1;
  this.scroll.current.y = this.scroll.target.y = this.scroll.last.y = -this.winH * 0.1;
}
Key Concepts
Scaling the layout ensures that your Figma-defined design adapts to any screen size without distortion.
2×2 duplication ensures seamless continuity when the user scrolls in any direction.
Random easing values create slight variation in tile movement, making the parallax effect feel more natural.
extraX and extraY values will later be used to shift tiles back into view once they scroll offscreen.
SplitText animation is used to break each caption (<small>) into individual lines, enabling line-by-line animation.
Adding Interactive Scroll and Drag Events
To bring the infinite grid to life, we need to connect it to user input. This includes:
Scrolling with the mouse wheel or trackpad
Dragging with a pointer (mouse or touch)
Smooth motion between input updates using linear interpolation (lerp)
Rather than instantly snapping to new positions, we interpolate between the current and target scroll values, which creates fluid, natural transitions.
Scroll and Drag Tracking
We capture two types of user interaction:
1) Wheel Events Wheel input updates a target scroll position. We multiply the deltas by a damping factor to control sensitivity.
In the render loop, we interpolate between the current and target scroll values using a lerp function. This creates smooth, decaying motion rather than abrupt changes.
The scroll.ease value controls how fast the scroll position catches up to the target—smaller values result in slower, smoother motion.
Animating Item Visibility with IntersectionObserver
To enhance the visual hierarchy and focus, we’ll highlight only the tiles that are currently within the viewport. This creates a dynamic effect where captions appear and styling changes as tiles enter view.
We’ll use the IntersectionObserver API to detect when each tile becomes visible and toggle a CSS class accordingly.
this.observer = new IntersectionObserver(entries => {
  entries.forEach(entry => {
    entry.target.classList.toggle('visible', entry.isIntersecting);
  });
});
// …and after appending each wrapper:
this.observer.observe(wrapper);
Creating an Intro Animation with GSAP
To finish the experience with a strong visual entry, we’ll animate all currently visible tiles from the center of the screen into their natural grid positions. This creates a polished, attention-grabbing introduction and adds a sense of depth and intentionality to the layout.
We’ll use GSAP for this animation, utilizing gsap.set() to position elements instantly, and gsap.to() with staggered timing to animate them into place.
Selecting Visible Tiles for Animation
First, we filter all tile elements to include only those currently visible in the viewport. This avoids animating offscreen elements and keeps the intro lightweight and focused:
x: 0, y: 0 restores the original position set via CSS transforms.
expo.inOut provides a dramatic but smooth easing curve.
stagger creates a cascading effect, enhancing visual rhythm
Wrapping Up
What we’ve built is a scrollable, draggable image grid with a parallax effect, visibility animations, and a smooth GSAP-powered intro. It’s a flexible base you can adapt for creative galleries, interactive backgrounds, or experimental interfaces.
Just a second! 🫷 If you are here, it means that you are a software developer.
So, you know that storage, networking, and domain management have a cost .
If you want to support this blog, please ensure that you have disabled the adblocker for this site. I configured Google AdSense to show as few ADS as possible – I don’t want to bother you with lots of ads, but I still need to add some to pay for the resources for my site.
Thank you for your understanding. – Davide
Asynchronous programming enables you to execute multiple operations without blocking the main thread.
In general, we often think of the Happy Scenario, when all the operations go smoothly, but we rarely consider what to do when an error occurs.
In this article, we will explore how Task.WaitAll and Task.WhenAll behave when an error is thrown in one of the awaited Tasks.
Prepare the tasks to be executed
For the sake of this article, we are going to use a silly method that returns the same number passed in input but throws an exception in case the input number can be divided by 3:
public Task<int> Echo(intvalue) => Task.Factory.StartNew(
() =>
{
if (value % 3 == 0)
{
Console.WriteLine($"[LOG] You cannot use {value}!");
thrownew Exception($"[EXCEPTION] Value cannot be {value}");
}
Console.WriteLine($"[LOG] {value} is a valid value!");
returnvalue;
}
);
Those Console.WriteLine instructions will allow us to see what’s happening “live”.
We prepare the collection of tasks to be awaited by using a simple Enumerable.Range
var tasks = Enumerable.Range(1, 11).Select(Echo);
And then, we use a try-catch block with some logs to showcase what happens when we run the application.
try{
Console.WriteLine("START");
// await all the tasks Console.WriteLine("END");
}
catch (Exception ex)
{
Console.WriteLine("The exception message is: {0}", ex.Message);
Console.WriteLine("The exception type is: {0}", ex.GetType().FullName);
if (ex.InnerException is not null)
{
Console.WriteLine("Inner exception: {0}", ex.InnerException.Message);
}
}
finally{
Console.WriteLine("FINALLY!");
}
If we run it all together, we can notice that nothing really happened:
In fact, we just created a collection of tasks (which does not actually exist, since the result is stored in a lazy-loaded enumeration).
We can, then, call WaitAll and WhenAll to see what happens when an error occurs.
Error handling when using Task.WaitAll
It’s time to execute the tasks stored in the tasks collection, like this:
try{
Console.WriteLine("START");
// await all the tasks Task.WaitAll(tasks.ToArray());
Console.WriteLine("END");
}
Task.WaitAll accepts an array of tasks to be awaited and does not return anything.
The execution goes like this:
START
1 is a valid value!
2 is a valid value!
:(  You cannot use 6!
5 is a valid value!
:(  You cannot use 3!
4 is a valid value!
8 is a valid value!
10 is a valid value!
:(  You cannot use 9!
7 is a valid value!
11 is a valid value!
The exception message is: One or more errors occurred. ([EXCEPTION] Value cannot be 3) ([EXCEPTION] Value cannot be 6) ([EXCEPTION] Value cannot be 9)
The exception type is: System.AggregateException
Inner exception: [EXCEPTION] Value cannot be 3
FINALLY!
There are a few things to notice:
the tasks are not executed in sequence: for example, 6 was printed before 4. Well, to be honest, we can say that Console.WriteLine printed the messages in that sequence, but maybe the tasks were executed in another different order (as you can deduce from the order of the error messages);
all the tasks are executed before jumping to the catch block;
the exception caught in the catch block is of type System.AggregateException; we’ll come back to it later;
the InnerException property of the exception being caught contains the info for the first exception that was thrown.
There are two main differences to notice when comparing Task.WaitAll and Task.WhenAll:
Task.WhenAll accepts in input whatever type of collection (as long as it is an IEnumerable);
it returns a Task that you have to await.
And what happens when we run the program?
START
2 is a valid value!
1 is a valid value!
4 is a valid value!
:(  You cannot use 3!
7 is a valid value!
5 is a valid value!
:(  You cannot use 6!
8 is a valid value!
10 is a valid value!
11 is a valid value!
:(  You cannot use 9!
The exception message is: [EXCEPTION] Value cannot be 3
The exception type is: System.Exception
FINALLY!
Again, there are a few things to notice:
just as before, the messages are not printed in order;
the exception message contains the message for the first exception thrown;
the exception is of type System.Exception, and not System.AggregateException as we saw before.
This means that the first exception breaks everything, and you lose the info about the other exceptions that were thrown.
📩 but now, a question for you: we learned that, when using Task.WhenAll, only the first exception gets caught by the catch block. What happens to the other exceptions? How can we retrieve them? Drop a message in the comment below ⬇️
Comparing Task.WaitAll and Task.WhenAll
Task.WaitAll and Task.WhenAll are similar but not identical.
Task.WaitAll should be used when you are in a synchronous context and need to block the current thread until all tasks are complete. This is common in simple old-style console applications or scenarios where asynchronous programming is not required. However, it is not recommended in UI or modern ASP.NET applications because it can cause deadlocks or freeze the UI.
Task.WhenAll is preferred in modern C# code, especially in asynchronous methods (where you can use async Task). It allows you to await the completion of multiple tasks without blocking the calling thread, making it suitable for environments where responsiveness is important. It also enables easier composition of continuations and better exception handling.
Let’s wrap it up in a table:
Feature
Task.WaitAll
Task.WhenAll
Return Type
void
Task or Task<TResult[]>
Blocking/Non-blocking
Blocking (waits synchronously)
Non-blocking (returns a Task)
Exception Handling
Throws AggregateException immediately
Exceptions observed when awaited
Usage Context
Synchronous code (e.g., console apps)
Asynchronous code (e.g., async methods)
Continuation
Not possible (since it blocks)
Possible (use .ContinueWith or await)
Deadlock Risk
Higher in UI contexts
Lower (if properly awaited)
Bonus tip: get the best out of AggregateException
We can expand a bit on the AggregateException type.
That specific type of exception acts as a container for all the exceptions thrown when using Task.WaitAll.
It contains a property named InnerExceptions that contains all the exceptions thrown so that you can access them using an Enumerator.
A common example is this:
if (ex is AggregateException aggEx)
{
    Console.WriteLine("There are {0} exceptions in the aggregate exception.", aggEx.InnerExceptions.Count);
    foreach (var innerEx in aggEx.InnerExceptions)
    {
        Console.WriteLine("Inner exception: {0}", innerEx.Message);
    }
}
Further readings
This article is all about handling the unhappy path.
If you want to learn more about Task.WaitAll and Task.WhenAll, I’d suggest you read the following two articles that I find totally interesting and well-written:
Small changes sometimes make a huge difference. Learn these 6 tips to improve the performance of your application just by handling strings correctly.
Table of Contents
Just a second! 🫷 If you are here, it means that you are a software developer.
So, you know that storage, networking, and domain management have a cost .
If you want to support this blog, please ensure that you have disabled the adblocker for this site. I configured Google AdSense to show as few ADS as possible – I don’t want to bother you with lots of ads, but I still need to add some to pay for the resources for my site.
Thank you for your understanding. – Davide
Sometimes, just a minor change makes a huge difference. Maybe you won’t notice it when performing the same operation a few times. Still, the improvement is significant when repeating the operation thousands of times.
In this article, we will learn five simple tricks to improve the performance of your application when dealing with strings.
Note: this article is part of C# Advent Calendar 2023, organized by Matthew D. Groves: it’s maybe the only Christmas tradition I like (yes, I’m kind of a Grinch 😂).
Benchmark structure, with dependencies
Before jumping to the benchmarks, I want to spend a few words on the tools I used for this article.
The project is a .NET 8 class library running on a laptop with an i5 processor.
Running benchmarks with BenchmarkDotNet
I’m using BenchmarkDotNet to create benchmarks for my code. BenchmarkDotNet is a library that runs your methods several times, captures some metrics, and generates a report of the executions. If you follow my blog, you might know I’ve used it several times – for example, in my old article “Enum.HasFlag performance with BenchmarkDotNet”.
All the benchmarks I created follow the same structure:
the class is marked with the [MemoryDiagnoser] attribute: the benchmark will retrieve info for both time and memory usage;
there is a property named Size with the attribute [Params]: this attribute lists the possible values for the Size property;
there is a method marked as [IterationSetup]: this method runs before every single execution, takes the value from the Size property, and initializes the AllStrings array;
the methods that are parts of the benchmark are marked with the [Benchmark] attribute.
Generating strings with Bogus
I relied on Bogus to create dummy values. This NuGet library allows you to generate realistic values for your objects with a great level of customization.
The string array generation strategy is shared across all the benchmarks, so I moved it to a static method:
Here I have a default set of predefined values ([string.Empty, " ", "\n \t", null]), which can be expanded with the values coming from the additionalStrings array. These values are then placed in random positions of the array.
In most cases, though, the value of the string is defined by Bogus.
Generating plots with chartbenchmark.net
To generate the plots you will see in this article, I relied on chartbenchmark.net, a fantastic tool that transforms the output generated by BenchmarkDotNet on the console in a dynamic, customizable plot. This tool created by Carlos Villegas is available on GitHub, and it surely deserves a star!
Please note that all the plots in this article have a Log10 scale: this scale allows me to show you the performance values of all the executions in the same plot. If I used the Linear scale, you would be able to see only the biggest values.
We are ready. It’s time to run some benchmarks!
Tip #1: StringBuilder is (almost always) better than String Concatenation
Let’s start with a simple trick: if you need to concatenate strings, using a StringBuilder is generally more efficient than concatenating string.
Whenever you concatenate strings with the + sign, you create a new instance of a string. This operation takes some time and allocates memory for every operation.
On the contrary, using a StringBuilder object, you can add the strings in memory and generate the final string using a performance-wise method.
Here’s the result table:
Method
Size
Mean
Error
StdDev
Median
Ratio
RatioSD
Allocated
Alloc Ratio
WithStringBuilder
4
4.891 us
0.5568 us
1.607 us
4.750 us
1.00
0.00
1016 B
1.00
WithConcatenation
4
3.130 us
0.4517 us
1.318 us
2.800 us
0.72
0.39
776 B
0.76
WithStringBuilder
100
7.649 us
0.6596 us
1.924 us
7.650 us
1.00
0.00
4376 B
1.00
WithConcatenation
100
13.804 us
1.1970 us
3.473 us
13.800 us
1.96
0.82
51192 B
11.70
WithStringBuilder
10000
113.091 us
4.2106 us
12.081 us
111.000 us
1.00
0.00
217200 B
1.00
WithConcatenation
10000
74,512.259 us
2,111.4213 us
6,058.064 us
72,593.050 us
666.43
91.44
466990336 B
2,150.05
WithStringBuilder
100000
1,037.523 us
37.1009 us
108.225 us
1,012.350 us
1.00
0.00
2052376 B
1.00
WithConcatenation
100000
7,469,344.914 us
69,720.9843 us
61,805.837 us
7,465,779.900 us
7,335.08
787.44
46925872520 B
22,864.17
Let’s see it as a plot.
Beware of the scale in the diagram!: it’s a Log10 scale, so you’d better have a look at the value displayed on the Y-axis.
As you can see, there is a considerable performance improvement.
There are some remarkable points:
When there are just a few strings to concatenate, the + operator is more performant, both on timing and allocated memory;
When you need to concatenate 100000 strings, the concatenation is ~7000 times slower than the string builder.
In conclusion, use the StringBuilder to concatenate more than 5 or 6 strings. Use the string concatenation for smaller operations.
Edit 2024-01-08: turn out that string.Concat has an overload that accepts an array of strings. string.Concat(string[]) is actually faster than using the StringBuilder. Read more this article by Robin Choffardet.
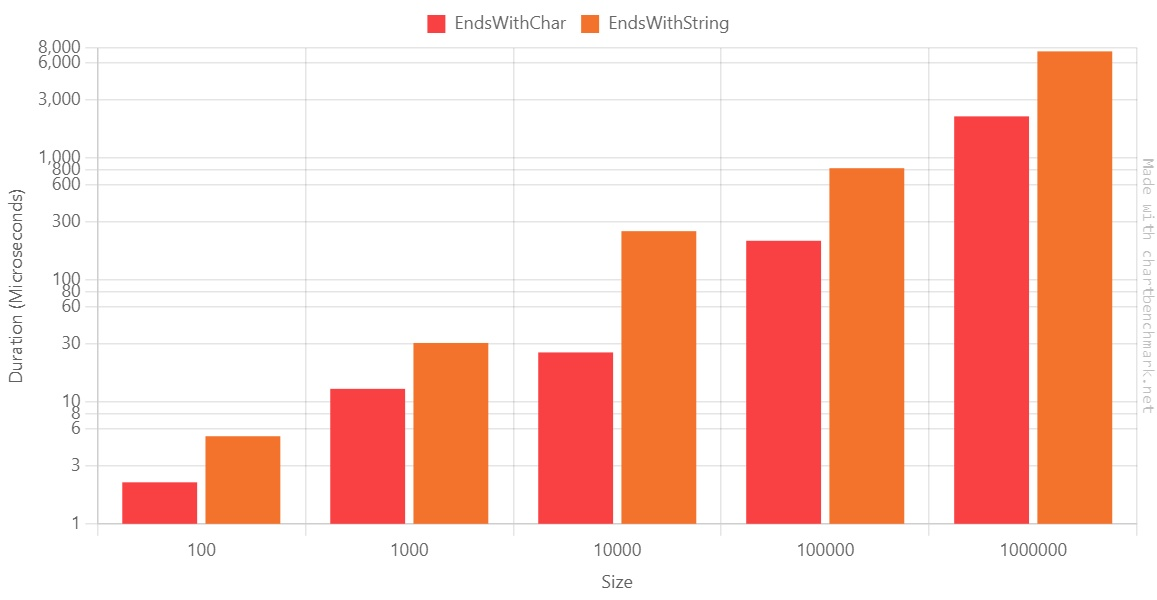
Tip #2: EndsWith(string) vs EndsWith(char): pick the right overload
One simple improvement can be made if you use StartsWith or EndsWith, passing a single character.
There are two similar overloads: one that accepts a string, and one that accepts a char.
Again, let’s generate the plot using the Log10 scale:
They appear to be almost identical, but look closely: based on this benchmark, when we have 10000, using EndsWith(string) is 10x slower than EndsWith(char).
Also, here, the duration ratio on the 1.000.000-items array is ~3.5. At first, I thought there was an error on the benchmark, but when rerunning it on the benchmark, the ratio did not change.
It looks like you have the best improvement ratio when the array has ~10.000 items.
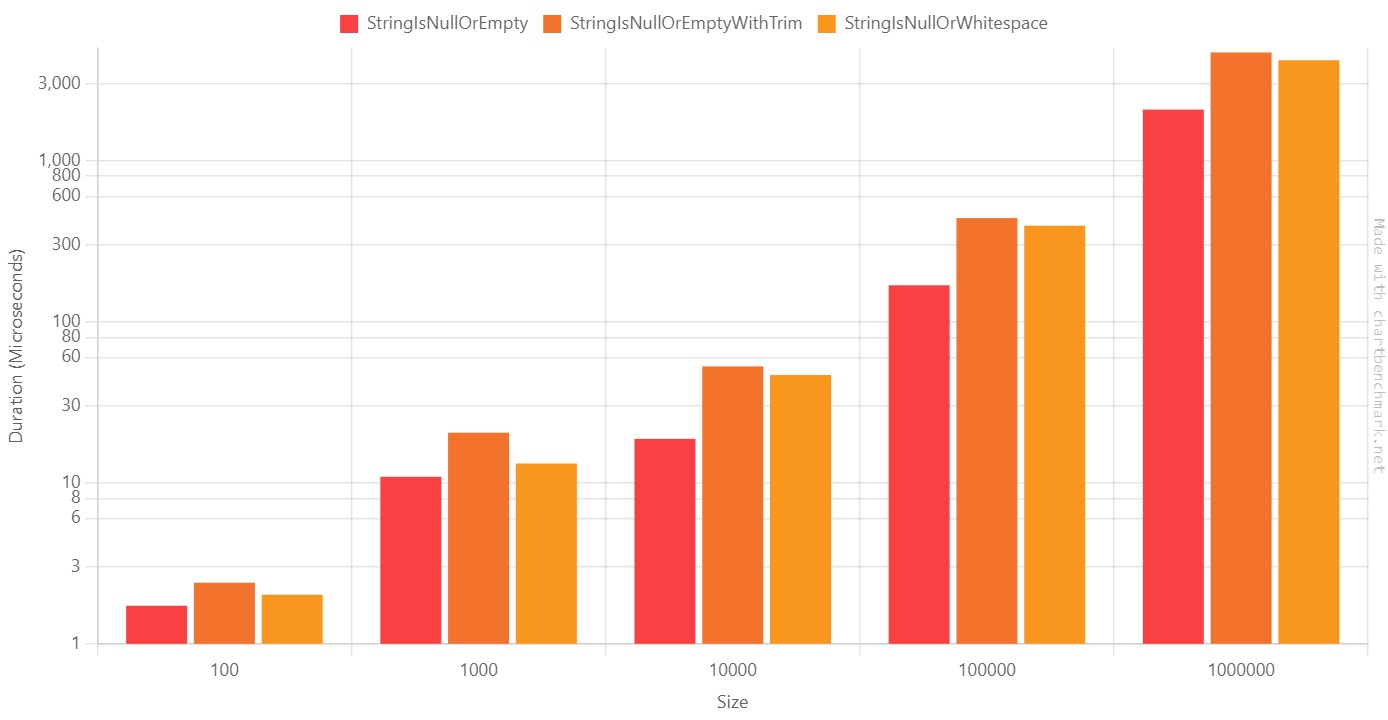
Tip #3: IsNullOrEmpty vs IsNullOrWhitespace vs IsNullOrEmpty + Trim
As you might know, string.IsNullOrWhiteSpace performs stricter checks than string.IsNullOrEmpty.
To demonstrate it, I have created three benchmarks: one for string.IsNullOrEmpty, one for string.IsNullOrWhiteSpace, and another one that lays in between: it first calls Trim() on the string, and then calls string.IsNullOrEmpty.
As you can see from the Log10 table, the results are pretty similar:
On average, StringIsNullOrWhitespace is ~2 times slower than StringIsNullOrEmpty.
So, what should we do? Here’s my two cents:
For all the data coming from the outside (passed as input to your system, received from an API call, read from the database), use string.IsNUllOrWhiteSpace: this way you can ensure that you are not receiving unexpected data;
If you read data from an external API, customize your JSON deserializer to convert whitespace strings as empty values;
Needless to say, choose the proper method depending on the use case. If a string like “\n \n \t” is a valid value for you, use string.IsNullOrEmpty.
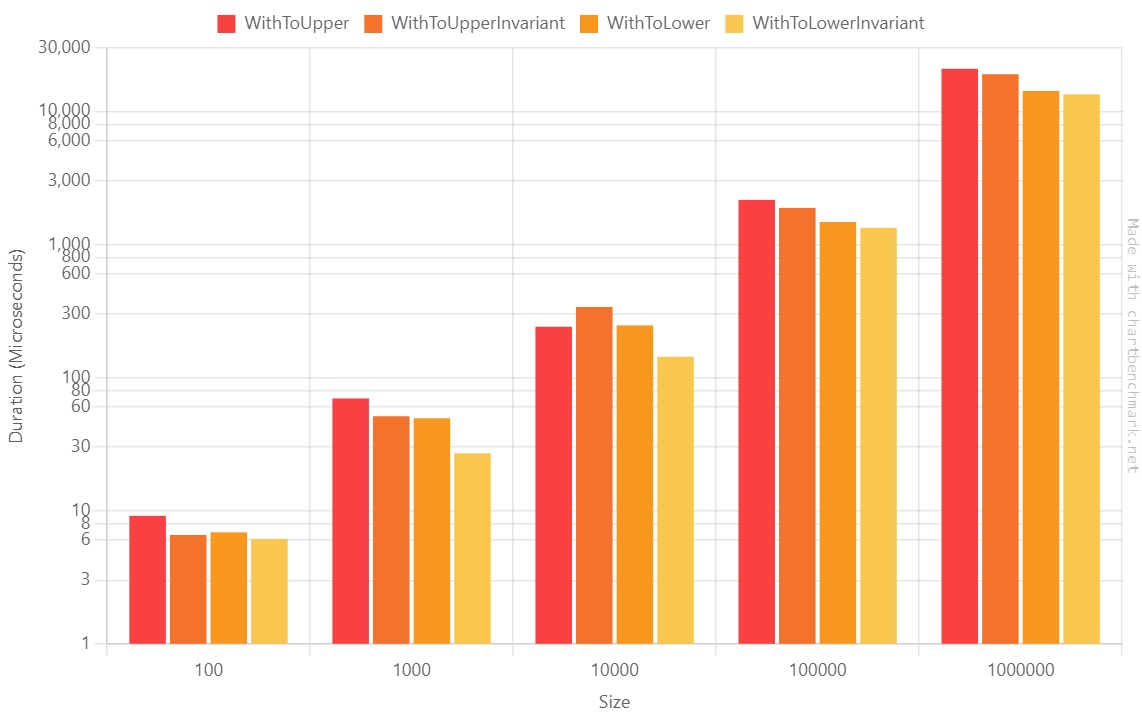
Tip #4: ToUpper vs ToUpperInvariant vs ToLower vs ToLowerInvariant: they look similar, but they are not
Even though they look similar, there is a difference in terms of performance between these four methods.
[MemoryDiagnoser]publicclassToUpperVsToLower()
{
[Params(100, 1000, 10_000, 100_000, 1_000_000)]publicint Size;
publicstring[] AllStrings { get; set; }
[IterationSetup]publicvoid Setup()
{
AllStrings = StringArrayGenerator.Generate(Size);
}
[Benchmark]publicvoid WithToUpper()
{
foreach (string s in AllStrings)
{
_ = s?.ToUpper();
}
}
[Benchmark]publicvoid WithToUpperInvariant()
{
foreach (string s in AllStrings)
{
_ = s?.ToUpperInvariant();
}
}
[Benchmark]publicvoid WithToLower()
{
foreach (string s in AllStrings)
{
_ = s?.ToLower();
}
}
[Benchmark]publicvoid WithToLowerInvariant()
{
foreach (string s in AllStrings)
{
_ = s?.ToLowerInvariant();
}
}
}
What will this benchmark generate?
Method
Size
Mean
Error
StdDev
Median
P95
Ratio
WithToUpper
100
9.153 us
0.9720 us
2.789 us
8.200 us
14.980 us
1.57
WithToUpperInvariant
100
6.572 us
0.5650 us
1.639 us
6.200 us
9.400 us
1.14
WithToLower
100
6.881 us
0.5076 us
1.489 us
7.100 us
9.220 us
1.19
WithToLowerInvariant
100
6.143 us
0.5212 us
1.529 us
6.100 us
8.400 us
1.00
WithToUpper
1000
69.776 us
9.5416 us
27.833 us
68.650 us
108.815 us
2.60
WithToUpperInvariant
1000
51.284 us
7.7945 us
22.860 us
38.700 us
89.290 us
1.85
WithToLower
1000
49.520 us
5.6085 us
16.449 us
48.100 us
79.110 us
1.85
WithToLowerInvariant
1000
27.000 us
0.7370 us
2.103 us
26.850 us
30.375 us
1.00
WithToUpper
10000
241.221 us
4.0480 us
3.588 us
240.900 us
246.560 us
1.68
WithToUpperInvariant
10000
339.370 us
42.4036 us
125.028 us
381.950 us
594.760 us
1.48
WithToLower
10000
246.861 us
15.7924 us
45.565 us
257.250 us
302.875 us
1.12
WithToLowerInvariant
10000
143.529 us
2.1542 us
1.910 us
143.500 us
146.105 us
1.00
WithToUpper
100000
2,165.838 us
84.7013 us
223.137 us
2,118.900 us
2,875.800 us
1.66
WithToUpperInvariant
100000
1,885.329 us
36.8408 us
63.548 us
1,894.500 us
1,967.020 us
1.41
WithToLower
100000
1,478.696 us
23.7192 us
50.547 us
1,472.100 us
1,571.330 us
1.10
WithToLowerInvariant
100000
1,335.950 us
18.2716 us
35.203 us
1,330.100 us
1,404.175 us
1.00
WithToUpper
1000000
20,936.247 us
414.7538 us
1,163.014 us
20,905.150 us
22,928.350 us
1.64
WithToUpperInvariant
1000000
19,056.983 us
368.7473 us
287.894 us
19,085.400 us
19,422.880 us
1.41
WithToLower
1000000
14,266.714 us
204.2906 us
181.098 us
14,236.500 us
14,593.035 us
1.06
WithToLowerInvariant
1000000
13,464.127 us
266.7547 us
327.599 us
13,511.450 us
13,926.495 us
1.00
Let’s see it as the usual Log10 plot:
We can notice a few points:
The ToUpper family is generally slower than the ToLower family;
The Invariant family is faster than the non-Invariant one; we will see more below;
So, if you have to normalize strings using the same casing, ToLowerInvariant is the best choice.
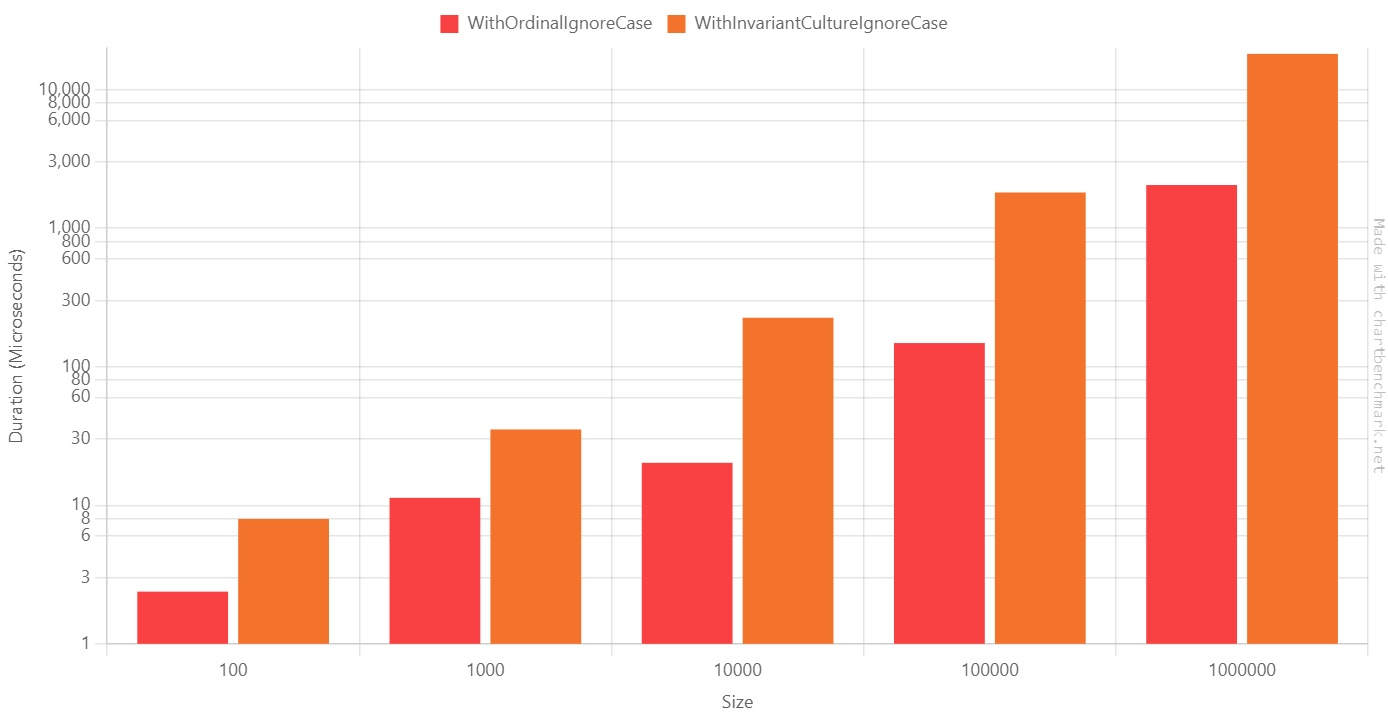
Tip #5: OrdinalIgnoreCase vs InvariantCultureIgnoreCase: logically (almost) equivalent, but with different performance
Comparing strings is trivial: the string.Compare method is all you need.
There are several modes to compare strings: you can specify the comparison rules by setting the comparisonType parameter, which accepts a StringComparison value.
As you can see, there’s a HUGE difference between Ordinal and Invariant.
When dealing with 100.000 items, StringComparison.InvariantCultureIgnoreCase is 12 times slower than StringComparison.OrdinalIgnoreCase!
Why? Also, why should we use one instead of the other?
Have a look at this code snippet:
var s1 = "Aa";
var s2 = "A" + newstring('\u0000', 3) + "a";
string.Equals(s1, s2, StringComparison.InvariantCultureIgnoreCase); //Truestring.Equals(s1, s2, StringComparison.OrdinalIgnoreCase); //False
As you can see, s1 and s2 represent equivalent, but not equal, strings. We can then deduce that OrdinalIgnoreCase checks for the exact values of the characters, while InvariantCultureIgnoreCase checks the string’s “meaning”.
So, in most cases, you might want to use OrdinalIgnoreCase (as always, it depends on your use case!)
Tip #6: Newtonsoft vs System.Text.Json: it’s a matter of memory allocation, not time
For the last benchmark, I created the exact same model used as an example in the official documentation.
This benchmark aims to see which JSON serialization library is faster: Newtonsoft or System.Text.Json?
As you might know, the .NET team has added lots of performance improvements to the JSON Serialization functionalities, and you can really see the difference!
Method
Size
Mean
Error
StdDev
Median
Ratio
RatioSD
Gen0
Gen1
Allocated
Alloc Ratio
WithJson
100
2.063 ms
0.1409 ms
0.3927 ms
1.924 ms
1.00
0.00
–
–
292.87 KB
1.00
WithNewtonsoft
100
4.452 ms
0.1185 ms
0.3243 ms
4.391 ms
2.21
0.39
–
–
882.71 KB
3.01
WithJson
10000
44.237 ms
0.8787 ms
1.3936 ms
43.873 ms
1.00
0.00
4000.0000
1000.0000
29374.98 KB
1.00
WithNewtonsoft
10000
78.661 ms
1.3542 ms
2.6090 ms
78.865 ms
1.77
0.08
14000.0000
1000.0000
88440.99 KB
3.01
WithJson
1000000
4,233.583 ms
82.5804 ms
113.0369 ms
4,202.359 ms
1.00
0.00
484000.0000
1000.0000
2965741.56 KB
1.00
WithNewtonsoft
1000000
5,260.680 ms
101.6941 ms
108.8116 ms
5,219.955 ms
1.24
0.04
1448000.0000
1000.0000
8872031.8 KB
2.99
As you can see, Newtonsoft is 2x slower than System.Text.Json, and it allocates 3x the memory compared with the other library.
So, well, if you don’t use library-specific functionalities, I suggest you replace Newtonsoft with System.Text.Json.
Wrapping up
In this article, we learned that even tiny changes can make a difference in the long run.
Let’s recap some:
Using StringBuilder is generally WAY faster than using string concatenation unless you need to concatenate 2 to 4 strings;
Sometimes, the difference is not about execution time but memory usage;
EndsWith and StartsWith perform better if you look for a char instead of a string. If you think of it, it totally makes sense!
More often than not, string.IsNullOrWhiteSpace performs better checks than string.IsNullOrEmpty; however, there is a huge difference in terms of performance, so you should pick the correct method depending on the usage;
ToUpper and ToLower look similar; however, ToLower is quite faster than ToUpper;
Ordinal and Invariant comparison return the same value for almost every input; but Ordinal is faster than Invariant;
Newtonsoft performs similarly to System.Text.Json, but it allocates way more memory.
My suggestion is always the same: take your time to explore the possibilities! Toy with your code, try to break it, benchmark it. You’ll find interesting takes!
I hope you enjoyed this article! Let’s keep in touch on Twitter or LinkedIn! 🤜🤛