برچسب: Angular

  • Angular Code Review Checklist. – PHPFOREVER

    Angular Code Review Checklist. – PHPFOREVER


    Introduction:

    Code review is a process where developers have their work reviewed by their peers to check the code’s quality and functionality. In the case of Angular, there are specific points that we must check to ensure code effectiveness, which we will be discussing in detail in our upcoming blog post. Effective code reviews are crucial to delivering high-quality applications to end-users. This process involves a peer review of developers’ work. The main aim of this evaluation is to detect any bugs, syntax issues, and other factors that could impact the application’s performance. However, code reviews can be time-consuming. Therefore, we have created a comprehensive list of the most crucial elements to consider during your Angular code reviews.

    Imports Organization:

    You should group your imports by source and arrange them alphabetically, which will help keep your import section organized and tidy.

    Bad Code Example:
    import { Component, OnInit, Input } from '@angular/core';
    import { FormsModule } from '@angular/forms';
    
    import { AuthService } from '../services/auth.service';
    import { BehaviorSubject, Observable, Subject, timer } from 'rxjs';
    import { UserService } from '../services/user.service';
    import { SomeOtherService } from '../services/some-other.service';
    import { SomeComponent } from '../some-component/some-component.component';
    import { AnotherComponent } from '../another-component/another-component.component';
    import { SharedModule } from '../shared/shared.module';
    import { ActivatedRoute, Router } from '@angular/router';
    import { HttpClient, HttpHeaders } from '@angular/common/http';
    
    @Component({
      selector: 'app-component',
      templateUrl: './app.component.html',
      styleUrls: ['./app.component.css']
    })
    export class AppComponent implements OnInit {
      // ...
    }


    Good Example (Organized imports order) 

    // Organize Angular modules separately
    import { Component, OnInit, Input } from '@angular/core';
    import { ActivatedRoute, Router } from '@angular/router';
    import { HttpClient, HttpHeaders } from '@angular/common/http';
    import { FormsModule } from '@angular/forms'; 
    
    
    // Organize Rxjs imports separetly 
    import { BehaviorSubject, Observable, Subject, timer } from 'rxjs';
    
    // Organize services imports separetly
    import { AuthService } from '../services/auth.service';
    import { UserService } from '../services/user.service';
    import { SomeOtherService } from '../services/some-other.service';
    
    import { SomeComponent } from '../some-component/some-component.component';
    import { AnotherComponent } from '../another-component/another-component.component';
    
    Service Injection:

    It is recommended to review dependency injection in components and utilize TypeScript’s access modifiers (public, private, etc.).

    Bad Code Example:
    @Component({
      selector: 'app-example',
      templateUrl: './example.component.html',
      styleUrls: ['./example.component.css']
    })
    export class ExampleComponent implements OnInit {
      // ...
     constructor(
        public dialog: MatDialog,
        authService: JobService,
        userService,
        public ref: ChangeDetectorRef,
    
      ) {
      }
    }
    
    Good Example (With private access modifier ):
    @Component({
      selector: 'app-example',
      templateUrl: './example.component.html',
      styleUrls: ['./example.component.css']
    })
    export class ExampleComponent implements OnInit {
      // ...
     constructor(
        private dialog: MatDialog,
        private authService: JobService,
        private userService,
        private ref: ChangeDetectorRef,
    
      ) {
      }
    }


    Observable Cleanup:

    Use the async pipe to simplify the component code instead of etching data with observables, doing the subscribe and cleanup in ngOnDestroy.

    Bad Code Example:
    import { Component, OnDestroy, OnInit } from '@angular/core';
    import { Subscription } from 'rxjs';
    import { DataService } from './data.service';
    
    @Component({
      selector: 'app-data-list',
      template: `
        <h2>Data List</h2>
        <ul>
          <li *ngFor="let item of data">{{ item }}</li>
        </ul>
      `,
    })
    export class DataListComponent implements OnInit, OnDestroy {
      data: string[] = [];
      private dataSubscription: Subscription;
    
      constructor(private dataService: DataService) {}
    
      ngOnInit() {
        this.dataSubscription = this.dataService.getData().subscribe((result) => {
          this.data = result;
        });
      }
    
      ngOnDestroy() {
        if (this.dataSubscription) {
          this.dataSubscription.unsubscribe();
        }
      }
    }
    Good Example ( With async pipe):
    import { Component } from '@angular/core';
    import { Observable } from 'rxjs';
    import { DataService } from './data.service';
    
    @Component({
      selector: 'app-data-list',
      template: `
        <h2>Data List</h2>
        <ul>
          <li *ngFor="let item of data$ | async">{{ item }}</li>
        </ul>
      `,
    })
    export class DataListComponent {
      data$: Observable<string[]>;
    
      constructor(private dataService: DataService) {
        this.data$ = this.dataService.getData();
      }
    }
    Property Initialization:

    It is considered a best practice to set default values for properties to prevent runtime errors.

    Bad Code Example ():
    import { Component } from '@angular/core';
    
    @Component({
      selector: 'app-data-grid',
      template: `
        <!-- Data grid rendering code -->
      `,
    })
    export class DataGridComponent {
      data; // No initialization
    
      constructor() {
        // Imagine some logic to populate dataArray dynamically.
      }
    }
    Good Example:
    import { Component } from '@angular/core';
    
    @Component({
      selector: 'app-data-grid',
      template: `
        <!-- Data grid rendering code -->
      `,
    })
    export class DataGridComponent {
      data: any[] = []; // Initialize with an empty array
    
      constructor() {
        // Logic to populate dataArray dynamically.
      }
    }


    Component Initialization:

    I recommend reviewing the ngOnInit  method, don’t make it too long. Try to break it into smaller methods for better readability and maintainability.

    Bad Code Example :

    import { Component, OnInit } from '@angular/core';
    import { DataService } from './data.service';
    
    @Component({
      selector: 'app-data-list',
      template: `
        <h2>Data List</h2>
        <ul>
          <li *ngFor="let item of data">{{ item }}</li>
        </ul>
      `,
    })
    export class DataListComponent implements OnInit {
      data: string[] = [];
    
      constructor(private dataService: DataService) {}
    
      ngOnInit() {
        // Fetch data from the service
        this.dataService.getData().subscribe((result) => {
          // Filter and transform the data
          const filteredData = result.filter((item) => item.length > 5);
          const transformedData = filteredData.map((item) => item.toUpperCase());
    
          // Sort the data
          transformedData.sort();
    
          // Set the component data
          this.data = transformedData;
        });
      }
    }

    Good Example (Breaking Down ngOnInit)


    import { Component, OnInit } from '@angular/core';
    import { DataService } from './data.service';
    
    @Component({
      selector: 'app-data-list',
      template: `
        <h2>Data List</h2>
        <ul>
          <li *ngFor="let item of data">{{ item }}</li>
        </ul>
      `,
    })
    export class DataListComponent implements OnInit {
      data: string[] = [];
    
      constructor(private dataService: DataService) {}
    
      ngOnInit() {
        this.loadData();
      }
    
      private loadData() {
        this.dataService.getData().subscribe((result) => {
          const filteredData = this.filterData(result);
          const transformedData = this.transformData(filteredData);
          this.data = this.sortData(transformedData);
        });
      }
    
      private filterData(data: string[]): string[] {
        return data.filter((item) => item.length > 5);
      }
    
      private transformData(data: string[]): string[] {
        return data.map((item) => item.toUpperCase());
      }
    
      private sortData(data: string[]): string[] {
        return [...data].sort();
      }
    }
    Consider Extracting Logic to Services:

    If a component logic can be reused in multiple places, we can extract it into services for better code organization and reusability.

    Bad Code Example:

    import { Component } from '@angular/core';
    import { User } from './user.model'; // Assuming User model is imported
    
    @Component({
      selector: 'app-user-management',
      template: `
        <h2>User Management</h2>
        <button Angular Code Review Checklist. - PHPFOREVER="generateTooltipForEditButton(currentUser)">Edit User</button>
      `,
    })
    export class UserManagementComponent {
      currentUser: User;
    
      constructor() {
        // Initialize the currentUser based on user data retrieval
        this.currentUser = this.getUser(/* specify user ID or other criteria */);
      }
    
      generateTooltipForEditButton(user: User): string {
        if (user) {
          if (user.state === 'SUSPENDED') {
            return 'This user is suspended and cannot be edited';
          } else if (user.state === 'INACTIVE') {
            return 'This user is inactive and cannot be edited';
          } else if (!user.authorizedToUpdate) {
            return 'You are not authorized to edit this user';
          } else {
            return 'Edit';
          }
        }
        return 'Edit';
      }
    
      // Simulated method to retrieve a user, replace with actual logic
      getUser(userId: number): User {
        return {
          id: userId,
          name: 'John Doe',
          state: 'ACTIVE',
          authorizedToUpdate: true,
        };
      }
    }


    Good Example:

    import { Injectable } from '@angular/core';
    
    @Injectable({
      providedIn: 'root',
    })
    export class UserService {
      // Other user-related methods and properties
    // move the component fucntion to the service 
      getEditUserButtonTooltip(user: User): string {
        if (user) {
          if (user.state === 'SUSPENDED') {
            return 'This user is suspended and cannot be edited';
          } else if (user.state === 'INACTIVE') {
            return 'This user is inactive and cannot be edited';
          } else if (!user.authorizedToUpdate) {
            return 'You are not authorized to edit this user';
          } else {
            return 'Edit';
          }
        }
        return 'Edit';
      }
    }


    import { Component } from '@angular/core';
    import { UserService, User } from '../user.service';
    
    @Component({
      selector: 'app-user-management',
      template: `
        <h2>User Management</h2>
        <button Angular Code Review Checklist. - PHPFOREVER="generateTooltipForEditButton(currentUser)">Edit User</button>
      `,
    })
    export class UserManagementComponent {
      currentUser: User;
    
      constructor(private userService: UserService) {
        // Initialize the currentUser based on user data retrieval
        this.currentUser = this.userService.getUser(/* specify user ID or other criteria */);
      }
    
      generateTooltipForEditButton(user: User): string {
        return this.userService.generateTooltipForEditButton(user);
      }
    }
    Hard-Coded Styles:

    It’s important to avoid using inline styles as they can be difficult to maintain. Instead, it’s recommended to define appropriate styling classes.

    Bad Example (Hard-Coded Styles in Template):

    <!-- bad-example.component.html -->
    <div>
      <h2 style="font-size: 24px; color: red;">Welcome to our website</h2>
      <p style="font-size: 18px; color: blue;">This is some text with hard-coded styles.</p>
      <button style="background-color: green; color: white;">Click me</button>
    </div>

    Good Example (Separate Styles in a CSS File) :

    <!-- good-example.component.html -->
    <div>
      <h2>Welcome to our website</h2>
      <p>This is some text with Angular-applied styles.</p>
      <button (click)="onButtonClick()">Click me</button>
    </div>
    
    /* styles.css or component-specific styles file */
    h2 {
      font-size: 24px;
      color: red;
    }
    
    p {
      font-size: 18px;
      color: blue;
    }
    
    button {
      background-color: green;
      color: white;
    }


    Angular Dropdown With Search And Multi Select.   Quiz App In Angular.


    Source link

  • Custom Pipe Example In Angular. Pipe example get month name.

    Custom Pipe Example In Angular. Pipe example get month name.


    Custom Pipe Example In Angular.

    This tutorial will show you how to create an Angular Custom Pipe. It is handy if we want to reuse some logic across our applications. It allows us to change the format in which data is displayed on the pages. For instance, consider the date of birth as 01-01-2024 and we want to display it as 01-January-2023. To achieve this we will make one pipe that can be used anywhere in our application. In angular

    Types of Pipe.
    •  Pure Pipe.
    •  Impure pipes.
    Pure Pipe.

    The pure pipe is a pipe called when a pure change is detected in the value. It is called fewer times than the latter.

    Impure Pipes.

    This pipe is often called after every change detection. Be it a pure change or not, the impure pipe is called repeatedly.

    Steps to Create Pipe

    Below are the steps to create the custom pipe.

    1. Create a pipe class.
    2. Decorate the class with the @Pipe decorator.
    3. Give a pipe name under name metadata in @Pipe decorator.
    4. Implement the PipeTransform interface and it will contain only one method that is transform.
    5. The transform method must transform the value and return the result.
    6. Import the pipe class in the component.
    7. Use the custom pipe by its name in the HTML file.
    Example.

    Create a pipe class and add the below code.

    import { Pipe,PipeTransform } from '@angular/core';
    
    @Pipe({
        name: 'custompipe',
        standalone: true,
    })
    
    export class custompipePipe implements PipeTransform {
    
        monthNumbers:any = ['January','February','March','April','May','June','July','August','September','October','November','December'];
        transform(value: any) {
            let date = value.split(/[.,\/ -]/);
            if(date[1]>12 || date[1]<1 || isNaN(date[1])){
                return "Invalid Month";
            }else{
                date[1] = this.monthNumbers[date[1]-1];
                return date.join('-');
            }   
             
        }
    }

    Import the custom pipe in pipe-example.componenet.ts file and add the below code.

    import { Component } from '@angular/core';
    import { custompipePipe } from '../custompipe/custompipe.pipe';
    
    @Component({
      selector: 'app-pipe-example',
      standalone: true,
      imports: [custompipePipe],
      templateUrl: './pipe-example.component.html',
      styleUrl: './pipe-example.component.css'
    })
    
    export class PipeExampleComponent{
    
      monthName:number = 0;
      ngOnIt(){
    
      }
    
      getMonthName(event:any){
        this.monthName = event.target.value;
      }
    }
    

    Add the below code in pipe-example.component.html file

     <input type="text" placeholder="Enter Month Name" (keyup)="getMonthName($event)" autofocus>    
    Month Name: {{ monthName | custompipe}}

    Input: 12-02-2023

    Output: 12-February-2023


    JavaScript Program To Count The Frequency Of Given Character In String.          Angular Dropdown With Search And Multi Select.


    Source link

  • how to generate qr code in angular.

    how to generate qr code in angular.


    How To Generate QR Code In Angular:

    In the modern digital era, QR codes have become essential for quickly sharing information through a simple scan. QR codes provide a versatile solution for marketing purposes, linking to a website, or sharing contact details. In this blog post, we’ll explore how to generate QR codes in your Angular applications using the angularx-qrcode library.

    We’ll guide you through the installation process, show you how to integrate the library into your Angular project and provide a complete example to get you started. By the end of this tutorial, you’ll be able to create and customize QR codes effortlessly, adding an extra layer of interactivity and functionality to your applications. Perfect for developers of all levels, this step-by-step guide ensures you can implement QR code generation quickly and efficiently. Join us as we dive into the world of QR codes and enhance your Angular projects with this powerful feature!

    Below are the steps to implement it.

    Step 1: Set Up Your Angular Project.

    If you don’t have an existing Angular project, create a new one using the Angular CLI:

    ng new qr-code-app
    cd qr-code-app
    Step 2: Install angularx-qrcode
    Install the angularx-qrcode library using npm:
    npm install angularx-qrcode

    Step 3: Create a Component and import the QRCodeModule.


    import { Component } from '@angular/core';
    import { MatFormFieldModule } from '@angular/material/form-field';
    import { QrCodeModule } from 'ng-qrcode';
    
    
    @Component({
      selector: 'app-qrcode',
      standalone: true,
      imports: [MatFormFieldModule,QrCodeModule],
      templateUrl: './qrcode.component.html',
      styleUrl: './qrcode.component.css'
    })
    export class QrcodeComponent {
    
      value: string = 'QRCODE Generator';
    }
    
    4. Update the QR Code Component.


    <div class="container">   
        <h1>Generate QR Codes Example</h1>
        <qr-code value="{{value}}" size="300" errorCorrectionLevel="M"></qr-code>
    </div>
    
    
    5. Run the Application.
    ng serve

    Navigate to http://localhost:4200/ in your web browser. You should see a QR code generated based on the data provided.

    Summary

    1. Set up your Angular project.
    2. Install the angularx-qrcode library.
    3. Import QRCodeModule in the imports section.
    4. Create a new component for the QR code.
    5. Update the component to generate and display the QR code.
    6. Run your application.

    This setup allows you to generate and display QR codes in your Angular application easily.

    Weather App In JavaScript                 Custom Pipe Example In Angular.

    https://www.npmjs.com/package/angularx-qrcode


    Source link

  • JavaScript and TypeScript Projects with React, Angular, or Vue in Visual Studio 2022 with or without .NET

    JavaScript and TypeScript Projects with React, Angular, or Vue in Visual Studio 2022 with or without .NET


    I was reading Gabby’s blog post about the new TypeScript/JavaScript project experience in Visual Studio 2022. You should read the docs on JavaScript and TypeScript in Visual Studio 2022.

    If you’re used to ASP.NET apps when you think about apps that are JavaScript heavy, “front end apps” or TypeScript focused, it can be confusing as to “where does .NET fit in?”

    You need to consider the responsibilities of your various projects or subsystems and the multiple totally valid ways you can build a web site or web app. Let’s consider just a few:

    1. An ASP.NET Web app that renders HTML on the server but uses TS/JS
      • This may have a Web API, Razor Pages, with or without the MVC pattern.
      • You maybe have just added JavaScript via <script> tags
      • Maybe you added a script minimizer/minifier task
      • Can be confusing because it can feel like your app needs to ‘build both the client and the server’ from one project
    2. A mostly JavaScript/TypeScript frontend app where the HTML could be served from any web server (node, kestrel, static web apps, nginx, etc)
      • This app may use Vue or React or Angular but it’s not an “ASP.NET app”
      • It calls backend Web APIs that may be served by ASP.NET, Azure Functions, 3rd party REST APIs, or all of the above
      • This scenario has sometimes been confusing for ASP.NET developers who may get confused about responsibility. Who builds what, where do things end up, how do I build and deploy this?

    VS2022 brings JavaScript and TypeScript support into VS with a full JavaScript Language Service based on TS. It provides a TypeScript NuGet Package so you can build your whole app with MSBuild and VS will do the right thing.

    NEW: Starting in Visual Studio 2022, there is a new JavaScript/TypeScript project type (.esproj) that allows you to create standalone Angular, React, and Vue projects in Visual Studio.

    The .esproj concept is great for folks familiar with Visual Studio as we know that a Solution contains one or more Projects. Visual Studio manages files for a single application in a Project. The project includes source code, resources, and configuration files. In this case we can have a .csproj for a backend Web API and an .esproj that uses a client side template like Angular, React, or Vue.

    Thing is, historically when Visual Studio supported Angular, React, or Vue, it’s templates were out of date and not updated enough. VS2022 uses the native CLIs for these front ends, solving that problem with Angular CLI, Create React App, and Vue CLI.

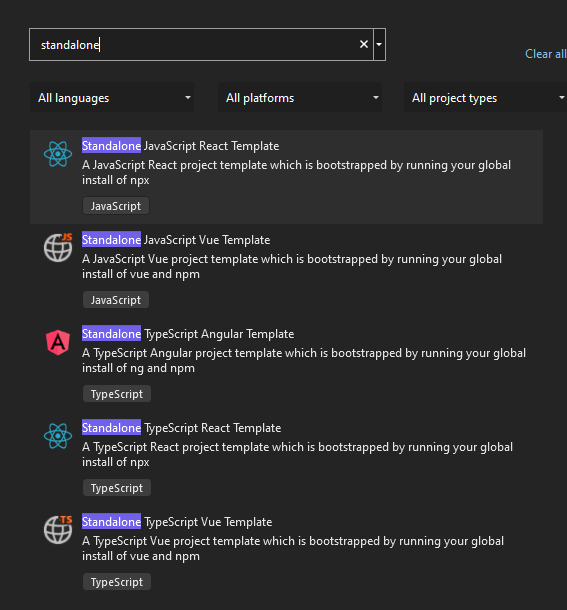
    If I am in VS and go “File New Project” there are Standalone templates that solve Example 2 above. I’ll pick JavaScript React.

    Standalone JavaScript Templates in VS2022

    Then I’ll click “Add integration for Empty ASP.NET Web API. This will give me a frontend with javascript ready to call a ASP.NET Web API backend. I’ll follow along here.

    Standalone JavaScript React Template

    It then uses the React CLI to make the front end, which again, is cool as it’s whatever version I want it to be.

    React Create CLI

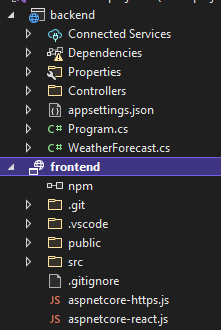
    Then I’ll add my ASP.NET Web API backend to the same solution, so now I have an esproj and a csproj like this

    frontend and backend

    Now I have a nice clean two project system – in this case more JavaScript focused than .NET focused. This one uses npm to startup the project using their web development server and proxyMiddleware to proxy localhost:3000 calls over to the ASP.NET Web API project.

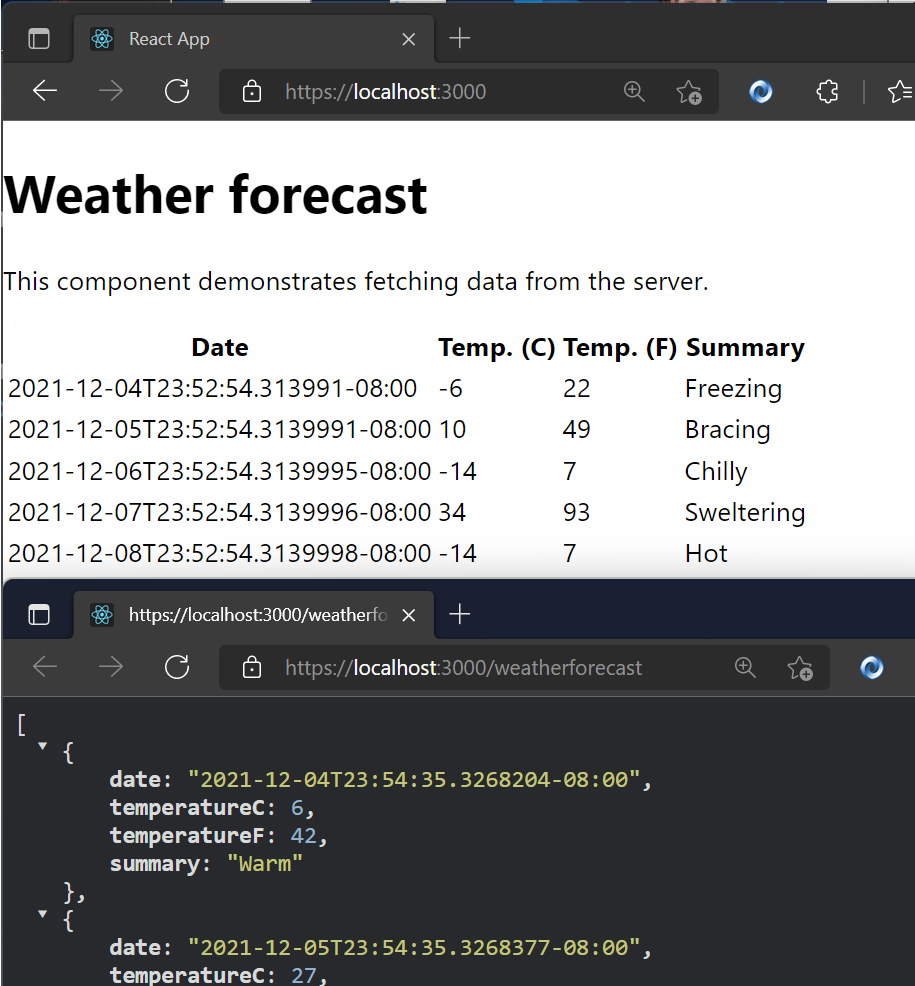
    Here is a React app served by npm calling over to the Weather service served from Kestrel on ASP.NET.

    npm app running in VS 2022 against an ASP.NET Web API

    This is inverted than most ASP.NET Folks are used to, and that’s OK. This shows me that Visual Studio 2022 can support either development style, use the CLI that is installed for whatever Frontend Framework, and allow me to choose what web server and web browser (via Launch.json) I want.

    If you want to flip it, and put ASP.NET Core as the primary and then bring in some TypeScript/JavaScript, follow this tutorial because that’s also possible!


    Sponsor: Make login Auth0’s problem. Not yours. Provide the convenient login features your customers want, like social login, multi-factor authentication, single sign-on, passwordless, and more. Get started for free.


    About Scott

    Scott Hanselman is a former professor, former Chief Architect in finance, now speaker, consultant, father, diabetic, and Microsoft employee. He is a failed stand-up comic, a cornrower, and a book author.

    facebook
    bluesky
    subscribe
    About   Newsletter

    Hosting By
    Hosted on Linux using .NET in an Azure App Service


    Source link