برچسب: Azure

  • How to integrate Feature Flags stored on Azure App Configuration in an ASP.NET Core Application | Code4IT

    How to integrate Feature Flags stored on Azure App Configuration in an ASP.NET Core Application | Code4IT


    Learn how to use Feature Flags in ASP.NET Core apps and read values from Azure App Configuration. Understand how to use filters, like the Percentage filter, to control feature activation, and learn how to take full control of the cache expiration of the values.

    Table of Contents

    Just a second! 🫷
    If you are here, it means that you are a software developer.
    So, you know that storage, networking, and domain management have a cost .

    If you want to support this blog, please ensure that you have disabled the adblocker for this site.
    I configured Google AdSense to show as few ADS as possible – I don’t want to bother you with lots of ads, but I still need to add some to pay for the resources for my site.

    Thank you for your understanding.
    Davide

    Feature Flags let you remotely control the activation of features without code changes. They help you to test, release, and manage features safely and quickly by driving changes using centralized configurations.

    In a previous article, we learned how to integrate Feature Flags in ASP.NET Core applications. Also, a while ago, we learned how to integrate Azure App Configuration in an ASP.NET Core application.

    In this article, we are going to join the two streams in a single article: in fact, we will learn how to manage Feature Flags using Azure App Configuration to centralize our configurations.

    It’s a sort of evolution from the previous article. Instead of changing the static configurations and redeploying the whole application, we are going to move the Feature Flags to Azure so that you can enable or disable those flags in just one click.

    A recap of Feature Flags read from the appsettings file

    Let’s reuse the example shown in the previous article.

    We have an ASP.NET Core application (in that case, we were building a Razor application, but it’s not important for the sake of this article), with some configurations defined in the appsettings file under the Feature key:

    {
      "FeatureManagement": {
        "Header": true,
        "Footer": true,
        "PrivacyPage": false,
        "ShowPicture": {
          "EnabledFor": [
            {
              "Name": "Percentage",
              "Parameters": { "Value": 60 }
            }
          ]
        }
      }
    }
    

    We have already dove deep into Feature Flags in an ASP.NET Core application in the previous article. However, let me summarize it.

    First of all, you have to define your flags in the appsettings.json file using the structure we saw before.

    To use Feature Flags in ASP.NET Core you have to install the Microsoft.FeatureManagement.AspNetCore NuGet package.

    Then, you have to tell ASP.NET to use Feature Flags by calling:

    builder.Services.AddFeatureManagement();
    

    Finally, you are able to consume those flags in three ways:

    • inject the IFeatureManager interface and call IsEnabled or IsEnabledAsync;
    • use the FeatureGate attribute on a Controller class or a Razor model;
    • use the <feature> tag in a Razor page to show or hide a portion of HTML

    How to create Feature Flags on Azure App Configuration

    We are ready to move our Feature Flags to Azure App Configuration. Needless to say, you need an Azure subscription 😉

    Log in to the Azure Portal, head to “Create a resource”, and create a new App Configuration:
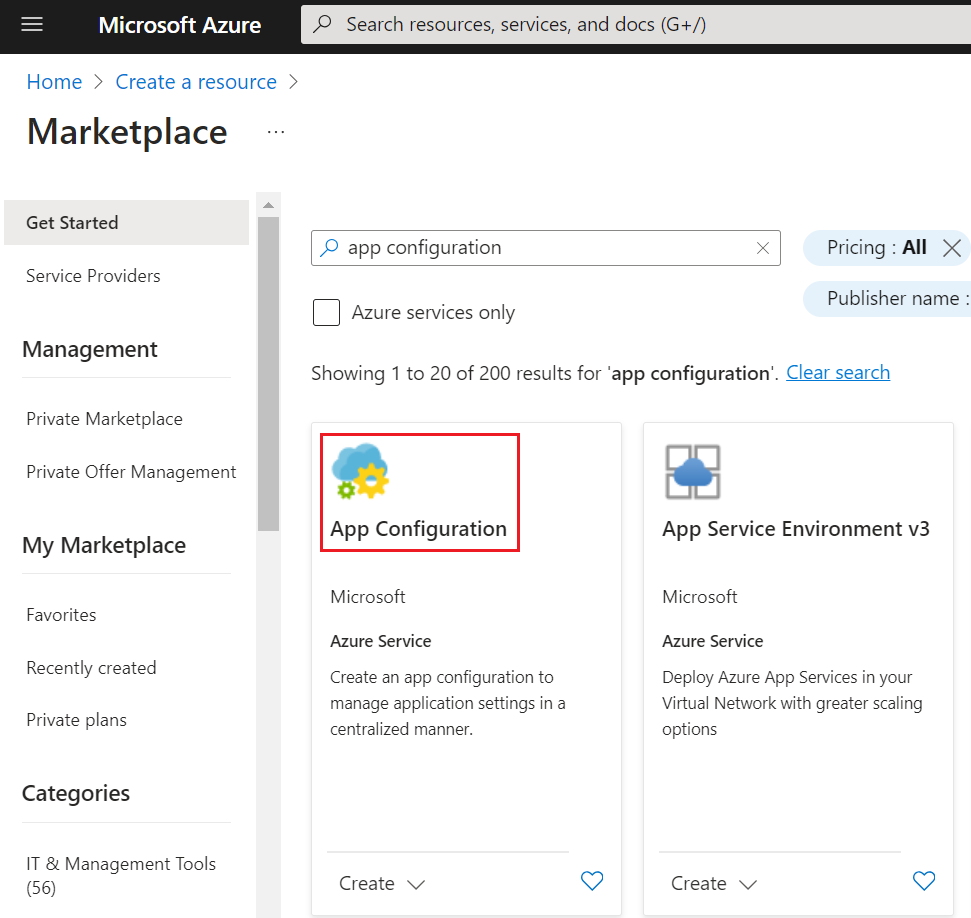
    Azure App configuration in the Marketplace

    I’m going to reuse the same instance I created in the previous article – you can see the full details in the How to create an Azure App Configuration instance section.

    Now we have to configure the same keys defined in the appsettings file: Header, Footer, and PrivacyPage.

    Open the App Configuration instance and locate the “Feature Manager” menu item in the left panel. This is the central place for creating, removing, and managing your Feature Flags. Here, you can see that I have already added the Header and Footer, and you can see their current state: “Footer” is enabled, while “Header” is not.
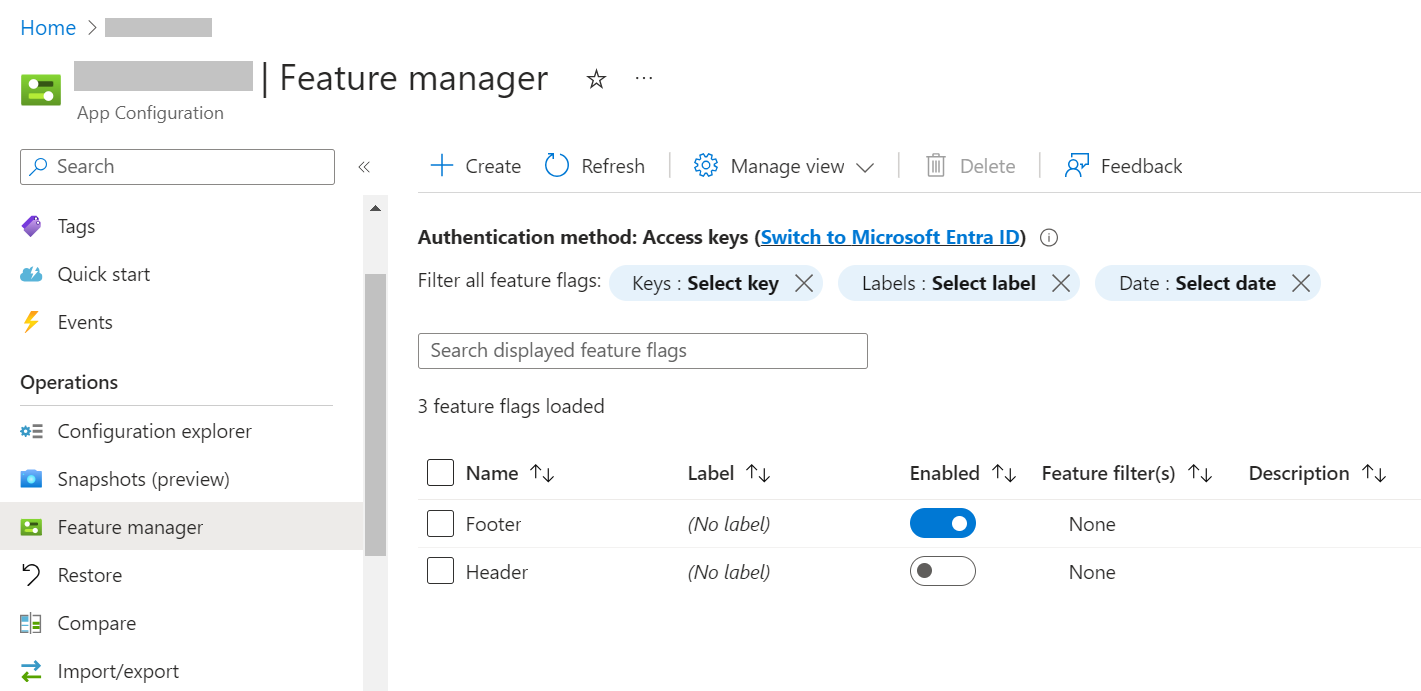
    Feature Flags manager dashboard

    How can I add the PrivacyPage flag? It’s elementary: click the “Create” button and fill in the fields.

    You have to define a Name and a Key (they can also be different), and if you want, you can add a Label and a Description. You can also define whether the flag should be active by checking the “Enable feature flag” checkbox.
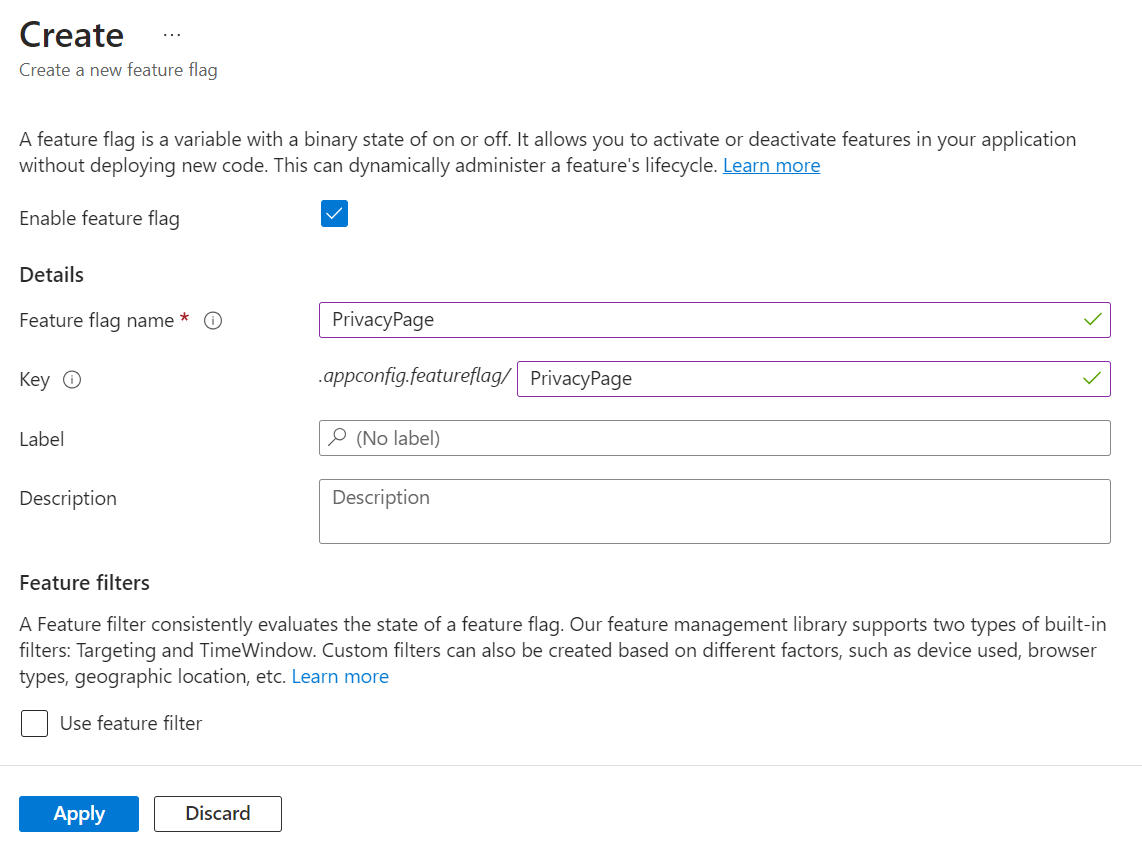
    Feature Flag definition form

    Read Feature Flags from Azure App Configuration in an ASP.NET Core application

    It’s time to integrate Azure App Configuration with our ASP.NET Core application.

    Before moving to the code, we have to locate the connection string and store it somewhere.

    Head back to the App Configuration resource and locate the “Access keys” menu item under the “Settings” section.
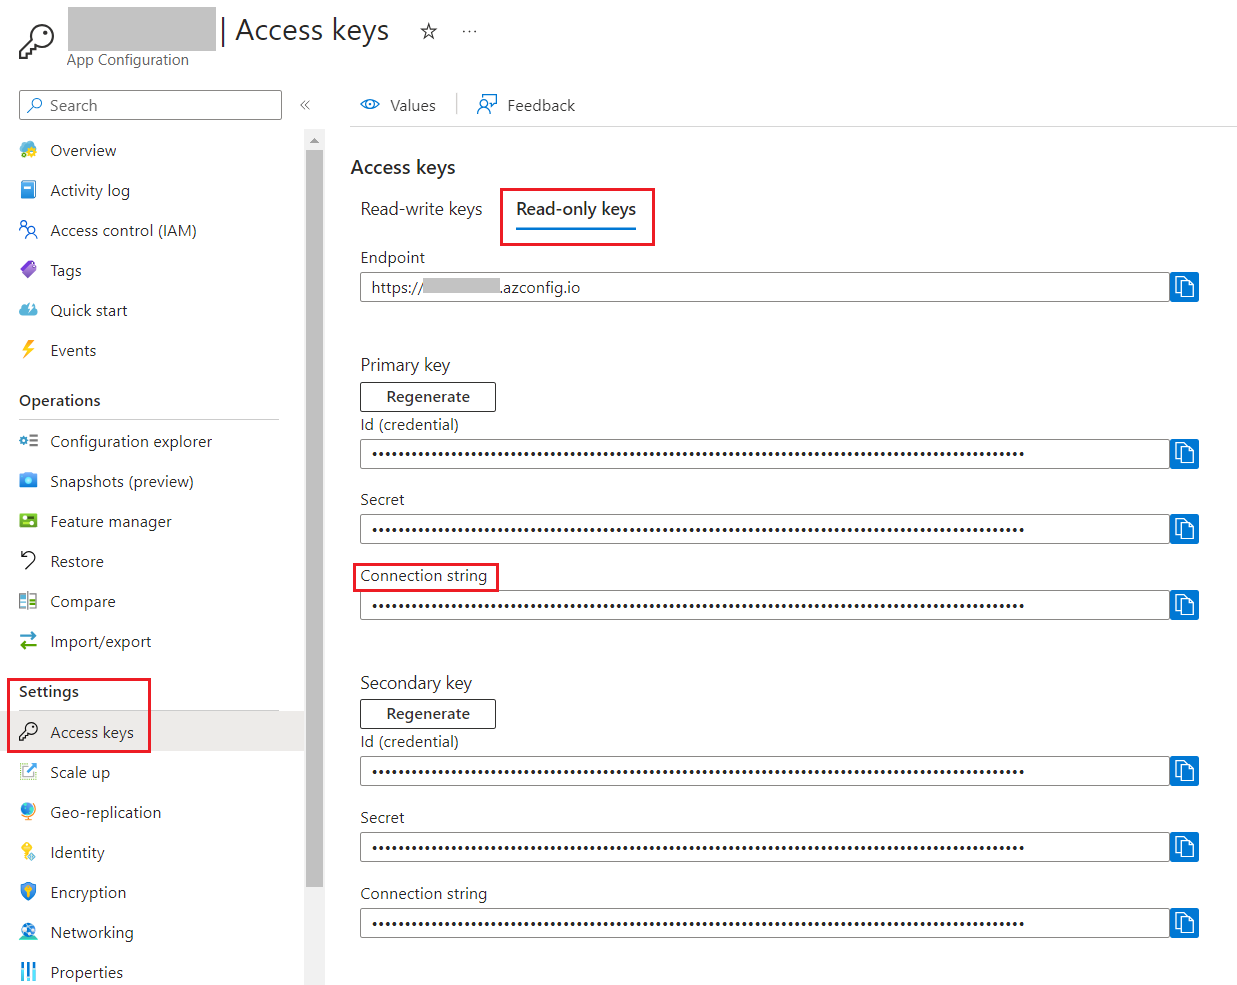
    Access Keys page with connection strings

    From here, copy the connection string (I suggest that you use the Read-only Keys) and store it somewhere.

    Before proceeding, you have to install the Microsoft.Azure.AppConfiguration.AspNetCore NuGet package.

    Now, we can add Azure App Configuration as a source for our configurations by connecting to the connection string and by declaring that we are going to use Feature Flags:

    builder.Configuration.AddAzureAppConfiguration(options =>
        options.Connect(connectionString).UseFeatureFlags()
    );
    

    That’s not enough. We need to tell ASP.NET that we are going to consume these configurations by adding such functionalities to the Services property.

    builder.Services.AddAzureAppConfiguration();
    
    builder.Services.AddFeatureManagement();
    

    Finally, once we have built our application with the usual builder.Build(), we have to add the Azure App Configuration middleware:

    app.UseAzureAppConfiguration();
    

    To try it out, run the application and validate that the flags are being applied. You can enable or disable those flags on Azure, restart the application, and check that the changes to the flags are being applied. Otherwise, you can wait 30 seconds to have the flag values refreshed and see the changes applied to your application.

    Using the Percentage filter on Azure App Configuration

    Suppose you want to enable a functionality only to a percentage of sessions (sessions, not users!). In that case, you can use the Percentage filter.

    The previous article had a specific section dedicated to the PercentageFilter, so you might want to check it out.

    As a recap, we defined the flag as:

    {
      "ShowPicture": {
        "EnabledFor": [
          {
            "Name": "Percentage",
            "Parameters": {
              "Value": 60
            }
          }
        ]
      }
    }
    

    And added the PercentageFilter filter to ASP.NET with:

    builder.Services.AddFeatureManagement()
        .AddFeatureFilter<PercentageFilter>();
    

    Clearly, we can define such flags on Azure as well.

    Head back to the Azure Portal and add a new Feature Flag. This time, you have to add a new Feature Filter to any existing flag. Even though the PercentageFilter is out-of-the-box in the FeatureManagement NuGet package, it is not available on the Azure portal.

    You have to define the filter with the following values:

    • Filter Type must be “Custom”;
    • Custom filter name must be “Percentage”
    • You must add a new key, “Value”, and set its value to “60”.
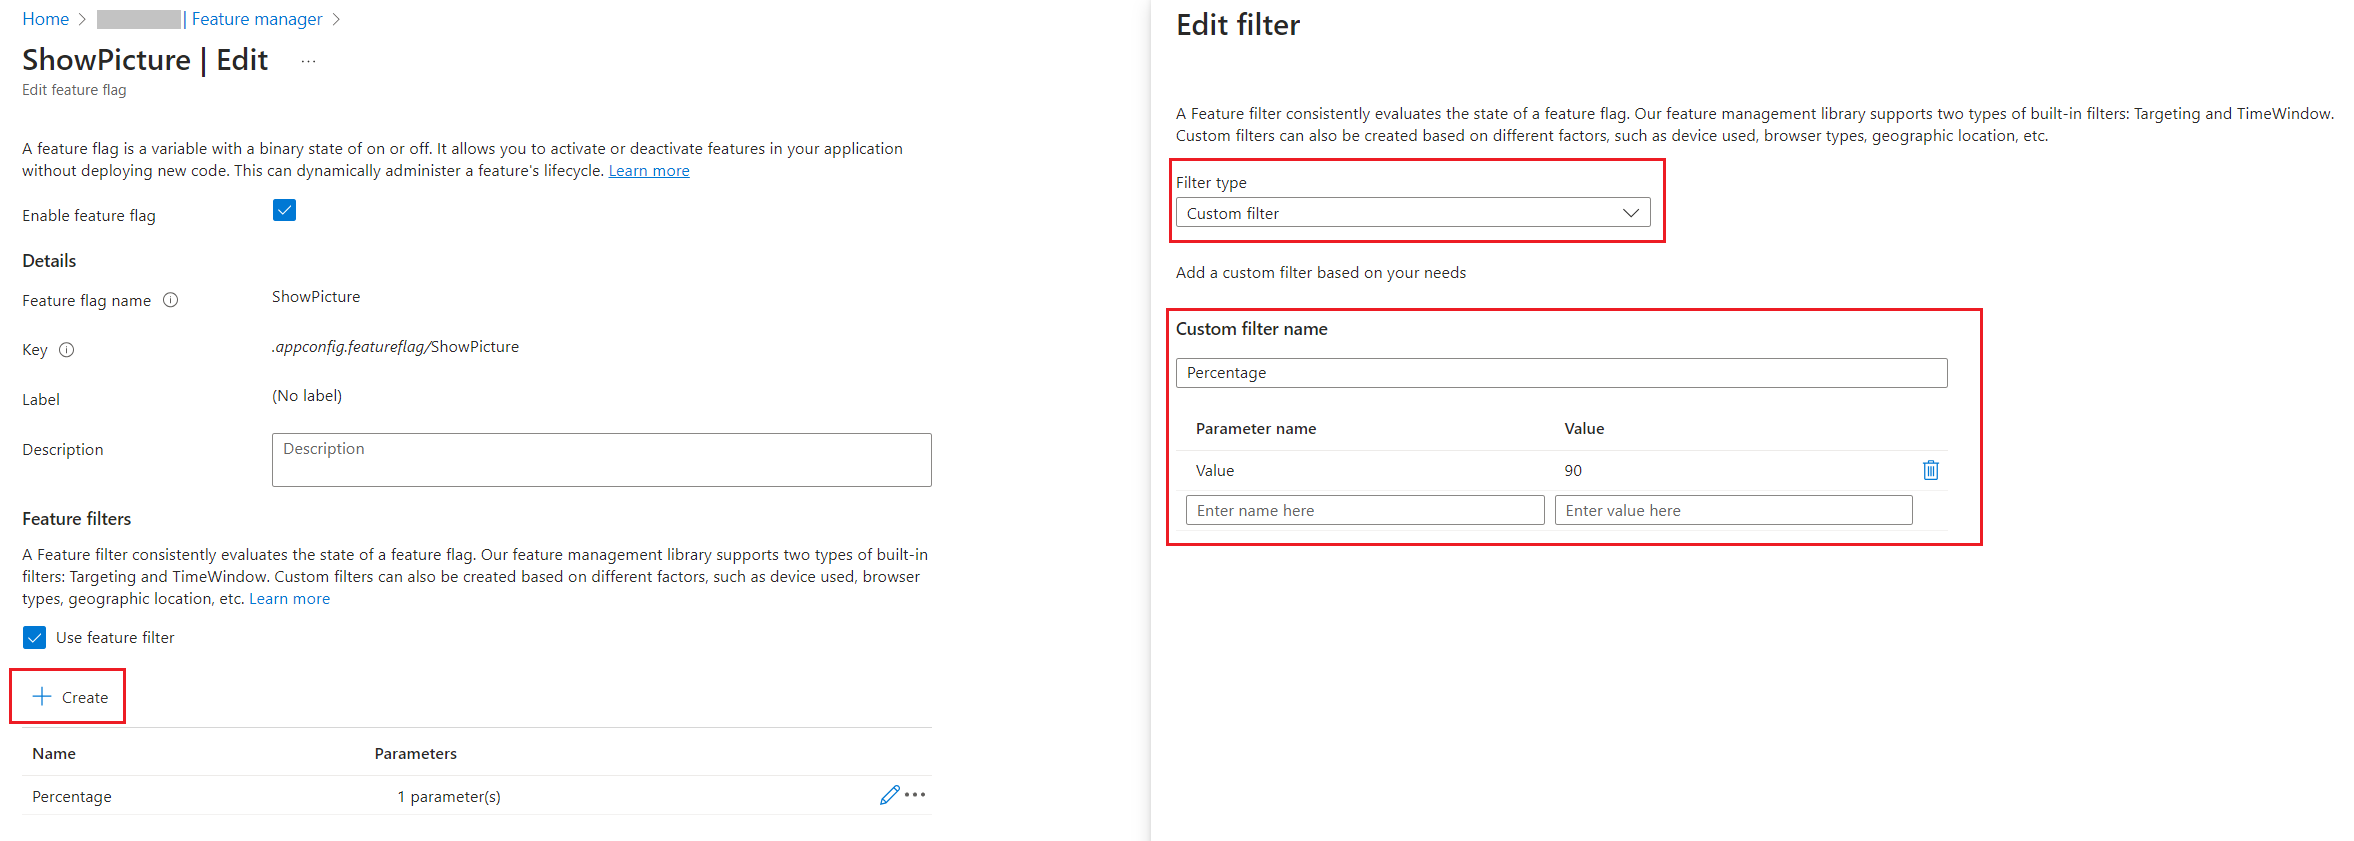
    Custom filter used to create Percentage Filter

    The configuration we just added reflects the JSON value we previously had in the appsettings file: 60% of the requests will activate the flag, while the remaining 40% will not.

    Define the cache expiration interval for Feature Flags

    By default, Feature Flags are stored in an internal cache for 30 seconds.

    Sometimes, it’s not the best choice for your project; you may prefer a longer duration to avoid additional calls to the App Configuration platform; other times, you’d like to have the changes immediately available.

    You can then define the cache expiration interval you need by configuring the options for the Feature Flags:

    builder.Configuration.AddAzureAppConfiguration(options =>
        options.Connect(connectionString).UseFeatureFlags(featureFlagOptions =>
        {
            featureFlagOptions.CacheExpirationInterval = TimeSpan.FromSeconds(10);
        })
    );
    

    This way, Feature Flag values are stored in the internal cache for 10 seconds. Then, when you reload the page, the configurations are reread from Azure App Configuration and the flags are applied with the new values.

    Further readings

    This is the final article of a path I built during these months to explore how to use configurations in ASP.NET Core.

    We started by learning how to set configuration values in an ASP.NET Core application, as explained here:

    🔗 3 (and more) ways to set configuration values in ASP.NET Core

    Then, we learned how to read and use them with the IOptions family:

    🔗 Understanding IOptions, IOptionsMonitor, and IOptionsSnapshot in ASP.NET Core

    From here, we learned how to read the same configurations from Azure App Configuration, to centralize our settings:

    🔗 Azure App Configuration and ASP.NET Core API: a smart and secure way to manage configurations | Code4IT

    Then, we configured our applications to automatically refresh the configurations using a Sentinel value:

    🔗 How to automatically refresh configurations with Azure App Configuration in ASP.NET Core

    Finally, we introduced Feature Flags in our apps:

    🔗 Feature Flags 101: A Guide for ASP.NET Core Developers | Code4IT

    And then we got to this article!

    This article first appeared on Code4IT 🐧

    Wrapping up

    In this article, we have configured an ASP.NET Core application to read the Feature Flags stored on Azure App Configuration.

    Here’s the minimal code you need to add Feature Flags for ASP.NET Core API Controllers:

    var builder = WebApplication.CreateBuilder(args);
    
    string connectionString = "my connection string";
    
    builder.Services.AddControllers();
    
    builder.Configuration.AddAzureAppConfiguration(options =>
        options.Connect(connectionString)
        .UseFeatureFlags(featureFlagOptions =>
            {
                featureFlagOptions.CacheExpirationInterval = TimeSpan.FromSeconds(10);
            }
        )
    );
    
    builder.Services.AddAzureAppConfiguration();
    
    builder.Services.AddFeatureManagement()
        .AddFeatureFilter<PercentageFilter>();
    
    var app = builder.Build();
    
    app.UseRouting();
    app.UseAzureAppConfiguration();
    app.MapControllers();
    app.Run();
    

    I hope you enjoyed this article! Let’s keep in touch on Twitter or LinkedIn! 🤜🤛

    Happy coding!

    🐧


    Source link

  • How to log to Azure Application Insights using ILogger in ASP.NET Core &vert; Code4IT

    How to log to Azure Application Insights using ILogger in ASP.NET Core | Code4IT


    Application Insights is a great tool for handling high volumes of logs. How can you configure an ASP.NET application to send logs to Azure Application Insights? What can I do to have Application Insights log my exceptions?

    Table of Contents

    Just a second! 🫷
    If you are here, it means that you are a software developer.
    So, you know that storage, networking, and domain management have a cost .

    If you want to support this blog, please ensure that you have disabled the adblocker for this site.
    I configured Google AdSense to show as few ADS as possible – I don’t want to bother you with lots of ads, but I still need to add some to pay for the resources for my site.

    Thank you for your understanding.
    Davide

    Logging is crucial for any application. However, generating logs is not enough: you must store them somewhere to access them.

    Application Insights is one of the tools that allows you to store your logs in a cloud environment. It provides a UI and a query editor that allows you to drill down into the details of your logs.

    In this article, we will learn how to integrate Azure Application Insights with an ASP.NET Core application and how Application Insights treats log properties such as Log Levels and exceptions.

    For the sake of this article, I’m working on an API project with HTTP Controllers with only one endpoint. The same approach can be used for other types of applications.

    How to retrieve the Azure Application Insights connection string

    Azure Application Insights can be accessed via any browser by using the Azure Portal.

    Once you have an instance ready, you can simply get the value of the connection string for that resource.

    You can retrieve it in two ways.

    You can get the connection string by looking at the Connection String property in the resource overview panel:

    Azure Application Insights overview panel

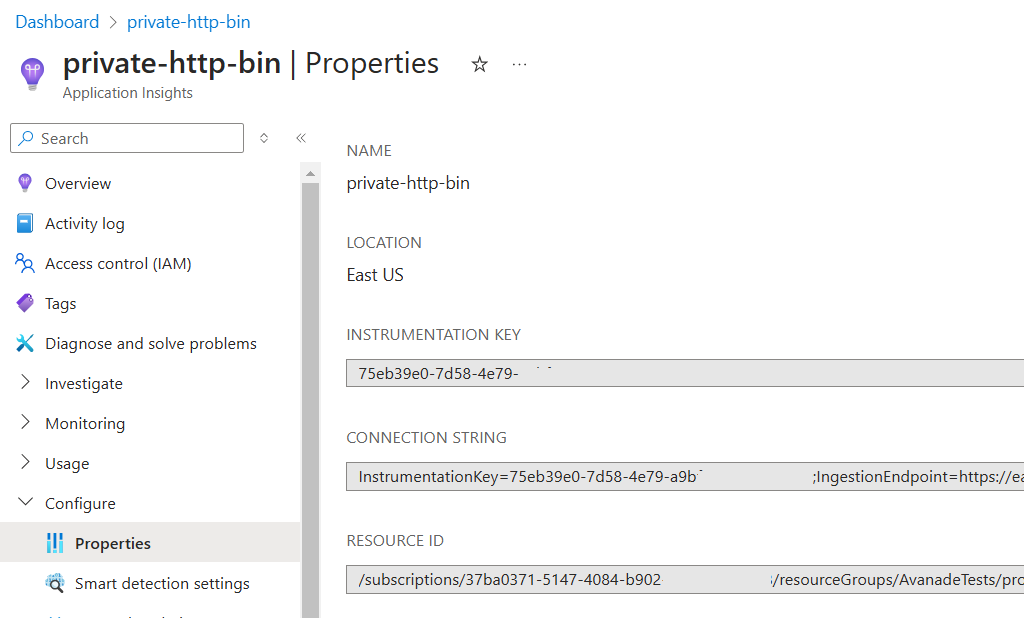
    The alternative is to navigate to the Configure > Properties page and locate the Connection String field.

    Azure Application Insights connection string panel

    How to add Azure Application Insights to an ASP.NET Core application

    Now that you have the connection string, you can place it in the configuration file or, in general, store it in a place that is accessible from your application.

    To configure ASP.NET Core to use Application Insights, you must first install the Microsoft.Extensions.Logging.ApplicationInsights NuGet package.

    Now you can add a new configuration to the Program class (or wherever you configure your services and the ASP.NET core pipeline):

    builder.Logging.AddApplicationInsights(
    configureTelemetryConfiguration: (config) =>
     config.ConnectionString = "InstrumentationKey=your-connection-string",
     configureApplicationInsightsLoggerOptions: (options) => { }
    );
    

    The configureApplicationInsightsLoggerOptions allows you to configure some additional properties: TrackExceptionsAsExceptionTelemetry, IncludeScopes, and FlushOnDispose. These properties are by default set to true, so you probably don’t want to change the default behaviour (except one, which we’ll modify later).

    And that’s it! You have Application Insights ready to be used.

    How log levels are stored and visualized on Application Insights

    I have this API endpoint that does nothing fancy: it just returns a random number.

    [Route("api/[controller]")]
    [ApiController]
    public class MyDummyController(ILogger<DummyController> logger) : ControllerBase
    {
     private readonly ILogger<DummyController> _logger = logger;
    
        [HttpGet]
        public async Task<IActionResult> Get()
        {
            int number = Random.Shared.Next();
            return Ok(number);
        }
    }
    

    We can use it to run experiments on how logs are treated using Application Insights.

    First, let’s add some simple log messages in the Get endpoint:

    [HttpGet]
    public async Task<IActionResult> Get()
    {
        int number = Random.Shared.Next();
    
        _logger.LogDebug("A debug log");
        _logger.LogTrace("A trace log");
        _logger.LogInformation("An information log");
        _logger.LogWarning("A warning log");
        _logger.LogError("An error log");
        _logger.LogCritical("A critical log");
    
        return Ok(number);
    }
    

    These are just plain messages. Let’s search for them in Application Insights!

    You first have to run the application – duh! – and wait for a couple of minutes for the logs to be ready on Azure. So, remember not to close the application immediately: you have to give it a few seconds to send the log messages to Application Insights.

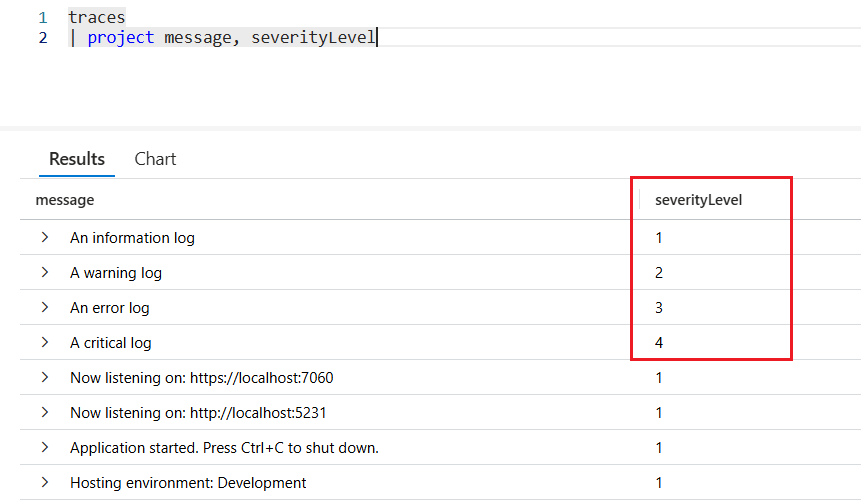
    Then, you can open the logs panel and access the logs stored in the traces table.

    Log levels displayed on Azure Application Insights

    As you can see, the messages appear in the query result.

    There are three important things to notice:

    • in .NET, the log level is called “Log Level”, while on Application Insights it’s called “severity level”;
    • the log levels lower than Information are ignored by default (in fact, you cannot see them in the query result);
    • the Log Levels are exposed as numbers in the severityLevel column: the higher the value, the higher the log level.

    So, if you want to update the query to show only the log messages that are at least Warnings, you can do something like this:

    traces
    | where severityLevel >= 2
    | order  by timestamp desc
    | project timestamp, message, severityLevel
    

    How to log exceptions on Application Insights

    In the previous example, we logged errors like this:

    _logger.LogError("An error log");
    

    Fortunately, ILogger exposes an overload that accepts an exception in input and logs all the details.

    Let’s try it by throwing an exception (I chose AbandonedMutexException because it’s totally nonsense in this simple context, so it’s easy to spot).

    private void SomethingWithException(int number)
    {
        try
        {
            _logger.LogInformation("In the Try block");
    
            throw new AbandonedMutexException("An exception message");
        }
        catch (Exception ex)
        {
            _logger.LogInformation("In the Catch block");
            _logger.LogError(ex, "Unable to complete the operation");
        }
        finally
        {
            _logger.LogInformation("In the Finally block");
        }
    }
    

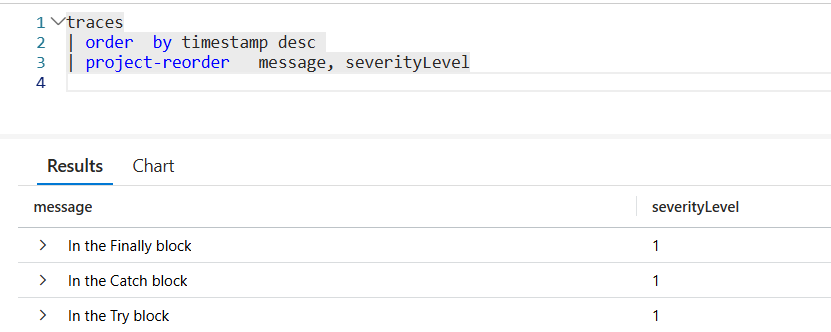
    So, when calling it, we expect to see 4 log entries, one of which contains the details of the AbandonedMutexException exception.

    The Exception message in Application Insights

    Hey, where is the exception message??

    It turns out that ILogger, when creating log entries like _logger.LogError("An error log");, generates objects of type TraceTelemetry. However, the overload that accepts as a first parameter an exception (_logger.LogError(ex, "Unable to complete the operation");) is internally handled as an ExceptionTelemetry object. Since internally, it’s a different type of Telemetry object, and it gets ignored by default.

    To enable logging exceptions, you have to update the way you add Application Insights to your application by setting the TrackExceptionsAsExceptionTelemetry property to false:

    builder.Logging.AddApplicationInsights(
    configureTelemetryConfiguration: (config) =>
     config.ConnectionString = connectionString,
     configureApplicationInsightsLoggerOptions: (options) => options.TrackExceptionsAsExceptionTelemetry = false);
    

    This way, ExceptionsTelemetry objects are treated as TraceTelemetry logs, making them available in Application Insights logs:

    The Exception log appears in Application Insights

    Then, to access the details of the exception like the message and the stack trace, you can look into the customDimensions element of the log entry:

    Details of the Exception log

    Even though this change is necessary to have exception logging work, it is barely described in the official documentation.

    Further readings

    It’s not the first time we have written about logging in this blog.

    For example, suppose you don’t want to use Application Insights but prefer an open-source, vendor-independent log sink. In that case, my suggestion is to try Seq:

    🔗 Easy logging management with Seq and ILogger in ASP.NET | Code4IT

    Logging manually is nice, but you may be interested in automatically logging all the data related to incoming HTTP requests and their responses.

    🔗 HTTP Logging in ASP.NET: how to automatically log all incoming HTTP requests (and its downsides!) | Code4IT

    This article first appeared on Code4IT 🐧

    You can read the official documentation here (even though I find it not much complete and does not show the results):

    🔗 Application Insights logging with .NET | Microsoft docs

    Wrapping up

    This article taught us how to set up Azure Application Insights in an ASP.NET application.
    We touched on the basics, discussing log levels and error handling. In future articles, we’ll delve into some other aspects of logging, such as correlating logs, understanding scopes, and more.

    I hope you enjoyed this article! Let’s keep in touch on LinkedIn, Twitter or BlueSky! 🤜🤛

    Happy coding!

    🐧


    Source link

  • Using WSL and Let’s Encrypt to create Azure App Service SSL Wildcard Certificates

    Using WSL and Let’s Encrypt to create Azure App Service SSL Wildcard Certificates


    There are many let’s encrypt automatic tools for azure but I also wanted to see if I could use certbot in wsl to generate a wildcard certificate for the azure Friday website and then upload the resulting certificates to azure app service.

    Azure app service ultimately needs a specific format called dot PFX that includes the full certificate path and all intermediates.

    Per the docs, App Service private certificates must meet the following requirements:

    • Exported as a password-protected PFX file, encrypted using triple DES.
    • Contains private key at least 2048 bits long
    • Contains all intermediate certificates and the root certificate in the certificate chain.

    If you have a PFX that doesn’t meet all these requirements you can have Windows reencrypt the file.

    I use WSL and certbot to create the cert, then I import/export in Windows and upload the resulting PFX.

    Within WSL, install certbot:

    sudo apt update
    sudo apt install python3 python3-venv libaugeas0
    sudo python3 -m venv /opt/certbot/
    sudo /opt/certbot/bin/pip install --upgrade pip
    sudo /opt/certbot/bin/pip install certbot

    Then I generate the cert. You’ll get a nice text UI from certbot and update your DNS as a verification challenge. Change this to make sure it’s two lines, and your domains and subdomains are correct and your paths are correct.

    sudo certbot certonly --manual --preferred-challenges=dns --email YOUR@EMAIL.COM   
    --server https://acme-v02.api.letsencrypt.org/directory
    --agree-tos --manual-public-ip-logging-ok -d "azurefriday.com" -d "*.azurefriday.com"
    sudo openssl pkcs12 -export -out AzureFriday2023.pfx
    -inkey /etc/letsencrypt/live/azurefriday.com/privkey.pem
    -in /etc/letsencrypt/live/azurefriday.com/fullchain.pem

    I then copy the resulting file to my desktop (check your desktop path) so it’s now in the Windows world.

    sudo cp AzureFriday2023.pfx /mnt/c/Users/Scott/OneDrive/Desktop
    

    Now from Windows, import the PFX, note the thumbprint and export that cert.

    Import-PfxCertificate -FilePath "AzureFriday2023.pfx" -CertStoreLocation Cert:\LocalMachine\My 
    -Password (ConvertTo-SecureString -String 'PASSWORDHERE' -AsPlainText -Force) -Exportable

    Export-PfxCertificate -Cert Microsoft.PowerShell.Security\Certificate::LocalMachine\My\597THISISTHETHUMBNAILCF1157B8CEBB7CA1
    -FilePath 'AzureFriday2023-fixed.pfx' -Password (ConvertTo-SecureString -String 'PASSWORDHERE' -AsPlainText -Force)

    Then upload the cert to the Certificates section of your App Service, under Bring Your Own Cert.

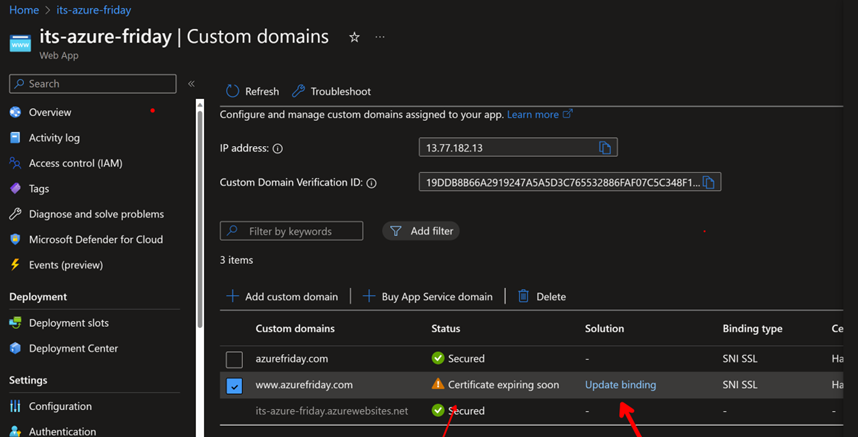
    Custom Domains in Azure App Service

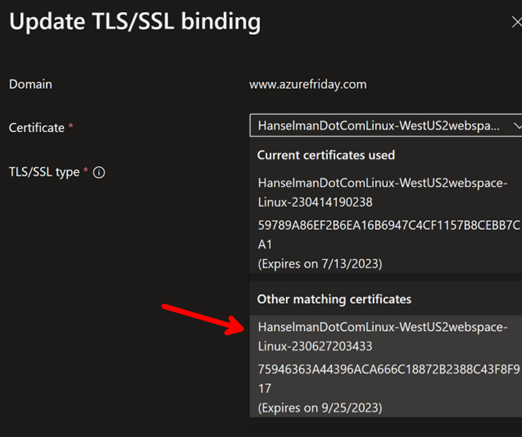
    Then under Custom Domains, click Update Binding and select the new cert (with the latest expiration date).

    image

    Next step is to make this even more automatic or select a more automated solution but for now, I’ll worry about this in September and it solved my expensive Wildcard Domain issue.


    About Scott

    Scott Hanselman is a former professor, former Chief Architect in finance, now speaker, consultant, father, diabetic, and Microsoft employee. He is a failed stand-up comic, a cornrower, and a book author.

    facebook
    bluesky
    subscribe
    About   Newsletter

    Hosting By
    Hosted on Linux using .NET in an Azure App Service


    Source link