When performing a talk, the audience experience is as important as the content. They must be focused on what you say, and not get distracted by external outputs. So, here’s 10 tips to rock your next virtual talk.
Table of Contents
Just a second! 🫷 If you are here, it means that you are a software developer.
So, you know that storage, networking, and domain management have a cost .
If you want to support this blog, please ensure that you have disabled the adblocker for this site. I configured Google AdSense to show as few ADS as possible – I don’t want to bother you with lots of ads, but I still need to add some to pay for the resources for my site.
Thank you for your understanding. – Davide
More and more developers crave to be also tech speakers. We can see every day dozens of meetups, live streaming, and YouTube videos by developers from all over the world. But regardless of the topic and the type of talk you’re doing, there are a few tips you should keep in mind to rock the execution.
Those tips are not about the content, but about the presentation itself. So, maybe, consider re-reading this checklist about 30 minutes before your next virtual conference.
1- Hide desktop icons
Many of you have lots of icons on your desktop, right? Me too. I often save on Desktop temporary files (that I always forget to move or delete) and many program icons, like Postman, Fiddler, Word, and so on.
They are just a distraction to your audience. You should keep the desktop as clean as possible.
You can do it in 2 ways: hide all the icons (on Windows: right-click > View > untick Show desktop icons) or just remove the ones that are not necessary.
The second option is better if you have lots of content to show from different sources, like images, plots, demo with different tools, and so on.
If you have everything under a single folder, you can simply hide all icons and pin that folder on Quick Access.
2- Choose a neutral desktop background
Again, your audience should focus on your talk, not on your desktop. So just remove funny or distracting background images.
Even more, if you use memes or family photos as desktop background.
A good idea is to create a custom desktop background for the event you are participating in: a simple image with the name of the talk, your name, and your social contacts.
3- Mute your phone
Avoid all the possible distractions. WhatsApp notifications, calls from Call Centres, alarm clocks you forgot to turn off…
So, just use Airplane mode.
4- Remove useless bookmarks (or use a different browser)
Just as desktop icons, bookmarks can distract your audience.
You don’t want to show everyone which social networks are you using, what are the projects you’re currently working on, and other private info about you.
A good alternative is to use a different browser. But remember to do a rehearsal with that browser: sometimes some JavaScript and CSS functionalities are not available on every browser, so don’t take anything for granted.
5- Close background processes
What if you get an awkward message on Skype or Slack while you’re sharing your screen?
So, remember to close all useless background processes: all the chats (Skype, Discord, Telegram…) and all the backup platforms (OneDrive, Dropbox, and so on).
A risk: unwanted notifications that appear while sharing your screen. And even worse, all those programs require network bandwidth and use CPU and Memory: shutting them down will boost the other applications and make everything run smoother.
6- Check font size and screen resolution
You don’t know the device your audience will use. Some of them will watch you talk on a smartphone, some others on a 60″ TV.
So, even if you’re used to small fonts and icons, make everything bigger. Start with screen resolution. If it is OK, now increase the font size for both your slides and your IDE.
Make sure everyone can read it. If you can, during the rehearsals share your screen with a smartphone and a big TV, and find the balance.
7- Disable dark mode
Accessibility is the key, even more for virtual events. And not everyone can see everything as you do. So, switch everything to light mode: IDEs, websites, tools. Everything that natively comes with light mode.
8- Check mic volume
This is simple: if your mic volume is too low, your audience won’t hear a word from you. So, instead of screaming for one hour, just put your mic near you or increase the volume.
9- Use ZoomIt to draw on your screen
«Ok, now, I click on this button on the top-left corner with the Home icon».
How many times have you heard this phrase? It’s not wrong to say so, but you can simply show it. Remember, show, don’t tell!
For Windows, you can install a small tool, ZoomIt, that allows you to draw lines, arrows, and shapes on your screen.
You can read more on this page by Microsoft, where you can find the download file, some shortcuts, and more info.
So, download it, try out some shortcuts (eg: R, G, B to use a red, green, or blue pen, and Hold Ctrl + Shift to draw an arrow) and use it to help your audience see what you’re indicating with your mouse.
10- Have a backup in case of network failures
Your internet connection goes down during the live. First reaction: shock. But then, you remember you have everything under control: you can use your smartphone as a hotspot and use that connection to move on with your talk. So, always have a plan B.
And what if the site you’re showing for your demos goes down? Say that you’re explaining what are Azure Functions, and suddenly the Azure Dashboard becomes unavailable. How to prevent this situation?
You can’t. But you can have a backup plan: save screenshots and screencasts, and show them if you cannot access the original sites.
Wrapping up
We’ve seen that there are lots of things to do to improve the quality of your virtual talks. If you have more tips to share, share them in the comment section below or on this discussion on Twitter.
Performing your first talks is really challenging, I know. But it’s worth a try. If you want to read more about how to be ready for it, here’s the recap of what I’ve learned after my very first public speech.
A Git commit represents the status of a system. Learn how to validate that your code builds, is well-formatted, and all the tests pass by adding a Git hook!
Table of Contents
Just a second! 🫷 If you are here, it means that you are a software developer.
So, you know that storage, networking, and domain management have a cost .
If you want to support this blog, please ensure that you have disabled the adblocker for this site. I configured Google AdSense to show as few ADS as possible – I don’t want to bother you with lots of ads, but I still need to add some to pay for the resources for my site.
Thank you for your understanding. – Davide
If you need to run operations before completing a Git commit, you can rely on Git Hooks.
Git hooks are scripts that run automatically whenever a particular event occurs in a Git repository. They let you customize Git’s internal behaviour and trigger customizable actions at key points in the development life cycle.
Extending Git hooks allows you to plug in custom functionalities to the regular Git flow, such as Git message validation, code formatting, etc.
I’ve already described how to use Husky with NPM, but here I’m gonna use Husky.NET, the version of Husky created for .NET-based applications.
Git hooks: a way to extend Git operations
As we said, Git hooks are actions that run during specific phases of Git operations.
Git hooks fall into 4 categories:
client-side hooks related to the committing workflow: they execute when you run git commit on your local repository;
client-side hooks related to the email workflow: they are executed when running git am, which is a command that allows you to integrate mails and Git repositories (I’ve never used it. If you are interested in this functionality, here’s the official documentation);
client-side hooks related to other operations: these hooks run on your local repository when performing operations like git rebase;
server-side hooks: they run after a commit is received on the remote repository, and they can reject a git push operation.
Let’s focus on the client-side hooks that run when you commit changes using git commit.
Hook name
Description
pre-commit
This hook is the first invoked by git commit (if you don’t use the -m flag, it is invoked before asking you to insert a commit message) and can be used to inspect the snapshot that is about to be committed.
prepare-commit-msg
This hook is invoked by git commit and can be used to edit the default commit message when it is generated by an automated tool.
commit-msg
This hook is invoked by git commit and can be used to validate or modify the commit message after it is entered by the user.
post-commit
This hook is invoked after the git commit execution has run correctly, and it is generally used to fire notifications.
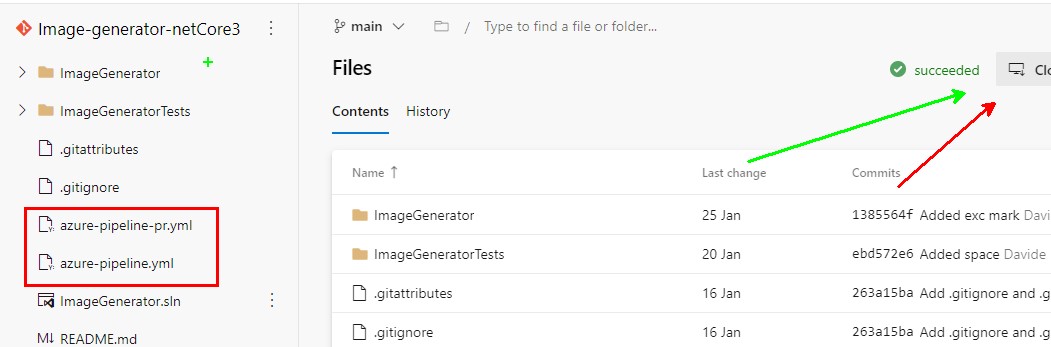
How to install Husky.NET and its dependencies in a .NET Application
Husky.NET must be installed in the root folder of the solution.
You first have to create a tool-manifest file in the root folder by running:
This command creates a file named dotnet-tools.json under the .config folder: here you can see the list of external tools used by dotnet.
After running the command, you will see that the dotnet-tools.json file contains this element:
{
  "version": 1,
  "isRoot": true,
  "tools": {}
}
Now you can add Husky as a dotnet tool by running:
dotnet tool install Husky
After running the command, the file will contain something like this:
This command creates a new file, pre-commit (without file extension), under the .husky folder. By default, it appears like this:
#!/bin/sh
. "$(dirname "$0")/_/husky.sh"## husky task runner examples -------------------## Note : for local installation use 'dotnet' prefix. e.g. 'dotnet husky'## run all tasks#husky run### run all tasks with group: 'group-name'#husky run --group group-name## run task with name: 'task-name'#husky run --name task-name## pass hook arguments to task#husky run --args "$1" "$2"## or put your custom commands -------------------#echo 'Husky.Net is awesome!'echo 'Hello world!'
The default content is pretty useless; it’s time to customize that hook.
Notice that the latest command has also generated a task-runner.json file; we will use it later.
Your first pre-commit hook
To customize the script, open the file located at .husky/pre-commit.
Here, you can add whatever you want.
In the example below, I run commands that compile the code, format the text (using dotnet format with the rules defined in the .editorconfig file), and then run all the tests.
#!/bin/sh
. "$(dirname "$0")/_/husky.sh"echo 'Building code'
dotnet build
echo 'Formatting code'
dotnet format
echo 'Running tests'
dotnet test
Then, add it to Git, and you are ready to go. 🚀 But wait…
3 ways to manage dotnet format with Husky.NET
There is a problem with the approach in the example above.
Let’s simulate a usage flow:
you modify a C# class;
you run git commit -m "message";
the pre-commit hook runs dotnet build;
the pre-commit hook runs dotnet format;
the pre-commit hook runs dotnet test;
after the hooks, the commit is created.
What is the final result?
Since dotnet format modifies the source files, and given that the snapshot has already been created before executing the hook, all the modified files will not be part of the final commit!
Also, dotnet format executes linting on every file in the solution, not only those that are part of the current snapshot. The operation might then take a lot of time, depending on the size of the repository, and most of the time, it will not update any file (because you’ve already formatted everything in a previous run).
We have to work out a way to fix this issue. I’ll suggest three approaches.
Include all the changes using Git add
The first approach is quite simple: run git add . after dotnet format.
So, the flow becomes:
you modify a C# class;
you run git commit -m "message";
the pre-commit hook runs dotnet build;
the pre-commit hook runs dotnet format;
the pre-commit hook runs git add .;
the pre-commit hook runs dotnet test;
Git creates the commit.
This is the most straightforward approach, but it has some downsides:
dotnet format is executed on every file in the solution. The more your project grows, the slower your commits become;
git add . adds to the current snapshot all the files modified, even those you did not add to this commit on purpose (maybe because you have updated many files and want to create two distinct commits).
So, it works, but we can do better.
Execute a dry run of dotnet-format
You can add the --verify-no-changes to the dotnet format command: this flag returns an error if at least one file needs to be updated because of a formatting rule.
Let’s see how the flow changes if one file needs to be formatted.
you modify a C# class;
you run git commit -m "message";
the pre-commit hook runs dotnet build;
the pre-commit hook runs dotnet format --verify-no-changes;
the pre-commit hook returns an error and aborts the operation;
you run dotnet format on the whole solution to fix all the formatting issues;
you run git add .;
you run git commit -m "message";
the pre-commit hook runs dotnet build;
the pre-commit hook runs dotnet format --verify-no-changes. Now, there is nothing to format, and we can proceed;
the pre-commit hook runs dotnet test;
Git creates the commit.
Notice that, this way, if there is something to format, the whole commit is aborted. You will then have to run dotnet format on the entire solution, fix the errors, add the changes to the snapshot, and restart the flow.
It’s a longer process, but it allows you to have complete control over the formatted files.
Also, you won’t risk including in the snapshot the files you want to keep staged in order to add them to a subsequent commit.
Run dotnet-format only on the staged files using Husky.NET Task Runner
The third approach is the most complex but with the best result.
If you recall, during the initialization, Husky added two files in the .husky folder: pre-commit and task-runner.json.
The key to this solution is the task-runner.json file. This file allows you to create custom scripts with a name, a group, the command to be executed, and its related parameters.
Here, we have specified a name, dotnet-format-staged-files, the command to run, dotnet, with some parameters listed in the args array. Notice that we can filter the list of files to be formatted by using the ${staged} parameter, which is populated by Husky.NET.
We have also added this task to a group named pre-commit-operations that we can use to reference a list of tasks to be executed together.
If you want to run a specific task, you can use dotnet husky run --name taskname. In our example, the command would be dotnet husky run --name dotnet-format-staged-files.
If you want to run a set of tasks belonging to the same group, you can run dotnet husky run --group groupname. In our example, the command would be dotnet husky run --group pre-commit-operations.
The last step is to call these tasks from within our pre-commit file. So, replace the old dotnet format command with one of the above commands.
Final result and optimizations of the pre-commit hook
Now that everything is in place, we can improve the script to make it faster.
Let’s see which parts we can optimize.
The first step is the build phase. For sure, we have to run dotnet build to see if the project builds correctly. You can consider adding the --no-restore flag to skip the restore step before building.
Then we have the format phase: we can avoid formatting every file using one of the steps defined before. I’ll replace the plain dotnet format with the execution of the script defined in the Task Runner (it’s the third approach we saw).
Then, we have the test phase. We can add both the --no-restore and the --no-build flag to the command since we have already built everything before. But wait! The format phase updated the content of our files, so we still have to build the whole solution. Unless we swap the build and the format phases.
So, here we have the final pre-commit file:
#!/bin/sh
. "$(dirname "$0")/_/husky.sh"echo 'Ready to commit changes!'echo 'Format'dotnet husky run --name dotnet-format-staged-files
echo 'Build'dotnet build --no-restore
echo 'Test'dotnet test --no-restore
echo 'Completed pre-commit changes'
Yes, I know that when you run the dotnet test command, you also build the solution, but I prefer having two separate steps just for clarity!
Ah, and don’t remove the #!/bin/sh at the beginning of the script!
How to skip Git hooks
To trigger the hook, just run git commit -m "message". Before completing the commit, the hook will run all the commands. If one of them fails, the whole commit operation is aborted.
There are cases when you have to skip the validation. For example, if you have integration tests that rely on an external source currently offline. In that case, some tests will fail, and you will be able to commit your code only once the external system gets working again.
You can skip the commit validation by adding the --no-verify flag:
git commit -m "my message" --no-verify
Further readings
Husky.NET is a porting of the Husky tool we already used in a previous article, using it as an NPM dependency. In that article, we also learned how to customize Conventional Commits using Git hooks.
One last thing: we installed Husky.NET using dotnet tools. If you want to learn more about this topic, I found an excellent article online that you might want to read:
Millions of articles extolling the advantages of remote work. It can be found online, but what about the less glamorous aspects of working from home? While obtaining remote employment has its benefits, there are a few things you may want to put into a statement before submitting your application if this is your first-time job search and applying for a remote position.
Being alone when working remotely
The days, weeks, and months might quickly start to seem lonely, although working remotely from home may seem like an introvert’s dream. Depending on the demands of your remote employees, you can go days without speaking to anyone, and when you do, it’s frequently over video chat or messaging software. By allowing their employees to socialise online or in person whenever possible, good remote employers will attempt to create a community among their staff.
It requires more effort to communicate
It’s simple to approach a coworker across the room or drop by their office in an office setting to discuss a project. It takes work to communicate as a remote team and includes job search. It’s far simpler for ideas to get lost in translation when you can’t share them in person and groups can span multiple time zones. Indeed, platforms and Slack make remote discussions more manageable. Setting your online status is as important as remembering to send a follow-up email or participate in a group chat when efficiently engaging with a remote team.
The Work of Your Remote Employer May Cross Many Time Zones
Working in a remote team requires becoming acclimated to communicating with individuals. Even if it’s simple to do this online, you still need to account for everyone’s time zone and national holidays. It may be necessary to compromise on your work schedule or schedule meetings at odd hours while working remotely with a large international team. It might not be for you to work remotely as part of a global team across time zones if you prefer a set 9 to 5 and demand constant access to all of your coworkers at RemoteHub. Using world clock apps is a simple approach to monitoring time in several time zones.
You might not receive payment in your home currency
Employers get to choose from among the people on the planet, which is one benefit of using a remote workforce. You might have to get used to receiving your pay in a different currency if you’re one of those remote workers. Every employer has a different pay structure. Some online firms will deposit money into your bank account immediately, while others may use a third-party payment system.
A Quality Remote Setup Can Be Expensive
You don’t fully understand how profitable it is to have office supplies like printers, stationery, ergonomic chairs, and standing desks until you leave an office setting. Most small companies expect you to have access to the tools you need to execute your job, while others will provide you with a budget to set up a remote home office. In addition to small items like pencils and paper, collect a desk, an ergonomic chair, a computer, a second monitor, a printer, headphones, a camera, and a quick internet connection.
Launching a basement renovation business can be an exciting yet challenging venture. The growing home improvement industry offers numerous opportunities, but success requires a sound understanding of key factors that can impact your business. By focusing on areas like moisture management, energy efficiency, and financial safeguards against fraud, you can build a robust foundation for your business and ensure long-term profitability.
Managing Moisture and Mold
Basements, by their very nature, are prone to moisture issues which can prove detrimental if not addressed properly. Mold begins to grow on damp surfaces quickly, potentially within 24 to 48 hours, making it imperative for business owners to incorporate effective waterproofing solutions. Implementing moisture management strategies, such as proper sealing and ventilation, ensures a healthier indoor environment for clients and protects the integrity of the renovation work.
Understanding the importance of moisture control can also enhance the reputation of your business. Clients are likely to choose a contractor who prioritizes their long-term comfort and safety in the space. By offering preventative solutions and educating clients about ongoing maintenance, you position your business as a trusted resource in basement renovations.
Moreover, addressing moisture-related issues upfront can lead to cost savings in the long run. Tackling potential problems before they escalate reduces the risk of adverse effects on construction materials and additional expenses. Such proactive measures not only protect your business from unexpected costs but also boost client satisfaction and referrals.
Achieving Energy Efficiency
Energy efficiency is increasingly becoming a priority for homeowners, and your basement renovation business should reflect this trend. Modernizing basements with energy-efficient features brings immediate and long-term benefits to clients. For instance, using LED lights in renovation projects is not only appealing but also practical, as they consume up to 80% less energy than traditional incandescent lighting.
By integrating energy-saving measures, your business can set itself apart in a competitive market. Offering solutions such as enhanced insulation, efficient HVAC systems, and smart home technology cultivates a reputation for innovation and environmental responsibility. These improvements not only enhance the comfort of the renovated space but also help reduce energy bills for clients over time.
Furthermore, aligning your renovation services with green building standards opens the door to new clientele interested in sustainable living. As awareness around environmental impact grows, businesses that adapt accordingly find they can attract a diverse client base. Demonstrating a commitment to sustainability not only establishes credibility but can also tap into emerging market demands.
Safeguarding Against Fraud
While the prospect of fraud may not be immediately apparent, it is a significant concern for any business, including basement renovation operations. Statistics reveal that businesses lose approximately 5% of their revenue each year to fraudulent activities. Cultivating a secure business strategy is essential to minimizing these risks and protecting your financial interests.
One effective method of reducing fraud is implementing robust financial controls. Monitoring cash flows, conducting regular audits, and separating financial duties among employees can diminish the potential for deceptive activities. By maintaining stringent internal processes, you help preserve the integrity and reputation of your business.
Additionally, investing in employee training to recognize and report suspicious behavior empowers your team to act proactively. An informed workforce is one of your greatest defenses against fraud, ensuring you can focus on serving clients and developing your business. By prioritizing security measures, you contribute to both your enterprise’s health and clients’ peace of mind.
Launching a basement renovation business is a rewarding endeavor, especially when armed with the knowledge of pivotal factors impacting success. Addressing moisture and mold issues, prioritizing energy efficiency, and securing operations against fraud are essential components. By integrating these elements, you create a dynamic and resilient business model poised for growth and longevity.