NITEX is not just another fashion-tech company. Their mission is to redefine the supply chain for fashion – bringing speed, sustainability, and intelligence to a traditionally rigid process. Their platform spans the entire workflow: design, trend forecasting, material sourcing, production, and logistics. In short, they offer a seamless, end-to-end system for brands who want to move faster and smarter.
When NITEX approached us, the challenge was clear: they needed more than a website. They needed a platform that could translate their vision into an experience that worked for multiple audiences – brands seeking services, investors looking for clarity, factories wanting partnerships, and talent exploring opportunities.
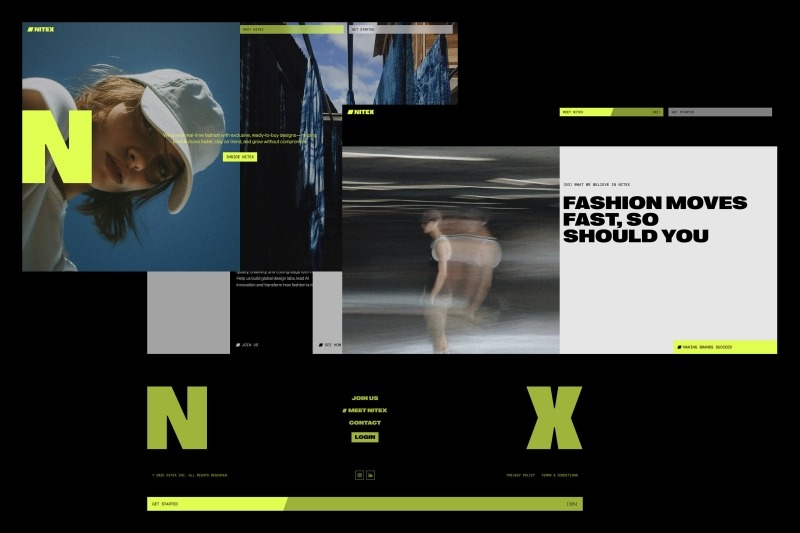
The project took shape over several months, moving from brand definition to UX architecture, UI design, and technical development. The turning point came with the realization that a single, linear site could not balance storytelling with action. To resolve this, we developed a dual-structure model: one path for narrative and inspiration, and another for practical conversion. This idea shaped every design and technical decision moving forward.
Crafting the Hybrid Identity
NITEX’s identity needed to reflect a unique duality: part fashion brand, part technology company. Our approach was to build a system that could flex between editorial elegance and sharp technical clarity.
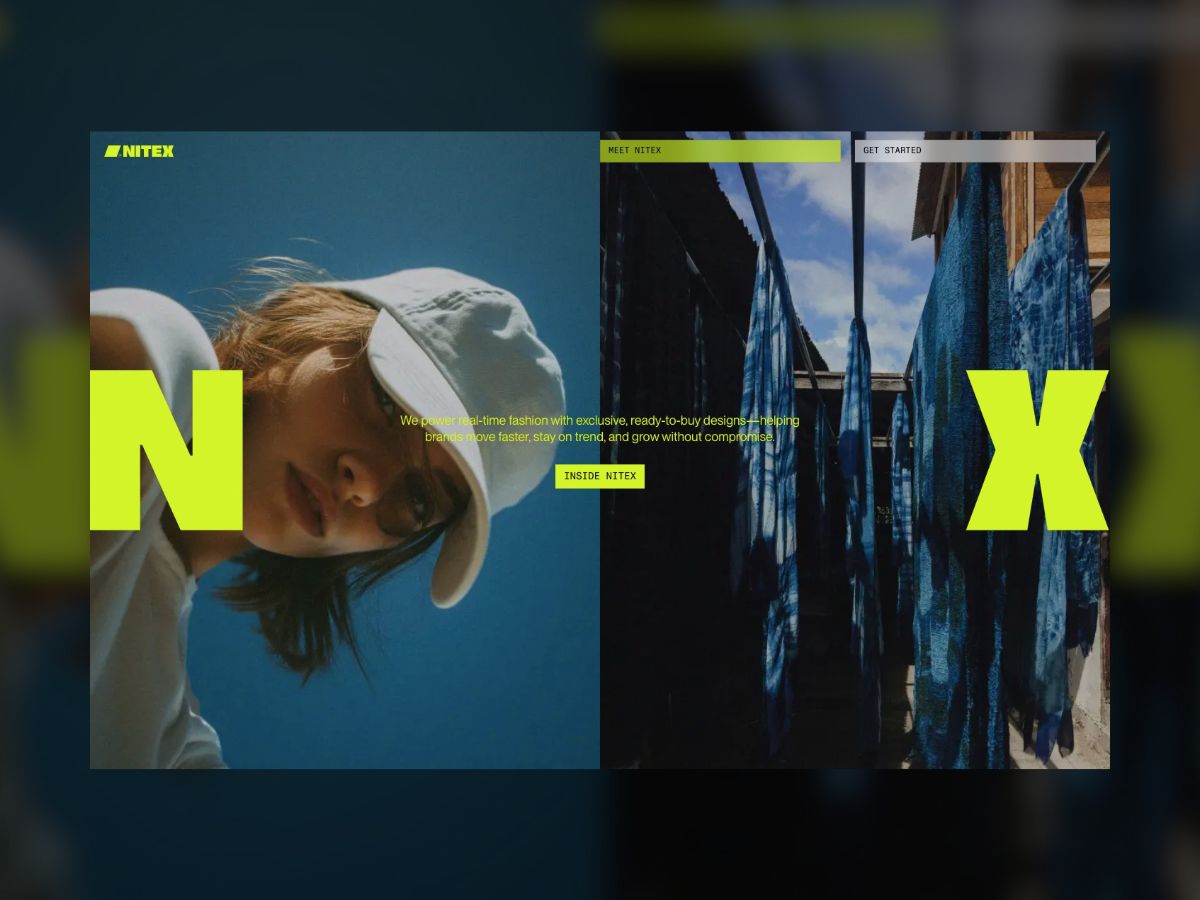
At the heart of the identity sits the NITEX logo, an angular form created from a forward-leaning N and X. This symbol is more than a mark – it acts as a flexible frame. The hollow center creates a canvas for imagery, data, or color, visualizing collaboration and adaptability.
This angular geometry informed much of the visual language across the site:
Buttons expand or tilt along the logo’s angles when hovered.
The progress bar in navigation and footer fills in the same diagonal form.
Headlines reveal themselves with angled wipes, reinforcing a consistent rhythm.
Typography was kept bold yet minimal, with global sans-serif structures that feel equally at home in high fashion and digital environments. Imagery played an equally important role. We chose photography that conveyed motion and energy, often with candid blur or dynamic framing. To push this further, we incorporated AI-generated visuals, adding intensity and reinforcing the sense of momentum at the core of the NITEX story. The result is a brand system that feels dynamic, flexible, and scalable – capable of stretching from streetwear to luxury contexts while always staying rooted in clarity and adaptability.
Building the Engine
A complex brand and experience required a strong technical foundation. For this, our developers chose tools that balanced performance, flexibility, and scalability:
Frontend: Nuxt
Backend / CMS: Sanity
Animations & Motion: GSAP and the Web Animations API
The heavy reliance on native CSS transitions and the Web Animations API ensured smooth performance even on low-powered devices. GSAP was used to orchestrate more complex transitions while still keeping load times and resource use efficient. A key architectural decision was to give overlays their own URLs. This meant that when users opened deep-dive layers or content modules, those states were addressable, shareable, and SEO-friendly. This approach kept the experience immersive while ensuring that content remained accessible outside the narrative scroll.
Defining the Flow
Several features stand out in the NITEX site for how they balance storytelling with functionality:
Expandable overlays: Each narrative chapter can unfold into deep-dive layers – showing case studies, workflow diagrams, or leadership perspectives without breaking the scroll.
Dynamic conversion flows: Forms adapt to the user’s audience type – brands, investors, talent, or factories – showing tailored fields and next steps.
Calendar integration: Visitors can book demos or design lab visits directly, streamlining the lead process and reinforcing immediacy.
This mix of storytelling modules and smart conversion flows ensured that every audience had a pathway forward, whether to be inspired, informed, or engaged.
Bringing It to Life
NITEX’s brand identity found its fullest expression in the motion and interaction design of the site. The site opens with scroll-based storytelling, each chapter unfolding with smooth transitions. Page transitions maintain energy, using angled wipes and overlays that slide in from the side. These overlays carry their own links, allowing users to dive deep without losing orientation. The angular motion language of the logo carries through:
Buttons expand dynamically on hover.
Rectangular components tilt into angular forms.
The dual-image module sees the N and X frame track the viewport, dynamically revealing new perspectives.
This creates a consistent visual rhythm, where every motion feels connected to the brand’s DNA. The imagery reinforces this, emphasizing speed and creativity through motion blur, candid composition, and AI-driven intensity. Importantly, we kept the overall experience modular and scalable. Each content block is built on a flexible grid with clear typographic hierarchy. This ensures usability while leaving room for surprise – whether it’s an animated reveal, a bold image transition, or a subtle interactive detail.
Under the Hood
From a structural standpoint, the site was designed to scale as NITEX grows. The codebase follows a modular approach, with reusable components that can be repurposed across sections. Sanity’s CMS allows editors to easily add new chapters, forms, or modules without breaking the system.
The split-entry structure – narrative vs. action – was the architectural anchor. This allowed us to keep storytelling immersive without sacrificing usability for users who came with a clear transactional intent.
Looking Back
This project was as much about balance as it was about creativity. Balancing brand storytelling with user conversion. Balancing motion and expressiveness with speed and performance. Balancing multiple audience needs within a single coherent system.
One of the most rewarding aspects was seeing how the dual-experience model solved what initially felt like an unsolvable challenge: how to serve users who want inspiration and those who want action without building two entirely separate sites.
The deep-dive overlays also proved powerful, letting NITEX show rather than just tell their story. They allowed us to layer complexity while keeping the surface experience clean and intuitive.
Looking ahead, the NITEX platform is built to evolve. Future possibilities include investor dashboards with live performance metrics, brand-specific case modules curated by industry, or interactive workflow tools aligned with NITEX’s trend-to-delivery logic. The foundation we built makes all of this possible.
Ultimately, the NITEX project reflects the company’s own values: clarity, adaptability, and speed. For us, it was an opportunity to merge brand design, UX, UI, and development into a single seamless system – one that redefines what a fashion-tech platform can look and feel like.
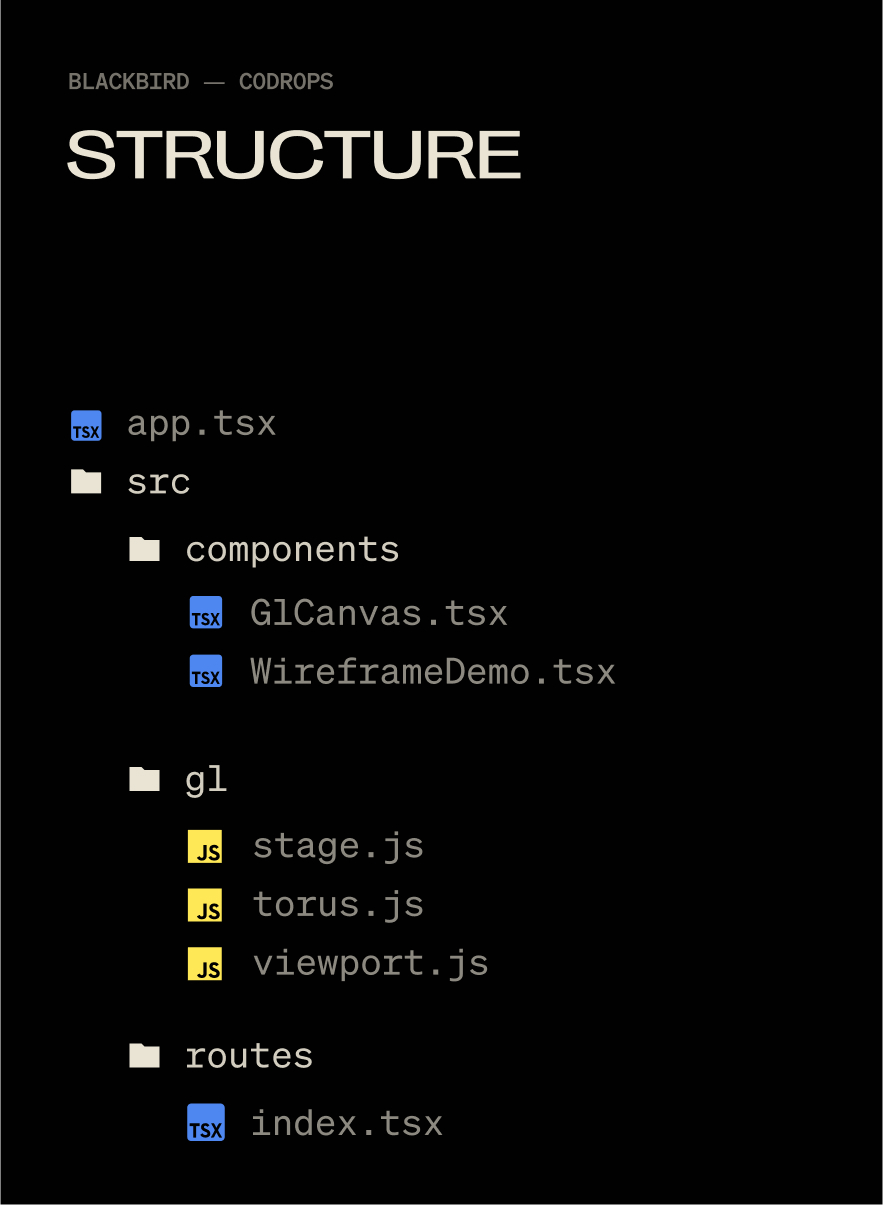
Blackbird was a fun, experimental site that I used as a way to get familiar with WebGL inside of Solid.js. It went through the story of how the SR-71 was built in super technical detail. The wireframe effect covered here helped visualize the technology beneath the surface of the SR-71 while keeping the polished metal exterior visible that matched the sites aesthetic.
Here is how the effect looks like on the Blackbird site:
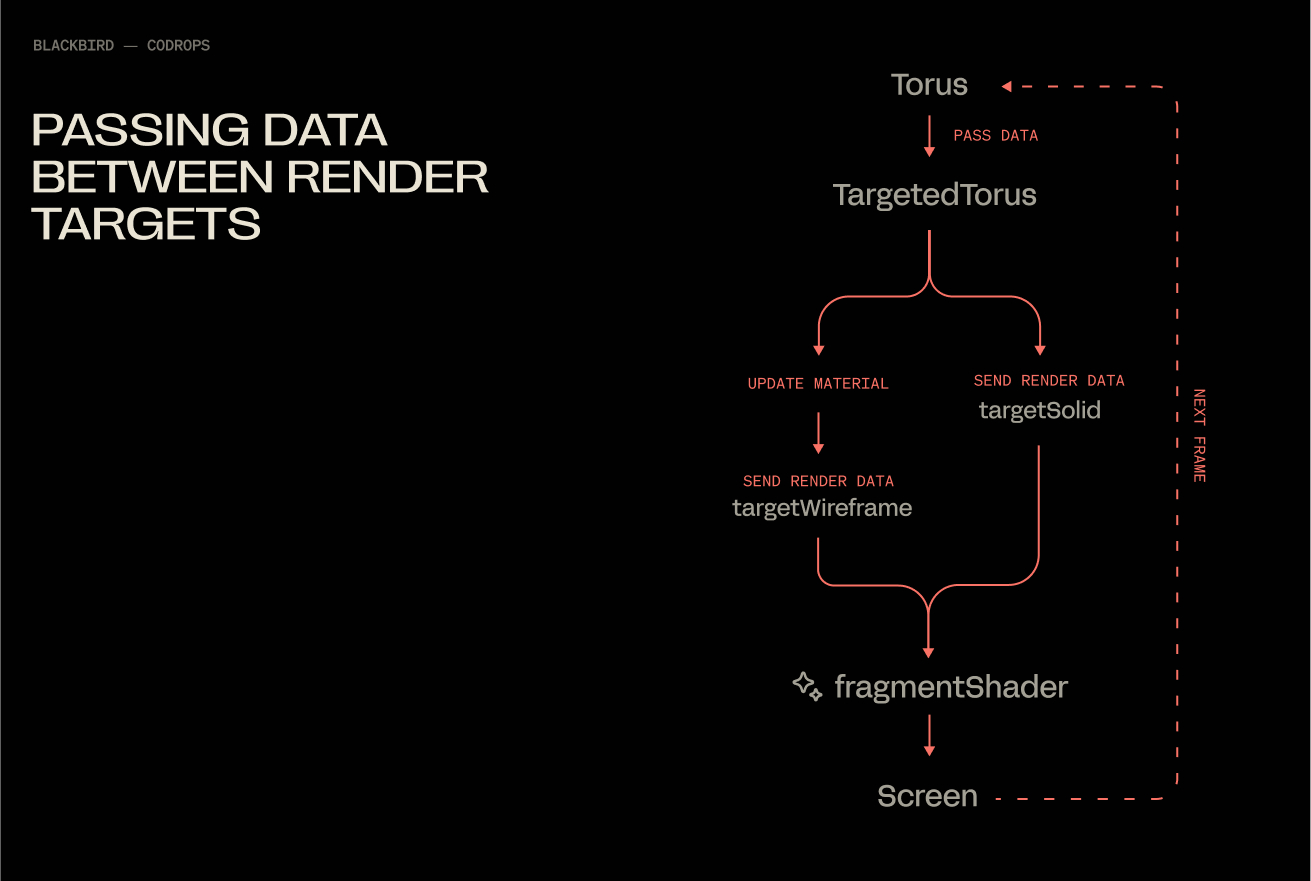
In this tutorial, we’ll rebuild that effect from scratch: rendering a model twice, once as a solid and once as a wireframe, then blending the two together in a shader for a smooth, animated transition. The end result is a flexible technique you can use for technical reveals, holograms, or any moment where you want to show both the structure and the surface of a 3D object.
There are three things at work here: material properties, render targets, and a black-to-white shader gradient. Let’s get into it!
But First, a Little About Solid.js
Solid.js isn’t a framework name you hear often, I’ve switched my personal work to it for the ridiculously minimal developer experience and because JSX remains the greatest thing since sliced bread. You absolutely don’t need to use the Solid.js part of this demo, you could strip it out and use vanilla JS all the same. But who knows, you may enjoy it 🙂
TLDR: Full-stack JSX without all of the opinions of Next and Nuxt, plus it’s like 8kb gzipped, wild.
The technical version: Written in JSX, but doesn’t use a virtual DOM, so a “reactive” (think useState()) doesn’t re-render an entire component, just one DOM node. Also runs isomorphically, so "use client" is a thing of the past.
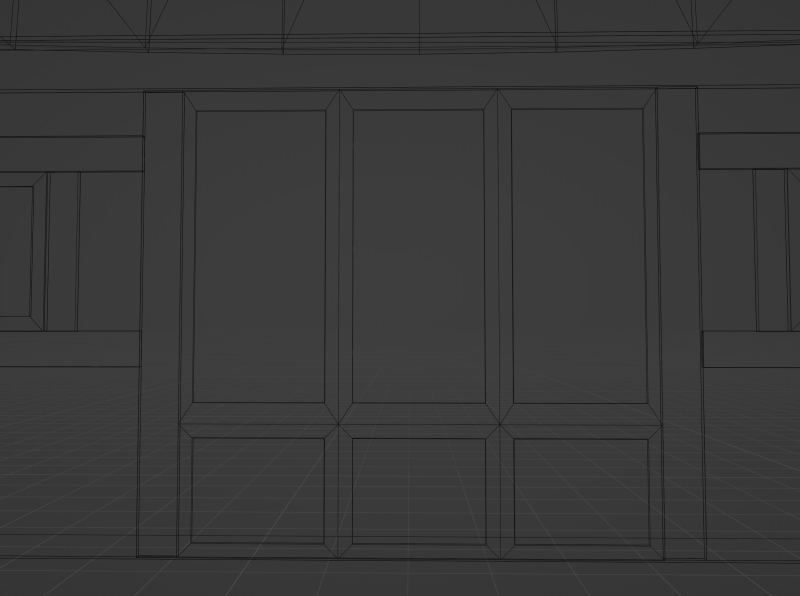
Setting Up Our Scene
We don’t need anything wild for the effect: a Mesh, Camera, Renderer, and Scene will do. I use a base Stage class (for theatrical-ish naming) to control when things get initialized.
A Global Object for Tracking Window Dimensions
window.innerWidth and window.innerHeight trigger document reflow when you use them (more about document reflow here). So I keep them in one object, only updating it when necessary and reading from the object, instead of using window and causing reflow. Notice these are all set to 0 and not actual values by default. window gets evaluated as undefined when using SSR, so we want to wait to set this until our app is mounted, GL class is initialized, and window is defined to avoid everybody’s favorite error: Cannot read properties of undefined (reading ‘window’).
Before we can render anything, we need a small framework to handle our scene setup, rendering loop, and resizing logic. Instead of scattering this across multiple files, we’ll wrap it in a Stage class that initializes the camera, renderer, and scene in one place. This makes it easier to keep our WebGL lifecycle organized, especially once we start adding more complex objects and effects.
// src/gl/stage.js

import { WebGLRenderer, Scene, PerspectiveCamera } from 'three';
import { viewport, resizeViewport } from './viewport';

class Stage {
  init(element) {
    resizeViewport() // Set the initial viewport dimensions, helps to avoid using window inside of viewport.js for SSR-friendliness

    this.camera = new PerspectiveCamera(45, viewport.aspectRatio, 0.1, 1000);
    this.camera.position.set(0, 0, 2); // back the camera up 2 units so it isn't on top of the meshes we make later, you won't see them otherwise.

    this.renderer = new WebGLRenderer();
    this.renderer.setSize(viewport.width, viewport.height);
    element.appendChild(this.renderer.domElement); // attach the renderer to the dom so our canvas shows up

    this.renderer.setPixelRatio(viewport.devicePixelRatio); // Renders higher pixel ratios for screens that require it.

    this.scene = new Scene();
  }

  render() {
    this.renderer.render(this.scene, this.camera);
    requestAnimationFrame(this.render.bind(this));
// All of the scenes child classes with a render method will have it called automatically
    this.scene.children.forEach((child) => {
      if (child.render && typeof child.render === 'function') {
        child.render();
      }
    });
  }

  resize() {
    this.renderer.setSize(viewport.width, viewport.height);
    this.camera.aspect = viewport.aspectRatio;
    this.camera.updateProjectionMatrix();

// All of the scenes child classes with a resize method will have it called automatically
    this.scene.children.forEach((child) => {
      if (child.resize && typeof child.resize === 'function') {
        child.resize();
      }
    });
  }
}

export default new Stage();
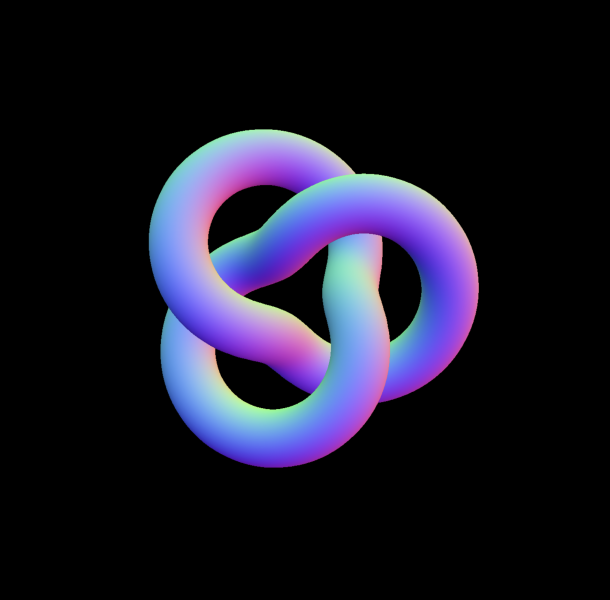
And a Fancy Mesh to Go With It
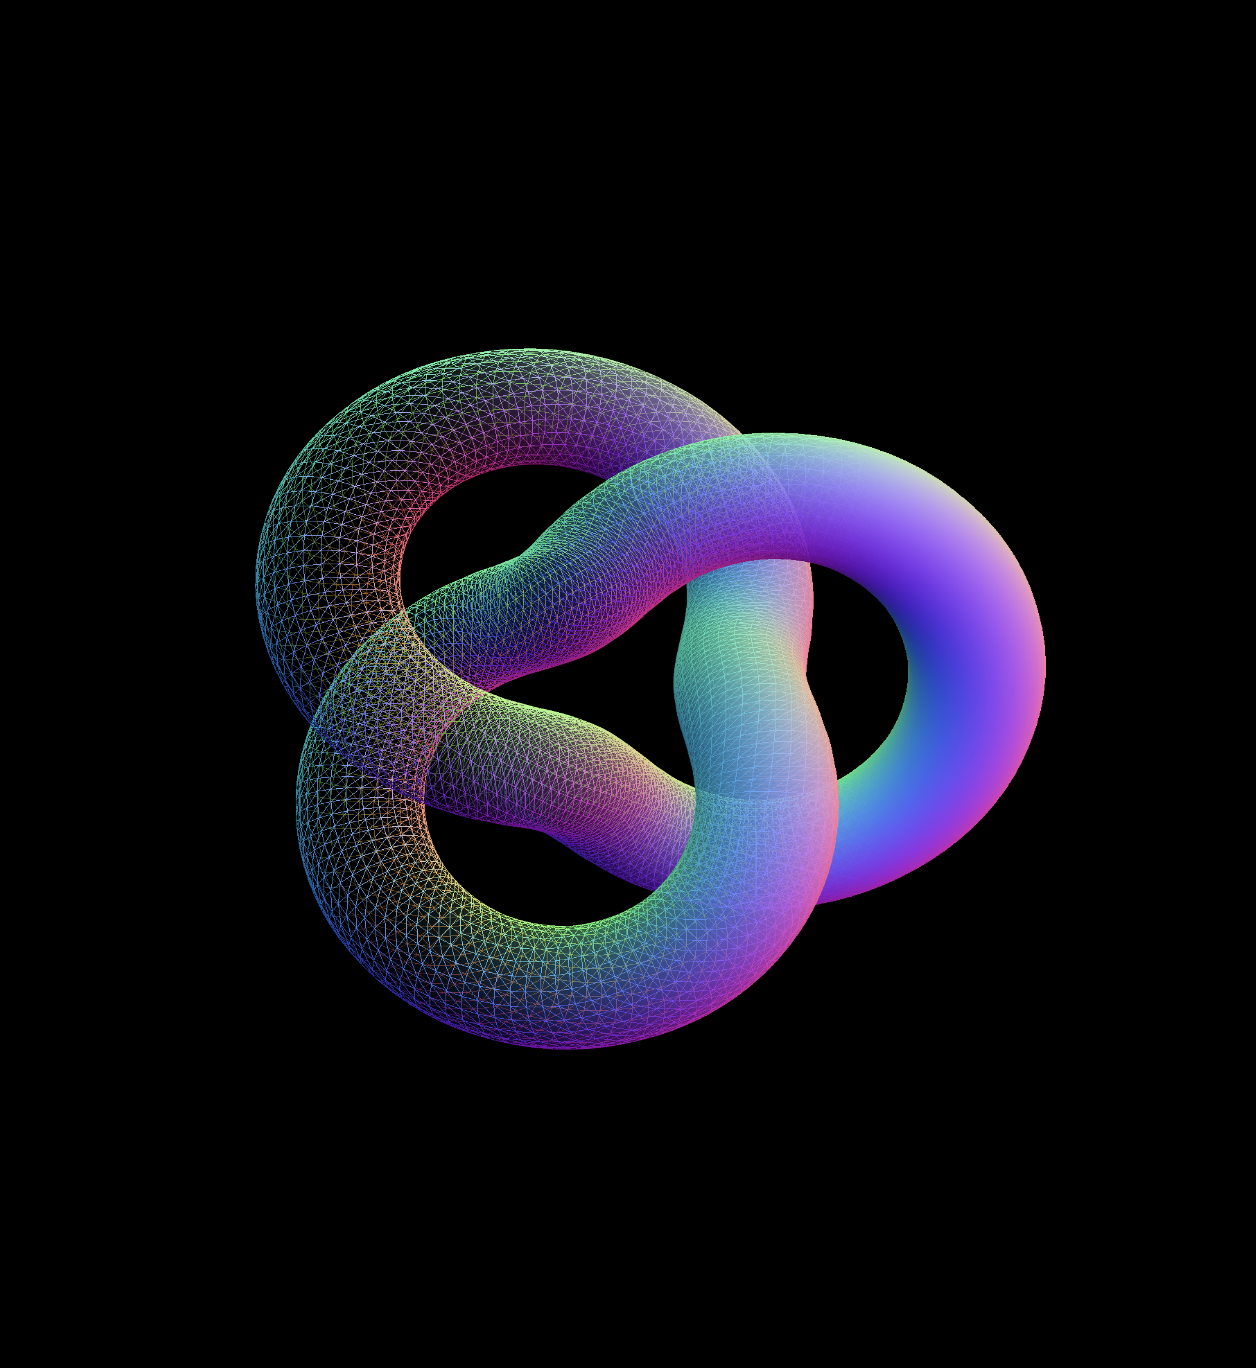
With our stage ready, we can give it something interesting to render. A torus knot is perfect for this: it has plenty of curves and detail to show off both the wireframe and solid passes. We’ll start with a simple MeshNormalMaterial in wireframe mode so we can clearly see its structure before moving on to the blended shader version.
// src/gl/torus.js

import { Mesh, MeshBasicMaterial, TorusKnotGeometry } from 'three';

export default class Torus extends Mesh {
  constructor() {
    super();

    this.geometry = new TorusKnotGeometry(1, 0.285, 300, 26);
    this.material = new MeshNormalMaterial({
      color: 0xffff00,
      wireframe: true,
    });

    this.position.set(0, 0, -8); // Back up the mesh from the camera so its visible
  }
}
A quick note on lights
For simplicity we’re using MeshNormalMaterial so we don’t have to mess with lights. The original effect on Blackbird had six lights, waaay too many. The GPU on my M1 Max was choked to 30fps trying to render the complex models and realtime six-point lighting. But reducing this to just 2 lights (which visually looked identical) ran at 120fps no problem. Three.js isn’t like Blender where you can plop in 14 lights and torture your beefy computer with the render for 12 hours while you sleep. The lights in WebGL have consequences 🫠
Now, the Solid JSX Components to House It All
// src/components/GlCanvas.tsx

import { onMount, onCleanup } from 'solid-js';
import Stage from '~/gl/stage';

export default function GlCanvas() {
// let is used instead of refs, these aren't reactive
  let el;
  let gl;
  let observer;

  onMount(() => {
    if(!el) return
    gl = Stage;

    gl.init(el);
    gl.render();


    observer = new ResizeObserver((entry) => gl.resize());
    observer.observe(el); // use ResizeObserver instead of the window resize event.
    // It is debounced AND fires once when initialized, no need to call resize() onMount
  });

  onCleanup(() => {
    if (observer) {
      observer.disconnect();
    }
  });


  return (
    <div
      ref={el}
      style={{
        position: 'fixed',
        inset: 0,
        height: '100lvh',
        width: '100vw',
      }}

    />
  );
}
let is used to declare a ref, there is no formal useRef() function in Solid. Signals are the only reactive method. Read more on refs in Solid.
Then slap that component into app.tsx:
// src/app.tsx

import { Router } from '@solidjs/router';
import { FileRoutes } from '@solidjs/start/router';
import { Suspense } from 'solid-js';
import GlCanvas from './components/GlCanvas';

export default function App() {
  return (
    <Router
      root={(props) => (
        <Suspense>
          {props.children}
          <GlCanvas />
        </Suspense>
      )}
    >
      <FileRoutes />
    </Router>
  );
}
Each 3D piece I use is tied to a specific element on the page (usually for timeline and scrolling), so I create an individual component to control each class. This helps me keep organized when I have 5 or 6 WebGL moments on one page.
// src/components/WireframeDemo.tsx

import { createEffect, createSignal, onMount } from 'solid-js'
import Stage from '~/gl/stage';
import Torus from '~/gl/torus';

export default function WireframeDemo() {
  let el;
  const [element, setElement] = createSignal(null);
  const [actor, setActor] = createSignal(null);

  createEffect(() => {
    setElement(el);
    if (!element()) return;

    setActor(new Torus()); // Stage is initialized when the page initially mounts,
    // so it's not available until the next tick.
    // A signal forces this update to the next tick,
    // after Stage is available.

    Stage.scene.add(actor());
  });

  return <div ref={el} />;
}
createEffect() instead of onMount(): this automatically tracks dependencies (element, and actor in this case) and fires the function when they change, no more useEffect() with dependency arrays 🙃. Read more on createEffect in Solid.
Then a minimal route to put the component on:
// src/routes/index.tsx

import WireframeDemo from '~/components/WiframeDemo';

export default function Home() {
  return (
    <main>
      <WireframeDemo />
    </main>
  );
}
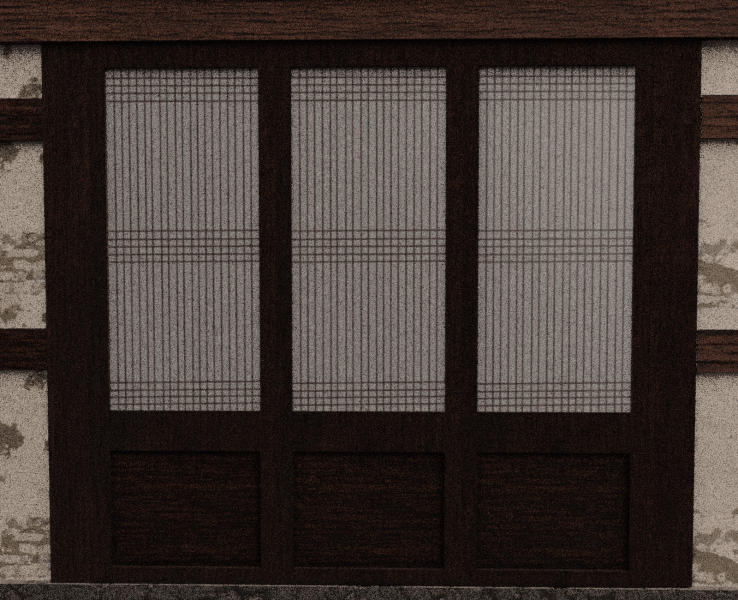
Now you’ll see this:
Switching a Material to Wireframe
I loved wireframe styling for the Blackbird site! It fit the prototype feel of the story, fully textured models felt too clean, wireframes are a bit “dirtier” and unpolished. You can wireframe just about any material in Three.js with this:
But we want to do this dynamically on only part of our model, not on the entire thing.
Enter render targets.
The Fun Part: Render Targets
Render Targets are a super deep topic but they boil down to this: Whatever you see on screen is a frame for your GPU to render, in WebGL you can export that frame and re-use it as a texture on another mesh, you are creating a “target” for your rendered output, a render target.
Since we’re going to need two of these targets, we can make a single class and re-use it.
// src/gl/render-target.js

import { WebGLRenderTarget } from 'three';
import { viewport } from '../viewport';
import Torus from '../torus';
import Stage from '../stage';

export default class RenderTarget extends WebGLRenderTarget {
  constructor() {
    super();

    this.width = viewport.width * viewport.devicePixelRatio;
    this.height = viewport.height * viewport.devicePixelRatio;
  }

  resize() {
    const w = viewport.width * viewport.devicePixelRatio;
    const h = viewport.height * viewport.devicePixelRatio;

    this.setSize(w, h)
  }
}
This is just an output for a texture, nothing more.
Now we can make the class that will consume these outputs. It’s a lot of classes, I know, but splitting up individual units like this helps me keep track of where stuff happens. 800 line spaghetti mega-classes are the stuff of nightmares when debugging WebGL.
// src/gl/targeted-torus.js

import {
  Mesh,
  MeshNormalMaterial,
  PerspectiveCamera,
  PlaneGeometry,
} from 'three';
import Torus from './torus';
import { viewport } from './viewport';
import RenderTarget from './render-target';
import Stage from './stage';

export default class TargetedTorus extends Mesh {
  targetSolid = new RenderTarget();
  targetWireframe = new RenderTarget();

  scene = new Torus(); // The shape we created earlier
  camera = new PerspectiveCamera(45, viewport.aspectRatio, 0.1, 1000);

  constructor() {
    super();

    this.geometry = new PlaneGeometry(1, 1);
    this.material = new MeshNormalMaterial();
  }

  resize() {
    this.targetSolid.resize();
    this.targetWireframe.resize();

    this.camera.aspect = viewport.aspectRatio;
    this.camera.updateProjectionMatrix();
  }
}
Now, switch our WireframeDemo.tsx component to use the TargetedTorus class, instead of Torus:
// src/components/WireframeDemo.tsx

import { createEffect, createSignal, onMount } from 'solid-js';
import Stage from '~/gl/stage';
import TargetedTorus from '~/gl/targeted-torus';

export default function WireframeDemo() {
  let el;
  const [element, setElement] = createSignal(null);
  const [actor, setActor] = createSignal(null);

  createEffect(() => {
    setElement(el);
    if (!element()) return;

    setActor(new TargetedTorus()); // << change me

    Stage.scene.add(actor());
  });

  return <div ref={el} data-gl="wireframe" />;
}
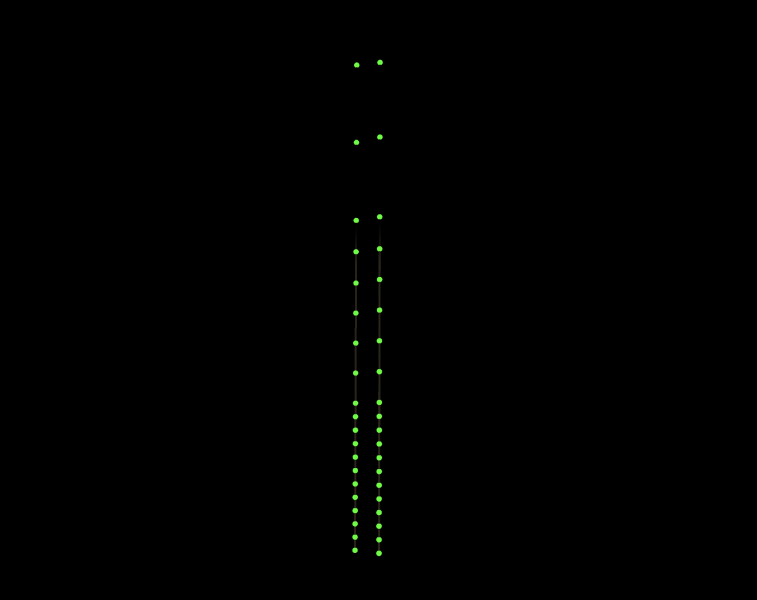
“Now all I see is a blue square Nathan, it feel like we’re going backwards, show me the cool shape again”.
Shhhhh, It’s by design I swear!
From MeshNormalMaterial to ShaderMaterial
We can now take our Torus rendered output and smack it onto the blue plane as a texture using ShaderMaterial. MeshNormalMaterial doesn’t let us use a texture, and we’ll need shaders soon anyway. Inside of targeted-torus.js remove the MeshNormalMaterial and switch this in:
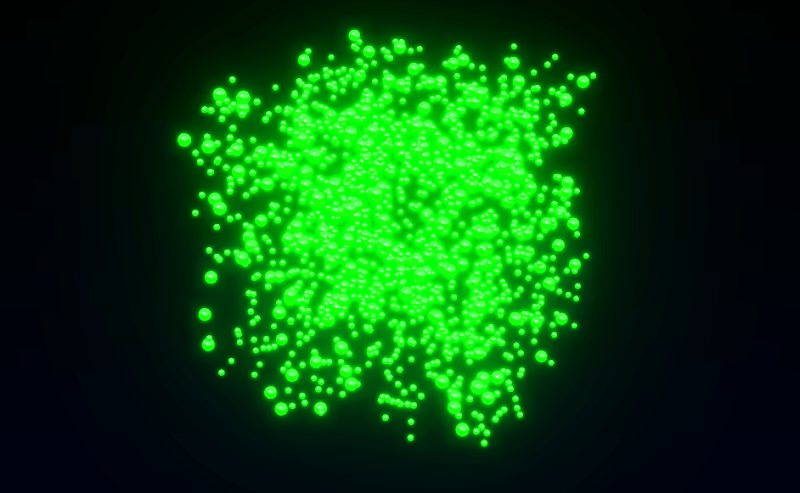
THE TORUS IS BACK. We’ve passed our image texture into the shader and its outputting our original render.
Mixing Wireframe and Solid Materials with Shaders
Shaders were black magic to me before this project. It was my first time using them in production and I’m used to frontend where you think in boxes. Shaders are coordinates 0 to 1, which I find far harder to understand. But, I’d used Photoshop and After Effects with layers plenty of times. These applications do a lot of the same work shaders can: GPU computing. This made it far easier. Starting out by picturing or drawing what I wanted, thinking how I might do it in Photoshop, then asking myself how I could do it with shaders. Photoshop or AE into shaders is far less mentally taxing when you don’t have a deep foundation in shaders.
Populating Both Render Targets
At the moment, we are only saving data to the solidTarget render target via normals. We will update our render loop, so that our shader has them both this and wireframeTarget available simultaneously.
With this, you end up with a flow that under the hood looks like this:
Fading Between Two Textures
Our fragment shader will get a little update, 2 additions:
smoothstep creates a linear ramp between 2 values. UVs only go from 0 to 1, so in this case we use .15 and .65 as the limits (they look make the effect more obvious than 0 and 1). Then we use the x value of the uvs to define which value gets fed into smoothstep.
vec4 mixed = mix(wireframe_texture, solid_texture, blend); mix does exactly what it says, mixes 2 values together at a ratio determined by blend. .5 being a perfectly even split.
Congratulations, you’ve officially spent a measurable portion of your day blending two materials together. It was worth it though, wasn’t it? At the very least, I hope this saved you some of the mental gymnastics orchestrating a pair of render targets.
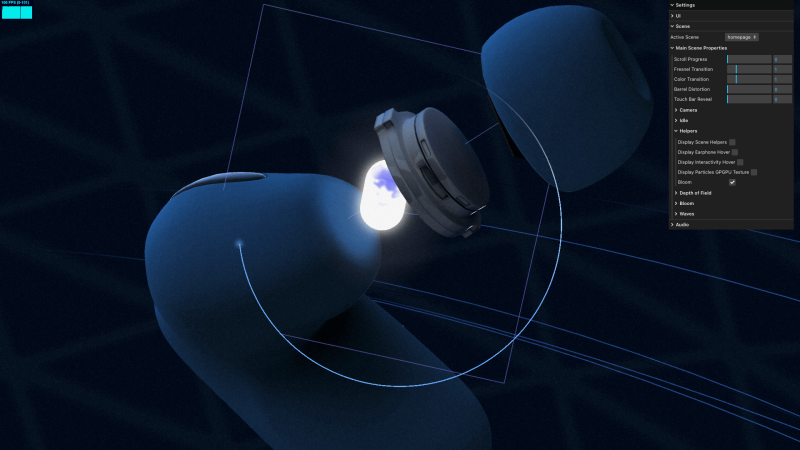
Aether 1 began as an internal experiment at OFF+BRAND: Could we craft a product‑launch site so immersive that visitors would feel the sound?
The earbuds themselves are fictional, but every pixel of the experience is real – an end‑to‑end sandbox where our brand, 3D, and engineering teams pushed WebGL, AI‑assisted tooling, and narrative design far beyond a typical product page.
This technical case study is the living playbook of that exploration. Inside you’ll find:
3D creation workflow – how we sculpted, animated, and optimised the earphones and their charging case.
Interactive WebGL architecture – the particle flow‑fields, infinite scroll, audio‑reactive shaders, and custom controllers that make the site feel alive.
Performance tricks – GPU‑friendly materials, faux depth‑of‑field, selective bloom, and other tactics that kept the project running at 60 FPS on mobile hardware.
Tool stack & takeaways – what worked, what didn’t, and why every lesson here can translate to your own projects.
Whether you’re a developer, designer, or producer, the next sections unpack the decisions, experiments, and hard‑won optimizations that helped us prove that “sound without boundaries” can exist on the web.
1. 3D Creation Workflow
By Celia Lopez
3D creation of the headphone and case
For the headphone shape, we needed to create one from scratch. To help ourselves quickly sketch out the ideas we had in mind, we used Midjourney. Thanks to references from the internet and the help of AI, we agreed on an artistic direction.
Size reference and headphone creation
To ensure the size matched a real-life reference, we used Apple headphones and iterated until we found something interesting. We used Figma to present all the iterations to the team, exporting three images – front, side, and back – each time to help them better visualize the object.
Same for the case.
Storyboard
For the storyboard, we first sketched our ideas and tried to match each specific scene with a 3D visualization.
We iterated for a while before finalizing the still frames for each part. Some parts were too tricky to represent in 3D, so we adjusted the workflow accordingly.
Motion
So that everyone agrees on the flow, look, and feel, we created a full-motion version of it.
Unwrapping and renaming
To prepare the scene for a developer, we needed to spend some time unwrapping the UVs, cleaning the file, and renaming the elements. We used C4D exclusively for unwrapping since the shapes weren’t too complex. It’s also very important to rename all parts and organize the file so the developer can easily recognize which object is which. (In the example below, we show the technique – not the full workflow or a perfect unwrap.)
Fluid flow baked
Almost all the animations were baked from C4D to Blender and exported as .glb files.
Timing
We decided to start with an infinite scroll and a looped experience. When the user releases the scroll, seven anchors subtly and automatically guide the progression. To make it easier for the developer to divide the baked animation, we used specific timing for each step — 200 keyframes between each anchor.
AO baking
Because the headphones were rotating, we couldn’t bake the lighting. We only baked the Ambient Occlusion shadows to enhance realism. For that, after unwrapping the objects, we combined all the different parts of the headphones into a single object, applied a single texture with the Ambient Occlusion, and baked it in Redshift. Same for the case.
Normal map baked
For the Play‑Stade touchpad only, we needed a normal map, so we exported it. However, since the AO was already baked, the UVs had to remain the same.
Camera path and target
In order to ensure a smooth flow during the web experience, it was crucial to use a single camera. However, since we have different focal points, we needed two separate circular paths with different centers and sizes, along with a null object to serve as a target reference throughout the flow.
2. WebGL Features and Interactive Architecture
By Adrian Gubrica
GPGPU particles
Particles are a great way to add an extra layer of detail to 3D scenes, as was the case with Aether 1. To complement the calming motion of the audio waves, a flow‑field simulation was used — a technique known for producing believable and natural movement in particle systems. With the right settings, the resulting motion can also be incredibly relaxing to watch.
To calculate the flow fields, noise algorithms — specifically Simplex4D — were used. Since these can be highly performance-intensive on the CPU, a GPGPU technique (essentially the WebGL equivalent of a compute shader) was implemented to run the simulation efficiently on the GPU. The results were stored and updated across two textures, enabling smooth and high-performance motion.
Smooth scene transitions
To create a seamless transition between scenes, I developed a custom controller to manage when each scene should or shouldn’t render. I also implemented a manual way of controlling their scroll state, allowing me, for example, to display the last position of a scene without physically scrolling there. By combining this with a custom transition function that primarily uses GSAP to animate values, I was able to create both forward and backward animations to the target scene.
It is important to note that all scenes and transitions are displayed within a “post‑processing scene,” which consists of an orthographic camera and a full‑screen plane. In the fragment shader, I merge all the renders together.
This transition technique became especially tricky when transitioning at the end of each scroll in the main scene to create an infinite loop. To achieve this, I created two instances of the main scene (A and B) and swapped between them whenever a transition occurred.
Custom scroll controller for infinite scrolling
As mentioned earlier, the main scene features an infinite loop at both the start and end of the scroll, which triggers a transition back to the beginning or end of the scene. This behavior is enhanced with some resistance during the backward movement and other subtle effects. Achieving this required careful manual tweaking of the Lenis library.
My initial idea was to use Lenis’ infinite: true property, which at first seemed like a quick solution – especially for returning to the starting scroll position. However, this approach required manually listening to the scroll velocity and predicting whether the scroll would pass a certain threshold to stop it at the right moment and trigger the transition. While possible, it quickly proved unreliable, often leading to unpredictable behavior like broken scroll states, unintended transitions, or a confused browser scroll history.
Because of these issues, I decided to remove the infinite: true property and handle the scroll transitions manually. By combining Lenis.scrollTo(), Lenis.stop(), and Lenis.start(), I was able to recreate the same looping effect at the end of each scroll with greater control and reliability. An added benefit was being able to retain Lenis’s default easing at the beginning and end of the scroll, which contributed a smooth and polished feel.
Cursor with fluid simulation pass
Fluid simulation triggered by mouse or touch movement has become a major trend on immersive websites in recent years. But beyond just being trendy, it consistently enhances the visual appeal and adds a satisfying layer of interactivity to the user experience.
In my implementation, I used the fluid simulation as a blue overlay that follows the pointer movement. It also served as a mask for the Fresnel pass (explained in more detail below) and was used to create a dynamic displacement and RGB shift effect in the final render.
Because fluid simulations can be performance‑intensive – requiring multiple passes to calculate realistic behavior – I downscaled it to just 7.5 percent of the screen resolution. This optimization still produced a visually compelling effect while maintaining smooth overall performance.
Fresnel pass on the earphones
In the first half of the main scene’s scroll progression, users can see the inner parts of the earphones when hovering over them, adding a nice interactive touch to the scene. I achieved this effect by using the fluid simulation pass as a mask on the earphones’ material.
However, implementing this wasn’t straightforward at first, since the earphones and the fluid simulation use different coordinate systems. My initial idea was to create a separate render pass for the earphones and apply the fluid mask in that specific pass. But this approach would have been costly and introduced unnecessary complexity to the post‑processing pipeline.
After some experimentation, I realized I could use the camera’s view position as a kind of screen‑space UV projection onto the material. This allowed me to accurately sample the fluid texture directly in the earphones’ material – exactly what I needed to make the effect work without additional rendering overhead.
Audio reactivity
Since the project is a presentation of earphones, some scene parameters needed to become audio‑reactive. I used one of the background audio’s frequency channels – the one that produced the most noticeable “jumps,” as the rest of the track had a very stable tone – which served as the input to drive various effects. This included modifying the pace and shape of the wave animations, influencing the strength of the particles’ flow field, and shaping the touchpad’s visualizer.
The background audio itself was also processed using the Web Audio API, specifically a low‑pass filter. This filter was triggered when the user hovered over the earphones in the first section of the main scene, as well as during the scene transitions at the start and end. The low‑pass effect helped amplify the impact of the animations, creating a subtle sensation of time slowing down.
Animation and empties
Most of the animations were baked directly into the .glb file and controlled via the scroll progress using THREE.js’s AnimationMixer. This included the camera movement as well as the earphone animations.
This workflow proved to be highly effective when collaborating with another 3D artist, as it gave them control over multiple aspects of the experience – such as timing, motion, and transitions – while allowing me to focus solely on the real‑time interactions and logic.
Speaking of real‑time actions, I extended the scene by adding multiple empties, animating their position and scale values to act as drivers for various interactive events – such as triggering interactive points or adjusting input strength during scroll. This approach made it easy to fine‑tune these events directly in Blender’s timeline and align them precisely with other baked animations.
3. Optimization Techniques
Visual expectations were set very high for this project, making it clear from the start that performance optimization would be a major challenge. Because of this, I closely monitored performance metrics throughout development, constantly looking for opportunities to save resources wherever possible. This often led to unexpected yet effective solutions to problems that initially seemed too demanding or impractical for our goals. Some of these optimizations have already been mentioned – such as using GPGPU techniques for particle simulation and significantly reducing the resolution of the cursor’s fluid simulation. However, there were several other key optimizations that played a crucial role in maintaining solid performance:
Artificial depth of field
One of that was using depth of field during the close‑up view on the headphones. Depth of field is usually used as a post‑processing layer using some kind of convolution to simulate progressive blurring of the rendered scene. I considered this as a good‑to‑have from the beginning in case we will be left with some additional fps, but not as a realistic option.
However, after implementing the particles simulation, which used smoothstep function in the particle’s fragment shader to draw the blue circle, I was wondering if it might not be enough to simply modify its values to make it look like it’s blurred. After few little tweaks, the particles became blurry.
The only problem left was that the blur was not progressive like in a real camera, meaning it was not getting blurry according to the focus point of the camera. So I decided to try the camera’s view position to get some kind of depth value, which surprisingly did the job well.
I applied the same smoothstep technique to the rotating tube in the background, but now without the progressive effect since it was almost at a constant distance most of the time.
Voilà. Depth of field for almost free (not perfect, but does the job well).
Artificial bloom
Bloom was also part of the post‑processing stack – typically a costly effect due to the additional render pass it requires. This becomes even more demanding when using selective bloom, which I needed to make the core of the earphones glow. In that case, the render pass is effectively doubled to isolate and blend only specific elements.
To work around this performance hit, I replaced the bloom effect with a simple plane using a pre‑generated bloom texture that matched the shape of the earphone core. The plane was set to always face the camera (a billboard technique), creating the illusion of bloom without the computational overhead.
Surprisingly, this approach worked very well. With a bit of fine‑tuning – especially adjusting the depth write settings – I was even able to avoid visible overlaps with nearby geometry, maintaining a clean and convincing look.
Custom performant glass material
A major part of the earphones’ visual appeal came from the glossy surface on the back. However, achieving realistic reflections in WebGL is always challenging – and often expensive – especially when using double‑sided materials.
To tackle this, I used a strategy I often rely on: combining a MeshStandardMaterial for the base physical lighting model with a glass matcap texture, injected via the onBeforeCompile callback. This setup provided a good balance between realism and performance.
To enhance the effect further, I added Fresnel lighting on the edges and introduced a slight opacity, which together helped create a convincing glass‑like surface. The final result closely matched the visual concept provided for the project – without the heavy cost of real‑time reflections or more complex materials.
Simplified raycasting
Raycasting on high‑polygon meshes can be slow and inefficient. To optimise this, I used invisible low‑poly proxy meshes for the points of interest – such as the earphone shapes and their interactive areas.
This approach significantly reduced the performance cost of raycasting while giving me much more flexibility. I could freely adjust the size and position of the raycastable zones without affecting the visual mesh, allowing me to fine‑tune the interactions for the best possible user experience.
Mobile performance
Thanks to the optimisation techniques mentioned above, the experience maintains a solid 60 FPS – even on older devices like the iPhone SE (2020).
Three.js: For a project of this scale, Three.js was the clear choice. Its built‑in materials, loaders, and utilities made it ideal for building highly interactive WebGL scenes. It was especially useful when setting up the GPGPU particle simulation, which is supported via a dedicated addon provided by the Three.js ecosystem.
lil‑gui: Commonly used alongside Three.js, was instrumental in creating a debug environment during development. It also allowed designers to interactively tweak and fine‑tune various parameters of the experience without needing to dive into the code.
GSAP: Most linear animations were handled with GSAP and its timeline system. It proved particularly useful when manually syncing animations to the scroll progress provided by Lenis, offering precise control over timing and transitions.
Lenis: As mentioned earlier, Lenis provided a smooth and reliable foundation for scroll behavior. Its syncTouch parameter helped manage DOM shifting on mobile devices, which can be a common challenge in scroll‑based experiences.
5. Results and Takeaways
Aether 1 successfully demonstrated how brand narrative, advanced WebGL interactions, and rigorous 3D workflows can blend into a single, performant, and emotionally engaging web experience.
By baking key animations, using empties for event triggers, and leaning on tools like Three.js, GSAP, and Lenis, the team was able to iterate quickly without sacrificing polish. Meanwhile, the 3D pipeline- from Midjourney concept sketches through C4D unwrapping and Blender export ensured the visual fidelity stayed aligned with the brand vision.
Most importantly, every technique outlined here is transferable. Whether you are considering audio‑reactive visuals, infinite scroll adventures, or simply trying to squeeze extra frames per second out of a heavy scene, the solutions documented above show that thoughtful planning and a willingness to experiment can push WebGL far beyond typical product‑page expectations.
6. Author Contributions
General – Ross Anderson 3D – Celia Lopez WebGL – Adrian Gubrica
7. Site credits
Art Direction – Ross Anderson Design – Gilles Tossoukpe 3D – Celia Lopez WebGL – Adrian Gubrica AI Integration – Federico Valla Motion – Jason Kearley Front End / Webflow – Youness Benammou
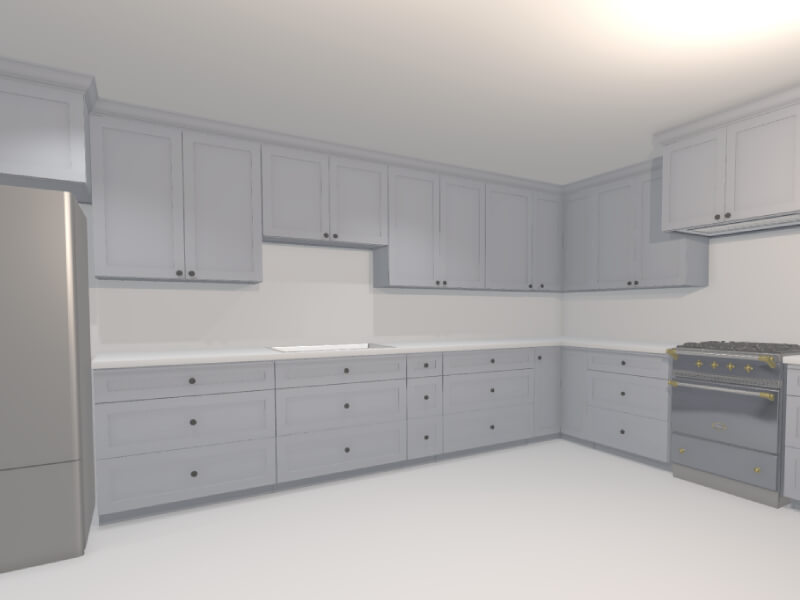
Back in November 2024, I shared a post on X about a tool I was building to help visualize kitchen remodels. The response from the Three.js community was overwhelmingly positive. The demo showed how procedural rendering techniques—often used in games—can be applied to real-world use cases like designing and rendering an entire kitchen in under 60 seconds.
In this article, I’ll walk through the process and thinking behind building this kind of procedural 3D kitchen design tool using vanilla Three.js and TypeScript—from drawing walls and defining cabinet segments to auto-generating full kitchen layouts. Along the way, I’ll share key technical choices, lessons learned, and ideas for where this could evolve next.
Have been wanting to redesign my parents’ kitchen for a while now
…so I built them a little 3D kitchen design-tool with @threejs, so they can quickly prototype floorplans/ideas
Here’s me designing a full kitchen remodel in ~60s 🙂
You can try out an interactive demo of the latest version here: https://kitchen-designer-demo.vercel.app/. (Tip: Press the “/” key to toggle between 2D and 3D views.)
Designing Room Layouts with Walls
Example of user drawing a simple room shape using the built-in wall module.
To initiate our project, we begin with the wall drawing module. At a high level, this is akin to Figma’s pen tool, where the user can add one line segment at a time until a closed—or open-ended—polygon is complete on an infinite 2D canvas. In our build, each line segment represents a single wall as a 2D plane from coordinate A to coordinate B, while the complete polygon outlines the perimeter envelope of a room.
We begin by capturing the [X, Z] coordinates (with Y oriented upwards) of the user’s initial click on the infinite floor plane. This 2D point is obtained via Three.js’s built-in raycaster for intersection detection, establishing Point A.
As the user hovers the cursor over a new spot on the floor, we apply the same intersection logic to determine a temporary Point B. During this movement, a preview line segment appears, connecting the fixed Point A to the dynamic Point B for visual feedback.
Upon the user’s second click to confirm Point B, we append the line segment (defined by Points A and B) to an array of segments. The former Point B instantly becomes the new Point A, allowing us to continue the drawing process with additional line segments.
Here is a simplified code snippet demonstrating a basic 2D pen-draw tool using Three.js:
import * as THREE from 'three';

const scene = new THREE.Scene();
const camera = new THREE.PerspectiveCamera(75, window.innerWidth / window.innerHeight, 0.1, 1000);
camera.position.set(0, 5, 10); // Position camera above the floor looking down
camera.lookAt(0, 0, 0);

const renderer = new THREE.WebGLRenderer();
renderer.setSize(window.innerWidth, window.innerHeight);
document.body.appendChild(renderer.domElement);

// Create an infinite floor plane for raycasting
const floorGeometry = new THREE.PlaneGeometry(100, 100);
const floorMaterial = new THREE.MeshBasicMaterial({ color: 0xcccccc, side: THREE.DoubleSide });
const floor = new THREE.Mesh(floorGeometry, floorMaterial);
floor.rotation.x = -Math.PI / 2; // Lay flat on XZ plane
scene.add(floor);

const raycaster = new THREE.Raycaster();
const mouse = new THREE.Vector2();
let points: THREE.Vector3[] = []; // i.e. wall endpoints
let tempLine: THREE.Line | null = null;
const walls: THREE.Line[] = [];

function getFloorIntersection(event: MouseEvent): THREE.Vector3 | null {
  mouse.x = (event.clientX / window.innerWidth) * 2 - 1;
  mouse.y = -(event.clientY / window.innerHeight) * 2 + 1;
  raycaster.setFromCamera(mouse, camera);
  const intersects = raycaster.intersectObject(floor);
  if (intersects.length > 0) {
    // Round to simplify coordinates (optional for cleaner drawing)
    const point = intersects[0].point;
    point.x = Math.round(point.x);
    point.z = Math.round(point.z);
    point.y = 0; // Ensure on floor plane
    return point;
  }
  return null;
}

// Update temporary line preview
function onMouseMove(event: MouseEvent) {
  const point = getFloorIntersection(event);
  if (point && points.length > 0) {
    // Remove old temp line if exists
    if (tempLine) {
      scene.remove(tempLine);
      tempLine = null;
    }
    // Create new temp line from last point to current hover
    const geometry = new THREE.BufferGeometry().setFromPoints([points[points.length - 1], point]);
    const material = new THREE.LineBasicMaterial({ color: 0x0000ff }); // Blue for temp
    tempLine = new THREE.Line(geometry, material);
    scene.add(tempLine);
  }
}

// Add a new point and draw permanent wall segment
function onMouseDown(event: MouseEvent) {
  if (event.button !== 0) return; // Left click only
  const point = getFloorIntersection(event);
  if (point) {
    points.push(point);
    if (points.length > 1) {
      // Draw permanent wall line from previous to current point
      const geometry = new THREE.BufferGeometry().setFromPoints([points[points.length - 2], points[points.length - 1]]);
      const material = new THREE.LineBasicMaterial({ color: 0xff0000 }); // Red for permanent
      const wall = new THREE.Line(geometry, material);
      scene.add(wall);
      walls.push(wall);
    }
    // Remove temp line after click
    if (tempLine) {
      scene.remove(tempLine);
      tempLine = null;
    }
  }
}

// Add event listeners
window.addEventListener('mousemove', onMouseMove);
window.addEventListener('mousedown', onMouseDown);

// Animation loop
function animate() {
  requestAnimationFrame(animate);
  renderer.render(scene, camera);
}
animate();
The above code snippet is a very basic 2D pen tool, and yet this information is enough to generate an entire room instance. For reference: not only does each line segment represent a wall (2D plane), but the set of accumulated points can also be used to auto-generate the room’s floor mesh, and likewise the ceiling mesh (the inverse of the floor mesh).
In order to view the planes representing the walls in 3D, one can transform each THREE.Line into a custom Wall class object, which contains both a line (for orthogonal 2D “floor plan” view) and a 2D inward-facing plane (for perspective 3D “room” view). To build this class:
class Wall extends THREE.Group {
  constructor(length: number, height: number = 96, thickness: number = 4) {
    super();

    // 2D line for top view, along the x-axis
    const lineGeometry = new THREE.BufferGeometry().setFromPoints([
      new THREE.Vector3(0, 0, 0),
      new THREE.Vector3(length, 0, 0),
    ]);
    const lineMaterial = new THREE.LineBasicMaterial({ color: 0xff0000 });
    const line = new THREE.Line(lineGeometry, lineMaterial);
    this.add(line);

    // 3D wall as a box for thickness
    const wallGeometry = new THREE.BoxGeometry(length, height, thickness);
    const wallMaterial = new THREE.MeshBasicMaterial({ color: 0xaaaaaa, side: THREE.DoubleSide });
    const wall = new THREE.Mesh(wallGeometry, wallMaterial);
    wall.position.set(length / 2, height / 2, 0);
    this.add(wall);
  }
}
We can now update the wall draw module to utilize this newly created Wall object:
// Update our variables
let tempWall: Wall | null = null;
const walls: Wall[] = [];

// Replace line creation in onMouseDown with
if (points.length > 1) {
  const start = points[points.length - 2];
  const end = points[points.length - 1];
  const direction = end.clone().sub(start);
  const length = direction.length();
  const wall = new Wall(length);
  wall.position.copy(start);
  wall.rotation.y = Math.atan2(direction.z, direction.x); // Align along direction (assuming CCW for inward facing)
  scene.add(wall);
  walls.push(wall);
}
Upon adding the floor and ceiling meshes, we can further transform our wall module into a room generation module. To recap what we have just created: by adding walls one by one, we have given the user the ability to create full rooms with walls, floors, and ceilings—all of which can be adjusted later in the scene.
User dragging out the wall in 3D perspective camera-view.
Generating Cabinets with Procedural Modeling
Our cabinet-related logic can consist of countertops, base cabinets, and wall cabinets.
Rather than taking several minutes to add the cabinets on a case-by-case basis—for example, like with IKEA’s 3D kitchen builder—it’s possible to add all the cabinets at once via a single user action. One method to employ here is to allow the user to draw high-level cabinet line segments, in the same manner as the wall draw module.
In this module, each cabinet segment will transform into a linear row of base and wall cabinets, along with a parametrically generated countertop mesh on top of the base cabinets. As the user creates the segments, we can automatically populate this line segment with pre-made 3D cabinet meshes in meshing software like Blender. Ultimately, each cabinet’s width, depth, and height parameters will be fixed, while the width of the last cabinet can be dynamic to fill the remaining space. We use a cabinet filler piece mesh here—a regular plank, with its scale-X parameter stretched or compressed as needed.
Creating the Cabinet Line Segments
User can make a half-peninsula shape by dragging the cabinetry line segments alongside the walls, then in free-space.
Here we will construct a dedicated cabinet module, with the aforementioned cabinet line segment logic. This process is very similar to the wall drawing mechanism, where users can draw straight lines on the floor plane using mouse clicks to define both start and end points. Unlike walls, which can be represented by simple thin lines, cabinet line segments need to account for a standard depth of 24 inches to represent the base cabinets’ footprint. These segments do not require closing-polygon logic, as they can be standalone rows or L-shapes, as is common in most kitchen layouts.
We can further improve the user experience by incorporating snapping functionality, where the endpoints of a cabinet line segment automatically align to nearby wall endpoints or wall intersections, if within a certain threshold (e.g., 4 inches). This ensures cabinets fit snugly against walls without requiring manual precision. For simplicity, we’ll outline the snapping logic in code but focus on the core drawing functionality.
We can start by defining the CabinetSegment class. Like the walls, this should be its own class, as we will later add the auto-populating 3D cabinet models.
class CabinetSegment extends THREE.Group {
  public length: number;

  constructor(length: number, height: number = 96, depth: number = 24, color: number = 0xff0000) {
    super();
    this.length = length;
    const geometry = new THREE.BoxGeometry(length, height, depth);
    const material = new THREE.MeshBasicMaterial({ color, wireframe: true });
    const box = new THREE.Mesh(geometry, material);
    box.position.set(length / 2, height / 2, depth / 2); // Shift so depth spans 0 to depth (inward)
    this.add(box);
  }
}
Once we have the cabinet segment, we can use it in a manner very similar to the wall line segments:
let cabinetPoints: THREE.Vector3[] = [];
let tempCabinet: CabinetSegment | null = null;
const cabinetSegments: CabinetSegment[] = [];
const CABINET_DEPTH = 24; // everything in inches
const CABINET_SEGMENT_HEIGHT = 96; // i.e. both wall & base cabinets -> group should extend to ceiling
const SNAPPING_DISTANCE = 4;

function getSnappedPoint(point: THREE.Vector3): THREE.Vector3 {
  // Simple snapping: check against existing wall points (wallPoints array from wall module)
  for (const wallPoint of wallPoints) {
    if (point.distanceTo(wallPoint) < SNAPPING_DISTANCE) return wallPoint;
  }
  return point;
}

// Update temporary cabinet preview
function onMouseMoveCabinet(event: MouseEvent) {
  const point = getFloorIntersection(event);
  if (point && cabinetPoints.length > 0) {
    const snappedPoint = getSnappedPoint(point);
    if (tempCabinet) {
      scene.remove(tempCabinet);
      tempCabinet = null;
    }
    const start = cabinetPoints[cabinetPoints.length - 1];
    const direction = snappedPoint.clone().sub(start);
    const length = direction.length();
    if (length > 0) {
      tempCabinet = new CabinetSegment(length, CABINET_SEGMENT_HEIGHT, CABINET_DEPTH, 0x0000ff); // Blue for temp
      tempCabinet.position.copy(start);
      tempCabinet.rotation.y = Math.atan2(direction.z, direction.x);
      scene.add(tempCabinet);
    }
  }
}

// Add a new point and draw permanent cabinet segment
function onMouseDownCabinet(event: MouseEvent) {
  if (event.button !== 0) return;
  const point = getFloorIntersection(event);
  if (point) {
    const snappedPoint = getSnappedPoint(point);
    cabinetPoints.push(snappedPoint);
    if (cabinetPoints.length > 1) {
      const start = cabinetPoints[cabinetPoints.length - 2];
      const end = cabinetPoints[cabinetPoints.length - 1];
      const direction = end.clone().sub(start);
      const length = direction.length();
      if (length > 0) {
        const segment = new CabinetSegment(length, CABINET_SEGMENT_HEIGHT, CABINET_DEPTH, 0xff0000); // Red for permanent
        segment.position.copy(start);
        segment.rotation.y = Math.atan2(direction.z, direction.x);
        scene.add(segment);
        cabinetSegments.push(segment);
      }
    }
    if (tempCabinet) {
      scene.remove(tempCabinet);
      tempCabinet = null;
    }
  }
}

// Add separate event listeners for cabinet mode (e.g., toggled via UI button)
window.addEventListener('mousemove', onMouseMoveCabinet);
window.addEventListener('mousedown', onMouseDownCabinet);
Auto-Populating the Line Segments with Live Cabinet Models
Here we fill 2 line-segments with 3D cabinet models (base & wall), and countertop meshes.
Once the cabinet line segments are defined, we can procedurally populate them with detailed components. This involves dividing each segment vertically into three layers: base cabinets at the bottom, countertops in the middle, and wall cabinets above. For the base and wall cabinets, we’ll use an optimization function to divide the segment’s length into standard widths (preferring 30-inch cabinets), with any remainder filled using the filler piece mentioned above. Countertops are even simpler—they form a single continuous slab stretching the full length of the segment.
The base cabinets are set to 24 inches deep and 34.5 inches high. Countertops add 1.5 inches in height and extend to 25.5 inches deep (including a 1.5-inch overhang). Wall cabinets start at 54 inches high (18 inches above the countertop), measure 12 inches deep, and are 30 inches tall. After generating these placeholder bounding boxes, we can replace them with preloaded 3D models from Blender using a loading function (e.g., via GLTFLoader).
To handle individual cabinets, we’ll create a simple Cabinet class that manages the placeholder and model loading.
import { GLTFLoader } from 'three/examples/jsm/loaders/GLTFLoader.js';

const loader = new GLTFLoader();

class Cabinet extends THREE.Group {
  constructor(width: number, height: number, depth: number, modelPath: string, color: number) {
    super();

    // Placeholder box
    const geometry = new THREE.BoxGeometry(width, height, depth);
    const material = new THREE.MeshBasicMaterial({ color });
    const placeholder = new THREE.Mesh(geometry, material);
    this.add(placeholder);


    // Load and replace with model async

    // Case: Non-standard width -> use filler piece
    if (width < DEFAULT_MODEL_WIDTH) {
      loader.load(FILLER_PIECE_FALLBACK_PATH, (gltf) => {
        const model = gltf.scene;
        model.scale.set(
          width / FILLER_PIECE_WIDTH,
          height / FILLER_PIECE_HEIGHT,
          depth / FILLER_PIECE_DEPTH,
        );
        this.add(model);
        this.remove(placeholder);
      });
    }

    loader.load(modelPath, (gltf) => {
      const model = gltf.scene;
      model.scale.set(width / DEFAULT_MODEL_WIDTH, 1, 1); // Scale width
      this.add(model);
      this.remove(placeholder);
    });
  }
}
Then, we can add a populate method to the existing CabinetSegment class:
function splitIntoCabinets(width: number): number[] {
  const cabinets = [];
  // Preferred width
  while (width >= DEFAULT_MODEL_WIDTH) {
    cabinets.push(DEFAULT_MODEL_WIDTH);
    width -= DEFAULT_MODEL_WIDTH;
  }
  if (width > 0) {
    cabinets.push(width); // Custom empty slot
  }
  return cabinets;
}

class CabinetSegment extends THREE.Group {
  // ... (existing constructor and properties)

  populate() {
    // Remove placeholder line and box
    while (this.children.length > 0) {
      this.remove(this.children[0]);
    }

    let offset = 0;
    const widths = splitIntoCabinets(this.length);

    // Base cabinets
    widths.forEach((width) => {
      const baseCab = new Cabinet(width, BASE_HEIGHT, BASE_DEPTH, 'models/base_cabinet.glb', 0x8b4513);
      baseCab.position.set(offset + width / 2, BASE_HEIGHT / 2, BASE_DEPTH / 2);
      this.add(baseCab);
      offset += width;
    });

    // Countertop (single slab, no model)
    const counterGeometry = new THREE.BoxGeometry(this.length, COUNTER_HEIGHT, COUNTER_DEPTH);
    const counterMaterial = new THREE.MeshBasicMaterial({ color: 0xa9a9a9 });
    const counter = new THREE.Mesh(counterGeometry, counterMaterial);
    counter.position.set(this.length / 2, BASE_HEIGHT + COUNTER_HEIGHT / 2, COUNTER_DEPTH / 2);
    this.add(counter);

    // Wall cabinets
    offset = 0;
    widths.forEach((width) => {
      const wallCab = new Cabinet(width, WALL_HEIGHT, WALL_DEPTH, 'models/wall_cabinet.glb', 0x4b0082);
      wallCab.position.set(offset + width / 2, WALL_START_Y + WALL_HEIGHT / 2, WALL_DEPTH / 2);
      this.add(wallCab);
      offset += width;
    });
  }
}

// Call for each cabinetSegment after drawing
cabinetSegments.forEach((segment) => segment.populate());
Further Improvements & Optimizations
We can further improve the scene with appliances, varying-height cabinets, crown molding, etc.
At this point, we should have the foundational elements of room and cabinet creation logic fully in place. In order to take this project from a rudimentary segment-drawing app into the practical realm—along with dynamic cabinets, multiple realistic material options, and varying real appliance meshes—we can further enhance the user experience through several targeted refinements:
We can implement a detection mechanism to determine if a cabinet line segment is in contact with a wall line segment.
For cabinet rows that run parallel to walls, we can automatically incorporate a backsplash in the space between the wall cabinets and the countertop surface.
For cabinet segments not adjacent to walls, we can remove the upper wall cabinets and extend the countertop by an additional 15 inches, aligning with standard practices for kitchen islands or peninsulas.
We can introduce drag-and-drop functionality for appliances, each with predefined widths, allowing users to position them along the line segment. This integration will instruct our cabinet-splitting algorithm to exclude those areas from dynamic cabinet generation.
Additionally, we can give users more flexibility by enabling the swapping of one appliance with another, applying different textures to our 3D models, and adjusting default dimensions—such as wall cabinet depth or countertop overhang—to suit specific preferences.
All these core components lead us to a comprehensive, interactive application that enables the rapid rendering of a complete kitchen: cabinets, countertops, and appliances, in a fully interactive, user-driven experience.
The aim of this project is to demonstrate that complex 3D tasks can be distilled down to simple user actions. It is fully possible to take the high-dimensional complexity of 3D tooling—with seemingly limitless controls—and encode these complexities into low-dimensional, easily adjustable parameters. Whether the developer chooses to expose these parameters to the user or an LLM, the end result is that historically complicated 3D processes can become simple, and thus the entire contents of a 3D scene can be fully transformed with only a few parameters.
If you find this type of development interesting, have any great ideas, or would love to contribute to the evolution of this product, I strongly welcome you to reach out to me via email. I firmly believe that only recently has it become possible to build home design software that is so wickedly fast and intuitive that any person—regardless of architectural merit—will be able to design their own single-family home in less than 5 minutes via a web app, while fully adhering to local zoning, architectural, and design requirements. All the infrastructure necessary to accomplish this already exists; all it takes is a team of crazy, ambitious developers looking to change the standard of architectural home design.
Hey! Jorge Toloza again, Co-Founder and Creative Director at DDS Studio. In this tutorial, we’re going to build a visually rich, infinitely scrolling grid where images move with a parallax effect based on scroll and drag interactions.
We’ll use GSAP for buttery-smooth animations, add a sprinkle of math to achieve infinite tiling, and bring it all together with dynamic visibility animations and a staggered intro reveal.
Let’s get started!
Setting Up the HTML Container
To start, we only need a single container to hold all the tiled image elements. Since we’ll be generating and positioning each tile dynamically with JavaScript, there’s no need for any static markup inside. This keeps our HTML clean and scalable as we duplicate tiles for infinite scrolling.
<div id="images"></div>
Basic Styling for the Grid Items
Now that we have our container, let’s give it the foundational styles it needs to hold and animate a large set of tiles.
We’ll use absolute positioning for each tile so we can freely place them anywhere in the grid. The outer container (#images) is set to relative so that all child .item elements are positioned correctly inside it. Each image fills its tile, and we’ll use will-change: transform to optimize animation performance.
To control the visual layout of our grid, we’ll use design data exported directly from Figma. This gives us pixel-perfect placement while keeping layout logic separate from our code.
I created a quick layout in Figma using rectangles to represent tile positions and dimensions. Then I exported that data into a JSON file, giving us a simple array of objects containing x, y, w, and h values for each tile.
With the layout data defined, the next step is to dynamically generate our tile grid in the DOM and enable it to scroll infinitely in both directions.
This involves three main steps:
Compute the scaled tile dimensions based on the viewport and the original Figma layout’s aspect ratio.
Duplicate the grid in both the X and Y axes so that as one tile set moves out of view, another seamlessly takes its place.
Store metadata for each tile, such as its original position and a random easing value, which we’ll use to vary the parallax animation slightly for a more organic effect.
The infinite scroll illusion is achieved by duplicating the entire tile set horizontally and vertically. This 2×2 tiling approach ensures there’s always a full set of tiles ready to slide into view as the user scrolls or drags.
onResize() {
  // Get current viewport dimensions
  this.winW = window.innerWidth;
  this.winH = window.innerHeight;

  // Scale tile size to match viewport width while keeping original aspect ratio
  this.tileSize = {
    w: this.winW,
    h: this.winW * (this.originalSize.h / this.originalSize.w),
  };

  // Reset scroll state
  this.scroll.current = { x: 0, y: 0 };
  this.scroll.target = { x: 0, y: 0 };
  this.scroll.last = { x: 0, y: 0 };

  // Clear existing tiles from container
  this.$container.innerHTML = '';

  // Scale item positions and sizes based on new tile size
  const baseItems = this.data.map((d, i) => {
    const scaleX = this.tileSize.w / this.originalSize.w;
    const scaleY = this.tileSize.h / this.originalSize.h;
    const source = this.sources[i % this.sources.length];
    return {
      src: source.src,
      caption: source.caption,
      x: d.x * scaleX,
      y: d.y * scaleY,
      w: d.w * scaleX,
      h: d.h * scaleY,
    };
  });

  this.items = [];

  // Offsets to duplicate the grid in X and Y for seamless looping (2x2 tiling)
  const repsX = [0, this.tileSize.w];
  const repsY = [0, this.tileSize.h];

  baseItems.forEach((base) => {
    repsX.forEach((offsetX) => {
      repsY.forEach((offsetY) => {
        // Create item DOM structure
        const el = document.createElement('div');
        el.classList.add('item');
        el.style.width = `${base.w}px`;

        const wrapper = document.createElement('div');
        wrapper.classList.add('item-wrapper');
        el.appendChild(wrapper);

        const itemImage = document.createElement('div');
        itemImage.classList.add('item-image');
        itemImage.style.width = `${base.w}px`;
        itemImage.style.height = `${base.h}px`;
        wrapper.appendChild(itemImage);

        const img = new Image();
        img.src = `./img/${base.src}`;
        itemImage.appendChild(img);

        const caption = document.createElement('small');
        caption.innerHTML = base.caption;

        // Split caption into lines for staggered animation
        const split = new SplitText(caption, {
          type: 'lines',
          mask: 'lines',
          linesClass: 'line'
        });
        split.lines.forEach((line, i) => {
          line.style.transitionDelay = `${i * 0.15}s`;
          line.parentElement.style.transitionDelay = `${i * 0.15}s`;
        });

        wrapper.appendChild(caption);
        this.$container.appendChild(el);

        // Observe caption visibility for animation triggering
        this.observer.observe(caption);

        // Store item metadata including offset, easing, and bounding box
        this.items.push({
          el,
          container: itemImage,
          wrapper,
          img,
          x: base.x + offsetX,
          y: base.y + offsetY,
          w: base.w,
          h: base.h,
          extraX: 0,
          extraY: 0,
          rect: el.getBoundingClientRect(),
          ease: Math.random() * 0.5 + 0.5, // Random parallax easing for organic movement
        });
      });
    });
  });

  // Double the tile area to account for 2x2 duplication
  this.tileSize.w *= 2;
  this.tileSize.h *= 2;

  // Set initial scroll position slightly off-center for visual balance
  this.scroll.current.x = this.scroll.target.x = this.scroll.last.x = -this.winW * 0.1;
  this.scroll.current.y = this.scroll.target.y = this.scroll.last.y = -this.winH * 0.1;
}
Key Concepts
Scaling the layout ensures that your Figma-defined design adapts to any screen size without distortion.
2×2 duplication ensures seamless continuity when the user scrolls in any direction.
Random easing values create slight variation in tile movement, making the parallax effect feel more natural.
extraX and extraY values will later be used to shift tiles back into view once they scroll offscreen.
SplitText animation is used to break each caption (<small>) into individual lines, enabling line-by-line animation.
Adding Interactive Scroll and Drag Events
To bring the infinite grid to life, we need to connect it to user input. This includes:
Scrolling with the mouse wheel or trackpad
Dragging with a pointer (mouse or touch)
Smooth motion between input updates using linear interpolation (lerp)
Rather than instantly snapping to new positions, we interpolate between the current and target scroll values, which creates fluid, natural transitions.
Scroll and Drag Tracking
We capture two types of user interaction:
1) Wheel Events Wheel input updates a target scroll position. We multiply the deltas by a damping factor to control sensitivity.
In the render loop, we interpolate between the current and target scroll values using a lerp function. This creates smooth, decaying motion rather than abrupt changes.
The scroll.ease value controls how fast the scroll position catches up to the target—smaller values result in slower, smoother motion.
Animating Item Visibility with IntersectionObserver
To enhance the visual hierarchy and focus, we’ll highlight only the tiles that are currently within the viewport. This creates a dynamic effect where captions appear and styling changes as tiles enter view.
We’ll use the IntersectionObserver API to detect when each tile becomes visible and toggle a CSS class accordingly.
this.observer = new IntersectionObserver(entries => {
  entries.forEach(entry => {
    entry.target.classList.toggle('visible', entry.isIntersecting);
  });
});
// …and after appending each wrapper:
this.observer.observe(wrapper);
Creating an Intro Animation with GSAP
To finish the experience with a strong visual entry, we’ll animate all currently visible tiles from the center of the screen into their natural grid positions. This creates a polished, attention-grabbing introduction and adds a sense of depth and intentionality to the layout.
We’ll use GSAP for this animation, utilizing gsap.set() to position elements instantly, and gsap.to() with staggered timing to animate them into place.
Selecting Visible Tiles for Animation
First, we filter all tile elements to include only those currently visible in the viewport. This avoids animating offscreen elements and keeps the intro lightweight and focused:
x: 0, y: 0 restores the original position set via CSS transforms.
expo.inOut provides a dramatic but smooth easing curve.
stagger creates a cascading effect, enhancing visual rhythm
Wrapping Up
What we’ve built is a scrollable, draggable image grid with a parallax effect, visibility animations, and a smooth GSAP-powered intro. It’s a flexible base you can adapt for creative galleries, interactive backgrounds, or experimental interfaces.
In this post, we’ll take a closer look at the dithering-shader project: a minimal, real-time ordered dithering effect built using GLSL and the Post Processing library.
Rather than just creating a one-off visual effect, the goal was to build something clean, composable, and extendable: a drop-in shader pass that brings pixel-based texture into modern WebGL pipelines.
What It Does
This shader applies ordered dithering as a postprocessing effect. It transforms smooth gradients into stylized, binary (or quantized) pixel patterns, simulating the visual language of early bitmap displays, dot matrix printers, and 8-bit games.
It supports:
Dynamic resolution via pixelSize
Optional grayscale mode
Composability with bloom, blur, or other passes
Easy integration via postprocessing‘s Effect class
Fragment Shader
Our dithering shader implementation consists of two main components:
1. The Core Shader
The heart of the effect lies in the GLSL fragment shader that implements ordered dithering:
bool getValue(float brightness, vec2 pos) {

// Early return for extreme values
if (brightness > 16.0 / 17.0) return false;
if (brightness < 1.0 / 17.0) return true;

// Calculate position in 4x4 dither matrix
vec2 pixel = floor(mod(pos.xy / gridSize, 4.0));
int x = int(pixel.x);
int y = int(pixel.y);

// 4x4 Bayer matrix threshold map
// ... threshold comparisons based on matrix position

}
The getValue function is the core of the dithering algorithm. It:
Takes brightness and position: Uses the pixel’s luminance value and screen position
Maps to dither matrix: Calculates which cell of the 4×4 Bayer matrix the pixel belongs to
Applies threshold: Compares the brightness against a predetermined threshold for that matrix position
Returns binary decision: Whether the pixel should be black or colored
Key Shader Features
gridSize: Controls the size of the dithering pattern
pixelSizeRatio: Adds pixelation effect for enhanced retro feel
grayscaleOnly: Converts the image to grayscale before dithering
invertColor: Inverts the final colors for different aesthetic effects
The shader combines dithering with optional pixelation, creating a compound retro effect that’s perfect for game-like visuals.
Creating a Custom Postprocessing Effect
The shader is wrapped using the Effect base class from the postprocessing library. This abstracts away the boilerplate of managing framebuffers and passes, allowing the shader to be dropped into a scene with minimal setup.
export class DitheringEffect extends Effect {
  uniforms: Map<string, THREE.Uniform<number | THREE.Vector2>>;

  constructor({
    time = 0,
    resolution = new THREE.Vector2(1, 1),
    gridSize = 4.0,
    luminanceMethod = 0,
    invertColor = false,
    pixelSizeRatio = 1,
    grayscaleOnly = false
  }: DitheringEffectOptions = {}) {
    const uniforms = new Map<string, THREE.Uniform<number | THREE.Vector2>>([
      ["time", new THREE.Uniform(time)],
      ["resolution", new THREE.Uniform(resolution)],
      ["gridSize", new THREE.Uniform(gridSize)],
      ["luminanceMethod", new THREE.Uniform(luminanceMethod)],
      ["invertColor", new THREE.Uniform(invertColor ? 1 : 0)],
      ["ditheringEnabled", new THREE.Uniform(1)],
      ["pixelSizeRatio", new THREE.Uniform(pixelSizeRatio)],
      ["grayscaleOnly", new THREE.Uniform(grayscaleOnly ? 1 : 0)]
    ]);

    super("DitheringEffect", ditheringShader, { uniforms });
    this.uniforms = uniforms;
  }

 ...

}
Optional: Integrating with React Three Fiber
Once defined, the effect is registered and applied using @react-three/postprocessing. Here’s a minimal usage example with bloom and dithering:
<Canvas>
  {/* ... your scene ... */}
  <EffectComposer>
    <Bloom intensity={0.5} />
    <Dithering pixelSize={2} grayscale />
  </EffectComposer>
</Canvas>
You can also tweak pixelSize dynamically to scale the effect with resolution, or toggle grayscale mode based on UI controls or scene context.
Extending the Shader
This shader is intentionally kept simple, a foundation rather than a full system. It’s easy to customize or extend. Here are some ideas you can try:
Add color quantization: convert color.rgb to indexed palettes
Pack depth-based dither layers for fake shadows
Animate the pattern for VHS-like shimmer
Interactive pixelation: use mouse proximity to affect u_pixelSize
Why Not Use a Texture?
Some dithering shaders rely on threshold maps or pre-baked noise textures. This one doesn’t. The matrix pattern is deterministic and screen-space based, which means:
No texture loading required
Fully procedural
Clean pixel alignment
It’s not meant for photorealism. It’s for styling and flattening. Think more zine than render farm.
Final Thoughts
This project started as a side experiment to explore what it would look like to bring tactile, stylized “non-photorealism” back into postprocessing workflows. But I found it had broader use cases, especially in cases where design direction favors abstraction or controlled distortion.
If you’re building UIs, games, or interactive 3D scenes where “perfect” isn’t the goal, maybe a little pixel grit is exactly what you need.
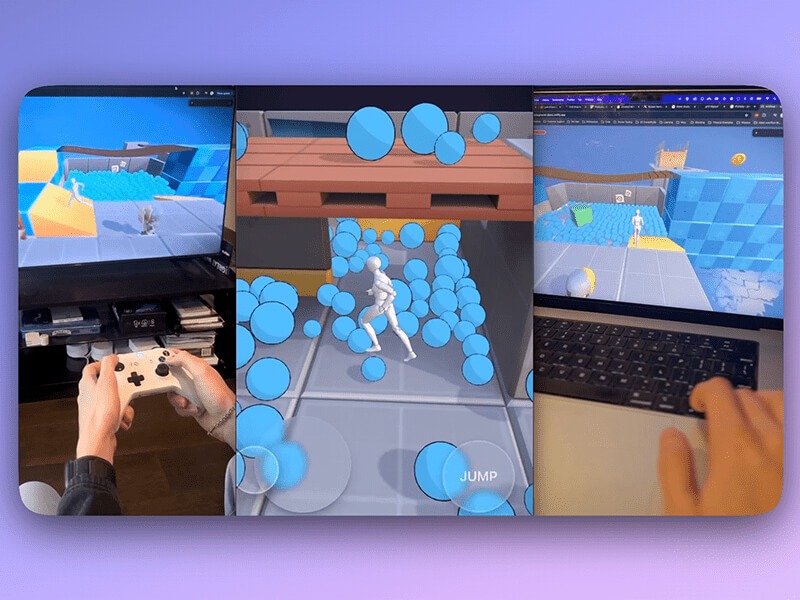
Creating a third-person character controller involves more than just moving an object around a 3D scene. Realistic movement, grounded physics, responsive jumping, and animation blending are essential for a polished feel. This article explores how these elements can be assembled — not through traditional manual coding, but via AI-assisted development using Bolt.new, a browser-based AI-assisted development tool that generates web code from natural language prompts, backed by Claude 3.7 Sonnet and Claude 3.5 Sonnet LLMs. It provides a lightweight environment where developers can focus on describing functionality rather than writing boilerplate.
For this character controller, Bolt handled tasks like setting up physics, integrating animations, and managing input systems, making it easier to test ideas and iterate quickly without switching between tools or writing everything from scratch.
If you’re curious to learn more, check out this article on Codrops, which also explores the platform’s capabilities and showcases another real-world project built entirely with AI.
The final project is powered by React Three Fiber, Three.js, and Rapier, and showcases how a designer or developer can create complex, interactive 3D experiences by guiding AI — focusing on behavior and structure rather than syntax.
Step 1: Setting Up Physics with a Capsule and Ground
The character controller begins with a simple setup: a capsule collider for the player and a ground plane to interact with. Rapier, a fast and lightweight physics engine built in WebAssembly, handles gravity, rigid body dynamics, and collisions. This forms the foundation for player movement and world interaction.
The capsule shape was chosen for its stability when sliding across surfaces and climbing over small obstacles — a common pattern in real-time games.
Step 2: Real-Time Tuning with a GUI
To enable rapid iteration and balance gameplay feel, a visual GUI was introduced (using Leva.js). This panel exposes parameters such as:
Player movement speed
Jump force
Gravity scale
Follow camera offset
Debug toggles
By integrating this directly into the experience, developers can tune the controller live without needing to edit or recompile code, speeding up testing and design decisions.
Step 3: Ground Detection with Raycasting
A raycast is used to detect whether the player is grounded. This simple yet effective check prevents the character from jumping mid-air or triggering multiple jumps in sequence.
The logic is executed on every frame, casting a ray downward from the base of the capsule collider. When contact is confirmed, the jump input is enabled. This technique also allows smooth transitions between grounded and falling states in the animation system.
Step 4: Integrating a Rigged Character with Animation States
The visual character uses a rigged GLB model via Mixamo, with three key animations: Idle, Run, and Fall. These are integrated as follows:
The GLB character is attached as a child of the capsule collider
The animation state switches dynamically based on velocity and grounded status
Transitions are handled via animation blending for a natural feel
This setup keeps the visuals in sync with physics, while preserving modular control over the physical capsule.
Step 5: World Building and Asset Integration
The environment was arranged in Blender, then exported as a single .glb file and imported into the bolt.new project scene. This approach allows for efficient scene composition while keeping asset management simple.
For web, using .glb keeps geometry and textures bundled together. To maintain performance, it’s recommended to keep textures at 1024×1024 resolution or other square power-of-two sizes (e.g. 256, 512, 2048). This ensures optimal GPU memory usage and faster load times across devices.
Special thanks to KayLousberg for the low-poly 3D kit used for prototyping.
Step 6: Cross-Platform Input Support
The controller was designed to work seamlessly across desktop, mobile, and gamepad platforms — all built using AI-generated logic through Bolt.
Gamepad support was added using the Gamepad API, allowing players to plug in a controller and play with analog input.
On desktop, the controller uses standard keyboard input (WASD or arrow keys) and mouse movement for camera control.
On mobile, AI-generated code enabled an on-screen joystick and jump button, making the game fully touch-compatible.
All input types control the same physics-driven character, ensuring consistent behavior across devices — whether you’re playing on a laptop, touchscreen, or game controller.
This cross-platform support was implemented entirely through natural language prompts, showcasing how AI can translate high-level intent into working input systems.
The Role of AI in the Workflow
What makes this controller unique isn’t the mechanics — it’s the process. Every system was generated by AI through descriptive prompts, allowing the developer to work more like a creative director than a traditional engineer.
AI handled the boilerplate, the physics setup, the animation switching logic — all based on clear creative goals. This opens new doors for prototyping and interactive design, where iteration speed matters more than syntax.
This character controller demo includes:
Capsule collider with physics
Grounded detection via raycast
State-driven animation blending
GUI controls for tuning
Environment interaction with static/dynamic objects
Cross-Platform Input Support
It’s a strong starting point for creating browser-based games, interactive experiences, or prototyping new ideas — all with the help of AI.
Check out the full game built using this setup as a base: 🎮 Demo Game
“Aurel’s Grand Theater” is an experimental, unconventional solo portfolio project that invites users to read case
studies, solve mysteries to unlock secret pages, or freely explore the theater – jumping around and even smashing
things!
I had an absolute blast working on it, even though it took much longer than I anticipated. Once I finally settled on a
creative direction, the project took about a year to complete – but reaching that direction took nearly two years on
its own. Throughout the journey, I balanced a full-time job as a lead web developer, freelance gigs, and an unexpected
relocation to the other side of the world. The cherry on top? I went through way
too many artistic iterations. It ‘s my longest solo project to date, but also one of the most fun and creatively
rewarding. It gave me the chance to dive deep into creative coding and design.
This article takes you behind the scenes of the project – covering everything from design to code, including tools,
inspiration, project architecture, design patterns, and even feature breakdowns with code snippets you can adapt for
your own work.
The Creative Process: Behind the Curtain
Genesis
After eight years, my portfolio no longer reflected my skills or creativity. I wanted to create something unconventional – an experience where visitors become active participants rather than passive observers. Most importantly, I wanted it to be something I ‘d genuinely enjoy building. I was wrapping up “ Leap for Mankind” at the time and had a blast working on it, blending storytelling with game and interactive elements. I wanted to create another experimental website that combines game mechanics with a narrative experience.
From the beginning, I envisioned a small character that could freely explore its environment – smashing objects, interacting with surrounding elements, and navigating not just the floor but also vertical spaces by jumping onto tables and chairs. The goal was to transform the portfolio from a passive viewing experience into a fun, interactive one. At the same time, I recognized that some content demands clarity over creativity. For example, case studies require a more traditional format that emphasizes readability.
One of the key challenges, then, was designing a portfolio that could seamlessly transition between an immersive 3D game world and more conventional documentation pages – without disrupting the overall experience.
Building the Foundation
I had a general concept of the website in mind, so I started coding a proof of concept (POC) for the game back in
2022. In this early version, the player could move around, bump into objects, and jump – laying the foundation for the
interactive world I envisioned. Interestingly, much of the core code structure from that POC made it into the final
product. While the technical side was coming together, I still hadn ‘t figured out the artistic direction at that
point.
Early Proof Of Concept
Trials and Errors
As a full-time web developer, I rarely find myself wrestling with artistic direction. Until now, every freelance and
side project I took on began with a clear creative vision that simply needed technical execution.
This time was different. At first, I leaned toward a cartoonish aesthetic with bold outlines, thinking it would
emphasize my creativity. I tried to convince myself it worked, but something felt off – especially when pairing the
visual style with the user interface. The disconnect between my vision and its execution was unfamiliar territory, and
it led me down a long and winding path of creative exploration.
Early artistic direction
I experimented with other styles too, like painterly visuals, which held promise but proved too time-consuming. Each
artistic direction felt either not suitable for me or beyond my practical capabilities as a developer moonlighting as
a designer.
The theater concept – which ultimately became central to the portfolio ‘s identity – arrived surprisingly late. It
wasn ‘t part of the original vision but surfaced only after countless iterations and discarded ideas. In total,
finding an artistic direction that truly resonated took nearly two years – a journey further complicated by a major
relocation across continents, ongoing work and freelance commitments, and personal responsibilities.
The extended timeline wasn ‘t due to technical complexity, but to an unexpected battle with creative identity. What
began as a straightforward portfolio refresh evolved into a deeper exploration of how to merge professional
presentation with personal expression – pushing me far beyond code and into the world of creative direction.
Tools & Inspiration: The Heart of Creation
After numerous iterations and abandoned concepts, I finally arrived at a creative direction that resonated with my
vision. Rather than detailing every artistic detour, I ‘ll focus on the tools and direction that ultimately led to the
final product.
Design Stack
Below is the stack I use to design my 3D projects:
UI/UX & Visual Design
Figma
: When I first started, everything was laid out in a Photoshop file. Over the years, I tried various design tools,
but I ‘ve been using Figma consistently since 2018 – and I ‘ve been really satisfied with it ever since.
Miro
: reat for moodboarding and early ideation. It helps me visually organize thoughts and explore concepts during the
initial phase.
3D Modeling & Texturing
Blender
: My favorite tool for 3D modeling. It ‘s incredibly powerful and flexible, though it does have a steep learning
curve at first. Still, it ‘s well worth the effort for the level of creative control it offers.
Adobe Substance 3D Painter
: The gold standard in my workflow for texture painting. It’s expensive, but the quality and precision it delivers
make it indispensable.
Image Editing
Krita
: I only need light photo editing, and Krita handles that perfectly without locking me into Adobe ‘s ecosystem – a
practical and efficient alternative.
Drawing Inspiration from Storytellers
While I drew inspiration from many sources, the most influential were Studio Ghibli and the mystical world of Harry
Potter. Ghibli ‘s meticulous attention to environmental detail shaped my understanding of atmosphere, while the
enchanting realism of the Harry Potter universe helped define the mood I wanted to evoke. I also browsed platforms
like ArtStation and Pinterest for broader visual inspiration, while sites like Behance, FWA, and Awwwards influenced
the more granular aspects of UX/UI design.
Initially, I organized these references on an InVision board. However, when the platform shut down mid-project, I had
to migrate everything to Miro – an unexpected transition and symbolic disruption that echoed the broader delays in the
project.
Mood board of Aurel’s Grand Theater
Designing the Theater
The theater concept emerged as the perfect metaphor for a portfolio: a space where different works could be presented
as “performances,” while maintaining a cohesive environment. It also aligned beautifully with the nostalgic,
pre-digital vibe inspired by many of my visual references.
Environment design is a specialized discipline I wasn ‘t very familiar with initially. To create a theater that felt
visually engaging and believable, I studied techniques from the FZD School
. These approaches were invaluable in conceptualizing spaces that truly feel alive: places where you can sense people
living their lives, working, and interacting with the environment.
To make the environment feel genuinely inhabited, I incorporated details that suggest human presence: scattered props,
tools, theater posters, food items, pamphlets, and even bits of miscellaneous junk throughout the space. These
seemingly minor elements were crucial in transforming the static 3D model into a setting rich with history, mood, and
character.
The 3D Modeling Process
Optimizing for Web Performance
Creating 3D environments for the web comes with unique challenges that differ significantly from video modelling. When
scenes need to be rendered in real-time by a browser, every polygon matters.
To address this, I adopted a strict low-poly approach and focused heavily on building reusable modular components.
These elements could be instantiated throughout the environment without duplicating unnecessary geometry or textures.
While the final result is still relatively heavy, this modular system allowed me to construct more complex and
detailed scenes while maintaining reasonable download sizes and rendering performance, which wouldn ‘t have been
possible without this approach.
Scaffolds models
Scaffolds models merged with the tower, hanok house and walls props
Texture Over Geometry
Rather than modeling intricate details that would increase polygon counts, I leveraged textures to suggest complexity.
Adobe Substance 3D became my primary tool for creating rich material surfaces that could convey detail without
overloading the renderer. This approach was particularly effective for elements like the traditional Hanok windows
with their intricate wooden lattice patterns. Instead of modeling each panel, which would have been
performance-prohibitive, I painted the details into textures and applied them to simple geometric forms.
Hanok model’s verticesHanok model painted using 3d Substance Painter
Frameworks & Patterns: Behind the Scenes of Development
Tech Stack
This is a comprehensive overview of the technology stack I used for Aurel’s Grand Theater website, leveraging my
existing expertise while incorporating specialized tools for animation and 3D effects.
Core Framework
Vue.js
: While I previously worked with React, Vue has been my primary framework since 2018. Beyond simply enjoying and
loving this framework, it makes sense for me to maintain consistency between the tools I use at work and on my side
projects. I also use Vite and Pinia.
Animation & Interaction
GSAP
: A cornerstone of my development toolkit for nearly a decade, primarily utilized on this project for:
ScrollTrigger functionality
MotionPath animations
Timeline and tweens
As a personal challenge, I created my own text-splitting functionality for this project (since it wasn ‘t client
work), but I highly recommend GSAP ‘s SplitText for most use cases.
Lenis
: My go-to library for smooth scrolling. It integrates beautifully with scroll animations, especially when working
with Three.js.
3D Graphics & Physics
Three.js
: My favorite 3D framework and a key part of my toolkit since 2015. I enjoy using it to bring interactive 3D
elements to the web.
Cannon.js
: Powers the site ‘s physics simulations. While I considered alternatives like Rapier, I stuck with Cannon.js since
it was already integrated into my 2022 proof-of-concept. Replacing it would have introduced unnecessary delays.
Styling
Queso
: A headless CSS framework developed at MamboMambo (my workplace). I chose it for its comprehensive starter
components and seamless integration with my workflow. Despite being in beta, it ‘s already reliable and flexible.
This tech stack strikes a balance between familiar tools and specialized libraries that enable the visual and
interactive elements that define the site’s experience.
Architecture
I follow Clean Code principles and other industry best practices, including aiming to keep my files small,
independent, reusable, concise, and testable.
I’ve also adopted the component folder architecture developed at my workplace. Instead of placing Vue
files directly inside the ./components
directory, each component resides in its own folder. This folder contains the Vue
file along with related types, unit tests, supporting files, and any child components.
Although initially designed for Vue
components, I ‘ve found this structure works equally well for organizing logic with Typescript
files, utilities
, directives
, and more. It ‘s a clean, consistent system that improves code readability, maintainability, and scalability.
This structured approach helps me manage the code base efficiently and maintain clear separation of concerns
throughout the codebase, making both development and future maintenance significantly more straightforward.
Design Patterns
Singleton
Singletons play a key role in this type of project architecture, enabling efficient code reuse without incurring
performance penalties.
import Experience from "@/three/Experience/Experience";
import type { Scene } from "@/types/three.types";

let instance: SingletonExample | null = null;

export default class SingletonExample {
  private scene: Scene;
  private experience: Experience;

  constructor() {
    if (instance) {
      return instance;
    }
    instance = this;

    this.experience = new Experience();
    this.scene = this.experience.scene;
  }

  init() {
    // initialize the singleton
  }

  someMethod() {
    // some method
  }

  update() {
    // update the singleton
  }

  update10fps() {
    // Optional: update methods capped at 10FPS
  }

  destroySingleton() {
    // clean up three.js + destroy the singleton
  }
}
Split Responsibility Architecture
As shown earlier in the project architecture section, I deliberately separated physics management from model handling
to produce smaller, more maintainable files.
World Management Files:
These files are responsible for initializing factories and managing meshes within the main loop. They may also include
functions specific to individual world items.
Here’s an example of one such file:
// src/three/Experience/Theater/mockFileModel/mockFileModel.ts
import Experience from "@/three/Experience/Theater/Experience/Experience";

import type {
  List,
  LoadModel
} from "@/types/experience/experience.types";
import type { Scene } from "@/types/three.types";
import type Physics from "@/three/Experience/Theater/Physics/Physics";
import type { Resources } from "@/three/Experience/Utils/Ressources/Resources";
import type { MaterialGenerator } from "@/types/experience/materialGeneratorType";


let instance: mockWorldFile | null = null;
export default class mockWorldFile {
  private experience: Experience;
  private list: List;
  private physics: Physics;
  private resources: Resources;
  private scene: Scene;
  private materialGenerator: MaterialGenerator;
  public loadModel: LoadModel;
  constructor() {
    //    Singleton
    if (instance) {
      return instance;
    }

    instance = this;

    this.experience = new Experience();
    this.scene = this.experience.scene;
    this.resources = this.experience.resources;
    this.physics = this.experience.physics;

    // factories
    this.materialGenerator = this.experience.materialGenerator;
    this.loadModel = this.experience.loadModel;

     // Most of the material are init in a file called sharedMaterials
    const bakedMaterial = this.experience.world.sharedMaterials.bakedMaterial;
    // physics infos such as position, rotation, scale, weight etc.
    const paintBucketPhysics = this.physics.items.paintBucket;

    // Array of objects of models. This will be used to update it's position, rotation, scale, etc.
    this.list = {
      paintBucket: [],
      ...
    };

    // get the resource file
    const resourcePaintBucket = this.resources.items.paintBucketWhite;

     //Reusable code to add models with physics to the scene. I will talk about that later.
    this.loadModel.setModels(
      resourcePaintBucket.scene,
      paintBucketPhysics,
      "paintBucketWhite",
      bakedMaterial,
      true,
      true,
      false,
      false,
      false,
      this.list.paintBucket,
      this.physics.mock,
      "metalBowlFalling",
    );
  }

  otherMethod() {
    ...
  }

  destroySingleton() {
    ...
  }
}
Physics Management Files
These files trigger the factories to apply physics to meshes, store the resulting physics bodies, and update mesh
positions on each frame.
// src/three/Experience/Theater/pathTo/mockFilePhysics
import Experience from "@/three/Experience/Theater/Experience/Experience";

import additionalShape from "./additionalShape.json";

import type {
  PhysicsResources,
  TrackName,
  List,
  modelsList
} from "@/types/experience/experience.types";
import type { cannonObject } from "@/types/three.types";
import type PhysicsGenerator from "../Factories/PhysicsGenerator/PhysicsGenerator";
import type UpdateLocation from "../Utils/UpdateLocation/UpdateLocation";
import type UpdatePositionMesh from "../Utils/UpdatePositionMesh/UpdatePositionMesh";
import type AudioGenerator from "../Utils/AudioGenerator/AudioGenerator";

let instance: MockFilePhysics | null = null;

export default class MockFilePhysics {
  private experience: Experience;
  private list: List;
  private physicsGenerator: PhysicsGenerator;
  private updateLocation: UpdateLocation;
  private modelsList: modelsList;
  private updatePositionMesh: UpdatePositionMesh;
  private audioGenerator: AudioGenerator;

  constructor() {
    //    Singleton
    if (instance) {
      return instance;
    }
    instance = this;

    this.experience = new Experience();
    this.debug = this.experience.debug;
    this.physicsGenerator = this.experience.physicsGenerator;
    this.updateLocation = this.experience.updateLocation;
    this.updatePositionMesh = this.experience.updatePositionMesh;
    this.audioGenerator = this.experience.audioGenerator;

    // Array of objects of physics. This will be used to update the model's position, rotation, scale etc.
    this.list = {
      paintBucket: [],
    };
  }

  setModelsList() {
    //When the load progress reaches a certain percentage, we can set the models list, avoiding some potential bugs or unnecessary conditional logic. Please note that the method update is never run until the scene is fully ready.
    this.modelsList = this.experience.world.constructionToolsModel.list;
  }

  addNewItem(
    element: PhysicsResources,
    listName: string,
    trackName: TrackName,
    sleepSpeedLimit: number | null = null,
  ) {

    // factory to add physics, I will talk about that later
    const itemWithPhysics = this.physicsGenerator.createItemPhysics(
      element,
      null,
      true,
      true,
      trackName,
      sleepSpeedLimit,
    );

    // Additional optional shapes to the item if needed
    switch (listName) {
      case "broom":
        this.physicsGenerator.addMultipleAdditionalShapesToItem(
          itemWithPhysics,
          additionalShape.broomHandle,
        );
        break;

    }

    this.list[listName].push(itemWithPhysics);
  }

  // this methods is called everyfame.
  update() {
    // reusable code to update the position of the mesh
    this.updatePositionMesh.updatePositionMesh(
      this.modelsList["paintBucket"],
      this.list["paintBucket"],
    );
  }


  destroySingleton() {
    ...
  }
}
Since the logic for updating mesh positions is consistent across the project, I created reusable code that can be
applied in nearly all physics-related files.
// src/three/Experience/Utils/UpdatePositionMesh/UpdatePositionMesh.ts

export default class UpdatePositionMesh {
  updatePositionMesh(meshList: MeshList, physicList: PhysicList) {
    for (let index = 0; index < physicList.length; index++) {
      const physic = physicList[index];
      const model = meshList[index].model;

      model.position.set(
        physic.position.x,
        physic.position.y,
        physic.position.z
      );
      model.quaternion.set(
        physic.quaternion.x,
        physic.quaternion.y,
        physic.quaternion.z,
        physic.quaternion.w
      );
    }
  }
}
Factory Patterns
To avoid redundant code, I built a system around reusable code. While the project includes multiple factories, these
two are the most essential:
Model Factory
: LoadModel
With few exceptions, all models—whether instanced or regular, with or without physics—are added through this factory.
// src/three/Experience/factories/LoadModel/LoadModel.ts
import * as THREE from "three";
import Experience from "@/three/Experience/Theater/Experience/Experience";

import type {
  PhysicsResources,
  TrackName,
  List,
  modelListPath,
  PhysicsListPath
} from "@/types/experience/experience.type";
import type { loadModelMaterial } from "./types";
import type { Material, Scene, Mesh } from "@/types/Three.types";
import type Progress from "@/three/Experience/Utils/Progress/Progress";
import type AddPhysicsToModel from "@/three/Experience/factories/AddPhysicsToModel/AddPhysicsToModel";

let instance: LoadModel | null = null;


export default class LoadModel {
  public experience: Experience;
  public progress: Progress;
  public mesh: Mesh;
  public addPhysicsToModel: AddPhysicsToModel;
  public scene: Scene;


  constructor() {
    if (instance) {
      return instance;
    }
    instance = this;

    this.experience = new Experience();
    this.scene = this.experience.scene;
    this.progress = this.experience.progress;
    this.addPhysicsToModel = this.experience.addPhysicsToModel;
  }


  async setModels(
    model: Model,
    list: PhysicsResources[],
    physicsList: string,
    bakedMaterial: LoadModelMaterial,
    isCastShadow: boolean = false,
    isReceiveShadow: boolean = false,
    isIntancedModel: boolean = false,
    isDoubleSided: boolean = false,
    modelListPath: ModelListPath,
    physicsListPath: PhysicsListPath,
    trackName: TrackName = null,
    sleepSpeedLimit: number | null = null,
  ) {
    const loadedModel = isIntancedModel
      ? await this.addInstancedModel(
          model,
          bakedMaterial,
          true,
          true,
          isDoubleSided,
          isCastShadow,
          isReceiveShadow,
          list.length,
        )
        : await this.addModel(
            model,
            bakedMaterial,
            true,
            true,
            isDoubleSided,
            isCastShadow,
            isReceiveShadow,
          );


    this.addPhysicsToModel.loopListThenAddModelToSceneThenToPhysics(
      list,
      modelListPath,
      physicsListPath,
      physicsList,
      loadedModel,
      isIntancedModel,
      trackName,
      sleepSpeedLimit,
    );
  }


  addModel = (
    model: Model,
    material: Material,
    isTransparent: boolean = false,
    isFrustumCulled: boolean = true,
    isDoubleSided: boolean = false,
    isCastShadow: boolean = false,
    isReceiveShadow: boolean = false,
    isClone: boolean = true,
  ) => {
    model.traverse((child: THREE.Object3D) => {
      !isFrustumCulled ? (child.frustumCulled = false) : null;
      if (child instanceof THREE.Mesh) {
        child.castShadow = isCastShadow;
        child.receiveShadow = isReceiveShadow;

        material
          && (child.material = this.setMaterialOrCloneMaterial(
              isClone,
              material,
            ))


        child.material.transparent = isTransparent;
        isDoubleSided ? (child.material.side = THREE.DoubleSide) : null;
        isReceiveShadow ? child.geometry.computeVertexNormals() : null; // https://discourse.threejs.org/t/gltf-model-shadows-not-receiving-with-gltfmeshstandardsgmaterial/24112/9
      }
    });

    this.progress.addLoadedModel(); // Update the number of items loaded
    return { model: model };
  };


  setMaterialOrCloneMaterial(isClone: boolean, material: Material) {
    return isClone ? material.clone() : material;
  }


  addInstancedModel = () => {
   ...
  };

  // other methods


  destroySingleton() {
    ...
  }
}
Physics Factory: PhysicsGenerator
This factory has a single responsibility: creative physics properties for meshes.
// src/three/Experience/Utils/PhysicsGenerator/PhysicsGenerator.ts
import Experience from "@/three/Experience/Theater/Experience/Experience";
import * as CANNON from "cannon-es";

import CannonUtils from "@/utils/cannonUtils.js";

import type {
  Quaternion,
  PhysicsItemPosition,
  PhysicsItemType,
  PhysicsResources,
  TrackName,
  CannonObject,
} from "@/types/experience/experience.types";

import type { Scene, ConvexGeometry } from "@/types/three.types";
import type Progress from "@/three/Experience/Utils/Progress/Progress";
import type AudioGenerator from "@/three/Experience/Utils/AudioGenerator/AudioGenerator";
import type Physics from "@/three/Experience/Theater/Physics/Physics";
import type { physicsShape } from "./PhysicsGenerator.types"

let instance: PhysicsGenerator | null = null;

export default class PhysicsGenerator {
  public experience: Experience;
  public physics: Physics;
  public currentScene: string | null = null;
  public progress: Progress;
  public audioGenerator: AudioGenerator;

  constructor() {
    //    Singleton
    if (instance) {
      return instance;
    }
    instance = this;

    this.experience = new Experience();
    this.resources = this.experience.resources;
    this.audioGenerator = this.experience.audioGenerator;
    this.physics = this.experience.physics;
    this.progress = this.experience.progress;

    this.currentScene = this.experience.currentScene;
  }


  //#region add physics to an object

  createItemPhysics(
    source: PhysicsResources, // object containing physics info such as mass, shape, position....
    convex?: ConvexGeometry | null = null,
    allowSleep?: boolean = true,
    isBodyToAdd?: boolean = true,
    trackName?: TrackName = null,
    sleepSpeedLimit?: number | null = null
  ) {
    const setSpeedLimit = sleepSpeedLimit ?? 0.15;

    // For this project I needed to detect if the user was in the Mont-Saint-Michel, Leap For Mankind, About or Archives scene.
    const localCurrentScene = source.locations[this.currentScene]
      ? this.currentScene
      : "about";

    switch (source.type as physicsShape) {
      case "box": {
        const boxShape = new CANNON.Box(new CANNON.Vec3(...source.shape));
        const boxBody = new CANNON.Body({
          mass: source.mass,
          position: new CANNON.Vec3(
            source.locations[localCurrentScene].position.x,
            source.locations[localCurrentScene].position.y,
            source.locations[localCurrentScene].position.z
          ),
          allowSleep: allowSleep,
          shape: boxShape,
          material: source.material
            ? source.material
            : this.physics.physics.defaultMaterial,
          sleepSpeedLimit: setSpeedLimit,
        });

        source.locations[localCurrentScene].quaternion
          && (boxBody.quaternion.y =
              source.locations[localCurrentScene].quaternion.y);

        this.physics.physics.addBody(boxBody);
        this.updatedLoadedItem();

        // Add optional SFX that will be played if the item collides with another physics item
        trackName
          && this.audioGenerator.addEventListenersToObject(boxBody, TrackName);

        return boxBody;
      }

      // Then it's basicly the same logic for all other cases
      case "sphere": {
        ...
      }

      case "cylinder": {
       ...
      }

      case "plane": {
       ...
      }

      case "trigger": {
      ...
      }

      case "torus": {
        ...
      }

      case "trimesh": {
       ...
      }

      case "polyhedron": {
        ...
      }

      default:
        ...
        break;
    }
  }

  updatedLoadedItem() {
    this.progress.addLoadedPhysicsItem(); // Update the number of item loaded (physics only)
  }

  //#endregion add physics to an object

  // other

  destroySingleton() {
    ...
  }
}
FPS Capping
With over 100 models and approximately 150 physics items loaded in the main scene, Aurel’s Grand Theater required
performance-driven coding from the outset.
I were to rebuild the project today, I would leverage GPU computing much more intensively. However, when I started the
proof of concept in 2022, GPU computing for the web was still relatively new and not fully mature—at least, that was
my perception at the time. Rather than recoding everything, I worked with what I had, which also presented a great
personal challenge. In addition to using low-poly models and employing classic optimization techniques, I extensively
used instanced meshes for all small, reusable items—even those with physics. I also relied on many other
under-the-hood techniques to keep the performance as smooth as possible on this CPU-intensive website.
One particularly helpful approach I implemented was adaptive frame rates. By capping the FPS to different levels (60,
30, or 10), depending on whether the logic required rendering at those rates, I optimized performance. After all, some
logic doesn ‘t require rendering every frame. This is a simple yet effective technique that can easily be incorporated
into your own project.
Now, let ‘s take a look at the file responsible for managing time in the project.
// src/three/Experience/Utils/Time/Time.ts
import * as THREE from "three";
import EventEmitter from "@/three/Experience/Utils/EventEmitter/EventEmitter";

let instance: Time | null = null;
let animationFrameId: number | null = null;
const clock = new THREE.Clock();

export default class Time extends EventEmitter {
  private lastTick60FPS: number = 0;
  private lastTick30FPS: number = 0;
  private lastTick10FPS: number = 0;

  private accumulator60FPS: number = 0;
  private accumulator30FPS: number = 0;
  private accumulator10FPS: number = 0;

  public start: number = 0;
  public current: number = 0;
  public elapsed: number = 0;
  public delta: number = 0;
  public delta60FPS: number = 0;
  public delta30FPS: number = 0;
  public delta10FPS: number = 0;

  constructor() {
    if (instance) {
      return instance;
    }
    super();
    instance = this;
  }

  tick() {
    const currentTime: number = clock.getElapsedTime() * 1000;

    this.delta = currentTime - this.current;
    this.current = currentTime;

    // Accumulate the time that has passed
    this.accumulator60FPS += this.delta;
    this.accumulator30FPS += this.delta;
    this.accumulator10FPS += this.delta;

    // Trigger uncapped tick event using the project's EventEmitter class
    this.trigger("tick");

    // Trigger 60FPS tick event
    if (this.accumulator60FPS >= 1000 / 60) {
      this.delta60FPS = currentTime - this.lastTick60FPS;
      this.lastTick60FPS = currentTime;

      // Same logic as "this.trigger("tick")" but for 60FPS
      this.trigger("tick60FPS");
      this.accumulator60FPS -= 1000 / 60;
    }

    // Trigger 30FPS tick event
    if (this.accumulator30FPS >= 1000 / 30) {
      this.delta30FPS = currentTime - this.lastTick30FPS;
      this.lastTick30FPS = currentTime;

      this.trigger("tick30FPS");
      this.accumulator30FPS -= 1000 / 30;
    }

    // Trigger 10FPS tick event
    if (this.accumulator10FPS >= 1000 / 10) {
      this.delta10FPS = currentTime - this.lastTick10FPS;
      this.lastTick10FPS = currentTime;

      this.trigger("tick10FPS");
      this.accumulator10FPS -= 1000 / 10;
    }

    animationFrameId = window.requestAnimationFrame(() => {
      this.tick();
    });
  }
}
Then, in the Experience.ts
file, we simply place the methods according to the required FPS.
constructor() {
   if (instance) {
      return instance;
    }

    ...

    this.time = new Time();

    ...


    //  The game loops (here called tick) are updated when the EventEmitter class is triggered.
    this.time.on("tick", () => {
      this.update();
    });
    this.time.on("tick60FPS", () => {
      this.update60();
    });
    this.time.on("tick30FPS", () => {
      this.update30();
    });
    this.time.on("tick10FPS", () => {
      this.update10();
    });
    }


  update() {
    this.renderer.update();
  }

  update60() {
    this.camera.update60FPS();
    this.world.update60FPS();
    this.physics.update60FPS();
  }

  update30() {
    this.physics.update30FPS();
    this.world.update30FPS();
  }

  update10() {
    this.physics.update10FPS();
    this.world.update10FPS();
  }
Inspired by techniques from the film industry, the transitions between the 3D game and the more traditionally
structured pages, such as the Case Studies, About, and Credits pages, were carefully designed to feel seamless and
cinematic.
The first-time visit animation provides context and immerses users into the website experience. Meanwhile, the other
page transitions play a crucial role in ensuring a smooth shift between the game and the more conventional layout of
the Case Studies and About page, preserving immersion while naturally guiding users from one experience to the next.
Without these transitions, it would feel like abruptly jumping between two entirely different worlds.
I’ll do a deep dive into the code for the animation when the user returns from the basement level. It’s a bit simpler
than the other cinematic transitions but the underlying logic is the same, which makes it easier for you to adapt it
to another project.
The init
method, called from another file, initiates the creation of the animation. At first, we set the path for the
animation, then the timeline.
init() {
    this.camera = this.experience.camera.instance;
    this.initPath();
 }

initPath() {
  // create the path for the camera
  const pathPoints = new CatmullRomCurve3([
    new Vector3(CAMERA_POSITION_SEAT[0], CAMERA_POSITION_SEAT[1], 15),
    new Vector3(5.12, 4, 8.18),
    new Vector3(...RETURNING_PLAYER_CAMERA_FINAL_POSITION),
  ]);

  // init the timeline
  this.initTimeline(pathPoints);
}

initTimeline(path: CatmullRomCurve3) {
 ...
}
The timeline animation is split into two: a) The camera moves vertically from the basement to the theater, above the
seats.
...

initTimeline(path: CatmullRomCurve3) {
    // get the points
    const pathPoints = path.getPoints(30);

    // create the gsap timeline
    this.timelineAnimation
      // set the initial position
      .set(this.camera.position, {
        x: CAMERA_POSITION_SEAT[0],
        y: CAMERA_POSITION_SEAT[1] - 3,
        z: 15,
      })
      .add(() => {
        this.camera.lookAt(3.5, 1, 0);
      })
      //   Start the animation! In this case the camera is moving from the basement to above the seat
      .to(this.camera.position, {
        x: CAMERA_POSITION_SEAT[0],
        y: CAMERA_POSITION_SEAT[1],
        z: 15,
        duration: 3,
        ease: "elastic.out(0.1,0.1)",
      })
      .to(
        this.camera.position,
        {
		      ...
        },
      )
      ...
  }
b) The camera follows a path while smoothly transitioning its view to the final location.
 .to(
    this.camera.position,
    {
      // then we use motion path to move the camera to the player behind the raccoon
      motionPath: {
        path: pathPoints,
        curviness: 0,
        autoRotate: false,
      },
      ease: "power1.inOut",
      duration: DURATION_RETURNING_FORWARD,
      onUpdate: function () {
        const progress = this.progress();

        // wait until progress reaches a certain point to rotate to the camera at the player LookAt
        if (
          progress >=
            1 -
              DURATION_LOOKAT_RETURNING_FORWARD /
                DURATION_RETURNING_FORWARD &&
          !this.lookAtTransitionStarted
        ) {
	         this.lookAtTransitionStarted = true;

           // Create a new Vector3 to store the current look direction
           const currentLookAt = new Vector3();

            // Get the current camera's forward direction (where it's looking)
            instance!.camera.getWorldDirection(currentLookAt);

            // Extend the look direction by 100 units and add the camera's position
            // This creates a point in space that the camera is currently looking at
            currentLookAt.multiplyScalar(100).add(instance!.camera.position);

            // smooth lookAt animation
	          createSmoothLookAtTransition(
	            currentLookAt,
	            new Vector3(...RETURNING_PLAYER_CAMERA_FINAL_LOOKAT),
	            DURATION_LOOKAT_RETURNING_FORWARD,
	            this.camera
	          );
        }
      },
    },
  )
  .add(() => {
    // animation is completed, you can add some code here
  });
As you noticed, I used a utility function called smoothLookAtTransition
since I needed this functionality in multiple places.
With everything ready, the animation sequence is run when playAnimation()
is triggered.
playAnimation() {
    // first set the position of the player
    this.setPositionPlayer();
    // then play the animation
    this.timelineAnimation.play();
  }

  setPositionPlayer() {
   // an simple utils to update the position of the player when the user land in the scene, return or switch scene.
    setPlayerPosition(this.experience, {
      position: PLAYER_POSITION_RETURNING,
      quaternion: RETURNING_PLAYER_QUATERNION,
      rotation: RETURNING_PLAYER_ROTATION,
    });
  }
Scroll-Triggered Animations: Showcasing Books on About Pages
While the game is fun and filled with details, the case studies and about pages are crucial to the overall experience,
even though they follow a more standardized format. These pages still have their own unique appeal. They are filled
with subtle details and animations, particularly scroll-triggered effects such as split text animations when
paragraphs enter the viewport, along with fade-out effects on SVGs and other assets. These animations create a vibe
that mirrors the mysterious yet intriguing atmosphere of the game, inviting visitors to keep scrolling and exploring.
While I can’t cover every animation in detail, I ‘d like to share the technical approach behind the book animations
featured on the about page. This effect blends DOM scroll event tracking with a Three.js scene, creating a seamless
interaction between the user ‘s scrolling behavior and the 3D-rendered books. As visitors scroll down the page, the
books transition elegantly and respond dynamically to their movement.
Before we dive into the Three.js
file, let ‘s look into the Vue
component.
//src/components/BookGallery/BookGallery.vue
<template>
  <!-- the ID is used in the three.js file -->
  <div class="book-gallery" id="bookGallery" ref="bookGallery"></div>
</template>

<script setup lang="ts">
import { onBeforeUnmount, onMounted, onUnmounted, ref } from "vue";

import gsap from "gsap";
import { ScrollTrigger } from "gsap/ScrollTrigger";

import type { BookGalleryProps } from "./types";

gsap.registerPlugin(ScrollTrigger);

const props = withDefaults(defineProps<BookGalleryProps>(), {});

const bookGallery = ref<HTMLBaseElement | null>(null);

const setupScrollTriggers = () => {
 ...
};

const triggerAnimation = (index: number) => {
  ...
};

onMounted(() => {
  setupScrollTriggers();
});

onUnmounted(() => {
  ...
});
</script>

<style lang="scss" scoped>
.book-gallery {
  position: relative;
  height: 400svh; // 1000svh * 4 books
}
</style>
Thresholds are defined for each book to determine which one will be active – that is, the book that will face the
camera.
// src/three/Experience/Basement/World/Books/Books.ts

import * as THREE from "three";
import Experience from "@/three/Experience/Basement/Experience/Experience";

import { SCROLL_RATIO } from "@/constant/scroll";

import { gsap } from "gsap";

import type { Book } from "./books.types";
import type { Material, Scene, Texture, ThreeGroup } from "@/types/three.types";
import type { Sizes } from "@/three/Experience/Utils/Sizes/types";
import type LoadModel from "@/three/Experience/factories/LoadModel/LoadModel";
import type MaterialGenerator from "@/three/Experience/factories/MaterialGenerator/BasicMaterialGenerator";
import type Resources from "@/three/Experience/Utils/Ressources/Resources";

const GSAP_EASE = "power2.out";
const GSAP_DURATION = 1;
const NB_OF_VIEWPORTS_BOOK_SECTION = 5;

let instance: Books | null = null;

export default class Books {
  public scene: Scene;
  public experience: Experience;
  public resources: Resources;
  public loadModel: LoadModel;
  public sizes: Sizes;

  public materialGenerator: MaterialGenerator;
  public resourceDiffuse: Texture;
  public resourceNormal: Texture;
  public bakedMaterial: Material;

  public startingPostionY: number;
  public originalPosition: Book[];
  public activeIndex: number = 0;
  public isAnimationRunning: boolean = false;

  public bookGalleryElement: HTMLElement | null = null;
  public bookSectionHeight: number;
  public booksGroup: ThreeGroup;


  constructor() {
    if (instance) {
      return instance;
    }
    instance = this;

    this.experience = new Experience();
    this.scene = this.experience.sceneSecondary; // I am using a second scene for the books, so it's not affected by the primary scene (basement in the background)
    this.sizes = this.experience.sizes;

    this.resources = this.experience.resources;
    this.materialGenerator = this.experience.materialGenerator;

    this.init();
  }

  init() {
    ...
  }

  initModels() {
   ...
  }

  findPosition() {
   ...
  }

  setBookSectionHeight() {
   ...
  }

  initBooks() {
   ...
  }

  initBook() {
   ...
  }

  createAnimation() {
    ...
  }

  toggleIsAnimationRunning() {
    ...
  }

  ...

  destroySingleton() {
    ...
  }
}
When the file is initialized, we set up the textures and positions of the books.
init() {
  this.initModels();
  this.findPosition();
  this.setBookSectionHeight();
  this.initBooks();
}

initModels() {
  this.originalPosition = [
      {
      name: "book1",
      meshName: null, // the name of the mesh from Blender will dynamically be written here
      position: { x: 0, y: -0, z: 20 },
      rotation: { x: 0, y: Math.PI / 2.2, z: 0 }, // some rotation on y axis so it looks more natural when the books are pilled
    },
    {
      name: "book2",
      meshName: null,
      position: { x: 0, y: -0.25, z: 20 },
      rotation: { x: 0, y: Math.PI / 1.8, z: 0 },
    },
    {
      name: "book3",
      meshName: null,
      position: { x: 0, y: -0.52, z: 20 },
      rotation: { x: 0, y: Math.PI / 2, z: 0 },
    },
    {
      name: "book4",
      meshName: null,
      position: { x: 0, y: -0.73, z: 20 },
      rotation: { x: 0, y: Math.PI / 2.3, z: 0 },
    },
  ];

  this.resourceDiffuse = this.resources.items.bookDiffuse;
  this.resourceNormal = this.resources.items.bookNormal;

    // a reusable class to set the material and normal map
  this.bakedMaterial = this.materialGenerator.setStandardMaterialAndNormal(
    this.resourceDiffuse,
    this.resourceNormal
  );
}

//#region position of the books

// Finds the initial position of the book gallery in the DOM
findPosition() {
  this.bookGalleryElement = document.getElementById("bookGallery");

  if (this.bookGalleryElement) {
    const rect = this.bookGalleryElement.getBoundingClientRect();
    this.startingPostionY = (rect.top + window.scrollY) / 200;
  }
}

//  Sets the height of the book section based on viewport and scroll ratio
setBookSectionHeight() {
  this.bookSectionHeight =
    this.sizes.height * NB_OF_VIEWPORTS_BOOK_SECTION * SCROLL_RATIO;
}

//#endregion position of the books
Each book mesh is created and added to the scene as a THREE.Group
.
Each time a book enters
or reenters
its thresholds, the triggers from the Vue
file run the animation createAnimation
in this file, which rotates the active book in front of the camera and stacks the other books into a pile.
The game is the main attraction of the website. The entire concept began back in 2022, when I set out to build a small
mini-game where you could jump on tables and smash things and it was my favorite part to work on.
Beyond being fun to develop, the interactive physics elements make the experience more engaging, adding a whole new
layer of excitement and exploration that simply isn’t possible in a flat, static environment.
While I can ‘t possibly cover all the physics-related elements, one of my favorites is the rope system near the menu.
It’s a subtle detail, but it was one of the first things I coded when I started leaning into a more theatrical,
artistic direction.
The ropes were also built with performance in mind—optimized to look and behave convincingly without dragging down the
framerate.
This is the base file for the meshes:
// src/three/Experience/Theater/World/Theater/Rope/RopeModel.ts

import * as THREE from "three";
import Experience from "@/three/Experience/Theater/Experience/Experience";
import RopeMaterialGenerator from "@/three/Experience/Factories/MaterialGenerator/RopeMaterialGenerator";

import ropesLocation from "./ropesLocation.json";

import type { Location, List } from "@/types/experience/experience.types";
import type { Scene, Resources, Physics, RopeMesh, CurveQuad } from "@/types/three.types";

let instance: RopeModel | null = null;

export default class RopeModel {
  public scene: Scene;
  public experience: Experience;
  public resources: Resources;
  public physics: Physics;
  public material: Material;
  public list: List;
  public ropeMaterialGenerator: RopeMaterialGenerator;

  public ropeLength: number = 20;
  public ropeRadius: number = 0.02;
  public ropeRadiusSegments: number = 8;

  constructor() {
    //    Singleton
    if (instance) {
      return instance;
    }
    instance = this;

    this.experience = new Experience();
    this.scene = this.experience.scene;
    this.resources = this.experience.resources;
    this.physics = this.experience.physics;
    this.ropeMaterialGenerator = new RopeMaterialGenerator();

    this.ropeLength = this.experience.physics.rope.numberOfSpheres || 20;
    this.ropeRadius = 0.02;
    this.ropeRadiusSegments = 8;

    this.list = {
      rope: [],
    };

    this.initRope();
  }

  initRope() {
   ...
  }

  createRope() {
    ...
  }

  setArrayOfVertor3() {
    ...
  }

  setYValues() {
    ...
  }

  setMaterial() {
    ...
  }

  addRopeToScene() {
    ...
  }

  //#region update at 60FPS
  update() {
   ...
  }

  updateLineGeometry() {
   ...
  }
  //#endregion update at 60FPS

  destroySingleton() {
    ...
  }
}
Mesh creation is initiated inside the constructor.
// src/three/Experience/Theater/World/Theater/Rope/RopeModel.ts

 constructor() {
	...
    this.initRope();
  }

  initRope() {
    // Generate the material that will be used for all ropes
    this.setMaterial();

    // Create a rope at each location specified in the ropesLocation configuration
    ropesLocation.forEach((location) => {
      this.createRope(location);
    });
  }

  createRope(location: Location) {
    // Generate the curve that defines the rope's path
    const curveQuad = this.setArrayOfVertor3();
    this.setYValues(curveQuad);

    const tube = new THREE.TubeGeometry(
      curveQuad,
      this.ropeLength,
      this.ropeRadius,
      this.ropeRadiusSegments,
      false
    );

    const rope = new THREE.Mesh(tube, this.material);

    rope.geometry.attributes.position.needsUpdate = true;

    // Add the rope to the scene and set up its physics. I'll explain it later.
    this.addRopeToScene(rope, location);
  }

  setArrayOfVertor3() {
    const arrayLimit = this.ropeLength;
    const setArrayOfVertor3 = [];
    // Create points in a vertical line, spaced 1 unit apart
    for (let index = 0; index < arrayLimit; index++) {
      setArrayOfVertor3.push(new THREE.Vector3(10, 9 - index, 0));
      if (index + 1 === arrayLimit) {
        return new THREE.CatmullRomCurve3(
          setArrayOfVertor3,
          false,
          "catmullrom",
          0.1
        );
      }
    }
  }

  setYValues(curve: CurveQuad) {
    // Set each point's Y value to its index, creating a vertical line
    for (let i = 0; i < curve.points.length; i++) {
      curve.points[i].y = i;
    }
  }

  setMaterial(){
	  ...
  }
Since the rope texture is used in multiple places, I use a factory pattern for efficiency.
...

setMaterial() {
    this.material = this.ropeMaterialGenerator.generateRopeMaterial(
      "rope",
      0x3a301d, // Brown color
      1.68, // Normal Repeat
      0.902, // Normal Intensity
      21.718, // Noise Strength
      1.57, // UV Rotation
      9.14, // UV Height
      this.resources.items.ropeDiffuse, // Diffuse texture map
      this.resources.items.ropeNormal // Normal map for surface detail
    );
  }
// src/three/Experience/Shaders/Rope/vertex.glsl

uniform float uNoiseStrength;      // Controls the intensity of noise effect
uniform float uNormalIntensity;    // Controls the strength of normal mapping
uniform float uNormalRepeat;       // Controls the tiling of normal map
uniform vec3 uLightColor;          // Color of the light source
uniform float uShadowStrength;     // Intensity of shadow effect
uniform vec3 uLightPosition;       // Position of the light source
uniform float uvRotate;            // Rotation angle for UV coordinates
uniform float uvHeight;            // Height scaling for UV coordinates
uniform bool isShadowBothSides;    // Flag for double-sided shadow rendering


varying float vNoiseStrength;      // Passes noise strength to fragment shader
varying float vNormalIntensity;    // Passes normal intensity to fragment shader
varying float vNormalRepeat;       // Passes normal repeat to fragment shader
varying vec2 vUv;                  // UV coordinates for texture mapping
varying vec3 vColorPrimary;        // Primary color for the material
varying vec3 viewPos;              // Position in view space
varying vec3 vLightColor;          // Light color passed to fragment shader
varying vec3 worldPos;             // Position in world space
varying float vShadowStrength;     // Shadow strength passed to fragment shader
varying vec3 vLightPosition;       // Light position passed to fragment shader

// Helper function to create a 2D rotation matrix
mat2 rotate(float angle) {
    return mat2(cos(angle), -sin(angle), sin(angle), cos(angle));
}

void main() {
    // Calculate rotation angle and its sine/cosine components
    float angle = 1.0 * uvRotate;
    float s = sin(angle);
    float c = cos(angle);

    // Create rotation matrix for UV coordinates
    mat2 rotationMatrix = mat2(c, s, -s, c);

    // Define pivot point for UV rotation
    vec2 pivot = vec2(0.5, 0.5);

    // Transform vertex position to clip space
    gl_Position = projectionMatrix * viewMatrix * modelMatrix * vec4(position, 1.0);

    // Apply rotation and height scaling to UV coordinates
    vUv = rotationMatrix * (uv - pivot) + pivot;
    vUv.y *= uvHeight;

    // Pass various parameters to fragment shader
    vNormalRepeat = uNormalRepeat;
    vNormalIntensity = uNormalIntensity;
    viewPos = vec3(0.0, 0.0, 0.0);  // Initialize view position
    vNoiseStrength = uNoiseStrength;
    vLightColor = uLightColor;
    vShadowStrength = uShadowStrength;
    vLightPosition = uLightPosition;
}
Once the material is created and added to the mesh, the addRopeToScene
function adds the rope to the scene, then calls the addPhysicsToRope
function from the physics file.
// src/three/Experience/Theater/World/Theater/Rope/RopeModel.ts
  addRopeToScene(mesh: Mesh, location: Location) {
    this.list.rope.push(mesh); //Add the rope to an array, which will be used by the physics file to update the mesh
    this.scene.add(mesh);
    this.physics.rope.addPhysicsToRope(location); // same as src/three/Experience/Theater/Physics/Theater/Rope/Rope.addPhysicsToRope(location)
  }
Let ‘s now focus on the physics file.
// src/three/Experience/Theater/Physics/Theater/Rope/Rope.ts

import * as CANNON from "cannon-es";

import Experience from "@/three/Experience/Theater/Experience/Experience";

import type { Location } from "@/types/experience.types";
import type Physics from "@/three/Experience/Theater/Physics/Physics";
import type { Scene, SphereBody } from "@/types/three.types";

let instance: Rope | null = null;

const SIZE_SPHERE = 0.05;
const ANGULAR_DAMPING = 1;
const DISTANCE_BETWEEN_SPHERES = SIZE_SPHERE * 5;
const DISTANCE_BETWEEN_SPHERES_BOTTOM = 2.3;
const DISTANCE_BETWEEN_SPHERES_TOP = 6;
const LINEAR_DAMPING = 0.5;
const NUMBER_OF_SPHERES = 20;

export default class Rope {
  public experience: Experience;
  public physics: Physics;
  public scene: Scene;
  public list: list[];

  constructor() {
    //    Singleton
    if (instance) {
      return instance;
    }
    instance = this;

    this.experience = new Experience();
    this.scene = this.experience.scene;
    this.physics = this.experience.physics;

    this.list = {
      rope: [],
    };
  }

  //#region add physics
  addPhysicsToRope() {
   ...
  }

  setRopePhysics() {
    ...
  }

  setMassRope() {
   ...
  }

  setDistanceBetweenSpheres() {
    ...
  }

  setDistanceBetweenConstraints() {
   ...
  }

  addConstraints() {
    ...
  }
  //#endregion add physics

  //#region update at 60FPS
  update() {
    ...
  }

  loopRopeWithPhysics() {
    ...
  }

  updatePoints() {
    ...
  }
  //#endregion update at 60FPS

  destroySingleton() {
    ...
  }
}
The rope’s physics is created from the mesh file using the methods addPhysicsToRope
, called using this.physics.rope.addPhysicsToRope(location);.
addPhysicsToRope(location: Location) {
  this.setRopePhysics(location);
}

setRopePhysics(location: Location) {
  const sphereShape = new CANNON.Sphere(SIZE_SPHERE);
  const rope = [];

  let lastBody = null;
  for (let index = 0; index < NUMBER_OF_SPHERES; index++) {
    // Create physics body for each sphere in the rope. The spheres will be what collide with the player
    const spherebody = new CANNON.Body({ mass: this.setMassRope(index) });

    spherebody.addShape(sphereShape);
    spherebody.position.set(
      location.x,
      location.y - index * DISTANCE_BETWEEN_SPHERES,
      location.z
    );
    this.physics.physics.addBody(spherebody);
    rope.push(spherebody);
    spherebody.linearDamping = LINEAR_DAMPING;
    spherebody.angularDamping = ANGULAR_DAMPING;

    // Create constraints between consecutive spheres
    lastBody !== null
      ? this.addConstraints(spherebody, lastBody, index)
      : null;

    lastBody = spherebody;

    if (index + 1 === NUMBER_OF_SPHERES) {
      this.list.rope.push(rope);
    }
  }
}

setMassRope(index: number) {
  return index === 0 ? 0 : 2; // first sphere is fixed (mass 0)
}

setDistanceBetweenSpheres(index: number, locationY: number) {
  return locationY - DISTANCE_BETWEEN_SPHERES * index;
}

setDistanceBetweenConstraints(index: number) {
// since the user only interact the spheres are the bottom, so the distance between the spheres is gradualy increasing from the bottom to the top//Since the user only interacts with the spheres that are at the bottom, the distance between the spheres is gradually increasing from the bottom to the top
  if (index <= 2) {
    return DISTANCE_BETWEEN_SPHERES * DISTANCE_BETWEEN_SPHERES_TOP;
  }
  if (index > 2 && index <= 8) {
    return DISTANCE_BETWEEN_SPHERES * DISTANCE_BETWEEN_SPHERES_BOTTOM;
  }
  return DISTANCE_BETWEEN_SPHERES;
}

addConstraints(
  sphereBody: CANNON.Body,
  lastBody: CANNON.Body,
  index: number
) {
  this.physics.physics.addConstraint(
    new CANNON.DistanceConstraint(
      sphereBody,
      lastBody,
      this.setDistanceBetweenConstraints(index)
    )
  );
}
When configuring physics parameters, strategy is key. Although users won ‘t consciously notice during gameplay, they
can only interact with the lower portion of the rope. Therefore, I concentrated more physics detail where it matters –
by adding more spheres to the bottom of the rope.
Since the user only interacts with the bottom of the rope, the density of the physics sphere is higher at the bottom
of the rope than at the top of the rope.
Rope meshes are then updated every frame from the physics file.
 //#region update at 60FPS
 update() {
  this.loopRopeWithPhysics();
}

loopRopeWithPhysics() {
  for (let index = 0; index < this.list.rope.length; index++) {
    this.updatePoints(this.list.rope[index], index);
  }
}

updatePoints(element: CANNON.Body[], indexParent: number) {
  element.forEach((item: CANNON.Body, index: number) => {
    // Update the mesh with the location of each of the physics spheres
    this.experience.world.rope.list.rope[
      indexParent
    ].geometry.parameters.path.points[index].copy(item.position);
  });
}
//#endregion update at 60FPS
Animations in the DOM – ticket tearing particles
While the website heavily relies on Three.js to create an immersive experience, many elements remain DOM-based. One of
my goals for this portfolio was to combine both worlds: the rich, interactive 3D environments and the efficiency of
traditional DOM elements. Furthermore, I genuinely enjoy coding DOM-based micro-interactions, so skipping out on them
wasn ‘t an option!
One of my favorite DOM animations is the ticket-tearing effect, especially the particles flying away. It ‘s subtle,
but adds a bit of charm. The effect is not only fun to watch but also relatively easy to adapt to other projects.
First, let ‘s look at the structure of the components.
TicketBase.vue
is a fairly simple file with minimal styling. It handles the tearing animation and a few basic functions. Everything
else related to the ticket such as the style is handled by other components passed through slots.
To make things clearer, I ‘ve cleaned up my TicketBase.vue
file a bit to highlight how the particle effect works.
The createParticles
function creates a few new <div>
elements, which act as the little particles. These divs are then appended to either the main part of the ticket or the
torn part.
const createParticles = (containerSelector: HTMLElement, direction: string) => {
  const numParticles = 5;
  for (let i = 0; i < numParticles; i++) {
    const particle = document.createElement("div");
    particle.className = "particle";

    // Calculate left position based on index and add small random offset
    const baseLeft = (i / numParticles) * 100;
    const randomOffset = (Math.random() - 0.5) * 10;
    particle.style.left = `calc(${baseLeft}% + ${randomOffset}%)`;

    // Assign unique animation properties
    const duration = Math.random() * 0.3 + 0.1;
    const translateY = (i / numParticles) * -20 - 2;
    const scale = Math.random() * 0.5 + 0.5;
    const delay = ((numParticles - i - 1) / numParticles) * 0;

    particle.style.animation = `flyAway ${duration}s ${delay}s ease-in forwards`;
    particle.style.setProperty("--translateY", `${translateY}px`);
    particle.style.setProperty("--scale", scale.toString());

    if (direction === "bottom") {
      particle.style.animation = `flyAwayBottom ${duration}s ${delay}s ease-in forwards`;
    }

    containerSelector.appendChild(particle);

    // Remove particle after animation ends
    particle.addEventListener("animationend", () => {
      particle.remove();
    });
  }
};
The particles are animated using a CSS keyframes animation called flyAway
or flyAwayBottom
.
There are so many features, details easter eggs and animation I wanted to cover in this article, but it’s simply not
possible to go through everything as it would be too much and many deserve their own tutorial.
That said, here are some of my favorites to code. They definitely deserve a spot in this article.
Some features I had a blast working on: radial blur, cursor trail, particles, 404 page, paws/bird animation,
navigation animation, collision animation.
Reflections on Aurel’s Grand Theater
Even though it took longer than I originally anticipated, Aurel ‘s Grand Theater was an incredibly fun and rewarding
project to work on. Because it wasn ‘t a client project, it offered a rare opportunity to freely experiment, explore
new ideas, and push myself outside my comfort zone, without the usual constraints of budgets or deadlines.
Looking back, there are definitely things I ‘d approach differently if I were to start again. I ‘d spend more time
defining the art direction upfront, lean more heavily into GPU, and perhaps implement Rapier. But despite these
reflections, I had an amazing time building this project and I ‘m satisfied with the final result.
While recognition was never the goal, I ‘m deeply honored that the site was acknowledged. It received FWA of the Day,
Awwwards Site of the Day and Developer Award, as well as GSAP’s Site of the Week and Site of the Month.
I ‘m truly grateful for the recognition, and I hope this behind-the-scenes look and shared code snippets inspire you
in your own creative coding journey.
While experimenting with particle systems, I challenged myself to create particles with tails, similar to snakes moving through space. At first, I didn’t have access to TSL, so I tested basic ideas, like using noise derivatives and calculating previous steps for each particle, but none of them worked as expected.
I spent a long time pondering how to make it work, but all my solutions involved heavy testing with WebGL and GPGPU, which seemed like it would require too much code for a simple proof of concept. That’s when TSL (Three.js Shader Language) came into play. With its Compute Shaders, I was able to compute arrays and feed the results into materials, making it easier to test ideas quickly and efficiently. This allowed me to accomplish the task without much time lost.
Now, let’s dive into the step-by-step process of building the particle system, from setting up the environment to creating the trails and achieving that fluid movement.
Step 1: Set Up the Particle System
First, we’ll define the necessary uniforms that will be used to create and control the particles in the system.
Next, create the variables that will define the parameters of the particle system. The “tails_count” variable determines how many segments each snake will have, while the “particles_count” defines the total number of segments in the scene. The “story_count” variable represents the number of frames used to store the position data for each segment. Increasing this value will increase the distance between segments, as we will store the position history of each one. The “story_snake” variable holds the history of one snake, while “full_story_length” stores the history for all snakes. These variables will be enough to bring the concept to life.
tails_count = 7 //  n-1 point tails
particles_count = this.tails_count * 200 // need % tails_count
story_count = 5 // story for 1 position
story_snake = this.tails_count * this.story_count
full_story_length = ( this.particles_count / this.tails_count ) * this.story_snake
Next, we need to create the buffers required for the computational shaders. The most important buffer to focus on is the “positionStoryBuffer,” which will store the position history of all segments. To understand how it works, imagine a train: the head of the train sets the direction, and the cars follow in the same path. By saving the position history of the head, we can use that data to determine the position of each car by referencing its position in the history.
Now, let’s create the particle system with a material. I chose a standard material because it allows us to use an emissiveNode, which will interact with Bloom effects. For each segment, we’ll use a sphere and disable frustum culling to ensure the particles don’t accidentally disappear off the screen.
To initialize the positions of the particles, we’ll use a computational shader to reduce CPU usage and speed up page loading. We randomly generate the particle positions, which form a pseudo-cube shape. To keep the particles always visible on screen, we assign them a lifetime after which they disappear and won’t reappear from their starting positions. The “cycleStep” helps us assign each snake its own random positions, ensuring the tails are generated in the same location as the head. Finally, we send this data to the computation process.
For each frame, we compute the position history for each segment. The key aspect of the “computePositionStory” function is that new positions are recorded only from the head of the snake, and all positions are shifted one step forward using a queue algorithm.
Next, we update the positions of all particles, taking into account the recorded history of their positions. First, we use simplex noise to generate the new positions of the particles, allowing our snakes to move smoothly through space. Each particle also has its own lifetime, during which it moves and eventually resets to its original position. The key part of this function is determining which particle is the head and which is the tail. For the head, we generate a new position based on simplex noise, while for the tail, we use positions from the saved history.
To display the particle positions, we’ll create a simple function called “positionNode.” This function will not only output the positions but also apply a slight magnification effect to the head of the snake.
Now, you should be able to easily create position history buffers for other problem-solving tasks, and with TSL, this process becomes quick and efficient. I believe this project has potential for further development, such as transferring position data to model bones. This could enable the creation of beautiful, flying dragons or similar effects in 3D space. For this, a custom bone structure tailored to the project would be needed.