Every application relies on some configurations. Many devs set them up using only the appsettings file. But there’s more!
Table of Contents
Just a second! 🫷
If you are here, it means that you are a software developer.
So, you know that storage, networking, and domain management have a cost .If you want to support this blog, please ensure that you have disabled the adblocker for this site.
I configured Google AdSense to show as few ADS as possible – I don’t want to bother you with lots of ads, but I still need to add some to pay for the resources for my site.Thank you for your understanding.
– Davide
Needless to say, almost every application needs to deal with some configurations. There are tons of use cases, and you already have some of them in mind, don’t you?
If you’re working with .NET, you’ve probably already used the appsettings.json file. It’s a good starting point, but it may be not enough in the case of complex applications (and complex deployments).
In this article, we will learn some ways to set configurations in a .NET API application. We will use the appsettings file, of course, and some other ways such as the dotnet CLI. Let’s go! 🚀
Project setup
First things first: let’s set up the demo project.
I have created a simple .NET 6 API application using Minimal APIs. This is my whole application (yes, less than 50 lines!)
using Microsoft.Extensions.Options;

namespace HowToSetConfigurations
{
    public class Program
    {
        public static void Main(string[] args)
        {
            WebApplicationBuilder builder = WebApplication.CreateBuilder(args);

            builder.Services.Configure<MyRootConfig>(
                builder.Configuration.GetSection("RootConfig")
            );

            builder.Services.Configure<JsonOptions>(o =>
            {
                o.SerializerOptions.WriteIndented = true;
            });

            WebApplication app = builder.Build();

            app.MapGet("/config", (IOptionsSnapshot<MyRootConfig> options) =>
            {
                MyRootConfig config = options.Value;
                return config;
            });

            app.Run();
        }
    }

    public class MyRootConfig
    {
        public MyNestedConfig Nested { get; set; }
        public string MyName { get; set; }
    }

    public class MyNestedConfig
    {
        public int Skip { get; set; }
        public int Limit { get; set; }
    }
}
Nothing else! 🤩
In short, I scaffold the WebApplicationBuilder, configure that I want to map the settings section with root named RootConfig to my class of type MyRootConfig, and then run the application.
I then expose a single endpoint, /config, which returns the current configurations, wrapped within an IOptionsSnapshot<MyRootConfig> object.
Where is the source of the application’s configurations?
As stated on the Microsoft docs website, here 🔗, the WebApplicationBuilder…
Loads app configuration in the following order from:
appsettings.json.
appsettings.{Environment}.json.
User secrets when the app runs in the Development environment using the entry assembly.
Environment variables.
Command-line arguments.
So, yeah, we have several possible sources, and the order does matter.
Let’s see a bunch of them.
Define settings within the appsetting.json file
The most common way is by using the appsettings.json file. Here, in a structured and hierarchical way, you can define all the logs used as a baseline for your application.
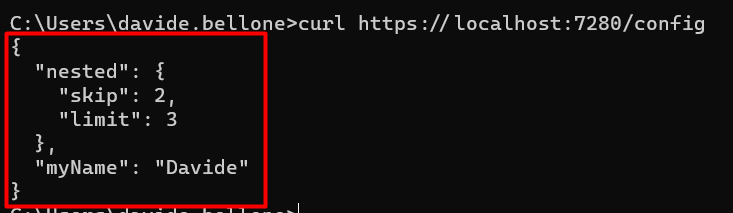
A typical example is this one:
{
  "Logging": {
    "LogLevel": {
      "Default": "Information",
      "Microsoft.AspNetCore": "Warning"
    }
  },
  "AllowedHosts": "*",
  "RootConfig": {
    "MyName": "Davide",
    "Nested": {
      "Skip": 2,
      "Limit": 3
    }
  }
}
With this file, all the fields within the RootConfig element will be mapped to the MyRootConfig class at startup. That object can then be returned using the /config endpoint.
Running the application (using Visual Studio or the dotnet CLI) you will be able to call that endpoint and see the expected result.
Use environment-specific appsettings.json
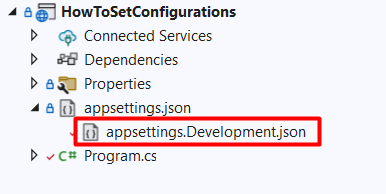
Now, you probably know that you can use other appsettings files with a name such as appsettings.Development.json.
With that file, you can override specific configurations using the same structure, but ignoring all the configs that don’t need to be changed.
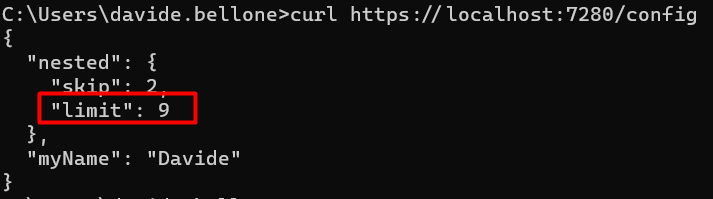
Let’s update the Limit field defined in the “base” appsettings. You don’t need to recreate the whole structure just for one key; you can use this JSON instead:
{
  "RootConfig": {
    "Nested": {
      "Limit": 9
    }
  }
}
Now, if we run the application using VS we will see this result:
Ok, but what made .NET understand that I wanted to use that file?? It’s a matter of Environment variables and Launch profiles.
How to define profiles within the launchSettings.json file
Within the Properties folder in your project, you can see a launchSettings.json file. As you might expect, that file describes how you can launch the application.
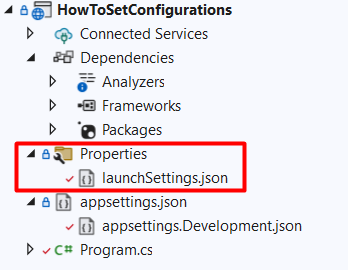
Here we have some Launch profiles, and each of them specifies an ASPNETCORE_ENVIRONMENT variable. By default, its value is set to Development.
"profiles": {
    "HowToSetConfigurations": {
      "commandName": "Project",
      "dotnetRunMessages": true,
      "launchBrowser": true,
      "launchUrl": "config",
      "applicationUrl": "https://localhost:7280;http://localhost:5280",
      "environmentVariables": {
        "ASPNETCORE_ENVIRONMENT": "Development"
      }
    },
}
Now, recall that the environment-specific appsettings file name is defined as appsettings.{Environment}.json. Therefore, by running your application with Visual Studio using the HowToSetConfigurations launch profile, you’re gonna replace that {Environment} with Development, thus using the appsettings.Development.json.
Ça va sans dire that you can use every value you prefer – such as Staging, MyCustomEnvironmentName, and so on.
How to define the current Environment with the CLI
If you are using the dotnet CLI you can set that environment variable as
dotnet run --ASPNETCORE_ENVIRONMENT=Development
or, in a simpler way, you can use
dotnet run --environment Development
and get the same result.
How do nested configurations get resolved?
As we’ve seen in a previous article, even if we are using configurations defined in a hierarchical structure, in the end, they are transformed into key-value pairs.
The Limit key as defined here:
{
  "RootConfig": {
    "Nested": {
      "Limit": 9
    }
  }
}
is transformed into
{
    "Key": "RootConfig:Nested:Limit",
    "Value": "9"
},
with the : separator. We will use this info shortly.
Define configurations in the launchSettings file
As we’ve seen before, each profile defined in the launchSettings file describes a list of environment variables:
"environmentVariables": {
  "ASPNETCORE_ENVIRONMENT": "Development"
}
This means that we can also define our configurations here, and have them loaded when using this specific profile.
From these configurations
"RootConfig": {
    "MyName": "Davide",
    "Nested": {
      "Skip": 2,
      "Limit": 3
    }
  }
I want to update the MyName field.
I can then update the current profile as such:
"environmentVariables": {
  "ASPNETCORE_ENVIRONMENT": "Development",
  "RootConfig:MyName": "Mr Bellone"
}
so that, when I run the application using that profile, I will get this result:
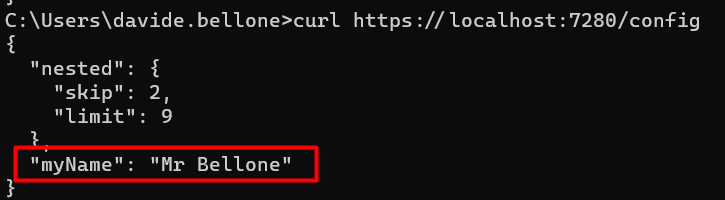
Have you noticed the key RootConfig:MyName? 😉
🔎 Notice that now we have both MyName = Mr Bellone, as defined in the lauchSettings file, and Limit = 9, since we’re still using the appsettings.Development.json file (because of that “ASPNETCORE_ENVIRONMENT”: “Development” ).
How to define the current profile with the CLI
Clearly, we can use the dotnet CLI to load the whole environment profile. We just need to specify it using the --launch-profile flag:
dotnet run --launch-profile=HowToSetConfigurations
Define application settings using the dotnet CLI
Lastly, we can specify config values directly using the CLI.
It’s just a matter of specifying the key-value pairs as such:
dotnet run --RootConfig:Nested:Skip=55
And – TAH-DAH! – you will see this result:
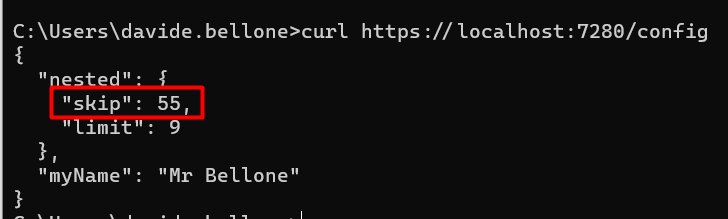
❓ A question for you! Notice that, even though I specified only the Skip value, both Limit and MyName have the value defined before. Do you know why it happens? Drop a message below if you know the answer! 📩
Further readings
As always, there’s more!
If you want to know more about how dotNET APIs load and start, you should have a look at this page:
🔗 ASP.NET Core Web Host | Microsoft Docs
Ok, now you know different approaches for setting configurations.
How do you know the exact values that are set in your application?
🔗 The 2 secret endpoints I create in my .NET APIs | Code4IT
This article first appeared on Code4IT
Wrapping up
Ok then, in this article we’ve seen different approaches you can use to define configurations in your .NET API projects.
Knowing what you can do with the CLI can be helpful especially when using CI/CD, in case you need to run the application using specific keys.
Do you know any other ways to define configs?
Happy coding!
🐧