برچسب: Core

  • How to log to Console with .NET Core and Serilog | Code4IT


    Serilog is a famous logger for .NET projects. In this article, we will learn how to integrate it in a .NET API project and output the logs on a Console.

    Table of Contents

    Just a second! 🫷
    If you are here, it means that you are a software developer.
    So, you know that storage, networking, and domain management have a cost .

    If you want to support this blog, please ensure that you have disabled the adblocker for this site.
    I configured Google AdSense to show as few ADS as possible – I don’t want to bother you with lots of ads, but I still need to add some to pay for the resources for my site.

    Thank you for your understanding.
    Davide

    Having meaningful logs is crucial for any application: without logs, we would not be able to see if errors occur, what’s the status of the application, if there are strange behaviors that should worry us, and so on.

    To define a good logging strategy, we need two parts, equally important: adding logs to our code and analyzing the data produced by our logs.

    In this article, we will see how to add Serilog, a popular logger library, to our .NET projects: we will learn how to configure it to print the logs on a Console.

    Why logging on console

    I can guess what you’re thinking:

    why should we write logs on Console? We should store them somewhere, to analyze them!

    And… you’d be right!

    But still, printing logs on Console can be useful in many ways.

    First of all, by printing on Console you can check that the logging is actually working, and you haven’t missed a configuration.

    Then, writing on Console is great when debugging locally: just spin up your application, run the code you need, and check what happened on the logs; in this way you can understand the internal state of the application, which warnings and errors occurred, and more.

    Lastly, because of an odd strategy that I’ve seen implemented in many projects: print the logs on console, add an agent that reads them and stores them in memory, and then send all the logs to the destination platform at once; in this way, you’ll perform fewer HTTP requests against those platforms, making you save money and avoiding reaching the connection limit of the destination platform.

    Now that we have good reasons to log on Console, well… let’s do it!

    Adding Serilog on Program class

    For this article, we will add Serilog logs to a simple .NET API project.

    Create a new API project – you know, the one with the WeatherForecast controller.

    Then, navigate to the Program class: by default, it should look like this:

    public class Program
    {
        public static void Main(string[] args)
        {
            CreateHostBuilder(args).Build().Run();
        }
    
        public static IHostBuilder CreateHostBuilder(string[] args) =>
            Host.CreateDefaultBuilder(args)
            .ConfigureWebHostDefaults(webBuilder =>
            {
                webBuilder.UseStartup<Startup>();
            });
    }
    

    There are no references to any logger, and, of course, to Serilog.

    So the first thing to do is to install it: via NuGet install Serilog.AspNetCore and Serilog.Extensions.Logging. The first one allows you to add Serilog to an ASP.NET project, while the second one allows you to use the native .NET logger in the code with all the capabilities provided by Serilog.

    Then, we need to add the logger to our project:

    public class Program
    {
        public static void Main(string[] args)
        {
    +        Log.Logger = new LoggerConfiguration()
    +                .CreateLogger();
    
            CreateHostBuilder(args).Build().Run();
        }
    
        public static IHostBuilder CreateHostBuilder(string[] args) =>
            Host.CreateDefaultBuilder(args)
    +        .UseSerilog((hostingContext, loggerConfiguration) =>
    +                    loggerConfiguration.ReadFrom.Configuration(hostingContext.Configuration))
                .ConfigureWebHostDefaults(webBuilder =>
                {
                    webBuilder.UseStartup<Startup>();
                });
    }
    

    There are two snippets to understand:

    Log.Logger = new LoggerConfiguration().CreateLogger();
    

    creates a new logger with the specified configurations (in our case, we use the default values), and then assigns the newly created logger to the globally-shared logger Log.Logger.

    Log.Logger lives in the Serilog namespace, so you have to add it to the using list.

    Then, we have this second part:

    .UseSerilog((hostingContext, loggerConfiguration) =>
            loggerConfiguration.ReadFrom.Configuration(hostingContext.Configuration)
        )
    

    This snippet defines where to get the Serilog configurations (in this case, from the same place used by the hosting context), and then sets Serilog as the logging provider.

    Inject the logger into constructors

    Since we have bound the Serilog logger to the one native on .NET – the one coming from Microsoft.Extensions.Logging – we can use the native logger everywhere in the project.

    Add a dependency to ILogger<T> in your constructor, where T is the name of the class itself:

    public class WeatherForecastController : ControllerBase
    {
    
        private readonly ILogger<WeatherForecastController> _logger;
    
        public WeatherForecastController(ILogger<WeatherForecastController> logger)
        {
            _logger = logger;
        }
    }
    

    So that you can use the different levels of logging and the Structured Data (see links below) to add more info:

    _logger.LogInformation("Getting random items. There are {AvailableItems} possible values", Summaries.Count());
    
    _logger.LogWarning("This is a warning");
    
    try
    {
        throw new ArgumentException();
    }
    catch (Exception ex)
    {
        _logger.LogError(ex, "And this is an error");
    }
    

    Update the AppSettings file

    But that’s not enough. We aren’t saying that our logs should be printed on Console. To do that, we must update the appsettings.json file and add some new configurations.

    "Serilog": {
        "Using": [ "Serilog.Sinks.Console" ],
        "MinimumLevel": {
            "Default": "Verbose",
            "Override": {
                "Microsoft": "Warning",
                "Microsoft.AspNetCore": "Warning",
                "System": "Error"
            }
        },
        "WriteTo": [
            {
            "Name": "Async",
            "Args": {
                "configure": [
                {
                    "Name": "Console",
                    "Args": {
                        "formatter": "Serilog.Formatting.Compact.RenderedCompactJsonFormatter, Serilog.Formatting.Compact"
                    }
                }
                ]
            }
            }
        ]
    }
    

    As usual, let’s break it down.

    The first thing to notice is the root of the JSON section: Serilog. This value is the default when defining the configuration values for Serilog (remember the loggerConfiguration.ReadFrom.Configuration(hostingContext.Configuration)? It binds the settings automagically!)

    The Using section defines the types of Sinks that will be used. A Sink is just the destination of the logs. So, just download the Serilog.Sinks.Console NuGet package and add that value to the Using array to use the Console as a Sink.

    Then, we have the MinimumLevel object: it defines the minimum levels of logs that will be taken into consideration. Here the default value is Verbose, but you’ll probably want it to be Warning in your production environment: is this way, all the logs with a level lower than Warning will be ignored.

    Lastly, we have the WriteTo section, which defines the exact configurations of the sinks. Notice the Async value: we need this value because writing logs is an asynchronous operation – logs must be printed in real-time. So, after you’ve installed the Serilog.Sinks.Async NuGet package, you must add the Async value to that object. And then you can configure the different Sinks: here I’m adding some simple JSON Formatters to the Console Sink.

    Run the application

    We’re finally ready to run our application.

    Just run it with the usual IIS profile and… nothing happens! Where is the Console??

    With IIS you cannot see any Console, since it simply does not exist – if the application runs as a web application, we don’t need the Console.

    So, you have to change the running profile and select the name of your application (in my case, SerilogLoggingOnConsole).
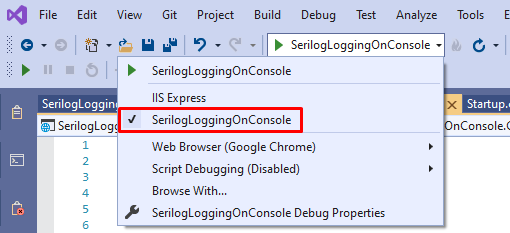
    Use the correct running profile

    Then you can run the application, navigate to an endpoint, and see the logs!

    Serilog logs as plain text

    But I don’t like how logs are displayed, too many details!

    Let me add a theme: in the AppSettings file, I can add a theme configuration:

    "Args": {
        "configure": [
        {
            "Name": "Console",
            "Args": {
    +        "theme": "Serilog.Sinks.SystemConsole.Themes.AnsiConsoleTheme::Code, Serilog.Sinks.Console",
            "formatter": "Serilog.Formatting.Compact.RenderedCompactJsonFormatter, Serilog.Formatting.Compact"
            }
        }
        ]
    }
    

    This makes Serilog show the logs with a different shape:

    Serilog logs with a simple theme

    So, just by updating the AppSettings file, you can fine-tune the behavior and the output of the logger. In this way, you can customize Release builds to update the AppSettings file and define custom properties for every deploy environment.

    Further reading

    If you want to learn more about the different topics discussed in this article:

    🔗 Serilog Structured Data | Code4IT

    🔗 Serilog Console Sink | GitHub

    🔗 How to integrate Serilog and Seq | Code4IT

    Wrapping up

    In this article, we’ve seen how to integrate Serilog in a .NET application to print the logs on the application Console.

    Time to recap the key points:

    • install the Serilog, Serilog.AspNetCore, and Serilog.Extensions.Logging NuGet packages to integrate the basic functionalities of Serilog
    • download the Serilog.Sinks.Console and Serilog.Sinks.Async NuGet packages to use the Console as a destination of your logs
    • update the Program class to specify that the application must use Serilog
    • use ILogger<T> instead of Serilog.ILogger
    • define the settings in the appsettings.json file instead of directly in the code

    Finally, if you want to see the full example, here’s the GitHub repository used for this article

    Happy coding!

    🐧


    Source link

  • How to perform CRUD operations with Entity Framework Core and PostgreSQL &vert; Code4IT

    How to perform CRUD operations with Entity Framework Core and PostgreSQL | Code4IT


    With Entity Framework you can perform operations on relational databases without writing a single line of SQL. We will use EF to integrate PostgreSQL in our application

    Table of Contents

    Just a second! 🫷
    If you are here, it means that you are a software developer.
    So, you know that storage, networking, and domain management have a cost .

    If you want to support this blog, please ensure that you have disabled the adblocker for this site.
    I configured Google AdSense to show as few ADS as possible – I don’t want to bother you with lots of ads, but I still need to add some to pay for the resources for my site.

    Thank you for your understanding.
    Davide

    When working with relational databases, you often come across two tasks: writing SQL queries and mapping the results to some DTO objects.

    .NET developers are lucky to have an incredibly powerful tool that can speed up their development: Entity Framework. Entity Framework (in short: EF) is an ORM built with in mind simplicity and readability.

    In this article, we will perform CRUD operations with Entity Framework Core on a database table stored on PostgreSQL.

    Introduction EF Core

    With Entity Framework you don’t have to write SQL queries in plain text: you write C# code that gets automatically translated into SQL commands. Then the result is automatically mapped to your C# classes.

    Entity Framework supports tons of database engines, such as SQL Server, MySQL, Azure CosmosDB, Oracle, and, of course, PostgreSQL.

    There are a lot of things you should know about EF if you’re new to it. In this case, the best resource is its official documentation.

    But the only way to learn it is by getting your hands dirty. Let’s go!

    How to set up EF Core

    For this article, we will reuse the same .NET Core repository and the same database table we used when we performed CRUD operations with Dapper (a lightweight OR-M) and with NpgSql, which is the library that performs bare-metal operations.

    The first thing to do is, as usual, install the related NuGet package. Here we will need Npgsql.EntityFrameworkCore.PostgreSQL. Since I’ve used .NET 5, I have downloaded version 5.0.10.

    Npgsql.EntityFrameworkCore.PostgreSQL NuGet package

    Then, we need to define and configure the DB Context.

    Define and configure DbContext

    The idea behind Entity Framework is to create DB Context objects that map database tables to C# data sets. DB Contexts are the entry point to the tables, and the EF way to work with databases.

    So, the first thing to do is to define a class that inherits from DbContext:

    public class BoardGamesContext : DbContext
    {
    
    }
    

    Within this class we define one or more DbSets, that represent the collections of data rows on their related DB table:

    public DbSet<BoardGame> Games { get; set; }
    

    Then we can configure this specific DbContext by overriding the OnConfiguring method and specifying some options; for example, you can specify the connection string:

    protected override void OnConfiguring(DbContextOptionsBuilder optionsBuilder)
    {
        optionsBuilder.UseNpgsql(CONNECTION_STRING);
        base.OnConfiguring(optionsBuilder);
    }
    

    Remember to call base.OnConfiguring! Otherwise some configurations will not be applied, and the system may not work.

    Also, pay attention to the Port in the connection string! While with other libraries you can define it as

    private const string CONNECTION_STRING = "Host=localhost:5455;" +
        "Username=postgresUser;" +
        "Password=postgresPW;" +
        "Database=postgresDB";
    

    Entity Framework core requires the port to be specified in a different field:

    private const string CONNECTION_STRING = "Host=localhost;"+
                "Port=5455;" + // THIS!!!!!
                "Username=postgresUser;" +
                "Password=postgresPW;" +
                "Database=postgresDB";
    

    If you don’t explicitly define the Port, EF Core won’t recognize the destination host.

    Then, we can configure the models mapped to DB tables by overriding OnModelCreating:

    protected override void OnModelCreating(ModelBuilder modelBuilder)
    {
        modelBuilder.Entity<BoardGame>(e => e.ToTable("games"));
        base.OnModelCreating(modelBuilder);
    }
    

    Here we’re saying that the rows in the games table will be mapped to BoardGame objects. We will come back to it later.

    For now, we’re done; here’s the full BoardGamesContext class:

    public class BoardGamesContext : DbContext
    {
        public DbSet<BoardGame> Games { get; set; }
    
        protected override void OnConfiguring(DbContextOptionsBuilder optionsBuilder)
        {
            optionsBuilder.UseNpgsql(CONNECTION_STRING);
            base.OnConfiguring(optionsBuilder);
        }
        private const string CONNECTION_STRING = "Host=localhost;Port=5455;" +
                    "Username=postgresUser;" +
                    "Password=postgresPW;" +
                    "Database=postgresDB";
    
        protected override void OnModelCreating(ModelBuilder modelBuilder)
        {
            modelBuilder.Entity<BoardGame>(e => e.ToTable("games"));
            base.OnModelCreating(modelBuilder);
        }
    }
    

    Add the DbContext to Program

    Now that we have the BoardGamesContext ready we have to add its reference in the Startup class.

    In the ConfigureServices method, add the following instruction:

    services.AddDbContext<BoardGamesContext>();
    

    With this instruction, you make the BoardGamesContext context available across the whole application.

    You can further configure that context using an additional parameter of type Action<DbContextOptionsBuilder>. In this example, you can skip it, since we’ve already configured the BoardGamesContext using the OnConfiguring method. They are equivalent.

    If you don’t like

    protected override void OnConfiguring(DbContextOptionsBuilder optionsBuilder)
    {
        optionsBuilder.UseNpgsql(CONNECTION_STRING);
        base.OnConfiguring(optionsBuilder);
    }
    

    you can do

    services.AddDbContext<BoardGamesContext>(
        optionsBuilder => optionsBuilder.UseNpgsql(CONNECTION_STRING)
    );
    

    The choice is yours!

    Define and customize the DB Model

    As we know, EF allows you to map DB rows to C# objects. So, we have to create a class and configure it in a way that allows EF Core to perform the mapping.

    Here we have the BoardGame class:

    public class BoardGame
    {
        [System.ComponentModel.DataAnnotations.Key]
        public int Id { get; set; }
    
        public string Name { get; set; }
    
        public int MinPlayers { get; set; }
    
        public int MaxPlayers { get; set; }
    
        public int AverageDuration { get; set; }
    }
    

    Notice that we’ve explicitly declared that Id is the primary key in the table.

    But it’s not enough! This way the code won’t work! 😣

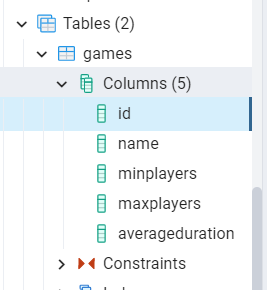
    Have a look at the table on Postgres:

    Games table on Posgres

    Have you noticed it? Postgres uses lowercase names, but we are using CamelCase. C# names must be 100% identical to those in the database!

    Now we have two ways:

    ➡ Rename all the C# properties to their lowercase equivalent

    public class BoardGame
    {
        [System.ComponentModel.DataAnnotations.Key]
        public int id { get; set; }
        public string name { get; set; }
        /// and so on
    }
    

    ➡ decorate all the properties with the Column attribute.

    public class BoardGame
    {
        [System.ComponentModel.DataAnnotations.Key]
        [Column("id")]
        public int Id { get; set; }
    
        [Column("name")]
        public string Name { get; set; }
    
        [Column("minplayers")]
        public int MinPlayers { get; set; }
    
        [Column("maxplayers")]
        public int MaxPlayers { get; set; }
    
        [Column("averageduration")]
        public int AverageDuration { get; set; }
    }
    

    Using the Column attribute is useful also when the DB column names and the C# properties differ for more than just the case, like in:

    [Column("averageduration")]
    public int AvgDuration { get; set; }
    

    Is it enough? Have a look again at the table definition:

    Games table on Posgres

    Noticed the table name? It’s “games”, not “BoardGame”!

    We need to tell EF which is the table that contains BoardGame objects.

    Again, we have two ways:

    ➡ Override the OnModelCreating method in the BoardGamesContext class, as we’ve seen before:

    protected override void OnModelCreating(ModelBuilder modelBuilder)
    {
        modelBuilder.Entity<BoardGame>(e => e.ToTable("games"));
        base.OnModelCreating(modelBuilder);
    }
    

    ➡ Add the Table attribute to the BoardGame class:

    [Table("games")]
    public class BoardGame
    {...}
    

    Again, the choice is yours.

    CRUD operations with Entity Framework

    Now that the setup is complete, we can perform our CRUD operations. Entity Framework simplifies a lot the way to perform such types of operations, so we can move fast in this part.

    There are two main points to remember:

    1. to access the context we have to create a new instance of BoardGamesContext, which should be placed into a using block.
    2. When performing operations that change the status of the DB (insert/update/delete rows), you have to explicitly call SaveChanges or SaveChangesAsync to apply those changes. This is useful when performing batch operations on one or more tables (for example, inserting an order in the Order table and updating the user address in the Users table).

    Create

    To add a new BoardGame, we have to initialize the BoardGamesContext context and add a new game to the Games DbSet.

    public async Task Add(BoardGame game)
    {
        using (var db = new BoardGamesContext())
        {
            await db.Games.AddAsync(game);
            await db.SaveChangesAsync();
        }
    }
    

    Read

    If you need a specific entity by its id you can use Find and FindAsync.

    public async Task<BoardGame> Get(int id)
    {
        using (var db = new BoardGamesContext())
        {
            return await db.Games.FindAsync(id);
        }
    }
    

    Or, if you need all the items, you can retrieve them by using ToListAsync

    public async Task<IEnumerable<BoardGame>> GetAll()
    {
        using (var db = new BoardGamesContext())
        {
            return await db.Games.ToListAsync();
        }
    }
    

    Update

    Updating an item is incredibly straightforward: you have to call the Update method, and then save your changes with SaveChangesAsync.

    public async Task Update(int id, BoardGame game)
    {
        using (var db = new BoardGamesContext())
        {
            db.Games.Update(game);
            await db.SaveChangesAsync();
    
        }
    }
    

    For some reason, EF does not provide an asynchronous way to update and remove items. I suppose that it’s done to prevent or mitigate race conditions.

    Delete

    Finally, to delete an item you have to call the Remove method and pass to it the game to be removed. Of course, you can retrieve that game using FindAsync.

    public async Task Delete(int id)
    {
        using (var db = new BoardGamesContext())
        {
            var game = await db.Games.FindAsync(id);
            if (game == null)
                return;
    
            db.Games.Remove(game);
            await db.SaveChangesAsync();
        }
    }
    

    Further readings

    Entity Framework is impressive, and you can integrate it with tons of database vendors. In the link below you can find the full list. But pay attention that not all the libraries are implemented by the EF team, some are third-party libraries (like the one we used for Postgres):

    🔗 Database Providers | Microsoft docs

    If you want to start working with PostgreSQL, a good way is to download it as a Docker image:

    🔗 How to run PostgreSQL locally with Docker | Code4IT

    Then, if you don’t like Entity Framework, you can perform CRUD operations using the native library, NpgSql:

    🔗 CRUD operations on PostgreSQL using C# and Npgsql | Code4IT

    or, maybe, if you prefer Dapper:

    🔗 PostgreSQL CRUD operations with C# and Dapper | Code4IT

    Finally, you can have a look at the full repository here:

    🔗 Repository used for this article | GitHub

    This article first appeared on Code4IT 🐧

    Wrapping up

    This article concludes the series that explores 3 ways to perform CRUD operations on a Postgres database with C#.

    In the first article, we’ve seen how to perform bare-metal queries using NpgSql. In the second article, we’ve used Dapper, which helps mapping queries results to C# DTOs. Finally, we’ve used Entity Framework to avoid writing SQL queries and have everything in place.

    Which one is your favorite way to query relational databases?

    What are the pros and cons of each approach?

    Happy coding!

    🐧


    Source link

  • How to automatically refresh configurations with Azure App Configuration in ASP.NET Core &vert; Code4IT

    How to automatically refresh configurations with Azure App Configuration in ASP.NET Core | Code4IT


    ASP.NET allows you to poll Azure App Configuration to always get the most updated values without restarting your applications. It’s simple, but you have to think thoroughly.

    Table of Contents

    Just a second! 🫷
    If you are here, it means that you are a software developer.
    So, you know that storage, networking, and domain management have a cost .

    If you want to support this blog, please ensure that you have disabled the adblocker for this site.
    I configured Google AdSense to show as few ADS as possible – I don’t want to bother you with lots of ads, but I still need to add some to pay for the resources for my site.

    Thank you for your understanding.
    Davide

    In a previous article, we learned how to centralize configurations using Azure App Configuration, a service provided by Azure to share configurations in a secure way. Using Azure App Configuration, you’ll be able to store the most critical configurations in a single place and apply them to one or more environments or projects.

    We used a very simple example with a limitation: you have to restart your applications to make changes effective. In fact, ASP.NET connects to Azure App Config, loads the configurations in memory, and serves these configs until the next application restart.

    In this article, we’re gonna learn how to make configurations dynamic: by the end of this article, we will be able to see the changes to our configs reflected in our applications without restarting them.

    Since this one is a kind of improvement of the previous article, you should read it first.

    Let me summarize here the code showcased in the previous article. We have an ASP.NET Core API application whose only purpose is to return the configurations stored in an object, whose shape is this one:

    {
      "MyNiceConfig": {
        "PageSize": 6,
        "Host": {
          "BaseUrl": "https://www.mydummysite.com",
          "Password": "123-go"
        }
      }
    }
    

    In the constructor of the API controller, I injected an IOptions<MyConfig> instance that holds the current data stored in the application.

     public ConfigDemoController(IOptions<MyConfig> config)
            => _config = config;
    

    The only HTTP Endpoint is a GET: it just accesses that value and returns it to the client.

    [HttpGet()]
    public IActionResult Get()
    {
        return Ok(_config.Value);
    }
    

    Finally, I created a new instance of Azure App Configuration, and I used a connection string to integrate Azure App Configuration with the existing configurations by calling:

    builder.Configuration.AddAzureAppConfiguration(ConnectionString);
    

    Now we can move on and make configurations dynamic.

    Sentinel values: a guard value to monitor changes in the configurations

    On Azure App Configuration, you have to update the configurations manually one by one. Unfortunately, there is no way to update them in a single batch. You can import them in a batch, but you have to update them singularly.

    Imagine that you have a service that accesses an external API whose BaseUrl and API Key are stored on Az App Configuration. We now need to move to another API: we then have to update both BaseUrl and API Key. The application is running, and we want to update the info about the external API. If we updated the application configurations every time something is updated on Az App Configuration, we would end up with an invalid state – for example, we would have the new BaseUrl and the old API Key.

    Therefore, we have to define a configuration value that acts as a sort of versioning key for the whole list of configurations. In Azure App Configuration’s jargon, it’s called Sentinel.

    A Sentinel is nothing but version key: it’s a string value that is used by the application to understand if it needs to reload the whole list of configurations. Since it’s just a string, you can set any value, as long as it changes over time. My suggestion is to use the UTC date value of the moment you have updated the value, such as 202306051522. This way, in case of errors you can understand when was the last time any of these values have changed (but you won’t know which values have changed), and, depending on the pricing tier you are using, you can compare the current values with the previous ones.

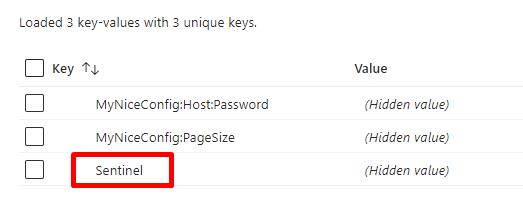
    So, head back to the Configuration Explorer page and add a new value: I called it Sentinel.

    Sentinel value on Azure App Configuration

    As I said, you can use any value. For the sake of this article, I’m gonna use a simple number (just for simplicity).

    Define how to refresh configurations using ASP.NET Core app startup

    We can finally move to the code!

    If you recall, in the previous article we added a NuGet package, Microsoft.Azure.AppConfiguration.AspNetCore, and then we added Azure App Configuration as a configurations source by calling

    builder.Configuration.AddAzureAppConfiguration(ConnectionString);
    

    That instruction is used to load all the configurations, without managing polling and updates. Therefore, we must remove it.

    Instead of that instruction, add this other one:

    builder.Configuration.AddAzureAppConfiguration(options =>
    {
        options
        .Connect(ConnectionString)
        .Select(KeyFilter.Any, LabelFilter.Null)
        // Configure to reload configuration if the registered sentinel key is modified
        .ConfigureRefresh(refreshOptions =>
                  refreshOptions.Register("Sentinel", label: LabelFilter.Null, refreshAll: true)
            .SetCacheExpiration(TimeSpan.FromSeconds(3))
          );
    });
    

    Let’s deep dive into each part:

    options.Connect(ConnectionString) just tells ASP.NET that the configurations must be loaded from that specific connection string.

    .Select(KeyFilter.Any, LabelFilter.Null) loads all keys that have no Label;

    and, finally, the most important part:

    .ConfigureRefresh(refreshOptions =>
                refreshOptions.Register(key: "Sentinel", label: LabelFilter.Null, refreshAll: true)
          .SetCacheExpiration(TimeSpan.FromSeconds(3))
        );
    

    Here we are specifying that all values must be refreshed (refreshAll: true) when the key with value=“Sentinel” (key: "Sentinel") is updated. Then, store those values for 3 seconds (SetCacheExpiration(TimeSpan.FromSeconds(3)).

    Here I used 3 seconds as a refresh time. This means that, if the application is used continuously, the application will poll Azure App Configuration every 3 seconds – it’s clearly a bad idea! So, pick the correct value depending on the change expectations. The default value for cache expiration is 30 seconds.

    Notice that the previous instruction adds Azure App Configuration to the Configuration object, and not as a service used by .NET. In fact, the method is builder.Configuration.AddAzureAppConfiguration. We need two more steps.

    First of all, add Azure App Configuration to the IServiceCollection object:

    builder.Services.AddAzureAppConfiguration();
    

    Finally, we have to add it to our existing middlewares by calling

    app.UseAzureAppConfiguration();
    

    The final result is this:

    public static void Main(string[] args)
    {
        var builder = WebApplication.CreateBuilder(args);
    
        const string ConnectionString = "......";
    
        // Load configuration from Azure App Configuration
        builder.Configuration.AddAzureAppConfiguration(options =>
        {
            options.Connect(ConnectionString)
                    .Select(KeyFilter.Any, LabelFilter.Null)
                    // Configure to reload configuration if the registered sentinel key is modified
                    .ConfigureRefresh(refreshOptions =>
                        refreshOptions.Register(key: "Sentinel", label: LabelFilter.Null, refreshAll: true)
                        .SetCacheExpiration(TimeSpan.FromSeconds(3)));
        });
    
        // Add the service to IServiceCollection
        builder.Services.AddAzureAppConfiguration();
    
        builder.Services.AddControllers();
        builder.Services.Configure<MyConfig>(builder.Configuration.GetSection("MyNiceConfig"));
    
        var app = builder.Build();
    
        // Add the middleware
        app.UseAzureAppConfiguration();
    
        app.UseHttpsRedirection();
    
        app.MapControllers();
    
        app.Run();
    }
    

    IOptionsMonitor: accessing and monitoring configuration values

    It’s time to run the project and look at the result: some of the values are coming from Azure App Configuration.

    Default config coming from Azure App Configuration

    Now we can update them: without restarting the application, update the PageSize value, and don’t forget to update the Sentinel too. Call again the endpoint, and… nothing happens! 😯

    This is because in our controller we are using IOptions<T> instead of IOptionsMonitor<T>. As we’ve learned in a previous article, IOptionsMonitor<T> is a singleton instance that always gets the most updated config values. It also emits an event when the configurations have been refreshed.

    So, head back to the ConfigDemoController, and replace the way we retrieve the config:

    [ApiController]
    [Route("[controller]")]
    public class ConfigDemoController : ControllerBase
    {
        private readonly IOptionsMonitor<MyConfig> _config;
    
        public ConfigDemoController(IOptionsMonitor<MyConfig> config)
        {
            _config = config;
            _config.OnChange(Update);
        }
    
        [HttpGet()]
        public IActionResult Get()
        {
            return Ok(_config.CurrentValue);
        }
    
        private void Update(MyConfig arg1, string? arg2)
        {
          Console.WriteLine($"Configs have been updated! PageSize is {arg1.PageSize}, " +
                    $" Password is {arg1.Host.Password}");
        }
    }
    

    When using IOptionsMonitor<T>, you can retrieve the current values of the configuration object by accessing the CurrentValue property. Also, you can define an event listener that is to be attached to the OnChange event;

    We can finally run the application and update the values on Azure App Configuration.

    Again, update one of the values, update the sentinel, and wait. After 3 seconds, you’ll see a message popping up in the console: it’s the text defined in the Update method.

    Then, call again the application (again, without restarting it), and admire the updated values!

    You can see a live demo here:

    Demo of configurations refreshed dinamically

    As you can see, the first time after updating the Sentinel value, the values are still the old ones. But, in the meantime, the values have been updated, and the cache has expired, so that the next time the values will be retrieved from Azure.

    My 2 cents on timing

    As we’ve learned, the config values are stored in a memory cache, with an expiration time. Every time the cache expires, we need to retrieve again the configurations from Azure App Configuration (in particular, by checking if the Sentinel value has been updated in the meanwhile). Don’t underestimate the cache value, as there are pros and cons of each kind of value:

    • a short timespan keeps the values always up-to-date, making your application more reactive to changes. But it also means that you are polling too often the Azure App Configuration endpoints, making your application busier and incurring limitations due to the requests count;
    • a long timespan keeps your application more performant because there are fewer requests to the Configuration endpoints, but it also forces you to have the configurations updated after a while from the update applied on Azure.

    There is also another issue with long timespans: if the same configurations are used by different services, you might end up in a dirty state. Say that you have UserService and PaymentService, and both use some configurations stored on Azure whose caching expiration is 10 minutes. Now, the following actions happen:

    1. UserService starts
    2. PaymentService starts
    3. Someone updates the values on Azure
    4. UserService restarts, while PaymentService doesn’t.

    We will end up in a situation where UserService has the most updated values, while PaymentService doesn’t. There will be a time window (in our example, up to 10 minutes) in which the configurations are misaligned.

    Also, take costs and limitations into consideration: with the Free tier you have 1000 requests per day, while with the Standard tier, you have 30.000 per hour per replica. Using the default cache expiration (30 seconds) in an application with a continuous flow of users means that you are gonna call the endpoint 2880 times per day (2 times a minute * (minutes per day = 1440)). Way more than the available value on the Free tier.

    So, think thoroughly before choosing an expiration time!

    Further readings

    This article is a continuation of a previous one, and I suggest you read the other one to understand how to set up Azure App Configuration and how to integrate it in an ASP.NET Core API application in case you don’t want to use dynamic configuration.

    🔗 Azure App Configuration and ASP.NET Core API: a smart and secure way to manage configurations | Code4IT

    This article first appeared on Code4IT 🐧

    Also, we learned that using IOptions we are not getting the most updated values: in fact, we need to use IOptionsMonitor. Check out this article to understand the other differences in the IOptions family.

    🔗 Understanding IOptions, IOptionsMonitor, and IOptionsSnapshot in ASP.NET Core | Code4IT

    Finally, I briefly talked about pricing. As of July 2023, there are just 2 pricing tiers, with different limitations.

    🔗 App Configuration pricing | Microsoft Learn

    Wrapping up

    In my opinion, smart configuration handling is essential for the hard times when you have to understand why an error is happening only in a specific environment.

    Centralizing configurations is a good idea, as it allows developers to simulate a whole environment by just changing a few values on the application.

    Making configurations live without restarting your applications manually can be a good idea, but you have to analyze it thoroughly.

    I hope you enjoyed this article! Let’s keep in touch on Twitter or LinkedIn! 🤜🤛

    Happy coding!

    🐧


    Source link

  • 2 ways to define ASP.NET Core custom Middleware &vert; Code4IT

    2 ways to define ASP.NET Core custom Middleware | Code4IT


    Customizing the behavior of an HTTP request is easy: you can use a middleware defined as a delegate or as a class.

    Table of Contents

    Just a second! 🫷
    If you are here, it means that you are a software developer.
    So, you know that storage, networking, and domain management have a cost .

    If you want to support this blog, please ensure that you have disabled the adblocker for this site.
    I configured Google AdSense to show as few ADS as possible – I don’t want to bother you with lots of ads, but I still need to add some to pay for the resources for my site.

    Thank you for your understanding.
    Davide

    Sometimes you need to create custom logic that must be applied to all HTTP requests received by your ASP.NET Core application. In these cases, you can create a custom middleware: pieces of code that are executed sequentially for all incoming requests.

    The order of middlewares matters. Here’s a nice schema published on the Microsoft website:

    Middleware order

    A Middleware, in fact, can manipulate the incoming HttpRequest and the resulting HttpResponse objects.

    In this article, we’re gonna learn 2 ways to create a middleware in .NET.

    Middleware as inline delegates

    The easiest way is to define a delegate function that must be defined after building the WebApplication.

    By calling the Use method, you can update the HttpContext object passed as a first parameter.

    app.Use(async (HttpContext context, Func<Task> task) =>
    {
        context.Response.Headers.TryAdd("custom-header", "a-value");
    
        await task.Invoke();
    });
    

    Note that you have to call the Invoke method to call the next middleware.

    There is a similar overload that accepts in input a RequestDelegate instance instead of Func<Task>, but it is considered to be less performant: you should, in fact, use the one with Func<Task>.

    Middleware as standalone classes

    The alternative to delegates is by defining a custom class.

    You can call it whatever you want, but you have some constraints to follow when creating the class:

    • it must have a public constructor with a single parameter whose type is RequestDelegate (that will be used to invoke the next middleware);
    • it must expose a public method named Invoke or InvokeAsync that accepts as a first parameter an HttpContext and returns a Task;

    Here’s an example:

    public class MyCustomMiddleware
    {
        private readonly RequestDelegate _next;
    
        public MyCustomMiddleware(RequestDelegate next)
        {
            _next = next;
        }
    
        public async Task InvokeAsync(HttpContext context)
        {
            context.Response.Headers.TryAdd("custom-name", "custom-value");
            await _next(context);
        }
    }
    

    Then, to add it to your application, you have to call

    app.UseMiddleware<MyCustomMiddleware>();
    

    Delegates or custom classes?

    Both are valid methods, but each of them performs well in specific cases.

    For simple scenarios, go with inline delegates: they are easy to define, easy to read, and quite performant. But they are a bit difficult to test.

    For complex scenarios, go with custom classes: this way you can define complex behaviors in a single class, organize your code better, use Dependency Injection to pass services and configurations to the middleware. Also, defining the middleware as a class makes it more testable. The downside is that, as of .NET 7, using a middleware resides on reflection: UseMiddleware invokes the middleware by looking for a public method named Invoke or InvokeAsync. So, theoretically, using classes is less performant than using delegates (I haven’t benchmarked it yet, though!).

    Wrapping up

    On Microsoft documentation you can find a well-explained introduction to Middlewares:

    🔗 ASP.NET Core Middleware | Microsoft docs

    And some suggestions on how to write a custom middleware as standalone classes:

    🔗 Write custom ASP.NET Core middleware | Microsoft docs

    I hope you enjoyed this article! Let’s keep in touch on Twitter or LinkedIn! 🤜🤛

    Happy coding!

    🐧


    Source link

  • A Guide for ASP.NET Core Developers &vert; Code4IT

    A Guide for ASP.NET Core Developers | Code4IT


    Feature Flags are a technique that allows you to control the visibility and functionality of features in your software without changing the code. They enable you to experiment with new features, perform gradual rollouts, and revert changes quickly if needed.

    Table of Contents

    Just a second! 🫷
    If you are here, it means that you are a software developer.
    So, you know that storage, networking, and domain management have a cost .

    If you want to support this blog, please ensure that you have disabled the adblocker for this site.
    I configured Google AdSense to show as few ADS as possible – I don’t want to bother you with lots of ads, but I still need to add some to pay for the resources for my site.

    Thank you for your understanding.
    Davide

    To turn functionalities on or off on an application, you can use simple if(condition) statements. That would work, of course. But it would not be flexible, and you’ll have to scatter those checks all around the application.

    There is another way, though: Feature Flags. Feature Flags allow you to effortlessly enable and disable functionalities, such as Middlewares, HTML components, and API controllers. Using ASP.NET Core, you have Feature Flags almost ready to be used: it’s just a matter of installing one NuGet package and using the correct syntax.

    In this article, we are going to create and consume Feature Flags in an ASP.NET Core application. We will start from the very basics and then see how to use complex, built-in filters. We will consume Feature Flags in a generic C# code, and then we will see how to include them in a Razor application and in ASP.NET Core APIs.

    How to add the Feature Flags functionality on ASP.NET Core applications

    The very first step to do is to install the Microsoft.FeatureManagement.AspNetCore NuGet package:

    Microsoft.FeatureManagement.AspNetCore NuGet package

    This package contains everything you need to integrate Feature Flags in an ASP.NET application, from reading configurations from the appsettings.json file to the utility methods we will see later in this article.

    Now that we have the package installed, we can integrate it into our application. The first step is to call AddFeatureManagement on the IServiceCollection object available in the Main method:

    var builder = WebApplication.CreateBuilder(args);
    
    builder.Services.AddFeatureManagement();
    

    By default, this method looks for Feature Flags in a configuration section named FeatureManagement.

    If you want to use another name, you can specify it by accessing the Configuration object. For example, if your section name is MyWonderfulFlags, you must use this line instead of the previous one:

    builder.Services.AddFeatureManagement(builder.Configuration.GetSection("MyWonderfulFlags"));
    

    But, for now, let’s stick with the default section name: FeatureManagement.

    Define Feature Flag values in the appsettings file

    As we saw, we have to create a section named FeatureManagement in the appsettings file. This section will contain a collection of keys, each representing a Feature Flag and an associated value.

    For now, let’s say that the value is a simple boolean (we will see an advanced case later!).

    For example, we can define our section like this:

    {
      "FeatureManagement": {
        "Header": true,
        "Footer": true,
        "PrivacyPage": false
      }
    }
    

    Using Feature Flags in generic C# code

    The simplest way to use Feature Flags is by accessing the value directly in the C# code.

    By calling AddFeatureManagement, we have also injected the IFeatureManager interface, which comes in handy to check whether a flag is enabled.

    You can then inject it in a class constructor and reference it:

    private readonly IFeatureManager _featureManager;
    
    public MyClass(IFeatureManager featureManager)
    {
        _featureManager = featureManager;
    }
    
    public async Task DoSomething()
    {
        bool privacyEnabled = await _featureManager.IsEnabledAsync("PrivacyPage");
        if(privacyEnabled)
        {
            // do something specific
        }
    }
    

    This is the simplest way. Looks like it’s nothing more than a simple if statement. Is it?

    Applying a Feature Flag to a Controller or a Razor Model using the FeatureGate attribute

    When rolling out new versions of your application, you might want to enable or disable an API Controller or a whole Razor Page, depending on the value of a Feature Flag.

    There is a simple way to achieve this result: using the FeatureGate attribute.

    Suppose you want to hide the “Privacy” Razor page depending on its related flag, PrivacyPage. You then have to apply the FeatureGate attribute to the whole Model class (in our case, PrivacyModel), specifying that the flag to watch out for is PrivacyPage:

    [FeatureGate("PrivacyPage")]
    public class PrivacyModel : PageModel
    {
    
        public PrivacyModel()
        {
        }
    
        public void OnGet()
        {
        }
    }
    

    Depending on the value of the flag, we will have two results:

    • if the flag is enabled, we will see the whole page normally;
    • if the flag is disabled, we will receive a 404 – Not Found response.

    Let’s have a look at the attribute definition:

    //
    // Summary:
    //     An attribute that can be placed on MVC controllers, controller actions, or Razor
    //     pages to require all or any of a set of features to be enabled.
    [AttributeUsage(AttributeTargets.Class | AttributeTargets.Method, AllowMultiple = true)]
    public class FeatureGateAttribute : ActionFilterAttribute, IAsyncPageFilter, IFilterMetadata
    

    As you can see, you can apply the attribute to any class or method that is related to API controllers or Razor pages. This allows you to support several scenarios:

    • add a flag on a whole API Controller by applying the attribute to the related class;
    • add a flag on a specific Controller Action, allowing you, for example, to expose the GET Action but apply the attribute to the POST Action.
    • add a flag to a whole Razor Model, hiding or showing the related page depending on the flag value.

    You can apply the attribute to a custom class or method unrelated to the MVC pipeline, but it will be ineffective.

    If you try with

    public void OnGet()
    {
        var hello = Hello();
        ViewData["message"] = hello;
    }
    
    [FeatureGate("PrivacyPage")]
    private string Hello()
    {
        return "Ciao!";
    }
    

    the Hello method will be called as usual. The same happens for the OnGet method: yes, it represents the way to access the Razor Page, but you cannot hide it; the only way is to apply the flag to the whole Model.

    You can use multiple Feature Flags on the same FeatureGate attribute. If you need to hide or show a component based on various Feature Flags, you can simply add the required keys in the attribute parameters list:

    [HttpGet]
    [FeatureGate("PrivacyPage", "Footer")]
    public IActionResult Get()
    {
        return Ok("Hey there!");
    }
    

    Now, the GET endpoint will be available only if both PrivacyPage and Footer are enabled.

    Finally, you can define that the component is available if at least one of the flags is enabled by setting the requirementType parameter to RequirementType.Any:

    [HttpGet]
    [FeatureGate(requirementType:RequirementType.Any,  "PrivacyPage", "Footer")]
    public IActionResult Get()
    {
        return Ok("Hey there!");
    }
    

    How to use Feature Flags in Razor Pages

    The Microsoft.FeatureManagement.AspNetCore NuGet package brings a lot of functionalities. Once installed, you can use Feature Flags in your Razor pages.

    To use such functionalities, though, you have to add the related tag helper: open the _ViewImports.cshtml file and add the following line:

    @addTagHelper *, Microsoft.FeatureManagement.AspNetCore
    

    Now, you can use the feature tag.

    Say you want to show an HTML tag when the Header flag is on. You can use the feature tag this way:

    <feature name="Header">
        <p>The header flag is on.</p>
    </feature>
    

    You can also show some content when the flag is off, by setting the negate attribute to true. This comes in handy when you want to display alternative content when the flag is off:

    <feature name="ShowPicture">
        <img src="image.png" />
    </feature>
    <feature name="ShowPicture" negate="true">
        <p>There should have been an image, here!</p>
    </feature>
    

    Clearly, if ShowPicture is on, it shows the image; otherwise, it displays a text message.

    Similar to the FeatureGate attribute, you can apply multiple flags and choose whether all of them or at least one must be on to show the content by setting the requirement attribute to Any (remember: the default value is All):

    <feature name="Header, Footer" requirement="All">
        <p>Both header and footer are enabled.</p>
    </feature>
    
    <feature name="Header, Footer" requirement="Any">
        <p>Either header or footer is enabled.</p>
    </feature>
    

    Conditional Feature Filters: a way to activate flags based on specific advanced conditions

    Sometimes, you want to activate features using complex conditions. For example:

    • activate a feature only for a percentage of requests;
    • activate a feature only during a specific timespan;

    Let’s see how to use the percentage filter.

    The first step is to add the related Feature Filter to the FeatureManagement functionality. In our case, we will add the Microsoft.FeatureManagement.FeatureFilters.PercentageFilter.

    builder.Services.AddFeatureManagement()
        .AddFeatureFilter<PercentageFilter>();
    

    Now we just have to define the related flag in the appsettings file. We cannot use anymore a boolean value, but we need a complex object. Let’s configure the ShowPicture flag to use the Percentage filter.

    {
      "ShowPicture": {
        "EnabledFor": [
          {
            "Name": "Percentage",
            "Parameters": {
              "Value": 60
            }
          }
        ]
      }
    }
    

    Have a look at the structure. Now we have:

    • a field named EnabledFor;
    • EnabledFor is an array, not a single object;
    • every object within the array is made of two fields: Name, which must match the filter name, and Parameters, which is a generic object whose value depends on the type of filter.

    In this example, we have set "Value": 60. This means that the flag will be active in around 60% of calls. In the remaining 40%, the flag will be off.

    Now, I encourage you to toy with this filter:
    Apply it to a section or a page.
    Run the application.
    Refresh the page several times without restarting the application.

    You’ll see the component appear and disappear.

    Further readings

    We learned about setting “simple” configurations in an ASP.NET Core application in a previous article. You should read it to have a better understanding of how we can define configurations.

    🔗Azure App Configuration and ASP.NET Core API: a smart and secure way to manage configurations | Code4IT

    Here, we focused on the Feature Flags. As we saw, most functionalities come out of the box with ASP.NET Core.

    In particular, we learned how to use the <feature> tag on a Razor page. You can read more on the official documentation (even though we already covered almost everything!):

    🔗FeatureTagHelper Class | Microsoft Docs

    This article first appeared on Code4IT 🐧

    Wrapping up

    In this article, we learned how to use Feature Flags in an ASP.NET application on Razor pages and API Controllers.

    Feature Flags can be tremendously useful when activating or deactivating a feature in some specific cases. For example, you can roll out a functionality in production by activating the related flag. Suppose you find an error in that functionality. In that case, you just have to turn off the flag and investigate locally the cause of the issue.

    I hope you enjoyed this article! Let’s keep in touch on Twitter or LinkedIn! 🤜🤛

    Happy coding!

    🐧


    Source link

  • How to integrate Feature Flags stored on Azure App Configuration in an ASP.NET Core Application &vert; Code4IT

    How to integrate Feature Flags stored on Azure App Configuration in an ASP.NET Core Application | Code4IT


    Learn how to use Feature Flags in ASP.NET Core apps and read values from Azure App Configuration. Understand how to use filters, like the Percentage filter, to control feature activation, and learn how to take full control of the cache expiration of the values.

    Table of Contents

    Just a second! 🫷
    If you are here, it means that you are a software developer.
    So, you know that storage, networking, and domain management have a cost .

    If you want to support this blog, please ensure that you have disabled the adblocker for this site.
    I configured Google AdSense to show as few ADS as possible – I don’t want to bother you with lots of ads, but I still need to add some to pay for the resources for my site.

    Thank you for your understanding.
    Davide

    Feature Flags let you remotely control the activation of features without code changes. They help you to test, release, and manage features safely and quickly by driving changes using centralized configurations.

    In a previous article, we learned how to integrate Feature Flags in ASP.NET Core applications. Also, a while ago, we learned how to integrate Azure App Configuration in an ASP.NET Core application.

    In this article, we are going to join the two streams in a single article: in fact, we will learn how to manage Feature Flags using Azure App Configuration to centralize our configurations.

    It’s a sort of evolution from the previous article. Instead of changing the static configurations and redeploying the whole application, we are going to move the Feature Flags to Azure so that you can enable or disable those flags in just one click.

    A recap of Feature Flags read from the appsettings file

    Let’s reuse the example shown in the previous article.

    We have an ASP.NET Core application (in that case, we were building a Razor application, but it’s not important for the sake of this article), with some configurations defined in the appsettings file under the Feature key:

    {
      "FeatureManagement": {
        "Header": true,
        "Footer": true,
        "PrivacyPage": false,
        "ShowPicture": {
          "EnabledFor": [
            {
              "Name": "Percentage",
              "Parameters": { "Value": 60 }
            }
          ]
        }
      }
    }
    

    We have already dove deep into Feature Flags in an ASP.NET Core application in the previous article. However, let me summarize it.

    First of all, you have to define your flags in the appsettings.json file using the structure we saw before.

    To use Feature Flags in ASP.NET Core you have to install the Microsoft.FeatureManagement.AspNetCore NuGet package.

    Then, you have to tell ASP.NET to use Feature Flags by calling:

    builder.Services.AddFeatureManagement();
    

    Finally, you are able to consume those flags in three ways:

    • inject the IFeatureManager interface and call IsEnabled or IsEnabledAsync;
    • use the FeatureGate attribute on a Controller class or a Razor model;
    • use the <feature> tag in a Razor page to show or hide a portion of HTML

    How to create Feature Flags on Azure App Configuration

    We are ready to move our Feature Flags to Azure App Configuration. Needless to say, you need an Azure subscription 😉

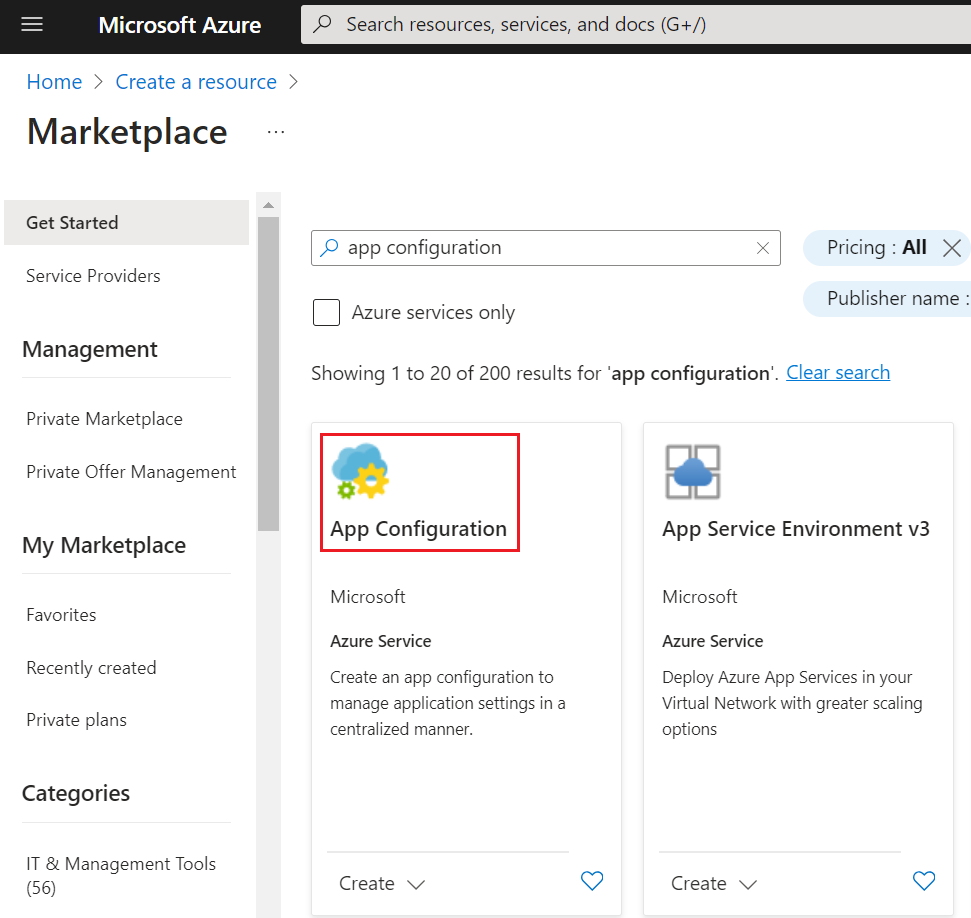
    Log in to the Azure Portal, head to “Create a resource”, and create a new App Configuration:

    Azure App configuration in the Marketplace

    I’m going to reuse the same instance I created in the previous article – you can see the full details in the How to create an Azure App Configuration instance section.

    Now we have to configure the same keys defined in the appsettings file: Header, Footer, and PrivacyPage.

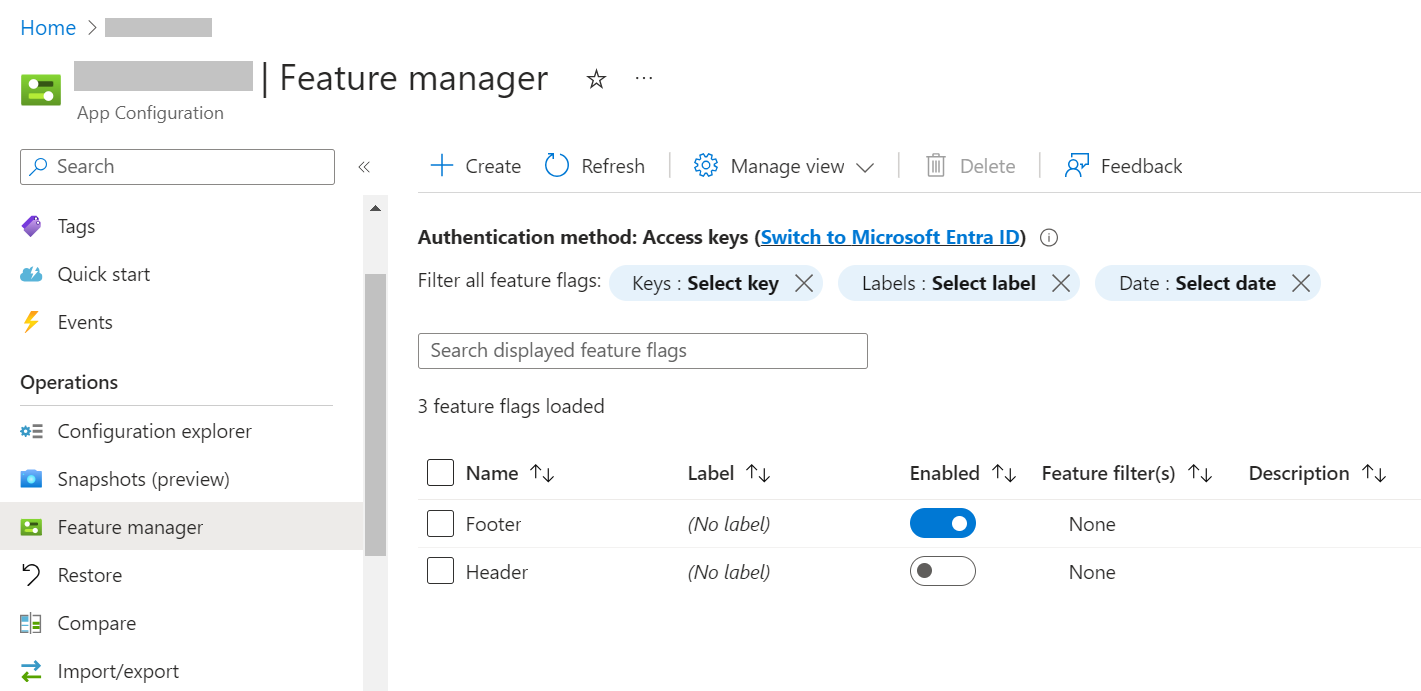
    Open the App Configuration instance and locate the “Feature Manager” menu item in the left panel. This is the central place for creating, removing, and managing your Feature Flags. Here, you can see that I have already added the Header and Footer, and you can see their current state: “Footer” is enabled, while “Header” is not.

    Feature Flags manager dashboard

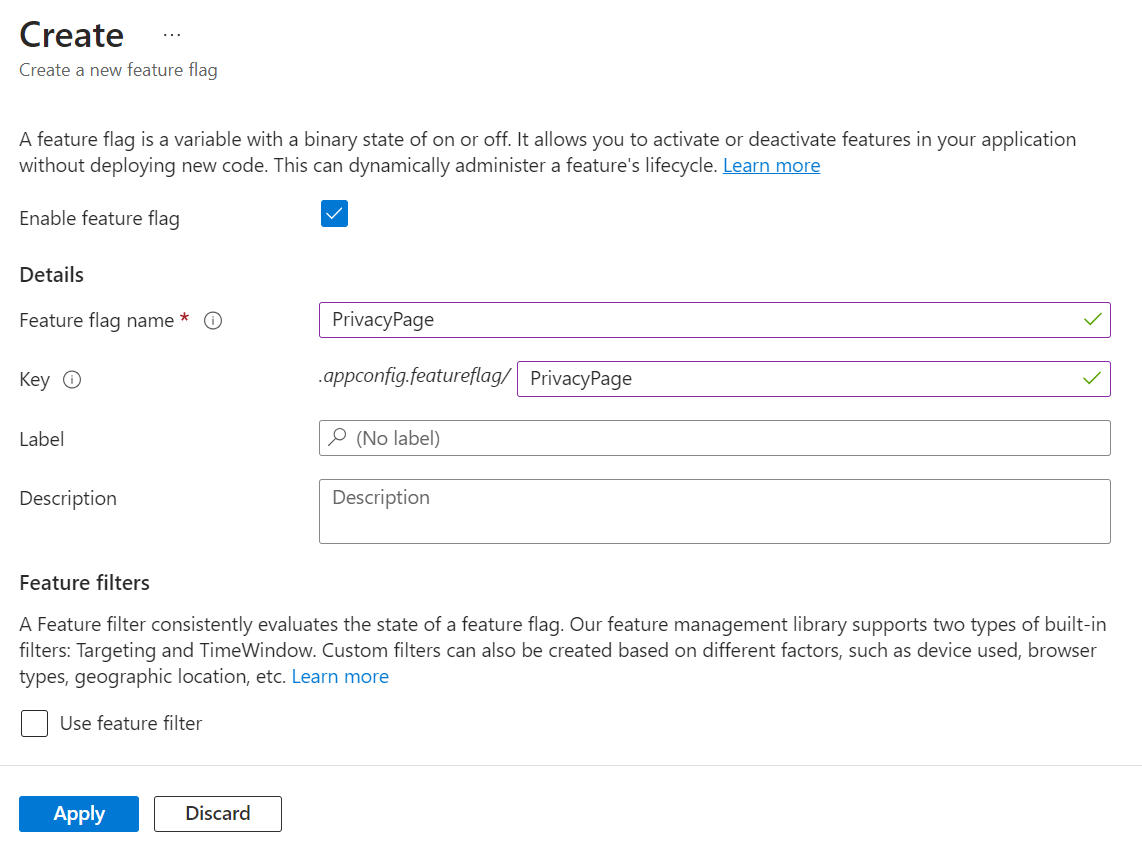
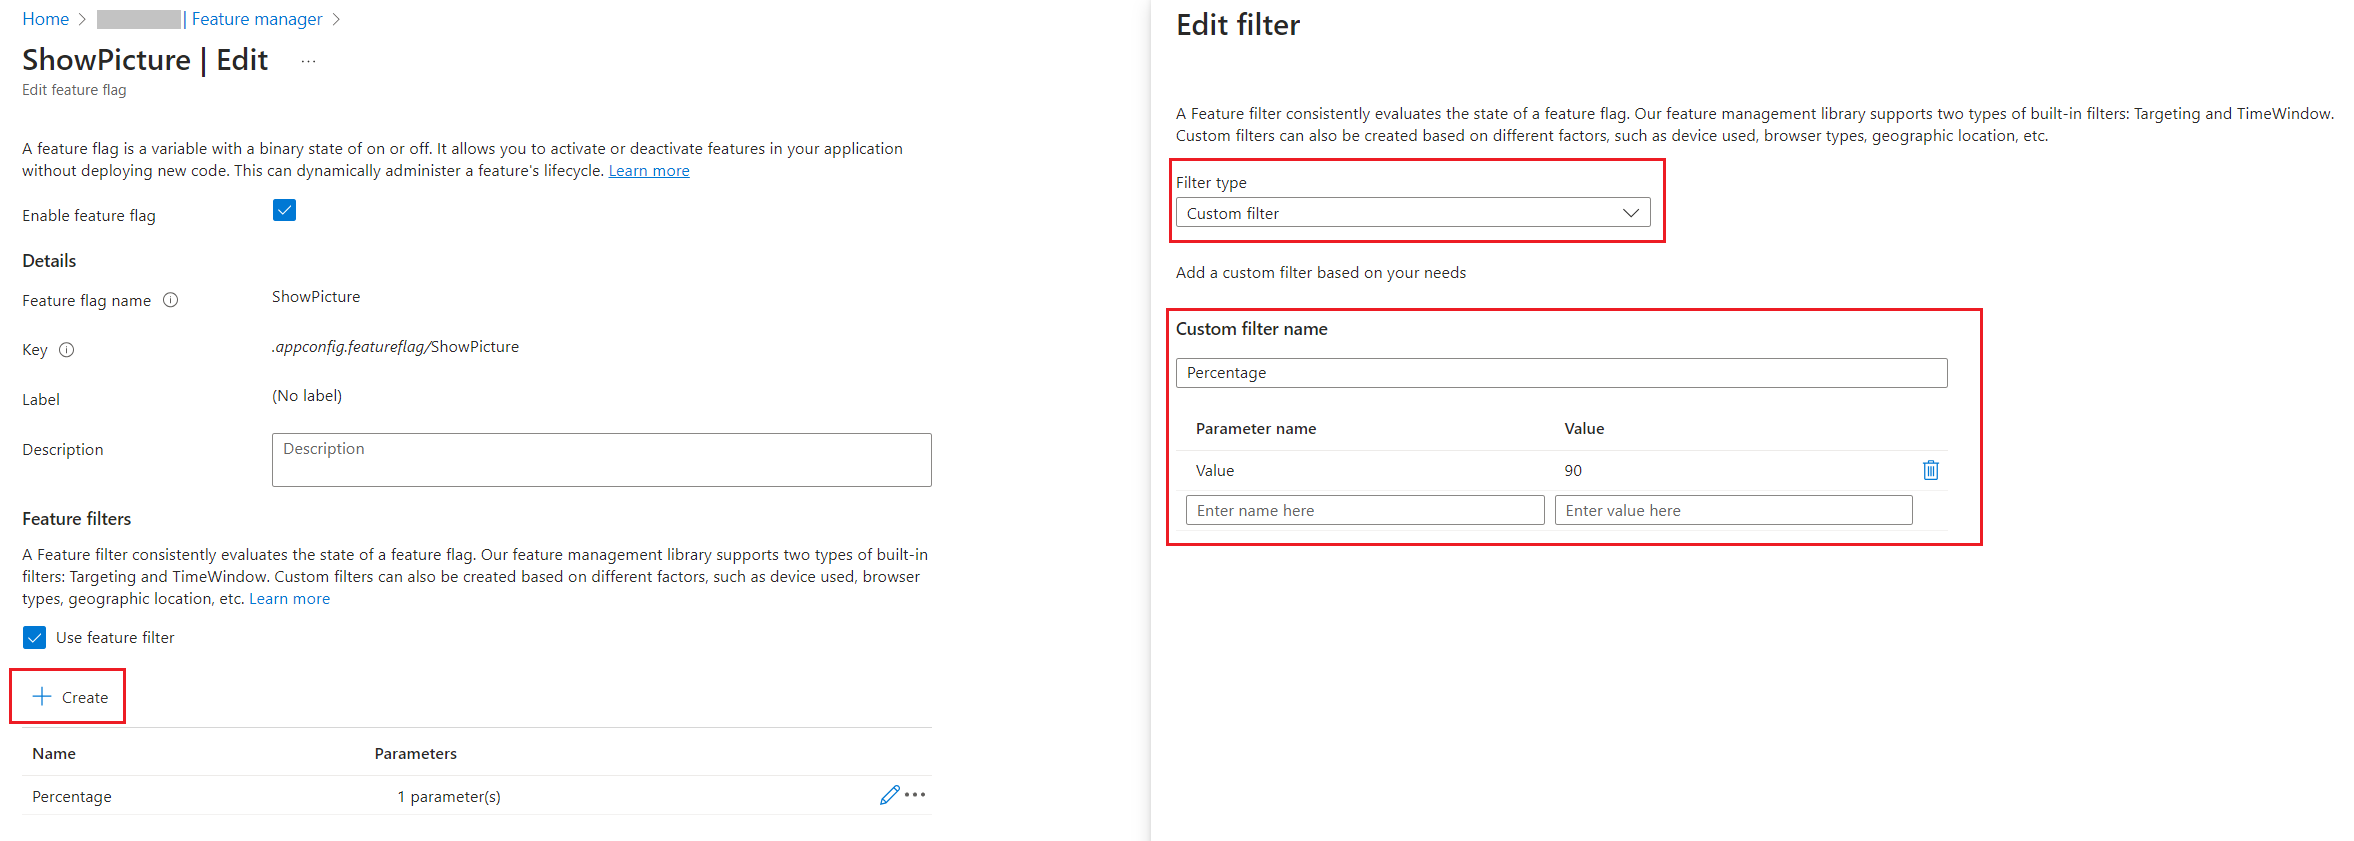
    How can I add the PrivacyPage flag? It’s elementary: click the “Create” button and fill in the fields.

    You have to define a Name and a Key (they can also be different), and if you want, you can add a Label and a Description. You can also define whether the flag should be active by checking the “Enable feature flag” checkbox.

    Feature Flag definition form

    Read Feature Flags from Azure App Configuration in an ASP.NET Core application

    It’s time to integrate Azure App Configuration with our ASP.NET Core application.

    Before moving to the code, we have to locate the connection string and store it somewhere.

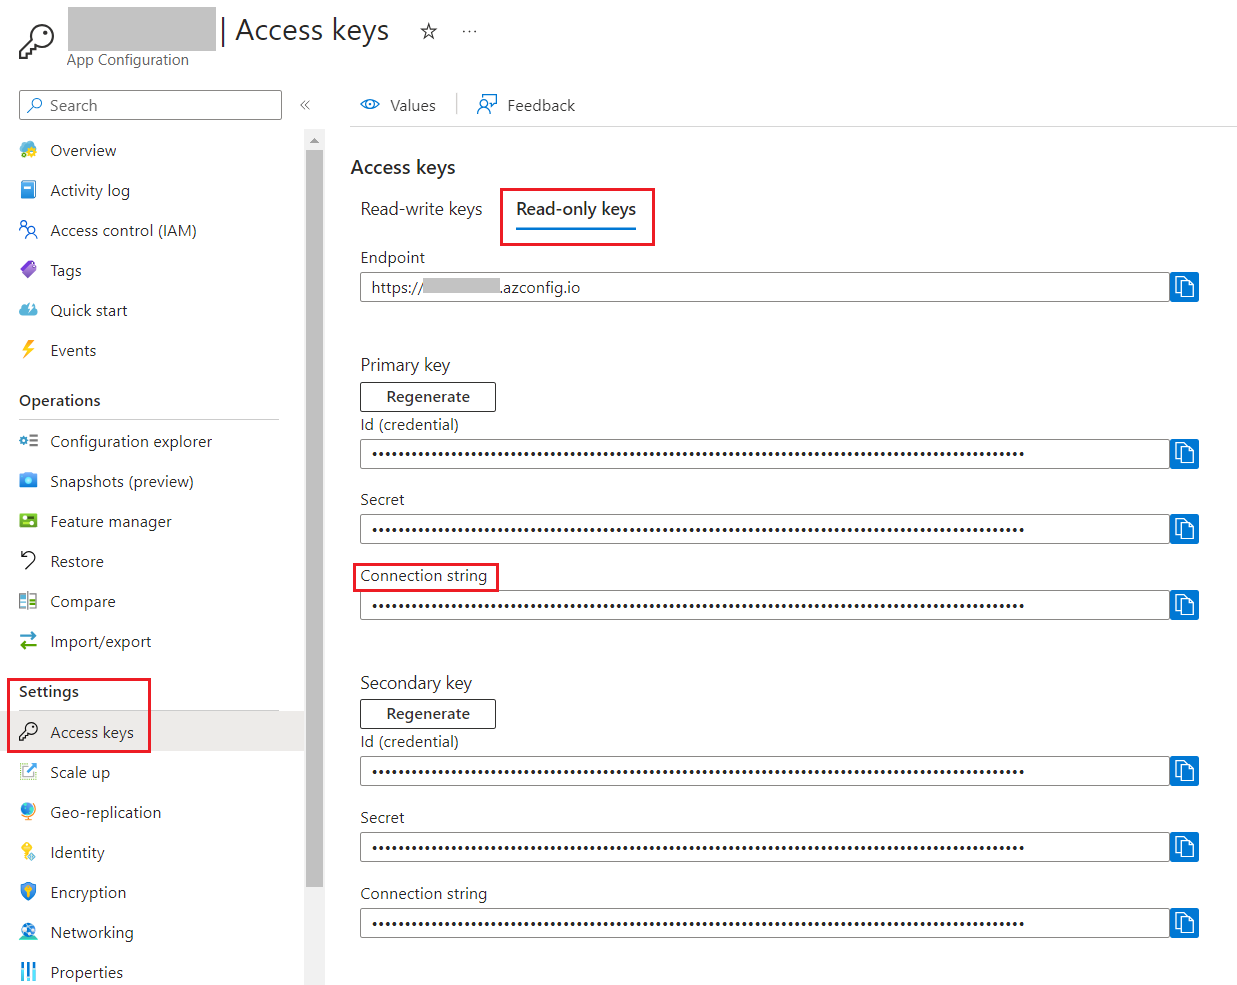
    Head back to the App Configuration resource and locate the “Access keys” menu item under the “Settings” section.

    Access Keys page with connection strings

    From here, copy the connection string (I suggest that you use the Read-only Keys) and store it somewhere.

    Before proceeding, you have to install the Microsoft.Azure.AppConfiguration.AspNetCore NuGet package.

    Now, we can add Azure App Configuration as a source for our configurations by connecting to the connection string and by declaring that we are going to use Feature Flags:

    builder.Configuration.AddAzureAppConfiguration(options =>
        options.Connect(connectionString).UseFeatureFlags()
    );
    

    That’s not enough. We need to tell ASP.NET that we are going to consume these configurations by adding such functionalities to the Services property.

    builder.Services.AddAzureAppConfiguration();
    
    builder.Services.AddFeatureManagement();
    

    Finally, once we have built our application with the usual builder.Build(), we have to add the Azure App Configuration middleware:

    app.UseAzureAppConfiguration();
    

    To try it out, run the application and validate that the flags are being applied. You can enable or disable those flags on Azure, restart the application, and check that the changes to the flags are being applied. Otherwise, you can wait 30 seconds to have the flag values refreshed and see the changes applied to your application.

    Using the Percentage filter on Azure App Configuration

    Suppose you want to enable a functionality only to a percentage of sessions (sessions, not users!). In that case, you can use the Percentage filter.

    The previous article had a specific section dedicated to the PercentageFilter, so you might want to check it out.

    As a recap, we defined the flag as:

    {
      "ShowPicture": {
        "EnabledFor": [
          {
            "Name": "Percentage",
            "Parameters": {
              "Value": 60
            }
          }
        ]
      }
    }
    

    And added the PercentageFilter filter to ASP.NET with:

    builder.Services.AddFeatureManagement()
        .AddFeatureFilter<PercentageFilter>();
    

    Clearly, we can define such flags on Azure as well.

    Head back to the Azure Portal and add a new Feature Flag. This time, you have to add a new Feature Filter to any existing flag. Even though the PercentageFilter is out-of-the-box in the FeatureManagement NuGet package, it is not available on the Azure portal.

    You have to define the filter with the following values:

    • Filter Type must be “Custom”;
    • Custom filter name must be “Percentage”
    • You must add a new key, “Value”, and set its value to “60”.

    Custom filter used to create Percentage Filter

    The configuration we just added reflects the JSON value we previously had in the appsettings file: 60% of the requests will activate the flag, while the remaining 40% will not.

    Define the cache expiration interval for Feature Flags

    By default, Feature Flags are stored in an internal cache for 30 seconds.

    Sometimes, it’s not the best choice for your project; you may prefer a longer duration to avoid additional calls to the App Configuration platform; other times, you’d like to have the changes immediately available.

    You can then define the cache expiration interval you need by configuring the options for the Feature Flags:

    builder.Configuration.AddAzureAppConfiguration(options =>
        options.Connect(connectionString).UseFeatureFlags(featureFlagOptions =>
        {
            featureFlagOptions.CacheExpirationInterval = TimeSpan.FromSeconds(10);
        })
    );
    

    This way, Feature Flag values are stored in the internal cache for 10 seconds. Then, when you reload the page, the configurations are reread from Azure App Configuration and the flags are applied with the new values.

    Further readings

    This is the final article of a path I built during these months to explore how to use configurations in ASP.NET Core.

    We started by learning how to set configuration values in an ASP.NET Core application, as explained here:

    🔗 3 (and more) ways to set configuration values in ASP.NET Core

    Then, we learned how to read and use them with the IOptions family:

    🔗 Understanding IOptions, IOptionsMonitor, and IOptionsSnapshot in ASP.NET Core

    From here, we learned how to read the same configurations from Azure App Configuration, to centralize our settings:

    🔗 Azure App Configuration and ASP.NET Core API: a smart and secure way to manage configurations | Code4IT

    Then, we configured our applications to automatically refresh the configurations using a Sentinel value:

    🔗 How to automatically refresh configurations with Azure App Configuration in ASP.NET Core

    Finally, we introduced Feature Flags in our apps:

    🔗 Feature Flags 101: A Guide for ASP.NET Core Developers | Code4IT

    And then we got to this article!

    This article first appeared on Code4IT 🐧

    Wrapping up

    In this article, we have configured an ASP.NET Core application to read the Feature Flags stored on Azure App Configuration.

    Here’s the minimal code you need to add Feature Flags for ASP.NET Core API Controllers:

    var builder = WebApplication.CreateBuilder(args);
    
    string connectionString = "my connection string";
    
    builder.Services.AddControllers();
    
    builder.Configuration.AddAzureAppConfiguration(options =>
        options.Connect(connectionString)
        .UseFeatureFlags(featureFlagOptions =>
            {
                featureFlagOptions.CacheExpirationInterval = TimeSpan.FromSeconds(10);
            }
        )
    );
    
    builder.Services.AddAzureAppConfiguration();
    
    builder.Services.AddFeatureManagement()
        .AddFeatureFilter<PercentageFilter>();
    
    var app = builder.Build();
    
    app.UseRouting();
    app.UseAzureAppConfiguration();
    app.MapControllers();
    app.Run();
    

    I hope you enjoyed this article! Let’s keep in touch on Twitter or LinkedIn! 🤜🤛

    Happy coding!

    🐧


    Source link

  • How to log to Azure Application Insights using ILogger in ASP.NET Core &vert; Code4IT

    How to log to Azure Application Insights using ILogger in ASP.NET Core | Code4IT


    Application Insights is a great tool for handling high volumes of logs. How can you configure an ASP.NET application to send logs to Azure Application Insights? What can I do to have Application Insights log my exceptions?

    Table of Contents

    Just a second! 🫷
    If you are here, it means that you are a software developer.
    So, you know that storage, networking, and domain management have a cost .

    If you want to support this blog, please ensure that you have disabled the adblocker for this site.
    I configured Google AdSense to show as few ADS as possible – I don’t want to bother you with lots of ads, but I still need to add some to pay for the resources for my site.

    Thank you for your understanding.
    Davide

    Logging is crucial for any application. However, generating logs is not enough: you must store them somewhere to access them.

    Application Insights is one of the tools that allows you to store your logs in a cloud environment. It provides a UI and a query editor that allows you to drill down into the details of your logs.

    In this article, we will learn how to integrate Azure Application Insights with an ASP.NET Core application and how Application Insights treats log properties such as Log Levels and exceptions.

    For the sake of this article, I’m working on an API project with HTTP Controllers with only one endpoint. The same approach can be used for other types of applications.

    How to retrieve the Azure Application Insights connection string

    Azure Application Insights can be accessed via any browser by using the Azure Portal.

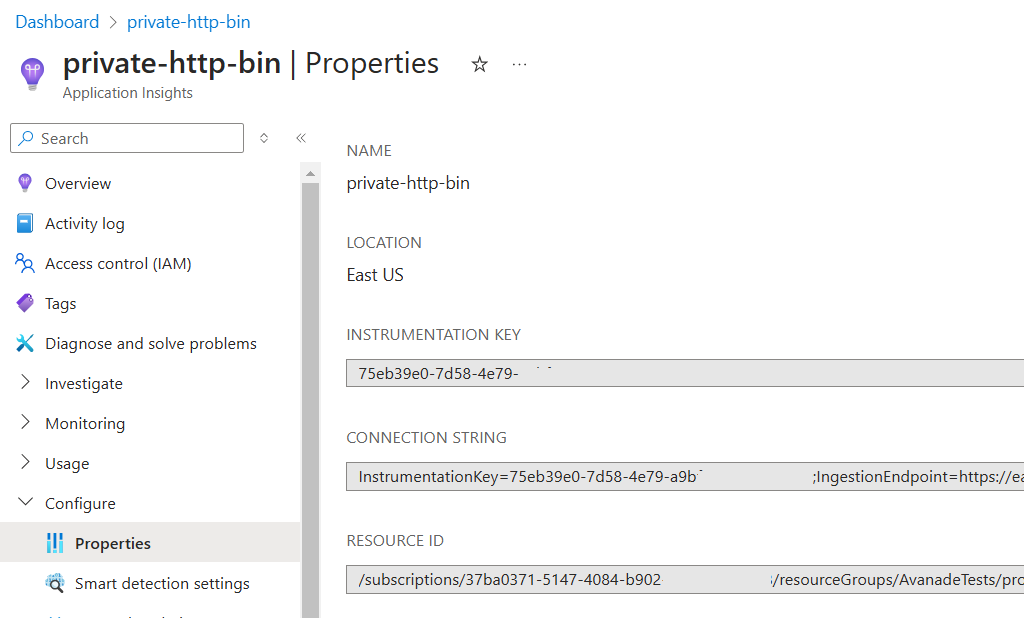
    Once you have an instance ready, you can simply get the value of the connection string for that resource.

    You can retrieve it in two ways.

    You can get the connection string by looking at the Connection String property in the resource overview panel:

    Azure Application Insights overview panel

    The alternative is to navigate to the Configure > Properties page and locate the Connection String field.

    Azure Application Insights connection string panel

    How to add Azure Application Insights to an ASP.NET Core application

    Now that you have the connection string, you can place it in the configuration file or, in general, store it in a place that is accessible from your application.

    To configure ASP.NET Core to use Application Insights, you must first install the Microsoft.Extensions.Logging.ApplicationInsights NuGet package.

    Now you can add a new configuration to the Program class (or wherever you configure your services and the ASP.NET core pipeline):

    builder.Logging.AddApplicationInsights(
    configureTelemetryConfiguration: (config) =>
     config.ConnectionString = "InstrumentationKey=your-connection-string",
     configureApplicationInsightsLoggerOptions: (options) => { }
    );
    

    The configureApplicationInsightsLoggerOptions allows you to configure some additional properties: TrackExceptionsAsExceptionTelemetry, IncludeScopes, and FlushOnDispose. These properties are by default set to true, so you probably don’t want to change the default behaviour (except one, which we’ll modify later).

    And that’s it! You have Application Insights ready to be used.

    How log levels are stored and visualized on Application Insights

    I have this API endpoint that does nothing fancy: it just returns a random number.

    [Route("api/[controller]")]
    [ApiController]
    public class MyDummyController(ILogger<DummyController> logger) : ControllerBase
    {
     private readonly ILogger<DummyController> _logger = logger;
    
        [HttpGet]
        public async Task<IActionResult> Get()
        {
            int number = Random.Shared.Next();
            return Ok(number);
        }
    }
    

    We can use it to run experiments on how logs are treated using Application Insights.

    First, let’s add some simple log messages in the Get endpoint:

    [HttpGet]
    public async Task<IActionResult> Get()
    {
        int number = Random.Shared.Next();
    
        _logger.LogDebug("A debug log");
        _logger.LogTrace("A trace log");
        _logger.LogInformation("An information log");
        _logger.LogWarning("A warning log");
        _logger.LogError("An error log");
        _logger.LogCritical("A critical log");
    
        return Ok(number);
    }
    

    These are just plain messages. Let’s search for them in Application Insights!

    You first have to run the application – duh! – and wait for a couple of minutes for the logs to be ready on Azure. So, remember not to close the application immediately: you have to give it a few seconds to send the log messages to Application Insights.

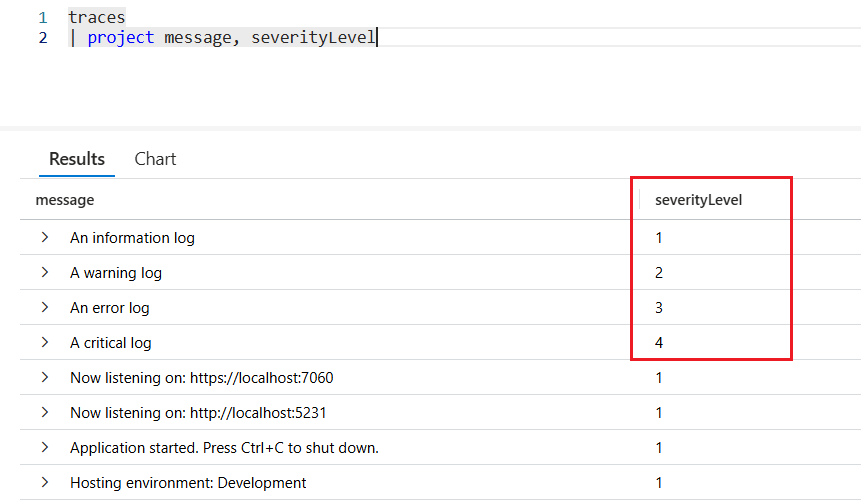
    Then, you can open the logs panel and access the logs stored in the traces table.

    Log levels displayed on Azure Application Insights

    As you can see, the messages appear in the query result.

    There are three important things to notice:

    • in .NET, the log level is called “Log Level”, while on Application Insights it’s called “severity level”;
    • the log levels lower than Information are ignored by default (in fact, you cannot see them in the query result);
    • the Log Levels are exposed as numbers in the severityLevel column: the higher the value, the higher the log level.

    So, if you want to update the query to show only the log messages that are at least Warnings, you can do something like this:

    traces
    | where severityLevel >= 2
    | order  by timestamp desc
    | project timestamp, message, severityLevel
    

    How to log exceptions on Application Insights

    In the previous example, we logged errors like this:

    _logger.LogError("An error log");
    

    Fortunately, ILogger exposes an overload that accepts an exception in input and logs all the details.

    Let’s try it by throwing an exception (I chose AbandonedMutexException because it’s totally nonsense in this simple context, so it’s easy to spot).

    private void SomethingWithException(int number)
    {
        try
        {
            _logger.LogInformation("In the Try block");
    
            throw new AbandonedMutexException("An exception message");
        }
        catch (Exception ex)
        {
            _logger.LogInformation("In the Catch block");
            _logger.LogError(ex, "Unable to complete the operation");
        }
        finally
        {
            _logger.LogInformation("In the Finally block");
        }
    }
    

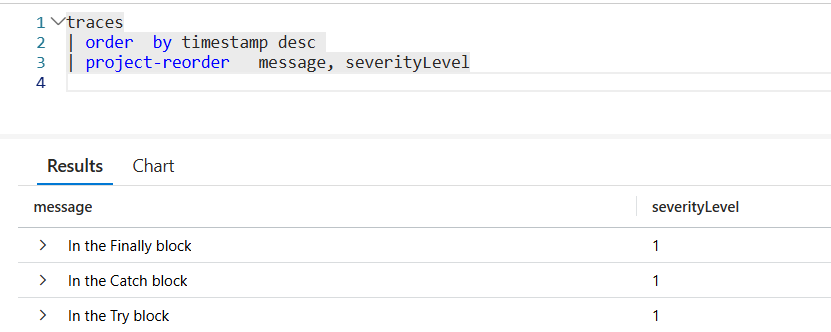
    So, when calling it, we expect to see 4 log entries, one of which contains the details of the AbandonedMutexException exception.

    The Exception message in Application Insights

    Hey, where is the exception message??

    It turns out that ILogger, when creating log entries like _logger.LogError("An error log");, generates objects of type TraceTelemetry. However, the overload that accepts as a first parameter an exception (_logger.LogError(ex, "Unable to complete the operation");) is internally handled as an ExceptionTelemetry object. Since internally, it’s a different type of Telemetry object, and it gets ignored by default.

    To enable logging exceptions, you have to update the way you add Application Insights to your application by setting the TrackExceptionsAsExceptionTelemetry property to false:

    builder.Logging.AddApplicationInsights(
    configureTelemetryConfiguration: (config) =>
     config.ConnectionString = connectionString,
     configureApplicationInsightsLoggerOptions: (options) => options.TrackExceptionsAsExceptionTelemetry = false);
    

    This way, ExceptionsTelemetry objects are treated as TraceTelemetry logs, making them available in Application Insights logs:

    The Exception log appears in Application Insights

    Then, to access the details of the exception like the message and the stack trace, you can look into the customDimensions element of the log entry:

    Details of the Exception log

    Even though this change is necessary to have exception logging work, it is barely described in the official documentation.

    Further readings

    It’s not the first time we have written about logging in this blog.

    For example, suppose you don’t want to use Application Insights but prefer an open-source, vendor-independent log sink. In that case, my suggestion is to try Seq:

    🔗 Easy logging management with Seq and ILogger in ASP.NET | Code4IT

    Logging manually is nice, but you may be interested in automatically logging all the data related to incoming HTTP requests and their responses.

    🔗 HTTP Logging in ASP.NET: how to automatically log all incoming HTTP requests (and its downsides!) | Code4IT

    This article first appeared on Code4IT 🐧

    You can read the official documentation here (even though I find it not much complete and does not show the results):

    🔗 Application Insights logging with .NET | Microsoft docs

    Wrapping up

    This article taught us how to set up Azure Application Insights in an ASP.NET application.
    We touched on the basics, discussing log levels and error handling. In future articles, we’ll delve into some other aspects of logging, such as correlating logs, understanding scopes, and more.

    I hope you enjoyed this article! Let’s keep in touch on LinkedIn, Twitter or BlueSky! 🤜🤛

    Happy coding!

    🐧


    Source link