When you plot two variables, you see data dots scattered across the plane. Their overall tilt and shape tell you how the variables move together. Correlation turns that visual impression into a single number you can report and compare.
What correlation measures
Correlation summarises the direction and strength of association between two numeric variables on a scale from −1 to +1.
Sign shows direction
positive – larger x tends to come with larger y
negative – larger x tends to come with smaller y
Magnitude shows strength
near 0 – weak association
near 1 in size – strong association
Correlation does not prove causation.
Two methods to measure correlation
Pearson correlation – distance based
Pearson asks: how straight is the tilt of the data dots? It uses actual distances from a straight line, so it is excellent for line-like patterns and sensitive to outliers. Use when:
you expect a roughly straight relationship
units and distances matter
residuals look symmetric around a line
Spearman correlation – rank based
Spearman converts each variable to ranks (1st, 2nd, 3rd, …) and then computes Pearson on those ranks. It measures monotonic association: do higher x values tend to come with higher y values overall, even if the shape is curved.
Ranks ignore distances and care only about order, which gives two benefits:
robust to outliers and weird units
invariant to any monotonic transform (log, sqrt, min-max), since order does not change
Use when:
you expect a consistent up or down trend that may be curved
the data are ordinal or have many ties
outliers are a concern
r and p in plain language
r is the correlation coefficient. It is your effect size on the −1 to +1 scale.
p answers: if there were truly no association, how often would we see an r at least this large in magnitude just by random chance.
Small p flags statistical signal. It is not a measure of importance. Usually findings, where p is bigger than .05 should be ignored.
When Pearson and Spearman disagree?
Curved but monotonic (for example price vs horsepower with diminishing returns) Spearman stays high because order increases consistently. Pearson is smaller because a straight line underfits the curve.
Outliers (for example a 10-year-old exotic priced very high) Pearson can jump because distances change a lot. Spearman changes less because rank order barely changes.
Propagating HTTP Headers can be useful, especially when dealing with Correlation IDs. It’s time to customize our HttpClients!
Table of Contents
Just a second! 🫷 If you are here, it means that you are a software developer.
So, you know that storage, networking, and domain management have a cost .
If you want to support this blog, please ensure that you have disabled the adblocker for this site. I configured Google AdSense to show as few ADS as possible – I don’t want to bother you with lots of ads, but I still need to add some to pay for the resources for my site.
Thank you for your understanding. – Davide
Imagine this: you have a system made up of different applications that communicate via HTTP. There’s some sort of entry point, exposed to the clients, that orchestrates the calls to the other applications. How do you correlate those requests?
A good idea is to use a Correlation ID: one common approach for HTTP-based systems is passing a value to the “public” endpoint using HTTP headers; that value will be passed to all the other systems involved in that operation to say that “hey, these incoming requests in the internal systems happened because of THAT SPECIFIC request in the public endpoint”. Of course, it’s more complex than this, but you got the idea.
Now. How can we propagate an HTTP Header in .NET? I found this solution on GitHub, provided by no less than David Fowler. In this article, I’m gonna dissect his code to see how he built this solution.
Important update: there’s a NuGet package that implements these functionalities: Microsoft.AspNetCore.HeaderPropagation. Consider this article as an excuse to understand what happens behind the scenes of an HTTP call, and use it to learn how to customize and extend those functionalities. Here’s how to integrate that package.
Just interested in the C# methods?
As I said, I’m not reinventing anything new: the source code I’m using for this article is available on GitHub (see link above), but still, I’ll paste the code here, for simplicity.
First of all, we have two extension methods that add some custom functionalities to the IServiceCollection.
It’s quite easy: if you want to propagate the my-correlation-id header for all the HttpClients created in your application, you just have to add this line to your Startup method.
This class lies in the middle of the HTTP Request pipeline. It can extend the functionalities of HTTP Clients because it inherits from System.Net.Http.DelegatingHandler.
If you recall from a previous article, the SendAsync method is the real core of any HTTP call performed using .NET’s HttpClients, and here we’re enriching that method by propagating some HTTP headers.
protectedoverride Task<HttpResponseMessage> SendAsync(HttpRequestMessage request, System.Threading.CancellationToken cancellationToken)
{
if (_contextAccessor.HttpContext != null)
{
foreach (var headerName in _options.HeaderNames)
{
// Get the incoming header valuevar headerValue = _contextAccessor.HttpContext.Request.Headers[headerName];
if (StringValues.IsNullOrEmpty(headerValue))
{
continue;
}
request.Headers.TryAddWithoutValidation(headerName, (string[])headerValue);
}
}
returnbase.SendAsync(request, cancellationToken);
}
By using _contextAccessor we can access the current HTTP Context. From there, we retrieve the current HTTP headers, check if one of them must be propagated (by looking up _options.HeaderNames), and finally, we add the header to the outgoing HTTP call by using TryAddWithoutValidation.
Notice that we’ve used `TryAddWithoutValidation` instead of `Add`: in this way, we can use whichever HTTP header key we want without worrying about invalid names (such as the ones with a new line in it). Invalid header names will simply be ignored, as opposed to the Add method that will throw an exception.
Finally, we continue with the HTTP call by executing `base.SendAsync`, passing the `HttpRequestMessage` object now enriched with additional headers.
Using HttpMessageHandlerBuilder to configure how HttpClients must be built
The Microsoft.Extensions.Http.IHttpMessageHandlerBuilderFilter interface allows you to apply some custom configurations to the HttpMessageHandlerBuilder right before the HttpMessageHandler object is built.
The Configure method allows you to customize how the HttpMessageHandler will be built: we are adding a new instance of the HeaderPropagationMessageHandler class we’ve seen before to the current HttpMessageHandlerBuilder’s AdditionalHandlers collection. All the handlers registered in the list will then be used to build the HttpMessageHandler object we’ll use to send and receive requests.
Here, we’re gonna extend the IServiceCollection with those functionalities. At first, we’re adding AddHttpContextAccessor, which allows us to access the current HTTP Context (the one we’ve used in the HeaderPropagationMessageHandler class).
Then, services.ConfigureAll(configure) registers an HeaderPropagationOptions that will be used by HeaderPropagationMessageHandlerBuilderFilter. Without that line, we won’t be able to specify the names of the headers to be propagated.
Honestly, I haven’t understood it thoroughly: I thought that it allows us to use more than one class implementing IHttpMessageHandlerBuilderFilter, but apparently if we create a sibling class and add them both using Add, everything works the same. If you know what this line means, drop a comment below! 👇
Wherever you access the ServiceCollection object (may it be in the Startup or in the Program class), you can propagate HTTP headers for every HttpClient by using
Yes, AddHeaderPropagation is the method we’ve seen in the previous paragraph!
Seeing it in action
Now we have all the pieces in place.
It’s time to run it 😎
To fully understand it, I strongly suggest forking this repository I’ve created and running it locally, placing some breakpoints here and there.
As a recap: in the Program class, I’ve added these lines to create a named HttpClient specifying its BaseAddress property. Then I’ve added the HeaderPropagation as we’ve seen before.
There’s also a simple Controller that acts as an entry point and that, using an HttpClient, sends data to another endpoint (the one defined in the previous snippet).
[HttpPost]publicasync Task<IActionResult> PostAsync([FromQuery] stringvalue)
{
var item = new Item(value);
var httpClient = _httpClientFactory.CreateClient("items");
await httpClient.PostAsJsonAsync("/", item);
return NoContent();
}
What happens at start-up time
When a .NET application starts up, the Main method in the Program class acts as an entry point and registers all the dependencies and configurations required.
We will then call builder.Services.AddHeaderPropagation, which is the method present in the HeaderPropagationExtensions class.
All the configurations are then set, but no actual operations are being executed.
The application then starts normally, waiting for incoming requests.
What happens at runtime
Now, when we call the PostAsync method by passing an HTTP header such as my-correlation-id:123, things get interesting.
The first operation is
var httpClient = _httpClientFactory.CreateClient("items");
While creating the HttpClient, the engine is calling all the registered IHttpMessageHandlerBuilderFilter and calling their Configure method. So, you’ll see the execution moving to HeaderPropagationMessageHandlerBuilderFilter’s Configure.
Of course, you’re also executing the HeaderPropagationMessageHandler constructor.
The HttpClient is now ready: when we call httpClient.PostAsJsonAsync("/", item) we’re also executing all the registered DelegatingHandler instances, such as our HeaderPropagationMessageHandler. In particular, we’re executing the SendAsync method and adding the required HTTP Headers to the outgoing HTTP calls.
We will then see the same HTTP Header on the destination endpoint.
If you’re not sure about what are extension methods (and you cannot respond to this question: How does inheritance work with extension methods?), then you can have a look at this article:
APIs often call other APIs to perform operations. If an error occurs in one of them, how can you understand the context that caused that error? You can use Correlation IDs in your logs!
Table of Contents
Just a second! 🫷 If you are here, it means that you are a software developer.
So, you know that storage, networking, and domain management have a cost .
If you want to support this blog, please ensure that you have disabled the adblocker for this site. I configured Google AdSense to show as few ADS as possible – I don’t want to bother you with lots of ads, but I still need to add some to pay for the resources for my site.
Thank you for your understanding. – Davide
Correlation IDs are values that are passed across different systems to correlate the operations performed during a “macro” operation.
Most of the time they are passed as HTTP Headers – of course in systems that communicate via HTTP.
In this article, we will learn how to log those Correlation IDs using Serilog, a popular library that helps handle logs in .NET applications.
Setting up the demo dotNET project
This article is heavily code-oriented. So, let me first describe the demo project.
Overview of the project
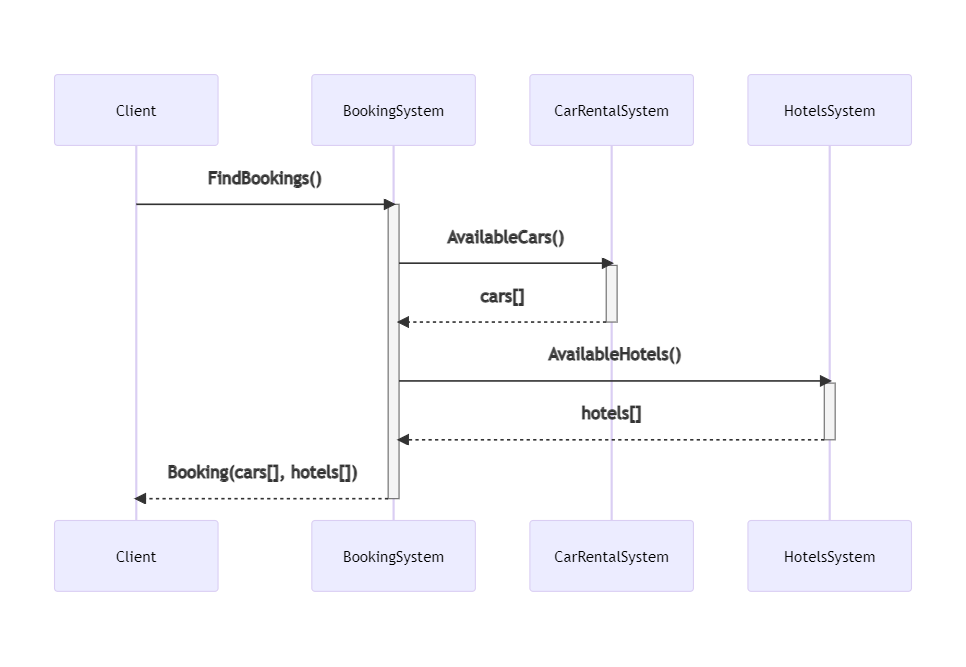
To demonstrate how to log Correlation IDs and how to correlate logs generated by different systems, I’ve created a simple solution that handles bookings for a trip.
The “main” project, BookingSystem, fetches data from external systems by calling some HTTP endpoints; it then manipulates the data and returns an aggregate object to the caller.
BookingSystem depends on two projects, placed within the same solution: CarRentalSystem, which returns data about the available cars in a specified date range, and HotelsSystem, which does the same for hotels.
So, this is the data flow:
If an error occurs in any of those systems, can we understand the full story of the failed request? No. Unless we use Correlation IDs!
Let’s see how to add them and how to log them.
We need to propagate HTTP Headers. You could implement it from scratch, as we’ve seen in a previous article. Or we could use a native library that does it all for us.
Of course, let’s go with the second approach.
For every project that will propagate HTTP headers, we have to follow these steps.
First, we need to install Microsoft.AspNetCore.HeaderPropagation: this NuGet package allows us to add the .NET classes needed to propagate HTTP headers.
Next, we have to update the part of the project that we use to configure our application. For .NET projects with Minimal APIs, it’s the Program class.
Here we need to add the capability to read the HTTP Context, by using
builder.Services.AddHttpContextAccessor();
As you can imagine, this is needed because, to propagate HTTP Headers, we need to know which are the incoming HTTP Headers. And they can be read from the HttpContext object.
Next, we need to specify, as a generic behavior, which headers must be propagated. For instance, to propagate the “my-custom-correlation-id” header, you must add
Since you probably know what’s going on, let me go straight to the point.
Install Serilog Enricher for Correlation IDs
We’re gonna use a specific library to log HTTP Headers treating them as Correlation IDs. To use it, you have to install the Serilog.Enrichers.CorrelationId package available on NuGet.
Therefore, you can simply run
dotnet add Serilog.Enrichers.CorrelationId
to every .NET project that will use this functionality.
Once we have that NuGet package ready, we can add its functionality to our logger by adding this line:
This simple line tells dotnet that, when we see an HTTP Header named “my-custom-correlation-id”, we should log it as a Correlation ID.
Run it all together
Now we have everything in place – it’s time to run it!
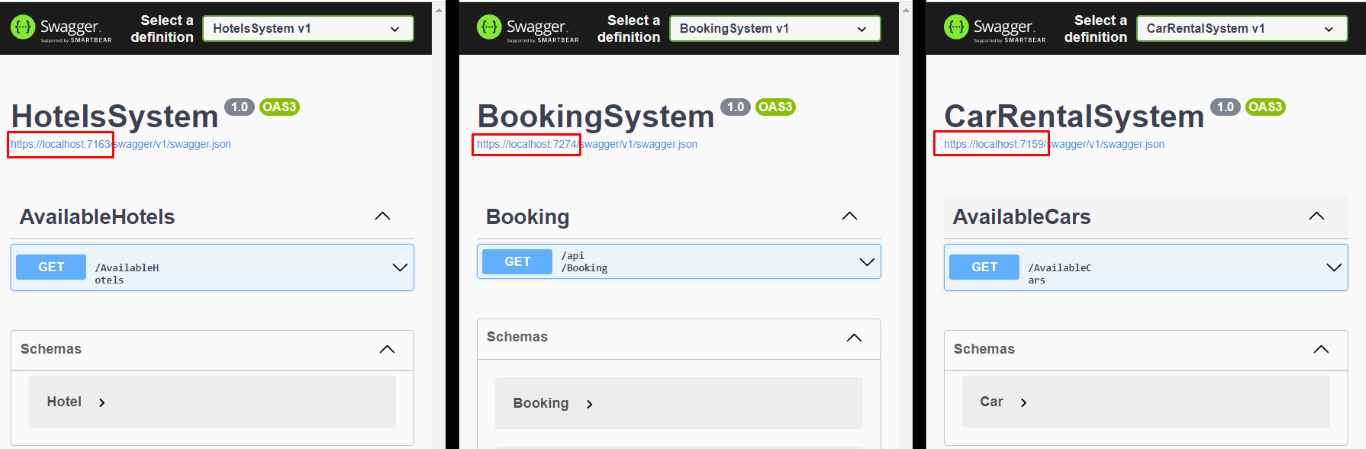
We have to run all the 3 services at the same time (you can do it with VisualStudio or you can run them separately using a CMD), and we need to have Seq installed on our local machine.
You will see 3 instances of Swagger, and each instance is running under a different port.
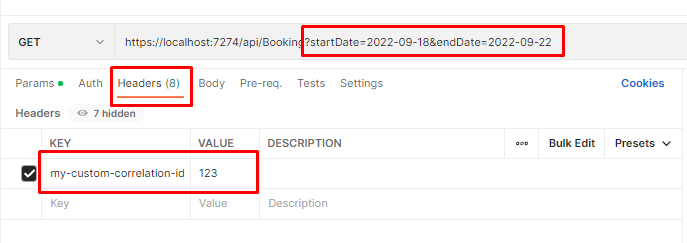
Once we have all the 3 applications up and running, we can call the /Bookings endpoint passing it a date range and an HTTP Header with key “my-custom-correlation-id” and value = “123” (or whatever we want).
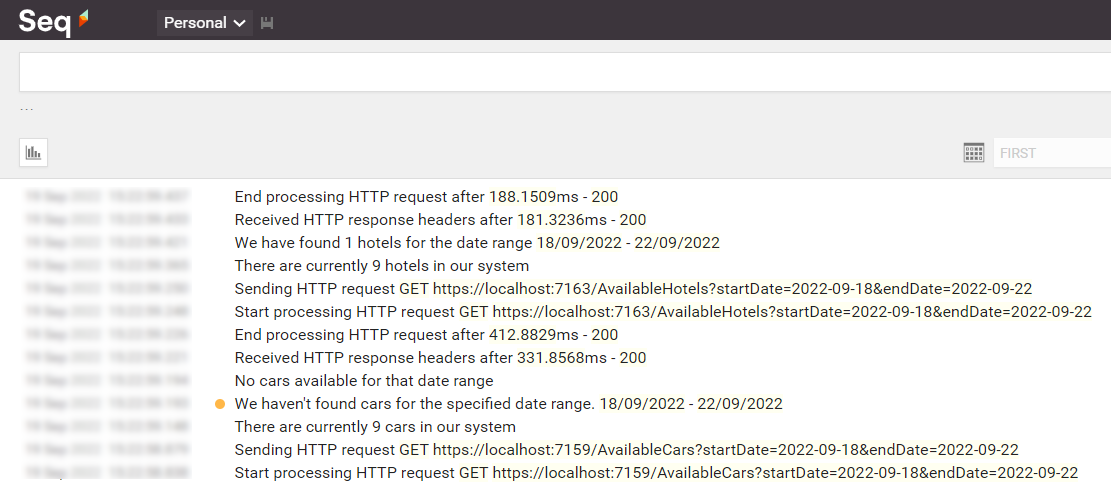
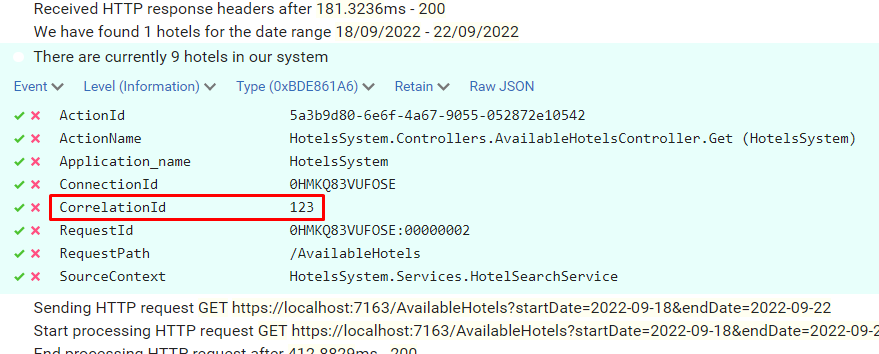
If everything worked as expected, we can open Seq and see all the logs we’ve written in our applications:
Open one of them and have a look at the attributes of the logs: you will see a CorrelationId field with the value set to “123”.
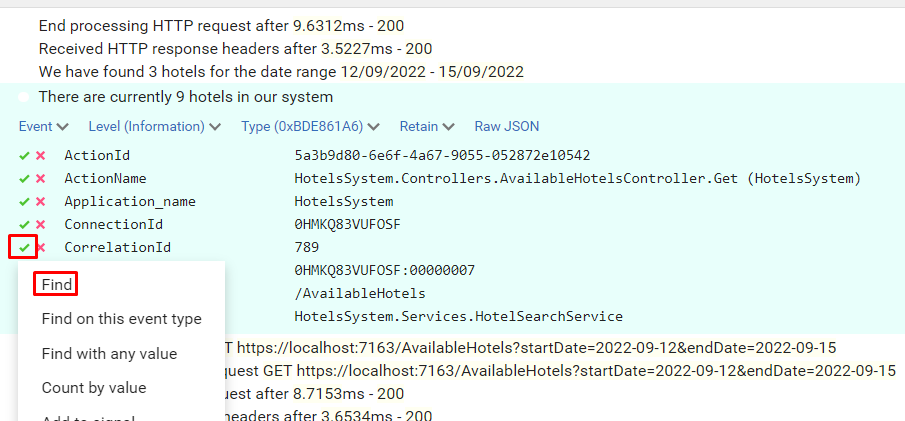
Now, to better demonstrate how it works, call the endpoint again, but this time set “789” as my-custom-correlation-id, and specify a different date range. You should be able to see another set of logs generated by this second call.
You can now apply filters to see which logs are related to a specific Correlation ID: open one log, click on the tick button and select “Find”.
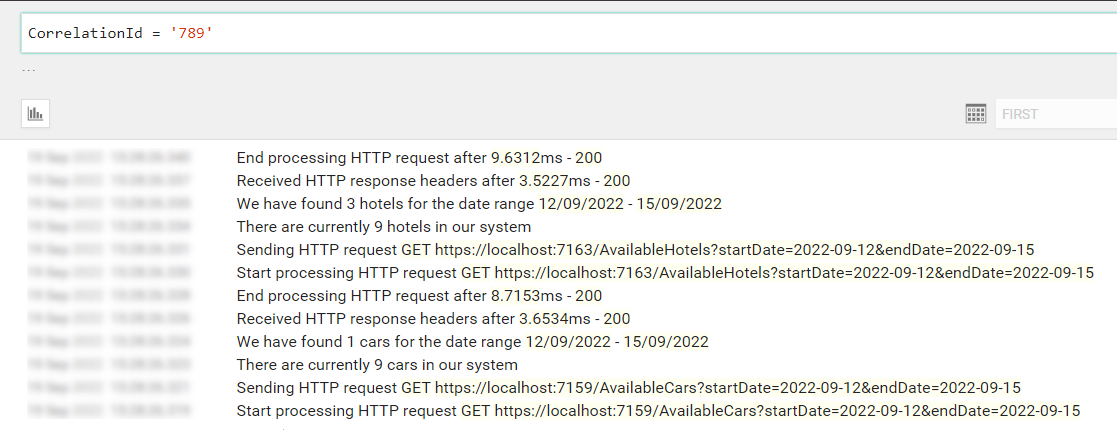
You will then see all and only logs that were generated during the call with header my-custom-correlation-id set to “789”.
Further readings
That’s it. With just a few lines of code, you can dramatically improve your logging strategy.
For this article, we’ve used the Microsoft.AspNetCore.HeaderPropagation package, which is ready to use. Are you interested in building your own solution – or, at least, learning how you can do that?
This article concludes a sort of imaginary path that taught us how to use Serilog, how to correlate different logs within the same application using Scopes, and how to correlate logs from different services using Correlation IDs.
Using these capabilities, you will be able to write logs that can help you understand the context in which a specific log occurred, thus helping you fix errors more efficiently.