برچسب: Custom

  • How to create custom snippets in Visual Studio 2022 | Code4IT

    How to create custom snippets in Visual Studio 2022 | Code4IT


    A simple way to improve efficiency is knowing your IDE shortcuts. Let’s learn how to create custom ones to generate code automatically.

    Table of Contents

    Just a second! 🫷
    If you are here, it means that you are a software developer.
    So, you know that storage, networking, and domain management have a cost .

    If you want to support this blog, please ensure that you have disabled the adblocker for this site.
    I configured Google AdSense to show as few ADS as possible – I don’t want to bother you with lots of ads, but I still need to add some to pay for the resources for my site.

    Thank you for your understanding.
    Davide

    One of the best tricks to boost productivity is knowing your tools.

    I’m pretty sure you’ve already used some predefined snippets in Visual Studio. For example, when you type ctor and hit Tab twice, VS automatically creates an empty constructor for the current class.

    In this article, we will learn how to create custom snippets: in particular, we will design a snippet that automatically creates a C# Unit Test method with some placeholders and predefined Arrange-Act-Assert blocks.

    Snippet Designer: a Visual Studio 2022 extension to add a UI to your placeholders

    Snippets are defined in XML-like files with .snippet extension. But we all know that working with XMLs can be cumbersome, especially if you don’t have a clear idea of the expected structure.

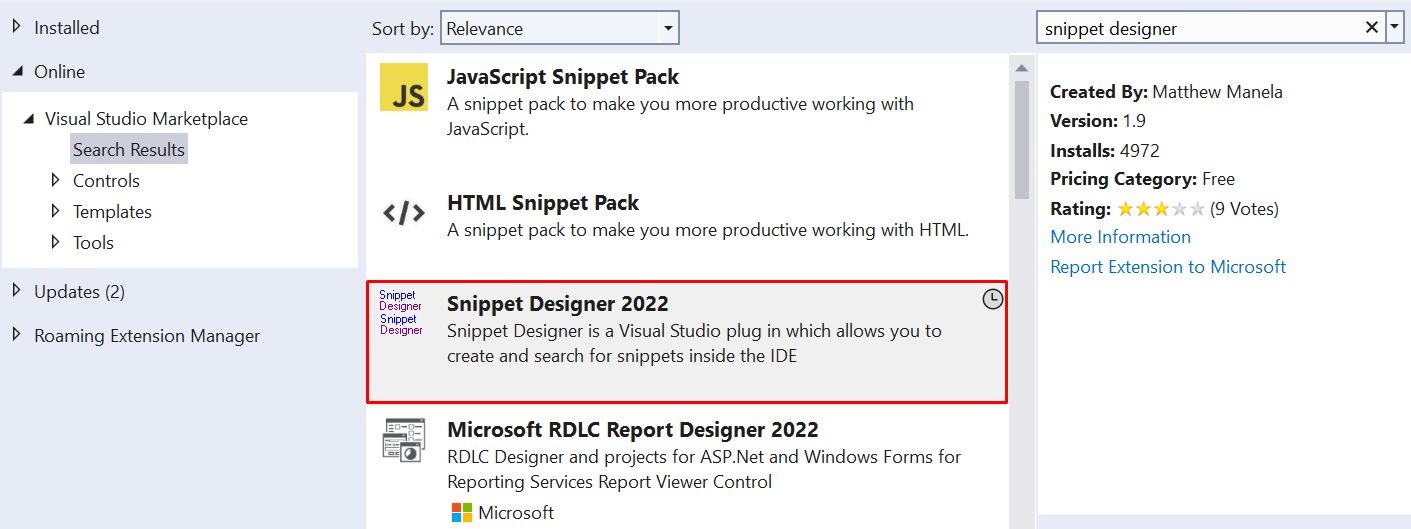
    Therefore, even if not strictly necessary, I suggest installing a VS2022 extension called Snippet Designer 2022.

    Snippet Designer 2022 in VS2022

    This extension, developed by Matthew Manela, can be found on GitHub, where you can view the source code.

    This extension gives you a UI to customize the snippet instead of manually editing the XML nodes. It allows you to customize the snippet, the related metadata, and even the placeholders.

    Create a basic snippet in VS2022 using a .snippet file

    As we saw, snippets are defined in a simple XML.

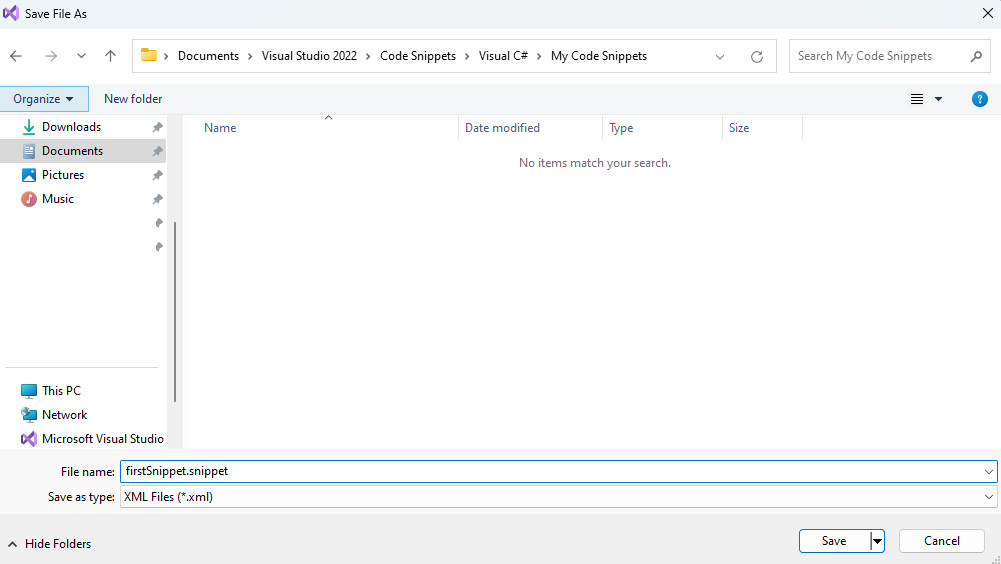
    In order to have your snippets immediately available in Visual Studio, I suggest you create those files in a specific VS2022 folder under the path \Documents\Visual Studio 2022\Code Snippets\Visual C#\My Code Snippets\.

    So, create an empty file, change its extension to .snippet, and save it to that location.

    Save snippet file under the My Code Snippets folder in VS2022

    Now, you can open Visual Studio (it’s not necessary to open a project, but I’d recommend you to do so). Then, head to File > Open, and open the file you saved under the My Code Snippets directory.

    Thanks to Snippet Designer, you will be able to see a nice UI instead of plain XML content.

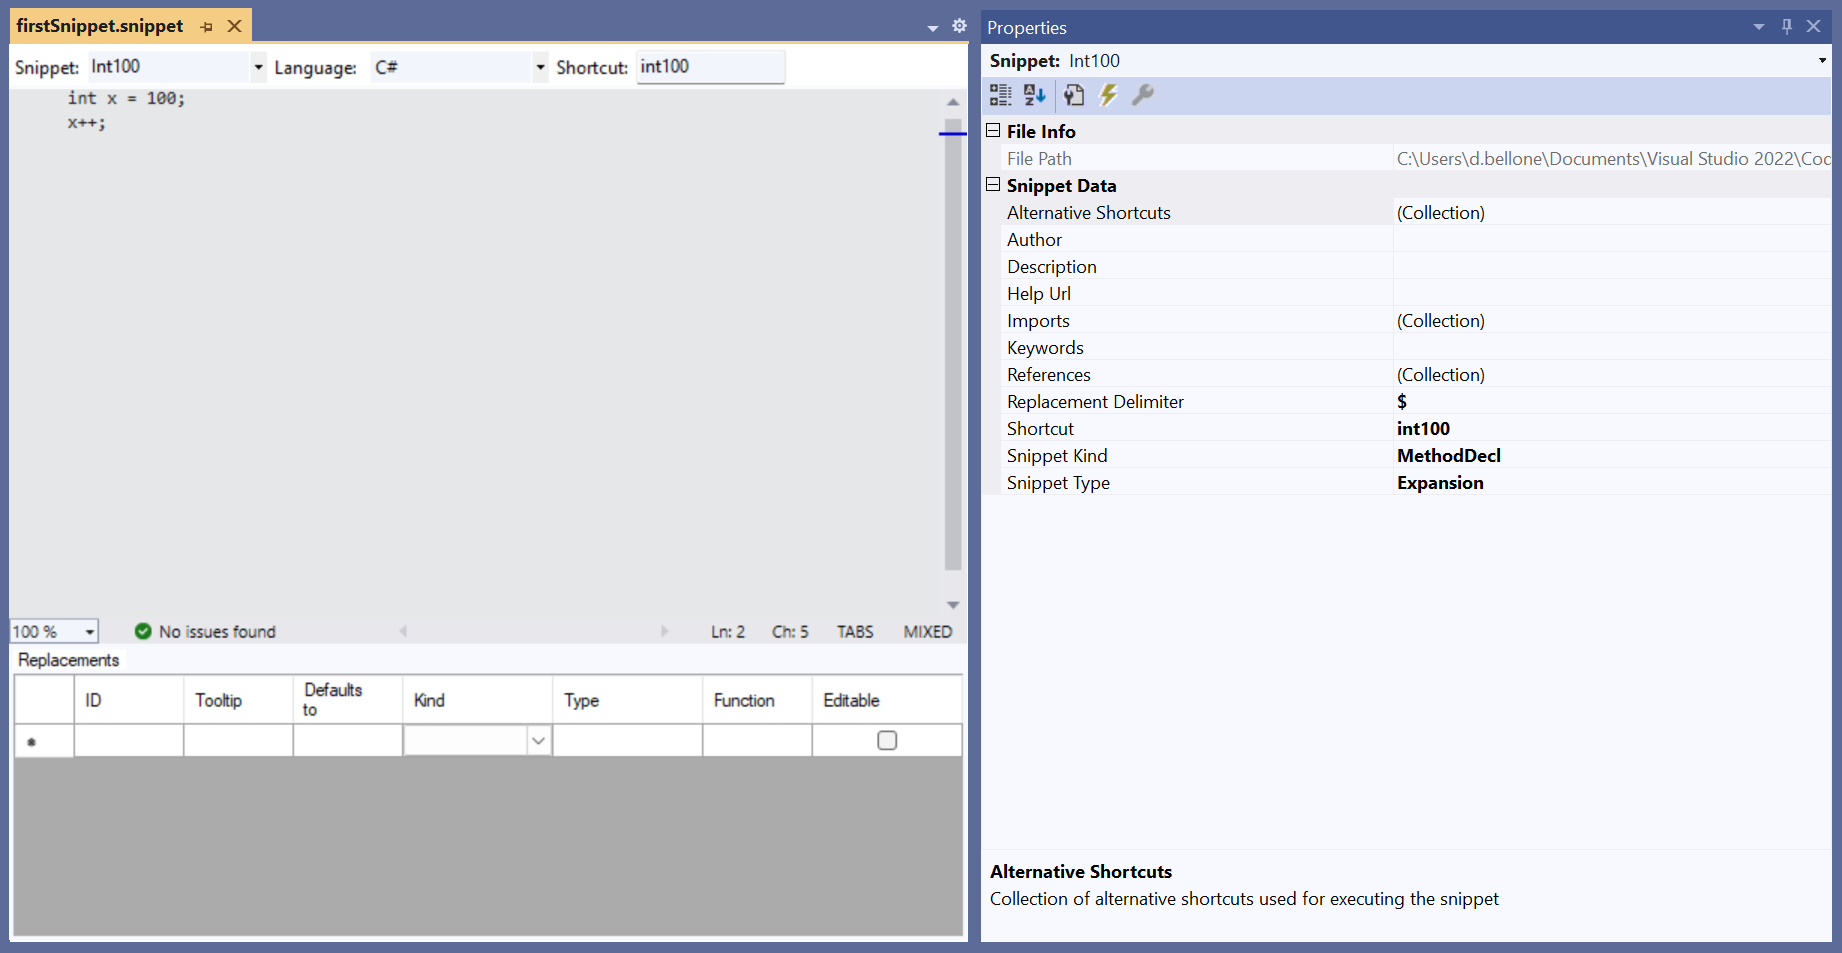
    Have a look at how I filled in the several parts to create a snippet that generates a variable named x, assigns to it a value, and then calls x++;

    Simple snippet, with related metadata and annotations

    Have a look at the main parts:

    • the body, which contains the snippet to be generated;
    • the top layer, where we specified:
      • the Snippet name: Int100; it’s the display name of the shortcut
      • the code language: C#;
      • the shortcut: int100; it’s the string you’ll type in that allows you to generate the expected snippet;
    • the bottom table, which contains the placeholders used in the snippet; more on this later;
    • the properties tab, on the sidebar: here is where you specify some additional metadata, such as:
      • Author, Description, and Help Url of the snippet, in case you want to export it;
      • the kind of snippet: possible values are MethodBody, MethodDecl and TypeDecl. However, this value is supported only in Visual Basic.

    Now, hit save and be ready to import it!

    Just for completeness, here’s the resulting XML:

    <?xml version="1.0" encoding="utf-8"?>
    <CodeSnippets xmlns="http://schemas.microsoft.com/VisualStudio/2005/CodeSnippet">
      <CodeSnippet Format="1.0.0">
        <Header>
          <SnippetTypes>
            <SnippetType>Expansion</SnippetType>
          </SnippetTypes>
          <Title>Int100</Title>
          <Author>
          </Author>
          <Description>
          </Description>
          <HelpUrl>
          </HelpUrl>
          <Shortcut>int100</Shortcut>
        </Header>
        <Snippet>
          <Code Kind="method decl" Language="csharp" Delimiter="$"><![CDATA[int x = 100;
    x++;]]></Code>
        </Snippet>
      </CodeSnippet>
    </CodeSnippets>
    

    Notice that the actual content of the snippet is defined in the CDATA block.

    Import the snippet in Visual Studio

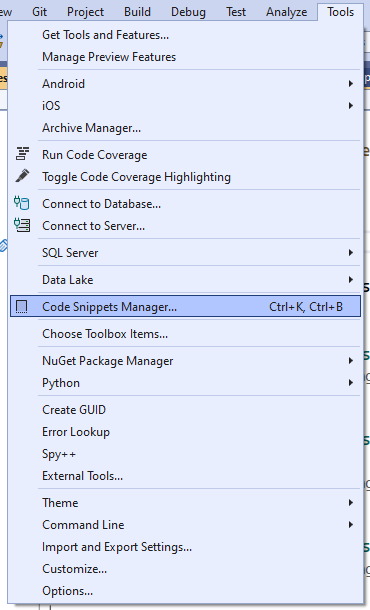
    It’s time to import the snippet. Open the Tools menu item and click on Code Snippets Manager.

    Code Snippets Manager menu item, under Tools

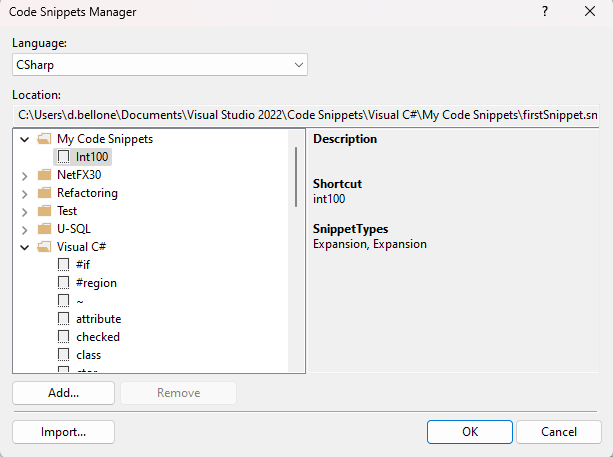
    From here, you can import a snippet by clicking the Import… button. Given that we’ve already saved our snippet in the correct folder, we’ll find it under the My Code Snippets folder.

    Code Snippets Manager tool

    Now it’s ready! Open a C# class, and start typing int100. You’ll see our snippet in the autocomplete list.

    Int100 snippet is now visible in Visual Studio

    By hitting Tab twice, you’ll see the snippet’s content being generated.

    How to use placeholders when defining snippets in Visual Studio

    Wouldn’t it be nice to have the possibility to define customizable parts of your snippets?

    Let’s see a real example: I want to create a snippet to create the structure of a Unit Tests method with these characteristics:

    • it already contains the AAA (Arrange, Act, Assert) sections;
    • the method name should follow the pattern “SOMETHING should DO STUFF when CONDITION”. I want to be able to replace the different parts of the method name by using placeholders.

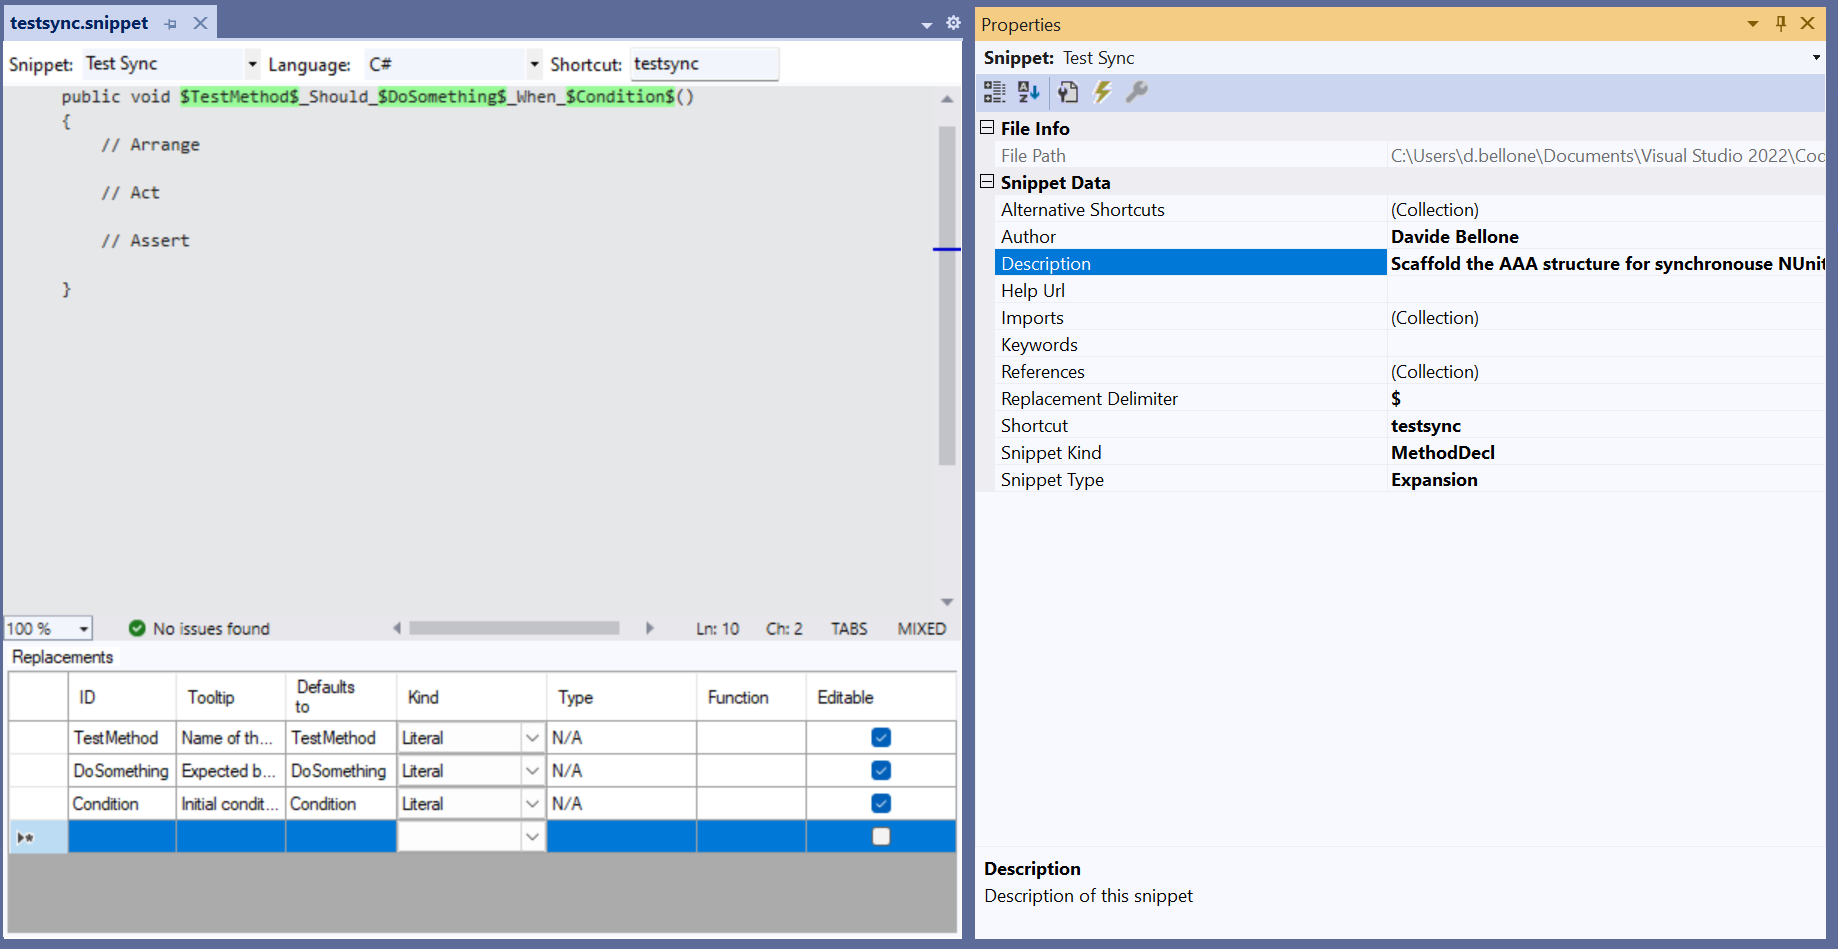
    You can define placeholders using the $ symbol. You will then see the placeholders in the table at the bottom of the UI. In this example, the placeholders are $TestMethod$, $DoSomething$, and $Condition$. I also added a description to explain the purpose of each placeholder better.

    TestSync snippet definition and metadata

    The XML looks like this:

    <?xml version="1.0" encoding="utf-8"?>
    <CodeSnippets xmlns="http://schemas.microsoft.com/VisualStudio/2005/CodeSnippet">
      <CodeSnippet Format="1.0.0">
        <Header>
          <SnippetTypes>
            <SnippetType>Expansion</SnippetType>
          </SnippetTypes>
          <Title>Test Sync</Title>
          <Author>Davide Bellone</Author>
          <Description>Scaffold the AAA structure for synchronous NUnit tests</Description>
          <HelpUrl>
          </HelpUrl>
          <Shortcut>testsync</Shortcut>
        </Header>
        <Snippet>
          <Declarations>
            <Literal Editable="true">
              <ID>TestMethod</ID>
              <ToolTip>Name of the method to be tested</ToolTip>
              <Default>TestMethod</Default>
              <Function>
              </Function>
            </Literal>
            <Literal Editable="true">
              <ID>DoSomething</ID>
              <ToolTip>Expected behavior or result</ToolTip>
              <Default>DoSomething</Default>
              <Function>
              </Function>
            </Literal>
            <Literal Editable="true">
              <ID>Condition</ID>
              <ToolTip>Initial conditions</ToolTip>
              <Default>Condition</Default>
              <Function>
              </Function>
            </Literal>
          </Declarations>
          <Code Language="csharp" Delimiter="$" Kind="method decl"><![CDATA[[Test]
    public void $TestMethod$_Should_$DoSomething$_When_$Condition$()
    {
        // Arrange
    
        // Act
    
        // Assert
    
    }]]></Code>
        </Snippet>
      </CodeSnippet>
    </CodeSnippets>
    

    Now, import it as we already did before.

    Then, head to your code, start typing testsync, and you’ll see the snippet come to life. The placeholders we defined are highlighted. You can then fill in these placeholders, hit tab, and move to the next one.

    Test sync snippet usage

    Bonus: how to view all the snippets defined in VS

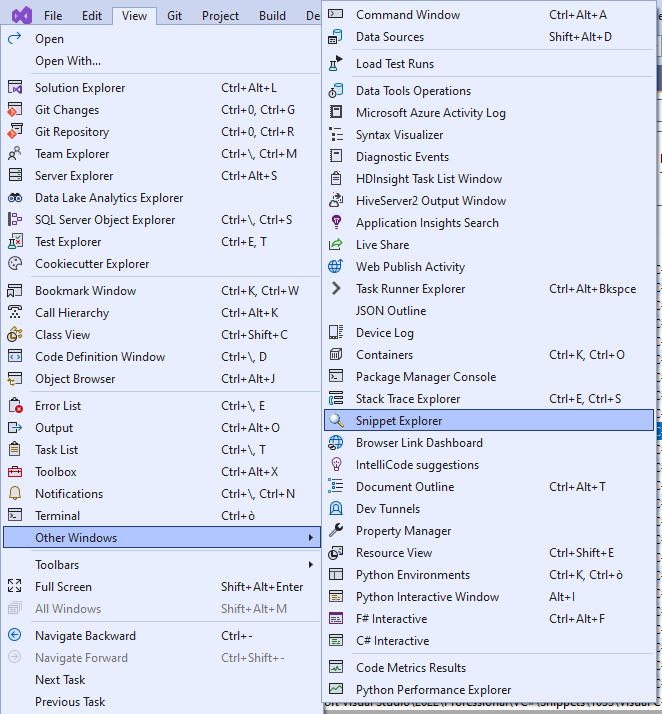
    If you want to learn more about your IDE and the available snippets, you can have a look at the Snippet Explorer table.

    You can find it under View > Tools > Snippet Explorer.

    Snippet Explorer menu item

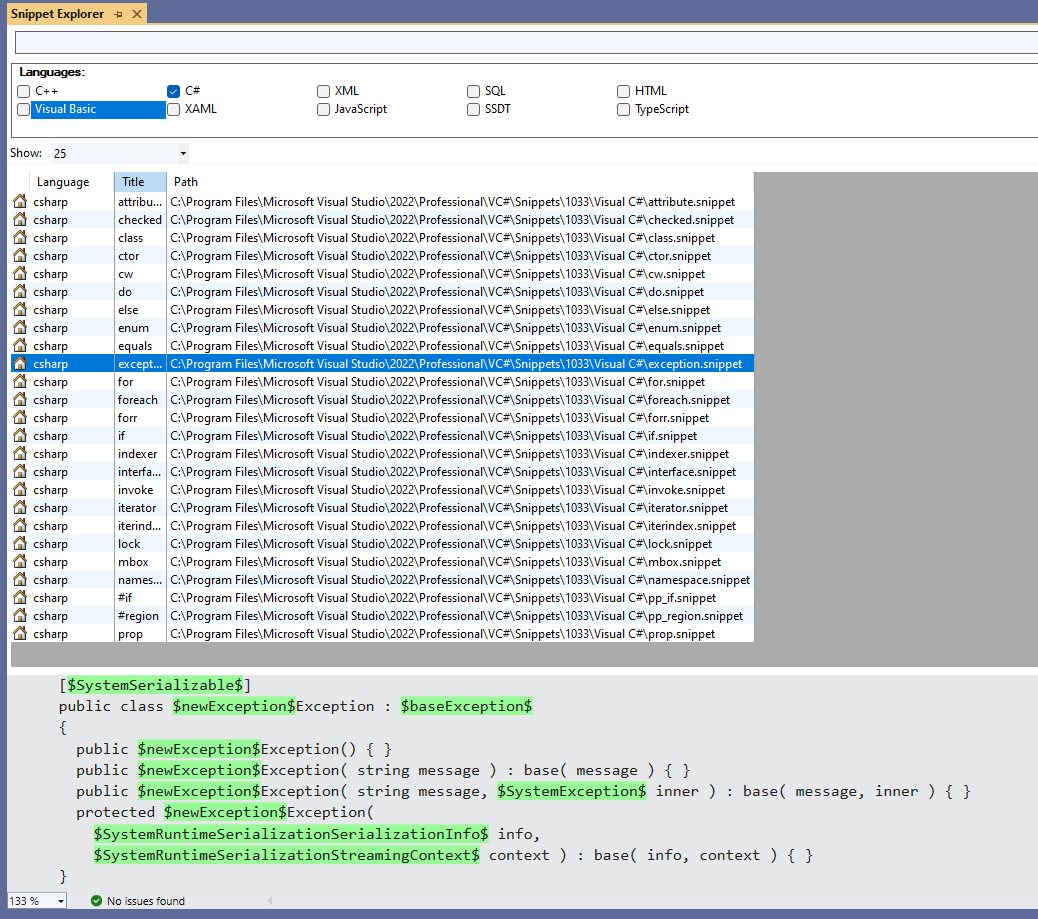
    Here, you can see all the snippets, their shortcuts, and the content of each snippet. You can also see the placeholders highlighted in green.

    List of snippets available in Snippet Explorer

    It’s always an excellent place to learn more about Visual Studio.

    Further readings

    As always, you can read more on Microsoft Docs. It’s a valuable resource, although I find it difficult to follow.

    🔗 Create a code snippet in Visual Studio | Microsoft docs

    I prefer working with the UI. If you want to have a look at the repo of the extension we used in this article, here’s the link:

    🔗 SnippetDesigner extension | GitHub

    This article first appeared on Code4IT 🐧

    Wrapping up

    There are some tips that may improve both the code quality and the developer productivity.

    If you want to enforce some structures or rules, add such snippets in your repository; when somebody joins your team, teach them how to import those snippets.

    I hope you enjoyed this article! Let’s keep in touch on Twitter or LinkedIn! 🤜🤛

    Happy coding!

    🐧


    Source link

  • Custom Pipe Example In Angular. Pipe example get month name.

    Custom Pipe Example In Angular. Pipe example get month name.


    Custom Pipe Example In Angular.

    This tutorial will show you how to create an Angular Custom Pipe. It is handy if we want to reuse some logic across our applications. It allows us to change the format in which data is displayed on the pages. For instance, consider the date of birth as 01-01-2024 and we want to display it as 01-January-2023. To achieve this we will make one pipe that can be used anywhere in our application. In angular

    Types of Pipe.
    •  Pure Pipe.
    •  Impure pipes.
    Pure Pipe.

    The pure pipe is a pipe called when a pure change is detected in the value. It is called fewer times than the latter.

    Impure Pipes.

    This pipe is often called after every change detection. Be it a pure change or not, the impure pipe is called repeatedly.

    Steps to Create Pipe

    Below are the steps to create the custom pipe.

    1. Create a pipe class.
    2. Decorate the class with the @Pipe decorator.
    3. Give a pipe name under name metadata in @Pipe decorator.
    4. Implement the PipeTransform interface and it will contain only one method that is transform.
    5. The transform method must transform the value and return the result.
    6. Import the pipe class in the component.
    7. Use the custom pipe by its name in the HTML file.
    Example.

    Create a pipe class and add the below code.

    import { Pipe,PipeTransform } from '@angular/core';
    
    @Pipe({
        name: 'custompipe',
        standalone: true,
    })
    
    export class custompipePipe implements PipeTransform {
    
        monthNumbers:any = ['January','February','March','April','May','June','July','August','September','October','November','December'];
        transform(value: any) {
            let date = value.split(/[.,\/ -]/);
            if(date[1]>12 || date[1]<1 || isNaN(date[1])){
                return "Invalid Month";
            }else{
                date[1] = this.monthNumbers[date[1]-1];
                return date.join('-');
            }   
             
        }
    }

    Import the custom pipe in pipe-example.componenet.ts file and add the below code.

    import { Component } from '@angular/core';
    import { custompipePipe } from '../custompipe/custompipe.pipe';
    
    @Component({
      selector: 'app-pipe-example',
      standalone: true,
      imports: [custompipePipe],
      templateUrl: './pipe-example.component.html',
      styleUrl: './pipe-example.component.css'
    })
    
    export class PipeExampleComponent{
    
      monthName:number = 0;
      ngOnIt(){
    
      }
    
      getMonthName(event:any){
        this.monthName = event.target.value;
      }
    }
    

    Add the below code in pipe-example.component.html file

     <input type="text" placeholder="Enter Month Name" (keyup)="getMonthName($event)" autofocus>    
    Month Name: {{ monthName | custompipe}}

    Input: 12-02-2023

    Output: 12-February-2023


    JavaScript Program To Count The Frequency Of Given Character In String.          Angular Dropdown With Search And Multi Select.


    Source link

  • 2 ways to use custom equality rules in a HashSet &vert; Code4IT

    2 ways to use custom equality rules in a HashSet | Code4IT


    With HashSet, you can get a list of different items in a performant way. What if you need a custom way to define when two objects are equal?

    Table of Contents

    Just a second! 🫷
    If you are here, it means that you are a software developer.
    So, you know that storage, networking, and domain management have a cost .

    If you want to support this blog, please ensure that you have disabled the adblocker for this site.
    I configured Google AdSense to show as few ADS as possible – I don’t want to bother you with lots of ads, but I still need to add some to pay for the resources for my site.

    Thank you for your understanding.
    Davide

    Sometimes, object instances can be considered equal even though some of their properties are different. Consider a movie translated into different languages: the Italian and French versions are different, but the movie is the same.

    If we want to store unique values in a collection, we can use a HashSet<T>. But how can we store items in a HashSet when we must follow a custom rule to define if two objects are equal?

    In this article, we will learn two ways to add custom equality checks when using a HashSet.

    Let’s start with a dummy class: Pirate.

    public class Pirate
    {
        public int Id { get; }
        public string Name { get; }
    
        public Pirate(int id, string username)
        {
            Id = id;
            Name = username;
        }
    }
    

    I’m going to add some instances of Pirate to a HashSet. Please, note that there are two pirates whose Id is 4:

    List<Pirate> mugiwara = new List<Pirate>()
    {
        new Pirate(1, "Luffy"),
        new Pirate(2, "Zoro"),
        new Pirate(3, "Nami"),
        new Pirate(4, "Sanji"), // This ...
        new Pirate(5, "Chopper"),
        new Pirate(6, "Robin"),
        new Pirate(4, "Duval"), // ... and this
    };
    
    
    HashSet<Pirate> hashSet = new HashSet<Pirate>();
    
    
    foreach (var pirate in mugiwara)
    {
        hashSet.Add(pirate);
    }
    
    
    _output.WriteAsTable(hashSet);
    

    (I really hope you’ll get the reference 😂)

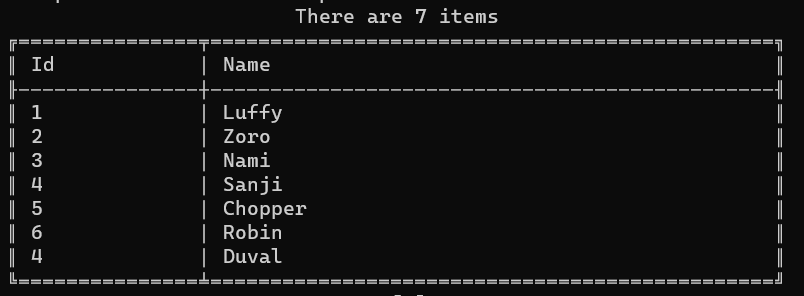
    Now, what will we print on the console? (ps: output is just a wrapper around some functionalities provided by Spectre.Console, that I used here to print a table)

    HashSet result when no equality rule is defined

    As you can see, we have both Sanji and Duval: even though their Ids are the same, those are two distinct objects.

    Also, we haven’t told HashSet that the Id property must be used as a discriminator.

    Define a custom IEqualityComparer in a C# HashSet

    In order to add a custom way to tell the HashSet that two objects can be treated as equal, we can define a custom equality comparer: it’s nothing but a class that implements the IEqualityComparer<T> interface, where T is the name of the class we are working on.

    public class PirateComparer : IEqualityComparer<Pirate>
    {
        bool IEqualityComparer<Pirate>.Equals(Pirate? x, Pirate? y)
        {
            Console.WriteLine($"Equals: {x.Name} vs {y.Name}");
            return x.Id == y.Id;
        }
    
        int IEqualityComparer<Pirate>.GetHashCode(Pirate obj)
        {
            Console.WriteLine("GetHashCode " + obj.Name);
            return obj.Id.GetHashCode();
        }
    }
    

    The first method, Equals, compares two instances of a class to tell if they are equal, following the custom rules we write.

    The second method, GetHashCode, defines a way to build an object’s hash code given its internal status. In this case, I’m saying that the hash code of a Pirate object is just the hash code of its Id property.

    To include this custom comparer, you must add a new instance of PirateComparer to the HashSet declaration:

    HashSet<Pirate> hashSet = new HashSet<Pirate>(new PirateComparer());
    

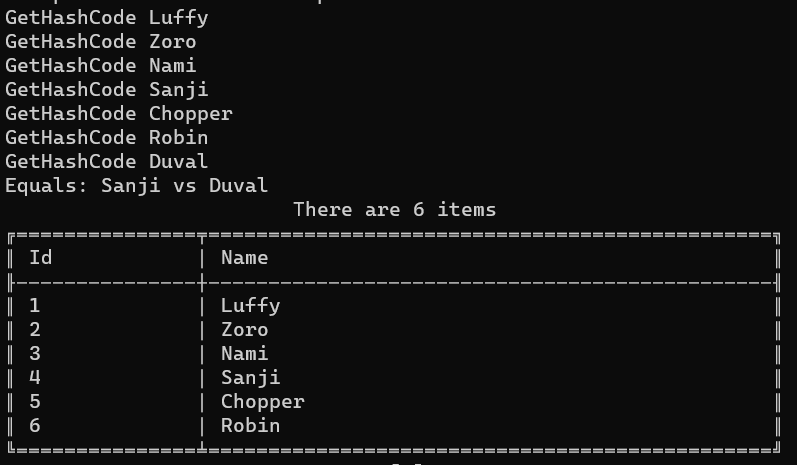
    Let’s rerun the example, and admire the result:

    HashSet result with custom comparer

    As you can see, there is only one item whose Id is 4: Sanji.

    Let’s focus a bit on the messages printed when executing Equals and GetHashCode.

    GetHashCode Luffy
    GetHashCode Zoro
    GetHashCode Nami
    GetHashCode Sanji
    GetHashCode Chopper
    GetHashCode Robin
    GetHashCode Duval
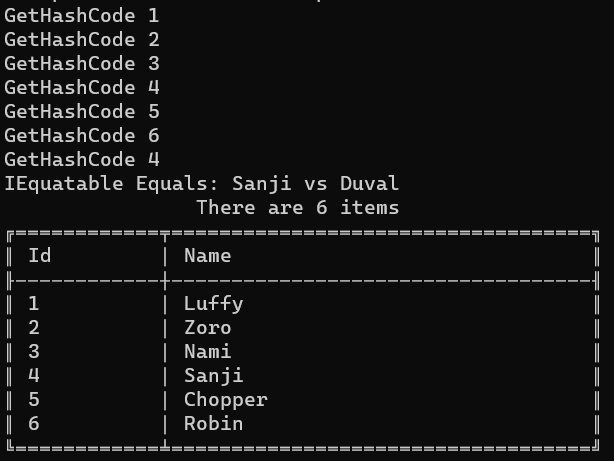
    Equals: Sanji vs Duval
    

    Every time we insert an item, we call the GetHashCode method to generate an internal ID used by the HashSet to check if that item already exists.

    As stated by Microsoft’s documentation,

    Two objects that are equal return hash codes that are equal. However, the reverse is not true: equal hash codes do not imply object equality, because different (unequal) objects can have identical hash codes.

    This means that if the Hash Code is already used, it’s not guaranteed that the objects are equal. That’s why we need to implement the Equals method (hint: do not just compare the HashCode of the two objects!).

    Is implementing a custom IEqualityComparer the best choice?

    As always, it depends.

    On the one hand, using a custom IEqualityComparer has the advantage of allowing you to have different HashSets work differently depending on the EqualityComparer passed in input; on the other hand, you are now forced to pass an instance of IEqualityComparer everywhere you use a HashSet — and if you forget one, you’ll have a system with inconsistent behavior.

    There must be a way to ensure consistency throughout the whole codebase.

    Implement the IEquatable interface

    It makes sense to implement the equality checks directly inside the type passed as a generic type to the HashSet.

    To do that, you need to have that class implement the IEquatable<T> interface, where T is the class itself.

    Let’s rework the Pirate class, letting it implement the IEquatable<Pirate> interface.

    public class Pirate : IEquatable<Pirate>
    {
        public int Id { get; }
        public string Name { get; }
    
        public Pirate(int id, string username)
        {
            Id = id;
            Name = username;
        }
    
        bool IEquatable<Pirate>.Equals(Pirate? other)
        {
            Console.WriteLine($"IEquatable Equals: {this.Name} vs {other.Name}");
            return this.Id == other.Id;
        }
    
        public override bool Equals(object obj)
        {
            Console.WriteLine($"Override Equals {this.Name} vs {(obj as Pirate).Name}");
            return Equals(obj as Pirate);
        }
    
        public override int GetHashCode()
        {
            Console.WriteLine($"GetHashCode {this.Id}");
            return (Id).GetHashCode();
        }
    }
    

    The IEquatable interface forces you to implement the Equals method. So, now we have two implementations of Equals (the one for IEquatable and the one that overrides the default implementation). Which one is correct? Is the GetHashCode really used?

    Let’s see what happens in the next screenshot:

    HashSet result with a class that implements IEquatable

    As you could’ve imagined, the Equals method called in this case is the one needed to implement the IEquatable interface.

    Please note that, as we don’t need to use the custom comparer, the HashSet initialization becomes:

    HashSet<Pirate> hashSet = new HashSet<Pirate>();
    

    What has the precedence: IEquatable or IEqualityComparer?

    What happens when we use both IEquatable and IEqualityComparer?

    Let’s quickly demonstrate it.

    First of all, keep the previous implementation of the Pirate class, where the equality check is based on the Id property:

    public class Pirate : IEquatable<Pirate>
    {
        public int Id { get; }
        public string Name { get; }
    
        public Pirate(int id, string username)
        {
            Id = id;
            Name = username;
        }
    
        bool IEquatable<Pirate>.Equals(Pirate? other)
        {
            Console.WriteLine($"IEquatable Equals: {this.Name} vs {other.Name}");
            return this.Id == other.Id;
        }
    
        public override int GetHashCode()
        {
            Console.WriteLine($"GetHashCode {this.Id}");
            return (Id).GetHashCode();
        }
    }
    

    Now, create a new IEqualityComparer where the equality is based on the Name property.

    public class PirateComparerByName : IEqualityComparer<Pirate>
    {
        bool IEqualityComparer<Pirate>.Equals(Pirate? x, Pirate? y)
        {
            Console.WriteLine($"Equals: {x.Name} vs {y.Name}");
            return x.Name == y.Name;
        }
        int IEqualityComparer<Pirate>.GetHashCode(Pirate obj)
        {
            Console.WriteLine("GetHashCode " + obj.Name);
            return obj.Name.GetHashCode();
        }
    }
    

    Now we have custom checks on both the Name and the Id.

    It’s time to add a new pirate to the list, and initialize the HashSet by passing in the constructor an instance of PirateComparerByName.

    List<Pirate> mugiwara = new List<Pirate>()
    {
        new Pirate(1, "Luffy"),
        new Pirate(2, "Zoro"),
        new Pirate(3, "Nami"),
        new Pirate(4, "Sanji"), // Id = 4
        new Pirate(5, "Chopper"), // Name = Chopper
        new Pirate(6, "Robin"),
        new Pirate(4, "Duval"), // Id = 4
        new Pirate(7, "Chopper") // Name = Chopper
    };
    
    
    HashSet<Pirate> hashSet = new HashSet<Pirate>(new PirateComparerByName());
    
    
    foreach (var pirate in mugiwara)
    {
        hashSet.Add(pirate);
    }
    

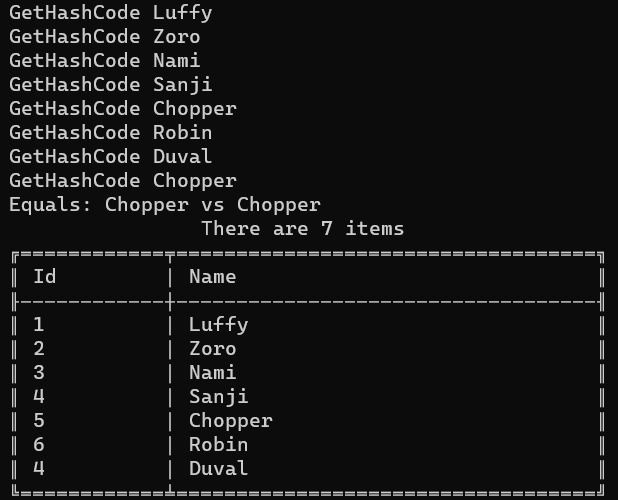
    We now have two pirates with ID = 4 and two other pirates with Name = Chopper.

    Can you foresee what will happen?

    HashSet items when defining both IEqualityComparare and IEquatable

    The checks on the ID are totally ignored: in fact, the final result contains both Sanji and Duval, even if their IDs are the same. The custom IEqualityComparer has the precedence over the IEquatable interface.

    This article first appeared on Code4IT 🐧

    Wrapping up

    This started as a short article but turned out to be a more complex topic.

    There is actually more to discuss, like performance considerations, code readability, and more. Maybe we’ll tackle those topics in a future article.

    I hope you enjoyed this article! Let’s keep in touch on LinkedIn or Twitter! 🤜🤛

    Happy coding!

    🐧


    Source link

  • How to create Custom Attributes, and why they are useful &vert; Code4IT

    How to create Custom Attributes, and why they are useful | Code4IT


    Just a second! 🫷
    If you are here, it means that you are a software developer.
    So, you know that storage, networking, and domain management have a cost .

    If you want to support this blog, please ensure that you have disabled the adblocker for this site.
    I configured Google AdSense to show as few ADS as possible – I don’t want to bother you with lots of ads, but I still need to add some to pay for the resources for my site.

    Thank you for your understanding.
    Davide

    In C#, attributes are used to describe the meaning of some elements, such as classes, methods, and interfaces.

    I’m sure you’ve already used them before. Examples are:

    • the [Required] attribute when you define the properties of a model to be validated;
    • the [Test] attribute when creating Unit Tests using NUnit;
    • the [Get] and the [FromBody] attributes used to define API endpoints.

    As you can see, all the attributes do not specify the behaviour, but rather, they express the meaning of a specific element.

    In this article, we will learn how to create custom attributes in C# and some possible interesting usages of such custom attributes.

    Create a custom attribute by inheriting from System.Attribute

    Creating a custom attribute is pretty straightforward: you just need to create a class that inherits from System.Attribute.

    [AttributeUsage(AttributeTargets.Interface | AttributeTargets.Class | AttributeTargets.Method, AllowMultiple = true)]
    public class ApplicationModuleAttribute : Attribute
    {
     public Module BelongingModule { get; }
    
     public ApplicationModuleAttribute(Module belongingModule)
       {
     BelongingModule = belongingModule;
       }
    }
    
    public enum Module
    {
     Authentication,
     Catalogue,
     Cart,
     Payment
    }
    

    Ideally, the class name should end with the suffix -Attribute: in this way, you can use the attribute using the short form [ApplicationModule] rather than using the whole class name, like [ApplicationModuleAttribute]. In fact, C# attributes can be resolved by convention.

    Depending on the expected usage, a custom attribute can have one or more constructors and can expose one or more properties. In this example, I created a constructor that accepts an enum.
    I can then use this attribute by calling [ApplicationModule(Module.Cart)].

    Define where a Custom Attribute can be applied

    Have a look at the attribute applied to the class definition:

    [AttributeUsage(AttributeTargets.Interface | AttributeTargets.Class | AttributeTargets.Method, AllowMultiple = true)]
    

    This attribute tells us that the ApplicationModule can be applied to interfaces, classes, and methods.

    System.AttributeTargets is an enum that enlists all the points you can attach to an attribute. The AttributeTargets enum is defined as:

    [Flags]
    public enum AttributeTargets
    {
     Assembly = 1,
     Module = 2,
     Class = 4,
     Struct = 8,
     Enum = 16,
     Constructor = 32,
     Method = 64,
     Property = 128,
     Field = 256,
     Event = 512,
     Interface = 1024,
     Parameter = 2048,
     Delegate = 4096,
     ReturnValue = 8192,
     GenericParameter = 16384,
     All = 32767
    }
    

    Have you noticed it? It’s actually a Flagged enum, whose values are powers of 2: this trick allows us to join two or more values using the OR operator.

    There’s another property to notice: AllowMultiple. When set to true, this property tells us that it’s possible to use apply more than one attribute of the same type to the same element, like this:

    [ApplicationModule(Module.Cart)]
    [ApplicationModule(Module.Catalogue)]
    public class ItemDetailsService { }
    

    Or, if you want, you can inline them:

    [ApplicationModule(Module.Cart), ApplicationModule(Module.Catalogue)]
    public class ItemDetailsService { }
    

    Practical usage of Custom Attributes

    You can use custom attributes to declare which components or business areas an element belongs to.

    In the previous example, I defined an enum that enlists all the business modules supported by my application:

    public enum Module
    {
        Authentication,
        Catalogue,
        Cart,
        Payment
    }
    

    This way, whenever I define an interface, I can explicitly tell which components it belongs to:

    [ApplicationModule(Module.Catalogue)]
    public interface IItemDetails
    {
        [ApplicationModule(Module.Catalogue)]
        string ShowItemDetails(string itemId);
    }
    
    [ApplicationModule(Module.Cart)]
    public interface IItemDiscounts
    {
        [ApplicationModule(Module.Cart)]
        bool CanHaveDiscounts(string itemId);
    }
    

    Not only that: I can have one single class implement both interfaces and mark it as related to both the Catalogue and the Cart areas.

    [ApplicationModule(Module.Cart)]
    [ApplicationModule(Module.Catalogue)]
    public class ItemDetailsService : IItemDetails, IItemDiscounts
    {
        [ApplicationModule(Module.Catalogue)]
        public string ShowItemDetails(string itemId) => throw new NotImplementedException();
    
        [ApplicationModule(Module.Cart)]
        public bool CanHaveDiscounts(string itemId) => throw new NotImplementedException();
    }
    

    Notice that I also explicitly enriched the two inner methods with the related attribute – even if it’s not necessary.

    Further readings

    As you noticed, the AttributeTargets is a Flagged Enum. Don’t you know what they are and how to define them? I’ve got you covered! I wrote two articles about Enums, and you can find info about Flagged Enums in both articles:

    🔗 5 things you should know about enums in C# | Code4IT

    and
    🔗 5 more things you should know about enums in C# | Code4IT

    This article first appeared on Code4IT 🐧

    There are some famous but not-so-obvious examples of attributes that you should know: DebuggerDisplay and InternalsVisibleTo.

    DebuggerDisplay can be useful for improving your debugging sessions.

    🔗 Simplify debugging with DebuggerDisplay attribute dotNET | Code4IT

    IntenalsVisibleTo can be used to give access to internal classes to external projects:;for example, you can use that attribute when writing unit tests.

    🔗 Testing internal members with InternalsVisibleTo | Code4IT

    Wrapping up

    In this article, I showed you how to create custom attributes in C# to specify which modules a class or a method belongs to. This trick can be useful if you want to speed up the analysis of your repository: if you need to retrieve all the classes that are used for the Cart module (for example, because you want to move them to an external library), you can just search for Module.Cart across the repository and have a full list of elements.

    In particular, this approach can be useful for the exposed components, such as API controllers. Knowing that two or more modules use the same Controller can help you understand if a change in the API structure is necessary.

    Another good usage of this attribute is automatic documentation: you could create a tool that automatically enlists all the interfaces, API endpoints, and classes grouped by the belonging module. The possibilities are infinite!

    I hope you enjoyed this article! Let’s keep in touch on LinkedIn, Twitter or BlueSky! 🤜🤛

    Happy coding!

    🐧


    Source link