In today’s regulatory climate, compliance is no longer a box-ticking exercise. It is a strategic necessity. Organizations across industries are under pressure to secure sensitive data, meet privacy obligations, and avoid hefty penalties. Yet, despite all the talk about “data visibility” and “compliance readiness,” one fundamental gap remains: unseen data—the information your business holds but doesn’t know about.
Unseen data isn’t just a blind spot—it’s a compliance time bomb waiting to trigger regulatory and reputational damage.
The Myth: Sensitive Data Lives Only in Databases
Many businesses operate under the dangerous assumption that sensitive information exists only in structured repositories like databases, ERP platforms, or CRM systems. While it’s true these systems hold vast amounts of personal and financial information, they’re far from the whole picture.
Reality check: Sensitive data is often scattered across endpoints, collaboration platforms, and forgotten storage locations. Think of HR documents on a laptop, customer details in a shared folder, or financial reports in someone’s email archive. These are prime targets for breaches—and they often escape compliance audits because they live outside the “official” data sources.
Myth vs Reality: Why Structured Data is Not the Whole Story
Yes, structured sources like SQL databases allow centralized access control and auditing. But compliance risks aren’t limited to structured data. Unstructured and endpoint data can be far more dangerous because:
They are harder to track.
They often bypass IT policies.
They get replicated in multiple places without oversight.
When organizations focus solely on structured data, they risk overlooking up to 50–70% of their sensitive information footprint.
The Challenge Without Complete Discovery
Without full-spectrum data discovery—covering structured, unstructured, and endpoint environments—organizations face several challenges:
Compliance Gaps – Regulations like GDPR, DPDPA, HIPAA, and CCPA require knowing all locations of personal data. If data is missed, compliance reports will be incomplete.
Increased Breach Risk – Cybercriminals exploit the easiest entry points, often targeting endpoints and poorly secured file shares.
Inefficient Remediation – Without knowing where data lives, security teams can’t effectively remove, encrypt, or mask it.
Costly Investigations – Post-breach forensics becomes slower and more expensive when data locations are unknown.
The Importance of Discovering Data Everywhere
A truly compliant organization knows where every piece of sensitive data resides, no matter the format or location. That means extending discovery capabilities to:
Structured Data
Where it lives: Databases, ERP, CRM, and transactional systems.
Why it matters: It holds core business-critical records, such as customer PII, payment data, and medical records.
Risks if ignored: Non-compliance with data subject rights requests; inaccurate reporting.
Unstructured Data
Where it lives: File servers, SharePoint, Teams, Slack, email archives, cloud storage.
Why it matters: Contains contracts, scanned IDs, reports, and sensitive documents in freeform formats.
Risks if ignored: Harder to monitor, control, and protect due to scattered storage.
Endpoint Data
Where it lives: Laptops, desktops, mobile devices (Windows, Mac, Linux).
Why it matters: Employees often store working copies of sensitive files locally.
Risks if ignored: Theft, loss, or compromise of devices can expose critical information.
Real-World Examples of Compliance Risks from Unseen Data
Healthcare Sector: A hospital’s breach investigation revealed patient records stored on a doctor’s laptop, which was never logged into official systems. GDPR fines followed.
Banking & Finance: An audit found loan application forms with customer PII on a shared drive, accessible to interns.
Retail: During a PCI DSS assessment, old CSV exports containing cardholder data were discovered in an unused cloud folder.
Government: Sensitive citizen records are emailed between departments, bypassing secure document transfer systems, and are later exposed to a phishing attack.
Closing the Gap: A Proactive Approach to Data Discovery
The only way to eliminate unseen data risks is to deploy comprehensive data discovery and classification tools that scan across servers, cloud platforms, and endpoints—automatically detecting sensitive content wherever it resides.
This proactive approach supports regulatory compliance, improves breach resilience, reduces audit stress, and ensures that data governance policies are meaningful in practice, not just on paper.
Bottom Line
Compliance isn’t just about protecting data you know exists—it’s about uncovering the data you don’t. From servers to endpoints, organizations need end-to-end visibility to safeguard against unseen risks and meet today’s stringent data protection laws.
Designing visuals that respond to real-time data or user input usually means switching between multiple tools — one for animation, another for logic, and yet another for implementation. This back-and-forth can slow down iteration, make small changes cumbersome, and create a disconnect between design and behavior.
If you’ve spent any time with Rive, you know it’s built to close that gap. It lets you design, animate, and add interaction all in one place — and with features like state machines and data binding, you can make your animations respond directly to variables and user actions.
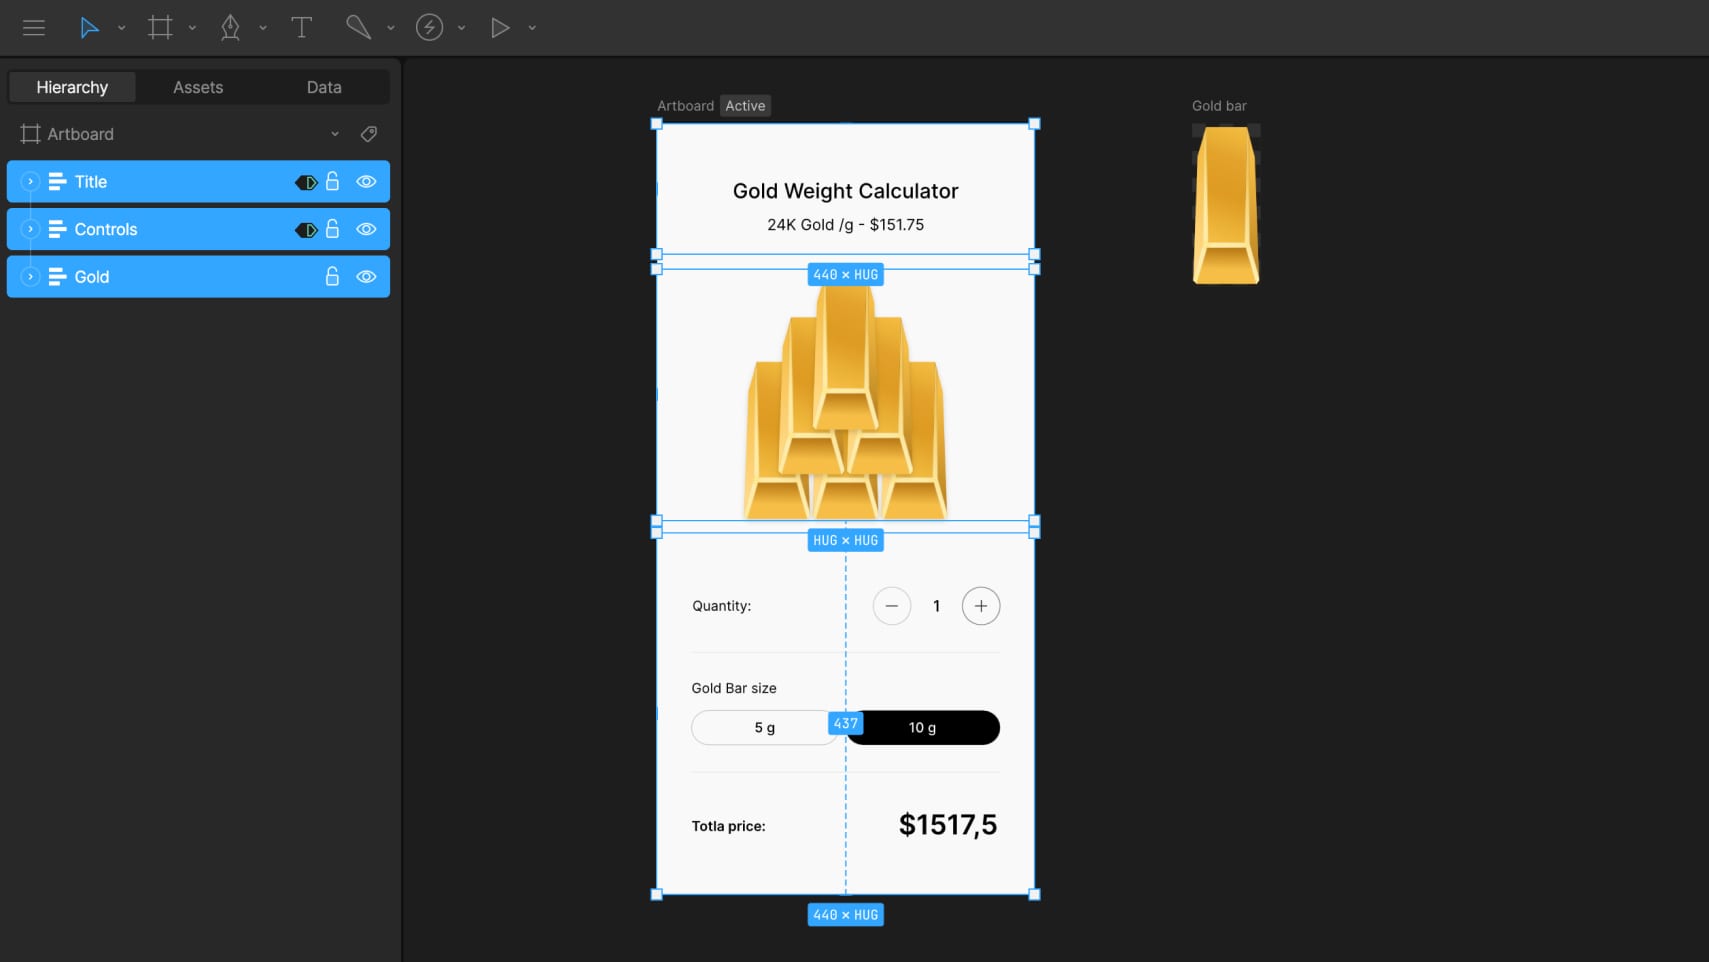
To demonstrate how we use data binding in Rive, we built a small interactive project — a gold calculator. The task was simple: calculate the price of 5g and 10g gold bars, from 1 to 6 bars, using external data for the current gold price per gram. The gold price can be dynamic, typically coming from market data, but in this case we used a manually set value.
Let’s break down how the calculator is built, step by step, starting with the layout and structure of the file.
1. File Structure
The layout is built for mobile, using a 440×900 px artboard. It’s structured around three layout groups:
Title with gold price per gram
Controls for choosing gold bar amount and weight
Gold bar illustration
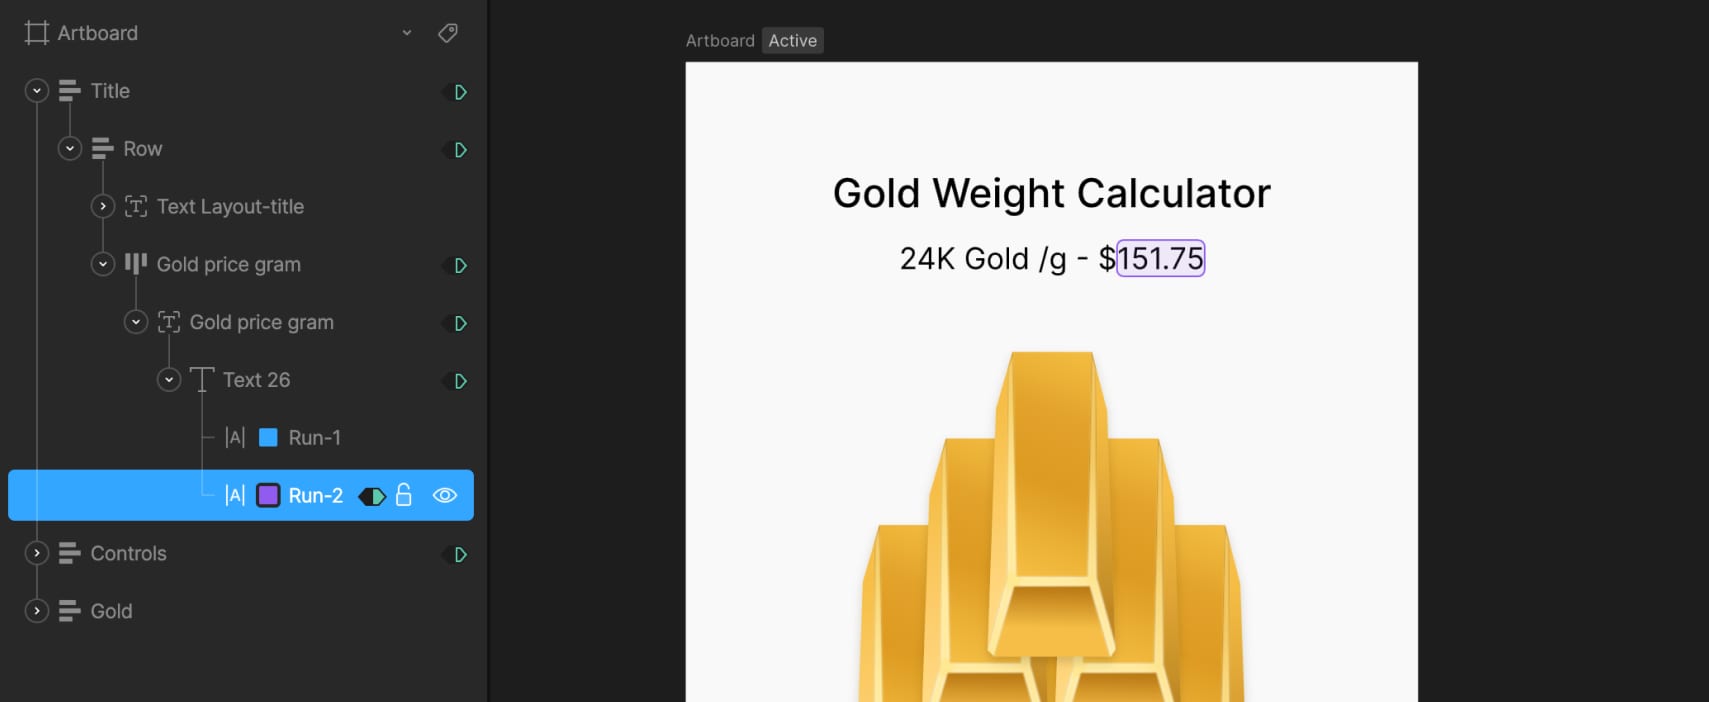
The title section includes a text layout made of two text runs: one holds static text like the label, while the other is dynamic and connected to external data using data binding. This allows the gold price to update in real time when the data changes.
In the controls section, we added plus and minus buttons to set the number of gold bars. These are simple layouts with icons inside. Below them, there are two buttons to switch between 5g and 10g options. They’re styled as rounded layouts with text inside.
In the state machine, two timelines define the tab states: one for when the 10g button is active, using a solid black background and white text, and another for 5g, with reversed styles. Switching between these two updates the active tab visually.
The total price section also uses two text runs — one for the currency icon and one for the total value. This value changes based on the selected weight and quantity, and is driven by data binding.
2. Gold Bar Illustration
The illustration is built using a nested artboard with a single vector gold bar. Inside the calculator layout, we duplicated this artboard to show anywhere from 1 to 6 bars depending on the user’s selection.
Since there are two weight options, we made the gold bar resize visually — wider for 10g and narrower for 5g. To do that, we used N-Slices so that the edges stay intact and only the middle stretches. The sliced group sits inside a fixed-size layout, and the artboard is set to Hug its contents, which lets it resize automatically.
Created two timelines to control bar size: one where the width is 88px for 10g, and another at 74px for 5g. The switch between them is controlled by a number variable called Size-gram gold, where 5g is represented by 0 and 10g by 1 with 1 set as the default value.
In the state machine, we connected this variable to the two timelines (the 10g timeline set as the default)— when it’s set to 0, the layout switches to 5g; when it’s 1, it switches to 10g. This makes the size update based on user selection without any manual switching. To keep the transition smooth, a 150ms animation duration is added.
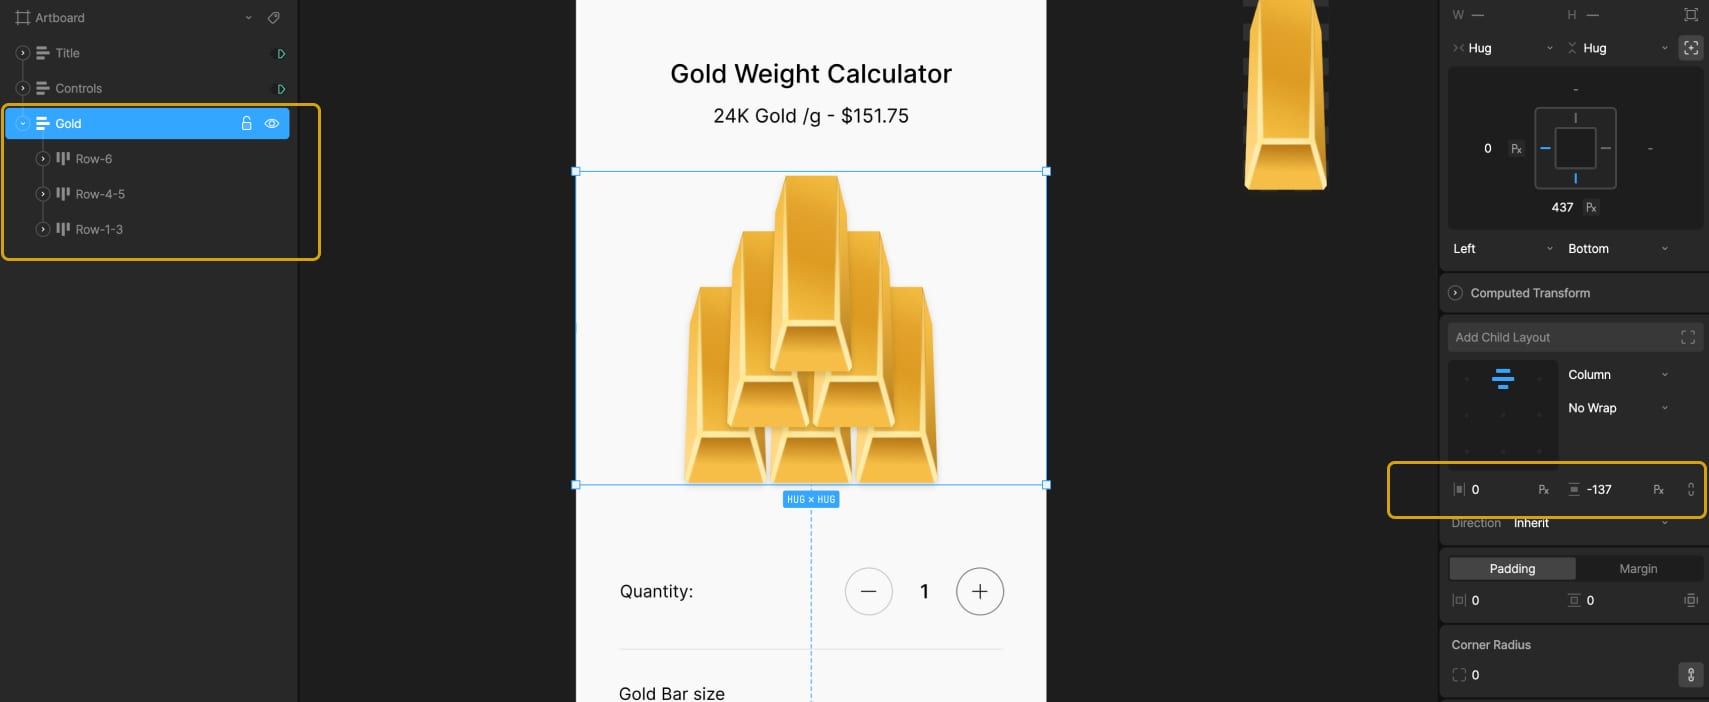
3. Visualizing 1–6 Gold Bars
To show different quantities of gold bars in the main calculator layout, we created a tiered structure using three stacked layout groups with a vertical gap -137. Each tier is offset vertically to form a simple pyramid arrangement, with everything positioned in the bottom-left corner of the screen.
The first tier contains three duplicated nested artboards of a single gold bar. Each of these is wrapped in a Hug layout, which allows them to resize correctly based on the weight. The second tier includes two gold bars and an empty layout. This empty layout is used for spacing — it creates a visual shift when we need to display exactly four bars. The top tier has just one gold bar centered.
All three tiers are bottom-centered, which keeps the pyramid shape consistent as bars are added or removed.
To control how many bars are visible, we created 6 timelines in Animate mode — one for each quantity from 1 to 6. To hide or show each gold bar, two techniques are used: adjusting the opacity of the nested artboard (100% to show, 0% to hide) and modifying the layout that wraps it. When a bar is hidden, the layout is set to a fixed width of 0px; when visible, it uses Hug settings to restore its size automatically.
Each timeline has its own combination of these settings depending on which bars should appear. For example, in the timeline with 4 bars, we needed to prevent the fourth bar from jumping to the center of the row. To keep it properly spaced, we assigned a fixed width of 80px to the empty layout used for shifting. On the other timelines, that same layout is hidden by setting its width to 0px.
This system makes it easy to switch between quantities while preserving the visual structure.
4. State Machine and Data Binding Setup
With the visuals and layouts ready, we moved on to setting up the logic with data binding and state transitions.
4.1 External Gold Price
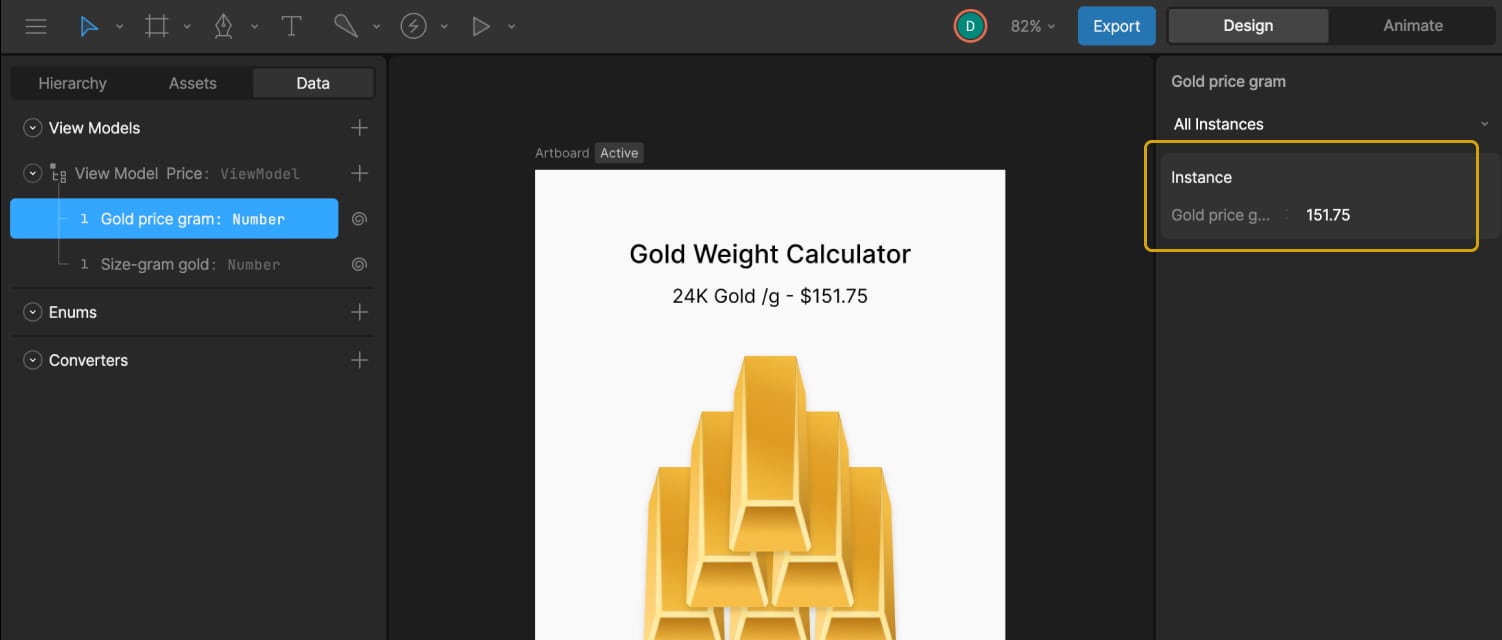
First, we created a number variable called Gold price gram. This value can be updated externally — for example, connected to a trading database — so the calculator always shows the current market price of gold. In our case, we used a static value of 151.75, which can also be updated manually by the user.
To display this in the UI, we bound Text Run 2 in the title layout to this variable. A converter in the Strings tab called “Convert to String Price” is then created and applied to that text run. This converter formats the number correctly for display and will be reused later.
4.2 Gold Bar Size Control
We already had a number variable called Size-gram gold, which controls the weight of the gold bar used in the nested artboard illustration.
In the Listeners panel, two listeners are created. The first is set to target the 5g tab, uses a Pointer Down action, and assigns Size-gram gold = 0. The second targets the 10g tab, also with a Pointer Down action, and assigns Size-gram gold = 1.
Next, two timelines (one for each tab state) are brought into the state machine. The 10g timeline is used as the default state, with transitions added: one from 10g to 5g when Size-gram gold = 0, and one back to 10g when Size-gram gold = 1. Each transition has a duration of 100ms to keep the switching smooth.
4.3 Gold Bar Quantity
Next, added another number variable, Quantity-gold, to track the number of selected bars. The default value is set to 1. In the Converters under Numeric, two “Calculate” converters are created — one that adds “+1” and one that subtracts “-1”.
In the Listeners panel, the plus button is assigned an action: Quantity-gold = Quantity-gold, using the “+1” converter. This way, clicking the plus button increases the count by 1. The same is done for the minus button, assigning Quantity-gold = Quantity-gold and attaching the “-1” converter. Clicking the minus button decreases the count by 1.
Inside the state machine, six timelines are connected to represent bar counts from 1 to 6. Each transition uses the Quantity-gold value to trigger the correct timeline.
By default, the plus button would keep increasing the value endlessly, but the goal is to limit the max to six bars. On the timeline where six gold bars are active, the plus button is disabled by setting its click area scale to 0 and lowering its opacity to create a “disabled” visual state. On all other timelines, those properties are returned to their active values.
The same logic is applied to the minus button to prevent values lower than one. On the timeline with one bar, the button is disabled, and on all others, it returns to its active state.
Almost there!
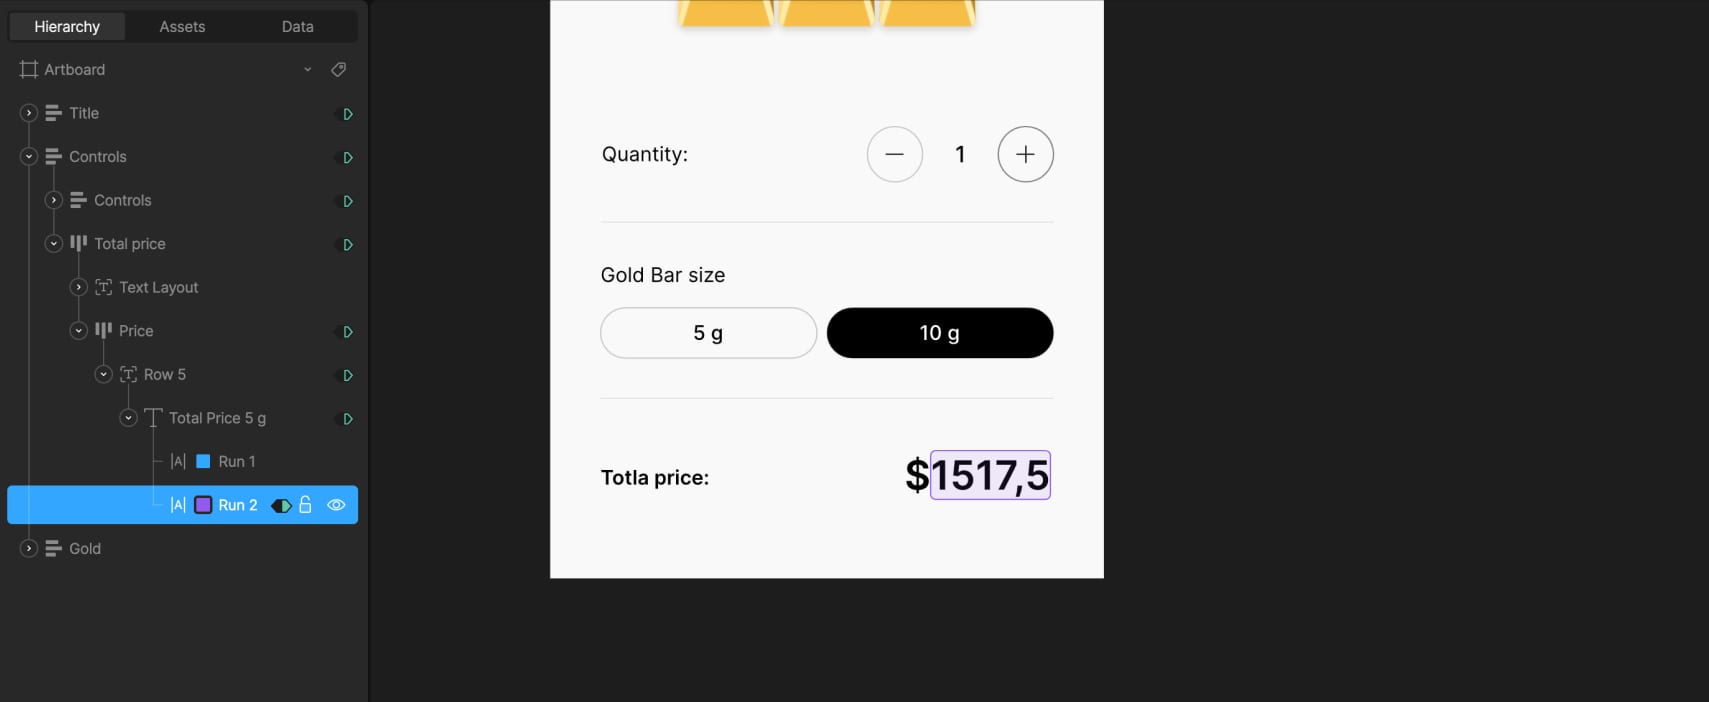
4.4 Total Price Logic
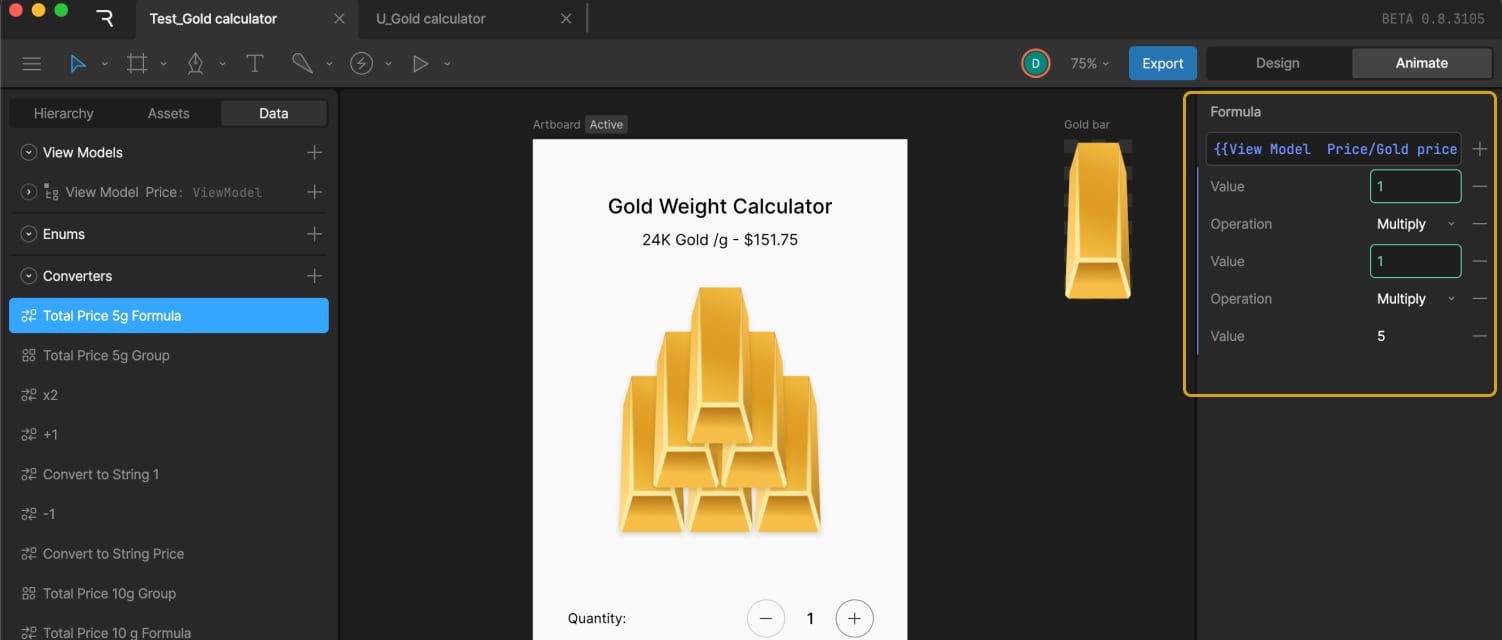
For the 5g bar price, we calculated it using this formula:
Total Price = Gold price gram + Quantity-gold * 5
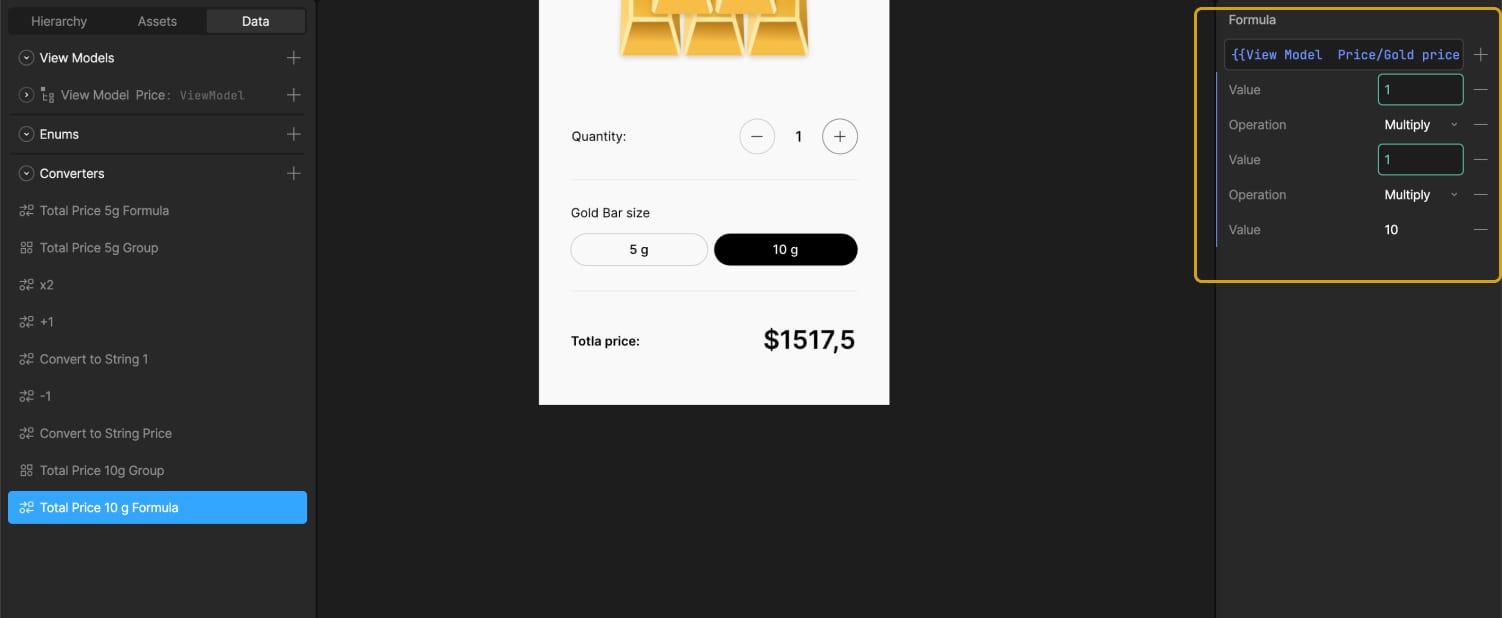
In Converters → Numeric, a Formula converter was created and named Total Price 5g Formula to calculate the total price. In the example, it looked like:
{{View Model Price/Gold price gram}}*{{View Model Price/Quanity-gold}}*5.0
Since we needed to display this number as text, the Total Price number variable was also converted into a string. For that, we used an existing converter called “Convert to String Price.”
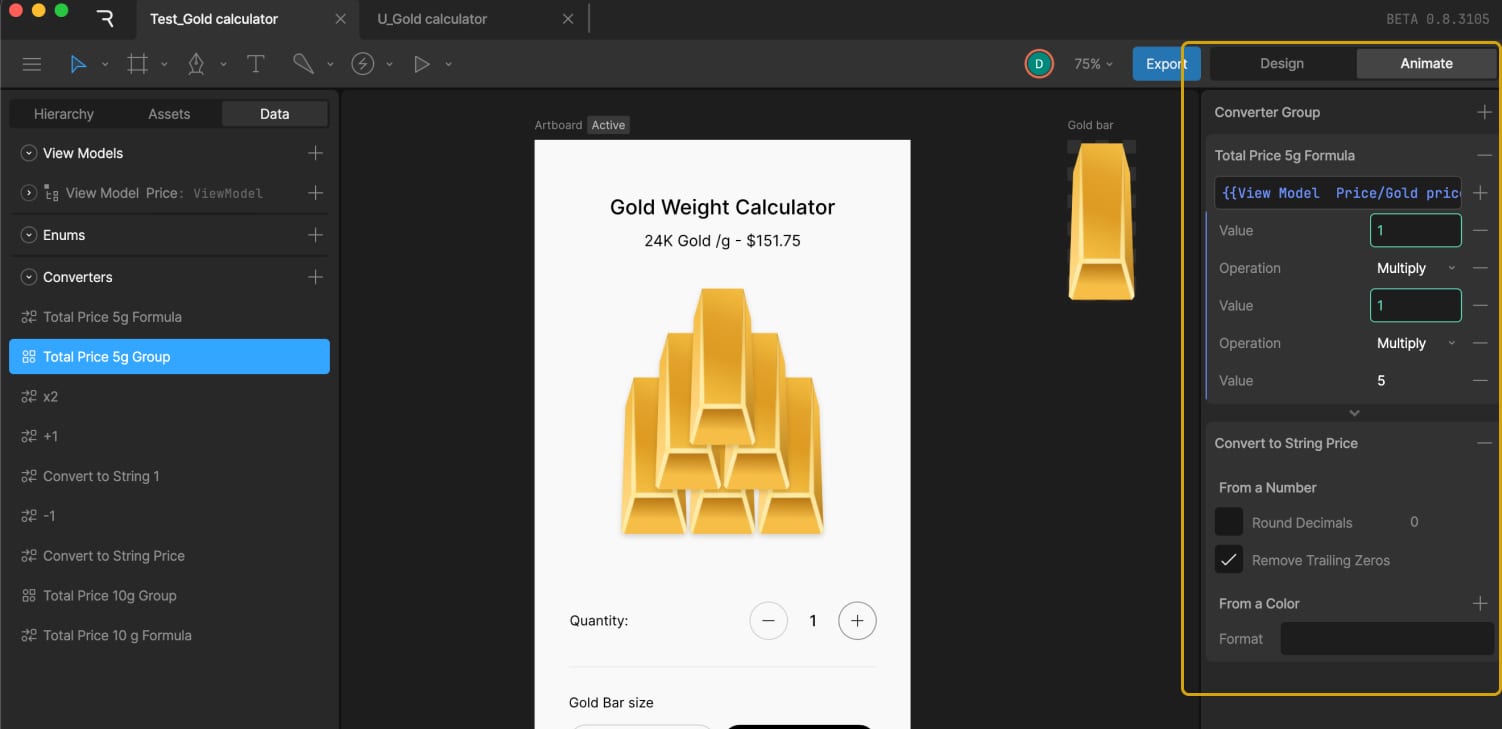
To use both converters together, a Group of converters was created and named Total Price 5g Group, which included the Total Price 5g Formula converter followed by the Convert to String Price converter.
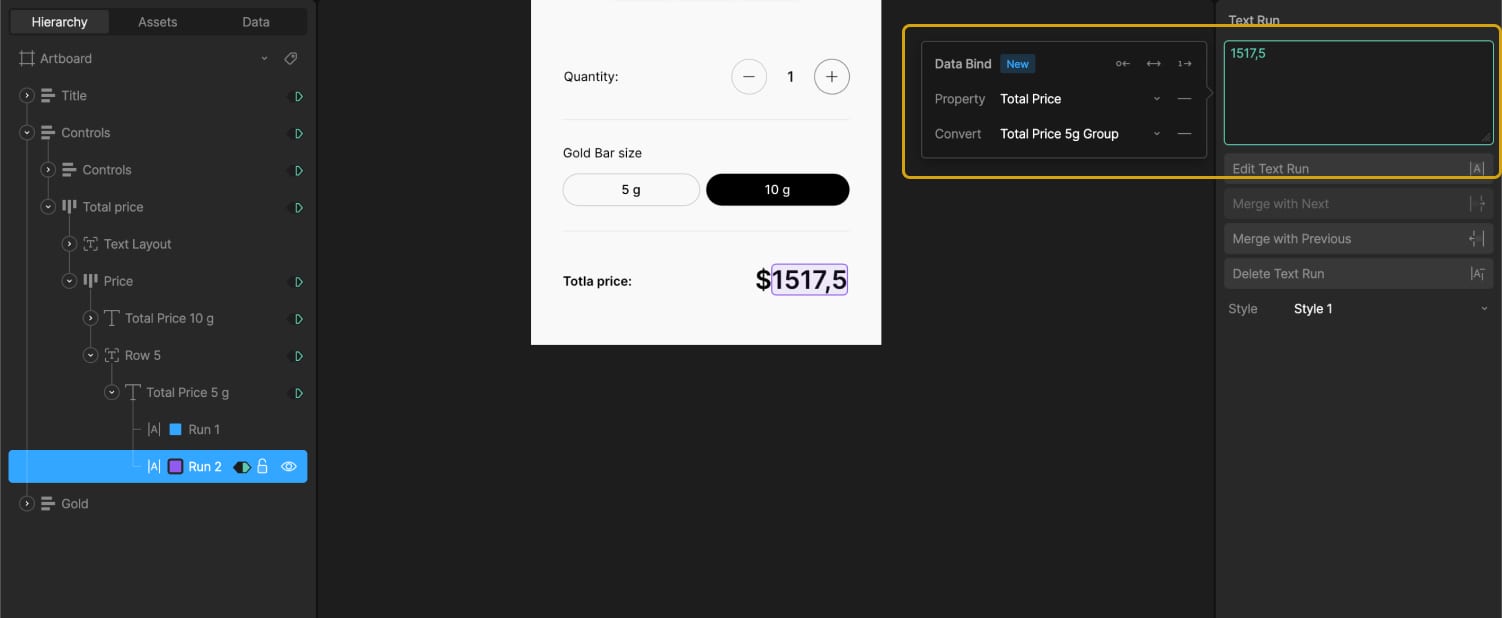
Then, the text for the price variable was data bound by adding the Total Price variable in the Property field and selecting Total Price 5g Group in the Convert field.
To handle the 10g case, which is double the price, two options are explored — either creating a new converter that multiplies by 10 or multiplying the existing result by 2.
Eventually, a second text element is added along with a new group of converters specifically for 10g. This includes a new formula:
Total Price = Gold price gram + Quantity-gold * 10
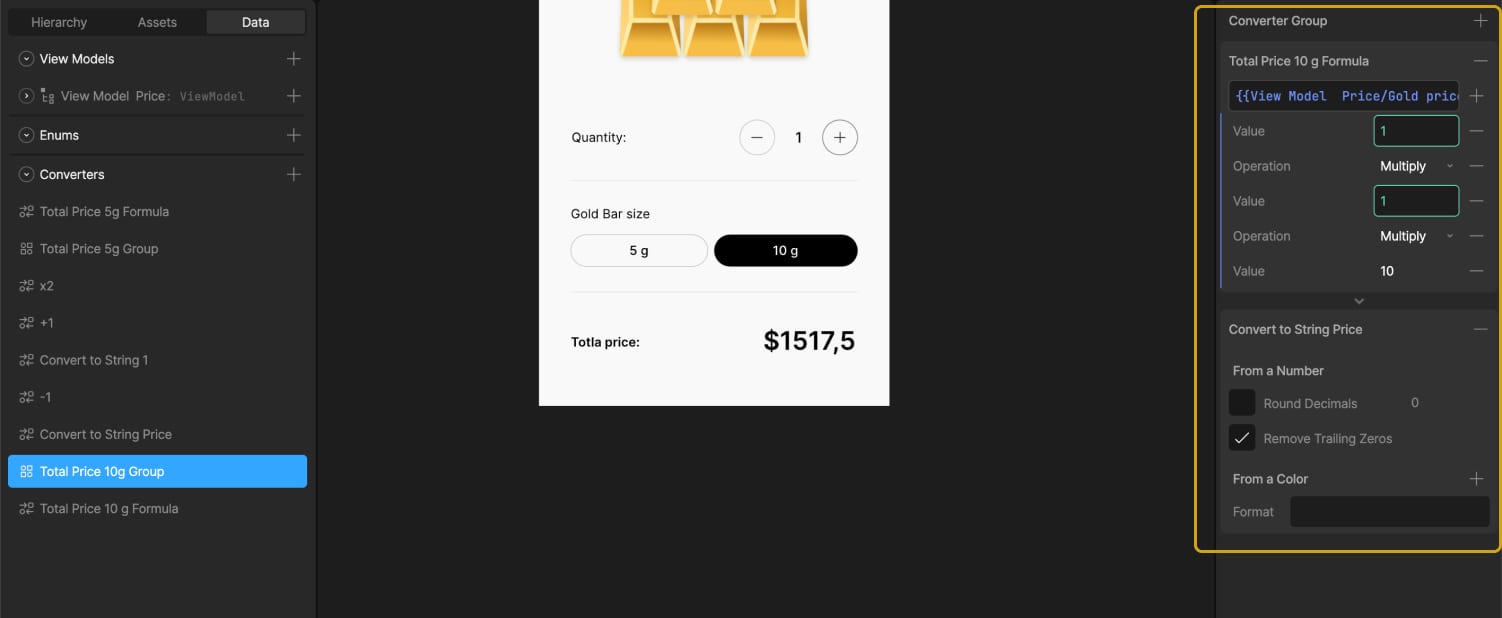
A formula converter and a group with both that formula and the string converter are created and named “Total Price 10g Group.”
Using timelines where the 5g and 10g buttons are in their active states, we adjusted the transparency of the text elements. This way, the total price connected to the 5g converters group is visible when the 5g button is selected, and the price from the 10g converters group appears when the 10g button is selected.
It works perfectly.
After this setup, the Gold price gram variable can be connected to live external data, allowing the gold price in the calculator to reflect the current market value in real time.
Wrapping Up
This gold calculator project is a simple example, but it shows how data binding in Rive can be used to connect visual design with real-time logic — without needing to jump between separate tools or write custom code. By combining state machines, variables, and converters, you can build interfaces that are not only animated but also smart and responsive.
Whether you’re working on a product UI, a prototype, or a standalone interactive graphic, Rive gives you a way to bring together motion and behavior in a single space. If you’re already experimenting with Rive, data binding opens up a whole new layer of possibilities to explore.
As data privacy laws evolve globally—from the GDPR to India’s Digital Personal Data Protection Act (DPDPA)—one common theme emerges: empowering individuals with control over their data. This shift places data principal rights at the center of privacy compliance.
Respecting these rights isn’t just a legal obligation for organizations; it’s a business imperative. Efficiently operationalizing and fulfilling data principal rights is now a cornerstone of modern privacy programs.
Understanding Data Principal Rights
Data principal rights refer to the entitlements granted to individuals regarding their data. Under laws like the DPDPA and GDPR, these typically include:
Right to Access: Individuals can request a copy of the personal data held about them.
Right to Correction: They can demand corrections to inaccurate or outdated data.
Right to Erasure (Right to Be Forgotten): They can request deletion of their data under specific circumstances.
Right to Data Portability: They can request their data in a machine-readable format.
Right to Withdraw Consent: They can withdraw previously given consent for data processing.
Right to Grievance Redressal: They can lodge complaints if their rights are not respected.
While these rights sound straightforward, fulfilling them at scale is anything but simple, especially when data is scattered across cloud platforms, internal systems, and third-party applications.
Why Data Principal Rights Management is Critical
Regulatory Compliance and Avoidance of Penalties
Non-compliance can result in substantial fines, regulatory scrutiny, and reputational harm. For instance, DPDPA empowers the Data Protection Board of India to impose heavy penalties for failure to honor data principal rights on time.
Customer Trust and Transparency
Respecting user rights builds transparency and demonstrates that your organization values privacy. This can increase customer loyalty and strengthen brand reputation in privacy-conscious markets.
Operational Readiness and Risk Reduction
Organizations risk delays, errors, and missed deadlines when rights requests are handled manually. An automated and structured rights management process reduces legal risk and improves operational agility.
Auditability and Accountability
Every action taken to fulfill a rights request must be logged and documented. This is essential for proving compliance during audits or investigations.
The Role of Data Discovery in Rights Fulfilment
To respond to any data principal request, you must first know where the relevant personal data resides. This is where Data Discovery plays a crucial supporting role.
A robust data discovery framework enables organizations to:
Identify all systems and repositories that store personal data.
Correlate data to specific individuals or identifiers.
Retrieve, correct, delete, or port data accurately and quickly.
Without comprehensive data visibility, any data principal rights management program will fail, resulting in delays, partial responses, or non-compliance.
Key Challenges in Rights Management
Despite its importance, many organizations struggle with implementing effective data principal rights management due to:
Fragmented data environments: Personal data is often stored in silos, making it challenging to aggregate and act upon.
Manual workflows: Fulfilling rights requests often involves slow, error-prone manual processes.
Authentication complexities: Verifying the identity of the data principal securely is essential to prevent abuse of rights.
Lack of audit trails: Without automated tracking, it’s hard to demonstrate compliance.
Building a Scalable Data Principal Rights Management Framework
To overcome these challenges, organizations must invest in technologies and workflows that automate and streamline the lifecycle of rights requests. A mature data principal rights management framework should include:
Centralized request intake: A portal or dashboard where individuals can easily submit rights requests.
Automated data mapping: Leveraging data discovery tools to locate relevant personal data quickly.
Workflow automation: Routing requests to appropriate teams with built-in deadlines and escalation paths.
Verification and consent tracking: Only verified individuals can initiate requests and track their consent history.
Comprehensive logging: Maintaining a tamper-proof audit trail of all actions to fulfill requests.
The Future of Privacy Lies in Empowerment
As data privacy regulations mature, the focus shifts from mere protection to empowerment. Data principles are no longer passive subjects but active stakeholders in handling their data. Organizations that embed data principal rights management into their core data governance strategy will stay compliant and gain a competitive edge in building customer trust.
Empower Your Privacy Program with Seqrite
Seqrite’s Data Privacy Suite is purpose-built to help enterprises manage data principal rights confidently. From automated request intake and identity verification to real-time data discovery and audit-ready logs, Seqrite empowers you to comply faster, smarter, and at scale.
Just a second! 🫷 If you are here, it means that you are a software developer.
So, you know that storage, networking, and domain management have a cost .
If you want to support this blog, please ensure that you have disabled the adblocker for this site. I configured Google AdSense to show as few ADS as possible – I don’t want to bother you with lots of ads, but I still need to add some to pay for the resources for my site.
Thank you for your understanding. – Davide
Imagine you need a way to raise events whenever an item is added or removed from a collection.
Instead of building a new class from scratch, you can use ObservableCollection<T> to store items, raise events, and act when the internal state of the collection changes.
In this article, we will learn how to use ObservableCollection<T>, an out-of-the-box collection available in .NET.
Introducing the ObservableCollection type
ObservableCollection<T> is a generic collection coming from the System.Collections.ObjectModel namespace.
It allows the most common operations, such as Add<T>(T item) and Remove<T>(T item), as you can expect from most of the collections in .NET.
Moreover, it implements two interfaces:
INotifyCollectionChanged can be used to raise events when the internal collection is changed.
INotifyPropertyChanged can be used to raise events when one of the properties of the changes.
Let’s see a simple example of the usage:
var collection = new ObservableCollection<string>();

collection.Add("Mario");
collection.Add("Luigi");
collection.Add("Peach");
collection.Add("Bowser");

collection.Remove("Luigi");

collection.Add("Waluigi");

_ = collection.Contains("Peach");

collection.Move(1, 2);
As you can see, we can do all the basic operations: add, remove, swap items (with the Move method), and check if the collection contains a specific value.
You can simplify the initialization by passing a collection in the constructor:
var collection = new ObservableCollection<string>(newstring[] { "Mario", "Luigi", "Peach" });
collection.Add("Bowser");
collection.Remove("Luigi");
collection.Add("Waluigi");
_ = collection.Contains("Peach");
collection.Move(1, 2);
How to intercept changes to the underlying collection
As we said, this data type implements INotifyCollectionChanged. Thanks to this interface, we can add event handlers to the CollectionChanged event and see what happens.
var collection = new ObservableCollection<string>(newstring[] { "Mario", "Luigi", "Peach" });
collection.CollectionChanged += WhenCollectionChanges;
Console.WriteLine("Adding Bowser...");
collection.Add("Bowser");
Console.WriteLine("");
Console.WriteLine("Removing Luigi...");
collection.Remove("Luigi");
Console.WriteLine("");
Console.WriteLine("Adding Waluigi...");
collection.Add("Waluigi");
Console.WriteLine("");
Console.WriteLine("Searching for Peach...");
var containsPeach = collection.Contains("Peach");
Console.WriteLine("");
Console.WriteLine("Swapping items...");
collection.Move(1, 2);
The WhenCollectionChanges method accepts a NotifyCollectionChangedEventArgs that gives you info about the intercepted changes:
privatevoid WhenCollectionChanges(object? sender, NotifyCollectionChangedEventArgs e)
{
var allItems = ((IEnumerable<object>)sender)?.Cast<string>().ToArray() ?? newstring[] { "<empty>" };
Console.WriteLine($"> Currently, the collection is {string.Join(',', allItems)}");
Console.WriteLine($"> The operation is {e.Action}");
var previousItems = e.OldItems?.Cast<string>()?.ToArray() ?? newstring[] { "<empty>" };
Console.WriteLine($"> Before the operation it was {string.Join(',', previousItems)}");
var currentItems = e.NewItems?.Cast<string>()?.ToArray() ?? newstring[] { "<empty>" };
Console.WriteLine($"> Now, it is {string.Join(',', currentItems)}");
}
Every time an operation occurs, we write some logs.
The result is:
Adding Bowser...
> Currently, the collection is Mario,Luigi,Peach,Bowser
> The operation is Add
> Before the operation it was <empty>
> Now, it is Bowser

Removing Luigi...
> Currently, the collection is Mario,Peach,Bowser
> The operation is Remove
> Before the operation it was Luigi
> Now, it is <empty>

Adding Waluigi...
> Currently, the collection is Mario,Peach,Bowser,Waluigi
> The operation is Add
> Before the operation it was <empty>
> Now, it is Waluigi

Searching for Peach...

Swapping items...
> Currently, the collection is Mario,Bowser,Peach,Waluigi
> The operation is Move
> Before the operation it was Peach
> Now, it is Peach
Notice a few points:
the sender property holds the current items in the collection. It’s an object?, so you have to cast it to another type to use it.
the NotifyCollectionChangedEventArgs has different meanings depending on the operation:
when adding a value, OldItems is null and NewItems contains the items added during the operation;
when removing an item, OldItems contains the value just removed, and NewItems is null.
when swapping two items, both OldItems and NewItems contain the item you are moving.
How to intercept when a collection property has changed
To execute events when a property changes, we need to add a delegate to the PropertyChanged event. However, it’s not available directly on the ObservableCollection type: you first have to cast it to an INotifyPropertyChanged:
var collection = new ObservableCollection<string>(newstring[] { "Mario", "Luigi", "Peach" });
(collection as INotifyPropertyChanged).PropertyChanged += WhenPropertyChanges;
Console.WriteLine("Adding Bowser...");
collection.Add("Bowser");
Console.WriteLine("");
Console.WriteLine("Removing Luigi...");
collection.Remove("Luigi");
Console.WriteLine("");
Console.WriteLine("Adding Waluigi...");
collection.Add("Waluigi");
Console.WriteLine("");
Console.WriteLine("Searching for Peach...");
var containsPeach = collection.Contains("Peach");
Console.WriteLine("");
Console.WriteLine("Swapping items...");
collection.Move(1, 2);
We can now specify the WhenPropertyChanges method as such:
privatevoid WhenPropertyChanges(object? sender, PropertyChangedEventArgs e)
{
var allItems = ((IEnumerable<object>)sender)?.Cast<string>().ToArray() ?? newstring[] { "<empty>" };
Console.WriteLine($"> Currently, the collection is {string.Join(',', allItems)}");
Console.WriteLine($"> Property {e.PropertyName} has changed");
}
As you can see, we have again the sender parameter that contains the collection of items.
Then, we have a parameter of type PropertyChangedEventArgs that we can use to get the name of the property that has changed, using the PropertyName property.
Let’s run it.
Adding Bowser...
> Currently, the collection is Mario,Luigi,Peach,Bowser
> Property Count has changed
> Currently, the collection is Mario,Luigi,Peach,Bowser
> Property Item[] has changed

Removing Luigi...
> Currently, the collection is Mario,Peach,Bowser
> Property Count has changed
> Currently, the collection is Mario,Peach,Bowser
> Property Item[] has changed

Adding Waluigi...
> Currently, the collection is Mario,Peach,Bowser,Waluigi
> Property Count has changed
> Currently, the collection is Mario,Peach,Bowser,Waluigi
> Property Item[] has changed

Searching for Peach...

Swapping items...
> Currently, the collection is Mario,Bowser,Peach,Waluigi
> Property Item[] has changed
As you can see, for every add/remove operation, we have two events raised: one to say that the Count has changed, and one to say that the internal Item[] is changed.
However, notice what happens in the Swapping section: since you just change the order of the items, the Count property does not change.
As you probably noticed, events are fired after the collection has been initialized. Clearly, it considers the items passed in the constructor as the initial state, and all the subsequent operations that mutate the state can raise events.
Also, notice that events are fired only if the reference to the value changes. If the collection holds more complex classes, like:
publicclassUser{
publicstring Name { get; set; }
}
No event is fired if you change the value of the Name property of an object already part of the collection:
var me = new User { Name = "Davide" };
var collection = new ObservableCollection<User>(new User[] { me });

collection.CollectionChanged += WhenCollectionChanges;
(collection as INotifyPropertyChanged).PropertyChanged += WhenPropertyChanges;

me.Name = "Updated"; // It does not fire any event!
Notice that ObservableCollection<T> is not thread-safe! You can find an interesting article by Gérald Barré (aka Meziantou) where he explains a thread-safe version of ObservableCollection<T> he created. Check it out!
As always, I suggest exploring the language and toying with the parameters, properties, data types, etc.
You’ll find lots of exciting things that may come in handy.
I hope you enjoyed this article! Let’s keep in touch on Twitter or LinkedIn! 🤜🤛
You don’t need a physical database to experiment with ORMs. You can use an in-memory DB and seed the database with realistic data generated with Bogus.
Table of Contents
Just a second! 🫷 If you are here, it means that you are a software developer.
So, you know that storage, networking, and domain management have a cost .
If you want to support this blog, please ensure that you have disabled the adblocker for this site. I configured Google AdSense to show as few ADS as possible – I don’t want to bother you with lots of ads, but I still need to add some to pay for the resources for my site.
Thank you for your understanding. – Davide
Sometimes, you want to experiment with some features or create a demo project, but you don’t want to instantiate a real database instance.
Also, you might want to use some realistic data – not just “test1”, 123, and so on. These values are easy to set but not very practical when demonstrating functionalities.
In this article, we’re going to solve this problem by using Bogus and Entity Framework: you will learn how to generate realistic data and how to store them in an in-memory database.
Bogus, a C# library for generating realistic data
Bogus is a popular library for generating realistic data for your tests. It allows you to choose the category of dummy data that best suits your needs.
It all starts by installing Bogus via NuGet by running Install-Package Bogus.
From here, you can define the so-called Fakers, whose purpose is to generate dummy instances of your classes by auto-populating their fields.
Let’s see a simple example. We have this POCO class named Book:
Note: for the sake of simplicity, I used a dumb approach: author’s first and last name are part of the Book info itself, and the Genres property is treated as an array of enums and not as a flagged enum.
From here, we can start creating our Faker by specifying the referenced type:
Faker<Book> bookFaker = new Faker<Book>();
We can add one or more RuleFor methods to create rules used to generate each property.
The simplest approach is to use the overload where the first parameter is a Function pointing to the property to be populated, and the second is a Function that calls the methods provided by Bogus to create dummy data.
Think of it as this pseudocode:
faker.RuleFor(sm => sm.SomeProperty, f => f.SomeKindOfGenerator.GenerateSomething());
Another approach is to pass as the first argument the name of the property like this:
Now that we’ve learned how to generate a Faker, we can refactor the code to make it easier to read:
private List<Book> GenerateBooks(int count)
{
    Faker<Book> bookFaker = new Faker<Book>()
        .RuleFor(b => b.Id, f => f.Random.Guid())
        .RuleFor(b => b.Title, f => f.Lorem.Text())
        .RuleFor(b => b.Genres, f => f.Random.EnumValues<Genre>())
        .RuleFor(b => b.AuthorFirstName, f => f.Person.FirstName)
        .RuleFor(b => b.AuthorLastName, f => f.Person.LastName)
        .RuleFor(nameof(Book.PagesCount), f => f.Random.Number(100, 800))
        .RuleForType(typeof(DateOnly), f => f.Date.PastDateOnly());

    return bookFaker.Generate(count);
}
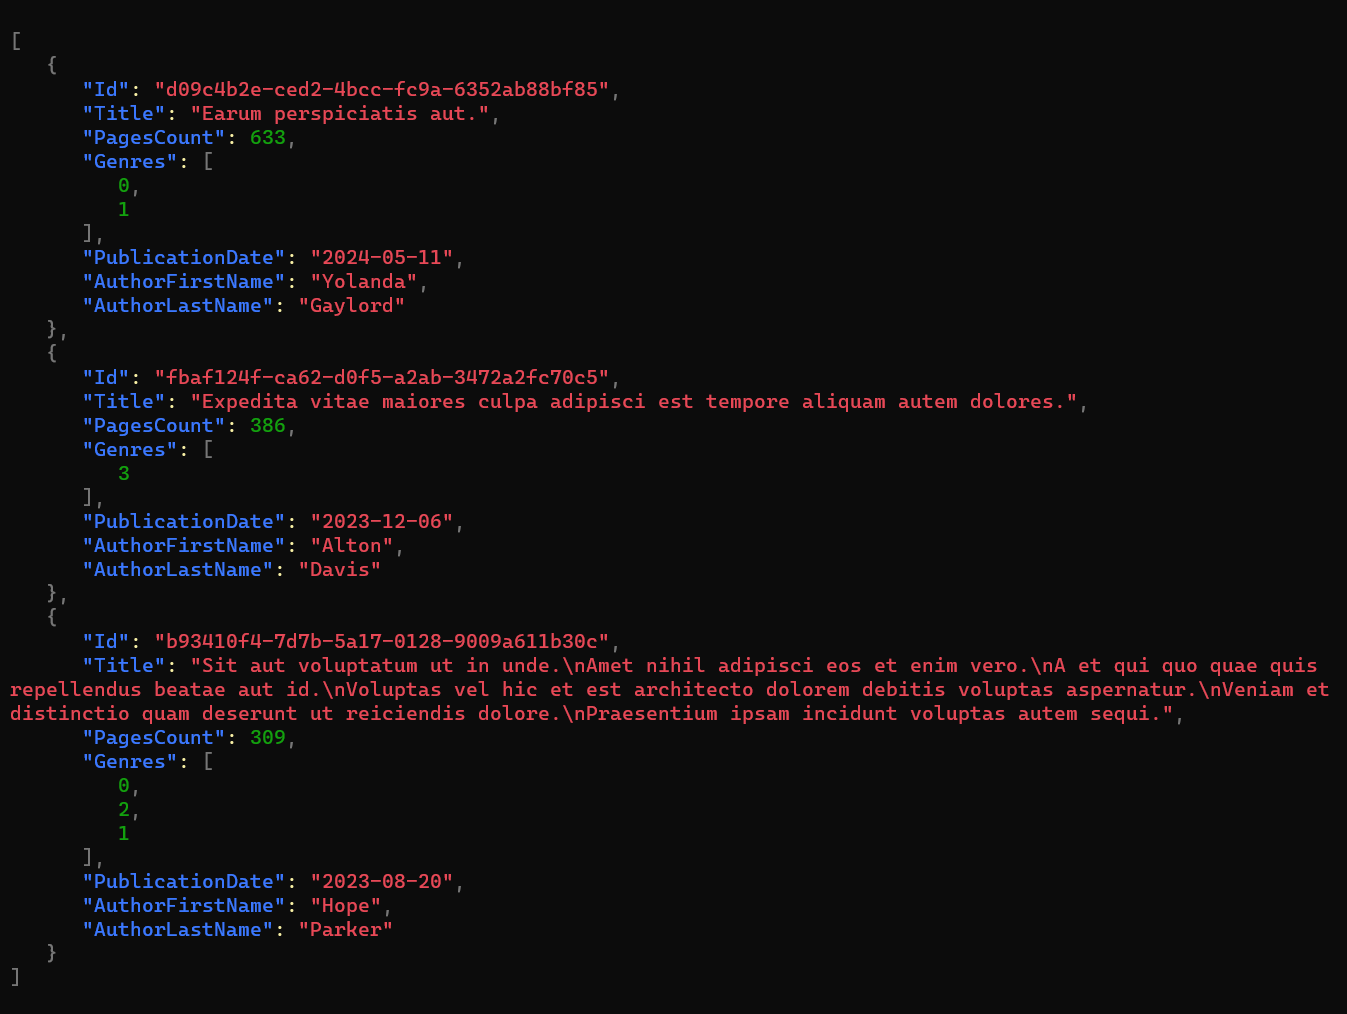
If we run it, we can see it generates the following items:
Seeding InMemory Entity Framework with dummy data
Entity Framework is among the most famous ORMs in the .NET ecosystem. Even though it supports many integrations, sometimes you just want to store your items in memory without relying on any specific database implementation.
Using Entity Framework InMemory provider
To add this in-memory provider, you must install the Microsoft.EntityFrameworkCore.InMemory NuGet Package.
Now you can add a new DbContext – which is a sort of container of all the types you store in your database – ensuring that the class inherits from DbContext.
Notice that we first create the items and then, using modelBuilder.Entity<Book>().HasData(booksFromBogus), we set the newly generated items as content for the Books DbSet.
Consume dummy data generated with EF Core
To wrap up, here’s the complete implementation of the DbContext:
We are now ready to instantiate the DbContext, ensure that the Database has been created and seeded with the correct data, and perform the operations needed.
using var dbContext = new BooksDbContext();
dbContext.Database.EnsureCreated();

var allBooks = await dbContext.Books.ToListAsync();

var thrillerBooks = dbContext.Books
        .Where(b => b.Genres.Contains(Genre.Thriller))
        .ToList();
Further readings
In this blog, we’ve already discussed the Entity Framework. In particular, we used it to perform CRUD operations on a PostgreSQL database.
I suggest you explore the potentialities of Bogus: there are a lot of functionalities that I didn’t cover in this article, and they may make your tests and experiments meaningful and easier to understand.
Bogus is a great library for creating unit and integration tests. However, I find it useful to generate dummy data for several purposes, like creating a stub of a service, populating a UI with realistic data, or trying out other tools and functionalities.
I hope you enjoyed this article! Let’s keep in touch on Twitter or LinkedIn! 🤜🤛
In today’s high-stakes digital arena, data is the lifeblood of every enterprise. From driving strategy to unlocking customer insights, enterprises depend on data like never before. But with significant volume comes great vulnerability.
Imagine managing a massive warehouse without labels, shelves, or a map. That’s how most organizations handle their data today—scattered across endpoints, servers, SaaS apps, and cloud platforms, much of it unidentified and unsecured. This dark, unclassified data is inefficient and dangerous.
At Seqrite, the path to resilient data privacy and governance begins with two foundational steps: Data Discovery and Classification.
Shedding Light on Dark Data: The Discovery Imperative
Before protecting your data, you need to know what you have and where it resides. That’s the core of data discovery—scanning your digital landscape to locate and identify every piece of information, from structured records in databases to unstructured files in cloud folders.
Modern Privacy tools leverage AI and pattern recognition to unearth sensitive data, whether it’s PII, financial records, or health information, often hidden in unexpected places. Shockingly, nearly 75% of enterprise data remains unused, mainly because it goes undiscovered.
Without this visibility, every security policy and compliance program stands on shaky ground.
Data Classification: Assigning Value and Implementing Control
Discovery tells you what data you have. Classification tells you how to treat it.
Is it public? Internal? Confidential? Restricted? Classification assigns your data a business context and risk level so you can apply the right protection, retention, and sharing rules.
This is especially critical in industries governed by privacy laws like GDPR, DPDP Act, and HIPAA, where treating all data the same is both inefficient and non-compliant.
With classification in place, you can:
Prioritize protection for sensitive data
Automate DLP and encryption policies
Streamline responses to individual rights requests
Reduce the clutter of ROT (redundant, obsolete, trivial) data
The Power of Discovery + Classification
Together, discovery and classification form the bedrock of data governance. Think of them as a radar system and rulebook:
Discovery shows you the terrain.
Classification helps you navigate it safely.
When integrated into broader data security workflows – like Zero Trust access control, insider threat detection, and consent management – they multiply the impact of every security investment.
Global data laws are demanding and constantly evolving. Discovery and classification help you prove accountability, map personal data flows, and respond to rights requests accurately and on time.
Storage & Cost Optimization
Storing ROT data is expensive and risky. Discovery helps you declutter, archive, or delete non-critical data while lowering infrastructure costs and improving data agility.
Proactive Risk Management
The longer a breach goes undetected, the more damage it does. By continuously discovering and classifying data, you spot anomalies and vulnerabilities early; well before they spiral into crises.
Better Decisions with Trustworthy Data
Only clean, well-classified data can fuel accurate analytics and AI. Whether it’s refining customer journeys or optimizing supply chains, data quality starts with discovery and classification.
In Conclusion, Know your Data, Secure your Future
In a world where data is constantly growing, moving, and evolving, the ability to discover and classify is a strategic necessity. These foundational capabilities empower organizations to go beyond reactive compliance and security, helping them build proactive, resilient, and intelligent data ecosystems.
Whether your goal is to stay ahead of regulatory demands, reduce operational risks, or unlock smarter insights, it all starts with knowing your data. Discovery and classification don’t just minimize exposure; they create clarity, control, and confidence.
Enterprises looking to take control of their data can rely on Seqrite’s Data Privacy solution, which delivers powerful discovery and classification capabilities to turn information into an advantage.
Organizations manage personal data across multiple jurisdictions in today’s interconnected digital economy, requiring a clear understanding of global data protection frameworks. The European Union’s General Data Protection Regulation (GDPR) and India’s Digital Personal Data Protection Act (DPDP) 2023 are two key regulations shaping the data privacy landscape. This guide provides a comparative analysis of these regulations, outlining key distinctions for businesses operating across both regions.
Understanding the GDPR: Key Considerations for Businesses
The GDPR, enforced in May 2018, is a comprehensive data protection law that applies to any organization processing personal data of EU residents, regardless of location.
Territorial Scope: GDPR applies to organizations with an establishment in the EU or those that offer goods or services to, or monitor the behavior of, EU residents, requiring many global enterprises to comply.
Definition of Personal Data: The GDPR defines personal data as any information related to an identifiable individual. It further classifies sensitive personal data and imposes stricter processing requirements.
Principles of Processing: Compliance requires adherence to lawfulness, fairness, transparency, purpose limitation, data minimization, accuracy, storage limitation, integrity, confidentiality, and accountability in data processing activities.
Lawful Basis for Processing: Businesses must establish a lawful basis for processing, such as consent, contract, legal obligation, vital interests, public task, or legitimate interest.
Data Subject Rights: GDPR grants individuals rights, including access, rectification, erasure, restriction, data portability, and objection to processing, necessitating dedicated mechanisms to address these requests.
Obligations of Controllers and Processors: GDPR imposes direct responsibilities on data controllers and processors, requiring them to implement security measures, maintain processing records, and adhere to breach notification protocols.
Understanding the DPDP Act 2023: Implications for Businesses in India
The DPDP Act 2023, enacted in August 2023, establishes a legal framework for the processing of digital personal data in India.
Territorial Scope: The Act applies to digital personal data processing in India and processing outside India if it involves offering goods or services to Indian data principals.
Definition of Personal Data: Personal data refers to any data that identifies an individual, specifically in digital form. Unlike GDPR, the Act does not differentiate between general and sensitive personal data (though future classifications may emerge).
Principles of Data Processing: The Act mandates lawful and transparent processing, purpose limitation, data minimization, accuracy, storage limitation, security safeguards, and accountability.
Lawful Basis for Processing: The primary basis for processing is explicit, informed, unconditional, and unambiguous consent, with certain legitimate exceptions.
Rights of Data Principals: Individuals can access, correct, and erase their data, seek grievance redressal, and nominate another person to exercise their rights if they become incapacitated.
Obligations of Data Fiduciaries and Processors: The Act imposes direct responsibilities on Data Fiduciaries (equivalent to GDPR controllers) to obtain consent, ensure data accuracy, implement safeguards, and report breaches. Data Processors (like GDPR processors) operate under contractual obligations set by Data Fiduciaries.
GDPR vs. DPDP: Key Differences for Businesses
Feature
GDPR
DPDP Act 2023
Business Implications
Data Scope
Covers both digital and non-digital personal data within a filing system.
Applies primarily to digital personal data.
Businesses need to assess their data inventory and processing activities, particularly for non-digital data handled in India.
Sensitive Data
Explicitly defines and provides stricter rules for processing sensitive personal data.
Applies a uniform standard to all digital personal data currently.
Organizations should be mindful of potential future classifications of sensitive data under DPDP.
Lawful Basis
Offers multiple lawful bases for processing, including legitimate interests and contractual necessity.
Primarily consent-based, with limited exceptions for legitimate uses.
Businesses need to prioritize obtaining explicit consent for data processing in India and carefully evaluate the scope of legitimate use exceptions.
Individual Rights
Provides a broader range of rights, including data portability and the right to object to profiling.
Focuses on core rights like access, correction, and erasure.
Compliance programs should address the specific set of rights granted under the DPDP Act.
Data Transfer
Strict mechanisms for international data transfers, requiring adequacy decisions or safeguards.
Permits cross-border transfers except to countries specifically restricted by the Indian government.
Businesses need to monitor the list of restricted countries for data transfers from India.
Breach Notification
Requires notification to the supervisory authority if the breach is likely to result in a high risk to individuals.
Mandates notification to both the Data Protection Board and affected Data Principals for all breaches.
Organizations must establish comprehensive data breach response plans aligned with DPDP’s broader notification requirements.
Enforcement
Enforced by Data Protection Authorities in each EU member state.
Enforced by the central Data Protection Board of India.
Businesses need to be aware of the centralized enforcement mechanism under the DPDP Act.
Data Protection Officer (DPO)
Mandatory for certain organizations based on processing activities.
Mandatory for Significant Data Fiduciaries, with criteria to be specified.
Organizations that meet the criteria for Significant Data Fiduciaries under DPDP will need to appoint a DPO.
Data Processor Obligations
Imposes direct obligations on data processors.
Obligations are primarily contractual between Data Fiduciaries and Data Processors.
Data Fiduciaries in India bear greater responsibility for ensuring the compliance of their Data Processors.
Navigating Global Compliance: A Strategic Approach for Businesses
Organizations subject to GDPR and DPDP must implement a harmonized yet region-specific compliance strategy. Key focus areas include:
Data Mapping and Inventory: Identify and categorize personal data flows across jurisdictions to determine applicable regulatory requirements.
Consent Management: Implement mechanisms that align with GDPR’s “freely given, specific, informed, and unambiguous” consent standard and DPDP’s stricter “free, specific, informed, unconditional, and unambiguous” requirement. Ensure easy withdrawal options.
Data Security Measures: Deploy technical and organizational safeguards proportionate to data processing risks, meeting the security mandates of both regulations.
Data Breach Response Plan: Establish incident response protocols that meet GDPR and DPDP notification requirements, particularly DPDP’s broader scope.
Data Subject/Principal Rights Management: Develop workflows to handle data access, correction, and erasure requests under both regulations, ensuring compliance with response timelines.
Cross-Border Data Transfer Mechanisms: Implement safeguards for international data transfers, aligning with GDPR’s standard contractual clauses and DPDP’s yet-to-be-defined jurisdictional rules.
Appointment of DPO/Contact Person: Assess whether a Data Protection Officer (DPO) is required under GDPR or if the organization qualifies as a Significant Data Fiduciary under DPDP, necessitating a DPO or designated contact person.
Employee Training: Conduct training programs on data privacy laws and best practices to maintain team compliance awareness.
Regular Audits: Perform periodic audits to evaluate data protection measures, adapting to evolving regulatory guidelines.
Conclusion: Towards a Global Privacy-Centric Approach
While GDPR and the DPDP Act 2023 share a common goal of enhancing data protection, they differ in scope, consent requirements, and enforcement mechanisms. Businesses operating across multiple jurisdictions must adopt a comprehensive, adaptable compliance strategy that aligns with both regulations.
By strengthening data governance, implementing robust security controls, and fostering a privacy-first culture, organizations can navigate global data protection challenges effectively and build trust with stakeholders.
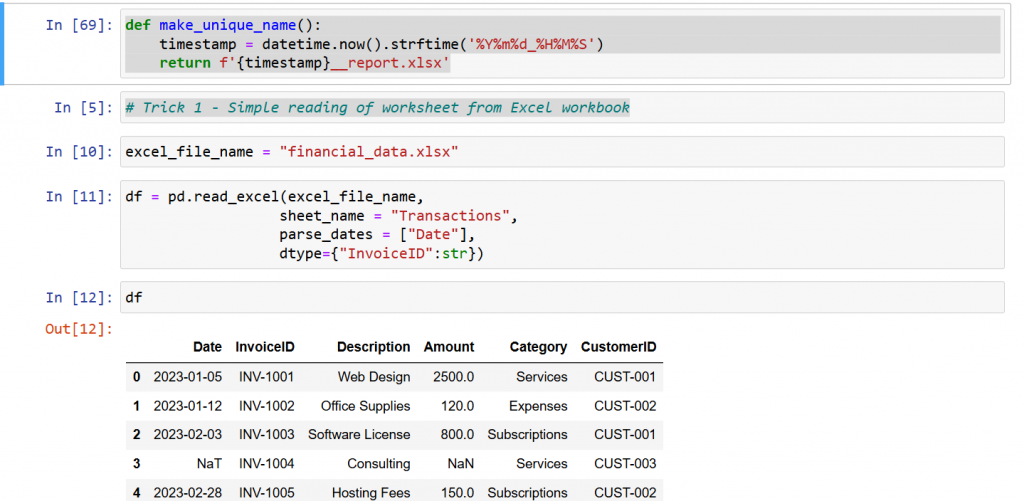
Data wrangling with Excel and Pandas is actually quite useful tool in the belt of any Excel professional, financial professional, data analyst or a developer. Really, everyonecan benefit from the well defined libraries that ease people’s lifes. These are the libraries used:
Reading financial data from the internet is sometimes challenging. In this short article with two python snippets, I will show how to read it from Wikipedia and from and from API, delivering in JSON format:
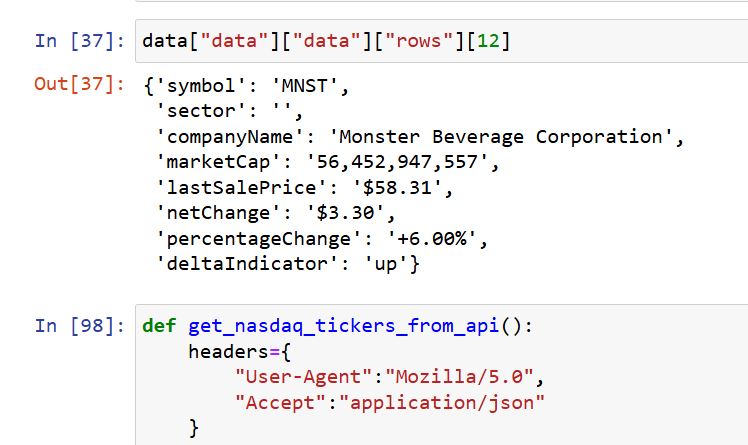
This is how the financial json data from the api looks like.
Reading the data from the API is actually not tough, if you have experience reading JSON, with nested lists. If not, simply try with trial and error and eventually you will succeed:
With the reading from wikipedia, it is actually even easier – the site works flawlessly with pandas, and if you count the tables correctly, you would get what you want:
Just a second! 🫷 If you are here, it means that you are a software developer.
So, you know that storage, networking, and domain management have a cost .
If you want to support this blog, please ensure that you have disabled the adblocker for this site. I configured Google AdSense to show as few ADS as possible – I don’t want to bother you with lots of ads, but I still need to add some to pay for the resources for my site.
Thank you for your understanding. – Davide
In a previous article, we delved into the creation of realistic data using Bogus, an open-source library that allows you to generate data with plausible values.
Bogus contains several properties and methods that generate realistic data such as names, addresses, birthdays, and so on.
In this article, we will learn two ways to generate data with Bogus: both ways generate the same result; the main change is on the reusability and the modularity. But, in my opinion, it’s just a matter of preference: there is no approach absolutely better than the other. However, both methods can be preferred in specific cases.
For the sake of this article, we are going to use Bogus to generate instances of the Book class, defined like this:
It is possible to create a specific object that, using a Builder approach, allows you to generate one or more items of a specified type.
It all starts with the Faker<T> generic type, where T is the type you want to generate.
Once you create it, you can define the rules to be used when initializing the properties of a Book by using methods such as RuleFor and RuleForType.
publicstaticclassBogusBookGenerator{
publicstatic Faker<Book> CreateFaker()
{
Faker<Book> bookFaker = new Faker<Book>()
.RuleFor(b => b.Id, f => f.Random.Guid())
.RuleFor(b => b.Title, f => f.Lorem.Text())
.RuleFor(b => b.Genres, f => f.Random.EnumValues<Genre>())
.RuleFor(b => b.AuthorFirstName, f => f.Person.FirstName)
.RuleFor(b => b.AuthorLastName, f => f.Person.LastName)
.RuleFor(nameof(Book.PagesCount), f => f.Random.Number(100, 800))
.RuleForType(typeof(DateOnly), f => f.Date.PastDateOnly());
return bookFaker;
}
}
In this way, thanks to the static method, you can simply create a new instance of Faker<Book>, ask it to generate one or more books, and enjoy the result:
Faker<Book> generator = BogusBookGenerator.CreateFaker();
var books = generator.Generate(10);
Clearly, it’s not necessary for the class to be marked as static: it all depends on what you need to achieve!
Expose a subtype of Faker, specific for the data type to be generated
If you don’t want to use a method (static or not static, it doesn’t matter), you can define a subtype of Faker<Book> whose customization rules are all defined in the constructor.
publicclassBookGenerator : Faker<Book>
{
public BookGenerator()
{
RuleFor(b => b.Id, f => f.Random.Guid());
RuleFor(b => b.Title, f => f.Lorem.Text());
RuleFor(b => b.Genres, f => f.Random.EnumValues<Genre>());
RuleFor(b => b.AuthorFirstName, f => f.Person.FirstName);
RuleFor(b => b.AuthorLastName, f => f.Person.LastName);
RuleFor(nameof(Book.PagesCount), f => f.Random.Number(100, 800));
RuleForType(typeof(DateOnly), f => f.Date.PastDateOnly());
}
}
Using this way, you can simply create a new instance of BookGenerator and, again, call the Generate method to create new book instances.
var generator = new BookGenerator();
var books = generator.Generate(10);
Method vs Subclass: When should we use which?
As we saw, both methods bring the same result, and their usage is almost identical.
So, which way should I use?
Use the method approach (the first one) when you need:
Simplicity: If you need to generate fake data quickly and your rules are straightforward, using a method is the easiest approach.
Ad-hoc Data Generation: Ideal for one-off or simple scenarios where you don’t need to reuse the same rules across your application.
Or use the subclass (the second approach) when you need:
Reusability: If you need to generate the same type of fake data in multiple places, defining a subclass allows you to encapsulate the rules and reuse them easily.
Complex scenarios and extensibility: Better suited for more complex data generation scenarios where you might have many rules or need to extend the functionality.
Maintainability: Easier to maintain and update the rules in one place.
Further readings
If you want to learn a bit more about Bogus and use it to populate data used by Entity Framework, I recently published an article about this topic:
I think Bogus is one of the best libraries in the .NET universe, as having realistic data can help you improve the intelligibility of the test cases you generate. Also, Bogus can be a great tool when you want to showcase demo values without accessing real data.
I hope you enjoyed this article! Let’s keep in touch on LinkedIn, Twitter or BlueSky! 🤜🤛