برچسب: Endpoint

  • 14 to 2 seconds: how I improved the performance of an endpoint by 82%


    Language details may impact application performance. In this article we’ll see some of the C# tips that brought me to improve my application. Singleton creation, StringBuilder and more!

    Table of Contents

    Just a second! 🫷
    If you are here, it means that you are a software developer.
    So, you know that storage, networking, and domain management have a cost .

    If you want to support this blog, please ensure that you have disabled the adblocker for this site.
    I configured Google AdSense to show as few ADS as possible – I don’t want to bother you with lots of ads, but I still need to add some to pay for the resources for my site.

    Thank you for your understanding.
    Davide

    In this second article, I’m going to share some more tips that brought me to improve the performance of an API from 14sec to less than 3 seconds: an improvement of 82%.

    In the previous article, we’ve seen some general, language-agnostic ways to approach this kind of problem, and what you can try (and avoid) to do to achieve a similar result.

    In this article, we’re going to see some .NET-related tips that can help to improve your APIs performance.

    WarmUp your application using Postman to create Singleton dependencies

    In my application, we use (of course) dependency injection. Almost all the dependencies are marked ad Singleton: this means that every dependency is created at the start-up of the application and is then shared through all the lifespan of the application.

    Pss: if you want to know the difference between Singleton, Transient, and Scoped lifetimes with real examples, check out this article!

    It makes sense, right? But have a closer look at the timing in this picture:
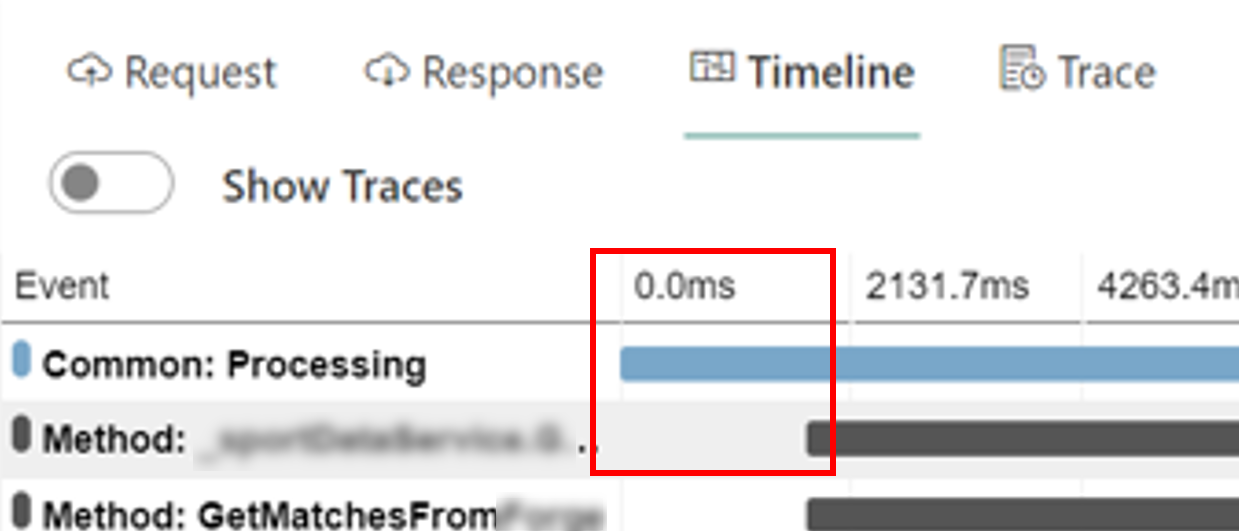
    Timings with initial warmup time

    The blue line is the whole HTTP call, and the black line is the API Action.

    There are almost 2 seconds of nothing! Why?

    Well, as explained in the article “Reducing initial request latency by pre-building services in a startup task in ASP.NET Core” by Andrew Lock, singletons are created during the first request, not at the real start-up of the application. And, given that all the dependencies in this application are singletons, the first 2 seconds are being used to create those instances.

    While Andrew explains how to create a Startup task to warm up the dependencies, I opted for a quick-and-dirty option: create a Warmup endpoint and call it before any call in Postman.

    [HttpGet, Route("warmup")]
    public ActionResult<string> WarmUp()
    {
        var obj = new
        {
            status = "ready"
        };
    
        return Ok(obj);
    }
    

    It is important to expose that endpoint under a controller that uses DI: as we’ve seen before, dependencies are created during the first request they’re needed; so, if you create an empty controller with only the WarmUp method, you won’t build any dependency and you’ll never see improvements. My suggestion is to place the WarmUp method under a controller that requires one of the root services: in this way, you’ll create the services and all their dependencies.

    To call the WarmUp endpoint before every request, I’ve created this simple script:

    pm.sendRequest("https://localhost:44326/api/warmup", function (err, response) {
      console.log("ok")
    })
    

    So, if you paste it in Postman, into the Pre-requests Script tab, it executes this call before the main HTTP call and warms up your application.

    Pre-request script on Postman

    This tip will not speed up your application but gives your a more precise value for the timings.

    Improve language-specific details

    Understanding how C# works and what functionalities it offers is crucial to get well working applications.

    There’s plenty of articles around the Internet that tell you some nice tips and trick to improve .NET performance; here I’ll list some of my favorite tips an why you should care about them.

    Choose the correct data type

    There’s a lot you can do, like choosing the right data type: if you are storing a player’s age, is int the right choice? Remember that int.MinValue is -2147483648 and int.MaxValue is -2147483648.

    You could use byte: its range is [0,255], so it’s perfectly fine to use it.

    To have an idea of what data type to choose, here’s a short recap with the Min value, the Max value, and the number of bytes occupied by that data type:

    Data type Min value Max Value # of bytes
    byte 0 255 1
    short -32768 32767 2
    ushort 0 65535 2
    int -2147483648 2147483647 4
    uint 0 4294967295 4

    So, just by choosing the right data type, you’ll improve memory usage and then the overall performance.

    It will not bring incredible results, but it’s a good idea to think well of what you need and why you should use a particular data type.

    StringBuilder instead of string concatenation

    Strings are immutable, in C#. This means that every time you concatenate 2 strings, you are actually creating a third one that will contain the result.

    So, have a look at this snippet of code:

    string result = "<table>";
    for (int i = 0; i < 19000; i++)
    {
        result += "<tr><td>"+i+"</td><td>Number:"+i+"</td></tr>";
    }
    
    result += "</table>";
    
    Console.WriteLine(result);
    

    This loop took 2784 milliseconds.

    That’s where the StringBuilder class comes in handy: you avoid all the concatenation and store all the substrings in the StringBuilder object:

    StringBuilder result = new StringBuilder();
    
    result.Append("<table>");
    for (int i = 0; i < 19000; i++)
    {
        result.Append("<tr><td>");
        result.Append(i);
        result.Append("</td><td>Number:");
        result.Append(i);
        result.Append("</td></tr>");
    }
    
    result.Append("</table>");
    
    Console.WriteLine(result.ToString());
    

    Using StringBuilder instead of string concatenation I got the exact same result as the example above but in 58 milliseconds.

    So, just by using the StringBuilder, you can speed up that part by 98%.

    Don’t return await if it’s the only operation in that method

    Every time you mark a method as async, behind the scenes .NET creates a state machine that keeps track of the execution of each method.

    So, have a look at this program where every method returns the result from another one. Pay attention to the many return await statements;

    async Task Main()
    {
        var isAvailable = await IsArticleAvailable();
        Console.WriteLine(isAvailable);
    }
    
    async Task<bool> IsArticleAvailable()
    {
        var articlePath = "/blog/clean-code-error-handling";
        return await IsPathAvailable(articlePath);
    }
    
    async Task<bool> IsPathAvailable(string articlePath)
    {
        var baseUrl = "https://www.code4it.dev/";
        return await IsResourceAvailable(baseUrl, articlePath);
    }
    
    async Task<bool> IsResourceAvailable(string baseUrl, string articlePath)
    {
        using (HttpClient client = new HttpClient() { BaseAddress = new Uri(baseUrl) })
        {
            HttpResponseMessage response = await client.GetAsync(articlePath);
            return response.IsSuccessStatusCode;
        }
    }
    

    So, what did I mean with state machine?

    Here’s just a small part of the result of the decompilation of that code. It’s a looooong listing: don’t focus on the details, just have a look at the general structure:

    If you are interested in the full example, here you can find the gist with both the original and the decompiled file.

    internal static class <Program>$
    {
        private sealed class <<<Main>$>g__Main|0_0>d : IAsyncStateMachine
        {
            public int <>1__state;
    
            public AsyncTaskMethodBuilder <>t__builder;
    
            private bool <isAvailable>5__1;
    
            private bool <>s__2;
    
            private TaskAwaiter<bool> <>u__1;
    
            private void MoveNext()
            {
                int num = <>1__state;
                try
                {
                    TaskAwaiter<bool> awaiter;
                    if (num != 0)
                    {
                        awaiter = <<Main>$>g__IsArticleAvailable|0_1().GetAwaiter();
                        if (!awaiter.IsCompleted)
                        {
                            num = (<>1__state = 0);
                            <>u__1 = awaiter;
                            <<<Main>$>g__Main|0_0>d stateMachine = this;
                            <>t__builder.AwaitUnsafeOnCompleted(ref awaiter, ref stateMachine);
                            return;
                        }
                    }
                    else
                    {
                        awaiter = <>u__1;
                        <>u__1 = default(TaskAwaiter<bool>);
                        num = (<>1__state = -1);
                    }
                    <>s__2 = awaiter.GetResult();
                    <isAvailable>5__1 = <>s__2;
                    Console.WriteLine(<isAvailable>5__1);
                }
                catch (Exception exception)
                {
                    <>1__state = -2;
                    <>t__builder.SetException(exception);
                    return;
                }
                <>1__state = -2;
                <>t__builder.SetResult();
            }
    
            void IAsyncStateMachine.MoveNext()
            {
                //ILSpy generated this explicit interface implementation from .override directive in MoveNext
                this.MoveNext();
            }
    
            [DebuggerHidden]
            private void SetStateMachine(IAsyncStateMachine stateMachine)
            {
            }
    
            void IAsyncStateMachine.SetStateMachine(IAsyncStateMachine stateMachine)
            {
                //ILSpy generated this explicit interface implementation from .override directive in SetStateMachine
                this.SetStateMachine(stateMachine);
            }
        }
    
        private sealed class <<<Main>$>g__IsArticleAvailable|0_1>d : IAsyncStateMachine
        {
            public int <>1__state;
    
            public AsyncTaskMethodBuilder<bool> <>t__builder;
    
            private string <articlePath>5__1;
    
            private bool <>s__2;
    
            private TaskAwaiter<bool> <>u__1;
    
            private void MoveNext()
            {
                int num = <>1__state;
                bool result;
                try
                {
                    TaskAwaiter<bool> awaiter;
                    if (num != 0)
                    {
                        <articlePath>5__1 = "/blog/clean-code-error-handling";
                        awaiter = <<Main>$>g__IsPathAvailable|0_2(<articlePath>5__1).GetAwaiter();
                        if (!awaiter.IsCompleted)
                        {
                            num = (<>1__state = 0);
                            <>u__1 = awaiter;
                            <<<Main>$>g__IsArticleAvailable|0_1>d stateMachine = this;
                            <>t__builder.AwaitUnsafeOnCompleted(ref awaiter, ref stateMachine);
                            return;
                        }
                    }
                    else
                    {
                        awaiter = <>u__1;
                        <>u__1 = default(TaskAwaiter<bool>);
                        num = (<>1__state = -1);
                    }
                    <>s__2 = awaiter.GetResult();
                    result = <>s__2;
                }
                catch (Exception exception)
                {
                    <>1__state = -2;
                    <articlePath>5__1 = null;
                    <>t__builder.SetException(exception);
                    return;
                }
                <>1__state = -2;
                <articlePath>5__1 = null;
                <>t__builder.SetResult(result);
            }
    
            void IAsyncStateMachine.MoveNext()
            {
                //ILSpy generated this explicit interface implementation from .override directive in MoveNext
                this.MoveNext();
            }
    
            [DebuggerHidden]
            private void SetStateMachine(IAsyncStateMachine stateMachine)
            {
            }
    
            void IAsyncStateMachine.SetStateMachine(IAsyncStateMachine stateMachine)
            {
                //ILSpy generated this explicit interface implementation from .override directive in SetStateMachine
                this.SetStateMachine(stateMachine);
            }
        }
    
        [AsyncStateMachine(typeof(<<<Main>$>g__IsArticleAvailable|0_1>d))]
        [DebuggerStepThrough]
        internal static Task<bool> <<Main>$>g__IsArticleAvailable|0_1()
        {
            <<<Main>$>g__IsArticleAvailable|0_1>d stateMachine = new <<<Main>$>g__IsArticleAvailable|0_1>d();
            stateMachine.<>t__builder = AsyncTaskMethodBuilder<bool>.Create();
            stateMachine.<>1__state = -1;
            stateMachine.<>t__builder.Start(ref stateMachine);
            return stateMachine.<>t__builder.Task;
        }
    

    Every method marked as async “creates” a class that implements the IAsyncStateMachine interface and implements the MoveNext method.

    So, to improve performance, we have to get rid of lots of this stuff: we can do it by simply removing await calls when there is only one awaited method and you do nothing after calling that method.

    So, we can transform the previous snippet:

    async Task Main()
    {
        var isAvailable = await IsArticleAvailable();
        Console.WriteLine(isAvailable);
    }
    
    async Task<bool> IsArticleAvailable()
    {
        var articlePath = "/blog/clean-code-error-handling";
        return await IsPathAvailable(articlePath);
    }
    
    async Task<bool> IsPathAvailable(string articlePath)
    {
        var baseUrl = "https://www.code4it.dev/";
        return await IsResourceAvailable(baseUrl, articlePath);
    }
    
    async Task<bool> IsResourceAvailable(string baseUrl, string articlePath)
    {
        using (HttpClient client = new HttpClient() { BaseAddress = new Uri(baseUrl) })
        {
            HttpResponseMessage response = await client.GetAsync(articlePath);
            return response.IsSuccessStatusCode;
        }
    }
    

    into this one:

    async Task Main()
    {
        var isAvailable = await IsArticleAvailable();
        Console.WriteLine(isAvailable);
    }
    
    Task<bool> IsArticleAvailable()
    {
        var articlePath = "/blog/clean-code-error-handling";
        return IsPathAvailable(articlePath);
    }
    
    Task<bool> IsPathAvailable(string articlePath)
    {
        var baseUrl = "https://www.code4it.dev/";
        return IsResourceAvailable(baseUrl, articlePath);
    }
    
    async Task<bool> IsResourceAvailable(string baseUrl, string articlePath)
    {
        using (HttpClient client = new HttpClient() { BaseAddress = new Uri(baseUrl) })
        {
            HttpResponseMessage response = await client.GetAsync(articlePath);
            return response.IsSuccessStatusCode;
        }
    }
    

    Notice that I removed both async and await keywords in the IsArticleAvailable and IsPathAvailable method.

    So, as you can see in this Gist, the only state machines are the ones for the Main method and for the IsResourceAvailable method.

    As usual, the more we improve memory usage, the better our applications will work.

    Other stuff

    There’s a lot more that you can improve. Look for articles that explain the correct usage of LINQ and why you should prefer HttpClientFactory over HttpClient.

    Run operations in parallel – but pay attention to the parallelism

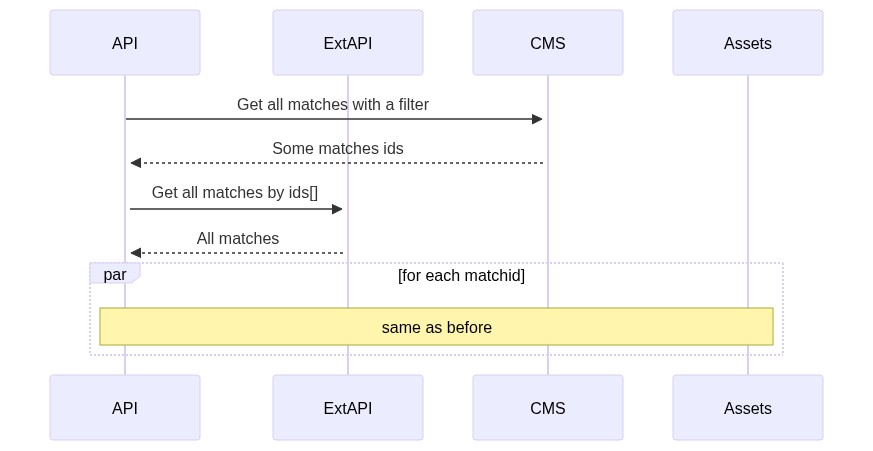
    Let’s recap a bit what problem I needed to solve: I needed to get some details for a list of sports matches:

    Initial sequence diagram

    As you see, I perform the same set of operations for every match. Working on them in parallel improved a bit the final result.

    Sequence diagram with parallel operations

    Honestly, I was expecting a better improvement. Parallel calculation is not the silver bullet. And you should know how to implement it.

    And I still don’t know.

    After many attempts, I’ve created this class that centralizes the usage or parallel operations, so that if I find a better way to implement it, I just need to update a single class.

    Feel free to copy it or suggest improvements.

    public static class ParallelHelper
    {
        public static IEnumerable<Out> PerformInParallel<In, Out>(IEnumerable<In> items, Func<In, Out> fn, int maxDegreeOfParallelism = 10)
        {
            var options = new ParallelOptions { MaxDegreeOfParallelism = maxDegreeOfParallelism };
    
            ConcurrentBag<Out> cb = new ConcurrentBag<Out>();
    
            Parallel.ForEach(items, options, item =>
            {
                cb.Add(fn(item));
            });
            return cb.ToList();
        }
    
        public static IEnumerable<Out> PerformInParallel<In, Out>(IEnumerable<IEnumerable<In>> batches, Func<In, Out> fn, int maxDegreeOfParallelism = 10)
        {
            var options = new ParallelOptions { MaxDegreeOfParallelism = maxDegreeOfParallelism };
            ConcurrentBag<Out> cb = new ConcurrentBag<Out>();
    
            foreach (var batch in batches)
            {
                Parallel.ForEach(batch, options, item =>
                {
                    cb.Add(fn(item));
                });
            }
            return cb.ToList();
        }
    
        public static IEnumerable<Out> PerformInParallel<In, Out>(IEnumerable<IEnumerable<In>> batches, Func<IEnumerable<In>, IEnumerable<Out>> fn, int maxDegreeOfParallelism = 10)
        {
            var options = new ParallelOptions { MaxDegreeOfParallelism = maxDegreeOfParallelism };
            ConcurrentBag<Out> cb = new ConcurrentBag<Out>();
    
            Parallel.ForEach(batches, options, batch =>
                {
                    var resultValues = fn(batch).ToList();
                    foreach (var result in resultValues)
                    {
                        cb.Add(result);
                    }
                });
            return cb.ToList();
        }
    }
    

    The first method performs the operation specified in the Func on every item passed in the IEnumerable parameter: then it aggregates the result in the ConcurrentBag object (it’s a thread-safe collection) and then returns the final result.

    The other methods do a similar thing but to a list of lists: this is useful when splitting the calculation into batches and performing each of these batches in sequence.

    But, why the MaxDegreeOfParallelism? Well, resources are not infinite; you can’t perform the same heavy operation on 200000 items at the same time, even more, if many requests arrive simultaneously. You have to reduce the number of items processed in parallel.
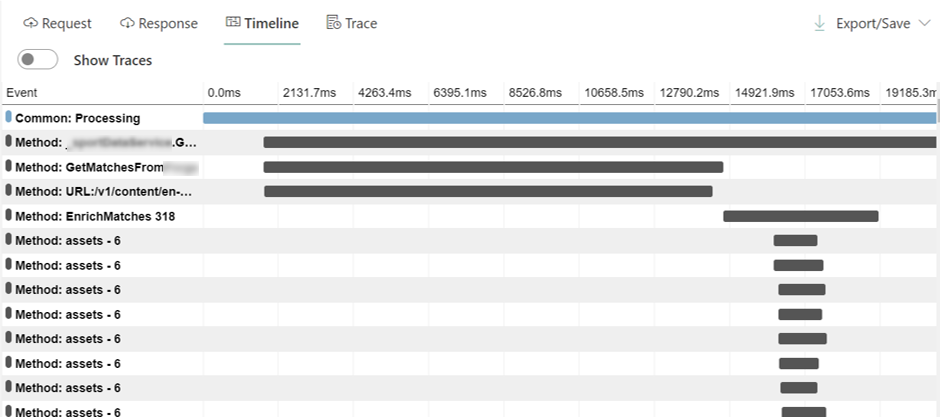
    Parallel execution of assets

    In the picture above you can see the parallel execution of the search for assets: every call begins at the same moment, so the final timing is a lot better than if I had performed all the operations in sequence.

    Move to .NET 5

    As reported by the official documentation, there has been a huge improvement in performance in the latest version of .NET.

    Those improvements are mainly about the usage of Garbage Collector, JIT optimization, and usage of strings and Regex-s.

    If you are interested, here’s a good article on Microsoft’s blog.

    So, did it really improved my application?

    Well, no.

    As you already know, the main bottlenecks are because of external dependencies (aka API calls). So, nothing that an update of the whole framework could impact.

    But, just to try it, I moved my application from .NET Core 3.1 to .NET 5: the porting was incredibly easy. But, as I was expecting, I did not get any significant improvement.

    So, since the application was a dependency of a wider system, I rolled it back to .NET 3.1.

    Ask, discuss, communicate

    The last tip is one of the most simple yet effective ones: talk with your colleagues, keep track of what worked and what didn’t, and communicate with other developers and managers.

    Even if a question is silly, ask. Maybe you’ll find some tip that gives you the best idea.

    Have a call with your colleagues, share your code and let them help you: even a simple trick, a tool they can suggest, an article that solves one of your problems, can be the key to the success.

    Don’t expect any silver bullet: you’ll improve your application with small steps.

    Wrapping up

    We’ve seen how I managed to improve the performance of an API endpoint passing from 14 seconds to 3.

    In this article you’ve seen some .NET-related tips to improve the performance of your applications: nothing fancy, but those little steps might help you reach the desired result.

    Of course, there is more: if you are want to know how compression algorithms and hosting models affect your applications, check out this article!

    If you have more tips, feel free to share them in the comments session!

    Happy coding!


    Source link

  • How to expose .NET Assembly Version via API endpoint routing | Code4IT


    Knowing the Assembly Version of the API you’ve deployed on an environment may be helpful for many reasons. We’re gonna see why, how to retrieve it, and how to expose it with Endpoint Routing (bye-bye Controllers and Actions!)

    Table of Contents

    Just a second! 🫷
    If you are here, it means that you are a software developer.
    So, you know that storage, networking, and domain management have a cost .

    If you want to support this blog, please ensure that you have disabled the adblocker for this site.
    I configured Google AdSense to show as few ADS as possible – I don’t want to bother you with lots of ads, but I still need to add some to pay for the resources for my site.

    Thank you for your understanding.
    Davide

    Sometimes it can be useful to show the version of the running Assembly in one .NET Core API endpoint: for example, when you want to know which version of your code is running in an environment, or to expose a simple endpoint that acts as a “minimal” health check.

    In this article, we’re going to see how to retrieve the assembly version at runtime using C#, then we will expose it under the root endpoint of a .NET Core API without creating an API Controller, and lastly we’ll see how to set the Assembly version with Visual Studio.

    How to get Assembly version

    To get the Assembly version, everything we need is this snippet:

    Assembly assembly = Assembly.GetEntryAssembly();
    AssemblyInformationalVersionAttribute versionAttribute = assembly.GetCustomAttribute<AssemblyInformationalVersionAttribute>();
    string assemblyVersion = versionAttribute.InformationalVersion;
    

    Let’s break it down!

    The first step is to get the info about the running assembly:

    Assembly assembly = Assembly.GetEntryAssembly();
    

    The Assembly class is part of the System.Reflection namespace, so you have to declare the corresponding using statement.

    The AssemblyInformationalVersionAttribute attribute comes from the same namespace, and contains some info for the assembly manifest. You can get that info with the second line of the snippet:

    AssemblyInformationalVersionAttribute versionAttribute = assembly.GetCustomAttribute<AssemblyInformationalVersionAttribute>();
    

    Lastly, we need the string that represents the assembly version:

    string assemblyVersion = versionAttribute.InformationalVersion;
    

    If you want to read more about Assembly versioning in .NET, just head to the official documentation.

    How to expose an endpoint with Endpoint Routing

    Next, we need to expose that value using .NET Core API.

    Since we’re exposing only that value, we might not want to create a new Controller with a single Action: in this case, endpoint routing is the best choice!

    In the Startup.cs file, under the Configure method, we can define how the HTTP request pipeline is configured.

    By default, for ASP.NET Core APIs, you’ll see a section that allows the engine to map the Controllers to the endpoints:

    app.UseEndpoints(endpoints =>
    {
        endpoints.MapControllers();
    });
    

    In this section, we can configure some other endpoints.

    The easiest way is to map a single path to an endpoint and specify the returned content. We can do it by using the MapGet method, which accepts a string for the path pattern and an async Delegate for the execution:

    app.UseEndpoints(endpoints =>
    {
        endpoints.MapGet("/", async context =>
        {
            await context.Response.WriteAsync("Hi there!!");
        });
    
        endpoints.MapControllers();
    });
    

    In this way, we will receive the message Hi there every time we call the root of our API (because of the first parameter, /), and it happens only when we use the GET HTTP Verb, because of the MapGet method.

    Putting all together

    Now that we have all in place, we can join the two parts and return the Assembly version on the root of our API.

    Putting all together

    You could just return the string as it is returned from the versionAttribute.InformationalVersion property we’ve seen before. Or you could wrap it into an object.

    If you don’t want to specify a class for it, you can use an ExpandoObject instance and create new properties on the fly. Then, you have to serialize it into a string, and return it in the HTTP Response:

    endpoints.MapGet("/", async context =>
    {
        // get assembly version
        Assembly assembly = Assembly.GetEntryAssembly();
        AssemblyInformationalVersionAttribute versionAttribute = assembly.GetCustomAttribute<AssemblyInformationalVersionAttribute>();
        string assemblyVersion = versionAttribute.InformationalVersion;
    
        // create the dynamic object
        dynamic result = new ExpandoObject();
        result.version = assemblyVersion;
    
        // serialize the object
        string versionAsText = JsonSerializer.Serialize(result);
    
        // return it as a string
        await context.Response.WriteAsync(versionAsText);
    });
    

    That’s it!

    Of course, if you want only the version as a string without the dynamic object, you can simplify the MapGet method in this way:

    endpoints.MapGet("/", async context =>
    {
        var version = Assembly.GetEntryAssembly().GetCustomAttribute<AssemblyInformationalVersionAttribute>().InformationalVersion;
        await context.Response.WriteAsync(version);
    });
    

    But, for this example, let’s stay with the full object.

    Let’s try it: update Assembly version and retrieve it from API

    After tidying up the code, the UseEndpoints section will have this form:

    app.UseEndpoints(endpoints =>
    {
        endpoints.MapGet("/", async context =>
        {
            dynamic result = new ExpandoObject();
            result.version = Assembly.GetEntryAssembly().GetCustomAttribute<AssemblyInformationalVersionAttribute>().InformationalVersion;
            string versionAsText = JsonSerializer.Serialize(result);
            await context.Response.WriteAsync(versionAsText);
        });
    
        endpoints.MapControllers();
    });
    

    or, if you want to clean up your code, you could simplify it like this:

    app.UseEndpoints(endpoints =>
    {
        endpoints.WithAssemblyVersionOnRoot();
        endpoints.MapControllers();
    });
    

    WithAssemblyVersionOnRoot is an extension method I created to wrap that logic and make the UseEndpoints method cleaner. If you want to learn how to create extension methods with C#, and what are some gotchas, head to this article!

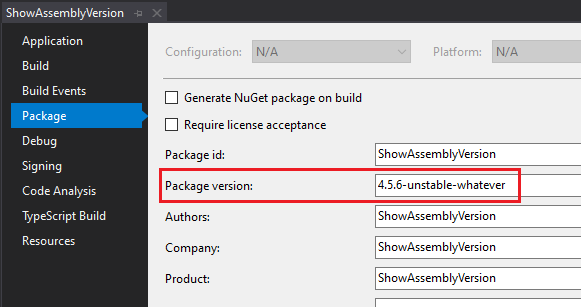
    To see the result, open Visual Studio, select the API project and click alt + Enter to navigate to the Project properties. Here, under the Package tag, define the version in the Package version section.

    Tab on Visual Studio used to define assembly version

    In this screen, you can set the value of the package that will be built.

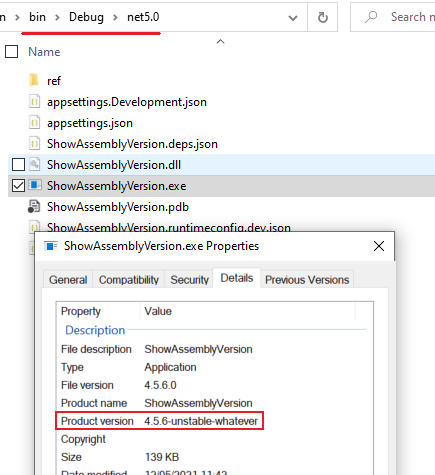
    To double-check that the version is correct, head to the bin folder and locate the exe related to your project: right-click on it, go to properties and to the details tab. Here you can see the details of that exe:

    Assembly version on exe properties

    Noticed the Product version? That’s exactly what we’ve set up on Visual Studio.

    So, now it’s time to run the application.

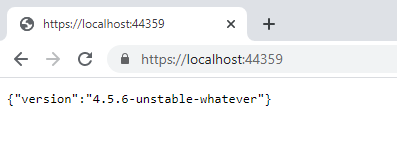
    Get back to Visual Studio, run the application, and navigate to the root of the API.

    Finally, we can enjoy the result!

    Assembly version as exposed by the API endpoint

    Quite simple, isn’t it?

    Wrapping up

    In this article, we’ve seen how to expose on a specific route the version of the assembly running at a specified URL.

    This is useful to help you understand which version is currently running in an environment without accessing the CD pipelines to see which version has been deployed.

    Also, you can use this information as a kind of health check, since the data exposed are static and do not depend on any input or database status: the simplest match for getting info about the readiness of your application.

    What other info would you add to the exposed object? Let me know in the comment section 👇

    Happy coding!


    Source link

  • C# Tip: use the Ping class instead of an HttpClient to ping an endpoint

    C# Tip: use the Ping class instead of an HttpClient to ping an endpoint


    Just a second! 🫷
    If you are here, it means that you are a software developer.
    So, you know that storage, networking, and domain management have a cost .

    If you want to support this blog, please ensure that you have disabled the adblocker for this site.
    I configured Google AdSense to show as few ADS as possible – I don’t want to bother you with lots of ads, but I still need to add some to pay for the resources for my site.

    Thank you for your understanding.
    Davide

    What if you wanted to see if a remote website is up and running?

    Probably, the first thing that may come to your mind is to use a common C# class: HttpClient. But it may cause you some trouble.

    There is another way to ping an endpoint: using the Ping class.

    Why not using HttpClient

    Say that you need to know if the host at code4it.dev is live. With HttpClient you might use something like this:

    async Task Main()
    {
        var url = "https://code4it.dev";
    
        var isUp = await IsWebsiteUp_Get(url);
    
        Console.WriteLine("The website is {0}", isUp ? "up" : "down");
    }
    
    private async Task<bool> IsWebsiteUp_Get(string url)
    {
        var httpClient = new HttpClient(); // yes, I know, I should use HttpClientFactory!
        var httpResponse = await httpClient.GetAsync(url);
        return httpResponse.IsSuccessStatusCode;
    }
    

    There are some possible issues with this approach: what if there is no resource available in the root? You will have to define a specific path. And what happens if the defined resource is under authentication? IsWebsiteUp_Get will always return false. Even when the site is correctly up.

    Also, it is possible that the endpoint does not accept HttpGet requests. So, we can use HttpHead instead:

    private async Task<bool> IsWebsiteUp_Head(string url)
    {
        var httpClient = new HttpClient();
        HttpRequestMessage request = new HttpRequestMessage
        {
            RequestUri = new Uri(url),
            Method = HttpMethod.Head // Not GET, but HEAD
        };
        var result = await httpClient.SendAsync(request);
        return result.IsSuccessStatusCode;
    }
    

    We have the same issues described before, but at least we are not bound to a specific HTTP verb.

    By the way, we need to find another way.

    How to use Ping

    By using the Ping class, we can get rid of those checks and evaluate the status of the Host, not of a specific resource.

    private async Task<bool> IsWebsiteUp_Ping(string url)
    {
        Ping ping = new Ping();
        var hostName = new Uri(url).Host;
    
        PingReply result = await ping.SendPingAsync(hostName);
        return result.Status == IPStatus.Success;
    }
    

    The Ping class comes in the System.Net.NetworkInformation namespace, and allows you to perform the same operations of the ping command you usually send via command line.

    Conclusion

    We’ve seen why you should use Ping instead of HttpClient to perform a ping-like operation.

    There’s more than this: head to this more complete article to learn more.

    👉 Let’s discuss it on Twitter or on the comment section below.

    🐧


    Source link

  • How Seqrite Endpoint Protection Blocks Bots, Scripts, and Malware


    In today’s hyper-connected digital world, the cybersecurity landscape is shifting dramatically. Gone are the days when cyberattacks primarily relied on human intervention. We’re now facing a new breed of silent, swift adversaries: non-human threats. These automated entities—bots, malicious scripts, and sophisticated malware—are designed to operate at machine speed, exploiting vulnerabilities, bypassing traditional defenses, and often remaining undetected until significant damage has occurred. So, how do you defend against something you can’t see, something that moves faster than human reaction? The answer lies in intelligent, automated endpoint security. Enter Seqrite Endpoint Protection (EPP), your robust shield against these invisible invaders. Available for both cloud-based and on-premise deployments, Seqrite EPP is engineered with cutting-edge technologies specifically designed to identify and neutralize these stealthy, non-human threats.

    Understanding the Enigma: What Exactly Are Non-Human Cyber Threats?

    When we talk about “non-human cyber threats,” we’re referring to automated programs and code snippets that launch attacks without requiring direct human interaction. These include:

    • Bots: Automated programs designed to perform repetitive tasks at scale. Think credential stuffing attacks where bots try thousands of username/password combinations, or Distributed Denial of Service (DDoS) attacks that flood a server with traffic.
    • Malicious Scripts: These are pieces of automated code, often hidden within legitimate-looking files or web pages, designed to exploit system weaknesses, exfiltrate sensitive data, or spread malware across your network.
    • Exploit Kits: These are sophisticated toolkits that automatically scan systems for unpatched vulnerabilities and then deploy exploits to gain unauthorized access or deliver payloads like ransomware.

    The key characteristic of these threats is their autonomy and speed. They operate under the radar, making traditional, reactive security measures largely ineffective. This is precisely why proactive, automated detection and prevention mechanisms are absolutely critical for modern businesses.

    Seqrite Endpoint Protection: Your Multi-Layered Defense Against Automation

    Seqrite’s EPP doesn’t just offer a single line of defense; it deploys a comprehensive, multi-layered security framework. This framework is specifically engineered to detect and block automation-driven threats using a powerful combination of intelligent rule-based systems, behavioral analysis, and advanced AI-powered capabilities.

    Let’s dive into the key features that make Seqrite EPP a formidable opponent against non-human threats:

    1. Advanced Device Control: Many non-human threats, especially scripts and certain types of malware, are delivered via external devices like USB drives. Seqrite’s Advanced Device Control enforces strict usage policies, allowing you to define what devices can connect to your endpoints and how they can be used. By controlling storage, network, and wireless interfaces, you effectively close off a major entry point for automated attacks.
    2. Application Control with Zero Trust: Imagine only allowing approved applications and scripts to run on your systems. That’s the power of Seqrite’s Application Control. By implementing a Zero Trust model, it blocks unknown or unapproved applications and scripts from executing. Through meticulous allowlisting and blocklisting, only trusted applications can operate, making it incredibly effective against stealthy automation tools that attempt to execute malicious code.
    3. Behavior-Based Detection (GoDeep.AI): This is where Seqrite truly shines. Leveraging cutting-edge AI and machine learning, GoDeep.AI continuously monitors endpoint activity to identify abnormal and suspicious behaviors that indicate a non-human threat. This includes detecting:
      • Repetitive access patterns: A hallmark of bots attempting to brute-force accounts or scan for vulnerabilities.
      • Scripted encryption behavior: Instantly flags the tell-tale signs of ransomware encrypting files.
      • Silent data exfiltration attempts: Catches automated processes trying to siphon off sensitive information. The system doesn’t just detect; it actively stops suspicious activity in its tracks before it can cause any harm.
    4. Intrusion Detection & Prevention System (IDS/IPS): Seqrite’s integrated IDS/IPS actively monitors network traffic for known exploit patterns and anomalous behavior. This robust system is crucial for blocking automation-based threats that attempt to infiltrate your network through known vulnerabilities or launch network-based attacks like port scanning.
    5. File Sandboxing: When a suspicious file or script enters your environment, Seqrite doesn’t let it run directly on your system. Instead, it’s whisked away to a secure, isolated virtual sandbox environment for deep analysis. Here, the file is allowed to execute and its behavior is meticulously observed. If it exhibits any malicious traits—like attempting to mimic user behavior, access restricted resources, or encrypt files—it’s immediately flagged and stopped, preventing any potential damage to your actual endpoints.
    6. Web Protection & Phishing Control: Many non-human threats, particularly bots and sophisticated malware, rely on communication with remote command-and-control (C2) servers. Seqrite’s Web Protection proactively blocks:
      • Access to known malicious domains.
      • Phishing sites designed to steal credentials.
      • Unauthorized web access that could lead to malware downloads.
      • Crucially, it cuts off botnet callbacks, effectively severing the communication lines between bots and their command centers, rendering them inert.

    Enhancing Your Defense: Essential Supporting Features

    Beyond its core capabilities, Seqrite Endpoint Protection is bolstered by a suite of supporting features that further strengthen your organization’s resilience against non-human threats and beyond:

    Feature Benefit
    Patch Management Automatically identifies and fixes software vulnerabilities that bots and scripts often exploit to gain entry. Proactive patching is key to prevention.
    Firewall Provides a critical layer of defense by filtering unauthorized network traffic and blocking communication with known botnet IP addresses.
    Data Loss Prevention (DLP) Prevents automated data theft by monitoring and controlling data in transit, ensuring sensitive information doesn’t leave your network without authorization.
    Centralized Log Management Offers a unified view of security events, allowing for rapid detection and auditing of unusual or suspicious behaviors across all endpoints.
    Disk Encryption Management Safeguards your data by encrypting entire disks, stopping automated decryption attempts even if data is stolen, and protecting against ransomware.


    The Future of Endpoint Security: Why Non-Human Threat Detection is Non-Negotiable

    As we move deeper into 2025 and beyond, cyber threats are becoming increasingly automated, sophisticated, and often, AI-driven. Relying on traditional, signature-based security solutions is no longer enough to match the speed, stealth, and evolving tactics of automation-based attacks.

    Seqrite Endpoint Protection is built for this future. It leverages intelligent automation to effectively combat automation—blocking bots, malicious scripts, advanced ransomware, and other non-human threats before they can execute and wreak havoc on your systems and data.

    Final Takeaway: Don’t Let Invisible Threats Compromise Your Business

    In a world where cyberattacks are increasingly executed by machines, your defense must be equally advanced. With its comprehensive suite of features—including cutting-edge device and application control, AI-driven behavioral detection (GoDeep.AI), robust network-level protection, and secure sandboxing—Seqrite Endpoint Protection ensures your endpoints remain locked down and secure.

    Whether your organization operates with a cloud-first strategy or relies on a traditional on-premise infrastructure, Seqrite provides the adaptable and powerful security solutions you need.

    Ready to Fortify Your Defenses?

    It’s time to upgrade your endpoint security and protect your organization from both human-initiated and the ever-growing wave of non-human cyber threats.

    Explore how Seqrite can secure your business today. Request a Free Trial or Schedule a Demo.


    Source link