برچسب: Every

  • 5 tricks every C# dev should know about LINQPad | Code4IT

    5 tricks every C# dev should know about LINQPad | Code4IT


    LINQPad is one of the tools I use daily. But still, I haven’t used it at its full power. And you?

    Table of Contents

    Just a second! 🫷
    If you are here, it means that you are a software developer.
    So, you know that storage, networking, and domain management have a cost .

    If you want to support this blog, please ensure that you have disabled the adblocker for this site.
    I configured Google AdSense to show as few ADS as possible – I don’t want to bother you with lots of ads, but I still need to add some to pay for the resources for my site.

    Thank you for your understanding.
    Davide

    LINQPad is one of my best friends: I use it daily, and it helps me A LOT when I need to run some throwaway code.

    There are many other tools out there, but I think that LINQPad (well, the full version!) is one of the best tools on the market.

    But still, many C# developers only use just a few of its functionalities! In this article, I will show you my top 5 functionalities you should know.

    Advanced Dump()

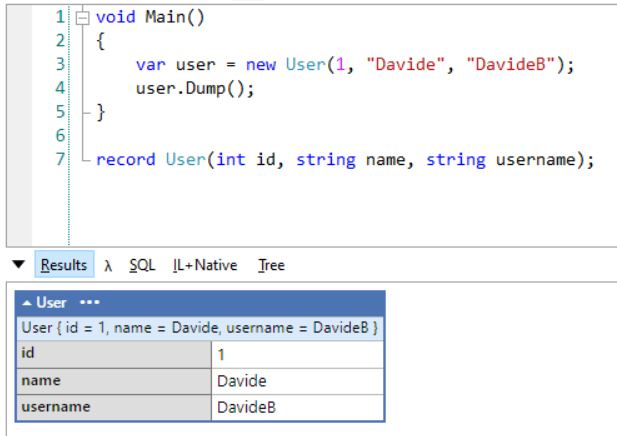
    As many of you already know, to print stuff on the console you don’t have to call Console.WriteLine(something), but you can use something.Dump();

    void Main()
    {
        var user = new User(1, "Davide", "DavideB");
        user.Dump();
    }
    

    Basic usage of Dump()

    You can simplify it by avoiding calling the Dump operation in a separate step: Dump can print the content and return it at the same time:

    var user = new User(1, "Davide", "DavideB").Dump();
    

    Dump() can both print and return a value

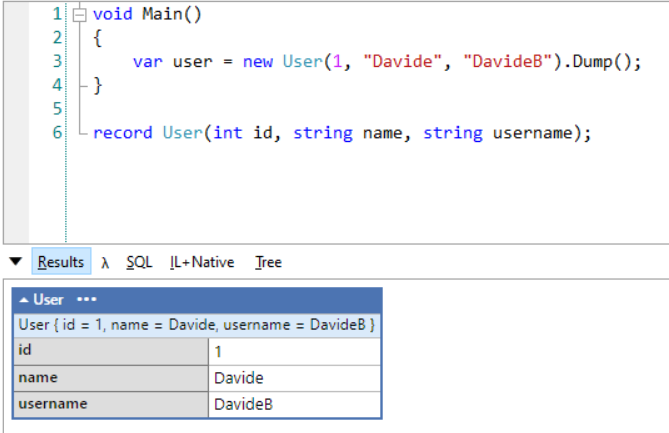
    For sure, this simple trick makes your code easier to read!

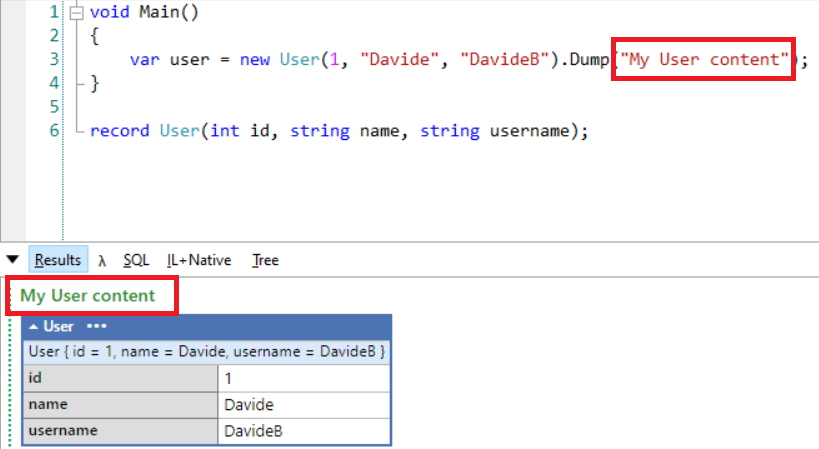
    Ok, what if you have too many Dump calls and you don’t know which operation prints which log? Lucky for us, the Dump method accepts a string as a Title: that text will be displayed in the output panel.

    var user = new User(1, "Davide", "DavideB").Dump("My User content");
    

    You can now see the “My User content” header right above the log of the user:

    Dump() with title

    Dump containers

    We can do a step further and introduce Dump containers.

    Dump Containers are some sort of sink for your logs (we’ve already talked about sinks, do you remember?). Once you’ve instantiated a DumpContainer object, you can perform some operations such as AppendContent to append some content at the end of the logs, ClearContent to clear the content (obviously!), and Dump to display the content of the Container in the Results panel.

    DumpContainer dc = new DumpContainer();
    
    dc.Content = "Hey!";
    dc.AppendContent("There");
    
    dc.Dump();
    

    Note: you don’t need to place the Dump() instruction at the end of the script: you can put it at the beginning and you’ll see the content as soon as it gets added. Otherwise, you will build the internal list of content and display it only at the end.

    So, this is perfectly valid:

    DumpContainer dc = new DumpContainer();
    dc.Dump();
    
    
    dc.Content = "Hey!";
    dc.AppendContent("There");
    

    Simple usage of Dump container

    You can even explicitly set the content of the Container: setting it will replace everything else.

    Here you can see what happens when we override the content:

    Replace log content with DumpContainer

    Why should we even care? 🤔

    My dear friend, it’s easy! Because we can create more Containers to log different things!

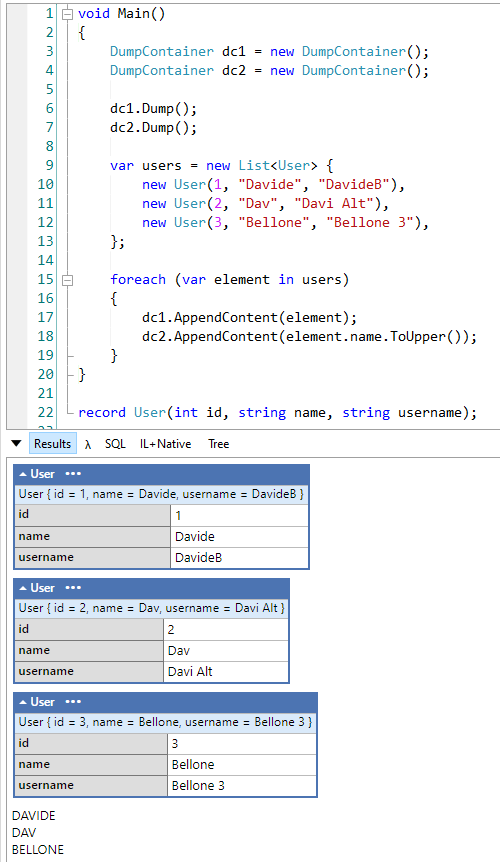
    Take this example: we want to loop over a list of items and use one Container to display the item itself, and another Container to list what happens when we perform some operations on each item. Yeeees, I know, it’s hard to understand in this way: let me show you an example!

    DumpContainer dc1 = new DumpContainer();
    DumpContainer dc2 = new DumpContainer();
    
    dc1.Dump();
    dc2.Dump();
    
    var users = new List<User> {
        new User(1, "Davide", "DavideB"),
        new User(2, "Dav", "Davi Alt"),
        new User(3, "Bellone", "Bellone 3"),
    };
    
    foreach (var element in users)
    {
        dc1.AppendContent(element);
        dc2.AppendContent(element.name.ToUpper());
    }
    

    Here we’re using two different containers, each of them lives its own life.

    Using multiple containers

    In this example I used AppendContent, but of course, you can replace the full content of a Container to analyze one item at a time.

    I can hear you: there’s another question in your mind:

    How can we differentiate those containers?

    You can use the Style property of the DumpContainer class to style the output, using CSS-like properties:

    DumpContainer dc2 = new DumpContainer();
    dc2.Style = "color:red; font-weight: bold";
    

    Now all the content stored in the dc2 container will be printed in red:

    Syling DumpContainer with CSS rules

    Great stuff 🤩

    Read text from input

    Incredibly useful, but often overlooked, is the ability to provide inputs to our scripts.

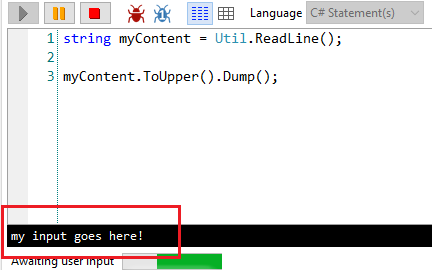
    To do that, you can rely on the Util.ReadLine method already included in LINQPad:

    string myContent = Util.ReadLine();
    

    When running the application, you will see a black box at the bottom of the window that allows you to write (or paste) some text. That text will then be assigned to the myContent variable.

    Using input in LINQPad

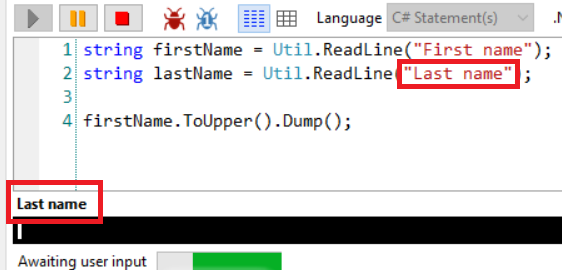
    There’s a nice overload that allows you to specify a sort of title to the text box, to let you know which is the current step:

    Input boxes can have a title

    Paste as escaped string

    This is one of my favorite functionalities: many times I have to escape text that contains quotes, copied from somewhere else to assign it to a string variable; I used to lose time escaping those values manually (well, using other tools that still are slower than this one).

    Take this JSON:

    {
      "name": "davide",
      "gender": "male",
      "probability": 0.99,
      "count": 82957
    }
    

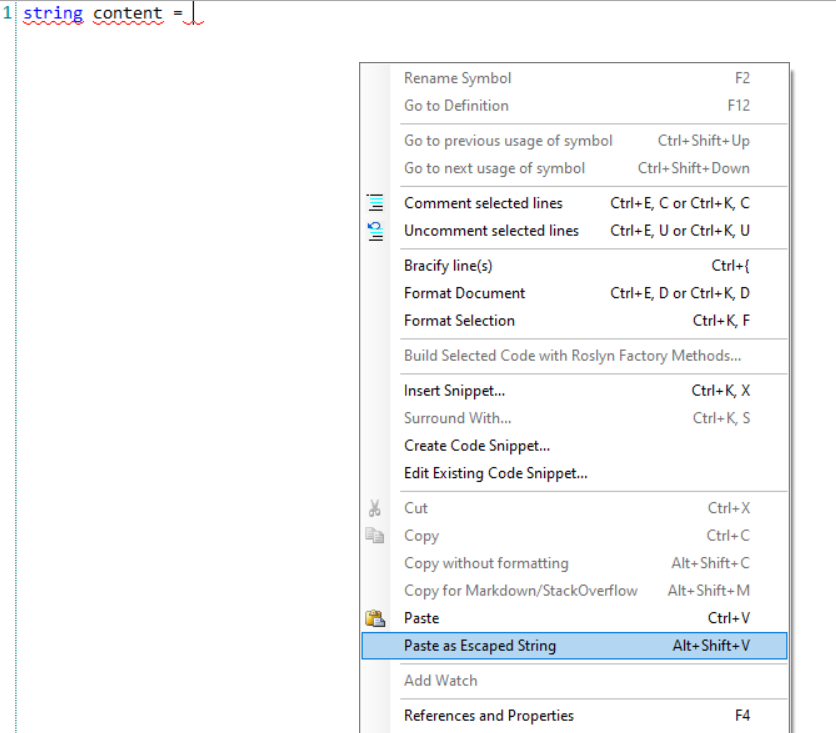
    Assigning it manually to a string becomes a mess. Lucky for us, we can copy it, get back on LINQPad, right-click, choose “Paste as escaped string” (or, if you prefer, use Alt+Shift+V) and have it already escaped and ready to be used:

    Escaped string in LINQPad

    That operation will generate this string:

    string content = "{\n\t\"name\": \"davide\",\n\t\"gender\": \"male\",\n\t\"probability\": 0.99,\n\t\"count\": 82957\n}";
    

    Not bad, isn’t it? 😎

    xUnit test support

    Another nice functionality that you can use to toy with classes or methods you don’t know is the xUnit test support.

    By clicking on the Query > Add XUnit Test Support, you can add xUnit to your query and write (and run, obviously) unit tests.

    All those tests are placed in a region named Tests:

    and can be run both by pressing Alt+Shift+T or by calling RunTests() in the Main method.

    After running the tests you will see a report with the list of the tests that passed and the details of the tests that failed:

    xUnit test result

    This article first appeared on Code4IT

    Wrapping up

    We’ve seen 5 amazing tricks to get the best out of LINQPad. In my opinion, every C# developer that uses this tool should know those tricks, they can really boost your productivity.

    Did you already know all of them? Which are your favorites? Drop a message in the comments section or on Twitter 📧

    Happy coding!

    🐧


    Source link

  • From Static to Dynamic: 3 Micro-Animations Every Web Developer Can Master with Rive

    From Static to Dynamic: 3 Micro-Animations Every Web Developer Can Master with Rive


    Interactive web animations have become essential for modern websites, but choosing the right implementation approach can be challenging. CSS, Video and JavaScript are the familiar methods and each certainly has its place in a developer’s toolkit. When you need your site to have unique custom interactions (while remaining light and performant, of course), that’s where Rive shines.

    Rive animations, whether vector or raster, look crisp at any size, are lightweight (often smaller than equivalent Lottie files), and can respond to user interactions and real-time data through a straightforward JavaScript API.

    This tutorial will walk you through Rive’s workflow and implementation process using three practical examples. We’ll build them step-by-step using a fictional smart plant care company called “TapRoot” as our case study, so you can see exactly how Rive fits into a real development process and decide if it’s right for your next project.

    There are countless ways to use Rive, but we’ll focus on these three patterns:

    1. Animated Hero Images create an immediate emotional connection and brand personality
    2. Interactive CTAs increase conversion rates by providing clear, satisfying feedback
    3. Flexible Layouts combine elements into an experience that works at any size

    Each pattern builds on the previous one, teaching you progressively more sophisticated Rive techniques while solving real-world UX challenges.

    Pattern 1: The Living Hero Image

    The Static Starting Point

    A static hero section for TapRoot could feature a photo of their smart plant pot with overlay text. It show’s the product, but we can do better.

    Creating the Rive Animation

    Let’s create an animated version that transforms this simple scene into a revealing experience that literally shows what makes TapRoot “smarter than it looks.” The animation features:

    • Gently swaying leaves: Constant, subtle motion brings a sense of life to the page.
    • Interior-reveal effect: Hovering over the pot reveals the hidden root system and embedded sensors
    • Product Feature Callouts: Key features are highlighted with interactive callouts

    Although Rive is vector-based, you can also import JPG, PNG, and PSD files. With an embedded image, a mesh can be constructed and a series of bones can be bound to it. Animating the bones gives the subtle motion of the leaves moving. We’ll loop it at a slow speed so the motion is noticeable, but not distracting.

    Adding Interactivity

    Next we’ll add a hover animation that reveals the inside of the pot. By clipping the image of the front of the pot to a rectangle, we can resize the shape to reveal the layers underneath. Using a joystick allows us to have an animation follow the cursor when it’s in within the hit area of the pot and snap back to normal when the cursor leaves the area.

    Feature Callouts

    With a nested artboard, it is easy to build a single layout to create multiple versions of an element. In this case, a feature callout has an updated icon, title, and short description for three separate features.

    The Result

    What was once a simple product photo is now an interactive revelation of TapRoot’s hidden intelligence. The animation embodies the brand message—”smarter than it looks”—by literally revealing the sophisticated technology beneath a beautifully minimal exterior.

    Pattern 2: The Conversion-Boosting Interactive CTA

    Beyond the Basic Button

    Most CTAs are afterthoughts—a colored rectangle with text. But your CTA is often the most important element on your page. Let’s make it irresistible.

    The Static Starting Point

    <button class="cta-button">Get yours today</button>
    .cta-button {
      background: #4CAF50;
      color: white;
      padding: 16px 32px;
      border: none;
      border-radius: 8px;
      font-size: 18px;
      cursor: pointer;
      transition: background-color 0.3s;
    }
    
    .cta-button:hover {
      background: #45a049;
    }

    Looks like this:

    Get’s the job done, but we can do better.

    The Rive Animation Design

    Our smart CTA tells a story in three states:

    1. Idle State: Clean, minimal button with an occasional “shine” animation
    2. Hover State: Fingerprint icon begins to follow the cursor
    3. Click State: An animated “tap” of the button

    Pattern 3: Flexible Layout

    Next we can combine the elements into a responsive animated layout that works on any device size. Rive’s layout features familiar row and column arrangements and lets you determine how your animated elements fit within areas as they resize.

    Check this out on the Rive Marketplace to dive into the file or remix it: https://rive.app/community/files/21264-39951-taproot-layout/

    Beyond These Three Patterns

    Once you’re comfortable with hero images, interactive CTAs, and flexible layouts, you can apply the same Rive principles to:

    • Loading states that tell stories while users wait
    • Form validation that guides users with gentle visual feedback
    • Data visualizations that reveal insights through motion
    • Onboarding flows that teach through interaction
    • Error states that maintain user confidence through friendly animation

    Your Next Steps

    1. Start Simple: Choose one existing static element on your site
    2. Design with Purpose: Every animation should solve a real user problem
    3. Test and Iterate: Measure performance and user satisfaction
    4. Explore Further: Check out the Rive Documentation and Community for inspiration

    Conclusion

    The web is becoming more interactive and alive. By understanding how to implement Rive animations—from X-ray reveals to root network interactions—you’re adding tools that create experiences users remember and share.

    The difference between a good website and a great one often comes down to these subtle details: the satisfying feedback of a button click, the smooth transition between themes, the curiosity sparked by hidden technology. These micro-interactions connect with users on an emotional level while providing genuine functional value.


    Source link