برچسب: for

  • Designing for Flow, Not Frustration: The Transformation of Arts Corporation Through Refined Animation

    Designing for Flow, Not Frustration: The Transformation of Arts Corporation Through Refined Animation


    You know what they say about playing sounds on a website: don’t. Autoplaying audio is often considered intrusive and disruptive, which is why modern web practices discourage it. However, sound design, when used thoughtfully, can enhance the user experience and reinforce a brand’s identity. So when Arts Corporation approached me to redesign their website with a request to integrate audio, I saw an opportunity to create an immersive experience that complemented their artistic vision.

    To ensure the sound experience was as seamless as possible, I started thinking about ways to refine it, such as muting audio when the tab is inactive or when a video is playing. That focus on detail made me wonder: what are some other UX improvements that are often overlooked but could make a significant difference? That question set the foundation for a broader exploration of how subtle refinements in animation and interaction design could improve the overall user experience.

    When an Idea is Good on Paper

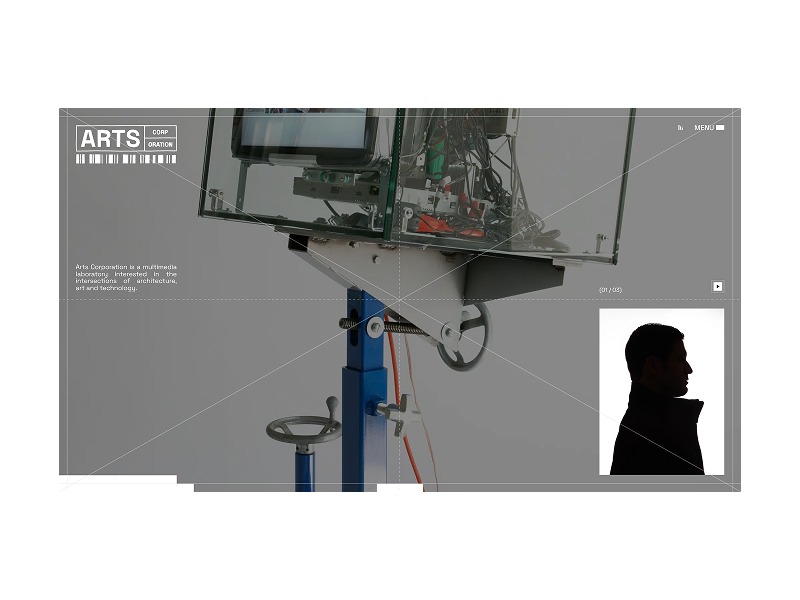
    The client came in with sketches and a strong vision for the website, including a key feature: “construction lines” overlaid across the design.

    These lines had to move individually, as though being “pushed” by the moving cursor. While this looked great in concept, it introduced a challenge: ensuring that users wouldn’t become frustrated when trying to interact with elements positioned behind the lines. 

    After some testing and trying to find ways to keep the interaction, I realized a compromise was necessary. Using GSAP ScrollTrigger, I made sure that when sections including buttons and links became visible, the interactive lines would be disabled. In the end, the interaction remained only in a few places, but the concept wasn’t worth the frustration.

    Splitting Text Like There’s No Tomorrow

    Another challenge in balancing animation and usability was ensuring that text remained readable and accessible. Splitting text has become a standard effect in the industry, but not everyone takes the extra step to prevent issues for users relying on screen readers. The best solution in my case was to simply revert to the original text once the animation was completed. Another solution, for those who need the text to remain split, would be using aria-label and aria-hidden.

    <h1 aria-label="Hello world">
      <span aria-hidden="true">
        <span>H</span>
        <span>e</span>
        <span>l</span>
        <span>l</span>
        <span>o</span>
      </span>
      <span aria-hidden="true">
        <span>W</span>
        <span>o</span>
        <span>r</span>
        <span>l</span>
        <span>d</span>
      </span>
    </h1>

    This way the user hears only the content of the aria-label attribute, not the text within the element.

    Scroll-Based Disorientation

    Another crucial consideration was scroll-based animations. While they add depth and interactivity, they can also create confusion if users stop mid-scroll and elements appear frozen in unexpected positions.

    Example of scroll-based animation stopped between two states
    Example of a scroll-based animation stopped between two states

    To counter this, I used GSAP ScrollTrigger’s snap feature. This ensured that when users stopped scrolling, the page would snap to the nearest section naturally, maintaining a seamless experience.

    Arrays Start at 5?

    Autoplaying sliders can be an effective way to signal interactivity, drawing users into the content rather than letting them assume it’s static. However, they can also create confusion if not implemented thoughtfully. While integrating the site, I realized that because some slides were numbered, users might land on the page and find themselves on the fifth slide instead of the first, disrupting their sense of flow.

    To address this, I set sliders to autoplay only when they entered the viewport, ensuring that users always started at the first slide. This not only maintained consistency but also reinforced a structured and intuitive browsing experience. By making autoplay purposeful rather than arbitrary, we guide users through the content without causing unnecessary distractions.

    Transition Confusion

    Page transitions play a crucial role in maintaining a smooth, immersive experience, but if not handled carefully, they can lead to momentary confusion. One challenge I encountered was the risk of the transition overlay blending with the footer, since both were black in my design. Users would not perceive a transition at all, making navigation feel disjointed.

    To solve this, I ensured that transition overlays had a distinct contrast by adding a different shade of black, preventing any ambiguity when users navigate between pages. I also optimized transition timing, making sure animations were fast enough to keep interactions snappy but smooth enough to avoid feeling abrupt. This balance created a browsing experience where users always had a clear sense of movement and direction within the site.

    I Can Feel a Shift

    A common issue in web development that often gets overlooked is the mobile resize trigger that occurs when scrolling, particularly when the browser’s address bar appears or disappears on some devices. This resize event can disrupt the smoothness of animations, causing sudden visual jumps or inconsistencies as the page shifts.

    To tackle this, I made sure that ScrollTrigger wouldn’t refresh or re-trigger its animations unnecessarily when this resize event occurred by turning on ignoreMobileResize:

    ScrollTrigger.config({
       ignoreMobileResize: true
     });

    I also ensured that any CSS or JavaScript based on viewport height would not be recalculated on a vertical resize on mobile. Here’s a utility function I use to handle resize as an example: 

    /**
     * Attaches a resize event listener to the window and executes a callback when the conditions are met.
     * 
     * @param {Function} callback - The function to execute when the resize condition is met.
     * @param {number} [debounceTime=200] - Time in milliseconds to debounce the resize event.
     */
    function onResize(callback, debounceTime = 200) {
      let oldVh = window.innerHeight;
      let oldVw = window.innerWidth;
      const isTouchDevice = 'maxTouchPoints' in navigator && navigator.maxTouchPoints > 0;
    
      // Define the resize handler with debounce to limit function execution frequency
      const resizeHandler = $.debounce(() => {
        const newVh = window.innerHeight;
        const newVw = window.innerWidth;
    
        /**
         * Condition:
         *  - If the device is touch and the viewport height has changed significantly (≥ 25%).
         *  - OR if the viewport width has changed at all.
         * If either condition is met, execute the callback and update old dimensions.
         */
        if ((isTouchDevice && Math.abs(newVh - oldVh) / oldVh >= 0.25) || newVw !== oldVw) {
          callback();
          oldVh = newVh;
          oldVw = newVw;
        }
      }, debounceTime);
    
      // Attach the resize handler to the window resize event
      $(window).on('resize', resizeHandler);
    }

    Copy That! Rethinking Contact Links

    It was the client’s request to have a simple contact link with a “mailto” instead of a full contact page. While this seemed like a straightforward approach, it quickly became clear that mailto links come with usability issues. Clicking one automatically opens the default email app, which isn’t always the one the user actually wants to use. Many people rely on webmail services like Gmail or Outlook in their browser, meaning a forced mail client launch can create unnecessary friction. Worse, if the user is on a shared or public computer, the mail app might not even be configured, leading to confusion or an error message.

    To improve this experience, I opted for a more user-friendly approach: mailto links would simply copy the email to the clipboard and display a confirmation message. 

    The Takeaway

    This project reinforced the importance of balancing creativity with usability. While bold ideas can drive engagement, the best experiences come from refining details users may not even notice. Whether it’s preventing unnecessary animations, ensuring smooth scrolling, or rethinking how users interact with contact links, these small decisions make a significant impact. In the end, great web design isn’t just about visuals, it’s about crafting an experience that feels effortless for the user.


    Source link

  • A Nightscout Segment for OhMyPosh shows my realtime Blood Sugar readings in my Git Prompt

    A Nightscout Segment for OhMyPosh shows my realtime Blood Sugar readings in my Git Prompt


    I’ve talked about how I love a nice pretty prompt in my Windows Terminal and made videos showing in detail how to do it. I’ve also worked with my buddy TooTallNate to put my real-time blood sugar into a bash or PowerShell prompt, but this was back in 2017.

    Now that I’m “Team OhMyPosh” I have been meaning to write a Nightscout “segment” for my prompt. Nightscout is an open source self-hosted (there are commercial hosts also like T1Pal) website and API for remote display of real-time and near-real-time glucose readings for Diabetics like myself.

    Since my body has an active REST API where I can just do an HTTP GET (via curl or whatever) and see my blood sugar, it clearly belongs in a place of honor, just like my current Git Branch!

    My blood sugar in my Prompt!

    Oh My Posh supports configurable “segments” and now there’s a beta (still needs mmol and stale readings support) Nightscout segment that you can setup in just a few minutes!

    This prompt works in ANY shell on ANY os! You can do this in zsh, PowerShell, Bash, whatever makes you happy.

    Here is a YouTube of Jan from OhMyPosh and I coding the segment LIVE in Go.

    https://www.youtube.com/watch?v=_meKUIm9NwA

    If you have an existing OhMyPosh json config, you can just add another segment like this. Make sure your Nightscout URL includes a secure Token or is public (up to you). Note also that I setup “if/then” rules in my background_templates. These are optional and up to you to change to your taste. I set my background colors to red, yellow, green depending on sugar numbers. I also have a foreground template that is not really used, as you can see it always evaluates to black #000, but it shows you how you could set it to white text on a darker background if you wanted.

    {
    "type": "nightscout",
    "style": "diamond",
    "foreground": "#ffffff",
    "background": "#ff0000",
    "background_templates": [
    "{{ if gt .Sgv 150 }}#FFFF00{{ end }}",
    "{{ if lt .Sgv 60 }}#FF0000{{ end }}",
    "#00FF00"
    ],
    "foreground_templates": [
    "{{ if gt .Sgv 150 }}#000000{{ end }}",
    "{{ if lt .Sgv 60 }}#000000{{ end }}",
    "#000000"
    ],

    "leading_diamond": "",
    "trailing_diamond": "\uE0B0",
    "properties": {
    "url": "https://YOURNIGHTSCOUTAPP.herokuapp.com/api/v1/entries.json?count=1&token=APITOKENFROMYOURADMIN",
    "http_timeout": 1500,
    "template": " {{.Sgv}}{{.TrendIcon}}"
    }
    },

    By default we will only go out and hit your Nightscout instance every 5 min, only when the prompt is repainted, and we’ll only wait 1500ms before giving up. You can set that “http_timeout” (how long before we give up) if you feel this slows you down. It’ll be cached for 5 min so it’s unlikely  to b something you’ll notice. The benefit of this new OhMyPosh segment over the previous solution is that it requires no additional services/chron jobs and can be setup extremely quickly. Note also that you can customize your template with NerdFonts. I’ve included a tiny syringe!

    What a lovely prompt with Blood Sugar!

    Next I’ll hope to improve the segment with mmol support as well as strikeout style for “stale” (over 15 min old) results. You’re also welcome to help out by watching our YouTube and submitting a PR!


    Sponsor: Make login Auth0’s problem. Not yours. Provide the convenient login features your customers want, like social login, multi-factor authentication, single sign-on, passwordless, and more. Get started for free.


    About Scott

    Scott Hanselman is a former professor, former Chief Architect in finance, now speaker, consultant, father, diabetic, and Microsoft employee. He is a failed stand-up comic, a cornrower, and a book author.

    facebook
    bluesky
    subscribe
    About   Newsletter

    Hosting By
    Hosted on Linux using .NET in an Azure App Service


    Source link

  • Effective Digital Marketing Strategies for Surrogacy Agencies


    In the competitive world of surrogacy, agencies seeking growth and visibility must leverage effective digital marketing strategies. The internet presents a wealth of opportunities to reach potential surrogates and intended parents alike. Through strategic approaches such as SEO, PPC advertising, and online reputation management, surrogacy agencies can gain a significant advantage. Understanding how to harness these digital tools can elevate a business to new heights, fostering trust and engagement. As technology continuously evolves, staying updated with digital trends is not just beneficial—it’s essential for sustained success and growth in the surrogacy field.

    Search Engine Optimization (SEO)

    Search Engine Optimization (SEO) is critical for surrogacy agencies aiming to increase their online visibility. Digital landscapes are crowded, and thousands of women apply to be surrogates every year, emphasizing the need for differentiation. Employing effective SEO strategies involves optimizing website content, utilizing relevant keywords, and ensuring a seamless user experience to attract more organic traffic.

    A comprehensive SEO strategy includes on-page and off-page optimization. On-page optimization focuses on content quality, meta tags, and URL structure to enhance relevance and authority. Off-page strategies, such as building backlinks and engaging in social media, further amplify a surrogacy agency’s online presence, building credibility and encouraging business growth.

    Maintaining an effective SEO campaign requires ongoing monitoring and analysis. Analyzing SEO metrics helps agencies identify successful strategies and areas needing improvement. By staying informed and responsive to changing SEO trends and algorithms, surrogacy agencies ensure that their web presence effectively reaches and resonates with their target audience.

    Pay-Per-Click (PPC) Advertising

    Pay-Per-Click (PPC) advertising offers surrogacy agencies immediate visibility through paid online campaigns. Utilizing PPC involves creating targeted ads that appear when potential clients search for related services. According to What to Expect, 75% of expecting parents create a baby registry, which highlights the necessity of understanding market behaviors.

    To optimize PPC campaigns, agencies need to carefully select keywords that resonate with both potential surrogates and intended parents. Crafting compelling ad copy that aligns with user intent can significantly enhance engagement and conversion rates. Furthermore, regular monitoring and optimization of PPC campaigns ensure better performance and return on investment.

    An effective PPC strategy is not a set-and-forget solution. Continuous adjustment and testing are necessary to align with evolving market demands and consumer interests. By refining strategies and implementing advanced targeting techniques, surrogacy agencies can maintain a competitive edge, contributing to overall business success.

    Online Reputation Management

    In the digital age, a surrogacy agency’s reputation is often synonymous with its success. Online reputation management revolves around controlling the narrative surrounding the agency. Proactively managing online reviews and engaging with clients can help build a positive reputation, fostering trust and reliability among prospective surrogates and parents.

    Statistics from High Rock Studios suggest that the most engaged audiences spend 76 times more on advertised products and services online. This fact underlines the importance of maintaining a stellar online reputation. Agencies must invest in monitoring their digital footprint, addressing negative feedback constructively, and celebrating positive testimonials to enhance their image.

    Reputation management is an ongoing effort that involves every department in the agency. Delivering excellent customer service, transparent communication, and honoring commitments are foundational to cultivating positive perceptions online. By prioritizing an exemplary reputation, surrogacy agencies can build longstanding relationships and trust, key elements in a sustainable business model.

    In conclusion, leveraging search engine optimization, pay-per-click advertising, and online reputation management are pivotal strategies for surrogacy agencies seeking success. Each tactic offers unique benefits that, when combined, result in a comprehensive digital marketing strategy. As the digital landscape continues to evolve, it is crucial for agencies to adapt their approaches accordingly. Continuous learning and adjustment of strategies ensure that the business remains relevant and competitive. Ultimately, a strategic focus on these areas empowers surrogacy agencies to thrive in an increasingly digital world.


    Source link

  • Use your own user @ domain for Mastodon discoverability with the WebFinger Protocol without hosting a server

    Use your own user @ domain for Mastodon discoverability with the WebFinger Protocol without hosting a server


    Mastodon is a free, open-source social networking service that is decentralized and distributed. It was created in 2016 as an alternative to centralized social media platforms such as Twitter and Facebook.

    One of the key features of Mastodon is the use of the WebFinger protocol, which allows users to discover and access information about other users on the Mastodon network. WebFinger is a simple HTTP-based protocol that enables a user to discover information about other users or resources on the internet by using their email address or other identifying information. The WebFinger protocol is important for Mastodon because it enables users to find and follow each other on the network, regardless of where they are hosted.

    WebFinger uses a “well known” path structure when calling an domain. You may be familiar with the robots.txt convention. We all just agree that robots.txt will sit at the top path of everyone’s domain.

    The WebFinger protocol is a simple HTTP-based protocol that enables a user or search to discover information about other users or resources on the internet by using their email address or other identifying information. My is first name at last name .com, so…my personal WebFinger API endpoint is here https://www.hanselman.com/.well-known/webfinger

    The idea is that…

    1. A user sends a WebFinger request to a server, using the email address or other identifying information of the user or resource they are trying to discover.

    2. The server looks up the requested information in its database and returns a JSON object containing the information about the user or resource. This JSON object is called a “resource descriptor.”

    3. The user’s client receives the resource descriptor and displays the information to the user.

    The resource descriptor contains various types of information about the user or resource, such as their name, profile picture, and links to their social media accounts or other online resources. It can also include other types of information, such as the user’s public key, which can be used to establish a secure connection with the user.

    There’s a great explainer here as well. From that page:

    When someone searches for you on Mastodon, your server will be queried for accounts using an endpoint that looks like this:

    GET https://${MASTODON_DOMAIN}/.well-known/webfinger?resource=acct:${MASTODON_USER}@${MASTODON_DOMAIN}

    Note that Mastodon user names start with @ so they are @username@someserver.com. Just like twiter would be @shanselman@twitter.com I can be @shanselman@hanselman.com now!

    Searching for me with Mastodon

    So perhaps https://www.hanselman.com/.well-known/webfinger?resource=acct:FRED@HANSELMAN.COM

    Mine returns

    {
    "subject":"acct:shanselman@hachyderm.io",
    "aliases":
    [
    "https://hachyderm.io/@shanselman",
    "https://hachyderm.io/users/shanselman"
    ],
    "links":
    [
    {
    "rel":"http://webfinger.net/rel/profile-page",
    "type":"text/html",
    "href":"https://hachyderm.io/@shanselman"
    },
    {
    "rel":"self",
    "type":"application/activity+json",
    "href":"https://hachyderm.io/users/shanselman"
    },
    {
    "rel":"http://ostatus.org/schema/1.0/subscribe",
    "template":"https://hachyderm.io/authorize_interaction?uri={uri}"
    }
    ]
    }

    This file should be returned as a mime type of application/jrd+json

    My site is an ASP.NET Razor Pages site, so I just did this in Startup.cs to map that well known URL to a page/route that returns the JSON needed.

    services.AddRazorPages().AddRazorPagesOptions(options =>
    {
    options.Conventions.AddPageRoute("/robotstxt", "/Robots.Txt"); //i did this before, not needed
    options.Conventions.AddPageRoute("/webfinger", "/.well-known/webfinger");
    options.Conventions.AddPageRoute("/webfinger", "/.well-known/webfinger/{val?}");
    });

    then I made a webfinger.cshtml like this. Note I have to double escape the @@ sites because it’s Razor.

    @page
    @{
    Layout = null;
    this.Response.ContentType = "application/jrd+json";
    }
    {
    "subject":"acct:shanselman@hachyderm.io",
    "aliases":
    [
    "https://hachyderm.io/@@shanselman",
    "https://hachyderm.io/users/shanselman"
    ],
    "links":
    [
    {
    "rel":"http://webfinger.net/rel/profile-page",
    "type":"text/html",
    "href":"https://hachyderm.io/@@shanselman"
    },
    {
    "rel":"self",
    "type":"application/activity+json",
    "href":"https://hachyderm.io/users/shanselman"
    },
    {
    "rel":"http://ostatus.org/schema/1.0/subscribe",
    "template":"https://hachyderm.io/authorize_interaction?uri={uri}"
    }
    ]
    }

    This is a static response, but if I was hosting pages for more than one person I’d want to take in the url with the user’s name, and then map it to their aliases and return those correctly.

    Even easier, you can just use the JSON file of your own Mastodon server’s webfinger response and SAVE IT as a static json file and copy it to your own server!

    As long as your server returns the right JSON from that well known URL then it’ll work.

    So this is my template https://hachyderm.io/.well-known/webfinger?resource=acct:shanselman@hachyderm.io from where I’m hosted now.

    If you want to get started with Mastodon, start here. https://github.com/joyeusenoelle/GuideToMastodon/ it feels like Twitter circa 2007 except it’s not owned by anyone and is based on web standards like ActivityPub.

    Hope this helps!


    About Scott

    Scott Hanselman is a former professor, former Chief Architect in finance, now speaker, consultant, father, diabetic, and Microsoft employee. He is a failed stand-up comic, a cornrower, and a book author.

    facebook
    bluesky
    subscribe
    About   Newsletter

    Hosting By
    Hosted on Linux using .NET in an Azure App Service


    Source link

  • GitHub Copilot for CLI for PowerShell

    GitHub Copilot for CLI for PowerShell


    GitHub Next has this cool project that is basically Copilot for the CLI (command line interface). You can sign up for their waitlist at the Copilot for CLI site.

    Copilot for CLI provides three shell commands: ??, git? and gh?

    This is cool and all, but I use PowerShell. Turns out these ?? commands are just router commands to a larger EXE called github-copilot-cli. So if you go “?? something” you’re really going “github-copilot-cli what-the-shell something.”

    So this means I should be able to to do the same/similar aliases for my PowerShell prompt AND change the injected prompt (look at me I’m a prompt engineer) to add ‘use powershell to.’

    Now it’s not perfect, but hopefully it will make the point to the Copilot CLI team that PowerShell needs love also.

    Here are my aliases. Feel free to suggest if these suck. Note the addition of “user powershell to” for the ?? one. I may make a ?? and a p? where one does bash and one does PowerShell. I could also have it use wsl.exe and shell out to bash. Lots of possibilities.

    function ?? { 
    $TmpFile = New-TemporaryFile
    github-copilot-cli what-the-shell ('use powershell to ' + $args) --shellout $TmpFile
    if ([System.IO.File]::Exists($TmpFile)) {
    $TmpFileContents = Get-Content $TmpFile
    if ($TmpFileContents -ne $nill) {
    Invoke-Expression $TmpFileContents
    Remove-Item $TmpFile
    }
    }
    }

    function git? {
    $TmpFile = New-TemporaryFile
    github-copilot-cli git-assist $args --shellout $TmpFile
    if ([System.IO.File]::Exists($TmpFile)) {
    $TmpFileContents = Get-Content $TmpFile
    if ($TmpFileContents -ne $nill) {
    Invoke-Expression $TmpFileContents
    Remove-Item $TmpFile
    }
    }
    }
    function gh? {
    $TmpFile = New-TemporaryFile
    github-copilot-cli gh-assist $args --shellout $TmpFile
    if ([System.IO.File]::Exists($TmpFile)) {
    $TmpFileContents = Get-Content $TmpFile
    if ($TmpFileContents -ne $nill) {
    Invoke-Expression $TmpFileContents
    Remove-Item $TmpFile
    }
    }
    }

    It also then offers to run the command. Very smooth.

    image

    Hope you like it. Lots of fun stuff happening in this space.


    About Scott

    Scott Hanselman is a former professor, former Chief Architect in finance, now speaker, consultant, father, diabetic, and Microsoft employee. He is a failed stand-up comic, a cornrower, and a book author.

    facebook
    bluesky
    subscribe
    About   Newsletter

    Hosting By
    Hosted on Linux using .NET in an Azure App Service


    Source link