برچسب: GitHub

  • how I automated my blogging workflow with GitHub, PowerShell, and Azure | Code4IT

    how I automated my blogging workflow with GitHub, PowerShell, and Azure | Code4IT


    After 100 articles, I’ve found some neat ways to automate my blogging workflow. I will share my experience and the tools I use from the very beginning to the very end.

    Table of Contents

    Just a second! 🫷
    If you are here, it means that you are a software developer.
    So, you know that storage, networking, and domain management have a cost .

    If you want to support this blog, please ensure that you have disabled the adblocker for this site.
    I configured Google AdSense to show as few ADS as possible – I don’t want to bother you with lots of ads, but I still need to add some to pay for the resources for my site.

    Thank you for your understanding.
    Davide

    This is my 100th article 🥳 To celebrate it, I want to share with you the full process I use for writing and publishing articles.

    In this article I will share all the automation and tools I use for writing, starting from the moment an idea for an article pops up in my mind to what happens weeks after an article has been published.

    I hope to give you some ideas to speed up your publishing process. Of course, I’m open to suggestions to improve my own flow: perhaps (well, certainly), you use better tools and processes, so feel free to share them.

    Introducing my blog architecture

    To better understand what’s going on, I need a very brief overview of the architecture of my blog.

    It is written in Gatsby, a framework based on ReactJS that, in short, allows you to transform Markdown files into blog posts (it does many other things, but they are not important for the purpose of this article).

    So, all my blog is stored in a private GitHub repository. Every time I push some changes on the master branch, a new deployment is triggered, and I can see my changes in a bunch of minutes on my blog.

    As I said, I use Gatsby. But the key point here is that my blog is stored in a GitHub repo: this means that everything you’ll read here is valid for any Headless CMS based on Git, such as Gatsby, Hugo, NextJS, and Jekyll.

    Now that you know some general aspects, it’s time to deep dive into my writing process.

    Before writing: organizing ideas with GitHub

    My central source, as you might have already understood, is GitHub.

    There, I write all my notes and keep track of the status of my articles.

    Everything is quite well organized, and with the support of some automation, I can speed up my publishing process.

    Github Projects to track the status of the articles

    GitHub Projects are the parts of GitHub that allow you to organize GitHub Issues to track their status.
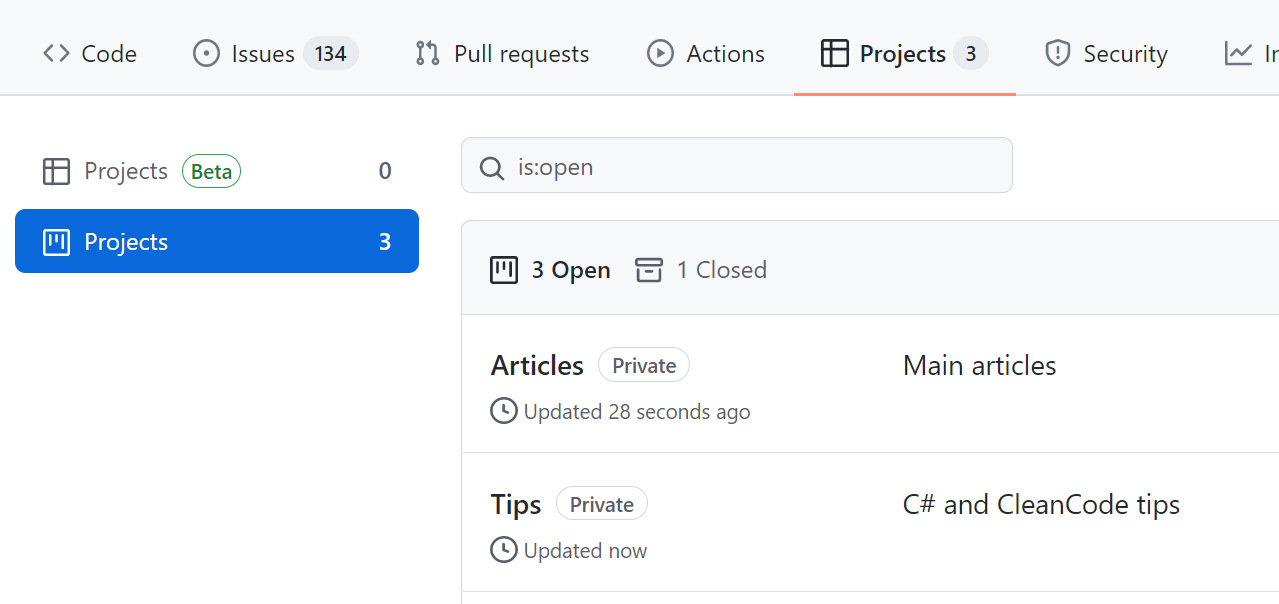
    GitHub projects

    I’ve created 2 GitHub Projects: one for the main articles (like this one), and one for my C# and Clean Code Tips.

    In this way, I can use different columns and have more flexibility when handling the status of the tasks.

    GitHub issues templates

    As I said, to write my notes I use GitHub issues.

    When I add a new Issue, the first thing is to define which type of article I want to write. And, since sometimes many weeks or months pass between when I came up with the idea for an article and when I start writing it, I need to organize my ideas in a structured way.

    To do that, I use GitHub templates. When I create a new Issue, I choose which kind of article I’m going to write.
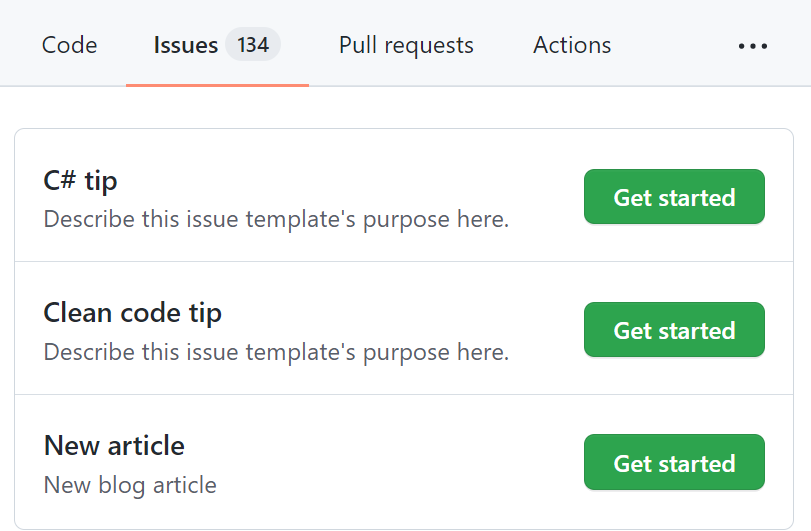
    The list of GitHub issues templates I use

    Based on the layout, I can add different info. For instance, when I want to write a new “main” article, I see this form
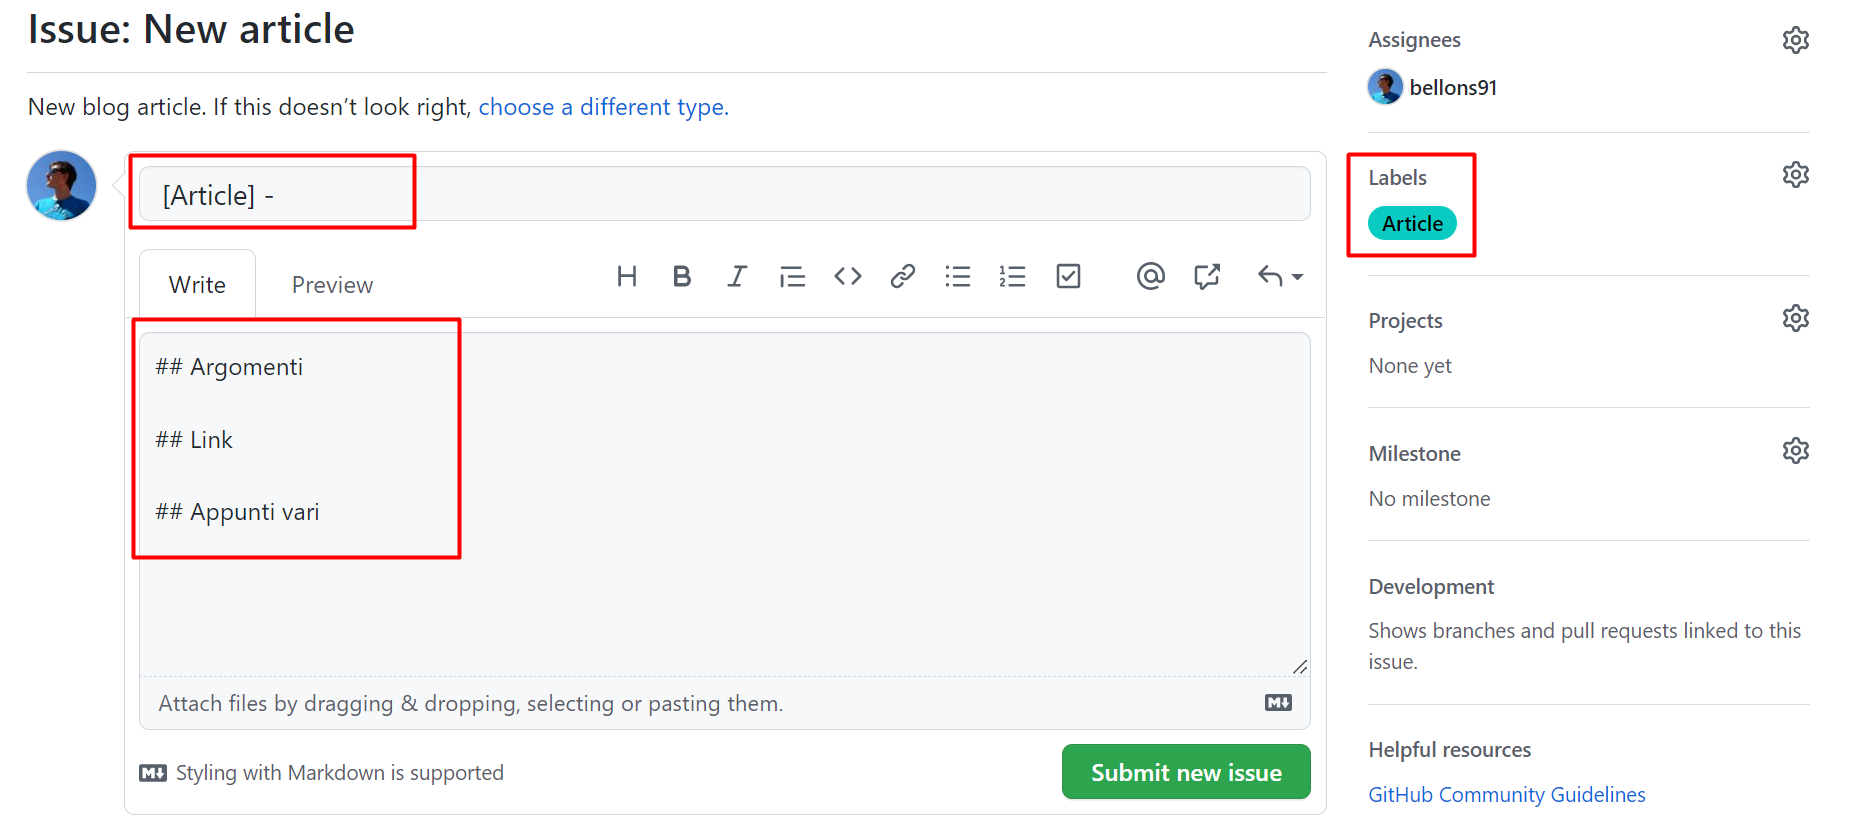
    Article creation form as generated by a template

    which is prepopulated with some fields:

    • Title: with a placeholder ([Article] )
    • Content: with some sections (the titles, translated from Italian, mean Topics, Links, General notes)
    • Labels: I automatically assign the Article label to the issue (you’ll see later why I do that)

    How can you create GitHub issue templates? All you need is a Markdown file under the .github/ISSUE_TEMPLATE folder with content similar to this one.

    ---
    name: New article
    about: New blog article
    title: "[Article] - "
    labels: Article
    assignees: bellons91
    ---
    
    ## Argomenti
    
    ## Link
    
    ## Appunti vari
    

    And you’re good to go!

    GitHub action to assign issues to a project

    Now I have GitHub Projects and different GitHub Issues Templates. How can I join the different parts? Well, with GitHub Actions!

    With GitHub Actions, you can automate almost everything that happens in GitHub (and outside) using YAML files.

    So, here’s mine:
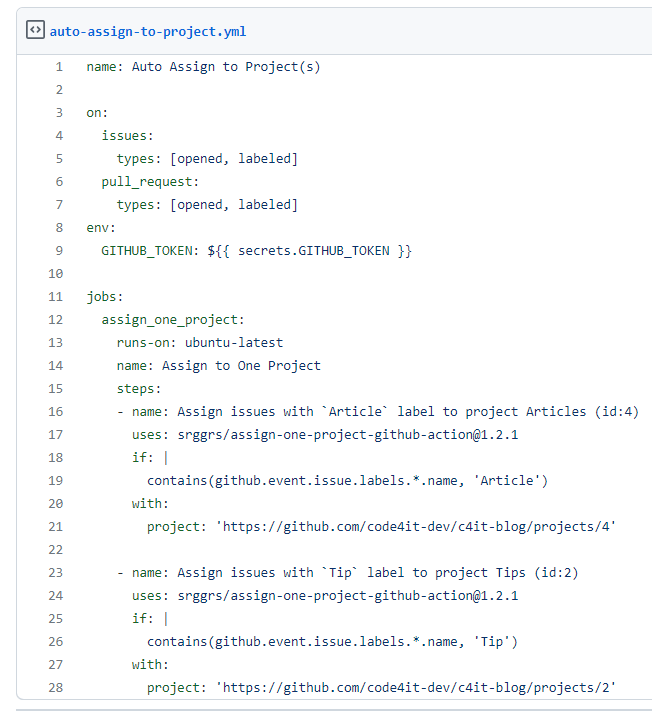
    Auto-assign to project GitHub Action

    For better readability, you can find the Gist here.

    This action looks for opened and labeled issues and pull requests, and based on the value of the label it assigns the element to the correct project.

    In this way, after I choose a template, filled the fields, and added additional labels (like C#, Docker, and so on), I can see my newly created issue directly in the Articles board. Neat 😎

    Writing

    Now it’s the time of writing!

    As I said, I’m using Gatsby, so all my articles are stored in a GitHub repository and written in Markdown.

    For every article I write, I use a separate git branch: in this way, I’m free to update the content already online (in case of a typo) without publishing my drafts.

    But, of course, I automated it! 😎

    Powershell script to scaffold a new article

    Every article lives in its /content/posts/{year}/{folder-name}/article.md file. And they all have a cover image in a file named cover.png.

    Also, every MD file begins with a Frontmatter section, like this:

    ---
    title: "How I automated my publishing flow with Gatsby, GitHub, PowerShell and Azure"
    path: "/blog/automate-articles-creations-github-powershell-azure"
    tags: ["MainArticle"]
    featuredImage: "./cover.png"
    excerpt: "a description for 072-how-i-create-articles"
    created: 4219-11-20
    updated: 4219-11-20
    ---
    

    But, you know, I was tired of creating everything from scratch. So I wrote a Powershell Script to do everything for me.
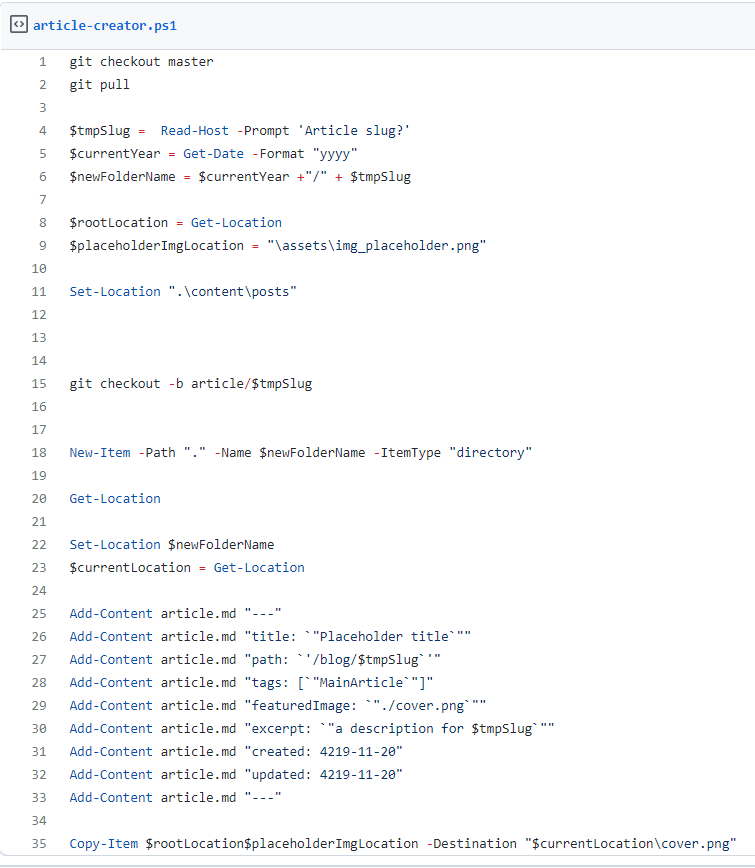
    PowerShell script to scaffold a new article

    You can find the code in this Gist.

    This script performs several actions:

    1. Switches to the Master branch and downloads the latest updates
    2. Asks for the article slug that will be used to create the folder name
    3. Creates a new branch using the article slug as a name
    4. Creates a new folder that will contain all the files I will be using for my article (markdown content and images)
    5. Creates the article file with the Frontmatter part populated with dummy values
    6. Copies a placeholder image into this folder; this image will be the temporary cover image

    In this way, with a single command, I can scaffold a new article with all the files I need to get started.

    Ok, but how can I run a PowerShell in a Gatsby repository?

    I added this script in the package.json file

    "create-article": "@powershell -NoProfile -ExecutionPolicy Unrestricted -Command ./article-creator.ps1",
    

    where article-creator.ps1 is the name of the file that contains the script.

    Now I can simply run npm run create-article to have a new empty article in a new branch, already updated with everything published in the Master branch.

    Markdown preview on VS Code

    I use Visual Studio Code to write my articles: I like it because it’s quite fast and with lots of functionalities to write in Markdown (you can pick your favorites in the Extensions store).

    One of my favorites is the Preview on Side. To see the result of your MarkDown on a side panel, press CTRL+SHIFT+P and select Open Preview to the Side.

    Here’s what I can see right now while I’m writing:
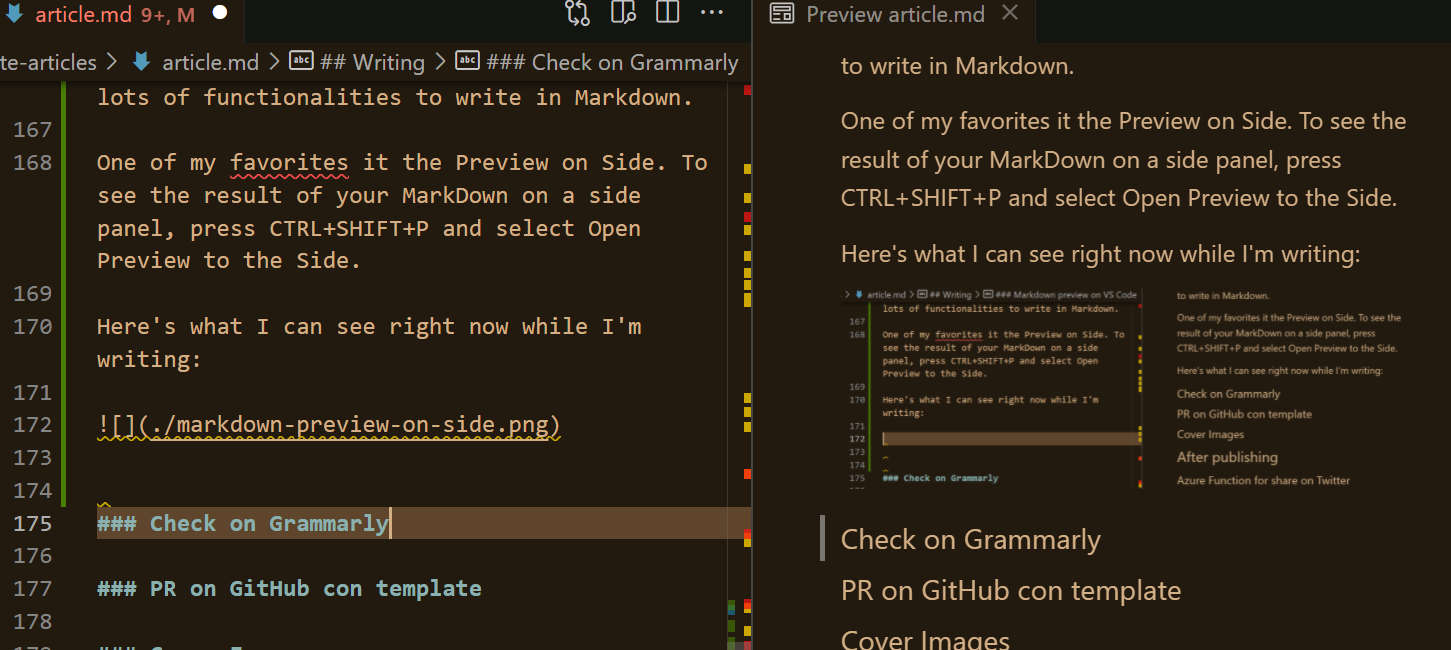
    Markdown preview on the side with VS Code

    Grammar check with Grammarly

    Then, it’s time for a check on the Grammar. I use Grammarly, which helps me fix lots of errors (well, in the last time, only a few: it means I’ve improved a lot! 😎).

    I copy the Markdown in their online editor, fix the issues, and copy it back into my repo.

    Fun fact: the online editor recognizes that you’re using Markdown and automatically checks only the actual text, ignoring all the symbols you use in Markdown (like brackets).

    Unprofessional, but fun, cover images

    One of the tasks I like the most is creating my cover images.

    I don’t use stock images, I prefer using less professional but more original cover images.

    Some of the cover images for my articles

    You can see all of them here.

    Creating and scheduling PR on GitHub with Templates and Actions

    Now that my article is complete, I can set it as ready for being scheduled.

    To do that, I open a Pull Request to the Master Branch, and, again, add some kind of automation!

    I have created a PR template in an MD file, which I use to create a draft of the PR content.
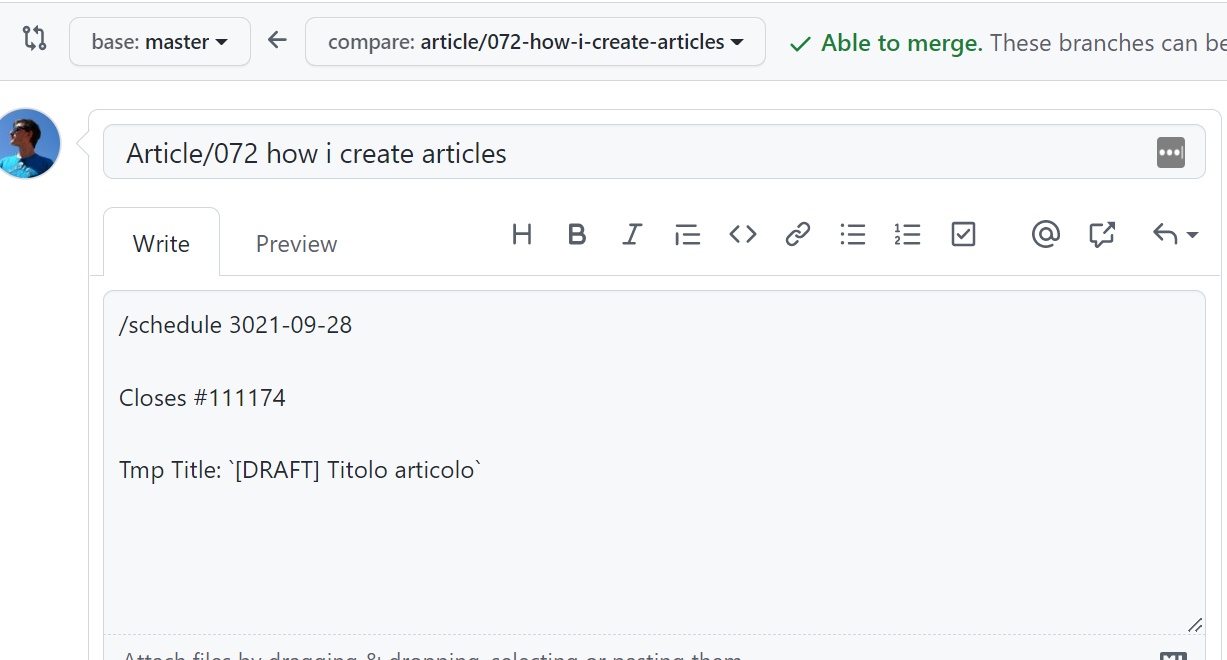
    Pull Request form on GitHub

    In this way, I can define which task (so, which article) is related to this PR, using the “Closes” formula (“Closes #111174” means that I’m closing the Issue with ID 111174).

    Also, I can define when this PR will be merged on Master, using the /schedule tag.

    It works because I have integrated into my workflow a GitHub Action, merge-schedule, that reads the date from that field to understand when the PR must be merged.
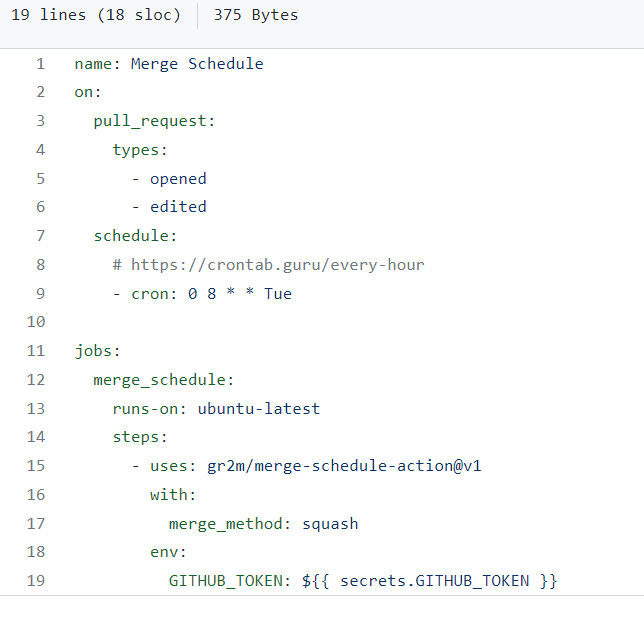
    YAML of Merge Schedule action

    So, every Tuesday at 8 AM, this action runs to check if there are any PRs that can be merged. If so, the PR will be merged into master, and the CI/CD pipeline builds the site and publishes the new content.

    As usual, you can find the code of this action here

    After the PR is merged, I also receive an email that notifies me of the action.

    After publishing

    Once a new article is online, I like to give it some visibility.

    To do that, I heavily rely on Azure Logic Apps.

    Azure Logic App for sharing on Twitter

    My blog exposes an RSS feed. And, obviously, when a new article is created, a new item appears in the feed.

    I use it to trigger an Azure Logic App to publish a message on Twitter:
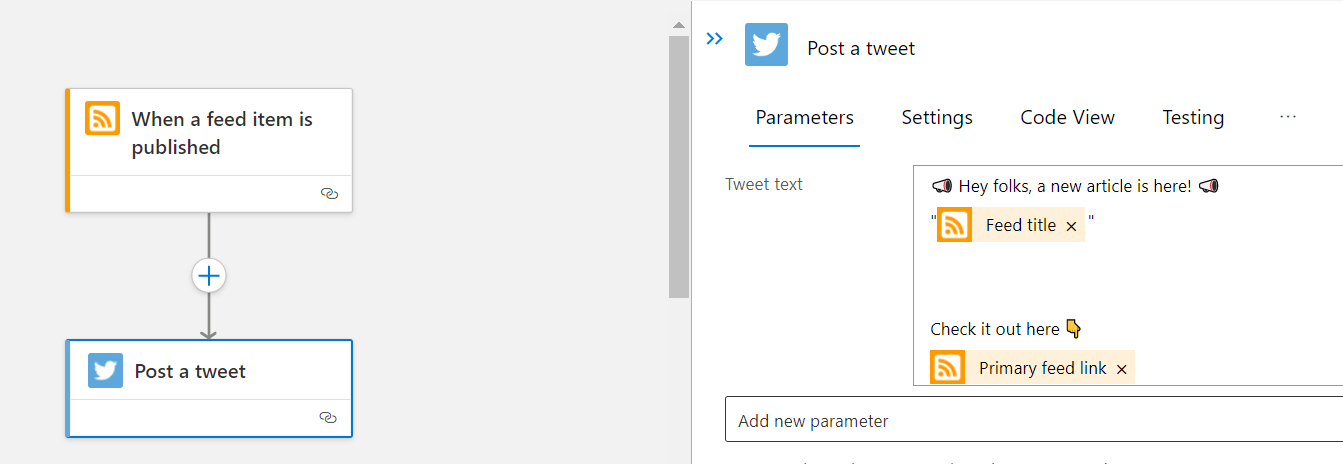
    Azure Logic App workflow for publishing on Twitter

    The Logic App reads the newly published feed item and uses its metadata to create a message that will be shared on Twitter.

    If you prefer, you can use a custom Azure Function! The choice is yours!

    Cross-post reminder with Azure Logic Apps

    Similarly, I use an Azure Logic App to send to myself an email to remind me to cross-post my articles to other platforms.

    Azure Logic App workflow for crosspost reminders

    I’ve added a delay so that my content lives longer, and I can repost it even after weeks or months.

    Unluckily, when I cross-post my articles I have to do it manually, This is quite a time-consuming especially when there are lots of images: in my MD files I use relative paths, so when porting my content to different platforms I have to find the absolute URL for my images.

    And, my friends, this is everything that happens in the background of my blog!

    What I’m still missing

    I’ve added a lot of effort to my blog, and I’m incredibly proud of it!

    But still, there are a few things I’d like to improve.

    SEO Tools/analysis

    I’ve never considered SEO. Or, better, Keywords.

    I write for the sake of writing, and because I love it. And I don’t like to stuff my content with keywords just to rank better on search engines.

    I take care of everything like alt texts, well-structured sections, and everything else. But I’m not able to follow the “rules” to find the best keywords.

    Maybe I should use some SEO tools to find the best keywords for me. But I don’t want to bend to that way of creating content.

    Also, I should spend more time thinking of the correct title and section titles.

    Any idea?

    Easy upgrade of Gatsby/Migrate to other headless CMSs

    Lastly, I’d like to find another theme or platform and leave the one I’m currently using.

    Not because I don’t like it. But because many dependencies are outdated, and the theme I’m using hasn’t been updated since 2019.

    Wrapping up

    That’s it: in this article, I’ve explained everything that I do when writing a blog post.

    Feel free to take inspiration from my automation to improve your own workflow, and contact me if you have some nice improvements or ideas: I’m all ears!

    So, for now, happy coding!

    🐧


    Source link

  • How to deploy .NET APIs on Azure using GitHub actions | Code4IT

    How to deploy .NET APIs on Azure using GitHub actions | Code4IT


    Building APIs with .NET is easy. Deploying them on Azure is easy too, with GitHub Actions!

    Table of Contents

    Just a second! 🫷
    If you are here, it means that you are a software developer.
    So, you know that storage, networking, and domain management have a cost .

    If you want to support this blog, please ensure that you have disabled the adblocker for this site.
    I configured Google AdSense to show as few ADS as possible – I don’t want to bother you with lots of ads, but I still need to add some to pay for the resources for my site.

    Thank you for your understanding.
    Davide

    With Continuous Delivery (CD), you can deploy your code in a fast-paced and stable way.

    To deploy applications, you’ll need workflows that run and automate the process. In that way, you don’t have to perform repetitive tasks and the whole process becomes less error-prone.

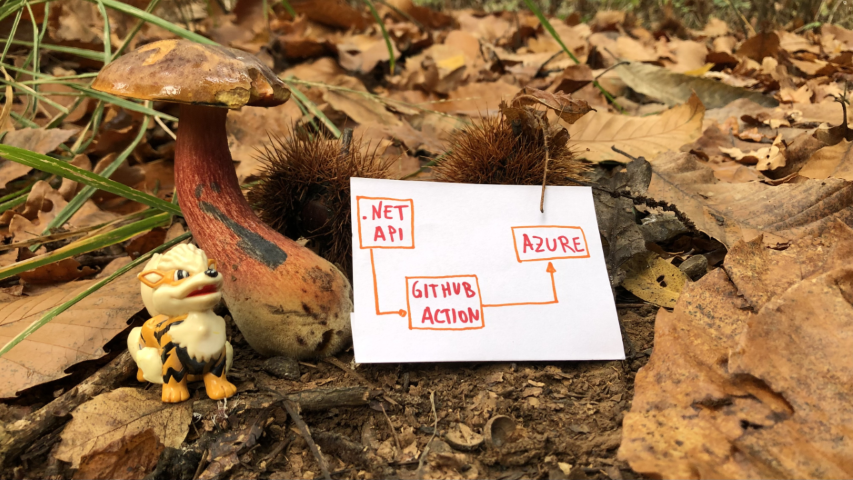
    In this article, we will learn how to implement CD pipelines using GitHub Actions. In particular, we will focus on the case of a .NET API application that will be deployed on Azure.

    Create a .NET API project

    Since the focus of this article is on the deployment part, we won’t create complex APIs. Just a simple Hello Word is enough.

    To do that, we’re gonna use dotnet Minimal API – a way to create APIs without scaffolding lots of files and configurations.

    Our API, the BooksAPI, has a single endpoint: /, the root, simply returns “Hello World!”.

    All our code is stored in the Program file:

    var builder = WebApplication.CreateBuilder(args);
    
    var app = builder.Build();
    
    app.UseHttpsRedirection();
    
    app.MapGet("/", () => "Hello World!");
    
    app.Run();
    

    Nothing fancy: run the application locally, and navigate to the root. You will see the Hello World message.

    Lastly, put your code on GitHub: initialize a repository and publish it on GitHub – it can either be a public or a private repository.

    Create an App Service on Azure

    Now, to deploy an application, we need to define its destination. We’re going to deploy it on Azure, so you need an Azure account before moving on.

    Open the Azure Portal, navigate to the App Service section, and create a new one.

    Configure it as you wish, and then proceed until you have it up and running.

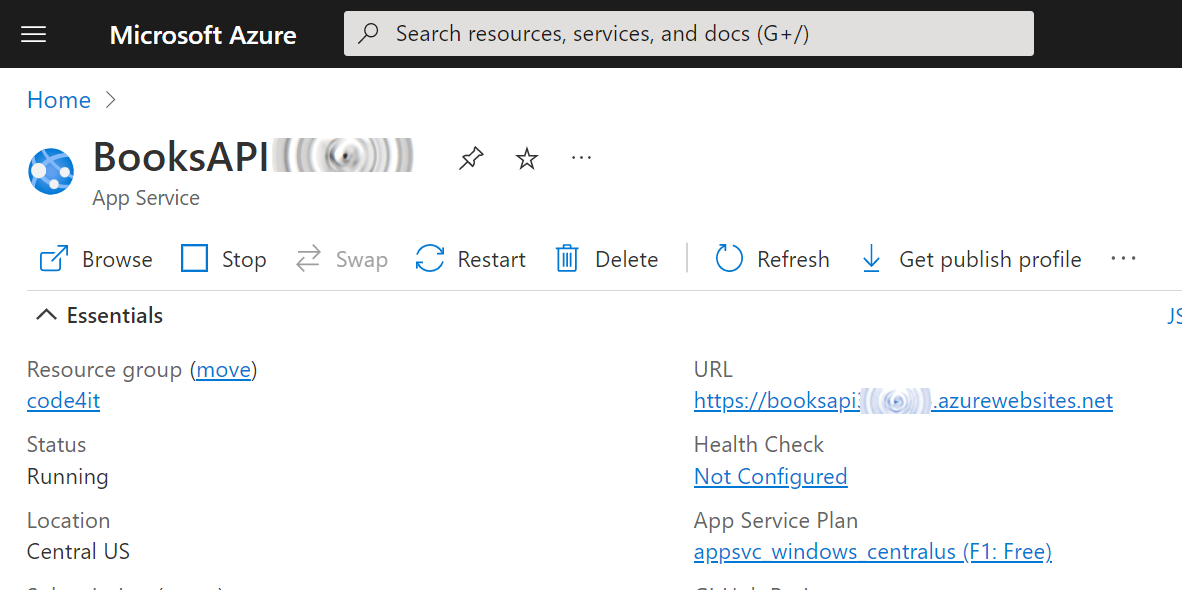
    Once everything is done, you should have something like this:

    Azure App Service overview

    Now the application is ready to be used: we now need to deploy our code here.

    Generate the GitHub Action YAML file for deploying .NET APIs on Azure

    It’s time to create our Continuous Delivery pipeline.

    Luckily, GitHub already provides lots of templates for GitHub Actions. We will need one specific for our .NET APIs.

    On GitHub, navigate to your repository, head to the Actions menu, and select New workflow.

    New Workflow button on GitHub

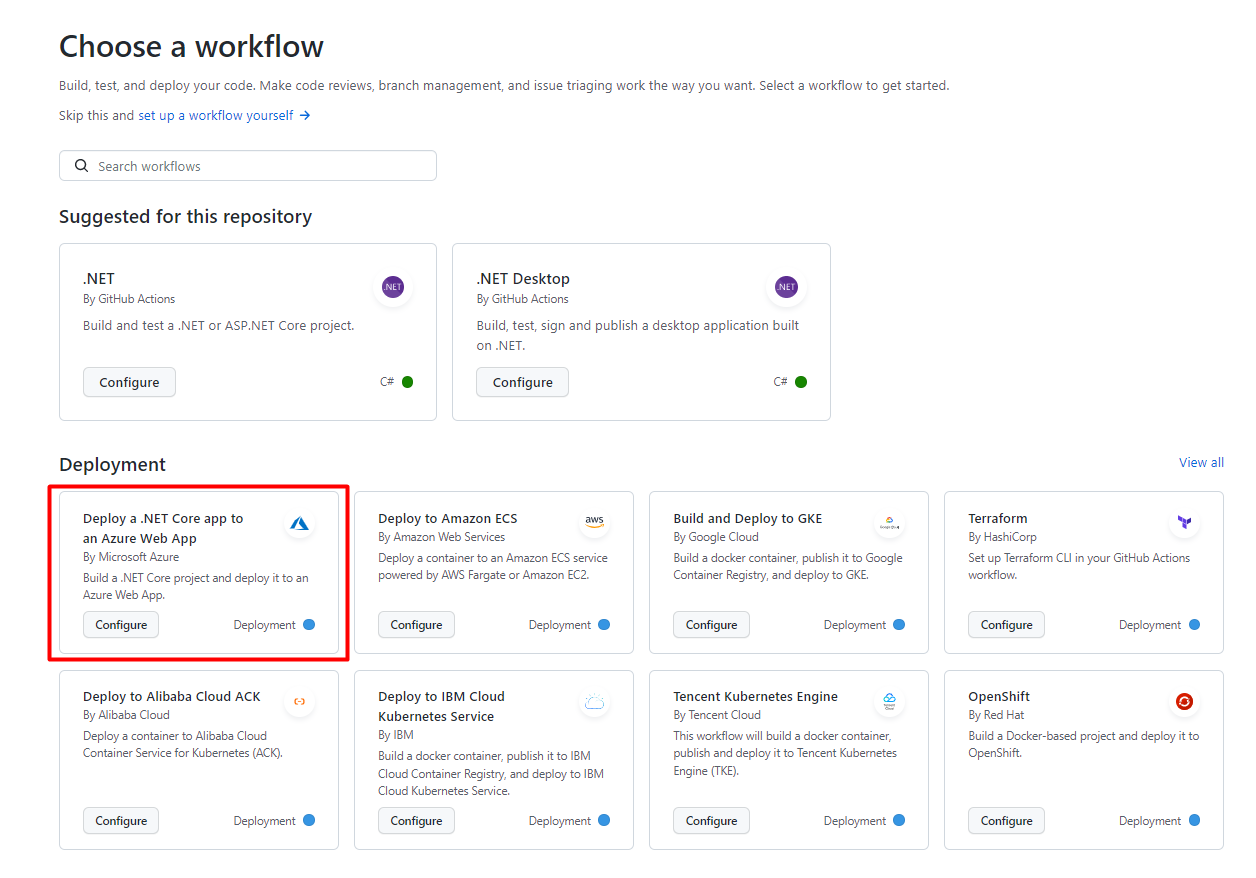
    You will see several predefined actions that allow you to do stuff with your repository. We are now interested in the one called “Deploy a .NET Core app to an Azure Web App”:

    Template for deploying the .NET Application on Azure

    Clicking on “Configure” you will see a template. Read carefully the instructions, as they will guide you to the correct configuration of the GitHub action.

    In particular, you will have to update the environment variables specified in this section:

    env:
      AZURE_WEBAPP_NAME: your-app-name # set this to the name of your Azure Web App
      AZURE_WEBAPP_PACKAGE_PATH: "." # set this to the path to your web app project, defaults to the repository root
      DOTNET_VERSION: "5" # set this to the .NET Core version to use
    

    Clearly, AZURE_WEBAPP_NAME must match the name you’ve defined on Azure, while DOTNET_VERSION must match the version you’re using to create your dotnet APIs.

    For my specific project, I’ve replaced that section with

    env:
      AZURE_WEBAPP_NAME: BooksAPI<myName> # set this to the name of your Azure Web App
      AZURE_WEBAPP_PACKAGE_PATH: "." # set this to the path to your web app project, defaults to the repository root
      DOTNET_VERSION: "6.0" # set this to the .NET Core version to use
    

    🟧 DOTNET_VERSION requires also the minor version of dotnet. Setting 6 will now work: you need to specify 6.0. 🟧

    Now you can save your YAML file in your repository: it will be saved under ./.github/workflows.

    So, as a reference, here’s the full YAML file I’m using to deploy my APIs:

    name: Build and deploy ASP.Net Core app to an Azure Web App
    
    env:
      AZURE_WEBAPP_NAME: BooksAPI<myName>
      AZURE_WEBAPP_PACKAGE_PATH: "."
      DOTNET_VERSION: "6.0"
    
    on:
      push:
        branches: ["master"]
      workflow_dispatch:
    
    permissions:
      contents: read
    
    jobs:
      build:
        runs-on: ubuntu-latest
    
        steps:
          - uses: actions/checkout@v3
    
          - name: Set up .NET Core
            uses: actions/setup-dotnet@v2
            with:
              dotnet-version: ${{ env.DOTNET_VERSION }}
    
          - name: Set up dependency caching for faster builds
            uses: actions/cache@v3
            with:
              path: ~/.nuget/packages
              key: ${{ runner.os }}-nuget-${{ hashFiles('**/packages.lock.json') }}
              restore-keys: |
                            ${{ runner.os }}-nuget-
    
          - name: Build with dotnet
            run: dotnet build --configuration Release
    
          - name: dotnet publish
            run: dotnet publish -c Release -o ${{env.DOTNET_ROOT}}/myapp
    
          - name: Upload artifact for deployment job
            uses: actions/upload-artifact@v3
            with:
              name: .net-app
              path: ${{env.DOTNET_ROOT}}/myapp
    
      deploy:
        permissions:
          contents: none
        runs-on: ubuntu-latest
        needs: build
        environment:
          name: "Development"
          url: ${{ steps.deploy-to-webapp.outputs.webapp-url }}
    
        steps:
          - name: Download artifact from build job
            uses: actions/download-artifact@v3
            with:
              name: .net-app
    
          - name: Deploy to Azure Web App
            id: deploy-to-webapp
            uses: azure/webapps-deploy@v2
            with:
              app-name: ${{ env.AZURE_WEBAPP_NAME }}
              publish-profile: ${{ secrets.AZURE_WEBAPP_PUBLISH_PROFILE }}
              package: ${{ env.AZURE_WEBAPP_PACKAGE_PATH }}
    

    As you can see, we have 2 distinct steps: build and deploy.

    In the build phase, we check out our code, restore the NuGet dependencies, build the project, pack it and store the final result as an artifact.

    In the deploy step, we retrieve the newly created artifact and publish it on Azure.

    Store the Publish profile as GitHub Secret

    As you can see in the instructions of the workflow file, you have to

    Create a secret in your repository named AZURE_WEBAPP_PUBLISH_PROFILE, paste the publish profile contents as the value of the secret.

    That Create a secret in your repository named AZURE_WEBAPP_PUBLISH_PROFILE statement was not clear to me: I thought you had to create that key within your .NET project. Turns out you can create secrets related to repositories on GitHub (so, it’s language-agnostic).

    A Publish profile is a file that contains information and settings used to deploy applications to Azure. It’s nothing but an XML file that lists the possible ways to deploy your application, such as FTP, Web Deploy, Zip Deploy, and so on.

    We have to get our publish profile and save it into GitHub secrets.

    To retrieve the Publish profile, head to the Azure App Service page and click Get publish profile to download the file.

    Get Publish Profile button on Azure Portal

    Now, get back on GitHub, Head to Settings > Security > Secrets > Actions.

    Here you can create a new secret related to your repository.

    Create a new one, name it AZURE_WEBAPP_PUBLISH_PROFILE, and paste the content of the Publish profile file you’ve just downloaded.

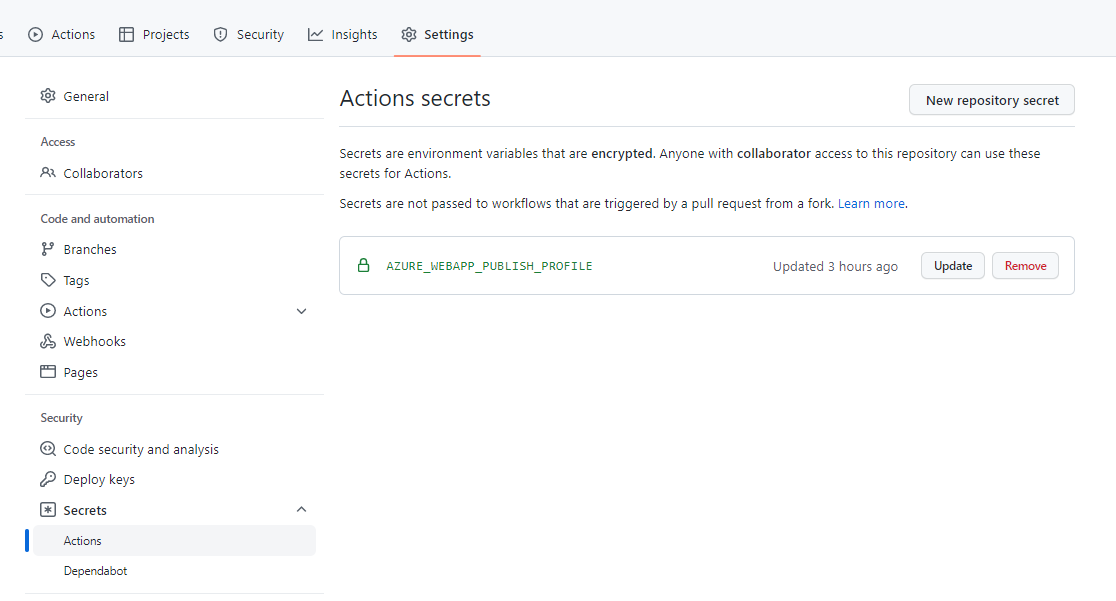
    You will then see something like this:

    GitHub secret for Publish profile

    Notice that the secret name must be AZURE_WEBAPP_PUBLISH_PROFILE. That constraint is set because we are accessing the Publish profile by key:

    - name: Deploy to Azure Web App
        id: deploy-to-webapp
        uses: azure/webapps-deploy@v2
        with:
            app-name: ${{ env.AZURE_WEBAPP_NAME }}
            publish-profile: ${{ secrets.AZURE_WEBAPP_PUBLISH_PROFILE }}
            package: ${{ env.AZURE_WEBAPP_PACKAGE_PATH }}
    

    In particular, notice the publish-profile: ${{ secrets.AZURE_WEBAPP_PUBLISH_PROFILE }} part.

    Clearly, the two names must match: nothing stops you from changing the name of the secret in both the YAML file and the GitHub Secret page.

    Final result

    It’s time to see the final result.

    Update the application code (I’ve slightly modified the Hello world message), and push your changes to GitHub.

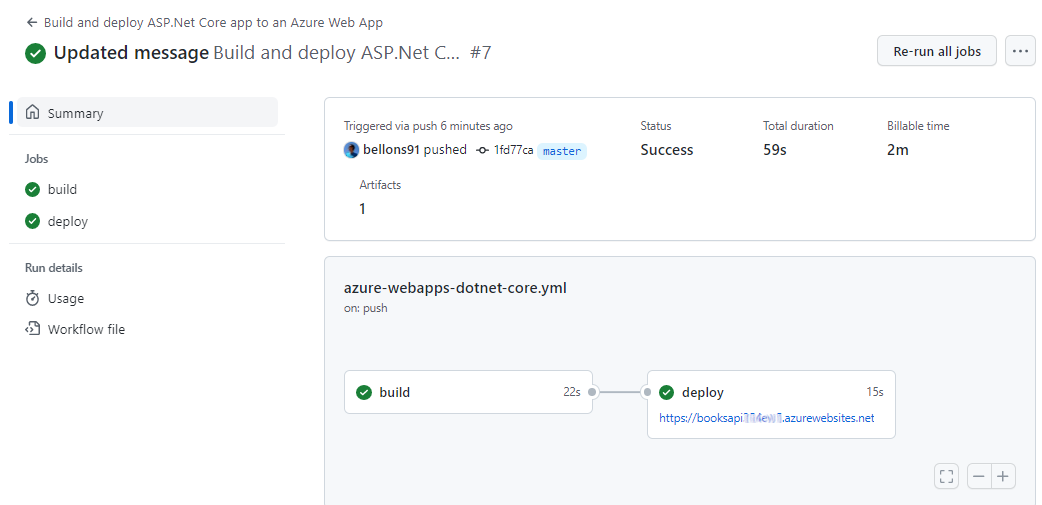
    Under the Actions tab, you will see your CD pipeline run.

    CD workflow run

    Once it’s completed, you can head to your application root and see the final result.

    Final result of the API

    Further readings

    Automating repetitive tasks allows you to perform more actions with fewer errors. Generally speaking, the more stuff you can automate, the better.

    My own blog heavily relies on automation: scaffolding content, tracking ideas, and publishing online…

    If you want to peek at what I do, here are my little secrets:

    🔗 From idea to publishing, and beyond: how I automated my blogging workflow with GitHub, PowerShell, and Azure | Code4IT

    In this article, we’ve only built and deployed our application. We can do more: run tests and keep track of code coverage. If you want to learn how you can do it using Azure DevOps, here we go:

    🔗 Cobertura, YAML, and Code Coverage Protector: how to view Code Coverage report on Azure DevOps | Code4IT

    This article first appeared on Code4IT 🐧

    Wrapping up

    I have to admit that I struggled a lot in setting up the CD pipeline. I was using the one proposed by default on Visual Studio – but it didn’t work.

    Using the template found on GitHub worked almost instantly – I just had to figure out what did they mean by repository secrets.

    Now we have everything in place. Since the workflow is stored in a text file within my repository, if I have to create and deploy a new API project I can simply do that by copying that file and fixing the references.

    Nice and easy, right? 😉

    Happy coding!

    🐧


    Source link

  • GitHub Copilot for CLI for PowerShell

    GitHub Copilot for CLI for PowerShell


    GitHub Next has this cool project that is basically Copilot for the CLI (command line interface). You can sign up for their waitlist at the Copilot for CLI site.

    Copilot for CLI provides three shell commands: ??, git? and gh?

    This is cool and all, but I use PowerShell. Turns out these ?? commands are just router commands to a larger EXE called github-copilot-cli. So if you go “?? something” you’re really going “github-copilot-cli what-the-shell something.”

    So this means I should be able to to do the same/similar aliases for my PowerShell prompt AND change the injected prompt (look at me I’m a prompt engineer) to add ‘use powershell to.’

    Now it’s not perfect, but hopefully it will make the point to the Copilot CLI team that PowerShell needs love also.

    Here are my aliases. Feel free to suggest if these suck. Note the addition of “user powershell to” for the ?? one. I may make a ?? and a p? where one does bash and one does PowerShell. I could also have it use wsl.exe and shell out to bash. Lots of possibilities.

    function ?? { 
    $TmpFile = New-TemporaryFile
    github-copilot-cli what-the-shell ('use powershell to ' + $args) --shellout $TmpFile
    if ([System.IO.File]::Exists($TmpFile)) {
    $TmpFileContents = Get-Content $TmpFile
    if ($TmpFileContents -ne $nill) {
    Invoke-Expression $TmpFileContents
    Remove-Item $TmpFile
    }
    }
    }

    function git? {
    $TmpFile = New-TemporaryFile
    github-copilot-cli git-assist $args --shellout $TmpFile
    if ([System.IO.File]::Exists($TmpFile)) {
    $TmpFileContents = Get-Content $TmpFile
    if ($TmpFileContents -ne $nill) {
    Invoke-Expression $TmpFileContents
    Remove-Item $TmpFile
    }
    }
    }
    function gh? {
    $TmpFile = New-TemporaryFile
    github-copilot-cli gh-assist $args --shellout $TmpFile
    if ([System.IO.File]::Exists($TmpFile)) {
    $TmpFileContents = Get-Content $TmpFile
    if ($TmpFileContents -ne $nill) {
    Invoke-Expression $TmpFileContents
    Remove-Item $TmpFile
    }
    }
    }

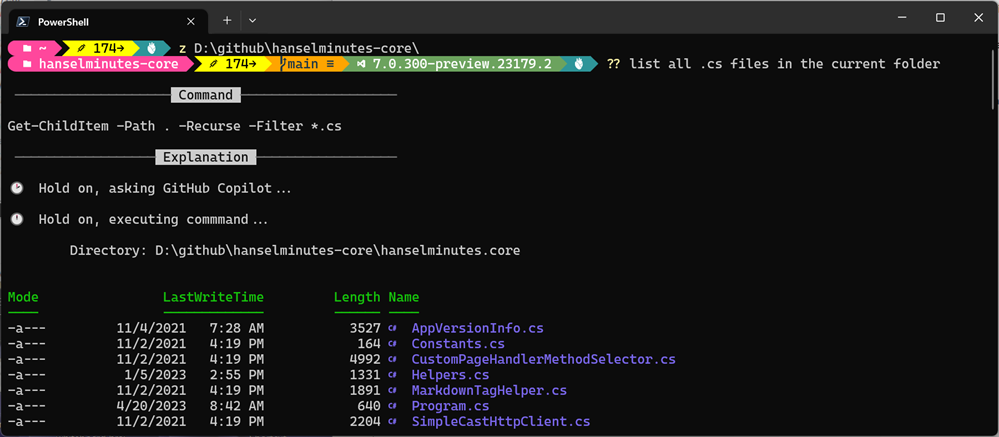
    It also then offers to run the command. Very smooth.

    image

    Hope you like it. Lots of fun stuff happening in this space.


    About Scott

    Scott Hanselman is a former professor, former Chief Architect in finance, now speaker, consultant, father, diabetic, and Microsoft employee. He is a failed stand-up comic, a cornrower, and a book author.

    facebook
    bluesky
    subscribe
    About   Newsletter

    Hosting By
    Hosted on Linux using .NET in an Azure App Service


    Source link