برچسب: ILogger

  • Easy logging management with Seq and ILogger in ASP.NET | Code4IT

    Easy logging management with Seq and ILogger in ASP.NET | Code4IT


    Seq is one of the best Log Sinks out there : it’s easy to install and configure, and can be added to an ASP.NET application with just a line of code.

    Table of Contents

    Just a second! 🫷
    If you are here, it means that you are a software developer.
    So, you know that storage, networking, and domain management have a cost .

    If you want to support this blog, please ensure that you have disabled the adblocker for this site.
    I configured Google AdSense to show as few ADS as possible – I don’t want to bother you with lots of ads, but I still need to add some to pay for the resources for my site.

    Thank you for your understanding.
    Davide

    Logging is one of the most essential parts of any application.

    Wouldn’t it be great if we could scaffold and use a logging platform with just a few lines of code?

    In this article, we are going to learn how to install and use Seq as a destination for our logs, and how to make an ASP.NET 8 API application send its logs to Seq by using the native logging implementation.

    Seq: a sink and dashboard to manage your logs

    In the context of logging management, a “sink” is a receiver of the logs generated by one or many applications; it can be a cloud-based system, but it’s not mandatory: even a file on your local file system can be considered a sink.

    Seq is a Sink, and works by exposing a server that stores logs and events generated by an application. Clearly, other than just storing the logs, Seq allows you to view them, access their details, perform queries over the collection of logs, and much more.

    It’s free to use for individual usage, and comes with several pricing plans, depending on the usage and the size of the team.

    Let’s start small and install the free version.

    We have two options:

    1. Download it locally, using an installer (here’s the download page);
    2. Use Docker: pull the datalust/seq image locally and run the container on your Docker engine.

    Both ways will give you the same result.

    However, if you already have experience with Docker, I suggest you use the second approach.

    Once you have Docker installed and running locally, open a terminal.

    First, you have to pull the Seq image locally (I know, it’s not mandatory, but I prefer doing it in a separate step):

    Then, when you have it downloaded, you can start a new instance of Seq locally, exposing the UI on a specific port.

    docker run --name seq -d --restart unless-stopped -e ACCEPT_EULA=Y -p 5341:80 datalust/seq:latest
    

    Let’s break down the previous command:

    • docker run: This command is used to create and start a new Docker container.
    • --name seq: This option assigns the name seq to the container. Naming containers can make them easier to manage.
    • -d: This flag runs the container in detached mode, meaning it runs in the background.
    • --restart unless-stopped: This option ensures that the container will always restart unless it is explicitly stopped. This is useful for ensuring that the container remains running even after a reboot or if it crashes.
    • -e ACCEPT_EULA=Y: This sets an environment variable inside the container. In this case, it sets ACCEPT_EULA to Y, which likely indicates that you accept the End User License Agreement (EULA) for the software running in the container.
    • -p 5341:80: This maps port 5341 on your host machine to port 80 in the container. This allows you to access the service running on port 80 inside the container via port 5341 on your host.
    • datalust/seq:latest: This specifies the Docker image to use for the container. datalust/seq is the image name, and latest is the tag, indicating that you want to use the latest version of this image.

    So, this command runs a container named seq in the background, ensures it restarts unless stopped, sets an environment variable to accept the EULA, maps a host port to a container port, and uses the latest version of the datalust/seq image.

    It’s important to pay attention to the used port: by default, Seq uses port 5341 to interact with the UI and the API. If you prefer to use another port, feel free to do that – just remember that you’ll need some additional configuration.

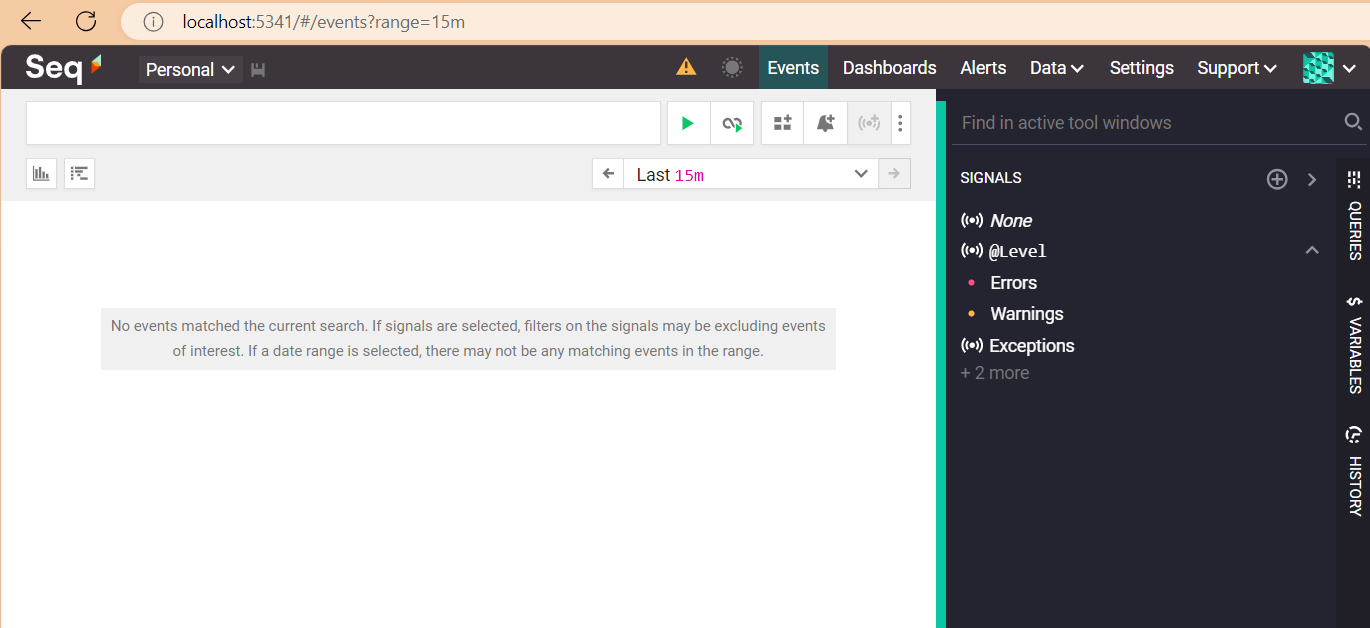
    Now that Seq is installed on your machine, you can access its UI. Guess what? It’s on localhost:5341!

    Seq brand new instance

    However, Seq is “just” a container for our logs – but we have to produce them.

    A sample ASP.NET API project

    I’ve created a simple API project that exposes CRUD operations for a data model stored in memory (we don’t really care about the details).

    [ApiController]
    [Route("[controller]")]
    public class BooksController : ControllerBase
    {
        public BooksController()
        {
    
        }
    
        [HttpGet("{id}")]
        public ActionResult<Book> GetBook([FromRoute] int id)
        {
    
            Book? book = booksCatalogue.SingleOrDefault(x => x.Id == id);
            return book switch
            {
                null => NotFound(),
                _ => Ok(book)
            };
        }
    }
    

    As you can see, the details here are not important.

    Even the Main method is the default one:

    var builder = WebApplication.CreateBuilder(args);
    
    builder.Services.AddControllers();
    
    builder.Services.AddEndpointsApiExplorer();
    builder.Services.AddSwaggerGen();
    
    var app = builder.Build();
    
    if (app.Environment.IsDevelopment())
    {
        app.UseSwagger();
        app.UseSwaggerUI();
    }
    
    app.UseHttpsRedirection();
    
    app.MapControllers();
    
    app.Run();
    

    We have the Controllers, we have Swagger… well, nothing fancy.

    Let’s mix it all together.

    How to integrate Seq with an ASP.NET application

    If you want to use Seq in an ASP.NET application (may it be an API application or whatever else), you have to add it to the startup pipeline.

    First, you have to install the proper NuGet package: Seq.Extensions.Logging.

    The Seq.Extensions.Logging NuGet package

    Then, you have to add it to your Services, calling the AddSeq() method:

    var builder = WebApplication.CreateBuilder(args);
    
    builder.Services.AddControllers();
    
    builder.Services.AddEndpointsApiExplorer();
    builder.Services.AddSwaggerGen();
    
    + builder.Services.AddLogging(lb => lb.AddSeq());
    
    var app = builder.Build();
    

    Now, Seq is ready to intercept whatever kind of log arrives at the specified port (remember, in our case, we are using the default one: 5341).

    We can try it out by adding an ILogger to the BooksController constructor:

    private readonly ILogger<BooksController> _logger;
    
    public BooksController(ILogger<BooksController> logger)
    {
        _logger = logger;
    }
    

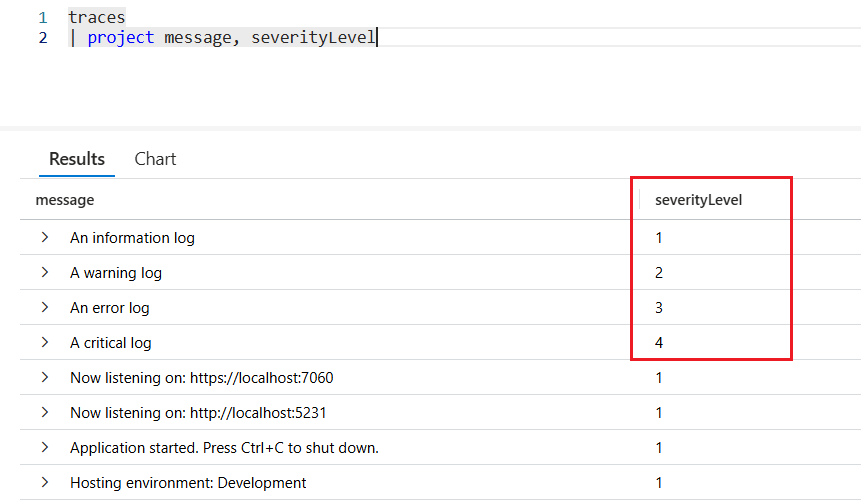
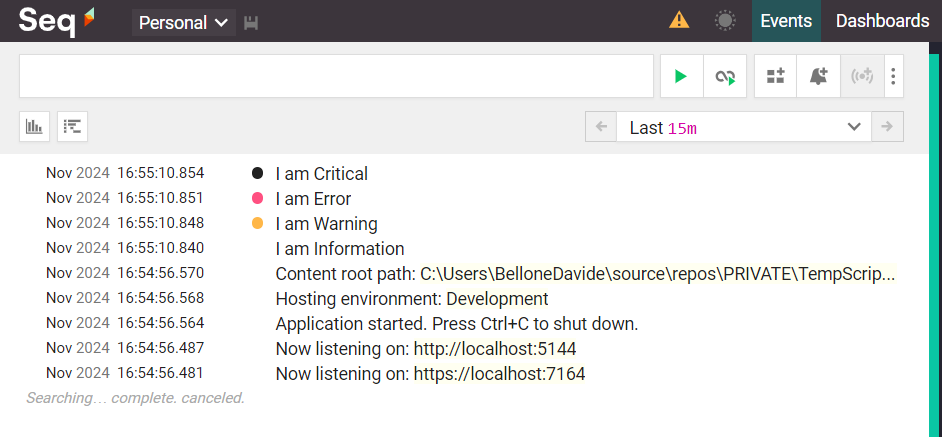
    So that we can use the _logger instance to create logs as we want, using the necessary Log Level:

    [HttpGet("{id}")]
    public ActionResult<Book> GetBook([FromRoute] int id)
    {
        _logger.LogInformation("I am Information");
        _logger.LogWarning("I am Warning");
        _logger.LogError("I am Error");
        _logger.LogCritical("I am Critical");
    
        Book? book = booksCatalogue.SingleOrDefault(x => x.Id == id);
        return book switch
        {
            null => NotFound(),
            _ => Ok(book)
        };
    }
    

    Log messages on Seq

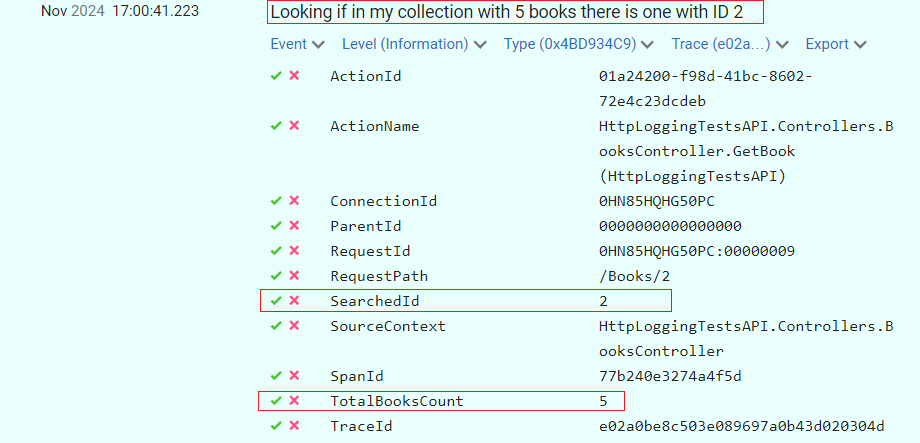
    Using Structured Logging with ILogger and Seq

    One of the best things about Seq is that it automatically handles Structured Logging.

    [HttpGet("{id}")]
    public ActionResult<Book> GetBook([FromRoute] int id)
    {
        _logger.LogInformation("Looking if in my collection with {TotalBooksCount} books there is one with ID {SearchedId}"
     , booksCatalogue.Count, id);
    
        Book? book = booksCatalogue.SingleOrDefault(x => x.Id == id);
        return book switch
        {
            null => NotFound(),
            _ => Ok(book)
        };
    }
    

    Have a look at this line:

    _logger.LogInformation("Looking if in my collection with {TotalBooksCount} books there is one with ID {SearchedId}"
     , booksCatalogue.Count, id);
    

    This line generates a string message, replaces all the placeholders, and, on top of that, creates two properties, SearchedId and TotalBooksCount; you can now define queries using these values.

    Structured Logs in Seq allow you to view additional logging properties

    Further readings

    I have to admit it: logging management is one of my favourite topics.

    I’ve already written a sort of introduction to Seq in the past, but at that time, I did not use the native ILogger, but Serilog, a well-known logging library that added some more functionalities on top of the native logger.

    🔗 Logging with Serilog and Seq | Code4IT

    This article first appeared on Code4IT 🐧

    In particular, Serilog can be useful for propagating Correlation IDs across multiple services so that you can fetch all the logs generated by a specific operation, even though they belong to separate applications.

    🔗 How to log Correlation IDs in .NET APIs with Serilog

    Feel free to search through my blog all the articles related to logging – I’m sure you will find interesting stuff!

    Wrapping up

    I think Seq is the best tool for local development: it’s easy to download and install, supports structured logging, and can be easily added to an ASP.NET application with just a line of code.

    I usually add it to my private projects, especially when the operations I run are complex enough to require some well-structured log.

    Given how it’s easy to install, sometimes I use it for my work projects too: when I have to fix a bug, but I don’t want to use the centralized logging platform (since it’s quite complex to use), I add Seq as a destination sink, run the application, and analyze the logs in my local machine. Then, of course, I remove its reference, as I want it to be just a discardable piece of configuration.

    I hope you enjoyed this article! Let’s keep in touch on LinkedIn, Twitter or BlueSky! 🤜🤛

    Happy coding!

    🐧


    Source link

  • How to log to Azure Application Insights using ILogger in ASP.NET Core &vert; Code4IT

    How to log to Azure Application Insights using ILogger in ASP.NET Core | Code4IT


    Application Insights is a great tool for handling high volumes of logs. How can you configure an ASP.NET application to send logs to Azure Application Insights? What can I do to have Application Insights log my exceptions?

    Table of Contents

    Just a second! 🫷
    If you are here, it means that you are a software developer.
    So, you know that storage, networking, and domain management have a cost .

    If you want to support this blog, please ensure that you have disabled the adblocker for this site.
    I configured Google AdSense to show as few ADS as possible – I don’t want to bother you with lots of ads, but I still need to add some to pay for the resources for my site.

    Thank you for your understanding.
    Davide

    Logging is crucial for any application. However, generating logs is not enough: you must store them somewhere to access them.

    Application Insights is one of the tools that allows you to store your logs in a cloud environment. It provides a UI and a query editor that allows you to drill down into the details of your logs.

    In this article, we will learn how to integrate Azure Application Insights with an ASP.NET Core application and how Application Insights treats log properties such as Log Levels and exceptions.

    For the sake of this article, I’m working on an API project with HTTP Controllers with only one endpoint. The same approach can be used for other types of applications.

    How to retrieve the Azure Application Insights connection string

    Azure Application Insights can be accessed via any browser by using the Azure Portal.

    Once you have an instance ready, you can simply get the value of the connection string for that resource.

    You can retrieve it in two ways.

    You can get the connection string by looking at the Connection String property in the resource overview panel:

    Azure Application Insights overview panel

    The alternative is to navigate to the Configure > Properties page and locate the Connection String field.

    Azure Application Insights connection string panel

    How to add Azure Application Insights to an ASP.NET Core application

    Now that you have the connection string, you can place it in the configuration file or, in general, store it in a place that is accessible from your application.

    To configure ASP.NET Core to use Application Insights, you must first install the Microsoft.Extensions.Logging.ApplicationInsights NuGet package.

    Now you can add a new configuration to the Program class (or wherever you configure your services and the ASP.NET core pipeline):

    builder.Logging.AddApplicationInsights(
    configureTelemetryConfiguration: (config) =>
     config.ConnectionString = "InstrumentationKey=your-connection-string",
     configureApplicationInsightsLoggerOptions: (options) => { }
    );
    

    The configureApplicationInsightsLoggerOptions allows you to configure some additional properties: TrackExceptionsAsExceptionTelemetry, IncludeScopes, and FlushOnDispose. These properties are by default set to true, so you probably don’t want to change the default behaviour (except one, which we’ll modify later).

    And that’s it! You have Application Insights ready to be used.

    How log levels are stored and visualized on Application Insights

    I have this API endpoint that does nothing fancy: it just returns a random number.

    [Route("api/[controller]")]
    [ApiController]
    public class MyDummyController(ILogger<DummyController> logger) : ControllerBase
    {
     private readonly ILogger<DummyController> _logger = logger;
    
        [HttpGet]
        public async Task<IActionResult> Get()
        {
            int number = Random.Shared.Next();
            return Ok(number);
        }
    }
    

    We can use it to run experiments on how logs are treated using Application Insights.

    First, let’s add some simple log messages in the Get endpoint:

    [HttpGet]
    public async Task<IActionResult> Get()
    {
        int number = Random.Shared.Next();
    
        _logger.LogDebug("A debug log");
        _logger.LogTrace("A trace log");
        _logger.LogInformation("An information log");
        _logger.LogWarning("A warning log");
        _logger.LogError("An error log");
        _logger.LogCritical("A critical log");
    
        return Ok(number);
    }
    

    These are just plain messages. Let’s search for them in Application Insights!

    You first have to run the application – duh! – and wait for a couple of minutes for the logs to be ready on Azure. So, remember not to close the application immediately: you have to give it a few seconds to send the log messages to Application Insights.

    Then, you can open the logs panel and access the logs stored in the traces table.

    Log levels displayed on Azure Application Insights

    As you can see, the messages appear in the query result.

    There are three important things to notice:

    • in .NET, the log level is called “Log Level”, while on Application Insights it’s called “severity level”;
    • the log levels lower than Information are ignored by default (in fact, you cannot see them in the query result);
    • the Log Levels are exposed as numbers in the severityLevel column: the higher the value, the higher the log level.

    So, if you want to update the query to show only the log messages that are at least Warnings, you can do something like this:

    traces
    | where severityLevel >= 2
    | order  by timestamp desc
    | project timestamp, message, severityLevel
    

    How to log exceptions on Application Insights

    In the previous example, we logged errors like this:

    _logger.LogError("An error log");
    

    Fortunately, ILogger exposes an overload that accepts an exception in input and logs all the details.

    Let’s try it by throwing an exception (I chose AbandonedMutexException because it’s totally nonsense in this simple context, so it’s easy to spot).

    private void SomethingWithException(int number)
    {
        try
        {
            _logger.LogInformation("In the Try block");
    
            throw new AbandonedMutexException("An exception message");
        }
        catch (Exception ex)
        {
            _logger.LogInformation("In the Catch block");
            _logger.LogError(ex, "Unable to complete the operation");
        }
        finally
        {
            _logger.LogInformation("In the Finally block");
        }
    }
    

    So, when calling it, we expect to see 4 log entries, one of which contains the details of the AbandonedMutexException exception.

    The Exception message in Application Insights

    Hey, where is the exception message??

    It turns out that ILogger, when creating log entries like _logger.LogError("An error log");, generates objects of type TraceTelemetry. However, the overload that accepts as a first parameter an exception (_logger.LogError(ex, "Unable to complete the operation");) is internally handled as an ExceptionTelemetry object. Since internally, it’s a different type of Telemetry object, and it gets ignored by default.

    To enable logging exceptions, you have to update the way you add Application Insights to your application by setting the TrackExceptionsAsExceptionTelemetry property to false:

    builder.Logging.AddApplicationInsights(
    configureTelemetryConfiguration: (config) =>
     config.ConnectionString = connectionString,
     configureApplicationInsightsLoggerOptions: (options) => options.TrackExceptionsAsExceptionTelemetry = false);
    

    This way, ExceptionsTelemetry objects are treated as TraceTelemetry logs, making them available in Application Insights logs:

    The Exception log appears in Application Insights

    Then, to access the details of the exception like the message and the stack trace, you can look into the customDimensions element of the log entry:

    Details of the Exception log

    Even though this change is necessary to have exception logging work, it is barely described in the official documentation.

    Further readings

    It’s not the first time we have written about logging in this blog.

    For example, suppose you don’t want to use Application Insights but prefer an open-source, vendor-independent log sink. In that case, my suggestion is to try Seq:

    🔗 Easy logging management with Seq and ILogger in ASP.NET | Code4IT

    Logging manually is nice, but you may be interested in automatically logging all the data related to incoming HTTP requests and their responses.

    🔗 HTTP Logging in ASP.NET: how to automatically log all incoming HTTP requests (and its downsides!) | Code4IT

    This article first appeared on Code4IT 🐧

    You can read the official documentation here (even though I find it not much complete and does not show the results):

    🔗 Application Insights logging with .NET | Microsoft docs

    Wrapping up

    This article taught us how to set up Azure Application Insights in an ASP.NET application.
    We touched on the basics, discussing log levels and error handling. In future articles, we’ll delve into some other aspects of logging, such as correlating logs, understanding scopes, and more.

    I hope you enjoyed this article! Let’s keep in touch on LinkedIn, Twitter or BlueSky! 🤜🤛

    Happy coding!

    🐧


    Source link