برچسب: Improve

  • How to improve Serilog logging in .NET 6 by using Scopes | Code4IT

    How to improve Serilog logging in .NET 6 by using Scopes | Code4IT


    Logs are important. Properly structured logs can be the key to resolving some critical issues. With Serilog’s Scopes, you can enrich your logs with info about the context where they happened.

    Table of Contents

    Just a second! 🫷
    If you are here, it means that you are a software developer.
    So, you know that storage, networking, and domain management have a cost .

    If you want to support this blog, please ensure that you have disabled the adblocker for this site.
    I configured Google AdSense to show as few ADS as possible – I don’t want to bother you with lots of ads, but I still need to add some to pay for the resources for my site.

    Thank you for your understanding.
    Davide

    Even though it’s not one of the first things we usually set up when creating a new application, logging is a real game-changer in the long run.

    When an error occurred, if we have proper logging we can get more info about the context where it happened so that we can easily identify the root cause.

    In this article, we will use Scopes, one of the functionalities of Serilog, to create better logs for our .NET 6 application. In particular, we’re going to create a .NET 6 API application in the form of Minimal APIs.

    We will also use Seq, just to show you the final result.

    Adding Serilog in our Minimal APIs

    We’ve already explained what Serilog and Seq are in a previous article.

    To summarize, Serilog is an open source .NET library for logging. One of the best features of Serilog is that messages are in the form of a template (called Structured Logs), and you can enrich the logs with some value automatically calculated, such as the method name or exception details.

    To add Serilog to your application, you simply have to run dotnet add package Serilog.AspNetCore.

    Since we’re using Minimal APIs, we don’t have the StartUp file anymore; instead, we will need to add it to the Program.cs file:

    builder.Host.UseSerilog((ctx, lc) => lc
        .WriteTo.Console() );
    

    Then, to create those logs, you will need to add a specific dependency in your classes:

    public class ItemsRepository : IItemsRepository
    {
        private readonly ILogger<ItemsRepository> _logger;
    
        public ItemsRepository(ILogger<ItemsRepository> logger)
        {
            _logger = logger;
        }
    }
    

    As you can see, we’re injecting an ILogger<ItemsRepository>: specifying the related class automatically adds some more context to the logs that we will generate.

    Installing Seq and adding it as a Sink

    Seq is a logging platform that is a perfect fit for Serilog logs. If you don’t have it already installed, head to their download page and install it locally (you can even install it as a Docker container 🤩).

    In the installation wizard, you can select the HTTP port that will expose its UI. Once everything is in place, you can open that page on your localhost and see a page like this:

    Seq empty page on localhost

    On this page, we will see all the logs we write.

    But wait! ⚠ We still have to add Seq as a sink for Serilog.

    A sink is nothing but a destination for the logs. When using .NET APIs we can define our sinks both on the appsettings.json file and on the Program.cs file. We will use the second approach.

    First of all, you will need to install a NuGet package to add Seq as a sink: dotnet add package Serilog.Sinks.Seq.

    Then, you have to update the Serilog definition we’ve seen before by adding a .WriteTo.Seq instruction:

    builder.Host.UseSerilog((ctx, lc) => lc
        .WriteTo.Console()
        .WriteTo.Seq("http://localhost:5341")
        );
    

    Notice that we’ve specified also the port that exposes our Seq instance.

    Now, every time we log something, we will see our logs both on the Console and on Seq.

    How to add scopes

    The time has come: we can finally learn how to add Scopes using Serilog!

    Setting up the example

    For this example, I’ve created a simple controller, ItemsController, which exposes two endpoints: Get and Add. With these two endpoints, we are able to add and retrieve items stored in an in-memory collection.

    This class has 2 main dependencies: IItemsRepository and IUsersItemsRepository. Each of these interfaces has its own concrete class, each with a private logger injected in the constructor:

    public ItemsRepository(ILogger<ItemsRepository> logger)
    {
        _logger = logger;
    }
    

    and, similarly

    public UsersItemRepository(ILogger<UsersItemRepository> logger)
    {
        _logger = logger;
    }
    

    How do those classes use their own _logger instances?

    For example, the UsersItemRepository class exposes an AddItem method that adds a specific item to the list of items already possessed by a specific user.

    public void AddItem(string username, Item item)
    {
        if (!_usersItems.ContainsKey(username))
        {
            _usersItems.Add(username, new List<Item>());
            _logger.LogInformation("User was missing from the list. Just added");
        }
        _usersItems[username].Add(item);
        _logger.LogInformation("Added item for to the user's catalogue");
    }
    

    We are logging some messages, such as “User was missing from the list. Just added”.

    Something similar happens in the ItemsRepository class, where we have a GetItem method that returns the required item if it exists, and null otherwise.

    public Item GetItem(int itemId)
    {
        _logger.LogInformation("Retrieving item {ItemId}", itemId);
        return _allItems.FirstOrDefault(i => i.Id == itemId);
    }
    

    Finally, who’s gonna call these methods?

    [HttpPost(Name = "AddItems")]
    public IActionResult Add(string userName, int itemId)
    {
        var item = _itemsRepository.GetItem(itemId);
    
        if (item == null)
        {
            _logger.LogWarning("Item does not exist");
    
            return NotFound();
        }
        _usersItemsRepository.AddItem(userName, item);
    
        return Ok(item);
    }
    

    Ok then, we’re ready to run the application and see the result.

    When I call that endpoint by passing “davide” as userName and “1” as itemId, we can see these logs:

    Simple logging on Seq

    We can see the 3 log messages but they are unrelated one each other. In fact, if we expand the logs to see the actual values we’ve logged, we can see that only the “Retrieving item 1” log has some information about the item ID we want to associate with the user.
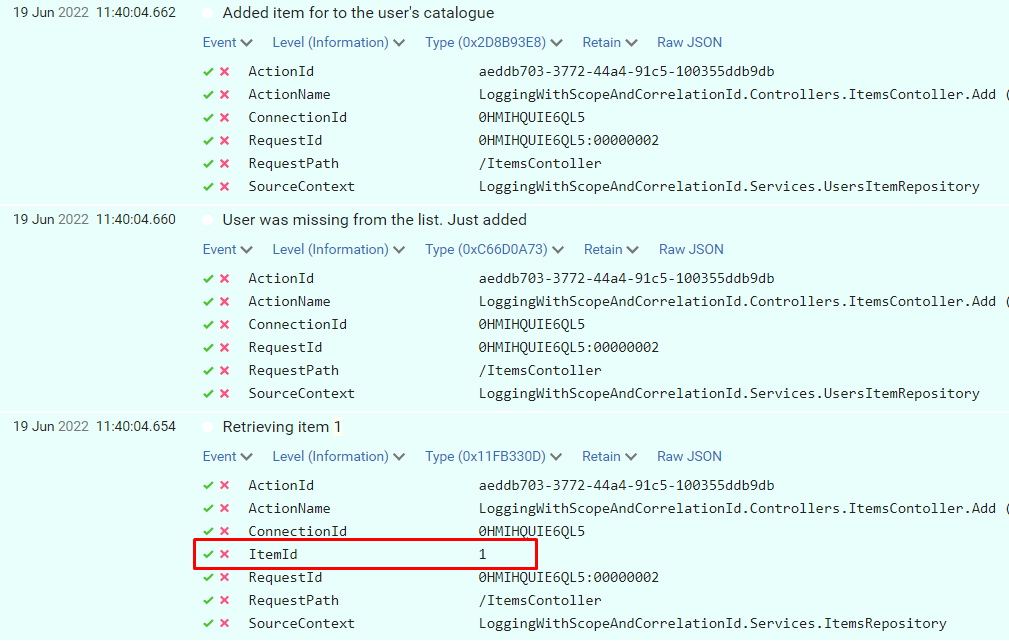
    Expanding logs on Seq

    Using BeginScope with Serilog

    Finally, it’s time to define the Scope.

    It’s as easy as adding a simple using statement; see how I added the scope to the Add method in the Controller:

    [HttpPost(Name = "AddItems")]
    public IActionResult Add(string userName, int itemId)
    {
        using (_logger.BeginScope("Adding item {ItemId} for user {UserName}", itemId, userName))
        {
            var item = _itemsRepository.GetItem(itemId);
    
            if (item == null)
            {
                _logger.LogWarning("Item does not exist");
    
                return NotFound();
            }
            _usersItemsRepository.AddItem(userName, item);
    
            return Ok(item);
        }
    }
    

    Here’s the key!

    using (_logger.BeginScope("Adding item {ItemId} for user {UserName}", itemId, userName))
    

    With this single instruction, we are actually performing 2 operations:

    1. we are adding a Scope to each message – “Adding item 1 for user davide”
    2. we are adding ItemId and UserName to each log entry that falls in this block, in every method in the method chain.

    Let’s run the application again, and we will see this result:
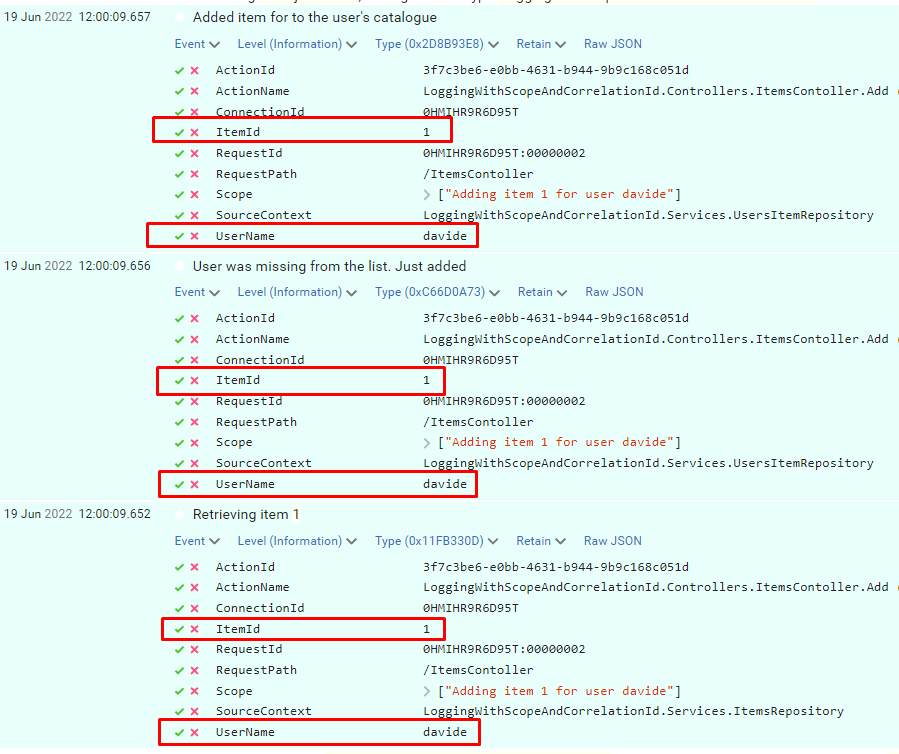
    Expanded logs on Seq with Scopes

    So, now you can use these new properties to get some info about the context of when this log happened, and you can use the ItemId and UserName fields to search for other related logs.

    You can also nest scopes, of course.

    Why scopes instead of Correlation ID?

    You might be thinking

    Why can’t I just use correlation IDs?

    Well, the answer is pretty simple: correlation IDs are meant to correlate different logs in a specific request, and, often, across services. You generally use Correlation IDs that represent a specific call to your API and act as a Request ID.

    For sure, that can be useful. But, sometimes, not enough.

    Using scopes you can also “correlate” distinct HTTP requests that have something in common.

    If I call 2 times the AddItem endpoint, I can filter both for UserName and for ItemId and see all the related logs across distinct HTTP calls.

    Let’s see a real example: I have called the endpoint with different values

    • id=1, username=“davide”
    • id=1, username=“luigi”
    • id=2, username=“luigi”

    Since the scope reference both properties, we can filter for UserName and discover that Luigi has added both Item1 and Item 2.
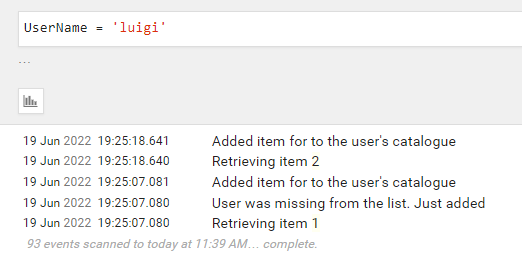
    Filtering logs by UserName

    At the same time, we can filter by ItemId and discover that the item with id = 2 has been added only once.
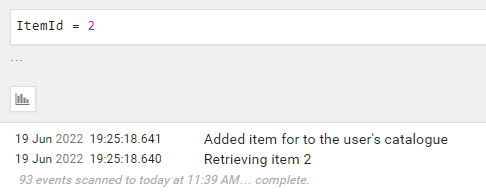
    Filtering logs by ItemId

    Ok, then, in the end, Scopes or Correlation IDs? The answer is simple:

    Both is good

    This article first appeared on Code4IT

    Read more

    As always, the best place to find the info about a library is its documentation.

    🔗 Serilog website

    If you prefer some more practical articles, I’ve already written one to help you get started with Serilog and Seq (and with Structured Logs):

    🔗 Logging with Serilog and Seq | Code4IT

    as well as one about adding Serilog to Console applications (which is slightly different from adding Serilog to .NET APIs)

    🔗 How to add logs on Console with .NET Core and Serilog | Code4IT

    Then, you might want to deep dive into Serilog’s BeginScope. Here’s a neat article by Nicholas Blumhardt. Also, have a look at the comments, you’ll find interesting points to consider

    🔗 The semantics of ILogger.BeginScope | Nicholas Blumhardt

    Finally, two must-read articles about logging best practices.

    The first one is by Thiago Nascimento Figueiredo:

    🔗 Logs – Why, good practices, and recommendations | Dev.to

    and the second one is by Llron Tal:

    🔗 9 Logging Best Practices Based on Hands-on Experience | Loom Systems

    Wrapping up

    In this article, we’ve added Scopes to our logs to enrich them with some common fields that can be useful to investigate in case of errors.

    Remember to read the last 3 links I’ve shared above, they’re pure gold – you’ll thank me later 😎

    Happy coding!

    🐧


    Source link

  • Initialize lists size to improve performance &vert; Code4IT

    Initialize lists size to improve performance | Code4IT


    Lists have an inner capacity. Every time you add more items than the current Capacity, you add performance overhead. How to prevent it?

    Table of Contents

    Just a second! 🫷
    If you are here, it means that you are a software developer.
    So, you know that storage, networking, and domain management have a cost .

    If you want to support this blog, please ensure that you have disabled the adblocker for this site.
    I configured Google AdSense to show as few ADS as possible – I don’t want to bother you with lots of ads, but I still need to add some to pay for the resources for my site.

    Thank you for your understanding.
    Davide

    Some collections, like List<T>, have a predefined initial size.

    Every time you add a new item to the collection, there are two scenarios:

    1. the collection has free space, allocated but not yet populated, so adding an item is immediate;
    2. the collection is already full: internally, .NET resizes the collection, so that the next time you add a new item, we fall back to option #1.

    Clearly, the second approach has an impact on the overall performance. Can we prove it?

    Here’s a benchmark that you can run using BenchmarkDotNet:

    [Params(2, 100, 1000, 10000, 100_000)]
    public int Size;
    
    [Benchmark]
    public void SizeDefined()
    {
        int itemsCount = Size;
    
        List<int> set = new List<int>(itemsCount);
        foreach (var i in Enumerable.Range(0, itemsCount))
        {
            set.Add(i);
        }
    }
    
    [Benchmark]
    public void SizeNotDefined()
    {
        int itemsCount = Size;
    
        List<int> set = new List<int>();
        foreach (var i in Enumerable.Range(0, itemsCount))
        {
            set.Add(i);
        }
    }
    

    Those two methods are almost identical: the only difference is that in one method we specify the initial size of the list: new List<int>(itemsCount).

    Have a look at the result of the benchmark run with .NET 7:

    Method Size Mean Error StdDev Median Gen0 Gen1 Gen2 Allocated
    SizeDefined 2 49.50 ns 1.039 ns 1.678 ns 49.14 ns 0.0248 104 B
    SizeNotDefined 2 63.66 ns 3.016 ns 8.507 ns 61.99 ns 0.0268 112 B
    SizeDefined 100 798.44 ns 15.259 ns 32.847 ns 790.23 ns 0.1183 496 B
    SizeNotDefined 100 1,057.29 ns 42.100 ns 121.469 ns 1,056.42 ns 0.2918 1224 B
    SizeDefined 1000 9,180.34 ns 496.521 ns 1,400.446 ns 8,965.82 ns 0.9766 4096 B
    SizeNotDefined 1000 9,720.66 ns 406.184 ns 1,184.857 ns 9,401.37 ns 2.0142 8464 B
    SizeDefined 10000 104,645.87 ns 7,636.303 ns 22,395.954 ns 99,032.68 ns 9.5215 1.0986 40096 B
    SizeNotDefined 10000 95,192.82 ns 4,341.040 ns 12,524.893 ns 92,824.50 ns 31.2500 131440 B
    SizeDefined 100000 1,416,074.69 ns 55,800.034 ns 162,771.317 ns 1,402,166.02 ns 123.0469 123.0469 123.0469 400300 B
    SizeNotDefined 100000 1,705,672.83 ns 67,032.839 ns 186,860.763 ns 1,621,602.73 ns 285.1563 285.1563 285.1563 1049485 B

    Notice that, in general, they execute in a similar amount of time; for instance when running the same method with 100000 items, we have the same magnitude of time execution: 1,416,074.69 ns vs 1,705,672.83 ns.

    The huge difference is with the allocated space: 400,300 B vs 1,049,485 B. Almost 2.5 times better!

    Ok, it works. Next question: How can we check a List capacity?

    We’ve just learned that capacity impacts the performance of a List.

    How can you try it live? Easy: have a look at the Capacity property!

    List<int> myList = new List<int>();
    
    foreach (var element in Enumerable.Range(0,50))
    {
        myList.Add(element);
        Console.WriteLine($"Items count: {myList.Count} - List capacity: {myList.Capacity}");
    }
    

    If you run this method, you’ll see this output:

    Items count: 1 - List capacity: 4
    Items count: 2 - List capacity: 4
    Items count: 3 - List capacity: 4
    Items count: 4 - List capacity: 4
    Items count: 5 - List capacity: 8
    Items count: 6 - List capacity: 8
    Items count: 7 - List capacity: 8
    Items count: 8 - List capacity: 8
    Items count: 9 - List capacity: 16
    Items count: 10 - List capacity: 16
    Items count: 11 - List capacity: 16
    Items count: 12 - List capacity: 16
    Items count: 13 - List capacity: 16
    Items count: 14 - List capacity: 16
    Items count: 15 - List capacity: 16
    Items count: 16 - List capacity: 16
    Items count: 17 - List capacity: 32
    Items count: 18 - List capacity: 32
    Items count: 19 - List capacity: 32
    Items count: 20 - List capacity: 32
    Items count: 21 - List capacity: 32
    Items count: 22 - List capacity: 32
    Items count: 23 - List capacity: 32
    Items count: 24 - List capacity: 32
    Items count: 25 - List capacity: 32
    Items count: 26 - List capacity: 32
    Items count: 27 - List capacity: 32
    Items count: 28 - List capacity: 32
    Items count: 29 - List capacity: 32
    Items count: 30 - List capacity: 32
    Items count: 31 - List capacity: 32
    Items count: 32 - List capacity: 32
    Items count: 33 - List capacity: 64
    Items count: 34 - List capacity: 64
    Items count: 35 - List capacity: 64
    Items count: 36 - List capacity: 64
    Items count: 37 - List capacity: 64
    Items count: 38 - List capacity: 64
    Items count: 39 - List capacity: 64
    Items count: 40 - List capacity: 64
    Items count: 41 - List capacity: 64
    Items count: 42 - List capacity: 64
    Items count: 43 - List capacity: 64
    Items count: 44 - List capacity: 64
    Items count: 45 - List capacity: 64
    Items count: 46 - List capacity: 64
    Items count: 47 - List capacity: 64
    Items count: 48 - List capacity: 64
    Items count: 49 - List capacity: 64
    Items count: 50 - List capacity: 64
    

    So, as you can see, List capacity is doubled every time the current capacity is not enough.

    Further readings

    To populate the lists in our Benchmarks we used Enumerable.Range. Do you know how it works? Have a look at this C# tip:

    🔗 C# Tip: LINQ’s Enumerable.Range to generate a sequence of consecutive numbers

    This article first appeared on Code4IT 🐧

    Wrapping up

    In this article, we’ve learned that just a minimal change can impact our application performance.

    We simply used a different constructor, but the difference is astounding. Clearly, this trick works only if already know the final length of the list (or, at least, an estimation). The more precise, the better!

    I hope you enjoyed this article! Let’s keep in touch on Twitter or on LinkedIn, if you want! 🤜🤛

    Happy coding!

    🐧


    Source link

  • Improve memory allocation by initializing collection size | Code4IT


    Sometimes just a minor change can affect performance. Here’s a simple trick: initialize your collections by specifying the initial size!

    Table of Contents

    Just a second! 🫷
    If you are here, it means that you are a software developer.
    So, you know that storage, networking, and domain management have a cost .

    If you want to support this blog, please ensure that you have disabled the adblocker for this site.
    I configured Google AdSense to show as few ADS as possible – I don’t want to bother you with lots of ads, but I still need to add some to pay for the resources for my site.

    Thank you for your understanding.
    Davide

    When you initialize a collection, like a List, you create it with the default size.

    Whenever you add an item to a collection, .NET checks that there is enough capacity to hold the new item. If not, it resizes the collection by doubling the inner capacity.

    Resizing the collection takes time and memory.

    Therefore, when possible, you should initialize the collection with the expected number of items it will contain.

    Initialize a List

    In the case of a List, you can simply replace new List<T>() with new List<T>(size). By specifying the initial size in the constructor’s parameters, you’ll have a good performance improvement.

    Let’s create a benchmark using BenchmarkDotNet and .NET 8.0.100-rc.1.23455.8 (at the time of writing, .NET 8 is still in preview. However, we can get an idea of the average performance).

    The benchmark is pretty simple:

    [MemoryDiagnoser]
    public class CollectionWithSizeInitializationBenchmarks
    {
        [Params(100, 1000, 10000, 100000)]
        public int Size;
    
        [Benchmark]
        public void WithoutInitialization()
        {
            List<int> list = new List<int>();
    
            for (int i = 0; i < Size; i++)
            {
    
                list.Add(i);
            }
        }
    
        [Benchmark(Baseline = true)]
        public void WithInitialization()
        {
            List<int> list = new List<int>(Size);
    
            for (int i = 0; i < Size; i++)
            {
                list.Add(i);
            }
        }
    }
    

    The only difference is in the list initialization: in the WithInitialization, we have List<int> list = new List<int>(Size);.

    Have a look at the benchmark result, split by time and memory execution.

    Starting with the execution time, we can see that without list initialization, we have an average 1.7x performance degradation.

    Method Size Mean Ratio
    WithoutInitialization 100 299.659 ns 1.77
    WithInitialization 100 169.121 ns 1.00
    WithoutInitialization 1000 1,549.343 ns 1.58
    WithInitialization 1000 944.862 ns 1.00
    WithoutInitialization 10000 16,307.082 ns 1.80
    WithInitialization 10000 9,035.945 ns 1.00
    WithoutInitialization 100000 388,089.153 ns 1.73
    WithInitialization 100000 227,040.318 ns 1.00

    If we talk about memory allocation, we waste an overage of 2.5x memory if compared to collections with size initialized.

    Method Size Allocated Alloc Ratio
    WithoutInitialization 100 1184 B 2.60
    WithInitialization 100 456 B 1.00
    WithoutInitialization 1000 8424 B 2.08
    WithInitialization 1000 4056 B 1.00
    WithoutInitialization 10000 131400 B 3.28
    WithInitialization 10000 40056 B 1.00
    WithoutInitialization 100000 1049072 B 2.62
    WithInitialization 100000 400098 B 1.00

    Initialize an HashSet

    Similar to what we’ve done with List’s, we can see significant improvements when initializing correctly other data types, such as HashSet’s.

    Let’s run the same benchmarks, but this time, let’s initialize a HashSet<int> instead of a List<int>.

    The code is pretty similar:

     [Benchmark]
     public void WithoutInitialization()
     {
         var set = new HashSet<int>();
    
         for (int i = 0; i < Size; i++)
         {
             set.Add(i);
         }
     }
    
     [Benchmark(Baseline = true)]
     public void WithInitialization()
     {
         var set = new HashSet<int>(Size);
    
         for (int i = 0; i < Size; i++)
         {
             set.Add(i);
         }
     }
    

    What can we say about performance improvements?

    If we talk about execution time, we can see an average of 2x improvements.

    Method Size Mean Ratio
    WithoutInitialization 100 1,122.2 ns 2.02
    WithInitialization 100 558.4 ns 1.00
    WithoutInitialization 1000 12,215.6 ns 2.74
    WithInitialization 1000 4,478.4 ns 1.00
    WithoutInitialization 10000 148,603.7 ns 1.90
    WithInitialization 10000 78,293.3 ns 1.00
    WithoutInitialization 100000 1,511,011.6 ns 1.96
    WithInitialization 100000 810,657.8 ns 1.00

    If we look at memory allocation, if we don’t initialize the HashSet, we are slowing down the application by a factor of 3x. Impressive!

    Method Size Allocated Alloc Ratio
    WithoutInitialization 100 5.86 KB 3.28
    WithInitialization 100 1.79 KB 1.00
    WithoutInitialization 1000 57.29 KB 3.30
    WithInitialization 1000 17.35 KB 1.00
    WithoutInitialization 10000 526.03 KB 3.33
    WithInitialization 10000 157.99 KB 1.00
    WithoutInitialization 100000 4717.4 KB 2.78
    WithInitialization 100000 1697.64 KB 1.00

    Wrapping up

    Do you need other good reasons to initialize your collection capacity when possible? 😉

    I used BenchmarkDotNet to create these benchmarks. If you want an introduction to this tool, you can have a look at how I used it to measure the performance of Enums:

    🔗 Enum.HasFlag performance with BenchmarkDotNet | Code4IT

    I hope you enjoyed this article! Let’s keep in touch on Twitter or LinkedIn! 🤜🤛

    Happy coding!

    🐧


    Source link

  • Golden Tips To Improve Your Essay Writing Skills


    Writing an essay is one of the many tasks you’ll face as a student, so it’s essential to have good essay-writing skills. Strong writing skills can help you excel in your classes, standardized tests, and workplace. Fortunately, there are many ways you can improve your essay-writing skills. This article will provide golden tips to help you become a better essay writer.

    Seek Professional Writing Help

    Seeking professional writing help is one of the golden tips to improve your essay writing skills because it gives you access to experienced and knowledgeable writers who can help you craft a high-quality essay. Essay writing can be challenging and time-consuming for many students, particularly those needing strong writing skills or more confidence in writing a good essay.

    With professional writing help, you can get personalized feedback, guidance, and support to ensure your essay is of the highest quality. Professional writing help can also allow you to learn from the expertise of experienced writers, enabling you to improve your essay-writing skills. Students can look into platforms like www.vivaessays.com/essay-writer/ to get the needed assistance.

    Read Widely

    Another crucial tip for improving your essay writing skills is to read widely. Reading other people’s work can give you a better insight into what makes a good essay and can help you to develop your writing style. Reading other people’s work can also help gain new knowledge and ideas.

    Additionally, reading widely allows you to better understand grammar and sentence structure, which will help you construct your sentences. Finally, reading widely can help you develop your critical thinking skills and allow you to compare and contrast different ideas and viewpoints. All of these skills will be beneficial when writing your essays.

    Practice!

    They say that practice makes perfect, and this is certainly true when it comes to essay writing. You can improve your essays by consistently practicing and honing your writing skills. Practicing can help you become more comfortable with the structure of an essay and become familiar with the conventions of essay writing.

    Additionally, practicing can help you become more aware of which words and phrases work best in an essay, as well as help you become a more effective and clear communicator. Practicing can also help you become more confident in your writing and can help you identify any weak areas that need improvement. In short, practicing can help you hone your skills and make you a better essay writer.

    Have Someone Else Review Your Work

    Having a third eye review of your work can help you identify areas of improvement in your essay-writing skills. It can see you identify areas where you may be using too many words or where your writing may be confusing or unclear. It can also aid in identifying areas where you may be making the same mistakes or where you may be repeating yourself. Furthermore, it can help you identify weak points in your argument or areas where you may need to provide more evidence or detail.

    Finally, it can help you identify any grammar, spelling, or punctuation mistakes that you may have made. Ultimately, having someone review your work can help you become a better essay writer by highlighting areas you need to improve and providing constructive feedback.

    Have A Study Buddy

    Having a study buddy or group can help improve your essay-writing skills by providing a constructive environment for peer review. The group members can read each other’s work, offer feedback and criticism, and discuss ways to improve the essay. This can help identify common mistakes and improvement areas and provide insight on how to structure an essay for clarity and effectiveness. Additionally, studying with a group can keep you motivated and on task. It can give a sense of camaraderie and support when tackling a complex writing task.

    Work On Your Grammar, Spelling, And Punctuation Skills

    Lastly, improving your grammar, spelling, and punctuation skills is essential for improving your essay writing skills. Good grammar, spelling, and punctuation are the foundation of effective communication. If your writing is filled with errors, your message may be lost, and your essay will not make the grade.

    Furthermore, when you write an essay, it is essential to remember the conventions of grammar, spelling, and punctuation. This will help ensure that your essay is straightforward to read. Additionally, if you can use correct grammar, spelling, and punctuation correctly, it will make your essay appear more professional and polished. Therefore, improving your grammar, spelling, and punctuation skills is essential to improving your essay writing skills.

    Conclusion

    Essays are part of every student’s life, so it’s crucial to have good essay-writing skills. Fortunately, there are many tips and strategies to help you become a better essay writer. These include seeking professional writing help, reading widely, practicing, having someone else review your work, and having a study buddy or group. Following these golden tips can improve your essay-writing skills and become a better essay writer.


    Source link