Just a second! 🫷 If you are here, it means that you are a software developer.
So, you know that storage, networking, and domain management have a cost .
If you want to support this blog, please ensure that you have disabled the adblocker for this site. I configured Google AdSense to show as few ADS as possible – I don’t want to bother you with lots of ads, but I still need to add some to pay for the resources for my site.
Thank you for your understanding. – Davide
Many developers say that
All comments are bad! 💢
False! Most of the comments are bad!
For example, look at this method, and look at the comments:
/// <summary> Checks if the password is valid </summary>/// <param name="password">The password to be validated</param>/// <returns>True if the password is valid, false otherwise</returns>publicbool IsPasswordValid(string password)
{
Regex regex = new Regex(@"[a-z]{2,7}[1-9]{3,4}");
var hasMatch = regex.IsMatch(password);
return hasMatch;
}
Here the comments are pointless – they just tell the same things you can infer by looking at the method signature: this method checks if the input string is a valid password.
So, yes, those kinds of comments are totally meaningless, and they should be avoided.
But still, there are cases when writing comments is pretty helpful.
publicbool IsPasswordValid(string password)
{
// 2 to 7 lowercase chars followed by 3 or 4 numbers// Valid: kejix173// aoe193// Invalid: a92881 Regex regex = new Regex(@"[a-z]{2,7}[1-9]{3,4}");
return regex.IsMatch(password);
}
Here the purpose of the comment is not to explain what the method does (it’s already pretty explicit), but it explains with examples the Regular Expression used to validate the password. Another way to explain it is by adding tests that validate some input strings. In this way, you make sure that the documentation (aka the tests) is always aligned with the production code.
By the way, for more complex calculations, adding comments explaining WHY (and not HOW or WHAT) a piece of code does is a good way to help developers understand the code.
Another reason to add comments is to explain why a specific piece of code exists: examples are legal regulations, related work items, or references to where you’ve found that particular solution.
Conclusion
Always pay attention when writing comments: yes, they often just clutter the code. But they can really add value to the code, in some cases.
To read more about good and bad comments, here’s a well-detailed article you might like:
DRY is a fundamental principle in software development. Should you apply it blindly?
Table of Contents
Just a second! 🫷 If you are here, it means that you are a software developer.
So, you know that storage, networking, and domain management have a cost .
If you want to support this blog, please ensure that you have disabled the adblocker for this site. I configured Google AdSense to show as few ADS as possible – I don’t want to bother you with lots of ads, but I still need to add some to pay for the resources for my site.
Thank you for your understanding. – Davide
You’ve probably heard about the DRY principle: Don’t Repeat Yourself.
Does it really make sense? Not always.
When to DRY
Yes, you should not repeat yourself if there is some logic that you can reuse. Take this simple example:
publicclassPageExistingService{
publicasync Task<string> GetHomepage()
{
string url = "https://www.code4it.dev/";
var httpClient = new HttpClient();
var result = await httpClient.GetAsync(url);
if (result.IsSuccessStatusCode)
{
returnawait result.Content.ReadAsStringAsync();
}
return"";
}
publicasync Task<string> GetAboutMePage()
{
string url = "https://www.code4it.dev/about-me";
var httpClient = new HttpClient();
var result = await httpClient.GetAsync(url);
if (result.IsSuccessStatusCode)
{
returnawait result.Content.ReadAsStringAsync();
}
return"";
}
}
As you can see, the two methods are almost identical: the only difference is with the page that will be downloaded.
pss: that’s not the best way to use an HttpClient! Have a look at this article
Now, what happens if an exception is thrown? You’d better add a try-catch to handle those errors. But, since the logic is repeated, you have to add the same logic to both methods.
That’s one of the reasons you should not repeat yourself: if you had to update a common functionality, you have to do that in every place it is used.
You can then refactor these methods in this way:
publicclassPageExistingService{
public Task<string> GetHomepage() => GetPage("https://www.code4it.dev/");
public Task<string> GetAboutMePage() => GetPage("https://www.code4it.dev/about-me");
privateasync Task<string> GetPage(string url)
{
var httpClient = new HttpClient();
var result = await httpClient.GetAsync(url);
if (result.IsSuccessStatusCode)
{
returnawait result.Content.ReadAsStringAsync();
}
return"";
}
}
Now both GetHomepage and GetAboutMePage use the same logic defined in the GetPage method: you can then add the error handling only in one place.
When NOT to DRY
This doesn’t mean that you have to refactor everything without thinking of the meanings.
You should not follow the DRY principle when
the components are not referring to the same context
the components are expected to evolve in different ways
The two points are strictly related.
A simple example is separating the ViewModels and the Database Models.
Say that you have a CRUD application that handles Users.
Both the View and the DB are handling Users, but in different ways and with different purposes.
We might have a ViewModelUser class used by the view (or returned from the APIs, if you prefer)
classViewModelUser{
publicstring Name { get; set; }
publicstring LastName { get; set; }
public DateTime RegistrationDate {get; set; }
}
and a DbUser class, similar to ViewModelUser, but which also handles the user Id.
classDbUser{
publicint Id { get; set; }
publicstring Name { get; set; }
publicstring LastName { get; set; }
public DateTime RegistrationDate {get; set; }
}
If you blinldy follow the DRY principle, you might be tempted to only use the DbUser class, maybe rename it as User, and just use the necessary fields on the View.
Another step could be to create a base class and have both models inherit from that class:
publicabstractclassUser{
publicstring Name { get; set; }
publicstring LastName { get; set; }
public DateTime RegistrationDate {get; set; }
}
classViewModelUser : User
{
}
classDbUser : User
{
publicint Id { get; set; }
}
Sounds familiar?
Well, in this case, ViewModelUser and DbUser are used in different contexts and with different purposes: showing the user data on screen and saving the user on DB.
What if, for some reason, you must update the RegistrationDate type from DateTime to string? That change will impact both the ViewModel and the DB.
There are many other reasons this way of handling models can bring more troubles than benefits. Can you find some? Drop a comment below 📧
The solution is quite simple: duplicate your code.
In that way, you have the freedom to add and remove fields, add validation, expose behavior… everything that would’ve been a problem to do with the previous approach.
Of course, you will need to map the two data types, if necessary: luckily it’s a trivial task, and there are many libraries that can do that for you. By the way, I prefer having 100% control of those mappings, also to have the flexibility of changes and custom behavior.
Further readings
DRY implies the idea of Duplication. But duplication is not just “having the same lines of code over and over”. There’s more:
Just a second! 🫷 If you are here, it means that you are a software developer.
So, you know that storage, networking, and domain management have a cost .
If you want to support this blog, please ensure that you have disabled the adblocker for this site. I configured Google AdSense to show as few ADS as possible – I don’t want to bother you with lots of ads, but I still need to add some to pay for the resources for my site.
Thank you for your understanding. – Davide
There may be times when you need to process a specific task on a timely basis, such as polling an endpoint to look for updates or refreshing a Refresh Token.
If you need infinite processing, you can pick two roads: the obvious one or the better one.
For instance, you can use an infinite loop and put a Sleep command to delay the execution of the next task:
The constructor accepts in input an interval (a double value that represents the milliseconds for the interval), whose default value is 100.
This class implements IDisposable: if you’re using it as a dependency of another component that must be Disposed, don’t forget to call Dispose on that Timer.
Note: use this only for synchronous tasks: there are other kinds of Timers that you can use for asynchronous operations, such as PeriodicTimer, which also can be stopped by canceling a CancellationToken.
In C#, nameof can be quite useful. But it has some drawbacks, if used the wrong way.
Table of Contents
Just a second! 🫷 If you are here, it means that you are a software developer.
So, you know that storage, networking, and domain management have a cost .
If you want to support this blog, please ensure that you have disabled the adblocker for this site. I configured Google AdSense to show as few ADS as possible – I don’t want to bother you with lots of ads, but I still need to add some to pay for the resources for my site.
Thank you for your understanding. – Davide
As per Microsoft’s definition,
A nameof expression produces the name of a variable, type, or member as the string constant.
that will print “items”, and not “hello”: this is because we are printing the name of the variable, items, and not its runtime value.
A real example I saw in my career
In some of the projects I’ve worked on during these years, I saw an odd approach that I highly recommend NOT to use: populate constants with the name of the constant itself:
conststring User_Table = nameof(User_Table);
and then use the constant name to access stuff on external, independent systems, such as API endpoints or Databases:
conststring User_Table = nameof(User_Table);
var users = db.GetAllFromTable(User_Table);
The reasons behind this, in my teammates opinion, are that:
It’s easier to write
It’s more performant: we’re using constants that are filled at compile time, not at runtime
You can just rename the constant if you need to access a new database table.
I do not agree with them: expecially the third point is pretty problematic.
Why this approach should not be used
We are binding the data access to the name of a constant, and not to its value.
We could end up in big trouble because if, from one day to the next, the system might not be able to reach the User table because the name does not exist.
How is it possible? It’s a constant, it can’t change! No: it’s a constant whose value changes if the contant name changes.
It can change for several reasons:
A developer, by mistake, renames the constant. For example, from User_Table to Users_Table.
An automatic tool (like a Linter) with wrong configurations updates the constants’ names: from User_Table to USER_TABLE.
New team styleguides are followed blindly: if the new rule is that “constants must not contain hyphens” and you apply it everywhere, you’ll end in trouble.
To me, those are valid reasons not to use nameof to give a value to a constant.
How to overcome it
If this approach is present in your codebase and it’s too time-consuming to update it everywhere, not everything is lost.
You must absolutely do just one thing to prevent all the issues I listed above: add tests, and test on the actual value.
If you’re using Moq, for instance, you should test the database access we saw before as:
// initialize and run the method[...]// test for the Table name_mockDb.Verify(db => db.GetAllFromTable("User_Table"));
Notice that here you must test against the actual name of the table: if you write something like
_mockDb.Verify(db => db.GetAllFromTable(DbAccessClass.User_Table));
//say that DbAccessClass is the name of the class the uses the data access showed above
Learn how to integrate Oh My Posh, a cross-platform tool that lets you create beautiful and informative prompts for PowerShell.
Table of Contents
Just a second! 🫷 If you are here, it means that you are a software developer.
So, you know that storage, networking, and domain management have a cost .
If you want to support this blog, please ensure that you have disabled the adblocker for this site. I configured Google AdSense to show as few ADS as possible – I don’t want to bother you with lots of ads, but I still need to add some to pay for the resources for my site.
Thank you for your understanding. – Davide
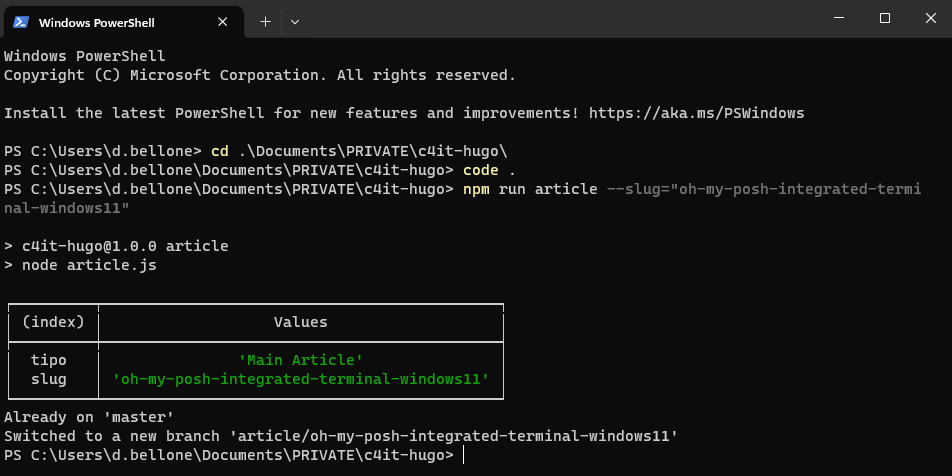
The content of the blog you are reading right now is stored in a Git repository. Every time I create an article, I create a new Git Branch to isolate the changes.
To generate the skeleton of the articles, I use the command line (well, I generally use PowerShell); in particular, given that I’m using both Windows 10 and Windows 11 – depending on the laptop I’m working on – I use the Integrated Terminal, which allows you to define the style, the fonts, and so on of every terminal configured in the settings.
The default profile is pretty basic: no info is shown except for the current path – I want to customize the appearance.
I want to show the status of the Git repository, including:
repository name
branch name
outgoing commits
There are lots of articles that teach how to use OhMyPosh with Cascadia Code. Unfortunately, I couldn’t make them work.
In this article, I teach you how I fixed it on my local machine. It’s a step-by-step guide I wrote while installing it on my local machine. I hope it works for you as well!
Step 1: Create the $PROFILE file if it does not exist
In PowerShell, you can customize the current execution by updating the $PROFILE file.
Clearly, you first have to check if the profile file exists.
Open the PowerShell and type:
$PROFILE # You can also use $profile lowercase - it's the same!
This command shows you the expected path of this file. The file, if it exists, is stored in that location.
In this case, the $Profile file should be available under the folder C:\Users\d.bellone\Documents\WindowsPowerShell. In my case, it does not exist, though!
Therefore, you must create it manually: head to that folder and create a file named Microsoft.PowerShell_profile.ps1.
Note: it might happen that not even the WindowsPowerShell folder exists. If it’s missing, well, create it!
Step 2: Install OhMyPosh using Winget, Scoop, or PowerShell
To use OhMyPosh, we have to – of course – install it.
As explained in the official documentation, we have three ways to install OhMyPosh, depending on the tool you prefer.
And, if you like working with PowerShell, execute:
Set-ExecutionPolicy Bypass -Scope Process -Force; Invoke-Expression ((New-Object System.Net.WebClient).DownloadString('https://ohmyposh.dev/install.ps1'))
I used Winget, and you can see the installation process here:
Now, to apply these changes, you have to restart the PowerShell.
Step 3: Add OhMyPosh to the PowerShell profile
Open the Microsoft.PowerShell_profile.ps1 file and add the following line:
oh-my-posh init pwsh | Invoke-Expression
This command is executed every time you open the PowerShell with the default profile, and it initializes OhMyPosh to have it available during the current session.
Now, you can save and close the file.
Hint: you can open the profile file with Notepad by running notepad $PROFILE.
Step 4: Set the Execution Policy to RemoteSigned
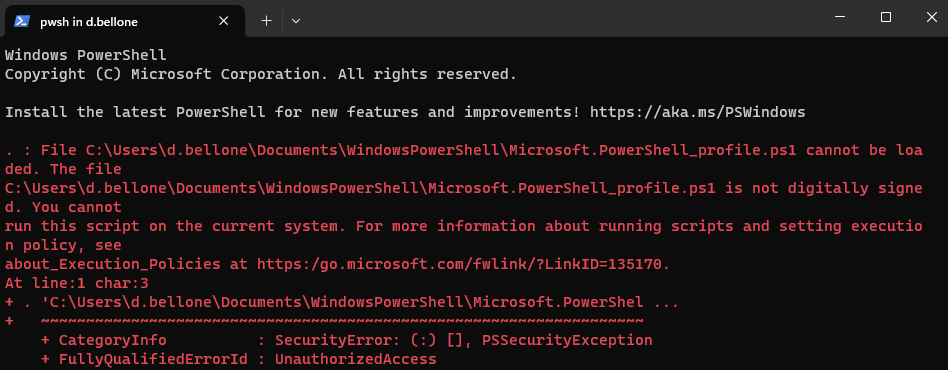
Restart the terminal. In all probability, you will see an error like this:
The error message
The file <path>\Microsoft.PowerShell_profile.ps1 is
not digitally signed. You cannot run this script on the current system
means that PowerShell does not trust the script it’s trying to load.
To see which Execution Policy is currently active, run:
You’ll probably see that the value is AllSigned.
To enable the execution of scripts created on your local machine, you have to set the Execution Policy value to RemoteSigned, using this command by running the PowerShell in administrator mode:
Set-ExecutionPolicy RemoteSigned
Let’s see the definition of the RemoteSigned Execution policy as per SQLShack’s article:
This is also a safe PowerShell Execution policy to set in an enterprise environment. This policy dictates that any script that was not created on the system that the script is running on, should be signed. Therefore, this will allow you to write your own script and execute it.
So, yeah, feel free to proceed and set the new Execution policy to have your PowerShell profile loaded correctly every time you open a new PowerShell instance.
Now, OhMyPosh can run in the current profile.
Head to a Git repository and notice that… It’s not working!🤬 Or, well, we have the Git information, but we are missing some icons and glyphs.
Step 5: Use CaskaydiaCove, not Cascadia Code, as a font
We still have to install the correct font with the missing icons.
We will install it using Chocolatey, a package manager available for Windows 11.
To check if you have it installed, run:
Now, to install the correct font family, open a PowerShell with administration privileges and run:
choco install cascadia-code-nerd-font
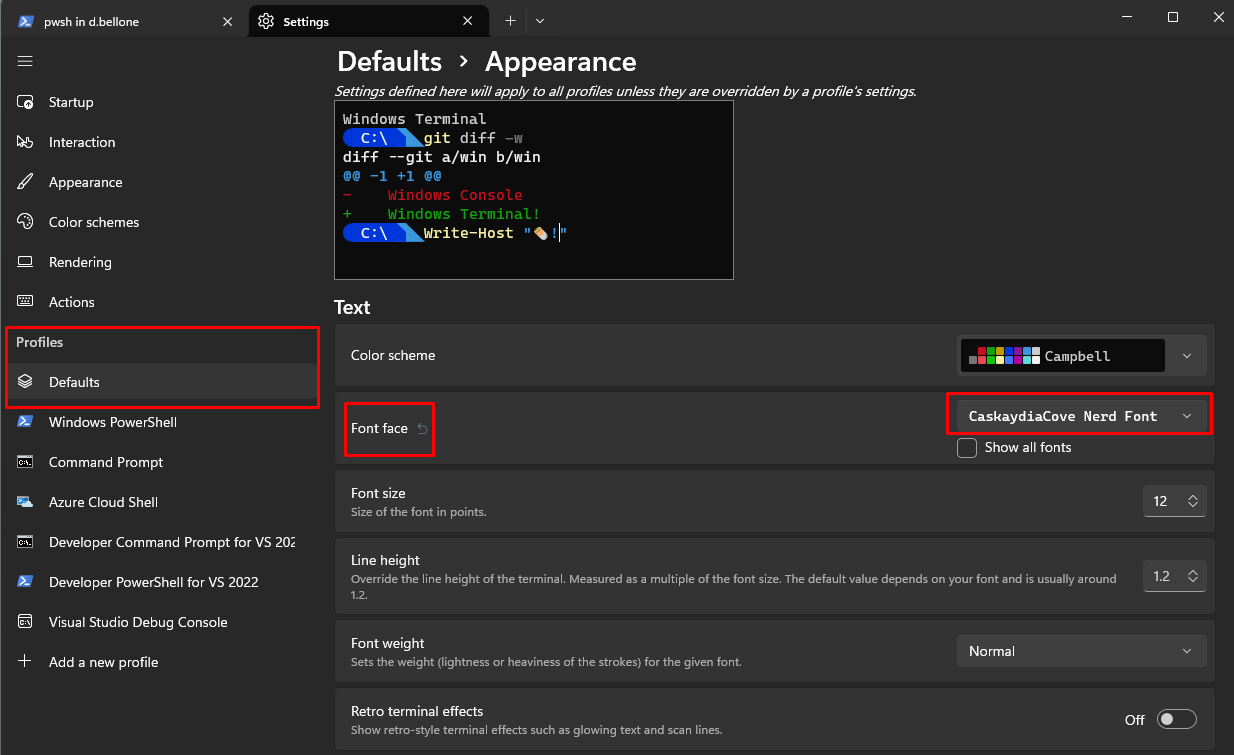
Once the installation is complete, you must tell Integrated Terminal to use the correct font by following these steps:
open to the Settings page (by hitting CTRL + ,)
select the profile you want to update (in my case, I’ll update the default profile)
open the Appearance section
under Font faceselect CaskaydiaCove Nerd Font
Now close the Integrated Terminal to apply the changes.
Open it again, navigate to a Git repository, and admire the result.
Further readings
The first time I read about OhMyPosh, it was on Scott Hanselman’s blog. I couldn’t make his solution work – and that’s the reason I wrote this article. However, in his article, he shows how he customized his own Terminal with more glyphs and icons, so you should give it a read.
We customized our PowerShell profile with just one simple configuration. However, you can do a lot more. You can read Ruud’s in-depth article about PowerShell profiles.
Finally, as I said at the beginning of this article, I use Git and Git Branches to handle the creation and management of my blog articles. That’s just the tip of the iceberg! 🏔️
If you want to steal my (previous) workflow, have a look at the behind-the-scenes of my blogging process (note: in the meanwhile, a lot of things have changed, but these steps can still be helpful for you)
Average teams aim at 100% Code Coverage just to reach the number. Great teams don’t. Why?
Table of Contents
Just a second! 🫷 If you are here, it means that you are a software developer.
So, you know that storage, networking, and domain management have a cost .
If you want to support this blog, please ensure that you have disabled the adblocker for this site. I configured Google AdSense to show as few ADS as possible – I don’t want to bother you with lots of ads, but I still need to add some to pay for the resources for my site.
Thank you for your understanding. – Davide
Code Coverage is a valuable metric in software development, especially when it comes to testing. It provides insights into how much of your codebase is exercised by your test suite.
However, we must recognize that Code Coverage alone should not be the ultimate goal of your testing strategy. It has some known limitations, and 100% Code Coverage does not guarantee your code to be bug-free.
In this article, we’ll explore why Code Coverage matters, its limitations, and how to balance achieving high coverage and effective testing. We’ll use C# to demonstrate when Code Coverage works well and how you can cheat on the result.
What Is Code Coverage?
Code Coverage measures the percentage of code lines, branches, or statements executed during testing. It helps answer questions like:
How much of my code is tested?
Are there any untested paths or dead code?
Which parts of the application need additional test coverage?
In C#, tools like Cobertura, dotCover, and Visual Studio’s built-in coverage analysis provide Code Coverage reports.
You may be tempted to think that the higher the coverage, the better the quality of your tests. However, we will soon demonstrate why this assumption is misleading.
Why Code Coverage Matters
Clearly, if you write valuable tests, Code Coverage is a great ally.
A high value of Code Coverage helps you with:
Risk mitigation: High Code Coverage reduces the risk of undiscovered defects. If a piece of code isn’t covered, it will likely contain bugs.
Preventing regressions: code is destined to evolve over time. If you ensure that most of your code is covered by tests, whenever you’ll add some more code you will discover which parts of the existing system are impacted by your changes. If you update the production code and no test fails, it might be a bad sign: you probably need to cover the code you are modifying with enough tests.
Quality assurance: Code Coverage ensures that critical parts of your application are tested thoroughly. Good tests focus on the functional aspects of the code (what) rather than on the technical aspects (how). A good test suite is a safety net against regressions.
Guidance for Testing Efforts: Code Coverage highlights areas that need more attention. It guides developers in writing additional tests where necessary.
The Limitations of Code Coverage
While Code Coverage is valuable, it has limitations:
False Sense of Security: Achieving 100% coverage doesn’t guarantee bug-free software. It’s possible to have well-covered code that still contains subtle defects. This is especially true when mocking dependencies.
They focus on Lines, Not Behavior: Code Coverage doesn’t consider the quality of tests. It doesn’t guarantee that the tests covers all possible scenarios.
Ignored Edge Cases: Some code paths (exception handling, rare conditions) are complex to cover. High coverage doesn’t necessarily mean thorough testing.
3 Practical reasons why Code Coverage percentage can be misleading
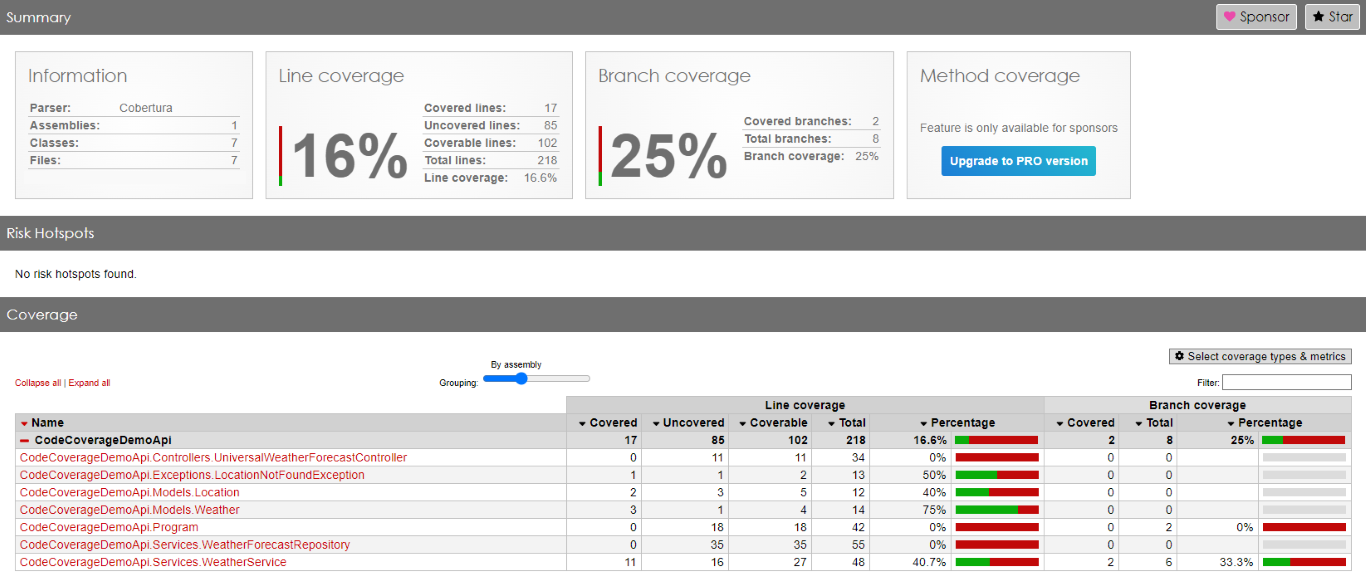
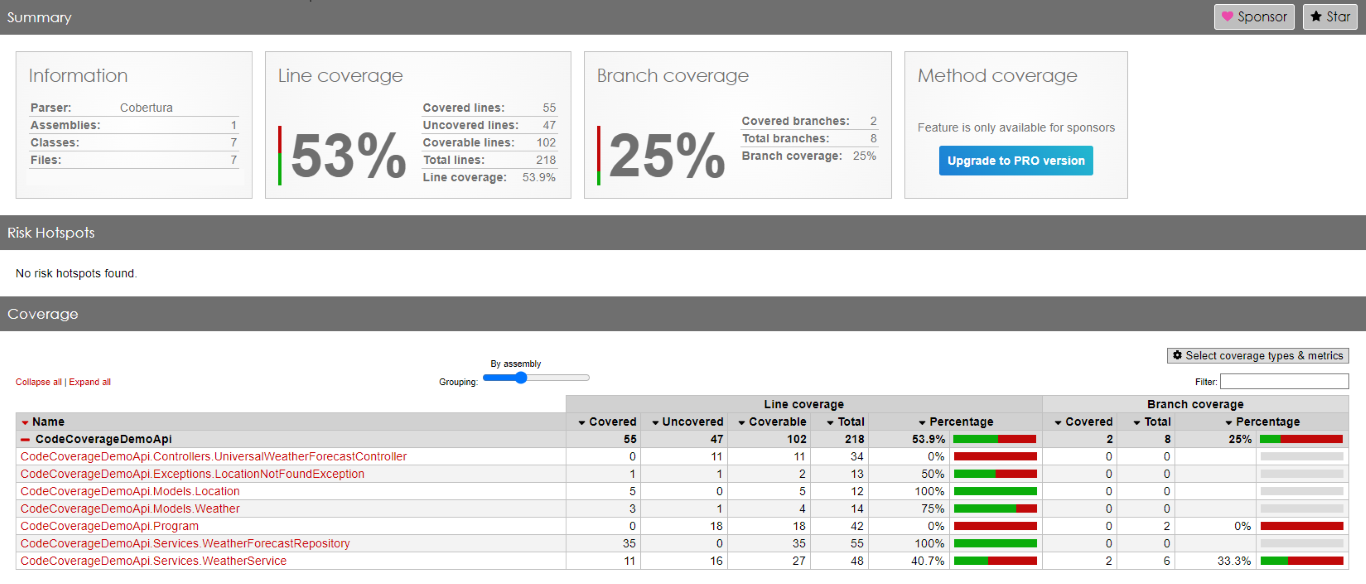
For the sake of this article, I’ve created a dummy .NET API project with the typical three layers: controller, service, and repository.
Here we are: we have reached 53% of total Code Coverage by adding one single test, which does not provide any value!
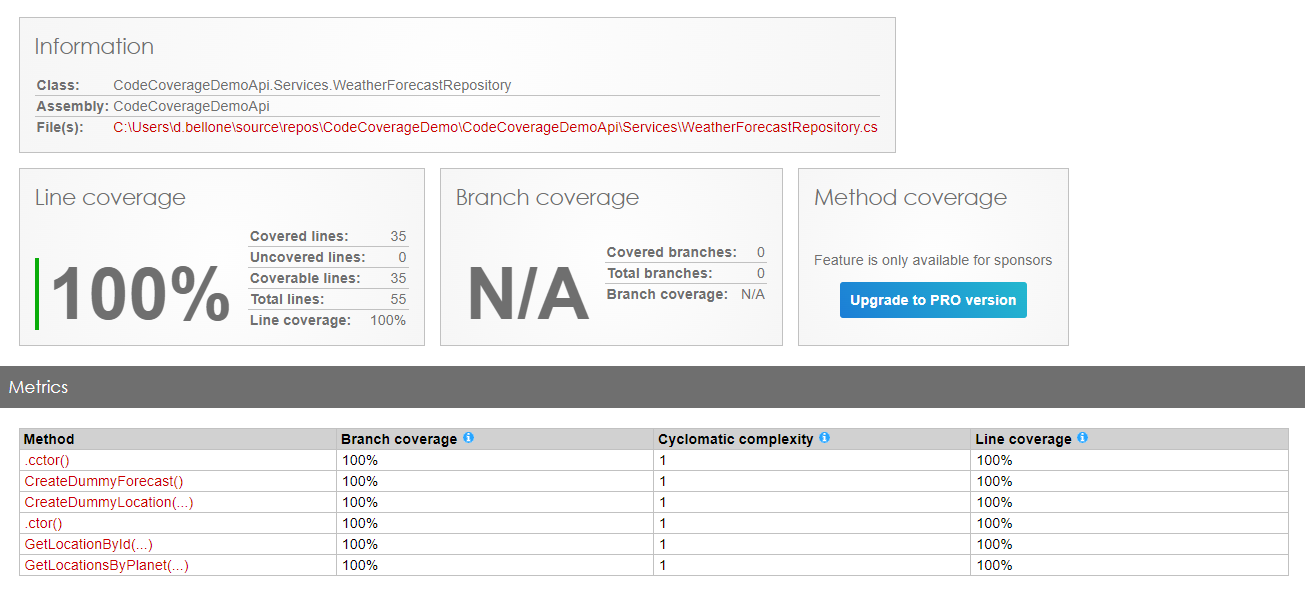
As you can see, in fact, the WeatherForecastRepository has now reached 100% Code Coverage.
Great job! Or is it?
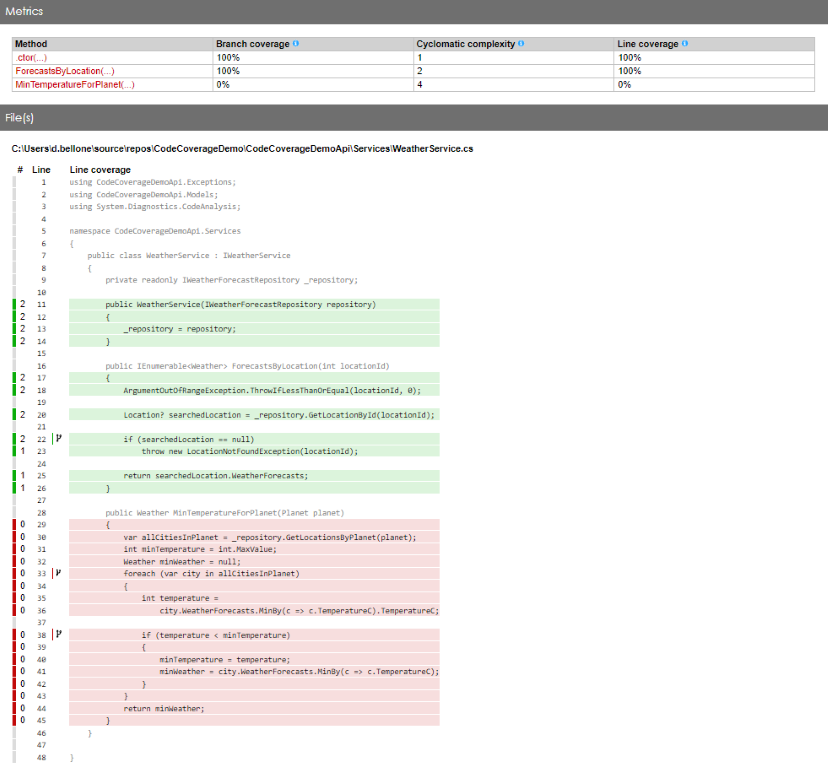
You can cheat by excluding parts of the code
In C# there is a handy attribute that you can apply to methods and classes: ExcludeFromCodeCoverage.
While this attribute can be useful for classes that you cannot test, it can be used to inflate the Code Coverage percentage by applying it to classes and methods you don’t want to test (maybe because you are lazy?).
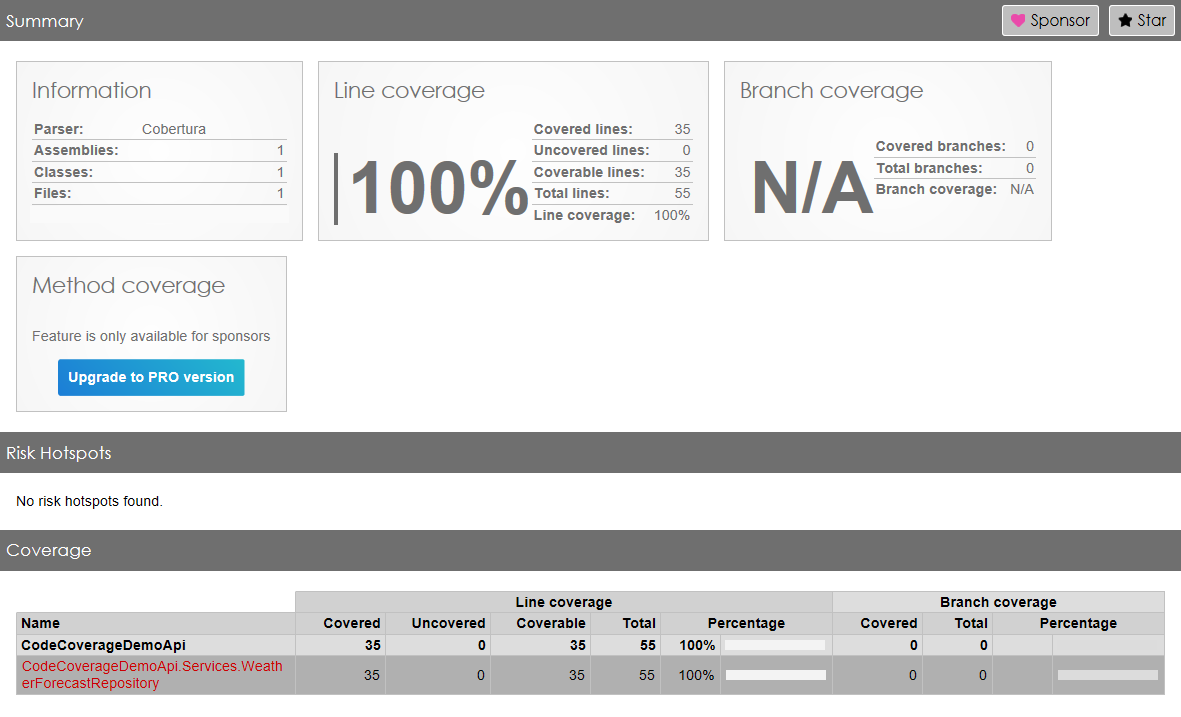
We can, in fact, add that attribute to every single class like this:
You can then add the same attribute to all the other classes – even the Program class! – to reach 100% Code Coverage without writing lots of test.
Note: to reach 100% I had to exclude everything but the tests on the Repository: otherwise, if I had exactly zero methods under tests, the final Code Coverage would’ve been 0.
As we saw, high Code Coverage is not enough. It’s a good starting point, but it must not be the final goal.
We can, indeed, focus our efforts in different areas:
Test Quality: Prioritize writing meaningful tests over chasing high coverage. Focus on edge cases, boundary values, and scenarios that matter to users.
Mutation Testing: Instead of just measuring coverage, consider mutation testing. It introduces artificial defects and checks if tests catch them.
Finally, my suggestion is to focus on integration tests rather than on unit tests: this testing strategy is called Testing Diamond.
Further readings
To generate Code Coverage reports, I used Coverlet, as I explained in this article (which refers to Visual Studio 2019, but the steps are still valid with newer versions).
In my opinion, we should not focus all our efforts on Unit Tests. On the contrary, we should write more Integration Tests to ensure that the functionality, as a whole, works correctly.
This way of defining tests is called Testing Diamond, and I explained it here:
Code Coverage is a useful metric but should not be the end goal. Aim for a balance: maintain good coverage while ensuring effective testing. Remember that quality matters more than mere numbers. Happy testing! 🚀
I hope you enjoyed this article! Let’s keep in touch on Twitter or LinkedIn! 🤜🤛
You know what they say about playing sounds on a website: don’t. Autoplaying audio is often considered intrusive and disruptive, which is why modern web practices discourage it. However, sound design, when used thoughtfully, can enhance the user experience and reinforce a brand’s identity. So when Arts Corporation approached me to redesign their website with a request to integrate audio, I saw an opportunity to create an immersive experience that complemented their artistic vision.
To ensure the sound experience was as seamless as possible, I started thinking about ways to refine it, such as muting audio when the tab is inactive or when a video is playing. That focus on detail made me wonder: what are some other UX improvements that are often overlooked but could make a significant difference? That question set the foundation for a broader exploration of how subtle refinements in animation and interaction design could improve the overall user experience.
When an Idea is Good on Paper
The client came in with sketches and a strong vision for the website, including a key feature: “construction lines” overlaid across the design.
These lines had to move individually, as though being “pushed” by the moving cursor. While this looked great in concept, it introduced a challenge: ensuring that users wouldn’t become frustrated when trying to interact with elements positioned behind the lines.
After some testing and trying to find ways to keep the interaction, I realized a compromise was necessary. Using GSAP ScrollTrigger, I made sure that when sections including buttons and links became visible, the interactive lines would be disabled. In the end, the interaction remained only in a few places, but the concept wasn’t worth the frustration.
Splitting Text Like There’s No Tomorrow
Another challenge in balancing animation and usability was ensuring that text remained readable and accessible. Splitting text has become a standard effect in the industry, but not everyone takes the extra step to prevent issues for users relying on screen readers. The best solution in my case was to simply revert to the original text once the animation was completed. Another solution, for those who need the text to remain split, would be using aria-label and aria-hidden.
This way the user hears only the content of the aria-label attribute, not the text within the element.
Scroll-Based Disorientation
Another crucial consideration was scroll-based animations. While they add depth and interactivity, they can also create confusion if users stop mid-scroll and elements appear frozen in unexpected positions.
Example of a scroll-based animation stopped between two states
To counter this, I used GSAP ScrollTrigger’s snap feature. This ensured that when users stopped scrolling, the page would snap to the nearest section naturally, maintaining a seamless experience.
Arrays Start at 5?
Autoplaying sliders can be an effective way to signal interactivity, drawing users into the content rather than letting them assume it’s static. However, they can also create confusion if not implemented thoughtfully. While integrating the site, I realized that because some slides were numbered, users might land on the page and find themselves on the fifth slide instead of the first, disrupting their sense of flow.
To address this, I set sliders to autoplay only when they entered the viewport, ensuring that users always started at the first slide. This not only maintained consistency but also reinforced a structured and intuitive browsing experience. By making autoplay purposeful rather than arbitrary, we guide users through the content without causing unnecessary distractions.
Transition Confusion
Page transitions play a crucial role in maintaining a smooth, immersive experience, but if not handled carefully, they can lead to momentary confusion. One challenge I encountered was the risk of the transition overlay blending with the footer, since both were black in my design. Users would not perceive a transition at all, making navigation feel disjointed.
Example of a low contrast transition overlay
To solve this, I ensured that transition overlays had a distinct contrast by adding a different shade of black, preventing any ambiguity when users navigate between pages. I also optimized transition timing, making sure animations were fast enough to keep interactions snappy but smooth enough to avoid feeling abrupt. This balance created a browsing experience where users always had a clear sense of movement and direction within the site.
Example of a good contrast transition overlay
I Can Feel a Shift
A common issue in web development that often gets overlooked is the mobile resize trigger that occurs when scrolling, particularly when the browser’s address bar appears or disappears on some devices. This resize event can disrupt the smoothness of animations, causing sudden visual jumps or inconsistencies as the page shifts.
To tackle this, I made sure that ScrollTrigger wouldn’t refresh or re-trigger its animations unnecessarily when this resize event occurred by turning on ignoreMobileResize:
I also ensured that any CSS or JavaScript based on viewport height would not be recalculated on a vertical resize on mobile. Here’s a utility function I use to handle resize as an example:
/**
 * Attaches a resize event listener to the window and executes a callback when the conditions are met.
 *
 * @param {Function} callback - The function to execute when the resize condition is met.
 * @param {number} [debounceTime=200] - Time in milliseconds to debounce the resize event.
 */
function onResize(callback, debounceTime = 200) {
  let oldVh = window.innerHeight;
  let oldVw = window.innerWidth;
  const isTouchDevice = 'maxTouchPoints' in navigator && navigator.maxTouchPoints > 0;

  // Define the resize handler with debounce to limit function execution frequency
  const resizeHandler = $.debounce(() => {
    const newVh = window.innerHeight;
    const newVw = window.innerWidth;

    /**
     * Condition:
     *  - If the device is touch and the viewport height has changed significantly (≥ 25%).
     *  - OR if the viewport width has changed at all.
     * If either condition is met, execute the callback and update old dimensions.
     */
    if ((isTouchDevice && Math.abs(newVh - oldVh) / oldVh >= 0.25) || newVw !== oldVw) {
      callback();
      oldVh = newVh;
      oldVw = newVw;
    }
  }, debounceTime);

  // Attach the resize handler to the window resize event
  $(window).on('resize', resizeHandler);
}
Copy That! Rethinking Contact Links
It was the client’s request to have a simple contact link with a “mailto” instead of a full contact page. While this seemed like a straightforward approach, it quickly became clear that mailto links come with usability issues. Clicking one automatically opens the default email app, which isn’t always the one the user actually wants to use. Many people rely on webmail services like Gmail or Outlook in their browser, meaning a forced mail client launch can create unnecessary friction. Worse, if the user is on a shared or public computer, the mail app might not even be configured, leading to confusion or an error message.
To improve this experience, I opted for a more user-friendly approach: mailto links would simply copy the email to the clipboard and display a confirmation message.
The Takeaway
This project reinforced the importance of balancing creativity with usability. While bold ideas can drive engagement, the best experiences come from refining details users may not even notice. Whether it’s preventing unnecessary animations, ensuring smooth scrolling, or rethinking how users interact with contact links, these small decisions make a significant impact. In the end, great web design isn’t just about visuals, it’s about crafting an experience that feels effortless for the user.