When writing unit tests, there are smarter ways to check if two objects are equal than just comparing every field one by one.
Table of Contents
Just a second! 🫷 If you are here, it means that you are a software developer.
So, you know that storage, networking, and domain management have a cost .
If you want to support this blog, please ensure that you have disabled the adblocker for this site. I configured Google AdSense to show as few ADS as possible – I don’t want to bother you with lots of ads, but I still need to add some to pay for the resources for my site.
Thank you for your understanding. – Davide
When writing unit tests, you might want to check that the result returned by a method is equal to the one you’re expecting.
publicstatic Player GetClone(Player source)
=> new Player
{
Id = source.Id,
UserName = source.UserName,
Score = source.Score
};
and call it this way:
[Test]publicvoid GetClone()
{
var originalPlayer = new Player { Id = 1, UserName = "me", Score = 1 };
var clonedPlayer = MyUtils.GetClone(originalPlayer);
Assert.That(clonedPlayer, Is.EqualTo(originalPlayer));
}
Even though logically originalPlayer and clonedPlayer are equal, they are not the same: the test will fail!
Lucky for us, we can specify the comparison rules!
Equality function: great for simple checks
Say that we don’t want to check that all the values match. We only care about Id and UserName.
When we have just a few fields to check, we can use a function to specify that two items are equal:
[Test]publicvoid GetClone_WithEqualityFunction()
{
var originalPlayer = new Player { Id = 1, UserName = "me", Score = 1 };
var clonedPlayer = MyUtils.GetClone(originalPlayer);
Assert.That(clonedPlayer, Is.EqualTo(originalPlayer).Using<Player>(
(Player a, Player b) => a.Id == b.Id && a.UserName == b.UserName)
);
}
Clearly, if the method becomes unreadable, you can refactor the comparer function as so:
[Test]publicvoid GetClone_WithEqualityFunction()
{
var originalPlayer = new Player { Id = 1, UserName = "me", Score = 1 };
var clonedPlayer = MyUtils.GetClone(originalPlayer);
Func<Player, Player, bool> comparer = (Player a, Player b) => a.Id == b.Id && a.UserName == b.UserName;
Assert.That(clonedPlayer, Is.EqualTo(originalPlayer).Using<Player>(comparer));
}
EqualityComparer class: best for complex scenarios
If you have a complex scenario to validate, you can create a custom class that implements the IEqualityComparer interface. Here, you have to implement two methods: Equals and GetHashCode.
Instead of just implementing the same check inside the Equals method, we’re gonna try a different approach: we’re gonna use GetHashCode to determine how to identify a Player, by generating a string used as a simple identifier, and then we’re gonna use the HashCode of the result string for the actual comparison:
Clearly, I’ve also added a check on nullability: (x is null && y is null).
Now we can instantiate a new instance of PlayersComparer and use it to check whether two players are equivalent:
[Test]publicvoid GetClone_WithEqualityComparer()
{
var originalPlayer = new Player { Id = 1, UserName = "me", Score = 1 };
var clonedPlayer = MyUtils.GetClone(originalPlayer);
Assert.That(clonedPlayer, Is.EqualTo(originalPlayer).Using<Player>(new PlayersComparer()));
}
Of course, you can customize the Equals method to use whichever condition to validate the equivalence of two instances, depending on your business rules. For example, you can say that two vectors are equal if they have the exact same length and direction, even though the start and end points are different.
❓ A question for you: where would you put the equality check: in the production code or in the tests project?
Wrapping up
As we’ve learned in this article, there are smarter ways to check if two objects are equal than just comparing every field one by one.
I hope you enjoyed this article! Let’s keep in touch on Twitter or LinkedIn! 🤜🤛
Integration Tests are incredibly useful: a few Integration Tests are often more useful than lots of Unit Tests. Let’s learn some advanced capabilities of WebApplicationFactory.
Table of Contents
Just a second! 🫷 If you are here, it means that you are a software developer.
So, you know that storage, networking, and domain management have a cost .
If you want to support this blog, please ensure that you have disabled the adblocker for this site. I configured Google AdSense to show as few ADS as possible – I don’t want to bother you with lots of ads, but I still need to add some to pay for the resources for my site.
Thank you for your understanding. – Davide
In a previous article, we learned a quick way to create Integration Tests for ASP.NET API by using WebApplicationFactory. That was a nice introductory article. But now we will delve into more complex topics and examples.
In my opinion, a few Integration Tests and just the necessary number of Unit tests are better than hundreds of Unit Tests and no Integration Tests at all. In general, the Testing Diamond should be preferred over the Testing Pyramid (well, in most cases).
In this article, we are going to create advanced Integration Tests by defining custom application settings, customizing dependencies to be used only during tests, defining custom logging, and performing complex operations in our tests.
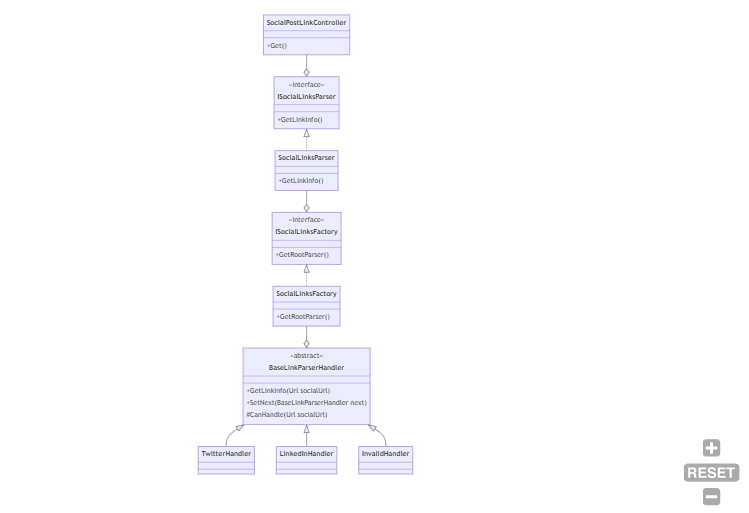
For the sake of this article, I created a sample API application that exposes one single endpoint whose purpose is to retrieve some info about the URL passed in the query string. For example,
GET /SocialPostLink?uri=https%3A%2F%2Ftwitter.com%2FBelloneDavide%2Fstatus%2F1682305491785973760
For completeness, instanceName is a value coming from the appsettings.json file, while info is an object that holds some info about the social post URL passed as input.
Internally, the code is using the Chain of Responsibility pattern: there is a handler that “knows” if it can handle a specific URL; if so, it just elaborates the input; otherwise, it calls the next handler.
There is also a Factory that builds the chain, and finally, a Service that instantiates the Factory and then resolves the dependencies.
As you can see, this solution can become complex. We could run lots of Unit Tests to validate that the Chain of Responsibility works as expected. We can even write a Unit Tests suite for the Factory.
But, at the end of the day, we don’t really care about the internal structure of the project: as long as it works as expected, we could even use a huge switch block (clearly, with all the consequences of this choice). So, let’s write some Integration Tests.
How to create a custom WebApplicationFactory in .NET
When creating Integration Tests for .NET APIs you have to instantiate a new instance of WebApplicationFactory, a class coming from the Microsoft.AspNetCore.Mvc.Testing NuGet Package.
Since we are going to define it once and reuse it across all the tests, let’s create a new class that extends WebApplicationFactory, and add some custom behavior to it.
Let’s focus on the Program class: as you can see, the WebApplicationFactory class requires an entry point. Generally speaking, it’s the Program class of our application.
If you hover on WebApplicationFactory<Program> and hit CTRL+. on Visual Studio, the autocomplete proposes two alternatives: one is the Program class defined in your APIs, while the other one is the Program class defined in Microsoft.VisualStudio.TestPlatform.TestHost. Choose the one for your API application! The WebApplicationFactory class will then instantiate your API following the instructions defined in your Program class, thus resolving all the dependencies and configurations as if you were running your application locally.
What to do if you don’t have the Program class? If you use top-level statements, you don’t have the Program class, because it’s “implicit”. So you cannot reference the whole class. Unless… You have to create a new partial class named Program, and leave it empty: this way, you have a class name that can be used to reference the API definition:
publicpartialclassProgram { }
Here you can override some definitions of the WebHost to be created by calling ConfigureWebHost:
How to use WebApplicationFactory in your NUnit tests
It’s time to start working on some real Integration Tests!
As we said before, we have only one HTTP endpoint, defined like this:
privatereadonly ISocialLinkParser _parser;
privatereadonly ILogger<SocialPostLinkController> _logger;
privatereadonly IConfiguration _config;
public SocialPostLinkController(ISocialLinkParser parser, ILogger<SocialPostLinkController> logger, IConfiguration config)
{
_parser = parser;
_logger = logger;
_config = config;
}
[HttpGet]public IActionResult Get([FromQuery] string uri)
{
_logger.LogInformation("Received uri {Uri}", uri);
if (Uri.TryCreate(uri, new UriCreationOptions { }, out Uri _uri))
{
var linkInfo = _parser.GetLinkInfo(_uri);
_logger.LogInformation("Uri {Uri} is of type {Type}", uri, linkInfo.SocialNetworkName);
var instance = new Instance
{
InstanceName = _config.GetValue<string>("InstanceName"),
Info = linkInfo
};
return Ok(instance);
}
else {
_logger.LogWarning("Uri {Uri} is not a valid Uri", uri);
return BadRequest();
}
}
We have 2 flows to validate:
If the input URI is valid, the HTTP Status code should be 200;
If the input URI is invalid, the HTTP Status code should be 400;
We could simply write Unit Tests for this purpose, but let me write Integration Tests instead.
First of all, we have to create a test class and create a new instance of IntegrationTestWebApplicationFactory. Then, we will create a new HttpClient every time a test is run that will automatically include all the services and configurations defined in the API application.
As you can see, the test class implements IDisposable so that we can call Dispose() on the IntegrationTestWebApplicationFactory instance.
From now on, we can use the _client instance to work with the in-memory instance of the API.
One of the best parts of it is that, since it’s an in-memory instance, we can even debug our API application. When you create a test and put a breakpoint in the production code, you can hit it and see the actual values as if you were running the application in a browser.
Now that we have the instance of HttpClient, we can create two tests to ensure that the two cases we defined before are valid. If the input string is a valid URI, return 200:
[Test]publicasync Task Should_ReturnHttp200_When_UrlIsValid()
{
string inputUrl = "https://twitter.com/BelloneDavide/status/1682305491785973760";
var result = await _client.GetAsync($"SocialPostLink?uri={inputUrl}");
Assert.That(result.StatusCode, Is.EqualTo(HttpStatusCode.OK));
}
Otherwise, return Bad Request:
[Test]publicasync Task Should_ReturnBadRequest_When_UrlIsNotValid()
{
string inputUrl = "invalid-url";
var result = await _client.GetAsync($"/SocialPostLink?uri={inputUrl}");
Assert.That(result.StatusCode, Is.EqualTo(HttpStatusCode.BadRequest));
}
How to create test-specific configurations using InMemoryCollection
WebApplicationFactory is highly configurable thanks to the ConfigureWebHost method. For instance, you can customize the settings injected into your services.
Usually, you want to rely on the exact same configurations defined in your appsettings.json file to ensure that the system behaves correctly with the “real” configurations.
For example, I defined the key “InstanceName” in the appsettings.json file whose value is “Real”, and whose value is used to create the returned Instance object. We can validate that that value is being read from that source as validated thanks to this test:
[Test]publicasync Task Should_ReadInstanceNameFromSettings()
{
string inputUrl = "https://twitter.com/BelloneDavide/status/1682305491785973760";
var result = await _client.GetFromJsonAsync<Instance>($"/SocialPostLink?uri={inputUrl}");
Assert.That(result.InstanceName, Is.EqualTo("Real"));
}
But some other times you might want to override a specific configuration key.
The ConfigureAppConfiguration method allows you to customize how you manage Configurations by adding or removing sources.
If you want to add some configurations specific to the WebApplicationFactory, you can use AddInMemoryCollection, a method that allows you to add configurations in a key-value format:
protectedoverridevoid ConfigureWebHost(IWebHostBuilder builder)
{
builder.ConfigureAppConfiguration((host, configurationBuilder) =>
{
configurationBuilder.AddInMemoryCollection(
new List<KeyValuePair<string, string?>>
{
new KeyValuePair<string, string?>("InstanceName", "FromTests")
});
});
}
Even if you had the InstanceName configured in your appsettings.json file, the value is now overridden and set to FromTests.
You can validate this change by simply replacing the expected value in the previous test:
[Test]publicasync Task Should_ReadInstanceNameFromSettings()
{
string inputUrl = "https://twitter.com/BelloneDavide/status/1682305491785973760";
var result = await _client.GetFromJsonAsync<Instance>($"/SocialPostLink?uri={inputUrl}");
Assert.That(result.InstanceName, Is.EqualTo("FromTests"));
}
If you also want to discard all the other existing configuration sources, you can call configurationBuilder.Sources.Clear() before AddInMemoryCollection and remove all the other existing configurations.
How to set up custom dependencies for your tests
Maybe you don’t want to resolve all the existing dependencies, but just a subset of them. For example, you might not want to call external APIs with a limited number of free API calls to avoid paying for the test-related calls. You can then rely on Stub classes that simulate the dependency by giving you full control of the behavior.
We want to replace an existing class with a Stub one: we are going to create a stub class that will be used instead of SocialLinkParser:
publicclassStubSocialLinkParser : ISocialLinkParser
{
public LinkInfo GetLinkInfo(Uri postUri) => new LinkInfo
{
SocialNetworkName = "test from stub",
Id = "test id",
SourceUrl = postUri,
Username = "test username" };
}
We can then customize Dependency Injection to use StubSocialLinkParser in place of SocialLinkParser by specifying the dependency within the ConfigureTestServices method:
Finally, we can create a method to validate this change:
[Test]publicasync Task Should_UseStubName()
{
string inputUrl = "https://twitter.com/BelloneDavide/status/1682305491785973760";
var result = await _client.GetFromJsonAsync<Instance>($"/SocialPostLink?uri={inputUrl}");
Assert.That(result.Info.SocialNetworkName, Is.EqualTo("test from stub"));
}
How to create Integration Tests on specific resolved dependencies
Now we are going to test that the SocialLinkParser does its job, regardless of the internal implementation. Right now we have used the Chain of Responsibility pattern, and we rely on the ISocialLinksFactory interface to create the correct sequence of handlers. But we don’t know in the future how we will define the code: maybe we will replace it all with a huge if-else sequence – the most important part is that the code works, regardless of the internal implementation.
We can proceed in two ways: writing tests on the interface or writing tests on the concrete class.
For the sake of this article, we are going to run tests on the SocialLinkParser class. Not the interface, but the concrete class. The first step is to add the class to the DI engine in the Program class:
builder.Services.AddScoped<SocialLinkParser>();
Now we can create a test to validate that it is working:
[Test]publicasync Task Should_ResolveDependency()
{
using (var _scope = _factory.Services.CreateScope())
{
var service = _scope.ServiceProvider.GetRequiredService<SocialLinkParser>();
Assert.That(service, Is.Not.Null);
Assert.That(service, Is.AssignableTo<SocialLinkParser>());
}
}
As you can see, we are creating an IServiceScope by calling _factory.Services.CreateScope(). Since we have to discard this scope after the test run, we have to place it within a using block. Then, we can create a new instance of SocialLinkParser by calling _scope.ServiceProvider.GetRequiredService<SocialLinkParser>() and create all the tests we want on the concrete implementation of the class.
The benefit of this approach is that you have all the internal dependencies already resolved, without relying on mocks. You can then ensure that everything, from that point on, works as you expect.
Here I created the scope within a using block. There is another approach that I prefer: create the scope instance in the SetUp method, and call Dispose() on it the the TearDown phase:
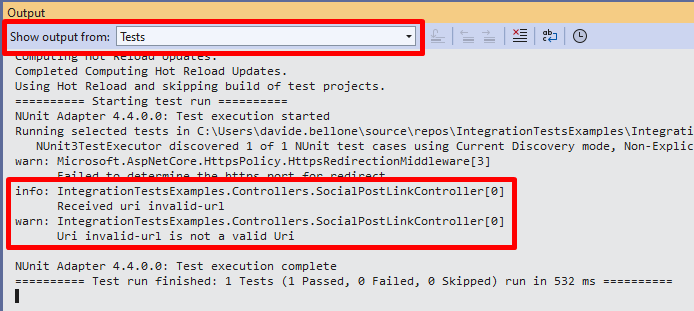
Sometimes you just want to see the logs generated by your application to help you debug an issue (yes, you can simply debug the application!). But, unless properly configured, the application logs will not be available to you.
But you can add logs to the console easily by customizing the adding the Console sink in your ConfigureTestServices method:
Now you will be able to see all the logs you generated in the Output panel of Visual Studio by selecting the Tests source:
Beware that you are still reading the configurations for logging from the appsettings file! If you have specified in your project to log directly to a sink (such as DataDog or SEQ), your tests will send those logs to the specified sinks. Therefore, you should get rid of all the other logging sources by calling ClearProviders():
As I often say, a few Integration Tests are often more useful than a ton of Unit Tests. Focusing on Integration Tests instead that on Unit Tests has the benefit of ensuring that the system behaves correctly regardless of the internal implementation.
In this article, I used the Chain of Responsibility pattern, so Unit Tests would be tightly coupled to the Handlers. If we decided to move to another pattern, we would have to delete all the existing tests and rewrite everything from scratch.
Therefore, in my opinion, the Testing Diamond is often more efficient than the Testing Pyramid, as I explained here:
Just a second! 🫷 If you are here, it means that you are a software developer.
So, you know that storage, networking, and domain management have a cost .
If you want to support this blog, please ensure that you have disabled the adblocker for this site. I configured Google AdSense to show as few ADS as possible – I don’t want to bother you with lots of ads, but I still need to add some to pay for the resources for my site.
Thank you for your understanding. – Davide
In my opinion, Unit tests should be well structured and written even better than production code.
In fact, Unit Tests act as a first level of documentation of what your code does and, if written properly, can be the key to fixing bugs quickly and without adding regressions.
One way to improve readability is by grouping similar tests that only differ by the initial input but whose behaviour is the same.
Let’s use a dummy example: some tests on a simple Calculator class that only performs sums on int values.
publicstaticclassCalculator{
publicstaticint Sum(int first, int second) => first + second;
}
One way to create tests is by creating one test for each possible combination of values:
publicclassSumTests{
[Test]publicvoid SumPositiveNumbers()
{
var result = Calculator.Sum(1, 5);
Assert.That(result, Is.EqualTo(6));
}
[Test]publicvoid SumNegativeNumbers()
{
var result = Calculator.Sum(-1, -5);
Assert.That(result, Is.EqualTo(-6));
}
[Test]publicvoid SumWithZero()
{
var result = Calculator.Sum(1, 0);
Assert.That(result, Is.EqualTo(1));
}
}
However, it’s not a good idea: you’ll end up with lots of identical tests (DRY, remember?) that add little to no value to the test suite. Also, this approach forces you to add a new test method to every new kind of test that pops into your mind.
When possible, we should generalize it. With NUnit, we can use the TestCase attribute to specify the list of parameters passed in input to our test method, including the expected result.
We can then simplify the whole test class by creating only one method that accepts the different cases in input and runs tests on those values.
[Test][TestCase(1, 5, 6)][TestCase(-1, -5, -6)][TestCase(1, 0, 1)]publicvoid SumWorksCorrectly(int first, int second, int expected)
{
var result = Calculator.Sum(first, second);
Assert.That(result, Is.EqualTo(expected));
}
By using TestCase, you can cover different cases by simply adding a new case without creating new methods.
Clearly, don’t abuse it: use it only to group methods with similar behaviour – and don’t add if statements in the test method!
There is a more advanced way to create a TestCase in NUnit, named TestCaseSource – but we will talk about it in a future C# tip 😉
Further readings
If you are using NUnit, I suggest you read this article about custom equality checks – you might find it handy in your code!
I’ve been doing not just Unit Testing for my sites but full on Integration Testing and Browser Automation Testing as early as 2007 with Selenium. Lately, however, I’ve been using the faster and generally more compatible Playwright. It has one API and can test on Windows, Linux, Mac, locally, in a container (headless), in my CI/CD pipeline, on Azure DevOps, or in GitHub Actions.
For me, it’s that last moment of truth to make sure that the site runs completely from end to end.
I can write those Playwright tests in something like TypeScript, and I could launch them with node, but I like running end unit tests and using that test runner and test harness as my jumping off point for my .NET applications. I’m used to right clicking and “run unit tests” or even better, right click and “debug unit tests” in Visual Studio or VS Code. This gets me the benefit of all of the assertions of a full unit testing framework, and all the benefits of using something like Playwright to automate my browser.
In 2018 I was using WebApplicationFactory and some tricky hacks to basically spin up ASP.NET within .NET (at the time) Core 2.1 within the unit tests and then launching Selenium. This was kind of janky and would require to manually start a separate process and manage its life cycle. However, I kept on with this hack for a number of years basically trying to get the Kestrel Web Server to spin up inside of my unit tests.
I’ve recently upgraded my main site and podcast site to .NET 8. Keep in mind that I’ve been moving my websites forward from early early versions of .NET to the most recent versions. The blog is happily running on Linux in a container on .NET 8, but its original code started in 2002 on .NET 1.1.
I love this. Nice and clean. Certainly here we are assuming that we have a URL in that first line, which will be localhost something, and then we assume that our web application has started up on its own.
Here is the setup code that starts my new “web application test builder factory,” yeah, the name is stupid but it’s descriptive. Note the OneTimeSetUp and the OneTimeTearDown. This starts my web app within the context of my TestHost. Note the :0 makes the app find a port which I then, sadly, have to dig out and put into the Url private for use within my Unit Tests. Note that the <Startup> is in fact my Startup class within Startup.cs which hosts my app’s pipeline and Configure and ConfigureServices get setup here so routing all works.
[OneTimeSetUp] public void Setup() { var builder = WebApplicationTestBuilderFactory.CreateBuilder<Startup>();
var startup = new Startup(builder.Environment); builder.WebHost.ConfigureKestrel(o => o.Listen(IPAddress.Loopback, 0)); startup.ConfigureServices(builder.Services); _app = builder.Build();
// listen on any local port (hence the 0) startup.Configure(_app, _app.Configuration); _app.Start();
//you are kidding me Url = _app.Services.GetRequiredService<IServer>().Features.GetRequiredFeature<IServerAddressesFeature>().Addresses.Last(); }
[OneTimeTearDown] public async Task TearDown() { await _app.DisposeAsync(); }
So what horrors are buried in WebApplicationTestBuilderFactory? The first bit is bad and we should fix it for .NET 9. The rest is actually every nice, with a hat tip to David Fowler for his help and guidance! This is the magic and the ick in one small helper class.
public class WebApplicationTestBuilderFactory { public static WebApplicationBuilder CreateBuilder<T>() where T : class { //This ungodly code requires an unused reference to the MvcTesting package that hooks up // MSBuild to create the manifest file that is read here. var testLocation = Path.Combine(AppContext.BaseDirectory, "MvcTestingAppManifest.json"); var json = JsonObject.Parse(File.ReadAllText(testLocation)); var asmFullName = typeof(T).Assembly.FullName ?? throw new InvalidOperationException("Assembly Full Name is null"); var contentRootPath = json?[asmFullName]?.GetValue<string>();
//spin up a real live web application inside TestHost.exe var builder = WebApplication.CreateBuilder( new WebApplicationOptions() { ContentRootPath = contentRootPath, ApplicationName = asmFullName }); return builder; } }
The first 4 lines are nasty. Because the test runs in the context of a different directory and my website needs to run within the context of its own content root path, I have to force the content root path to be correct and the only way to do that is by getting the apps base directory from a file generated within MSBuild from the (aging) MvcTesting package. The package is not used, but by referencing it it gets into the build and makes that file that I then use to pull out the directory.
If we can get rid of that “hack” and pull the directory from context elsewhere, then this helper function turns into a single line and .NET 9 gets WAY WAY more testable!
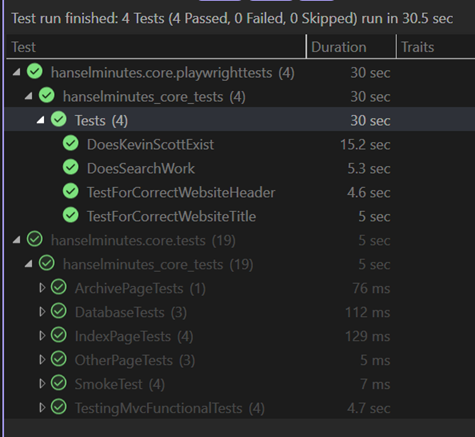
Now I can run my Unit Tests AND Playwright Browser Integration Tests across all OS’s, headed or headless, in docker or on the metal. The site is updated to .NET 8 and all is right with my code. Well, it runs at least. 😉
About Scott
Scott Hanselman is a former professor, former Chief Architect in finance, now speaker, consultant, father, diabetic, and Microsoft employee. He is a failed stand-up comic, a cornrower, and a book author.
 I’ve been doing not just Unit Testing for my sites but full on Integration Testing and Browser Automation Testing as early as 2007 with Selenium. Lately, however, I’ve been using the faster and generally more compatible