Revise PowerShell basics with a simple script that opens a browser for each specified URL. We’re gonna cover how to declare variables, define arrays, concatenate strings and run CMD commands.
Table of Contents
Just a second! 🫷 If you are here, it means that you are a software developer.
So, you know that storage, networking, and domain management have a cost .
If you want to support this blog, please ensure that you have disabled the adblocker for this site. I configured Google AdSense to show as few ADS as possible – I don’t want to bother you with lots of ads, but I still need to add some to pay for the resources for my site.
Thank you for your understanding. – Davide
Say that your project is already deployed on multiple environments: dev, UAT, and production; now you want to open the same page from all the environments.
You could do it manually, by composing the URL on a notepad. Or you could create a PowerShell script that opens them for you.
In this article, I’m going to share with you a simple script to open multiple browsers with predefined URLs. First of all, I’ll show you the completed script, then I’ll break it down to understand what’s going on and to brush up on some basic syntax for PowerShell.
Understanding the problem: the full script
I have a website deployed on 3 environments: dev, UAT, and production, and I want to open all of them under the same page, in this case under “/Image?w=60”.
So, here’s the script that opens 3 instances of my default browser, each with the URL of one of the environments:
In fact, to declare an array you must simply separate each string with ,.
Foreach loops in PowerShell
Among the other loops (while, do-while, for), the foreach loop is probably the most used.
Even here, it’s really simple:
foreach($baseUrl in $baseUrls)
{

}
As we’ve already seen before, there is no type declaration for the current item.
Just like C#, the keyword used in the body of the loop definition is in.
foreach (var item in collection)
{
// In C# we use the `var` keyword to declare the variable}
String concatenation in PowerShell
The $fullUrl variable is the concatenation of 2 string variables: $baseUrl and $path.
$fullUrl = "$($baseUrl)$($path)";
We can see that to declare this new string we must wrap it between "...".
More important, every variable that must be interpolated is wrapped in a $() block.
How to run a command with PowerShell
The key part of this script is for sure this line:
Invoke-Expression "cmd.exe /C start $($fullUrl)"
The Invoke-Expression cmdlet evaluates and runs the specified string in your local machine.
The command cmd.exe /C start $($fullUrl) just tells the CMD to open the link stored in the $fullUrl variable with the default browser.
Wrapping up
We learned how to open multiple browser instances with PowerShell. As you can understand, this was just an excuse to revise some basic concepts of PowerShell.
I think that many of us are too focused on our main language (C#, Java, JavaScript, and so on) that we forget to learn something different that may help us with our day-to-day job.
With Log4J’s vulnerability, we’ve all been reminded that systems are vulnerable, and OSS are not immune too. What should we do now?
Table of Contents
Just a second! 🫷 If you are here, it means that you are a software developer.
So, you know that storage, networking, and domain management have a cost .
If you want to support this blog, please ensure that you have disabled the adblocker for this site. I configured Google AdSense to show as few ADS as possible – I don’t want to bother you with lots of ads, but I still need to add some to pay for the resources for my site.
Thank you for your understanding. – Davide
After the Log4J vulnerability, we should reflect on how open source impacts our projects, and what are the benefits and disadvantages of using such libraries.
The following article is more an opinion, just some random thoughts about what happened and what we can learn from this event.
A recap of the Log4J vulnerability
To give some context to those who have never heard (or forgot) about the Log4J vulnerability, here’s a short recap.
Log4J is a popular Java library for logging. So popular that it has been inglobed in the Apache ecosystem.
For some reason I haven’t understood, the logger evaluates the log messages instead of just treating them as strings. So, a kind of SQL injection (but for logs) could be executed: by sending a specific string format to services that use Log4J, that string is evaluated and executed on the server; as a result, external scripts could be run on the server, allowing attackers to access your server. Of course, it’s not a detailed and 100% accurate description: there are plenty of resources on the Internet if you want to deep dive into this topic.
Some pieces of evidence show that the earliest exploitation of this vulnerability happened on Dec 1, 2021, as stated by Matthew Prince, CEO of Cloudflare, in this Tweet. But the vulnerability became public 9 days later.
Benefits of OSS projects
The source code of Log4J is publicly available on GitHub
This means that:
it’s free to use (yes, OSS != free, but it’s rare to find paid OSS projects)
you can download and run the source code
you can inspect the code and propose changes
it saves you time: you don’t have to reinvent the wheel – everything is already done by others.
Issues with OSS projects
Given that the source code is publicly accessible, attackers can study it to find security flaws, and – of course – take advantage of those vulnerabilities before the community notices them.
Most of the time, OSS projects are created by single devs to solve their specific problems. Then, they share those repositories to help their peers and allow other devs to work on the library. All the coding is done for free and in their spare time. As you can expect, the quality is deeply impacted by this.
What to do with OSS projects?
So, what should we do with all those OSS projects? Should we stop using them?
I don’t think so. just because those kinds of issues can arise, it doesn’t mean that they will arise so often.
Also, it’s pretty stupid to build everything from scratch “just in case”. Just because attackers don’t know the source code, it doesn’t mean that they can’t find a way to access your systems.
On the other hand, we should not blindly use every library we see on GitHub. It’s not true that just because it’s open source, it’s safe to use – as the Log4J story taught us.
So, what should we do?
I don’t have an answer. But for sure we can perform some operations when working on our projects.
We should review which external packages we’re using, and keep track of their version. Every N months, we should write a recap (even an Excel file is enough) to update the list of packages we’re using. In this way, if a vulnerability is discovered for a package, and a patch is released, we can immediately apply that patch to our applications.
Finding installed dependencies for .NET projects is quite simple: you can open the csproj file and see the list of NuGet packages you’re using.
The problem with this approach is that you don’t see the internal dependencies: if one of the packages you’re using depends on another package with a known vulnerability, your application may be vulnerable too.
How can you list all your dependencies? Are there any tools that work with your programming language? Drop a comment below, it can help other devs!
Then, before choosing a project instead of another, we should answer (at least) three questions. Does this package solve our problem? Does the code look safe to use? Is the repository active, or is it stale?
Spend some time skimming the source code, looking for weird pieces of code. Pay attention when they evaluate the code (possible issues like with Log4J), when they perform unexpected calls to external services (are they tracking you?), and so on.
Look at the repository history: is the repository still being updated? Is it maintained by a single person, or is there a community around it?
You can find this info on GitHub under the Insight tab.
In the following picture, you can see the contributions to the Log4J library (available here):
Does this repo have tests? Without tests (or, maybe worse, with not meaningful tests), the package should not be considered safe. Have a look at the code and at the CI pipelines, if publicly available.
Finally, a hope for a future: to define a standard and some procedures to rate the security of a package/repository. I don’t know if it can be feasible, but it would be a good addition to the OSS world.
Further readings
If you’re interested in the general aspects of the Log4J vulnerability, you can have a look at this article by the Wall Street Journal:
This was not the usual article/tutorial, it was more an opinion on the current status of OSS and on what we should do to avoid issues like those caused by Log4J.
It’s not the first vulnerability, and for sure it won’t be the only one.
As design and development teams grow and projects span across web, mobile, and internal tools, keeping everything consistent becomes tricky. Even small changes, like updating a brand color or adjusting spacing, can turn into hours of manual work across design files, codebases, and documentation. It is easy for things to drift out of sync.
That is where design tokens come in. They are a way to define and reuse the key design decisions like colors, typography, and spacing in a format that both designers and developers can use. Instead of repeating values manually, tokens let teams manage these decisions from a central place and apply them consistently across tools and platforms.
With Penpot’s new native support for design tokens, this workflow becomes more accessible and better integrated. Designers can now create and manage tokens directly inside their design files. Developers can rely on those same tokens being structured and available for use in code. No plugins, no copy pasting, no mismatched styles.
In this article, we will look at what design tokens are and why they matter, walk through how Penpot implements them, and explore some real world workflows and use cases. Whether you are working solo or managing a large design system, tokens can help bring order and clarity to your design decisions—and we will show you how.
What are Design Tokens?
Design tokens are a way to describe the small but important visual decisions that make up your user interface. Things like primary colors, heading sizes, border radius, or spacing between elements. Instead of hardcoding those values in a design file or writing them directly into code, you give each one a name and store it as a token.
Each token is a small piece of structured data. It has a name, a value, and a type. For example, a button background might be defined like this:
By putting all your decisions into a token format like this, they can be shared and reused across different projects and tools. Designers can use tokens inside the design tool, while developers can use them to generate CSS variables, theme files, or design system code. It is a way to keep everyone aligned, without needing to sync manually.
The idea behind tokens has been around for a while, but it is often hard to implement unless you are using very specific tools or have custom workflows in place. Penpot changes that by building token support directly into the tool. You do not need extra plugins or complex naming systems. You define tokens once, and they are available everywhere in your design.
Tokens are also flexible. You can create simple ones like colors or font sizes, or more complex groups for shadows, typography, or spacing systems. You can even reference other tokens, so if your design language evolves, you only need to change one thing.
Why Should You Care About Design Tokens?
Consistency and efficiency are two of the main reasons design tokens are becoming essential in design and development work. They reduce the need for manual coordination, avoid inconsistencies, and make it easier to scale design decisions. Here is how they help across different roles:
For designers Tokens remove the need to repeat yourself. Instead of manually applying the same color or spacing across every frame, you define those values once and apply them as tokens. That means no more copy-pasting styles or fixing inconsistencies later. Everything stays consistent, and updates take seconds, not hours.
For developers You get design values in a format that is ready to use. Tokens act as a shared language between design and code, so instead of pulling hex codes out of a mockup, you work directly with the same values defined by the design team. It reduces friction, avoids mismatches, and makes handoff smoother.
For teams and larger systems Tokens are especially useful when multiple people are working on the same product or when you are managing a design system across several platforms or brands. They allow you to define decisions once and reuse them everywhere, keeping things in sync and easy to update when the brand evolves or when new platforms are added.
Watch this quick and complete demo as Laura Kalbag, designer, developer and educator at Penpot, highlights the key benefits and main uses of Penpot’s design tokens:
What Sets Penpot Apart?
Penpot is not just adding support for design tokens as a separate feature. Tokens are being built directly into how Penpot works. They are part of the core design process, not an extra tool you have to manage on the side.
You can create tokens from the canvas or from the token panel, organize them into sets, and apply them to components, styles, or entire boards. You do not need to keep track of where a value is used—Penpot does that for you. When you change a token, any component using it updates automatically.
Take a look at this really great overview:
Tokens in Penpot follow the same format defined by the Design Tokens Community Group, which makes them easy to sync with code and other tools. They are stored in a way that works across platforms, and they are built to be shared, copied, or extended as your project grows.
You also get extra capabilities like:
Tokens that can store text, numbers, and more
Math operations between tokens (for example, spacing that is based on a base value)
Integration with Penpot’s graph engine, so you can define logic and conditions around your tokens
That means you can do more than just store values—you can create systems that adapt based on context or scale with your product.
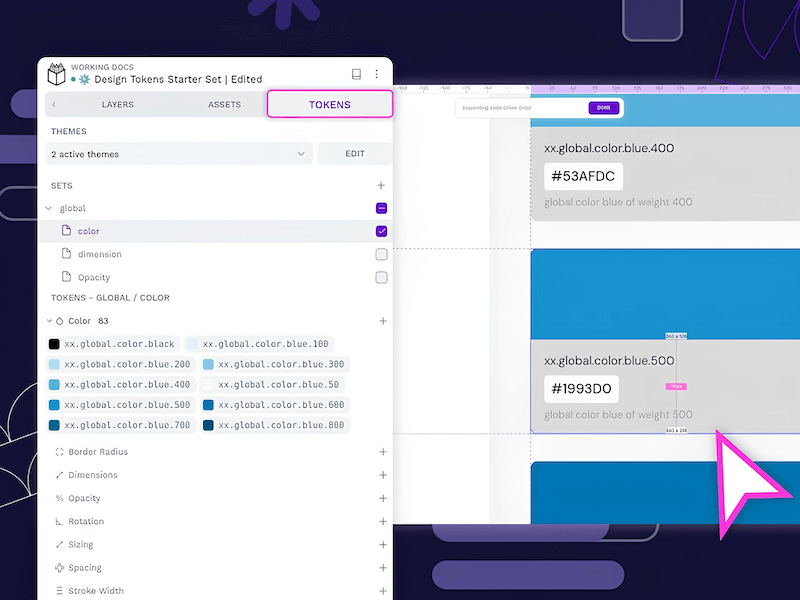
Key features
Penpot design tokens support different token types, themes, and sets.
Design tokens in Penpot are built to be practical and flexible from the start. Whether you are setting up a simple style guide or building a full design system, these features help you stay consistent without extra effort.
Native to the platform Tokens are a core part of Penpot. You do not need plugins, workarounds, or naming tricks to make them work. You can create, edit, and apply them directly in your files.
Based on open standards Penpot follows the format defined by the Design Tokens Community Group (W3C), which means your tokens are portable and ready for integration with other tools or codebases.
Component aware You can inspect which tokens are applied to components right on the canvas, and copy them out for use in code or documentation.
Supports multiple types Tokens can represent strings, numbers, colors, font families, shadows, and more. This means you are not limited to visual values—you can also manage logic-based or structural decisions.
Math support Define tokens in relation to others. For example, you can set a spacing token to be twice your base unit, and it will update automatically when the base changes.
Graph engine integration Tokens can be part of more advanced workflows using Penpot’s visual graph engine. This opens the door for conditional styling, dynamic UI variations, or even generative design.
Practical Use Cases
Design tokens are flexible building blocks that can support a range of workflows. Here are a few ways they’re already proving useful:
Scaling across platforms Tokens make it easier to maintain visual consistency across web, mobile, and desktop interfaces. When spacing, colors, and typography are tokenized, they adapt across screen sizes and tech stacks without manual rework.
Creating themes and variants Whether you’re supporting light and dark modes, multiple brands, or regional styles, tokens let you swap out entire visual styles by changing a single set of values—without touching your components.
Simplifying handoff and implementation Because tokens are defined in code-friendly formats, they eliminate guesswork. Developers can use tokens as source-of-truth values, reducing design drift and unnecessary back-and-forth.
Prototyping and iterating quickly Tokens make it easier to explore design ideas without breaking things. Want to try out a new font scale or update your color palette? Change the token values and everything updates—no tedious find-and-replace needed.
Versioning design decisions You can track changes to tokens over time just like code. That means your design system becomes easier to maintain, document, and evolve—without losing control.
Your First Tokens in Penpot
So how do you actually work with tokens in Penpot?
The best way to understand design tokens is to try them out. Penpot makes this surprisingly approachable, even if you’re new to the concept. Here’s how to start creating and using tokens inside the editor.
Creating a Token
Open your project and click on the Tokens tab in the left panel.
You’ll see a list of token types like color, dimension, font size, etc.
Click the + button next to any token type to create a new token.
You’ll be asked to fill in:
Name: Something like dimension.small or color.primary
Value: For example, 8px for a dimension, or #005FCC for a color
Description(optional): A short note about what it’s for
Hit Save, and your token will appear in the list. Tokens are grouped by type, so it stays tidy even as your set grows.
If you try to create a token with a name that already exists, you’ll get an error. Token names must be unique.
Editing and Duplicating Tokens
You can right-click any token to edit or duplicate it.
Edit: Change the name, value, or description
Duplicate: Makes a copy with -copy added to the name
Handy if you’re exploring alternatives or setting up variants.
Referencing Other Tokens (Aliases)
Tokens can point to other tokens. This lets you define a base token and reuse it across multiple other tokens. If the base value changes, everything that references it updates automatically.
For example:
Create a token called dimension.small with a value of 8px
Create another token called spacing.small
In spacing.small, set the value to {dimension.small}
Now if you ever update dimension.small to 4px, the spacing token will reflect that change too.
Token references are case-sensitive, so be precise.
Using Math in Tokens
Penpot supports simple math in token values—especially useful for dimension tokens.
You can write things like:
{dimension.base} * 2
16 + 4
{spacing.small} + {spacing.medium}
Let’s say dimension.base is 4px, and you want a larger version that’s always double. You can set dimension.large to:
csharpCopyEdit{dimension.base} * 2
This means if you ever change the base, the large size follows along.
Math expressions support basic operators:
+ addition
- subtraction
* multiplication
This adds a lightweight logic layer to your design decisions—especially handy for spacing scales, typography ramps, or breakpoints.
What’s Next for Penpot Design Tokens?
Penpot has an exciting roadmap for design tokens that will continue to expand their functionality:
GitHub Sync: A feature allowing teams to easily export and import design tokens, facilitating smooth collaboration between design and development teams.
Gradients: An upcoming addition to design tokens, enabling designers to work with gradients as part of their design system.
REST API & Automation: The future addition of a REST API will enable even deeper integrations and allow teams to automate their design workflows.
Since Penpot is open source and works under a culture of sharing as much as they can, as early as possible, you can check out their open Taiga board to see what the team is working on in real time and what’s coming up next.
Conclusion
Penpot’s design tokens are more than just a tool for managing visual consistency—they are a game-changer for how design and development teams collaborate. Whether you’re a junior UI designer trying to learn scalable design practices, a senior developer looking to streamline design implementation, or an enterprise team managing a complex design system, design tokens can help bring order to complexity.
As Penpot continues to refine and expand this feature, now is the perfect time to explore the possibilities it offers.
Give it a try!
Are you excited about Penpot’s new design token feature? Check it out and explore the potential of scalable design, and stay tuned for updates. We look forward to see how you will start incorporating design tokens into your workflow!
Ten years ago, Microsoft released the source for MS-DOS 1.25 and 2.0 to the Computer History Museum, and then later republished them for reference purposes. This code holds an important place in history and is a fascinating read of an operating system that was written entirely in 8086 assembly code nearly 45 years ago.
Today, in partnership with IBM and in the spirit of open innovation, we’re releasing the source code to MS-DOS 4.00 under the MIT license. There’s a somewhat complex and fascinating history behind the 4.0 versions of DOS, as Microsoft partnered with IBM for portions of the code but also created a branch of DOS called Multitasking DOS that did not see a wide release.
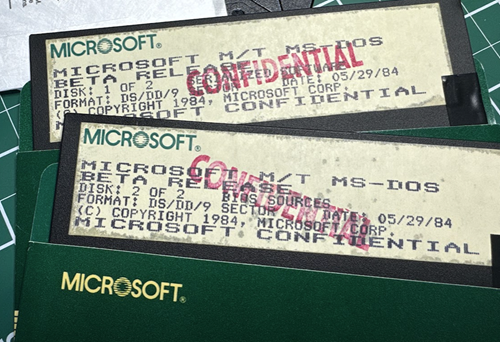
A young English researcher named Connor “Starfrost” Hyde recently corresponded with former Microsoft Chief Technical Officer Ray Ozzie about some of the software in his collection. Amongst the floppies, Ray found unreleased beta binaries of DOS 4.0 that he was sent while he was at Lotus. Starfrost reached out to the Microsoft Open Source Programs Office (OSPO) to explore releasing DOS 4 source, as he is working on documenting the relationship between DOS 4, MT-DOS, and what would eventually become OS/2. Some later versions of these Multitasking DOS binaries can be found around the internet, but these new Ozzie beta binaries appear to be much earlier, unreleased, and also include the ibmbio.com source.
Scott Hanselman, with the help of internet archivist and enthusiast Jeff Sponaugle, has imaged these original disks and carefully scanned the original printed documents from this “Ozzie Drop”. Microsoft, along with our friends at IBM, think this is a fascinating piece of operating system history worth sharing.
Jeff Wilcox and OSPO went to the Microsoft Archives, and while they were unable to find the full source code for MT-DOS, they did find MS DOS 4.00, which we’re releasing today, alongside these additional beta binaries, PDFs of the documentation, and disk images. We will continue to explore the archives and may update this release if more is discovered.
Thank you to Ray Ozzie, Starfrost, Jeff Sponaugle, Larry Osterman, our friends at the IBM OSPO, as well as the makers of such digital archeology software including, but not limited to Greaseweazle, Fluxengine, Aaru Data Preservation Suite, and the HxC Floppy Emulator. Above all, thank you to the original authors of this code, some of whom still work at Microsoft and IBM today!
If you’d like to run this software yourself and explore, we have successfully run it directly on an original IBM PC XT, a newer Pentium, and within the open source PCem and 86box emulators.
About Scott
Scott Hanselman is a former professor, former Chief Architect in finance, now speaker, consultant, father, diabetic, and Microsoft employee. He is a failed stand-up comic, a cornrower, and a book author.


 See
See 