برچسب: Platform

  • NITEX: Building a Brand and Digital Platform for Fashion’s New Supply Chain

    NITEX: Building a Brand and Digital Platform for Fashion’s New Supply Chain


    NITEX is not just another fashion-tech company. Their mission is to redefine the supply chain for fashion – bringing speed, sustainability, and intelligence to a traditionally rigid process. Their platform spans the entire workflow: design, trend forecasting, material sourcing, production, and logistics. In short, they offer a seamless, end-to-end system for brands who want to move faster and smarter.

    When NITEX approached us, the challenge was clear: they needed more than a website. They needed a platform that could translate their vision into an experience that worked for multiple audiences – brands seeking services, investors looking for clarity, factories wanting partnerships, and talent exploring opportunities.

    The project took shape over several months, moving from brand definition to UX architecture, UI design, and technical development. The turning point came with the realization that a single, linear site could not balance storytelling with action. To resolve this, we developed a dual-structure model: one path for narrative and inspiration, and another for practical conversion. This idea shaped every design and technical decision moving forward.

    Crafting the Hybrid Identity

    NITEX’s identity needed to reflect a unique duality: part fashion brand, part technology company. Our approach was to build a system that could flex between editorial elegance and sharp technical clarity.

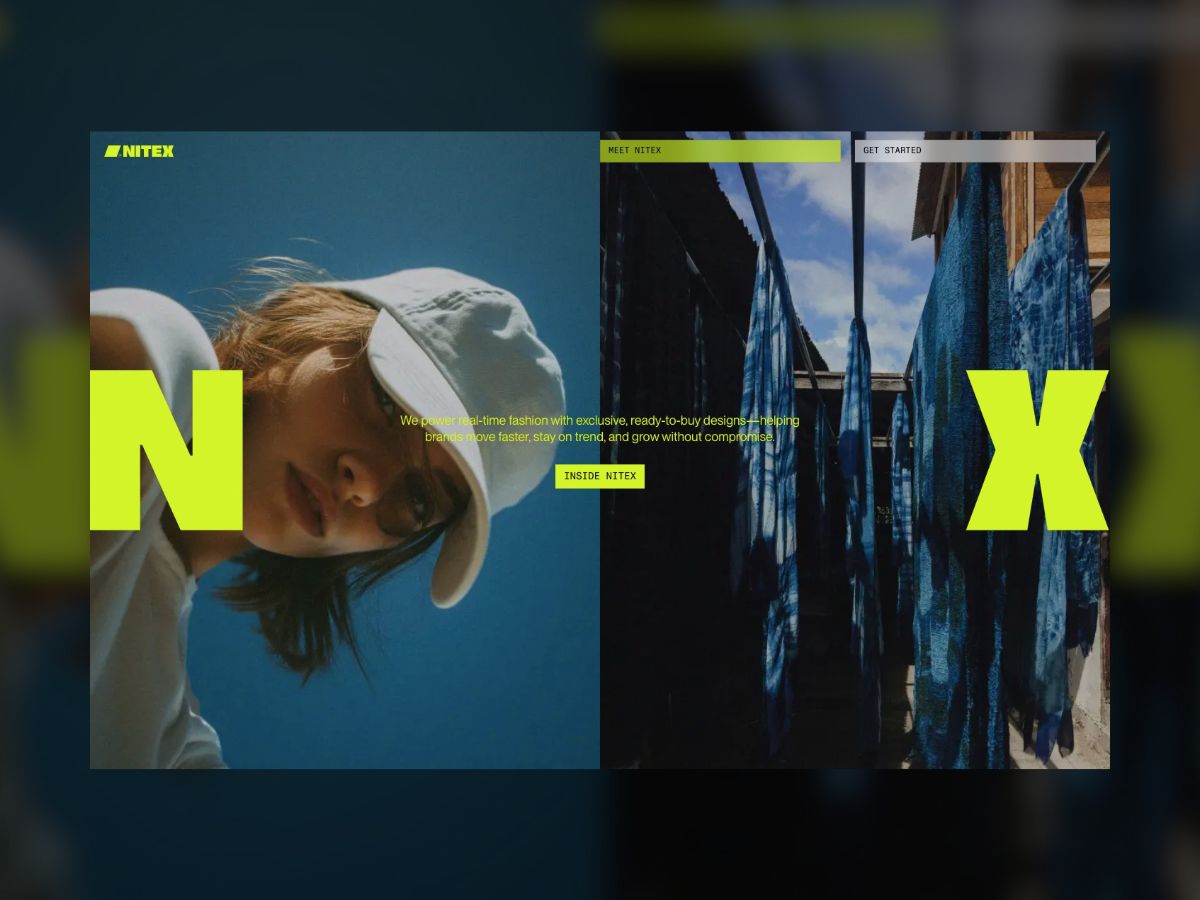
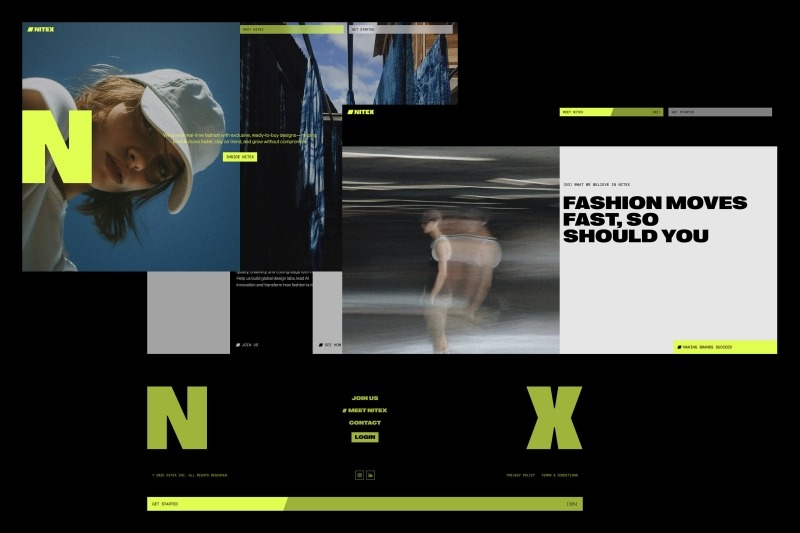
    At the heart of the identity sits the NITEX logo, an angular form created from a forward-leaning N and X. This symbol is more than a mark – it acts as a flexible frame. The hollow center creates a canvas for imagery, data, or color, visualizing collaboration and adaptability.

    This angular geometry informed much of the visual language across the site:

    • Buttons expand or tilt along the logo’s angles when hovered.
    • The progress bar in navigation and footer fills in the same diagonal form.
    • Headlines reveal themselves with angled wipes, reinforcing a consistent rhythm.

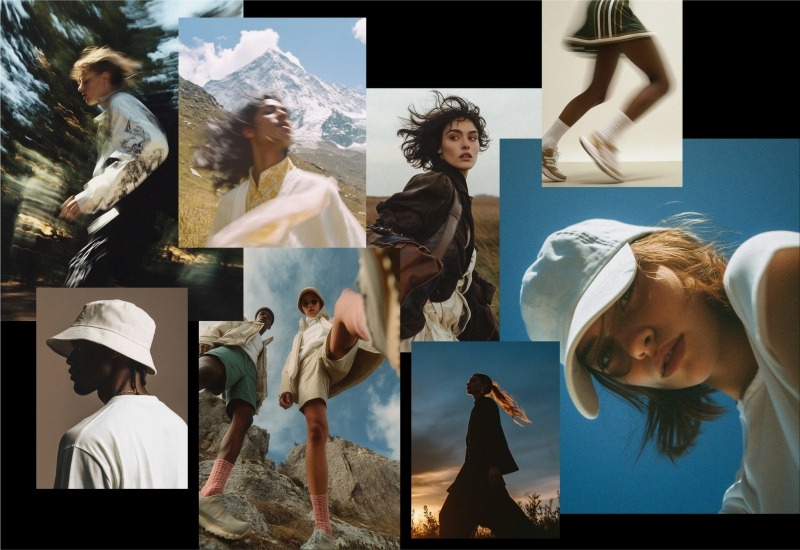
    Typography was kept bold yet minimal, with global sans-serif structures that feel equally at home in high fashion and digital environments. Imagery played an equally important role. We chose photography that conveyed motion and energy, often with candid blur or dynamic framing. To push this further, we incorporated AI-generated visuals, adding intensity and reinforcing the sense of momentum at the core of the NITEX story. The result is a brand system that feels dynamic, flexible, and scalable – capable of stretching from streetwear to luxury contexts while always staying rooted in clarity and adaptability.

    Building the Engine

    A complex brand and experience required a strong technical foundation. For this, our developers chose tools that balanced performance, flexibility, and scalability:

    • Frontend: Nuxt
    • Backend / CMS: Sanity
    • Animations & Motion: GSAP and the Web Animations API

    The heavy reliance on native CSS transitions and the Web Animations API ensured smooth performance even on low-powered devices. GSAP was used to orchestrate more complex transitions while still keeping load times and resource use efficient. A key architectural decision was to give overlays their own URLs. This meant that when users opened deep-dive layers or content modules, those states were addressable, shareable, and SEO-friendly. This approach kept the experience immersive while ensuring that content remained accessible outside the narrative scroll.

    Defining the Flow

    Several features stand out in the NITEX site for how they balance storytelling with functionality:

    • Expandable overlays: Each narrative chapter can unfold into deep-dive layers – showing case studies, workflow diagrams, or leadership perspectives without breaking the scroll.
    • Dynamic conversion flows: Forms adapt to the user’s audience type – brands, investors, talent, or factories – showing tailored fields and next steps.
    • Calendar integration: Visitors can book demos or design lab visits directly, streamlining the lead process and reinforcing immediacy.

    This mix of storytelling modules and smart conversion flows ensured that every audience had a pathway forward, whether to be inspired, informed, or engaged.

    Bringing It to Life

    NITEX’s brand identity found its fullest expression in the motion and interaction design of the site. The site opens with scroll-based storytelling, each chapter unfolding with smooth transitions. Page transitions maintain energy, using angled wipes and overlays that slide in from the side. These overlays carry their own links, allowing users to dive deep without losing orientation. The angular motion language of the logo carries through:

    • Buttons expand dynamically on hover.
    • Rectangular components tilt into angular forms.
    • The dual-image module sees the N and X frame track the viewport, dynamically revealing new perspectives.

    This creates a consistent visual rhythm, where every motion feels connected to the brand’s DNA. The imagery reinforces this, emphasizing speed and creativity through motion blur, candid composition, and AI-driven intensity. Importantly, we kept the overall experience modular and scalable. Each content block is built on a flexible grid with clear typographic hierarchy. This ensures usability while leaving room for surprise – whether it’s an animated reveal, a bold image transition, or a subtle interactive detail.

    Under the Hood

    From a structural standpoint, the site was designed to scale as NITEX grows. The codebase follows a modular approach, with reusable components that can be repurposed across sections. Sanity’s CMS allows editors to easily add new chapters, forms, or modules without breaking the system.

    The split-entry structure – narrative vs. action – was the architectural anchor. This allowed us to keep storytelling immersive without sacrificing usability for users who came with a clear transactional intent.

    Looking Back

    This project was as much about balance as it was about creativity. Balancing brand storytelling with user conversion. Balancing motion and expressiveness with speed and performance. Balancing multiple audience needs within a single coherent system.

    One of the most rewarding aspects was seeing how the dual-experience model solved what initially felt like an unsolvable challenge: how to serve users who want inspiration and those who want action without building two entirely separate sites.

    The deep-dive overlays also proved powerful, letting NITEX show rather than just tell their story. They allowed us to layer complexity while keeping the surface experience clean and intuitive.

    Looking ahead, the NITEX platform is built to evolve. Future possibilities include investor dashboards with live performance metrics, brand-specific case modules curated by industry, or interactive workflow tools aligned with NITEX’s trend-to-delivery logic. The foundation we built makes all of this possible.

    Ultimately, the NITEX project reflects the company’s own values: clarity, adaptability, and speed. For us, it was an opportunity to merge brand design, UX, UI, and development into a single seamless system – one that redefines what a fashion-tech platform can look and feel like.


    Source link

  • The Making of a Personal Project Platform: A Portfolio that Grew out of Process and Play

    The Making of a Personal Project Platform: A Portfolio that Grew out of Process and Play


    This summer I created my Personal Project Platform. It wasn’t exactly intentional. When I realised where my process was going, I was already some way along.

    Speaking of process, I’m a big fan. When you’re ready to surrender, you’ll find yourself in places you wouldn’t expect. Anyway, two paths came together when I discovered I was working on my Personal Project Platform. Let’s talk about the first one.

    Path 1: A Necessary Happy Place

    As a designer, or as a human being for that matter, not every day is full of inspiration. Especially when the design-and-AI landscape changes as fast as it does now, it’s sometimes hard to see the big picture.

    As a remedy, I started building a moodboard that would serve as my Happy Place. Whenever I came across a reference that made me smile, I put it there. It had sections for my dream office; quotes and thoughts that resonated with me; and random image fragments that, together, felt like me ~ or at least a designer version of me. I started adding my own scribbles, notes and thoughts about purpose: why am I still doing this? What am I looking for as a designer?

    Things that inspired me. Among MyMind, Bon Iver, Collins, Orchid and other stuff from great designers.
    A section from my Happy Place. Snippets from MyMind, Bon Iver, Collins, Orchid, Kode, Daylight and other work from great designers.

    Path 2: Instagram Experiments

    One evening in December 2022, I had a drink with a designer friend. We were making random things just for fun. At work, I had shifted into more of a managerial role, and I missed designing. 

    Then I thought: why not throw it online? So I created an Instagram account and posted my first Processing sketch.

    The more I made, the more I wanted to make. Over time, this habit became part of me. Sketches became interactive, but it bothered me they only ran locally ~ I was the only one who could interact with them. I also started sharing quick tutorials, and was amazed by how many positive responses I got from people who felt inspired to make something of their own.

    Where the Two Paths Meet

    Meanwhile, my “Happy Place” notes grew longer and more intentional. I wanted more people to interact with my sketches. Since I was doing it all for fun, why not share the source code? Why not collect my resources for others to use?

    Slowly it became an idea for a platform: one where the intentional and the unexpected coexist, showing new designers ~ especially with AI replacing all the fun ~ that learning a craft, practising, and training your creative muscle still matter. 

    Now I just had to build it.

    I started with just a few basic components in Figma.

    Building the Platform

    Since we’re on Codrops, let’s talk code. I have a background in PHP and JavaScript ~ old-school, before ES6 or TypeScript, let alone Vue or React. I wanted to use this project to learn something new.

    After some research, I decided on Nuxt.js. From what I read, it’s easier to set up than Next.js. And since my platform isn’t likely to scale any time soon, I think it does the job. I had also played with Prismic CMS a few years back. Lightweight, not too many features, but fine for me. So I watched some Nuxt.js+Prismic tutorials, and off I went.

    The Hero

    I knew I wanted interactive components. Something that gave visitors an immediate sense of my work. Let’s start with the hero.

    With your mouse you draw objects onto the canvas, plain and simple. I wanted the objects to have a link with nature ~ something that grows, can flourish ~ as you would do when you take on lots of personal projects.

    In my first sketch the flowers scaled from small to big, literally growing. But then I thought: how many times had I got stuck on a sketch, frustrated over an idea that just wouldn’t work out? So I decided linear growth wouldn’t be honest. Most of the time when I work on my projects my head is all over the place. Things should scale randomly, they don’t even need to match in width and height. I like it like this, it mirrors the tension between control and chaos in my work. Below you’ll find the bit where this is happening.

    /**
     * Get a portion of the next image
     */
     public getPortion(): p5.Image {
       // Fetch original
       const original = this.getNext();
       if (! original) return null;
    
       // Source
       const ow = original.width;
       const oh = original.height;
       const sx = Math.random() * ow;
       const sy = Math.random() * oh;
    
       // Remaining part
       const loW = ow - sx;
       const loH = oh - sy;
    
       let sw = Math.round(loW * Math.random()) + 10;
       let sh = Math.round(loH * Math.random()) + 10;
    
       // Destination
       const dx = 0;
       const dy = 0;
       const dw = sw;
       const dh = sh;
        
       // Create new image
       const copy = this.p.createImage(dw, dh);
       copy.copy(original, sx, sy, sw, sh, dx, dy, dw, dh);
    
       return copy;
     }
    
     public getRandomSizedPortion(): p5.Image {
       // Get portion
       const img = this.getPortion();
       if (! img) return null;
    
       // Random size
       const maxSize = this.p.width * .1;
       img.resize(this.p.random(10,maxSize), this.p.random(10,maxSize));
    
       return img;
     }

    The Footer

    To balance the hero, I also made the footer interactive. I used an older sketch as a base, adding depth and texture to make it feel a little like an abstract ocean.

    For me, it brings a sense of calm and focus ~ with subtle vertical movement and a tone that changes as you move the mouse along the x-axis. The snippet below should give you an idea of how it works, but the original sketch is available to download on the platform. So if you’re curious, go ahead and play.

    /**
     * Calculate all data
     */
     public update() {
    
       // Animation settings
       let duration: number = 128;
       let progress: number = this.p.frameCount % duration;
       if(progress == 0) this.iteration++;
        
       // Rows and height
       let numRowsDrawn: number = this.numRows + 1 + this.iteration;
       let colW: number = this.p.width / this.numCols;
       let rowH: number = this.p.height / this.numRows;
    
       let count = 0;
       // Loop through rows
       for (let y: number = this.iteration; y<numRowsDrawn; y++) {
          
         // Calculate y position (start at the bottom)
         let targetY: number = this.p.height - (y+1) * rowH + this.iteration * rowH;
    
         // Where are we in the progress
         let posY: number = this.p.map(progress, 0, duration, targetY, targetY+rowH);
         // Mouse influence
         const smoothing = 0.06;
         this.currentMouseX += (this.p.mouseX - this.currentMouseX) * smoothing;
         const mouseInfluence: number = this.p.map(this.currentMouseX, 0, this.p.width, .8, -.3);
    
         // What is the influence based on the y position
         let yInfluence: number = this.p.map(posY / this.numRows, 0, rowH, 1, this.numRows+1) * mouseInfluence;
         // Double columns each row
         let extraCols: number = Math.exp(yInfluence * Math.LN2); 
         // Size and position
         let currentW: number = colW + extraCols * colW;
          
         // Loop through columns
         for (let x:number = 0; x<this.numCols; x++) {
           // Calculate x position
           let posX: number = x * currentW - (extraCols * yInfluence + 1) * colW;
    
           // Don't draw things out of screen x-axis
           if(posX > this.p.width) continue;
           if(posX + currentW < 0) continue;
    
           // Draw 
           this.display(x, y, posX, posY, currentW, rowH);
           count++;
          }
        }
      }

    The Masonry Grid

    I’ve always liked inspiration websites where a lot is going on. You get all sorts of images and videos that are strong on their own, but gain new purpose in a different context. That’s what I wanted for my case overview

    Since I don’t aim for any particular graphical style, I like that it feels more like a collection of references. This is why I decided to go for a masonry grid. I didn’t want to use a plugin, so I built this little CSS/JavaScript thingy where I use CSS Grid rows to distribute the images, and JavaScript to calculate how many rows it should span, depending on the aspect ratio that is set in the CMS. I think there is still room for improvement, but to be honest, I ran low on patience on this one. I decided it does the job for now. Maybe I will get back to it someday to refactor. Below is the snippet where most of the work happens.

    function applyMasonry() {
       // Fetch grid and items
       const grid = document.querySelector('.masonry-grid');
       const items = grid?.querySelectorAll('.masonry-item');
    
       // Make sure they’re both loaded
       if (!grid || !items) return
    
       // Get properties from CSS
       const rowHeight = parseInt(getComputedStyle(grid).getPropertyValue('grid-auto-rows'))
       const gap = parseInt(getComputedStyle(grid).getPropertyValue('gap') || 0)
        
       items.forEach(item => {
    
         // Fetch media and info container separately
         const media = item.querySelector('.masonry-item__image-container')
         const info = item.querySelector('.masonry-item__info-container')
    
         if (!media || !info) return
    
         // Combine them to item height
         const mediaHeight = media.getBoundingClientRect().height
         const infoHeight = info.getBoundingClientRect().height
         const itemHeight = mediaHeight + infoHeight
    
         // Calculate how many rows to span
         const rowSpan = Math.ceil((itemHeight + gap) / (rowHeight + gap))
    
         // Apply row span
         item.style.gridRowEnd = `span ${rowSpan}`;
         item.style.opacity = 1;
       })
     }

    Resources & Code

    Since I truly want to encourage people to start their own journey with personal projects, I want to share resources and code examples to get them started.

    Of course with the launch of this platform I had to do this retrospectively for more than 20 projects, so in future I’ll probably share more process and behind-the-scenes. Who knows. Anyway, this component gives me a space for anything that might be useful to people who are interested.

    Two Weeks Without a Laptop

    Then the summer holiday arrived. France. Four days of Disneyland chaos, followed by some peace near the ocean. Days were simple: beach, pool, playgrounds. In between, I picked up a Bon Iver notebook I’d bought back home.

    At the time, the platform had a temporary wordmark with my initials “mvds”. But I felt I could spend a little more time and attention crafting something beautiful. So every day I doodled my initials in all sorts of forms. By the end of the holiday I had a pretty good idea of what my logomark should become. Back home, with two more weeks before I needed to get back to work, I started digitising my sketches and tweaking anchor points until I got it right. (Then tweaked a little more, you know how it goes.) This resulted in a logomark I’m quite proud of. So I figured it needed a place on the platform.

    P5.js vs Three.js

    For the launch of my logomark on Instagram, I created a Processing sketch that placed the logo in a pixelated 3D scene, rotating. I liked that it almost became a sculpture or building of sorts. Now I only needed to build a web version.

    Because my Hero and Footer components were both p5.js, this was my first choice. But it was slow ~ I mean like really slow. No matter how I tried to optimise it, the 3D workload killed the performance. I had only worked with Three.js once a few years back, but I remembered it handled 3D pretty well. Not sure you’re going to have the best performing website by using multiple libraries, but since it’s all just for fun, I decided to give it a go. With the Three.js version I could add far more detail to the structure, and it still performed flawlessly compared to the p5.js version. Below you’ll see me looping through all the voxels.

    let instanceId: number = 0;
    
    // Loop using voxel resolution (detail), not image resolution
    for (let z: number = 0; z < detail; z++) {
      for (let y: number = 0; y < detail; y++) {
        const flippedY: number = detail - 1 - y;
    
        for (let x: number = 0; x < detail; x++) {
          // Sample image using normalized coordinates
          const sampleX: number = Math.floor((x / detail) * imgDetail);
          const sampleY: number = Math.floor((flippedY / detail) * imgDetail);
          const sampleZ: number = Math.floor((z / detail) * imgDetail);
    
          const brightness1: number = getBrightnessAt(imgData, imgDetail, sampleX, sampleY);
          const brightness2: number = getBrightnessAt(imgData, imgDetail, sampleZ, sampleY);
    
          if (brightness1 < 100 && brightness2 < 100 && instanceId < maxInstances) {
            dummy.position.set(
              x * cellSize - (detail * cellSize) / 2,
              y * cellSize - (detail * cellSize) / 2,
              z * cellSize - (detail * cellSize) / 2
              );
            dummy.updateMatrix();
            mesh.setMatrixAt(instanceId, dummy.matrix);
            instanceId++;
          }
        }
      }
    }

    Wrapping Up

    This platform isn’t finished ~ that’s the point. It’s a space to interact with my coded tools, for sketches to be shared for further exploration and for process itself to stay visible. If you’re a designer or coder, I hope it nudges you to start or continue your own side projects. That’s how creativity stays alive. Thank you for reading.


    Source link

  • How an XDR Platform Transforms Your SOC Operations

    How an XDR Platform Transforms Your SOC Operations


    XDR solutions are revolutionizing how security teams handle threats by dramatically reducing false positives and streamlining operations. In fact, modern XDR platforms generate significantly fewer false positives than traditional SIEM threat analytics, allowing security teams to focus on genuine threats rather than chasing shadows. We’ve seen firsthand how security operations centers (SOCs) struggle with alert fatigue, fragmented visibility, and resource constraints. However, an XDR platform addresses these challenges by unifying information from multiple sources and providing a holistic view of threats. This integration enables organizations to operate advanced threat detection and response with fewer SOC resources, making it a cost-effective approach to modern security operations.

    An XDR platform consolidates security data into a single system, ensuring that SOC teams and surrounding departments can operate from the same information base. Consequently, this unified approach not only streamlines operations but also minimizes breach risks, making it an essential component of contemporary cybersecurity strategies.

    In this article, we’ll explore how XDR transforms SOC operations, why traditional tools fall short, and the practical benefits of implementing this technology in your security framework.

    The SOC Challenge: Why Traditional Tools Fall Short

    Security Operations Centers (SOCs) today face unprecedented challenges with their traditional security tools. While security teams strive to protect organizations, they’re increasingly finding themselves overwhelmed by fundamental limitations in their security infrastructure.

    Alert overload and analyst fatigue

    Modern SOC teams are drowning in alerts. As per Vectra AI, an overwhelming 71% of SOC practitioners worry they’ll miss real attacks buried in alert floods, while 51% believe they simply cannot keep pace with mounting security threats. The statistics paint a troubling picture:

    Siloed tools and fragmented visibility

    The tool sprawl in security operations creates massive blind spots. According to Vectra AI findings, 73% of SOCs have more than 10 security tools in place, while 45% juggle more than 20 different tools. Despite this arsenal, 47% of practitioners don’t trust their tools to work as needed.

    Many organizations struggle with siloed security data across disparate systems. Each department stores logs, alerts, and operational details in separate repositories that rarely communicate with one another. This fragmentation means threat hunting becomes guesswork because critical artifacts sit in systems that no single team can access.

    Slow response times and manual processes

    Traditional SOCs rely heavily on manual processes, significantly extending detection and response times. When investigating incidents, analysts must manually piece together information from different silos, losing precious time during active cyber incidents.

    According to research by Palo Alto Networks, automation can reduce SOC response times by up to 50%, significantly limiting breach impacts. Unfortunately, most traditional SOCs lack this capability. The workflow in traditional environments is characterized by manual processes that exacerbate alert fatigue while dealing with massive threat alert volumes.

    The complexity of investigations further slows response. When an incident occurs, analysts must combine data from various sources to understand the full scope of an attack, a time-consuming process that allows threats to linger in systems longer than necessary.

    What is an XDR Platform and How Does It Work?

    Extended Detection and Response (XDR) platforms represent the evolution of cybersecurity technology, breaking down traditional barriers between security tools. Unlike siloed solutions, XDR solutions provide a holistic approach to threat management through unified visibility and coordinated response.

    Unified data collection across endpoints, network, and cloud

    At its core, an XDR platform aggregates and correlates data from multiple security layers into a centralized repository. This comprehensive data collection encompasses:

    • Endpoints (computers, servers, mobile devices)
    • Network infrastructure and traffic
    • Cloud environments and workloads
    • Email systems and applications
    • Identity and access management

    This integration eliminates blind spots that typically plague security operations. By collecting telemetry from across the entire attack surface, XDR platforms provide security teams with complete visibility into potential threats. The system automatically ingests, cleans, and standardizes this data, ensuring consistent, high-quality information for analysis.

    Real-time threat detection using AI and ML

    XDR platforms leverage advanced analytics, artificial intelligence, and machine learning to identify suspicious patterns and anomalies that human analysts might miss. These capabilities enable:

    • Automatic correlation of seemingly unrelated events across different security layers
    • Identification of sophisticated multi-vector attacks through pattern recognition
    • Real-time monitoring and analysis of data streams for immediate threat identification
    • Reduction in false positives through contextual understanding of alerts

    The AI-powered capabilities enable XDR platforms to detect threats at a scale and speed impossible for human analysts alone. Moreover, these systems continuously learn and adapt to evolving threats through machine learning models.

    Automated response and orchestration capabilities

    Once threats are detected, XDR platforms can initiate automated responses without requiring manual intervention. This automation includes:

    • Isolation of compromised devices to contain threats
    • Blocking of malicious IP addresses and domains
    • Execution of predefined response playbooks for consistent remediation
    • Prioritization of incidents based on severity for efficient resource allocation

    Key Benefits of XDR for SOC Operations

    Implementing an XDR platform delivers immediate, measurable advantages to security operations centers struggling with traditional tools and fragmented systems. SOC teams gain specific capabilities that fundamentally transform their effectiveness against modern threats.

    Faster threat detection and reduced false positives

    The strategic advantage of XDR solutions begins with their ability to dramatically reduce alert volume. XDR tools automatically group related alerts into unified incidents, representing entire attack sequences rather than isolated events. This correlation across different security layers identifies complex attack patterns that traditional solutions might miss.

    Improved analyst productivity through automation

    As per the Tines report, 64% of analysts spend over half their time on tedious manual work, with 66% believing that half of their tasks could be automated. XDR platforms address this challenge through built-in orchestration and automation that offload repetitive tasks. Specifically, XDR can automate threat detection through machine learning, streamline incident response processes, and generate AI-powered incident reports. This automation allows SOC teams to detect sophisticated attacks with fewer resources while reducing response time.

    Centralized visibility and simplified workflows

    XDR provides a single pane view that eliminates “swivel chair integration,” where analysts manually interface across multiple security systems. This unified approach aggregates data from endpoints, networks, applications, and cloud environments into a consolidated platform. As a result, analysts gain swift investigation capabilities with instant access to all forensic artifacts, events, and threat intelligence in one location. This centralization particularly benefits teams during complex investigations, enabling them to quickly understand the complete attack story.

    Better alignment with compliance and audit needs

    XDR strengthens regulatory compliance through detailed documentation and monitoring capabilities. The platform generates comprehensive logs and audit trails of security events, user activities, and system changes, helping organizations demonstrate compliance to regulators. Additionally, XDR’s continuous monitoring adapts to new threats and regulatory changes, ensuring consistent compliance over time. Through centralized visibility and data aggregation, XDR effectively monitors data flows and access patterns, preventing unauthorized access to sensitive information.

    Conclusion

    XDR platforms clearly represent a significant advancement in cybersecurity technology.  At Seqrite, we offer a comprehensive XDR platform designed to help organizations simplify their SOC operations, improve detection accuracy, and automate responses. If you are looking to strengthen your cybersecurity posture with an effective and scalable XDR solution, Seqrite XDR is built to help you stay ahead of evolving threats.


    Source link