PostgreSQL is a famous relational database. In this article, we will learn how to run it locally using Docker.
Table of Contents
Just a second! 🫷 If you are here, it means that you are a software developer.
So, you know that storage, networking, and domain management have a cost .
If you want to support this blog, please ensure that you have disabled the adblocker for this site. I configured Google AdSense to show as few ADS as possible – I don’t want to bother you with lots of ads, but I still need to add some to pay for the resources for my site.
Thank you for your understanding. – Davide
PostgreSQL is a relational database characterized for being open source and with a growing community supporting the project.
There are several ways to store a Postgres database online so that you can use it to store data for your live applications. But, for local development, you might want to spin up a Postgres database on your local machine.
In this article, we will learn how to run PostgreSQL on a Docker container for local development.
Pull Postgres Docker Image
As you may know, Docker allows you to download images of almost everything you want in order to run them locally (or wherever you want) without installing too much stuff.
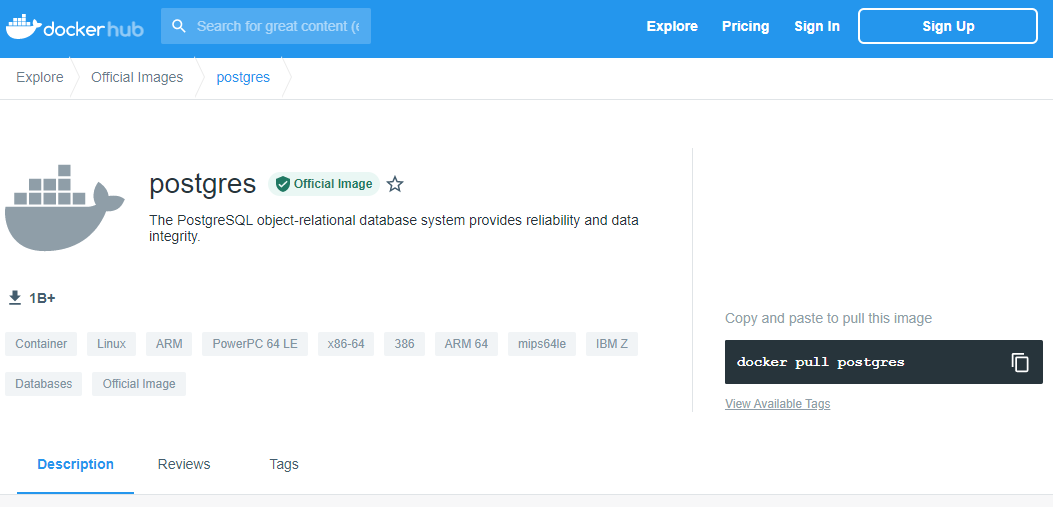
The best way to check the available versions is to head to DockerHub and search for postgres.
Here you’ll find a description of the image, all the documentation related to the installation parameters, and more.
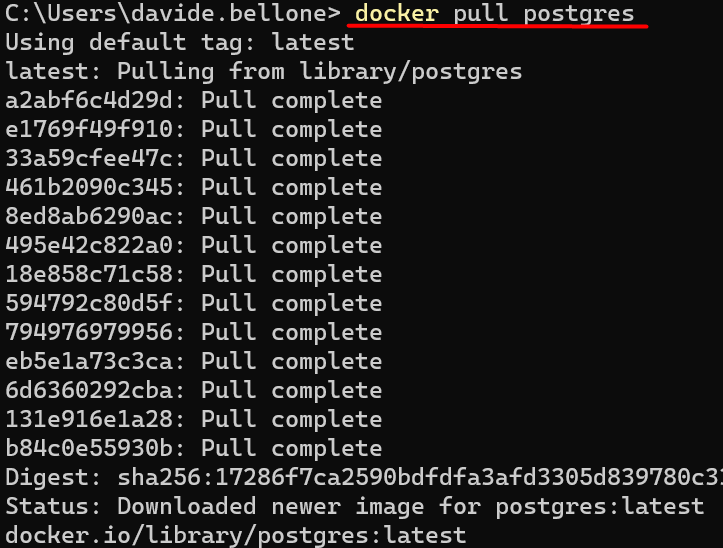
If you have Docker already installed, just open a terminal and run
to download the latest image of PostgreSQL.
Run the Docker Container
Now that we have the image in our local environment, we can spin up a container and specify some parameters.
docker run is the command used to create and run a new container based on an already downloaded image.
--name myPostgresDb is the name we assign to the container that we are creating.
-p 5455:5432 is the port mapping. Postgres natively exposes the port 5432, and we have to map that port (that lives within Docker) to a local port. In this case, the local 5455 port maps to Docker’s 5432 port.
-e POSTGRES_USER=postgresUser, -e POSTGRES_PASSWORD=postgresPW, and -e POSTGRES_DB=postgresDB set some environment variables. Of course, we’re defining the username and password of the admin user, as well as the name of the database.
-d indicates that the container run in a detached mode. This means that the container runs in a background process.
postgres is the name of the image we are using to create the container.
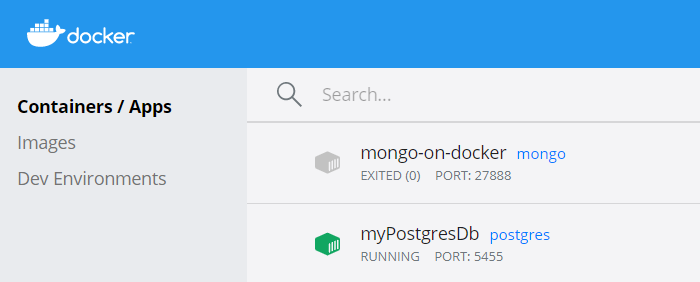
As a result, you will see the newly created container on the CLI (running docker ps) or view it using some UI tool like Docker Desktop:
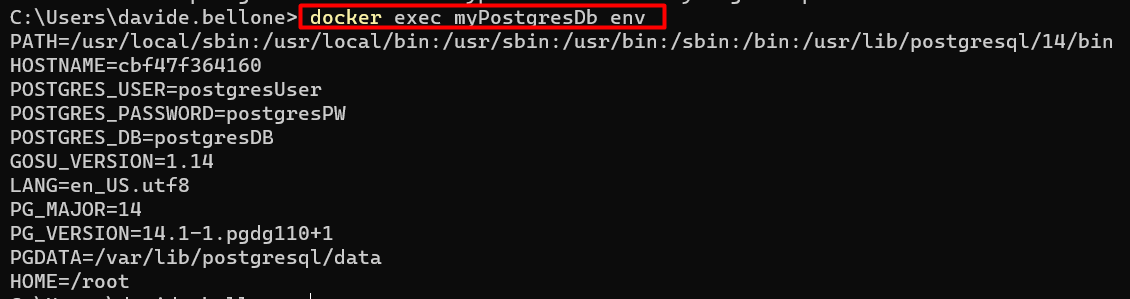
If you forgot which environment variables you’ve defined for that container, you can retrieve them using Docker Desktop or by running docker exec myPostgresDb env, as shown below:
Note: environment variables may change with newer image versions. Always refer to the official docs, specifically to the documentation related to the image version you are consuming.
Navigate the DB with PgAdmin
Now that we have Postgres up and running, we can work with it.
You can work with the DB using the console, or, if you prefer, using a UI.
I prefer the second approach (yes, I know, it’s not cool as using the terminal, but it works), so I downloaded pgAdmin.
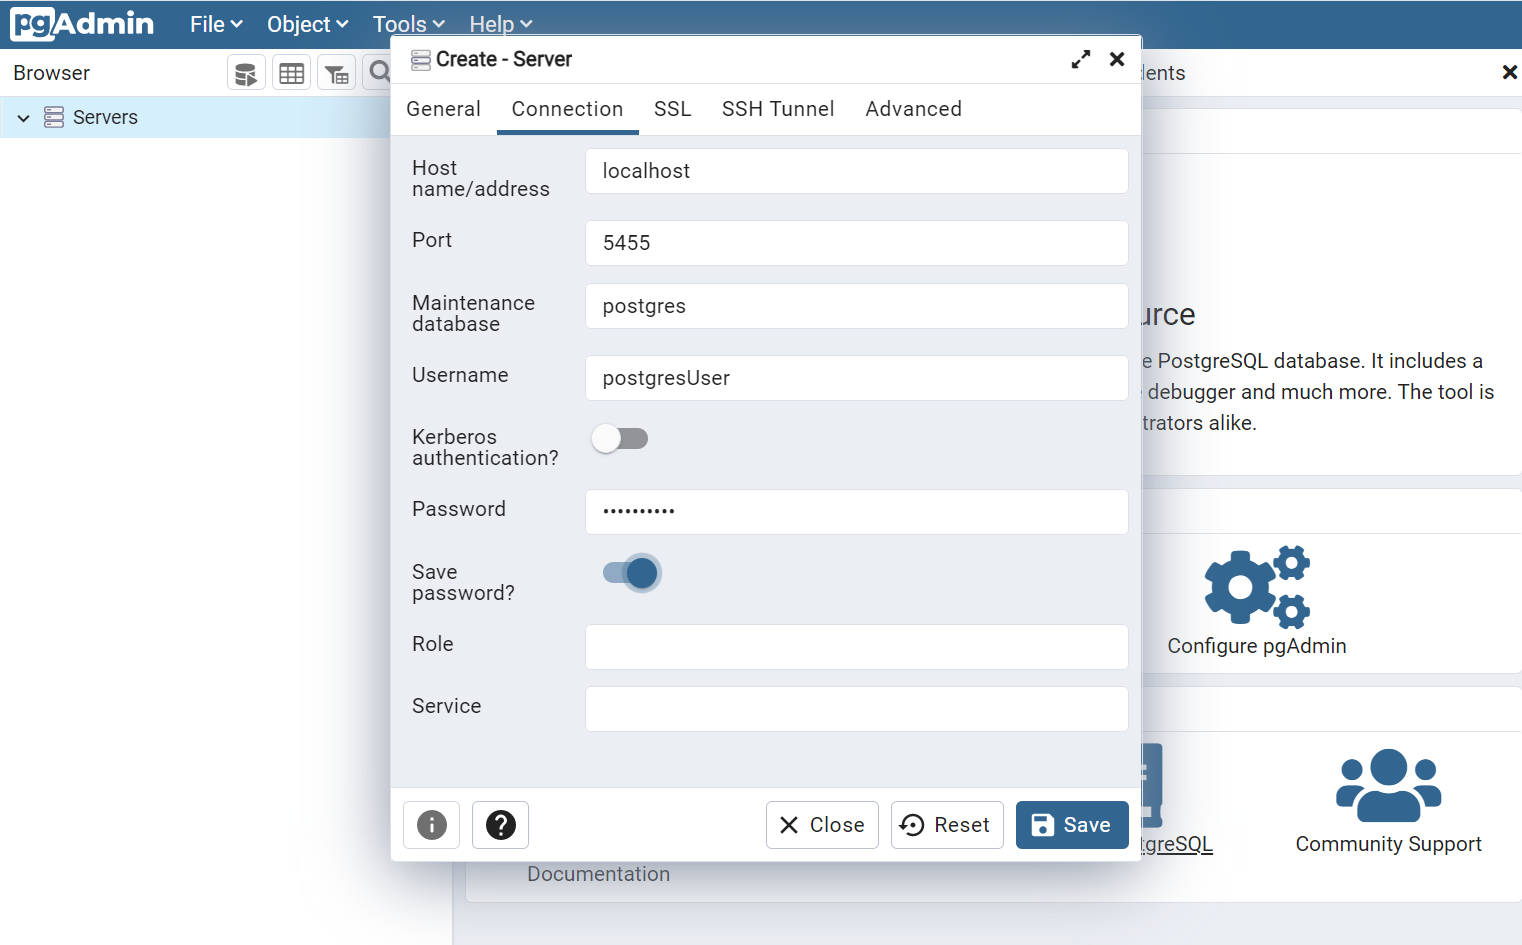
There, you can connect to the server by using the environment variable you’ve defined when running docker run. Remember that the hostname is simply localhost.
And we’ve finished! 🥳 Now you can work with a local instance of Postgres and shut it remove it when you don’t need it anymore.
Additional resources
I’ve already introduced Docker in another article, where I explained how to run MongoDB locally:
Finally, a special mention to Francesco Ciulla, who thought me how to run Postgres with Docker while I thought him how to query it with C#. Yes, mutual help! 👏
Once we have a Postgres instance running, we can perform operations on it. We will use Npgsql to query a Postgres instance with C#
Table of Contents
Just a second! 🫷 If you are here, it means that you are a software developer.
So, you know that storage, networking, and domain management have a cost .
If you want to support this blog, please ensure that you have disabled the adblocker for this site. I configured Google AdSense to show as few ADS as possible – I don’t want to bother you with lots of ads, but I still need to add some to pay for the resources for my site.
Thank you for your understanding. – Davide
PostgreSQL is one of the most famous relational databases. It has got tons of features, and it is open source.
In a previous article, we’ve seen how to run an instance of Postgres by using Docker.
In this article, we will learn how to perform CRUD operations in C# by using Npgsql.
Introducing the project
To query a Postgres database, I’ve created a simple .NET API application with CRUD operations.
We will operate on a single table that stores info for my board game collection. Of course, we will Create, Read, Update and Delete items from the DB (otherwise it would not be an article about CRUD operations 😅).
Before starting writing, we need to install Npgsql, a NuGet package that acts as a dataprovider for PostgreSQL.
Open the connection
Once we have created the application, we can instantiate and open a connection against our database.
private NpgsqlConnection connection;

public NpgsqlBoardGameRepository()
{
    connection = new NpgsqlConnection(CONNECTION_STRING);
    connection.Open();
}
We simply create a NpgsqlConnection object, and we keep a reference to it. We will use that reference to perform queries against our DB.
Connection string
The only parameter we can pass as input to the NpgsqlConnection constructor is the connection string.
You must compose it by specifying the host address, the port, the database name we are connecting to, and the credentials of the user that is querying the DB.
If you instantiate Postgres using Docker following the steps I described in a previous article, most of the connection string configurations we use here match the Environment variables we’ve defined before.
CRUD operations
Now that everything is in place, it’s time to operate on our DB!
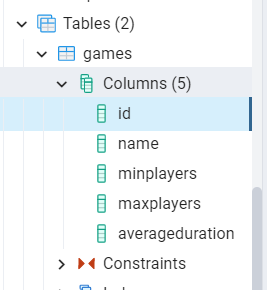
We are working on a table, Games, whose name is stored in a constant:
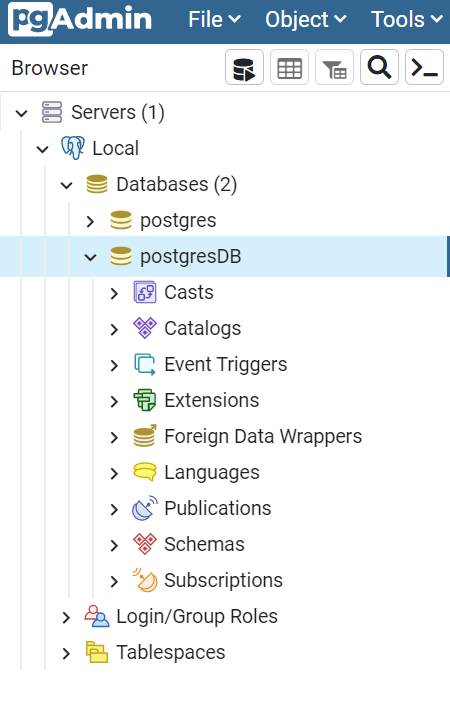
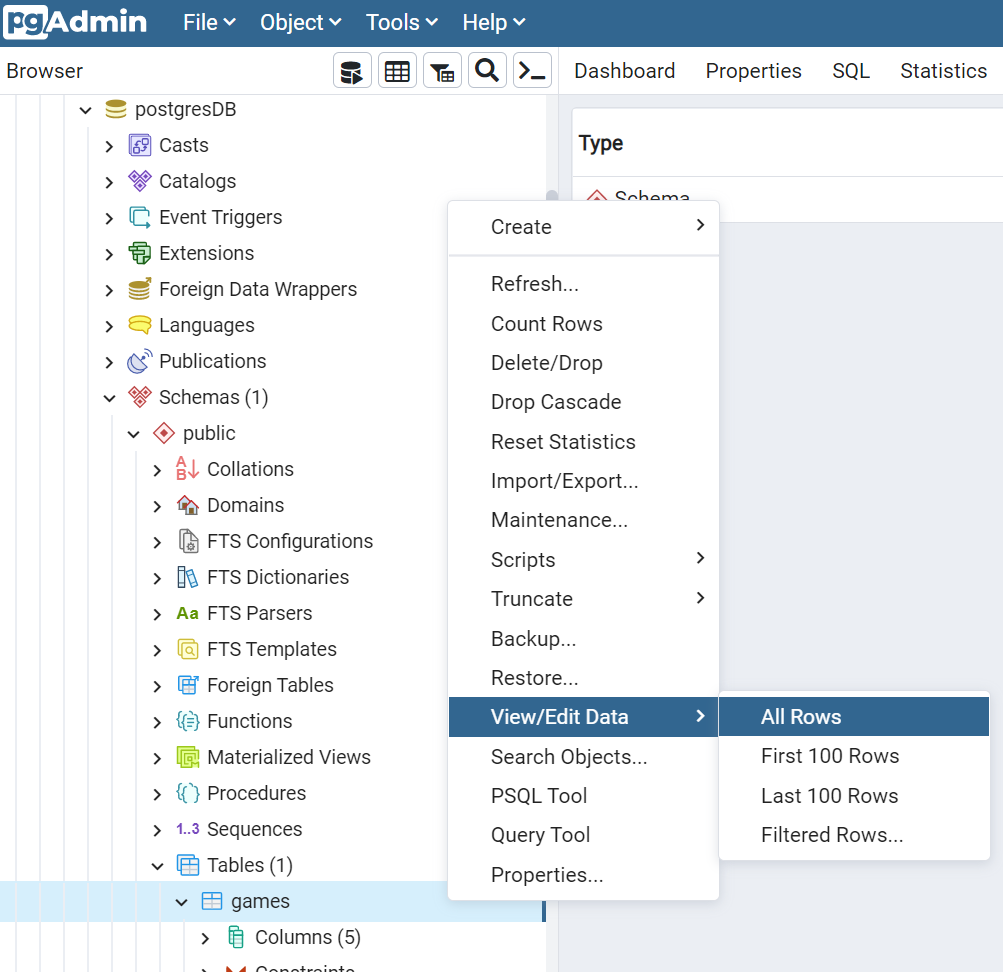
To double-check the results, you can use a UI tool to access the Database. For instance, if you use pgAdmin, you can find the list of databases running on a host.
And, if you want to see the content of a particular table, you can select it under Schemas>public>Tables>tablename, and then select View>AllRows
Create
First things first, we have to insert some data in our DB.
The commandText string contains the full command to be issued. In this case, it’s a simple INSERT statement.
We use the commandText string to create a NpgsqlCommandobject by specifying the query and the connection where we will perform that query. Note that the command must be Disposed after its use: wrap it in a using block.
Then, we will add the parameters to the query. AddWithValue accepts two parameters: the first is the name of the key, with the same name defined in the query, but without the @ symbol; in the query, we use @minPl, and as a parameter, we use minPl.
Never, never, create the query by concatenating the input params as a string, to avoid SQL Injection attacks.
Finally, we can execute the query asynchronously with ExecuteNonQueryAsync.
Read
Now that we have some games stored in our table, we can retrieve those items:
publicasync Task<BoardGame> Get(int id)
{
string commandText = $"SELECT * FROM {TABLE_NAME} WHERE ID = @id";
awaitusing (NpgsqlCommand cmd = new NpgsqlCommand(commandText, connection))
{
cmd.Parameters.AddWithValue("id", id);
awaitusing (NpgsqlDataReader reader = await cmd.ExecuteReaderAsync())
while (await reader.ReadAsync())
{
BoardGame game = ReadBoardGame(reader);
return game;
}
}
returnnull;
}
Again, we define the query as a text, use it to create a NpgsqlCommand, specify the parameters’ values, and then we execute the query.
The ExecuteReaderAsync method returns a NpgsqlDataReader object that we can use to fetch the data. We update the position of the stream with reader.ReadAsync(), and then we convert the current data with ReadBoardGame(reader) in this way:
privatestatic BoardGame ReadBoardGame(NpgsqlDataReader reader)
{
int? id = reader["id"] asint?;
string name = reader["name"] asstring;
short? minPlayers = reader["minplayers"] as Int16?;
short? maxPlayers = reader["maxplayers"] as Int16?;
short? averageDuration = reader["averageduration"] as Int16?;
BoardGame game = new BoardGame
{
Id = id.Value,
Name = name,
MinPlayers = minPlayers.Value,
MaxPlayers = maxPlayers.Value,
AverageDuration = averageDuration.Value
};
return game;
}
This method simply reads the data associated with each column (for instance, reader["averageduration"]), then we convert them to their data type. Then we build and return a BoardGame object.
Update
Updating items is similar to inserting a new item.
publicasync Task Update(int id, BoardGame game)
{
var commandText = $@"UPDATE {TABLE_NAME}
SET Name = @name, MinPlayers = @minPl, MaxPlayers = @maxPl, AverageDuration = @avgDur
WHERE id = @id";
awaitusing (var cmd = new NpgsqlCommand(commandText, connection))
{
cmd.Parameters.AddWithValue("id", game.Id);
cmd.Parameters.AddWithValue("name", game.Name);
cmd.Parameters.AddWithValue("minPl", game.MinPlayers);
cmd.Parameters.AddWithValue("maxPl", game.MaxPlayers);
cmd.Parameters.AddWithValue("avgDur", game.AverageDuration);
await cmd.ExecuteNonQueryAsync();
}
}
Of course, the query is different, but the general structure is the same: create the query, create the Command, add parameters, and execute the query with ExecuteNonQueryAsync.
Delete
Just for completeness, here’s how to delete an item by specifying its id.
publicasync Task Delete(int id)
{
string commandText = $"DELETE FROM {TABLE_NAME} WHERE ID=(@p)";
awaitusing (var cmd = new NpgsqlCommand(commandText, connection))
{
cmd.Parameters.AddWithValue("p", id);
await cmd.ExecuteNonQueryAsync();
}
}
Always the same story, so I have nothing to add.
ExecuteNonQueryAsync vs ExecuteReaderAsync
As you’ve seen, some operations use ExecuteNonQueryAsync, while some others use ExecuteReaderAsync. Why?
ExecuteNonQuery and ExecuteNonQueryAsync execute commands against a connection. Those methods do not return data from the database, but only the number of rows affected. They are used to perform INSERT, UPDATE, and DELETE operations.
On the contrary, ExecuteReader and ExecuteReaderAsync are used to perform queries on the database and return a DbDataReader object, which is a read-only stream of rows retrieved from the data source. They are used in conjunction with SELECT queries.
Bonus 1: Create the table if not already existing
Of course, you can also create tables programmatically.
publicasync Task CreateTableIfNotExists()
{
var sql = $"CREATE TABLE if not exists {TABLE_NAME}" +
$"(" +
$"id serial PRIMARY KEY, " +
$"Name VARCHAR (200) NOT NULL, " +
$"MinPlayers SMALLINT NOT NULL, " +
$"MaxPlayers SMALLINT, " +
$"AverageDuration SMALLINT" +
$")";
using var cmd = new NpgsqlCommand(sql, connection);
await cmd.ExecuteNonQueryAsync();
}
Again, nothing fancy: create the command text, create a NpgsqlCommand object, and execute the command.
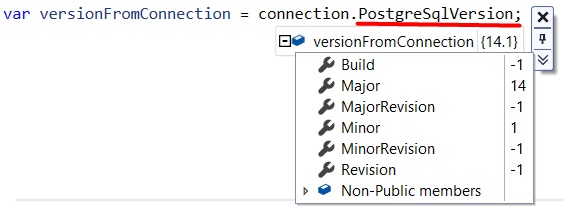
Bonus 2: Check the database version
To check if the database is up and running, and your credentials are correct (those set in the connection string), you might want to retrieve the DB version.
You can do it in 2 ways.
With the following method, you query for the version directly on the database.
publicasync Task<string> GetVersion()
{
var sql = "SELECT version()";
using var cmd = new NpgsqlCommand(sql, connection);
var versionFromQuery = (await cmd.ExecuteScalarAsync()).ToString();
return versionFromQuery;
}
This method returns lots of info that directly depend on the database instance. In my case, I see PostgreSQL 14.1 (Debian 14.1-1.pgdg110+1) on x86_64-pc-linux-gnu, compiled by gcc (Debian 10.2.1-6) 10.2.1 20210110, 64-bit.
In this article, we’ve learned how to perform simple operations on a PostgreSQL database to retrieve and update the content of a table.
This is the most basic way to perform those operations. You explicitly write the queries and issue them without much stuff in between.
In future articles, we will see some other ways to perform the same operations in C#, but using other tools and packages. Maybe Entity Framework? Maybe Dapper? Stay tuned!
Mapping every SQL result to a data type can be a pain. To simplify our life, we can use an ORM like Dapper to automatically map the data.
Table of Contents
Just a second! 🫷 If you are here, it means that you are a software developer.
So, you know that storage, networking, and domain management have a cost .
If you want to support this blog, please ensure that you have disabled the adblocker for this site. I configured Google AdSense to show as few ADS as possible – I don’t want to bother you with lots of ads, but I still need to add some to pay for the resources for my site.
Thank you for your understanding. – Davide
In a previous article, we’ve seen how to perform simple CRUD operations on a Postgres database by using Npgsql, a library that allows you to write and perform queries to be executed specifically on a PostgreSQL database.
In this article, we will take a step further: we will perform the same operations using Dapper, one of the most popular ORM for .NET applications, and we will see how performing those operations becomes easier.
Introducing the project
For this article, I will reuse the project I used for the previous article.
This project performs CRUD (Create, Read, Update, Delete) operations on a Postgres database with a single table: Games. All those operations (plus a bunch of other additional ones) are executed by a class that implements this interface:
This allows me to define and use a new class without modifying too much the project: in fact, I simply have to replace the dependency in the Startup class to use the Dapper repository.
But first…
Dapper, a micro-ORM
In the introduction, I said that we will use Dapper, a popular ORM. Let me explain.
ORM stands for Object-relational mapping and is a technique that allows you to map data from one format to another. This technique simplifies developers’ lives since they don’t have to manually map everything that comes from the database to an object – the ORM takes care of this task.
Dapper is one of the most popular ORMs, created by the Stack Overflow team. Well, actually Dapper is a Micro-ORM: it performs only a subset of the operations commonly executed by other ORMs; for example, Dapper allows you to map query results to objects, but it does not automatically generate the queries.
To add Dapper to your .NET project, simply run this command:
dotnet add package Dapper
Or add the NuGet package via Visual Studio:
Dapper will take care of only a part of the operations; for instance, it cannot open a connection to your DB. That’s why you need to install Npgsql, just as we did in a previous article. We can say the whole Dapper library is a set of Extension Methods built on top of the native data access implementation – in the case of PostgreSQL, on to op Npgsql.
Now we have all the dependencies installed, so we can start writing our queries.
Open the connection
Once we have created the application, we must instantiate and open a connection against our database.
private NpgsqlConnection connection;

public DapperBoardGameRepository()
{
    connection = new NpgsqlConnection(CONNECTION_STRING);
    connection.Open();
}
We will use the connection object later when we will perform the queries.
CRUD operations
We are working on a table, Games, whose name is stored in a constant:
So, the main task of Dapper is to map the result of the queries performed on the Games table to one or more BoardGame objects.
Create
To create a new row on the Games table, we need to do something like this:
publicasync Task Add(BoardGame game)
{
string commandText = $"INSERT INTO {TABLE_NAME} (id, Name, MinPlayers, MaxPlayers, AverageDuration) VALUES (@id, @name, @minPl, @maxPl, @avgDur)";
var queryArguments = new
{
    id = game.Id,
    name = game.Name,
    minPl = game.MinPlayers,
    maxPl = game.MaxPlayers,
    avgDur = game.AverageDuration
};
await connection.ExecuteAsync(commandText, queryArguments);
}
Since Dapper does not create any queries for us, we still need to define them explicitly.
The query contains various parameters, marked with the @ symbol (@id, @name, @minPl, @maxPl, @avgDur). Those are placeholders, whose actual values are defined in the queryArguments anonymous object:
var queryArguments = new{
id = game.Id,
name = game.Name,
minPl = game.MinPlayers,
maxPl = game.MaxPlayers,
avgDur = game.AverageDuration
};
Finally, we can execute our query on the connection we have opened in the constructor:
When using Dapper, we declare the parameter values in a single anonymous object, and we don’t create a NpgsqlCommand instance to define our query.
Read
As we’ve seen before, an ORM simplifies how you read data from a database by automatically mapping the query result to a list of objects.
When we want to get all the games stored on our table, we can do something like that:
publicasync Task<IEnumerable<BoardGame>> GetAll()
{
string commandText = $"SELECT * FROM {TABLE_NAME}";
var games = await connection.QueryAsync<BoardGame>(commandText);
return games;
}
Again, we define our query and allow Dapper to do the rest for us.
In particular, connection.QueryAsync<BoardGame> fetches all the data from the query and converts it to a collection of BoardGame objects, performing the mapping for us.
Of course, you can also query for BoardGames with a specific Id:
publicasync Task<BoardGame> Get(int id)
{
string commandText = $"SELECT * FROM {TABLE_NAME} WHERE ID = @id";
var queryArgs = new { Id = id };
var game = await connection.QueryFirstAsync<BoardGame>(commandText, queryArgs);
return game;
}
As we did before, you define the query with a placeholder @id, which will have the value defined in the queryArgs anonymous object.
To store the result in a C# object, we map only the first object returned by the query, by using QueryFirstAsync instead of QueryAsync.
Comparison with Npgsql
The power of Dapper is the ability to automatically map query results to C# object.
With the plain Npgsql library, we would have done:
awaitusing (NpgsqlDataReader reader = await cmd.ExecuteReaderAsync())
while (await reader.ReadAsync())
{
BoardGame game = ReadBoardGame(reader);
games.Add(game);
}
to perform the query and open a reader on the result set. Then we would have defined a custom mapper to convert the Reader to a BoardGame object.
privatestatic BoardGame ReadBoardGame(NpgsqlDataReader reader)
{
int? id = reader["id"] asint?;
string name = reader["name"] asstring;
short? minPlayers = reader["minplayers"] as Int16?;
short? maxPlayers = reader["maxplayers"] as Int16?;
short? averageDuration = reader["averageduration"] as Int16?;
BoardGame game = new BoardGame
{
Id = id.Value,
Name = name,
MinPlayers = minPlayers.Value,
MaxPlayers = maxPlayers.Value,
AverageDuration = averageDuration.Value
};
return game;
}
With Dapper, all of this is done in a single instruction:
var games = await connection.QueryAsync<BoardGame>(commandText);
Update and Delete
Update and Delete operations are quite similar: just a query, with a parameter, whose operation is executed in an asynchronous way.
I will add them here just for completeness:
publicasync Task Update(int id, BoardGame game)
{
var commandText = $@"UPDATE {TABLE_NAME}
SET Name = @name, MinPlayers = @minPl, MaxPlayers = @maxPl, AverageDuration = @avgDur
WHERE id = @id";
var queryArgs = new {
id = game.Id,
name = game.Name,
minPl = game.MinPlayers,
maxPl = game.MaxPlayers,
avgDur = game.AverageDuration
};
await connection.ExecuteAsync(commandText, queryArgs);
}
and
publicasync Task Delete(int id)
{
string commandText = $"DELETE FROM {TABLE_NAME} WHERE ID=(@p)";
var queryArguments = new { p = id };
await connection.ExecuteAsync(commandText, queryArguments);
}
Again: define the SQL operation, specify the placeholders, and execute the operation with ExecuteAsync.
Further readings
As always, the best way to get started with a new library is by reading the official documentation:
Dapper adds a layer above the data access. If you want to go a level below, to have full control over what’s going on, you should use the native PostgreSQL library, Npgsql, as I explained in a previous article.
How to get a Postgres instance running? You can use any cloud implementation, or you can download and run a PostgreSQL instance on your local machine using Docker as I explained in this guide:
In this article, we’ve seen how to use Dapper to simplify our data access. Dapper is useful for querying different types of RDBMS, not only PostgreSQL.
To try those examples out, download the code from GitHub, specify the connection string, and make sure that you are using the DapperBoardGameRepository class (this can be configured in the Startup class).
In a future article, we will use Entity Framework to – guess what? – perform CRUD operations on the Games table. In that way, you will have 3 different ways to access data stored on PostgreSQL by using .NET Core.
With Entity Framework you can perform operations on relational databases without writing a single line of SQL. We will use EF to integrate PostgreSQL in our application
Table of Contents
Just a second! 🫷 If you are here, it means that you are a software developer.
So, you know that storage, networking, and domain management have a cost .
If you want to support this blog, please ensure that you have disabled the adblocker for this site. I configured Google AdSense to show as few ADS as possible – I don’t want to bother you with lots of ads, but I still need to add some to pay for the resources for my site.
Thank you for your understanding. – Davide
When working with relational databases, you often come across two tasks: writing SQL queries and mapping the results to some DTO objects.
.NET developers are lucky to have an incredibly powerful tool that can speed up their development: Entity Framework. Entity Framework (in short: EF) is an ORM built with in mind simplicity and readability.
In this article, we will perform CRUD operations with Entity Framework Core on a database table stored on PostgreSQL.
Introduction EF Core
With Entity Framework you don’t have to write SQL queries in plain text: you write C# code that gets automatically translated into SQL commands. Then the result is automatically mapped to your C# classes.
Entity Framework supports tons of database engines, such as SQL Server, MySQL, Azure CosmosDB, Oracle, and, of course, PostgreSQL.
There are a lot of things you should know about EF if you’re new to it. In this case, the best resource is its official documentation.
But the only way to learn it is by getting your hands dirty. Let’s go!
How to set up EF Core
For this article, we will reuse the same .NET Core repository and the same database table we used when we performed CRUD operations with Dapper (a lightweight OR-M) and with NpgSql, which is the library that performs bare-metal operations.
The first thing to do is, as usual, install the related NuGet package. Here we will need Npgsql.EntityFrameworkCore.PostgreSQL. Since I’ve used .NET 5, I have downloaded version 5.0.10.
Then, we need to define and configure the DB Context.
Define and configure DbContext
The idea behind Entity Framework is to create DB Context objects that map database tables to C# data sets. DB Contexts are the entry point to the tables, and the EF way to work with databases.
So, the first thing to do is to define a class that inherits from DbContext:
publicclassBoardGamesContext : DbContext
{
}
Within this class we define one or more DbSets, that represent the collections of data rows on their related DB table:
public DbSet<BoardGame> Games { get; set; }
Then we can configure this specific DbContext by overriding the OnConfiguring method and specifying some options; for example, you can specify the connection string:
Now that we have the BoardGamesContext ready we have to add its reference in the Startup class.
In the ConfigureServices method, add the following instruction:
services.AddDbContext<BoardGamesContext>();
With this instruction, you make the BoardGamesContext context available across the whole application.
You can further configure that context using an additional parameter of type Action<DbContextOptionsBuilder>. In this example, you can skip it, since we’ve already configured the BoardGamesContext using the OnConfiguring method. They are equivalent.
As we know, EF allows you to map DB rows to C# objects. So, we have to create a class and configure it in a way that allows EF Core to perform the mapping.
Now that the setup is complete, we can perform our CRUD operations. Entity Framework simplifies a lot the way to perform such types of operations, so we can move fast in this part.
There are two main points to remember:
to access the context we have to create a new instance of BoardGamesContext, which should be placed into a using block.
When performing operations that change the status of the DB (insert/update/delete rows), you have to explicitly call SaveChanges or SaveChangesAsync to apply those changes. This is useful when performing batch operations on one or more tables (for example, inserting an order in the Order table and updating the user address in the Users table).
Create
To add a new BoardGame, we have to initialize the BoardGamesContext context and add a new game to the Games DbSet.
publicasync Task Add(BoardGame game)
{
using (var db = new BoardGamesContext())
{
await db.Games.AddAsync(game);
await db.SaveChangesAsync();
}
}
Read
If you need a specific entity by its id you can use Find and FindAsync.
publicasync Task<BoardGame> Get(int id)
{
using (var db = new BoardGamesContext())
{
returnawait db.Games.FindAsync(id);
}
}
Or, if you need all the items, you can retrieve them by using ToListAsync
publicasync Task<IEnumerable<BoardGame>> GetAll()
{
using (var db = new BoardGamesContext())
{
returnawait db.Games.ToListAsync();
}
}
Update
Updating an item is incredibly straightforward: you have to call the Update method, and then save your changes with SaveChangesAsync.
publicasync Task Update(int id, BoardGame game)
{
using (var db = new BoardGamesContext())
{
db.Games.Update(game);
await db.SaveChangesAsync();
}
}
For some reason, EF does not provide an asynchronous way to update and remove items. I suppose that it’s done to prevent or mitigate race conditions.
Delete
Finally, to delete an item you have to call the Remove method and pass to it the game to be removed. Of course, you can retrieve that game using FindAsync.
publicasync Task Delete(int id)
{
using (var db = new BoardGamesContext())
{
var game = await db.Games.FindAsync(id);
if (game == null)
return;
db.Games.Remove(game);
await db.SaveChangesAsync();
}
}
Further readings
Entity Framework is impressive, and you can integrate it with tons of database vendors. In the link below you can find the full list. But pay attention that not all the libraries are implemented by the EF team, some are third-party libraries (like the one we used for Postgres):
This article concludes the series that explores 3 ways to perform CRUD operations on a Postgres database with C#.
In the first article, we’ve seen how to perform bare-metal queries using NpgSql. In the second article, we’ve used Dapper, which helps mapping queries results to C# DTOs. Finally, we’ve used Entity Framework to avoid writing SQL queries and have everything in place.
Which one is your favorite way to query relational databases?