The Digital Personal Data Protection Act (DPDPA) is a transformative piece of legislation in India, designed to safeguard personal data and strengthen privacy in an increasingly digital landscape. For organizations handling personal data, compliance with the DPDPA is both a legal obligation and a strategic opportunity to build customer trust. This blog outlines practical steps to achieve DPDPA compliance, drawing on insights from Seqrite’s cybersecurity and data protection expertise.
Understanding the DPDPA
The DPDPA establishes a robust framework for protecting personal data, placing clear responsibilities on organizations, referred to as “Data Fiduciaries.” It emphasizes principles such as transparency, accountability, and informed consent while imposing penalties for non-compliance. Compliance is not just about meeting regulatory requirements—it’s about fostering trust and demonstrating commitment to data privacy.
Strategic Focus Areas for DPDPA Readiness
To align with the DPDPA, organizations must focus on the following core areas:
Consent Management:
Obtain clear, informed, and specific consent from individuals (“Data Principals”) before collecting or processing their data.
Implement user-friendly consent mechanisms that allow individuals to understand what data is being collected and for what purpose.
Maintain auditable records of consent to demonstrate compliance during regulatory reviews.
Data Minimization and Purpose Limitation:
Collect only the data necessary for the intended purpose and avoid excessive data collection.
Ensure data is processed strictly for the purpose for which consent was given, adhering to the DPDPA’s principle of purpose limitation.
Data Security and Breach Preparedness:
Deploy robust cybersecurity measures to protect personal data, including encryption, access controls, and regular security audits.
Develop an incident response plan to address data breaches promptly and report them to the Data Protection Board of India within the required timeframe.
Data Protection Impact Assessments (DPIAs):
Conduct DPIAs to identify and mitigate risks associated with data processing activities.
Integrate DPIAs into the planning phase of new projects or systems that handle personal data.
Employee Training and Awareness:
Train employees regularly on DPDPA requirements and cybersecurity best practices, as they are often the first line of defense against data breaches.
Foster a culture of data protection to ensure compliance across all levels of the organization.
Third-Party Vendor Management:
Ensure third-party vendors handling personal data comply with DPDPA requirements, as Data Fiduciaries are accountable for their vendors’ actions.
Include clear data protection clauses in vendor contracts and conduct periodic audits of vendor practices.
Practical Steps for DPDPA Compliance
Here are actionable steps organizations can take to achieve and maintain DPDPA compliance:
Conduct a Data Inventory:
Using automated tools, discover and classify all personal data collected, stored, and processed across the organization.
Identify data flows, storage locations, and access points to understand the scope of compliance requirements.
Appoint a Data Protection Officer (DPO):
Designate a DPO as mandated for Significant Data Fiduciaries to oversee DPDPA compliance and engage with regulatory authorities.
For other organizations, appoint privacy champions across key departments to ensure localized accountability and awareness.
Implement Robust Consent Mechanisms:
Designate a DPO as mandated for Significant Data Fiduciaries to oversee DPDPA compliance and engage with regulatory authorities.
For other organizations, appoint privacy champions across key departments to ensure localized accountability and awareness and user-friendly consent forms that allow individuals to opt in or opt out easily.
Regularly review and update consent mechanisms to align with evolving DPDPA guidelines.
Engage with Legal and Compliance Experts:
Partner with legal professionals to stay updated on DPDPA regulations and interpret its requirements for your industry.
Seqrite’s advisory services can provide tailored guidance to streamline compliance efforts.
Strengthen Cybersecurity Infrastructure:
Deploy advanced cybersecurity solutions to safeguard personal data, such as endpoint protection, threat detection, and data loss prevention tools.
Seqrite’s suite of cybersecurity products, including endpoint security and data encryption solutions, can help organizations meet DPDPA’s security standards.
Develop a Data Breach Response Plan:
Create a comprehensive plan outlining steps to detect, contain, and report data breaches.
Conduct regular drills to ensure your team is prepared to respond effectively.
Why DPDPA Compliance Matters
Compliance with the DPDPA is more than a regulatory checkbox—it’s a competitive advantage. Non-compliance can result in significant fines and reputational damage, while proactive adherence builds customer trust and strengthens brand credibility. In today’s data-driven economy, prioritizing data protection is a strategic move that sets organizations apart.
How Seqrite Can Help
Seqrite, a cybersecurity and data protection leader, offers a comprehensive suite of solutions to support DPDPA compliance. From endpoint security to data encryption and threat intelligence, Seqrite’s tools are designed to protect sensitive data and ensure regulatory adherence. Additionally, Seqrite’s expert resources and advisory services empower organizations to navigate the complexities of data protection confidently.
Conclusion
The DPDPA is a critical step toward protecting personal data in India, and compliance is a shared responsibility for all organizations. Businesses can align with the law and build trust by implementing practical measures like consent management, robust cybersecurity, and employee training. With Seqrite’s cybersecurity expertise and solutions, organizations can confidently meet DPDPA requirements while safeguarding their data and reputation.
For more information on how Seqrite can help you achieve DPDPA compliance, visit our website.
D2 is an open-source tool to design architectural layouts using a declarative syntax. It’s a textual format, which can also be stored under source control. Let’s see how it works, how you can install it, and some practical usage tips.
Table of Contents
Just a second! 🫷 If you are here, it means that you are a software developer.
So, you know that storage, networking, and domain management have a cost .
If you want to support this blog, please ensure that you have disabled the adblocker for this site. I configured Google AdSense to show as few ADS as possible – I don’t want to bother you with lots of ads, but I still need to add some to pay for the resources for my site.
Thank you for your understanding. – Davide
When defining the architecture of a system, I believe in the adage that says that «A picture is worth a thousand words».
Proper diagramming helps in understanding how the architecture is structured, the dependencies between components, how the different components communicate, and their responsibilities.
A clear architectural diagram can also be useful for planning. Once you have a general idea of the components, you can structure the planning according to the module dependencies and the priorities.
A lack of diagramming leads to a “just words” definition: how many times have you heard people talk about modules that do not exist or do not work as they were imagining?
The whole team can benefit from having a common language: a clear diagram brings clear thoughts, helping all the stakeholders (developers, architects, managers) understand the parts that compose a system.
I tried several approaches: both online WYSIWYG tools like Draw.IO and DSL like Structurizr and Mermaid. For different reasons, I wasn’t happy with any of them.
Then I stumbled upon D2: its rich set of elements makes it my new go-to tool for describing architectures. Let’s see how it works!
A quick guide to D2 syntax
Just like the more famous Mermaid, when using D2, you have to declare all the elements and connections as textual nodes.
You can generate diagrams online by using the Playground section available on the official website, or you can install it locally (as you will see later).
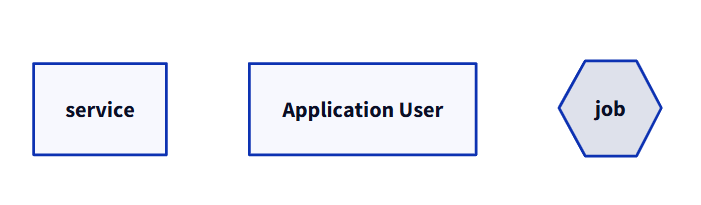
Elements: the basic components of every diagram
Elements are defined as a set of names that can be enriched with a label and other metadata.
Here’s an example of the most straightforward configurations for standalone elements.
service

user: Application User

job: {
  shape: hexagon
}
For each element, you can define its internal name (service), a label (user: Application User) and a shape (shape: hexagon).
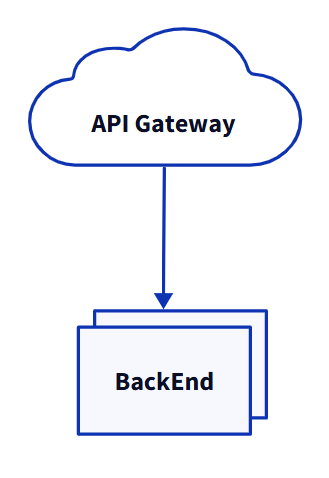
Other than that, I love the fact that you can define elements to be displayed as multiple instances: this can be useful when a service has multiple instances of the same type, and you want to express it clearly without the need to manually create multiple elements.
You can do it by setting the multiple property to true.
apiGtw: API Gateway {
  shape: cloud
}
be: BackEnd {
  style.multiple: true
}

apiGtw -> be
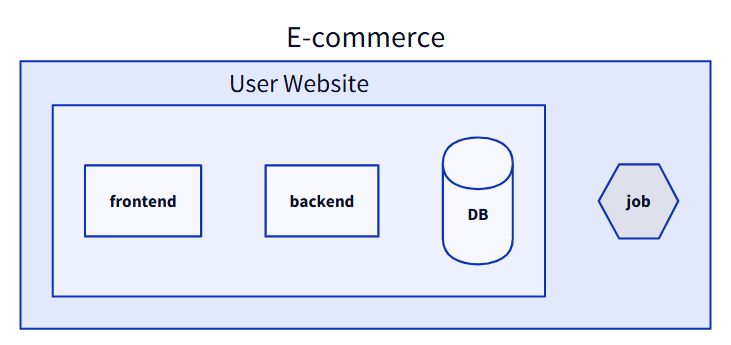
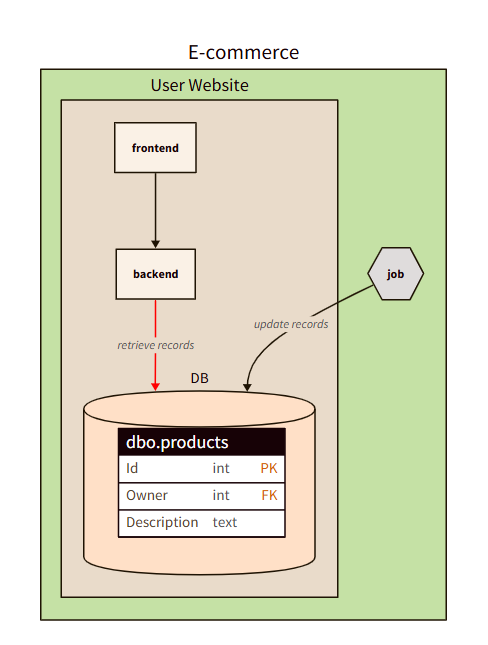
Grouping: nesting elements hierarchically
You may want to group elements. You can do that by using a hierarchical structure.
In the following example, the main container represents my e-commerce application, composed of a website and a background job. The website is composed of a frontend, a backend, and a database.
As you can see from the diagram definition, elements can be nested in a hierarchical structure using the {} symbols. Of course, you can still define styles and labels to nested elements.
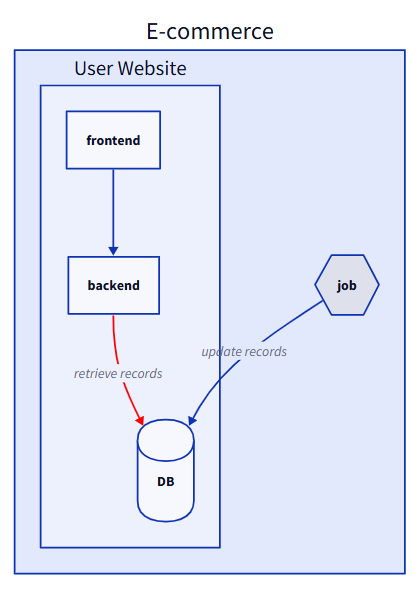
Connections: making elements communicate
An architectural diagram is helpful only if it can express connections between elements.
To connect two elements, you must use the --, the -> or the <- connector. You have to link their IDs, not their labels.
ecommerce: E-commerce {
    website: User Website {
        frontend
    backend
    database: DB {
        shape: cylinder
    }
    frontend -> backend
    backend -> database: retrieve records {
        style.stroke: red
    }
  }

  job: {
      shape: hexagon
  }
  job -> website.database: update records
}
The previous example contains some interesting points.
Elements within the same container can be referenced directly using their ID: frontend -> backend.
You can add labels to a connection: backend -> database: retrieve records.
You can apply styles to a connection, like choosing the arrow colour with style.stroke: red.
You can create connections between elements from different containers: job -> website.database.
When referencing items from different containers, you must always include the container ID: job -> website.database works, but job -> database doesn’t because database is not defined (so it gets created from scratch).
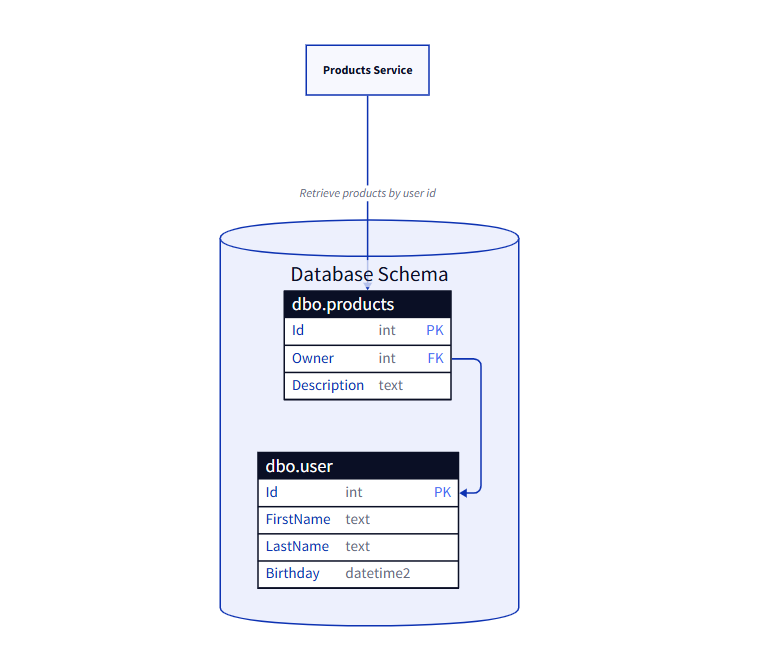
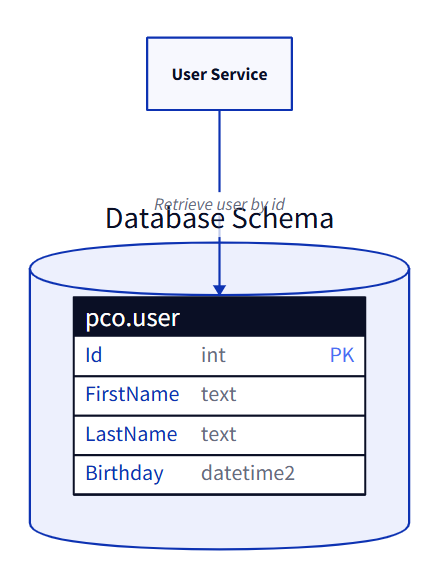
SQL Tables: represent the table schema
An interesting part of D2 diagrams is the possibility of adding the description of SQL tables.
Obviously, the structure cannot be validated: the actual syntax depends on the database vendor.
However, having the table schema defined in the diagram can be helpful in reasoning around the dependencies needed to complete a development.
serv: Products Service

db: Database Schema {
  direction: right
  shape: cylinder
  userTable: dbo.user {
    shape: sql_table
    Id: int {constraint: primary_key}
    FirstName: text
    LastName: text
    Birthday: datetime2
  }

  productsTable: dbo.products {
    shape: sql_table
    Id: int {constraint: primary_key}
    Owner: int {constraint: foreign_key}
    Description: text
  }

  productsTable.Owner -> userTable.Id
}

serv -> db.productsTable: Retrieve products by user id
Notice how you can also define constraints to an element, like {constraint: foreign_key}, and specify the references from one table to another.
How to install and run D2 locally
D2 is a tool written in Go.
Go is not natively present in every computer, so you have to install it. You can learn how to install it from the official page.
Once Go is ready, you can install D2 in several ways. I use Windows 11, so my preferred installation approach is to use a .msi installer, as described here.
If you are on macOS, you can use Homebrew to install it by running:
Regardless of the Operating System, you can have Go directly install D2 by running the following command:
go install oss.terrastruct.com/d2@latest
It’s even possible to install it via Docker. However, this approach is quite complex, so I prefer installing D2 directly with the other methods I explained before.
To work with D2 diagrams, you need to create a file with the .d2 extension. That file will contain the textual representation of the diagrams, following the syntax we saw before.
Once D2 is installed and the file is present in the file system (in my case, I named the file my-diagram.d2), you can use the console to generate the diagram locally – remember, I’m using Windows11, so I need to run the exe file:
d2.exe --watch .\my-diagram.d2
Now you can open your browser, head to the localhost page displayed on the shell, and see how D2 renders the local file. Thanks to the --watch flag, you can update the file locally and see the result appear on the browser without the need to restart the application.
When the diagram is ready, you can export it as a PNG or SVG by running
d2.exe .\my-diagram.d2 my-wonderful-design.png
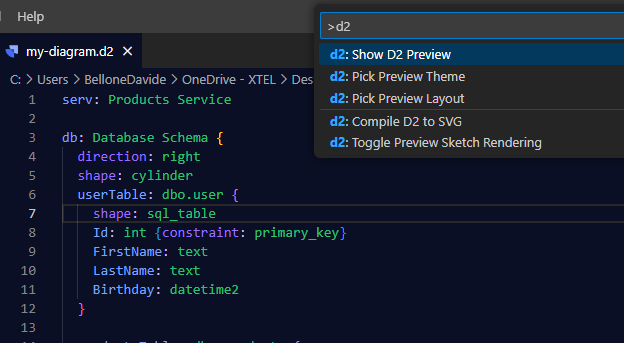
Create D2 Diagrams on Visual Studio Code
Another approach is to install the D2 extension on VS Code.
Thanks to this extension, you can open any D2 file and, by using the command palette, see a preview of the final result. You can also format the document to have the diagram definition tidy and well-structured.
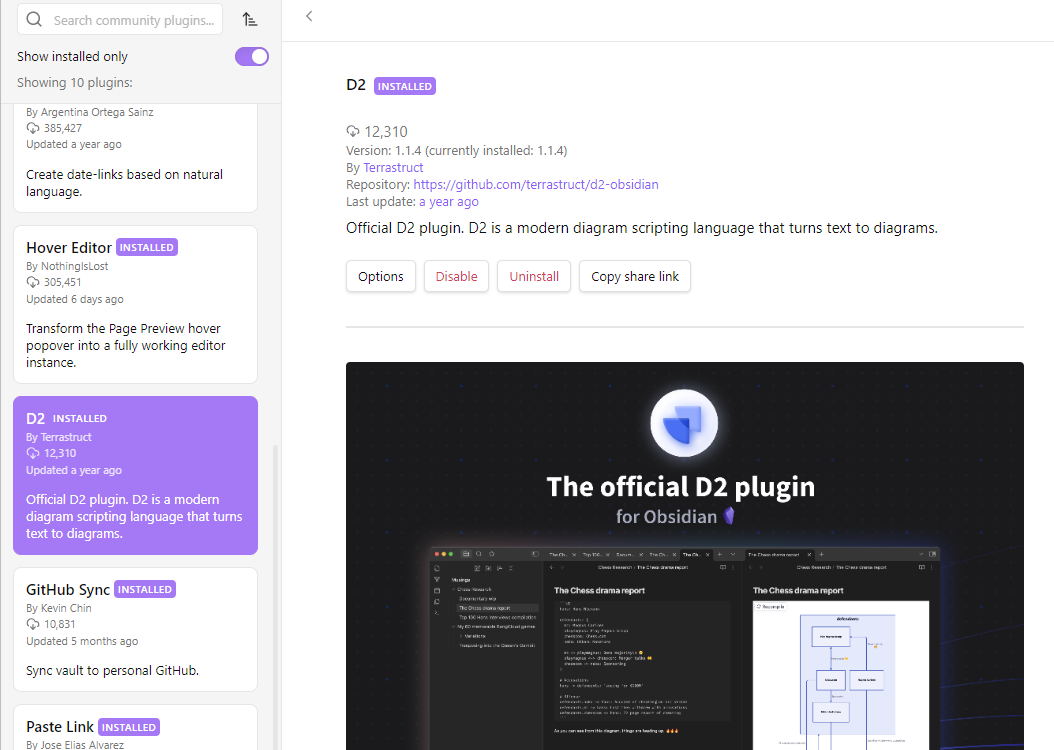
How to install and use D2 Diagrams on Obsidian
Lastly, D2 can be easily integrated with tools like Obsidian. Among the community plugins, you can find the official D2 plugin.
As you can imagine, Go is required on your machine.
And, if necessary, you are required to explicitly set the path to the bin folder of Go. In my case, I had to set it to C:\Users\BelloneDavide\go\bin\.
To insert a D2 diagram in a note generated with Obsidian, you have to use d2 as a code fence language.
Practical tips for using D2
D2 is easy to use once you have a basic understanding of how to create elements and connections.
However, some tips may be useful to ease the process of creating the diagrams. Or, at least, these tips helped me write and maintain my diagrams.
Separate elements and connections definition
A good approach is to declare the application’s structure first, and then list all the connections between elements unless the elements are within the same components and are not expected to change.
ecommerce: E-commerce {
  website: User Website {
    backend
    database: DB {
      shape: cylinder
    }

    backend -> database: retrieve records {
      style.stroke: red
    }
  }

  job -> website.database: update records
}
Here, the connection between backend and database is internal to the website element, so it makes sense to declare it directly within the website element.
However, the other connection between the job and the database is cross-element. In the long run, it may bring readability problems.
So, you could update it like this:
ecommerce: E-commerce {
 website: User Website {
 backend
 database: DB {
 shape: cylinder
 }

 backend -> database: retrieve records {
 style.stroke: red
 }
 }

- job -> website.database: update records
}

+ ecommerce.job -> ecommerce.website.database: update records
This tip can be extremely useful when you have more than one element with the same name belonging to different parents.
Needless to say, since the order of the connection declarations does not affect the final rendering, write them in an organized way that best fits your needs. In general, I prefer creating sections (using comments to declare the area), and grouping connections by the outbound module.
Pick a colour theme (and customize it, if you want!)
D2 allows you to specify a theme for the diagram. There are some predefined themes (which are a set of colour palettes), each with a name and an ID.
To use a theme, you have to specify it in the vars element on top of the diagram:
vars: {
  d2-config: {
    theme-id: 103
  }
}
103 is the theme named “Earth tones”, using a brown-based palette that, when applied to the diagram, renders it like this.
However, if you have a preferred colour palette, you can use your own colours by overriding the default values:
You can read more about themes and customizations here.
What is that B4 key overridden in the previous example? Unfortunately, I don’t know: you must try all the variables to understand how the diagram is rendered.
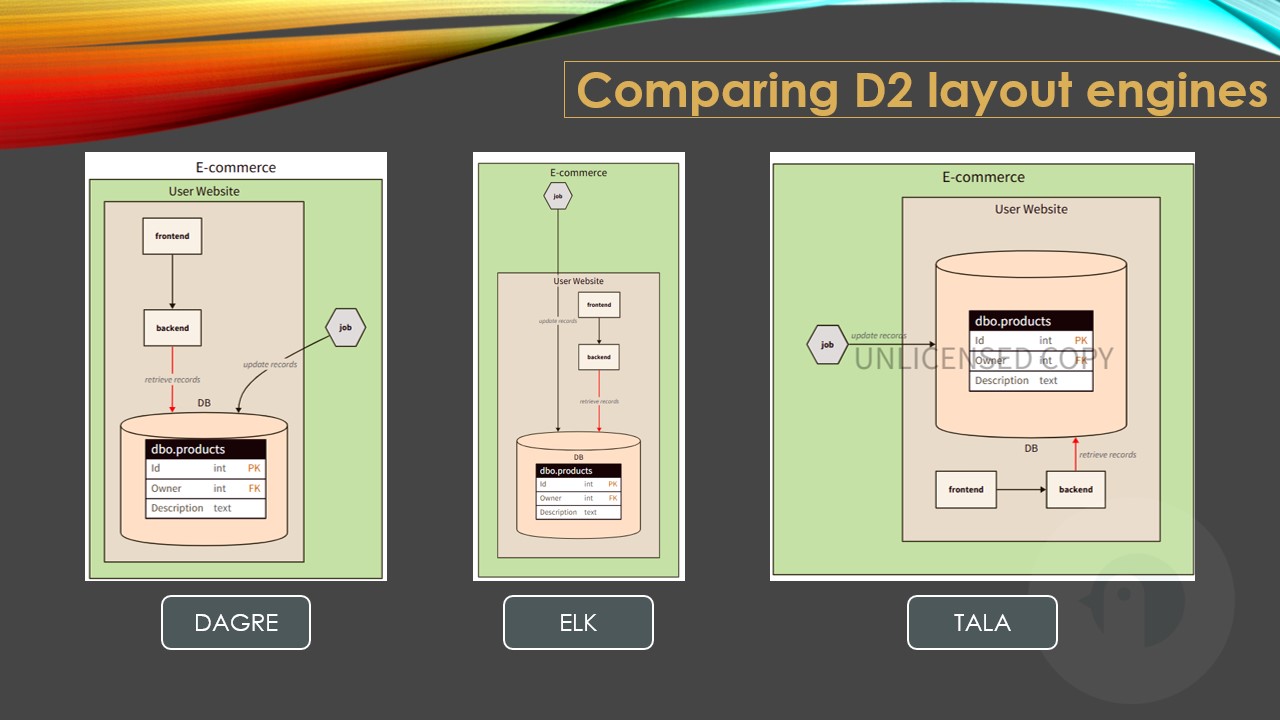
Choose the right layout engine
You can choose one of the three supported layout engines to render the elements in a different way (more info here).
DAGRE and ELK are open source, but quite basic. TALA is more sophisticated, but it requires a paid licence.
Here’s an example of how the same diagram is rendered using the three different engines.
You can decide which engine to use by declaring it in the layout-engine element:
vars: {
  d2-config: {
    layout-engine: tala
  }
}
Choosing the right layout engine can be beneficial because sometimes some elements are not rendered correctly: here’s a weird rendering with the DAGRE engine.
Use variables to simplify future changes
D2 allows you to define variables in a single place and have the same value repeated everywhere it’s needed.
If in the future you’ll have to handle not only Magazines but also other media types, you can simply replace the value of entityName in one place and have it updated all over the diagram.
D2 vs Mermaid: a comparison
D2 and Mermaid are similar but have some key differences.
They both are diagram-as-a-code tools, meaning that the definition of a diagram is expressed as a text file, thus making it available under source control.
Mermaid is already supported by many tools, like Azure DevOps wikis, GitHub pages, and so on.
On the contrary, D2 must be installed (along with the Go language).
Mermaid is quite a “close” system: even if it allows you to define some basic styles, it’s not that flexible.
On the contrary, D2 allows you to choose a theme for the whole diagram, as well as choosing different layout engines.
Also, D2 has some functionalities that are (currently) missing on Mermaid:
Mermaid, on the contrary, allows us to define more types of diagrams: State Diagrams, Gantt, Mindmaps, and so on. Also, as we saw, it’s already supported on many platforms.
So, my (current) choice is: use D2 for architectural diagrams, and use Mermaid for everything else.
I haven’t tried D2 for Sequence Diagrams yet, so I won’t express an opinion on that.
Further readings
D2 is available online with a playground you can use to try things out in a sandboxed environment.
And, if you want, you can use icons to create better diagrams: D2 exposes a set of SVG icons that can be easily integrated into your diagrams. You can find them here:
And, of course, just the architectural diagram is not enough: you should also describe the dependencies, the constraints, the deployment strategies, and so on. Arc42 is a template that can guide you to proper system documentation: