Why buy a whole tool when you can build your own? Learn how the Type system works in .NET, and create your own minimal type analyser.
Table of Contents
Just a second! 🫷
If you are here, it means that you are a software developer.
So, you know that storage, networking, and domain management have a cost .If you want to support this blog, please ensure that you have disabled the adblocker for this site.
I configured Google AdSense to show as few ADS as possible – I don’t want to bother you with lots of ads, but I still need to add some to pay for the resources for my site.Thank you for your understanding.
– Davide
Analysing your code is helpful to get an idea of the overall quality. At the same time, having an automatic tool that identifies determinate characteristics or performs some analysis for you can be useful.
Sure, there are many fantastic tools available, but having a utility class that you can build as needed and run without setting up a complex infrastructure is sufficient.
In this article, we are going to see how to navigate assemblies, classes, methods and parameters to perfor some custom analysis.
For this article, my code is structured into 3 Assemblies:
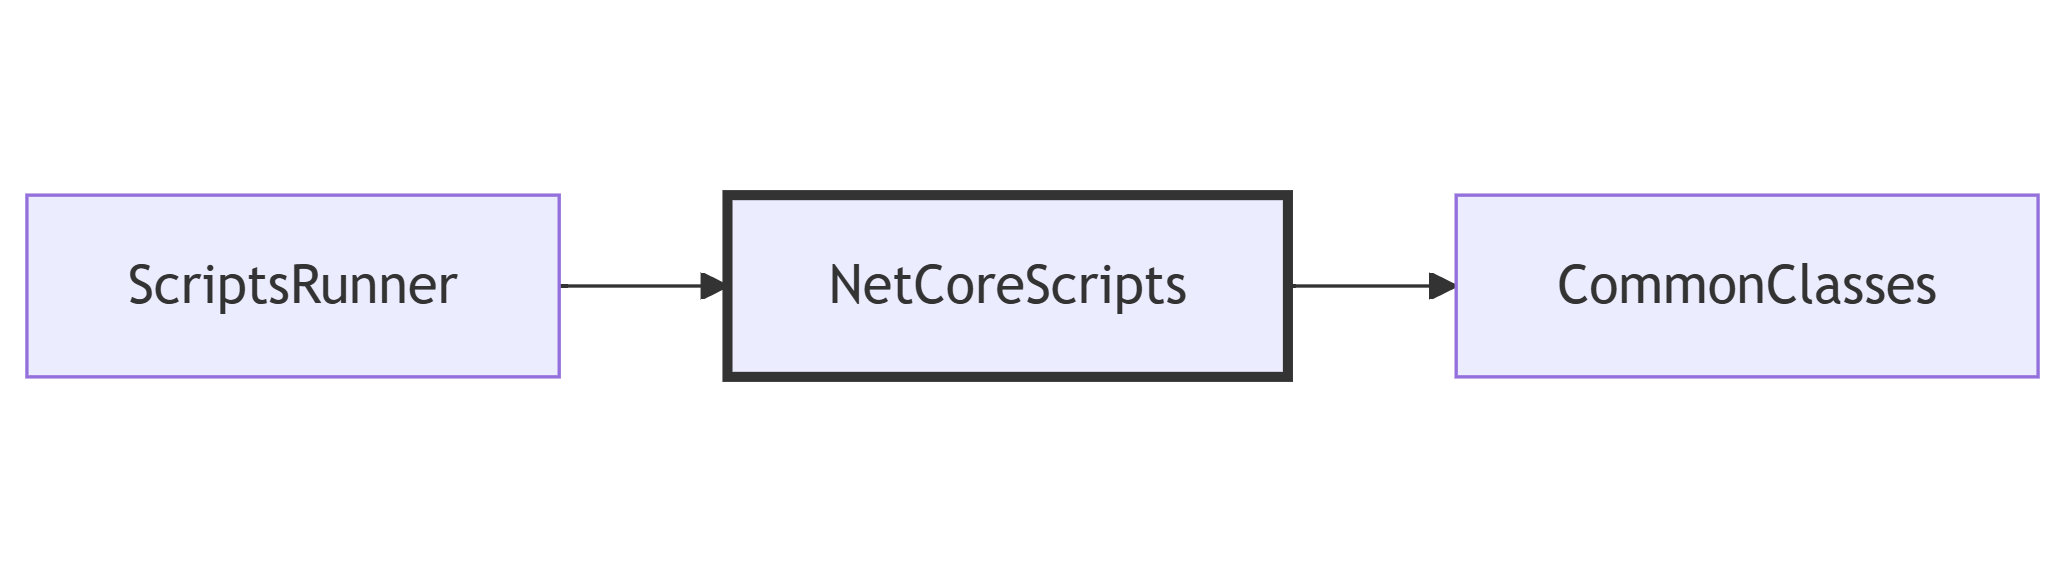
CommonClasses, a Class Library that contains some utility classes;NetCoreScripts, a Class Library that contains the code we are going to execute;ScriptsRunner, a Console Application that runs the scripts defined in theNetCoreScriptslibrary.
The dependencies between the modules are shown below: ScriptsRunner depends on NetCoreScripts, and NetCoreScripts depends on CommonClasses.
In this article, we are going to write the examples in the NetCoreScripts class library, in a class named AssemblyAnalysis.
How to load an Assembly in C#, with different methods
The starting point to analyse an Assembly is, well, to have an Assembly.
So, in the Scripts Class Library (the middle one), I wrote:
var assembly = DefineAssembly();
In the DefineAssembly method we can choose the Assembly we are going to analyse.
Load the Assembly containing a specific class
The easiest way is to do something like this:
private static Assembly DefineAssembly()
    => typeof(AssemblyAnalysis).Assembly;
Where AssemblyAnalysis is the class that contains our scripts.
Similarly, we can get the Assembly info for a class belonging to another Assembly, like this:
private static Assembly DefineAssembly()
    => typeof(CommonClasses.BaseExecutable).Assembly;
In short, you can access the Assembly info of whichever class you know – if you can reference it directly, of course!
Load the current, the calling, and the executing Assembly
The Assembly class provides you with some methods that may look similar, but give you totally different info depending on how your code is structured.
Remember the ScriptsRunner –> NetCoreScripts –> CommonClasses sequence? To better explain how things work, let’s run the following examples in a method in the CommonClasses class library (the last one in the dependency chain).
var executing = System.Reflection.Assembly.GetExecutingAssembly();
var calling = System.Reflection.Assembly.GetCallingAssembly();
var entry = System.Reflection.Assembly.GetEntryAssembly();
Assembly.GetExecutingAssembly returns the Assembly that contains the actual code instructions (so, in short, the Assembly that actually contains the code). In this case, it’s the CommonClasses Assembly.
Assembly.GetCallingAssembly returns the caller Assembly, so the one that references the Executing Assembly. In this case, given that the CommonClasses library is referenced only by the NetCoreScripts library, well, we are getting info about the NetCoreScripts class library.
Assembly.GetEntryAssembly returns the info of the Assembly that is executing the whole application – so, the entry point. In our case, it’s the ScriptsRunner Console Application.
Deciding which one to choose is crucial, especially when you are going to distribute your libraries, for example, as NuGet packages. For sure, you’ll know the Executing Assembly. Most probably, depending on how the project is structured, you’ll also know the Calling Assembly. But almost certainly you won’t know the Entry Assembly.
| Method name | Meaning | In this example… |
|---|---|---|
| GetExecutingAssembly | The current Assembly | CommonClasses |
| GetCallingAssembly | The caller Assembly | NetCoreScripts |
| GetEntryAssembly | The top-level executor | ScriptsRunner |
How to retrieve classes of a given .NET Assembly
Now you have an Assembly to analyse. It’s time to load the classes belonging to your Assembly.
You can start with assembly.GetTypes(): this method returns all the types (in the form of a Type array) belonging to the Assembly.
For each Type you can access several properties, such as IsClass, IsPublic, IsAbstract, IsGenericType, IsEnum and so on. The full list of properties of a Type is available 🔗here.
You may want to analyse public classes: therefore, you can do something like:
private static List<Type> GetAllPublicTypes(Assembly assembly) => assembly
            .GetTypes()
            .Where(t => t.IsClass && t.IsPublic)
            .ToList();
How to list the Methods belonging to a C# Type
Given a Type, you can extract the info about all the available methods.
The Type type contains several methods that can help you find useful information, such as GetConstructors.
In our case, we are only interested in public methods, declared in that class (and not inherited from a base class):
private static MethodInfo[] GetPublicMethods(Type type) =>
    type.GetMethods(BindingFlags.Instance | BindingFlags.Static | BindingFlags.Public | BindingFlags.DeclaredOnly);
The BindingFlags enum is a 🔗Flagged Enum: it’s an enum with special values that allow you to perform an OR operation on the values.
| Value | Description | Example |
|---|---|---|
| Public | Includes public members. | public void Print() |
| NonPublic | Includes non-public members (private, protected, etc.). | private void Calculate() |
| Instance | Includes instance (non-static) members. | public void Save() |
| Static | Includes static members. | public static void Log(string msg) |
| FlattenHierarchy | Includes static members up the inheritance chain. | public static void Helper() (this method exists in the base class) |
| DeclaredOnly | Only members declared in the given type, not inherited. | public void MyTypeSpecific() (this method does not exist in the base class) |
How to get the parameters of a MethodInfo object
The final step is to retrieve the list of parameters from a MethodInfo object.
This step is pretty easy: just call the GetParameter() method:
public ParameterInfo[] GetParameters(MethodInfo method) => method.GetParameters();
A ParameterInfo object contains several pieces of information, such as the name, the type and the default value of the parameter.
Let’s consider this silly method:
public static void RandomCity(string[] cities, string fallback = "Rome")
{ }
If we have a look at its parameters, we will find the following values:

Bonus tip: Auto-properties act as Methods
Let’s focus a bit more on the properties of a class.
Consider this class:
public class User
{
  public string Name { get; set; }
}
There are no methods; only one public property.
But hey! It turns out that properties, under the hood, are treated as methods. In fact, you can find two methods, named get_Name and set_Name, that act as an access point to the Name property.

Further readings
Do you remember that exceptions are, in the end, Types?
And that, in the catch block, you can filter for exceptions of a specific type or with a specific condition?
If not, check this article out!
🔗 Exception handling with WHEN clause | Code4IT
This article first appeared on Code4IT 🐧
Wrapping up (plus the full example)
From here, you can use all this info to build whatever you want. Personally, I used it to analyse my current project, checking how many methods accept more than N parameters as input, and which classes have the highest number of public methods.
In short, an example of a simple code analyser can be this one:
public void Execute()
{
    var assembly = DefineAssembly();
    var paramsInfo = AnalyzeAssembly(assembly);

    AnalyzeParameters(paramsInfo);
}

private static Assembly DefineAssembly()
    => Assembly.GetExecutingAssembly();

public static List<ParamsMethodInfo> AnalyzeAssembly(Assembly assembly)
{
    List<ParamsMethodInfo> all = new List<ParamsMethodInfo>();
    var types = GetAllPublicTypes(assembly);

    foreach (var type in types)
    {
        var publicMethods = GetPublicMethods(type);

        foreach (var method in publicMethods)
        {
            var parameters = method.GetParameters();
            if (parameters.Length > 0)
            {
                var f = parameters.First();
            }

            all.Add(new ParamsMethodInfo(
                assembly.GetName().Name,
                type.Name,
                method
                ));
        }
    }
    return all;
}

private static MethodInfo[] GetPublicMethods(Type type) =>
    type.GetMethods(BindingFlags.Instance | BindingFlags.Static | BindingFlags.Public | BindingFlags.DeclaredOnly);

private static List<Type> GetAllPublicTypes(Assembly assembly) => assembly.GetTypes()
            .Where(t => t.IsClass && t.IsPublic)
            .ToList();

public class ParamsMethodInfo(string AssemblyName, string ClassName, MethodInfo Method)
{
    public string MethodName => Method.Name;
    public ParameterInfo[] Parameters => Method.GetParameters();
}
And then, in the AnalyzeParameters, you can add your own logic.
As you can see, you don’t need to adopt complex tools to perform operations like this: just knowing that you can access the static details of each class and method can be enough (of course, it depends on the use!).
I hope you enjoyed this article! Let’s keep in touch on LinkedIn, Twitter or BlueSky! 🤜🤛
Happy coding!
🐧