Downloading a file from a remote resource seems an easy task: download the byte stream and copy it to a local file. Beware of edge cases!
Table of Contents
Just a second! 🫷 If you are here, it means that you are a software developer.
So, you know that storage, networking, and domain management have a cost .
If you want to support this blog, please ensure that you have disabled the adblocker for this site. I configured Google AdSense to show as few ADS as possible – I don’t want to bother you with lots of ads, but I still need to add some to pay for the resources for my site.
Thank you for your understanding. – Davide
Downloading files from an online source and saving them on the local machine seems an easy task.
And guess what? It is!
In this article, we will learn how to download an online file, perform some operations on it – such as checking its file extension – and store it in a local folder. We will also learn how to deal with edge cases: what if the file does not exist? Can we overwrite existing files?
How to download a file stream from an online resource using HttpClient
Ok, this is easy. If you have the file URL, it’s easy to just download it using HttpClient.
HttpClient httpClient = new HttpClient();
Stream fileStream = await httpClient.GetStreamAsync(fileUrl);
Using HttpClient can cause some trouble, especially when you have a huge computational load. As a matter of fact, using HttpClientFactory is preferred, as we’ve already explained in a previous article.
But, ok, it looks easy – way too easy! There are two more parts to consider.
How to handle errors while downloading a stream of data
You know, shit happens!
There are at least 2 cases that stop you from downloading a file: the file does not exist or the file requires authentication to be accessed.
In both cases, an HttpRequestException exception is thrown, with the following stack trace:
at System.Net.Http.HttpResponseMessage.EnsureSuccessStatusCode()
at System.Net.Http.HttpClient.GetStreamAsyncCore(HttpRequestMessage request, CancellationToken cancellationToken)
As you can see, we are implicitly calling EnsureSuccessStatusCode while getting the stream of data.
You can tell the consumer that we were not able to download the content in two ways: throw a custom exception or return Stream.Null. We will use Stream.Null for the sake of this article.
Note: always throw custom exceptions and add context to them: this way, you’ll add more useful info to consumers and logs, and you can hide implementation details.
So, let me refactor the part that downloads the file stream and put it in a standalone method:
so that we can use Stream.Null to check for the existence of the stream.
How to store a file in your local machine
Now we have our stream of data. We need to store it somewhere.
We will need to copy our input stream to a FileStream object, placed within a using block.
using (FileStream outputFileStream = new FileStream(path, FileMode.Create))
{
    await fileStream.CopyToAsync(outputFileStream);
}
Possible errors and considerations
When creating the FileStream instance, we have to pass the constructor both the full path of the image, with also the file name, and FileMode.Create, which tells the stream what type of operations should be supported.
FileMode is an enum coming from the System.IO namespace, and has different values. Each value fits best for some use cases.
Again, there are some edge cases that we have to consider:
the destination folder does not exist: you will get an DirectoryNotFoundException exception. You can easily fix it by calling Directory.CreateDirectory to generate all the hierarchy of folders defined in the path;
the destination file already exists: depending on the value of FileMode, you will see a different behavior. FileMode.Create overwrites the image, while FileMode.CreateNew throws an IOException in case the image already exists.
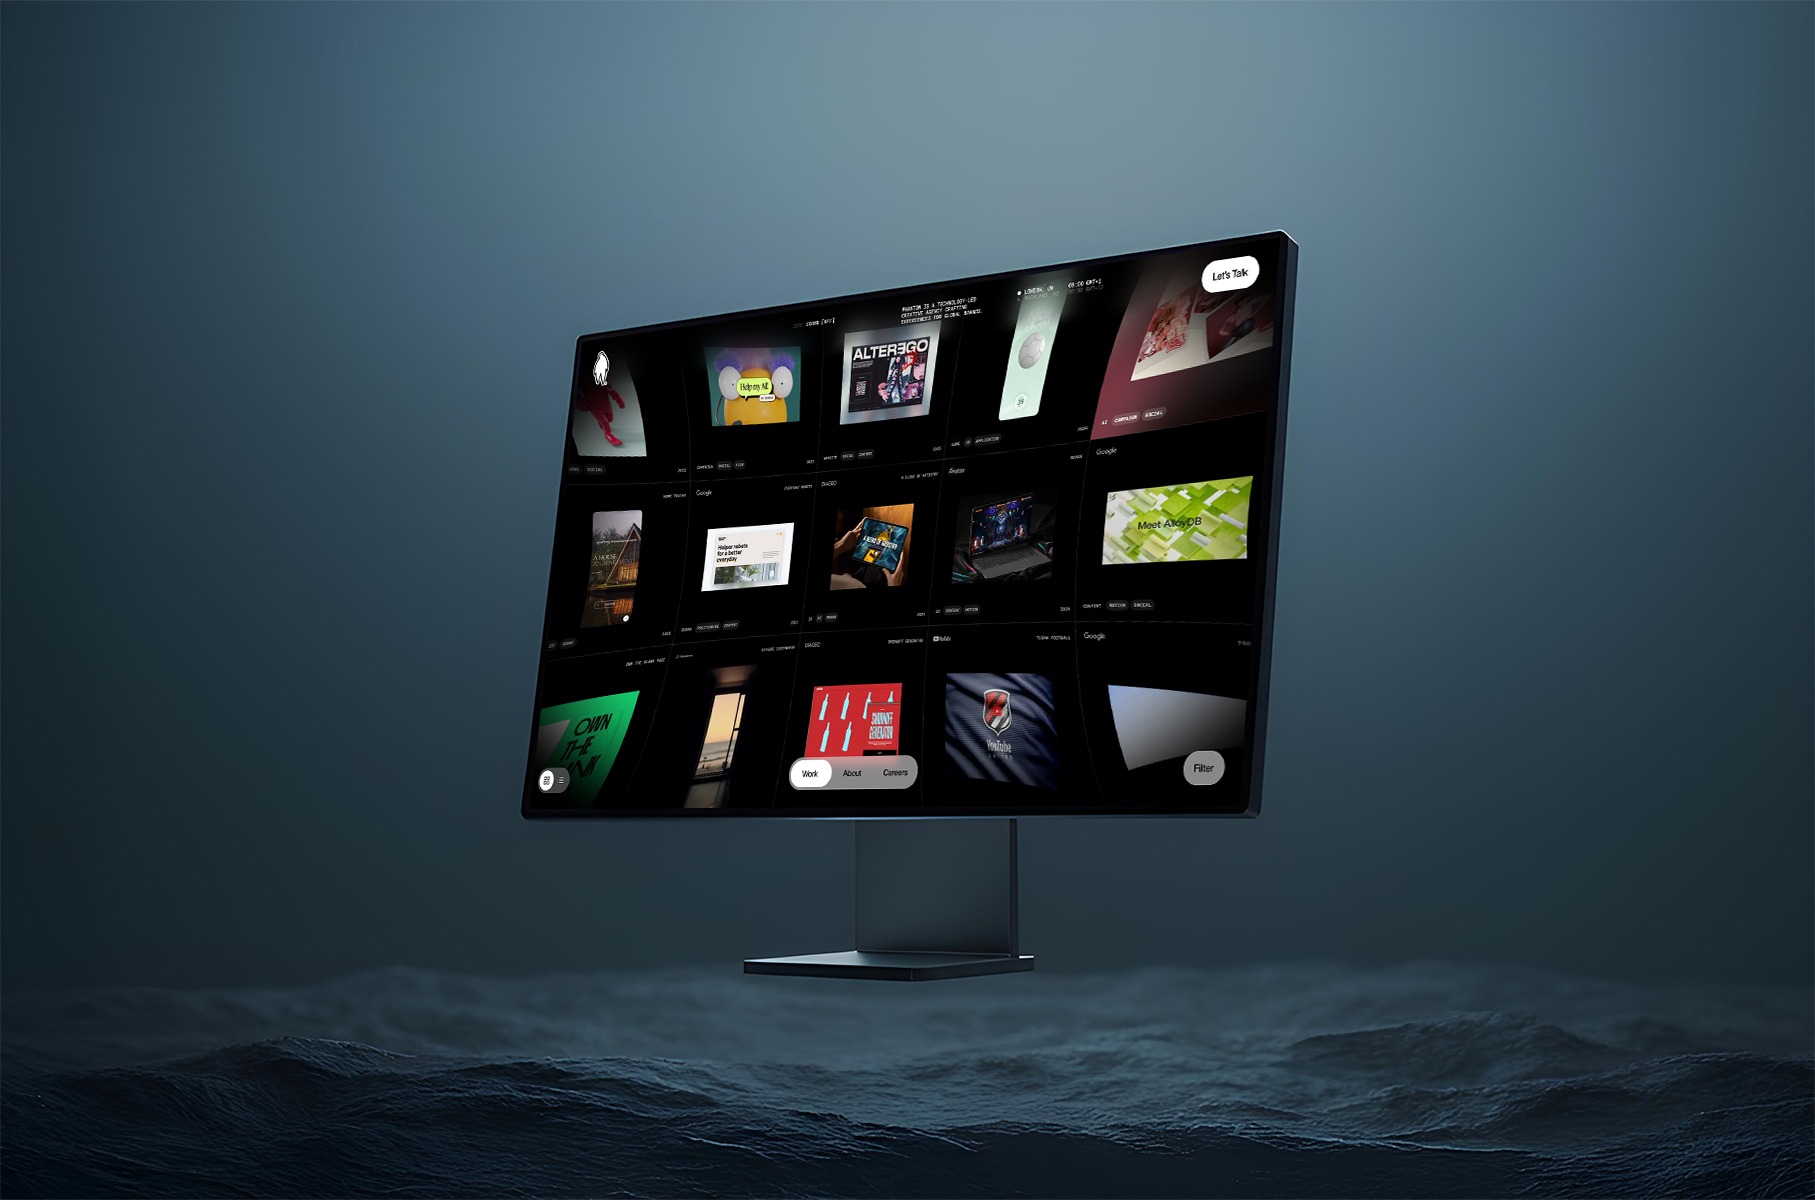
From the outset, we knew we wanted something that subverted any conventional agency website formulas. Instead,
inspired by the unseen energy that drives creativity, connection and transformation, we arrived at the idea of invisible forces
. Could we take the powerful yet intangible elements that shape our world—motion, emotion, intuition, and
inspiration—and manifest them in a digital space?
We were excited about creating something that included many custom interactions and a very experiential feel. However,
our concern was picking a set of tools that would allow most of our developers to contribute to and maintain the site
after launch.
We chose to start from a Next / React base, as we often do at Phantom. React also has the advantage of being
compatible with the excellent React Three Fiber library, which we used to seamlessly bridge the gap between our DOM
components and the WebGL contexts used across the site. For styles, we are using our very own CSS components
as well as SASS.
For interactive behaviours and animation, we chose to use GSAP for two main reasons. Firstly, it contains a lot of
plugins we know and love, such as SplitText, CustomEase and ScrollTrigger. Secondly, GSAP allows us to use a single
animation framework across DOM and WebGL components.
We could go on and on talking about the details behind every single animation and micro-interaction on the site, but
for this piece we have chosen to focus our attention on two of the most unique components of our site: the homepage
grid and the scrollable employee face particle carousel.
The Homepage Grid
It took us a very long time to get this view to perform and feel just how we wanted it to. In this article, we will focus on the interactive part. For more info on how we made things performant, head to our previous article: Welcome back to Phantomland
Grid View
The project’s grid view is integrated into the homepage by incorporating a primitive Three.js object into a React
Three Fiber scene.
We initially wanted to write all the code for the grid using React Three Fiber but realised that, due to the
complexity of our grid component, a vanilla Three.js
class would be easier to maintain.
One of the key elements that gives our grid its iconic feel is our post-processing distortion effect. We implemented
this feature by creating a custom shader pass within our post-processing pipeline:
When the grid transitions in and out on the site, the distortion intensity changes to make the transition feel
natural. This animation is done through a simple tween in our DistortionShader
class:
We also added a vignette effect to our post-processing shader to darken the corners of the viewport, focusing the
user’s attention toward the center of the screen.
In order to make our home view as smooth as possible, we also spent a fair amount of time crafting the
micro-interactions and transitions of the grid.
Ambient mouse offset
When the user moves their cursor around the grid, the grid moves slightly in the opposite direction, creating a very
subtle ambient floating effect. This was simply achieved by calculating the mouse position on the grid and moving the
grid mesh accordingly:
getAmbientCursorOffset() {
  // Get the pointer coordinates in UV space ( 0 - 1 ) range
  const uv = this.navigation.pointerUv;
  const offset = uv.subScalar(0.5).multiplyScalar(0.2);
  return offset;
}

update() {
  ...
  // Apply cursor offset to grid position
  const cursorOffset = getAmbientCursorOffset();
  this.mesh.position.x += cursorOffset.x;
  this.mesh.position.y += cursorOffset.y;
}
Drag Zoom
When the grid is dragged around, a zoom-out effect occurs and the camera seems to pan away from the grid. We created
this effect by detecting when the user starts and stops dragging their cursor, then using that to trigger a GSAP
animation with a custom ease for extra control.
Last but not least, when the user drags across the grid and releases their cursor, the grid slides through with a
certain amount of inertia.
drag(offset: Vector2) {
  this.dragAction = offset;

  // Gradually increase velocity with drag time and distance
  this.velocity.lerp(offset, 0.8);
}

// Every frame
update() {
  // positionOffset is later used to move the grid mesh
  if(this.isDragAction) {
    // if the user is dragging their cursor, add the drag value to offset
    this.positionOffset.add(this.dragAction.clone());
  } else {
    // if the user is not dragging, add the velocity to the offset
    this.positionOffset.add(this.velocity);
  }

  this.dragAction.set(0, 0);
  // Attenuate velocity with time
  this.velocity.lerp(new Vector2(), 0.1);
}
Face Particles
The second major component we want to highlight is our employee face carousel, which presents team members through a
dynamic 3D particle system. Built with React Three Fiber’s BufferGeometry
and custom GLSL shaders, this implementation leverages custom shader materials for lightweight performance and
flexibility, allowing us to generate entire 3D face representations using only a 2D colour photograph and its
corresponding depth map—no 3D models required.
Core Concept: Depth-Driven Particle Generation
The foundation of our face particle system lies in converting 2D imagery into volumetric 3D representations. We’ve
kept things efficient, with each face using only two optimized 256×256 WebP images (under 15KB each).
To capture the images, each member of the Phantom team was 3D scanned using RealityScan
from Unreal Engine on iPhone, creating a 3D model of their face.
These scans were cleaned up and then rendered from Cinema4D with a position and colour pass.
The position pass was converted into a greyscale depth map in Photoshop, and this—along with the colour pass—was
retouched where needed, cropped, and then exported from Photoshop to share with the dev team.
Each face is constructed from approximately 78,400 particles (280×280 grid), where each particle’s position and
appearance is determined by sampling data from our two source textures.
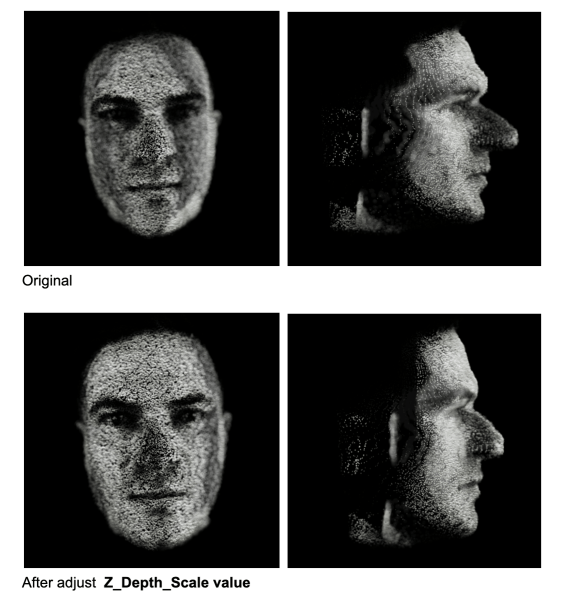
The depth map provides normalized values (0–1) that directly translate to Z-depth positioning. A value of 0 represents
the furthest point (background), while 1 represents the closest point (typically the nose tip).
/* vertex shader */

// sample depth and color data for each particle
vec3 depthTexture1 = texture2D(depthMap1, vIndex.xy).xyz;

// convert depth to Z-position
float zDepth = (1. - depthValue.z);
pos.z = (zDepth * 2.0 - 1.0) * zScale;
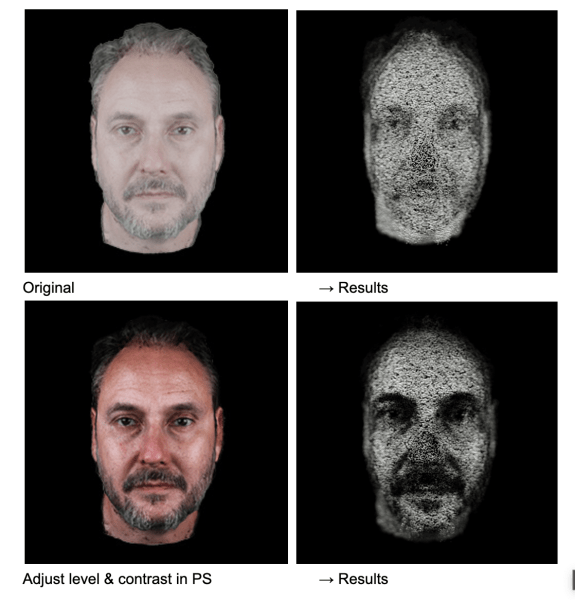
Dynamic Particle Scaling Through Colour Analysis
One of the key methods that brings our faces to life is utilizing colour data to influence particle scale. In our
vertex shader, rather than using uniform particle sizes, we analyze the colour density of each pixel so that brighter,
more colourful areas of the face (like eyes, lips, or well-lit cheeks) generate larger, more prominent particles,
while darker areas (shadows, hair) create smaller, subtler particles. The result is a more organic, lifelike
representation that emphasizes facial features naturally.
/* vertex shader */

vec3 colorTexture1 = texture2D(colorMap1, vIndex.xy).xyz;

// calculate color density
float density = (mainColorTexture.x + mainColorTexture.y + mainColorTexture.z) / 3.;

// map density to particle scale
float pScale = mix(pScaleMin, pScaleMax, density);
The calibration below demonstrates the influence of colour (contrast, brightness, etc.) on the final 3D particle formation.
Ambient Noise Animation
To prevent static appearances and maintain visual interest, we apply continuous noise-based animation to all
particles. This ambient animation system uses curl noise to create subtle, flowing movement across the entire
face structure.
To add visual interest during transitions, we further inject additional noise that’s strongest at the midpoint of the
transition. This creates a subtle “disturbance” effect where particles temporarily deviate from their target
positions, making transitions feel more dynamic and organic.
To enhance the three-dimensional perception, we implemented a custom depth of field effect directly in our shader
material. It calculates view-space distance for each particle and modulates both opacity and size based on proximity
to a configurable focus plane.
One of the challenges we faced was achieving visual consistency across different team members’ photos. Each photograph
was captured under slightly different conditions—varying lighting, camera distances, and facial proportions.
Therefore, we went through each face to calibrate multiple scaling factors:
Depth scale calibration
to ensure no nose protrudes too aggressively
Colour density balancing
to maintain consistent particle size relationships
Focus plane optimization
to prevent excessive blur on any individual face
Our face particle system demonstrates how simple yet careful technical implementation can create fun visual
experiences from minimal assets. By combining lightweight WebP textures, custom shader materials, and animations,
we’ve created a system that transforms simple 2D portraits into interactive 3D figures.