برچسب: Time

  • use yield return to return one item at the time | Code4IT

    use yield return to return one item at the time | Code4IT


    Yield is a keyword that allows you to return an item at the time instead of creating a full list and returning it as a whole.

    Table of Contents

    Just a second! 🫷
    If you are here, it means that you are a software developer.
    So, you know that storage, networking, and domain management have a cost .

    If you want to support this blog, please ensure that you have disabled the adblocker for this site.
    I configured Google AdSense to show as few ADS as possible – I don’t want to bother you with lots of ads, but I still need to add some to pay for the resources for my site.

    Thank you for your understanding.
    Davide

    To me, yield return has always been one of the most difficult things to understand.

    Now that I’ve understood it (not thoroughly, but enough to explain it), it’s my turn to share my learnings.

    So, what does yield return mean? How is it related to collections of items?

    Using Lists

    Say that you’re returning a collection of items and that you need to iterate over them.

    A first approach could be creating a list with all the items, returning it to the caller, and iterating over the collection:

    IEnumerable<int> WithList()
    {
        List<int> items = new List<int>();
    
        for (int i = 0; i < 10; i++)
        {
            Console.WriteLine($"Added item {i}");
            items.Add(i);
        }
    
        return items;
    }
    
    void Main()
    {
        var items = WithList();
    
        foreach (var i in items)
        {
            Console.WriteLine($"This is Mambo number {i}");
        }
    }
    

    This snippet creates the whole collection and then prints the values inside that list. On the console, you’ll see this text:

    Added item 0
    Added item 1
    Added item 2
    Added item 3
    Added item 4
    Added item 5
    Added item 6
    Added item 7
    Added item 8
    Added item 9
    This is Mambo number 0
    This is Mambo number 1
    This is Mambo number 2
    This is Mambo number 3
    This is Mambo number 4
    This is Mambo number 5
    This is Mambo number 6
    This is Mambo number 7
    This is Mambo number 8
    This is Mambo number 9
    

    This means that, if you need to operate over a collection with 1 million items, at first you’ll create ALL the items, and then you’ll perform operations on each of them. This approach has two main disadvantages: it’s slow (especially if you only need to work with a subset of those items), and occupies a lot of memory.

    With Yield

    We can use another approach: use the yield return keywords:

    IEnumerable<int> WithYield()
    {
        for (int i = 0; i < 10; i++)
        {
            Console.WriteLine($"Returning item {i}");
    
            yield return i;
        }
    }
    
    void Main()
    {
        var items = WithYield();
    
        foreach (var i in items)
        {
            Console.WriteLine($"This is Mambo number {i}");
        }
    }
    

    With this method, the order of messages is different:

    Returning item 0
    This is Mambo number 0
    Returning item 1
    This is Mambo number 1
    Returning item 2
    This is Mambo number 2
    Returning item 3
    This is Mambo number 3
    Returning item 4
    This is Mambo number 4
    Returning item 5
    This is Mambo number 5
    Returning item 6
    This is Mambo number 6
    Returning item 7
    This is Mambo number 7
    Returning item 8
    This is Mambo number 8
    Returning item 9
    This is Mambo number 9
    

    So, instead of creating the whole list, we create one item at a time, and only when needed.

    Benefits of Yield

    As I said before, there are several benefits with yield: the application is more performant when talking about both the execution time and the memory usage.

    It’s like an automatic iterator: every time you get a result, the iterator advances to the next item.

    Just a note: yield works only for methods that return IAsyncEnumerable<T>, IEnumerable<T>, IEnumerable, IEnumerator<T>, or IEnumerator.

    You cannot use it with a method that returns, for instance, List<T>, because, as the error message says,

    The body of X cannot be an iterator block because List<int> is not an iterator interface type

    Cannot use yield return with lists

    A real use case

    If you use NUnit as a test suite, you’ve probably already used this keyword.

    In particular, when using the TestCaseSource attribute, you specify the name of the class that outputs the test cases.

    public class MyTestClass
    {
        [TestCaseSource(typeof(DivideCases))]
        public void DivideTest(int n, int d, int q)
        {
            Assert.AreEqual(q, n / d);
        }
    }
    
    class DivideCases : IEnumerable
    {
        public IEnumerator GetEnumerator()
        {
            yield return new object[] { 12, 3, 4 };
            yield return new object[] { 12, 2, 6 };
            yield return new object[] { 12, 4, 3 };
        }
    }
    

    When executing the tests, an iterator returns a test case at a time, without creating a full list of test cases.

    The previous snippet is taken directly from NUnit’s documentation for the TestCaseSource attribute, that you can find here.

    Wrapping up

    Yes, yield is a quite difficult keyword to understand.

    To read more, head to the official docs.

    Another good resource is “C# – Use yield return to minimize memory usage” by Makolyte. You should definitely check it out!

    And, if you want, check out the conversation I had about this keyword on Twitter.

    Happy coding!

    🐧


    Source link

  • injecting and testing the current time with TimeProvider and FakeTimeProvider &vert; Code4IT

    injecting and testing the current time with TimeProvider and FakeTimeProvider | Code4IT


    Just a second! 🫷
    If you are here, it means that you are a software developer.
    So, you know that storage, networking, and domain management have a cost .

    If you want to support this blog, please ensure that you have disabled the adblocker for this site.
    I configured Google AdSense to show as few ADS as possible – I don’t want to bother you with lots of ads, but I still need to add some to pay for the resources for my site.

    Thank you for your understanding.
    Davide

    Things that depend on concrete stuff are difficult to use when testing. Think of the file system: to have tests work properly, you have to ensure that the file system is structured exactly as you are expecting it to be.

    A similar issue occurs with dates: if you create tests based on the current date, they will fail the next time you run them.

    In short, you should find a way to abstract these functionalities, to make them usable in the tests.

    In this article, we are going to focus on the handling of dates: we’ll learn what the TimeProvider class is, how to use it and how to mock it.

    The old way for handling dates: a custom interface

    Back in the days, the most straightforward approach to add abstraction around the date management was to manually create an interface, or an abstract class, to wrap the access to the current date:

    public interface IDateTimeWrapper
    {
      DateTime GetCurrentDate();
    }
    

    Then, the standard implementation implemented the interface by using only the UTC date:

    public class DateTimeWrapper : IDateTimeWrapper
    {
      public DateTime GetCurrentDate() => DateTime.UtcNow;
    }
    

    A similar approach is to have an abstract class instead:

    public abstract class DateTimeWrapper
    {
      public virtual DateTime GetCurrentDate() => DateTime.UctNow;
    }
    

    Easy: you then have to add an instance of it in the DI engine, and you are good to go.

    The only problem? You have to do it for every project you are working on. Quite a waste of time!

    How to use TimeProvider in a .NET application to get the current date

    Along with .NET 8, the .NET team released an abstract class named TimeProvider. This abstract class, beyond providing an abstraction for local time, exposes methods for working with high-precision timestamps and TimeZones.

    It’s important to notice that dates are returned as DateTimeOffset, and not as DateTime instances.

    TimeProvider comes out-of-the-box with a .NET Console application, accessible as a singleton:

    static void Main(string[] args)
    {
      Console.WriteLine("Hello, World!");
      
      DateTimeOffset utc = TimeProvider.System.GetUtcNow();
      Console.WriteLine(utc);
    
      DateTimeOffset local = TimeProvider.System.GetLocalNow();
      Console.WriteLine(local);
    }
    

    On the contrary, if you need to use Dependency Injection, for example, in .NET APIs, you have to inject it as a singleton, like this:

    builder.Services.AddSingleton(TimeProvider.System);
    

    So that you can use it like this:

    public class SummerVacationCalendar
    {
      private readonly TimeProvider _timeProvider;
    
      public SummerVacationCalendar(TimeProvider timeProvider)
     {
        this._timeProvider = timeProvider;
     }
    
      public bool ItsVacationTime()
     {
        var today = _timeProvider.GetLocalNow();
        return today.Month == 8;
     }
    }
    

    How to test TimeProvider with FakeTimeProvider

    Now, how can we test the ItsVacationTime of the SummerVacationCalendar class?

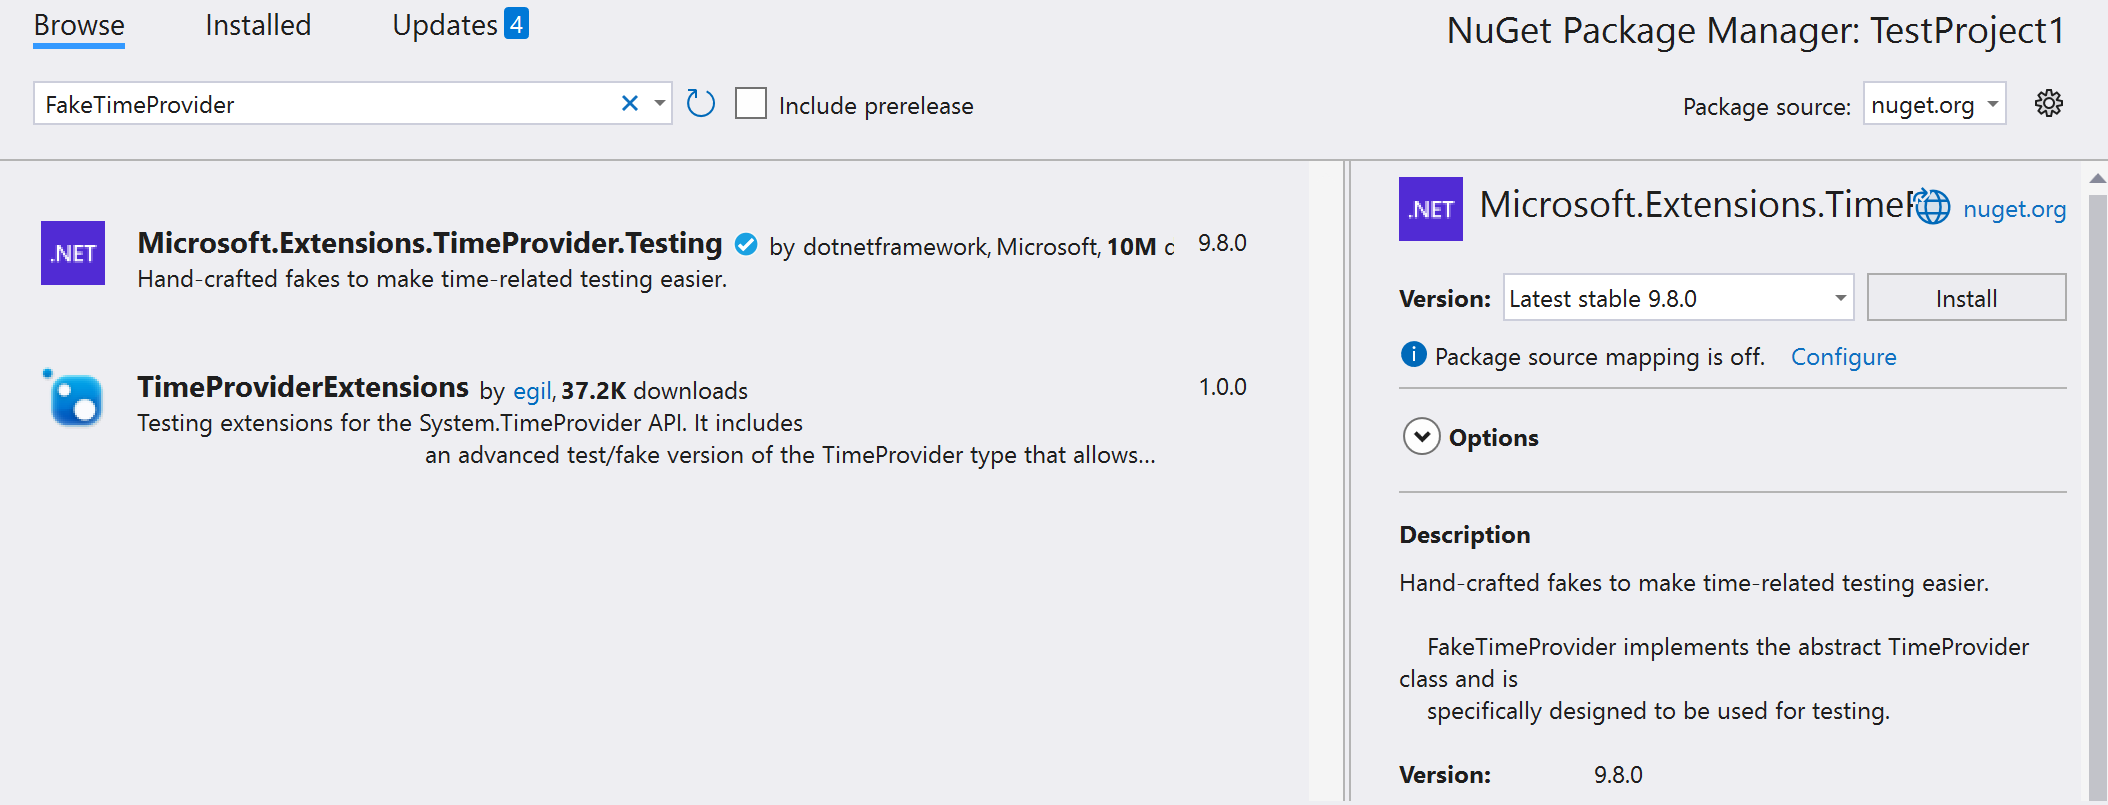
    We can use the Microsoft.Extensions.TimeProvider.Testing NuGet library, still provided by Microsoft, which provides a FakeTimeProvider class that acts as a stub for the TimeProvider abstract class:

    TimeProvider.Testing NuGet package

    By using the FakeTimeProvider class, you can set the current UTC and Local time, as well as configure the other options provided by TimeProvider.

    Here’s an example:

    [Fact]
    public void WhenItsAugust_ShouldReturnTrue()
    {
     // Arrange
      var fakeTime = new FakeTimeProvider();
      fakeTime.SetUtcNow(new DateTimeOffset(2025, 8, 14, 22, 24, 12, TimeSpan.Zero));
      var sut = new SummerVacationCalendar(fakeTime);
    
     // Act
      var isVacation = sut.ItsVacationTime();
    
     // Assert
      Assert.True(isVacation);
    }
    
    [Fact]
    public void WhenItsNotAugust_ShouldReturnFalse()
    {
     // Arrange
      var fakeTime = new FakeTimeProvider();
      fakeTime.SetUtcNow(new DateTimeOffset(2025, 3, 14, 22, 24, 12, TimeSpan.Zero));
      var sut = new SummerVacationCalendar(fakeTime);
    
     // Act
      var isVacation = sut.ItsVacationTime();
    
     // Assert
      Assert.False(isVacation);
    }
    

    Further readings

    Actually, TimeProvider provides way more functionalities than just returning the UTC and the Local time.

    Maybe we’ll explore them in the future. But for now, do you know how the DateTimeKind enumeration impacts the way you create new DateTimes?

    🔗 C# tip: create correct DateTimes with DateTimeKind | Code4IT

    This article first appeared on Code4IT 🐧

    However, always remember to test the code not against the actual time but against static values. But, if for some reason you cannot add TimeProvider in your classes, there are other less-intrusive strategies that you can use (and that can work for other types of dependencies as well, like the file system):

    🔗 3 ways to inject DateTime and test it | Code4IT

    Wrapping up

    I hope you enjoyed this article! Let’s keep in touch on LinkedIn, Twitter or BlueSky! 🤜🤛

    Happy coding!

    🐧


    Source link

  • No Visuals, No Time, No Problem: Launching OXI Instruments / ONE MKII in 2 Weeks

    No Visuals, No Time, No Problem: Launching OXI Instruments / ONE MKII in 2 Weeks


    Two weeks. No 3D Visuals. No panic.
    We built the OXI ONE MKII website using nothing but structure and type. All to meet the deadline for the product launch and its debut in Berlin.

    The Challenge

    Creating a website for the launch of a new flagship product is already a high-stakes task; doing it in under 14 days, with no flawless renders, raises the bar even higher. When OXI Instruments approached us, the ONE MKII was entering its final development stage. The product was set to premiere in Berlin, and the website had to be live by that time, no extensions, no room for delay. At the same time, there was no finalized imagery, no video, and no product renders ready for use.

    We had to

    • Build a bold, functional website without relying on visual assets
    • Reflect the character and philosophy of the ONE MKII — modular, live, expressive
    • Craft a structure that would be clear to musicians and intuitive across devices
    • Work in parallel with the OXI team, adjusting to changes and updates in real time

    This wasn’t just about speed. It was about designing clarity under pressure, with a strict editorial mindset, where every word, margin, and interaction had to work harder than usual. These are the kinds of things you’d never guess as an outside observer or a potential customer. But constraints like these are truly a test of resilience.

    The Approach

    If you’ve seen other websites we’ve launched with various teams, you’ll notice they often include 3D graphics or other rich visual layers. This project, however, was a rare exception.

    It was crucial to make the right call early on and to hit expectations spot-on during the concept stage. A couple of wrong turns wouldn’t be fatal, but too many missteps could easily lead to missing the deadline and delivering an underwhelming result.

    We focused on typography, photography, and rhythm. Fortunately, we were able to shape the art direction for the photos in parallel with the design process. Big thanks to Candace Janee (OXI project manager) who coordinated between me, the photographers, and everyone involved to quickly arrange compositions, lighting setups, and other details for the shoot.

    Another layer of complexity was planning the broader interface and future platform in tandem with this launch. While we were only releasing two core pages at this stage, we knew the site would eventually evolve into a full eCommerce platform. Every design choice had to consider the long game from homepage and support pages to product detail layouts and checkout flows. That also meant thinking ahead about how systems like Webflow, WordPress, WooCommerce, and email automation would integrate down the line.

    Typography

    With no graphics to lean on, typography had to carry more weight than usual not just in terms of legibility, but in how it communicates tone, energy, and brand attitude. We opted for a bold, editorial rhythm. Headlines drive momentum across the layout, while smaller supporting text helps guide the eye without clutter.

    We selected both typefaces from the same designer, Wei Huang, a type designer from Australia. Work Sans for headlines and body copy, and Fragment Mono for supporting labels and detailed descriptions.The two fonts complement each other well and are completely free to use, which allowed us to rely on Google Fonts without worrying about file formats or load sizes.

    CMS System

    Even though we were only launching two pages initially, the CMS was built with a full content ecosystem in mind. Product specs, updates, videos, and future campaigns all had a place in the structure. Instead of hardcoding static blocks, we built flexible content types that could evolve alongside the product line.

    The idea was simple: avoid rework later. The CMS wasn’t just a backend; it was the foundation of a scalable platform. Whether we were thinking of Webflow’s CMS collections or potential integrations with WordPress and WooCommerce, the goal was to create a system that was clean, extensible, and future-ready.

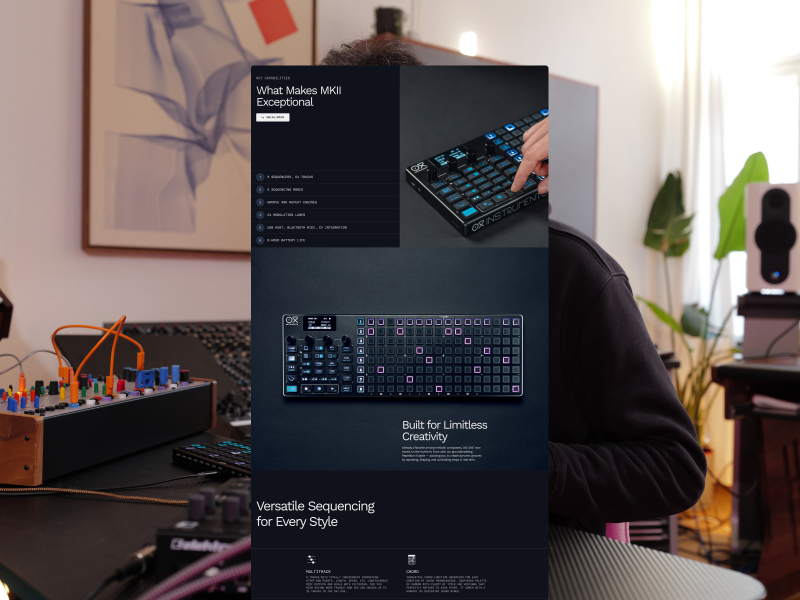
    Sketches. Early explorations.

    I really enjoy the concept phase. It’s the moment where different directions emerge and key patterns begin to form. Whether it’s alignment, a unique sense of ornamentation, asymmetry, or something else entirely. This stage is where the visual language starts to take shape.

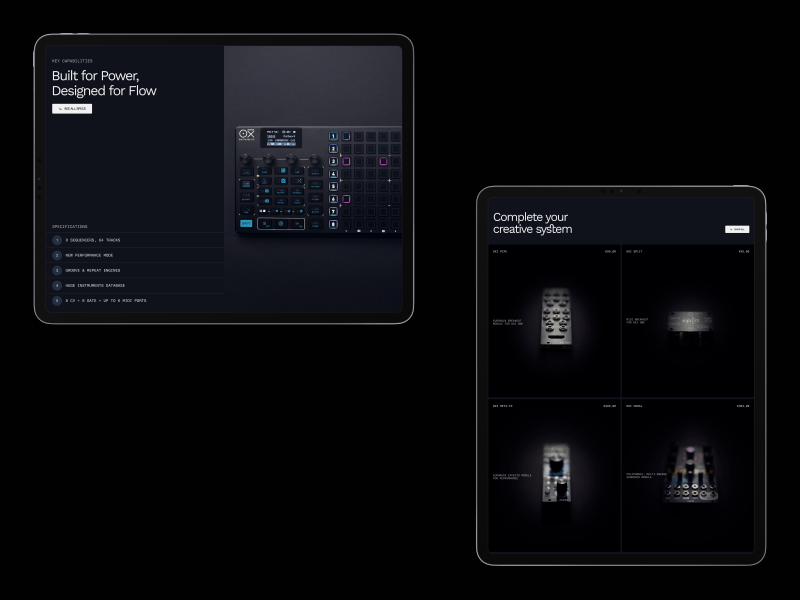
    Here’s a look at some of the early concepts we explored. The OXI website could’ve turned out very differently.

    We settled on a dark version of the design partly due to the founder’s preference, and partly because the brand’s core colors (which were off-limits for changes) worked well with it. Additionally, cutting out the device from photos made it easier to integrate visuals into the layout and mask any imperfections.

    Rhythm & Layout

    When planning the rhythm and design, it’s important not to go overboard with creativity. As designers, we often want to add that “wow” factor but sometimes, the business just doesn’t need it.

    The target audience, people in the music world, already get their visual overload during performances by their favorite artists. But when they’re shopping for a new device, they’re not looking for spectacle. They want to see the product. The details. The specs. Everything that matters.

    All of it needs to be delivered clearly and accessibly. We chose the simplest approach: alternating between center-aligned and left-aligned sections, giving us the flexibility to structure the layout intuitively. Photography helps break up the technical content, and icons quickly draw attention to key features. People don’t read, they scan. We designed with that in mind.

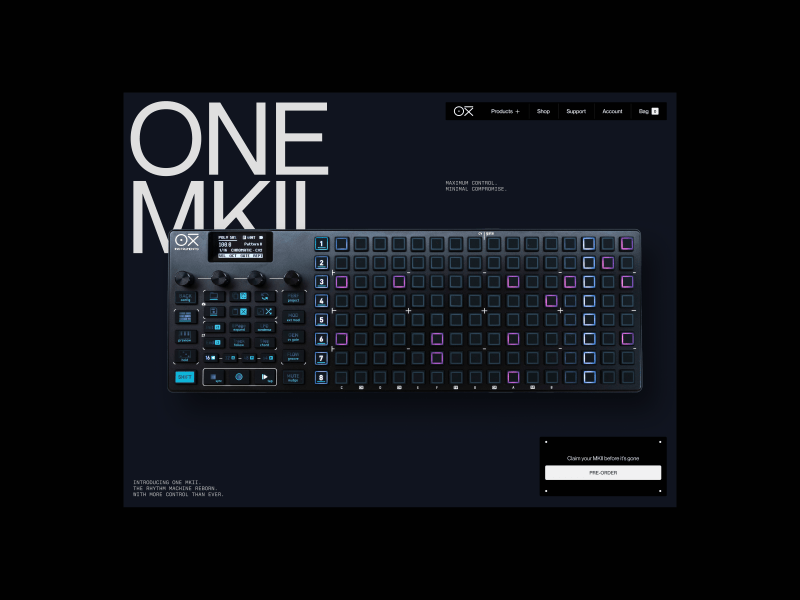
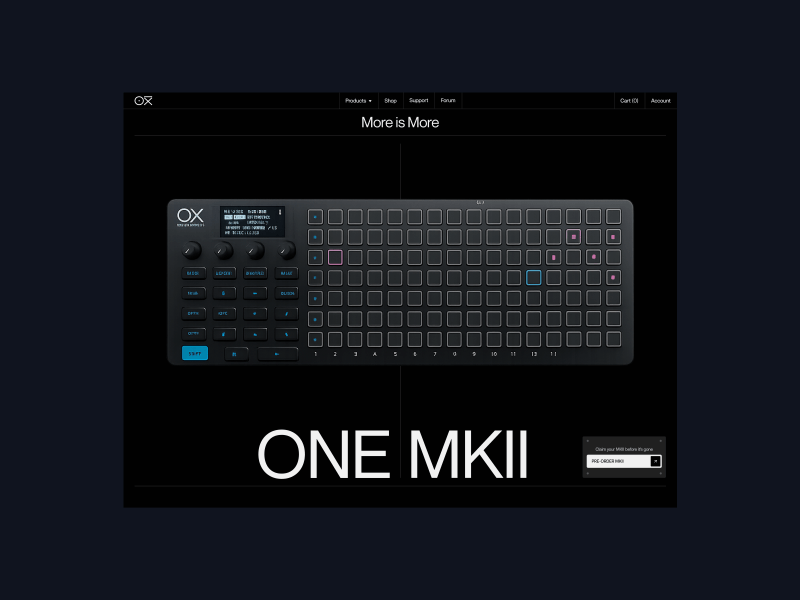
    A few shots highlighting some of my favorite sections.

    Result

    The results were genuinely rewarding. The team felt a boost in motivation, and the brand’s audience and fans immediately noticed the shift highlighting how the update pushed OXI into a more professional direction.

    According to my information, the pre-orders for the device sold out in less than a week. It’s always a great feeling when you’re proud of the outcome, the team is happy, and the audience responds positively. That’s what matters most.

    Looking Ahead / Part Two

    This was just the beginning. The second part of the project (a full eCommerce experience) is currently in the works. The core will expand, but the principles will remain the same.

    I hope you’ll find the full relaunch of OXI Instruments just as exciting. Stay tuned on updates.


    Source link

  • Automating Your DevOps: Writing Scripts that Save Time and Headaches | by Ulas Can Cengiz


    Or, how scripting revolutionized my workflow

    Photo by Stephen Dawson on Unsplash

    Imagine a time when factories were full of life, with gears turning and machines working together. It was a big change, like what’s happening today with computers. In the world of creating and managing software, we’re moving from doing things by hand to letting computers do the work. I’ve seen this change happen, and I can tell you, writing little programs, or “scripts,” is what’s making this change possible.

    Just like factories changed how things were made, these little programs are changing the way we handle software. They’re like a magic trick that turns long, boring tasks into quick and easy ones. In this article, I’m going to show you how these little programs fit into the bigger picture, how they make things better and faster, and the headaches they can take away.

    We’re going to go on a trip together. I’ll show you how things used to be done, talk about the different kinds of little programs and tools we use now, and share some of the tricks I’ve learned. I’ll tell you stories about times when these little programs really made a difference, give you tips, and show you some examples. So, buckle up, and let’s jump into this world where making and managing software is not just a job, but something really special.


    Source link