Three years ago, I began developing a lightweight interpolation library called Interpol, a low-level engine for handling value tweening and smooth motion on the web. You may have already come across it on my social channels, where I’ve shared a few experiments. In this article, I’ll explain the origins of the library and how it’s become a key part of my animation workflow.
Interpol usage examples
Three years ago, I began developing a lightweight interpolation library called @wbe/interpol. Interpol is designed to interpolate sets of values using a GSAP-like API. Its main distinction is that it isn’t a “real” animation library, it’s an interpolation engine.
My observation was that in many projects, I didn’t need all the power of GSAP or anime.js, but just a simple function to interpolate values and import a much lighter library. This is a mechanism that I recreated several times by hand, so I decided to make a library out of it.
Learn modern web animation using GSAP 3 with 34 hands-on video lessons and practical projects — perfect for all skill levels.
Lightweight: the bundle size has to be around 3.5kB
Low-level: for being maintainable and predictable, no magic, no DOM API, only interpolation of values
Performant: Interpol instances should be batched and updated on a single Ticker loop instance
Multiple interpolations: need to interpolate a set of values per instance, not only one
Chaining interpolations: need to create Timelines, with instance offsets
Close to the GSAP and anime.js API: should look like what I’m already used to, in order to not have to adapt myself to a new API
Strongly typed: written in TypeScript with strong types
Optional RAF: Give the possibility to not use the internal requestAnimationFrame. The global update logic should be possible to call manually in a custom loop
Interpolation, what are we talking about?
To summarize, a linear interpolation (called lerp) is a mathematical function that finds a value between two others. It returns an average of the two values depending on a given amount:
function lerp(start: number, end: number, amount: number): number {
  return start + (end - start) * amount
}
For now, nothing special. The magic happens when we use it in a loop: The master feature we can exploit from the browser API for creating animations is the requestAnimationFrame function that we call “RAF”. With a strong knowledge of RAF, we can do wonderful things. And with RAF and lerp combined, we can create smoothy-floppy-buttery-coolify-cleanex transitions between two values (yes, all of that).
The most classic usages of lerp in a RAF are the lerp damping and the tweening. Interpol is time-based interpolation engine, so it is a tweening approach. Its time value will be normalized between 0 and 1 and that is what represents the progression of our interpolation.
const loop = (): void => {
  const value = lerp(from, to, easing((now - start) / duration))
  // Do something with the value...
  requestAnimationFrame(loop)
}
requestAnimationFrame(loop)
All this logic is essentially the same as that used by animation libraries like GSAP or anime.js. Many other features are added to those libraries, of course, but this constitutes the core of a tween engine.
Tweening vs Damping
A brief detour on this subject which seems important to me to understand well before going further. Initially, it took me some time to build a mental model of how lerp function works in the context of tweening versus damping. I finally found a way to explain it as in these graphs.
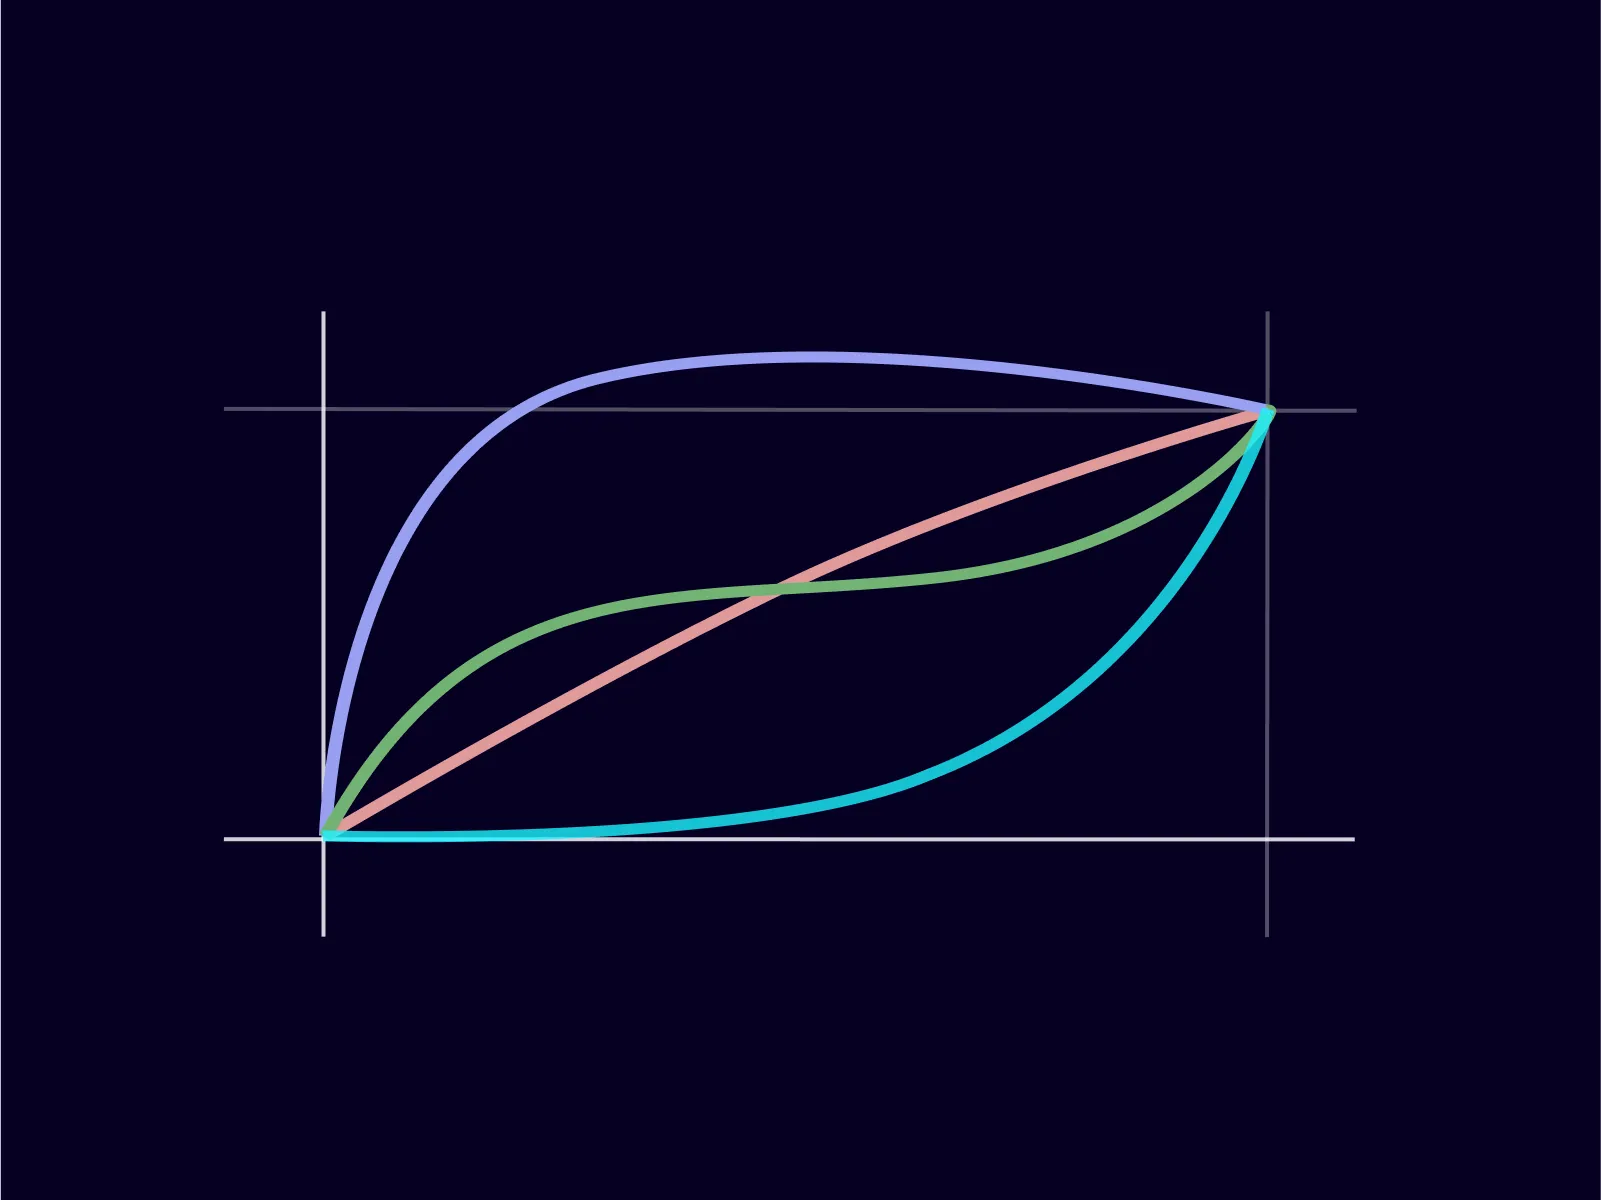
Tweening
With tweening, interpolation is strictly time-bound. When we tween a value over 1000ms, that duration defines an absolute boundary. The animation completes precisely at that moment.
In a second time, we can add an easing function that controls how the value progresses within that fixed window, but the window itself remains constant. Each colored curve represents an interpolation of our value, from 0 to 100, in 1000ms, with a different easing function.
const from = 0
const to = 100
const duration = 1000
const easing =
const progress = easing((now - start) / duration)

                         // in a tween context
                         // we update the progress/amount/speed param
                                ✅
const value = lerp(from, to, progress)
Damping
When we talk about “lerp”, we often refer to the “damping lerp” approach. However, this is not how Interpol works, since its interpolations are time-based. With “damped lerp” (or “damping lerp”), there is no concept of time involved. It’s purely frame-based. This technique updates values on each frame, without considering elapsed time. See the graph below for a visual explanation.
let current = 0
let target = 100
let amount = 0.05

         // in a damping lerp
         // we update the current value on each frame
   ⬇️           ✅
current = lerp(current, target, amount)
I intentionally renamed the properties passed to the lerp function to make it fit better in the context. Here, it’s better to refer to current and target, since these are values that will be mutated.
To conclude this aside, the lerp function is the basis for several web animation techniques. Lerp can be used on its own, while tweening is a technique dependent on the lerp function. This distinction took me a while to formulate and I felt it was important to share.
That being said, let’s return to Interpol (a tween library if we can say). What does the API for this tool looks like?
Dive inside the API
Interpol constructor
Here is the constructor of an Interpol instance:
import { Interpol } from "@wbe/interpol"

new Interpol({
  x: [0, 100],
  y: [300, 200],
  duration: 1300,
  onUpdate: ({ x, y }, time, progress, instance) => {
    // Do something with the values...
  },
})
First, we define a set of values to interpolate. Keynames can be anything (x, y, foo, bar, etc.). Because we’re not referencing any DOM element, we need to explicitly define “where we start” and “where we want to go”. This is the first main difference with animations libraries that can hold information which comes from the DOM, and implicitly define the from value.
// [from, to] array
x: [0, 100],
// Use an object instead of an array (with optional specific ease)
foo: { from: 50, to: 150, ease: "power3.in" }
// Implicite from is 0, like [0, 200]
bar: 200
// use computed values that can be re-evaluated on demand
baz: [100, () => Math.random() * 500]
In a second step, we define options like the common duration, paused on init, immediateRender & ease function.
// in ms, but can be configured from the global settings
duration: 1300,
// start paused
paused: true,
// Execute onUpdate method once when the instance is created
immediateRender: true
// easing function or typed string 'power3.out' etc.
ease:
Then, we have callbacks that are called at different moments of the interpolation lifecycle. The most important one is onUpdate. This is where the magic happens.
onUpdate: ({ x, y }, time, progress, instance) => {
// Do something with the x and y values
// time is the elapsed time in ms
// progress is the normalized progress between 0 to 1
},
onStart: ({ x, y }, time, progress, instance) => {
// the initial values
},
onComplete: ({ x, y }, time, progress, instance) => {
// done!
}
In terms of developer experience, I feel better merging props, options & callbacks at the same level in the constructor object. It reduces mental overhead when reading an animation, especially in a complex timeline. On the other hand, the web animation API separates keyframes & options ; motion.dev did something similar. It’s probably to stay as close as possible to the native API, which is a smart move too.
It’s just a matter of getting used to it, but it’s also the kind of question that keeps library developers awake at night. Once the API is set, it’s difficult to reverse it. In the case of Interpol, I don’t have this kind of problem, as long as the library remains relatively niche. But for API design issues, and because I like to procrastinate on these kind of details, these are important questions.
Interpol methods
Now, what about methods? I kept the API surface to a minimum and explained below why I did so.
The GUI works thanks to computed properties defined as functions that return new GUI_PARAMS.value values each time you update the x or scale sliders during the animation.
const itp = new Interpol({
x: [0, ()=> GUI_PARAMS.x]
})
// call refresh to recompute all computed values
itp.refresh()
So far there shouldn’t be any surprise if you are used to animation libraries. The best is coming with Timelines.
Timeline & algorithm
Interpolating a set of values is one thing. Building a sequencing engine on top of it is a completely different challenge. The constructor and methods look like what we already know:
import { Timeline } from "@wbe/interpol"
const tl = new Timeline()
// Pass Interpol constructor to the add()
tl.add({
x: [-10, 100],
duration: 750,
ease: t => t * t
onUpdate: ({ x }, time, progress) => {},
})
tl.add({
foo: [100, 50],
bar: [0, 500],
duration: 500,
ease: "power3.out"
onUpdate: ({ foo, bar }, time, progress) => {},
})
// Second possibility: Set a callback function parameter
tl.add(() => {
// Reach this point at 50ms via the absolute offset
}, 50)
tl.play(.3) // start at 30% of the timeline progress, why not?
This API allows us to sequence Interpol instances via add() methods. It’s one of the most challenging part of the library because it requires to maintain an array of Interpol instances internally, with some programmatic properties, like their current position, current progress, duration of the current instance, their possible offset etc.
In the Timeline algorithm, we basically can’t call the play() method of each “add”, It would be a nightmare to control. On the other hand, we have the possibility to calculate a timeline progress (our percent) as long as we know the time position of each of the Interpol instances it holds. This algorithm is based on the fact that a progress lower than 0 or higher than 1 is not animated. In this case, the Interpol instance is not playing at all, but “progressed” lower than 0 or higher than 1.
Take this screen capture: it displays four animated elements in four adds (meaning Interpol instances in the Timeline).
As said before, we calculate a global timeline progress used to modify the progression value of each internal Interpol. All adds are impacted by the global progress, even if it is not yet their turn to be animated. For example, we know that the green square should start its own interpolation at a relative timeline progress .15 (approximately) or 15% of the total timeline, but will be asked to progress since the Timeline is playing.
updateAdds(tlTime: number, tlProgress: number) {
this.adds.forEach((add) => {
// calc a progress between 0 and 1 for each add
add.progress.current = (tlTime - add.time.start) / add.instance.duration
add.instance.progress(add.progress.current)
})
}
tick(delta) {
// calc the timeline time and progress spend from the start
// and update all the interpolations
this.updateAdds(tlTime, tlProgress)
}
It’s then up to each add.interpol.progress() to handle its own logic, to execute its own onUpdate() when needed. Check logs on the same animation: onUpdate is called only during the interpolation, and it’s what we want.
Try it by yourself!
Offsets
Another topic that is of particular interest to me is offsets. In fact, when animating something with a timeline, we always need this functionality. It consists in repositioning a tween, relatively from its natural position or absolutely, in the timeline. All timelines examples below use them in order to superimpose instances. Too many sequential animations feel weird to me.
Technically offsets are about recalculating all adds starts and ends, depending of their own offset.
tl.add({}, 110) // start absolutely at 110ms
tl.add({}, "-=110") // start relatively at -110ms
tl.add({}, "+=110") // start relatively at +110ms
The main difficulty I encountered with this topic was testing. To ensure the offset calculations work correctly, I had to write numerous unit tests. This was far from wasted time, as I still refer to them today to remember how offset calculations should behave in certain edge cases.
Example: What happens if an animation is added with a negative offset and its start is positioned before the timeline’s start? All answers to this kind of questions have been covered in this timeline.offset.test.
it("absolute offset should work with number", () => {
return Promise.all([
// when absolute offset of the second add is 0
/**
0 100 200 300
[- itp1 (100) -]
[ ------- itp2 (200) -------- ]
^
offset start at absolute 0 (number)
^
total duration is 200
*/
testTemplate([[100], [200, 0]], 200),
})
When properly written, tests are my guarantee that my code aligns with my project’s business rules. This is a crucial point for a library’s evolution. I could also say that I’ve learned to protect myself from myself by “fixing” strict rules through tests, which prevent me from breaking everything when trying to add new features. And when you need to cover multiple topics in your API, this allows to breathe.
Make choices & find some workarounds
Back to the “lightweight library” topic, which required me to make several choices: first, by not developing any functionality that I don’t currently need; and second, by filtering out API features that I can already express using existing tools.
For example, there’s no repeat feature in Interpol. But we can simply implement it by calling start in a loop, as long as the method returns a promise:
const repeat = async (n: number): void => {
for (let i = 0; i < n; i++) await itp.play();
};
Another example is about the missing seek method, that allows to move the animation to a specific point via a duration parameter; example: “Move directly to 1,4s of the animation”. I mostly use the same type of method with a streamlined percentage parameter like progress that allows me to move “relatively” across the entire animation, rather than depending on a time factor. But if needed, it remains easy to “seek” with progress as follow:
const duration = 1430 // ms
const itp = new Interpol({
duration,
//...
})
// We want to move the animation at 1000ms
const targetTime = 1000
const percent = targetTime / duration // 0.69...
// progress take a value between 0 and 1
itp.progress(percent)
And about staggers? Again, we can use delay for Interpol, or offsets for Timeline to cover this need.
for (let i = 0; i < elements.length; i++) {
const el = elements[i];
const itp = new Interpol({
// create the stagger with a relative delay
delay: i * 20,
x: [innerWidth / 2, () => random(0, innerWidth)],
y: [innerHeight / 2, () => random(0, innerHeight)],
scale: [0, 5],
onUpdate: ({ x, y, scale, opacity }) => {
el.style.transform = `translate3d(${x}px, ${y}px, 0px) scale(${scale})`
el.style.opacity = `${opacity}`
},
});
}
Similarly, we can easily create our own yoyo function and control what happens on each recursive call. The refresh() method is invoked each time we play the Interpol again to recompute all dynamic values.
And here, an example of what we can achieve by combining these two last technics.
Digging on performance questions
Batching callbacks
The first major optimization for this kind of library is to batch all callback (onUpdate) executions into a single sequential queue. A naive implementation would trigger a separate requestAnimationFrame (RAF) for each instance. Instead, the most performant approach is to externalize and globalize a single RAF, to which all Interpol instances subscribe.
// Global Ticker instance (which contains the unique RAF)
// Used by all Interpol & Timeline instances
const ticker = new Ticker()
class Interpol {
// ...
play() {
ticker.add(this.update)
}
stop() {
this.ticker.remove(this.update)
}
update = () => {
// Do everything you want to do on each frame
}
}
The Ticker instance works like a publish-subscriber pattern, adding and removing callbacks from its own unique RAF. This strategy significantly improves performance, ensuring that all property updates, (whether DOM, GL properties, or others) occur exactly on the same frame.
Batching DOM update
Another important optimization is to batch all DOM writes within the same frame. When multiple elements are updated independently. For example, setting style.transform or style.opacity across different animation instances. Each modification can trigger separate layout and paint operations. By synchronizing all updates through a shared ticker, you ensure that these style changes occur together, minimizing layout thrashing and reducing reflow costs.
This is actually a good example of what Interpol can’t do.
Interpol instances don’t know what happens insider their own onUpdate, unlike a traditional animation library that directly manages DOM targets and can optimize updates globally. On this kind of optimization, Interpol will never be able to compete. It’s part of the “low-level” philosophy of the library. It’s important to keep this in mind.
Stress test
I won’t dive too deep into benchmarks, because in most real-world cases, the difference is barely noticeable in my personal usage. Still, I built a small sandbox to test how different engines behave when animating hundreds of particles on a shared loop. Both GSAP and Interpol stay at a stable 60 FPS in this example with a grid of 6^4 elements. With 7^4, GSAP starts to win. This is purely a stress test because, in a real-world scenario, you wouldn’t build a particle system with DOM elements anyway 🙂
Conclusion
So the final question is: Why use a tool that doesn’t cover every need? And this is a valid question!
Interpol is my personal research project, I use it on my projects even if it’s 50% percent of why I continue to maintain it. The second 50% is that library allows me to ask deep questions about mechanisms, implementation choices, and understand performance issues. It’s a playground that deserves to be explored beyond its simple usefulness and coolness in the world of open-source JS libraries. I will always encourage reinventing the wheel for the purpose of learning and understanding the underlying concepts, this is exactly how I learned to develop.
For sure, I continue to use GSAP and anime.js on many projects for reasons that you know after reading this article. They’re so easy to use, the work is phenomenal.
About me
Because there are humans behind the code, I’m Willy Brauner, senior front-end developer, from Lyon (France). Previously lead front-end developer at Cher-ami, I’m back as a freelancer for almost two years. I Mostly work with agencies on creative projects, building front-end architectures, development workflows, and animations. I write about my research on my journal and publish open-source code on Github. You can reach out to me on Bluesky, Linkedin or email.