برچسب: vert

  • 2 ways to use custom equality rules in a HashSet | Code4IT

    2 ways to use custom equality rules in a HashSet | Code4IT


    With HashSet, you can get a list of different items in a performant way. What if you need a custom way to define when two objects are equal?

    Table of Contents

    Just a second! 🫷
    If you are here, it means that you are a software developer.
    So, you know that storage, networking, and domain management have a cost .

    If you want to support this blog, please ensure that you have disabled the adblocker for this site.
    I configured Google AdSense to show as few ADS as possible – I don’t want to bother you with lots of ads, but I still need to add some to pay for the resources for my site.

    Thank you for your understanding.
    Davide

    Sometimes, object instances can be considered equal even though some of their properties are different. Consider a movie translated into different languages: the Italian and French versions are different, but the movie is the same.

    If we want to store unique values in a collection, we can use a HashSet<T>. But how can we store items in a HashSet when we must follow a custom rule to define if two objects are equal?

    In this article, we will learn two ways to add custom equality checks when using a HashSet.

    Let’s start with a dummy class: Pirate.

    public class Pirate
    {
        public int Id { get; }
        public string Name { get; }
    
        public Pirate(int id, string username)
        {
            Id = id;
            Name = username;
        }
    }
    

    I’m going to add some instances of Pirate to a HashSet. Please, note that there are two pirates whose Id is 4:

    List<Pirate> mugiwara = new List<Pirate>()
    {
        new Pirate(1, "Luffy"),
        new Pirate(2, "Zoro"),
        new Pirate(3, "Nami"),
        new Pirate(4, "Sanji"), // This ...
        new Pirate(5, "Chopper"),
        new Pirate(6, "Robin"),
        new Pirate(4, "Duval"), // ... and this
    };
    
    
    HashSet<Pirate> hashSet = new HashSet<Pirate>();
    
    
    foreach (var pirate in mugiwara)
    {
        hashSet.Add(pirate);
    }
    
    
    _output.WriteAsTable(hashSet);
    

    (I really hope you’ll get the reference 😂)

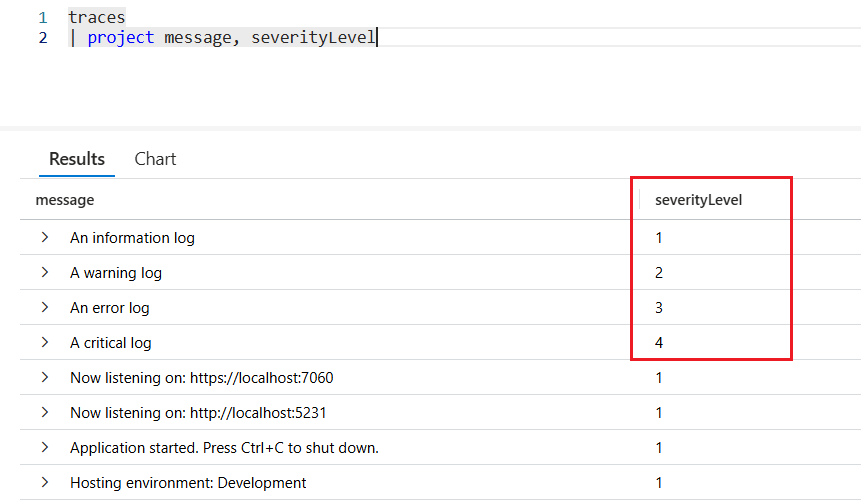
    Now, what will we print on the console? (ps: output is just a wrapper around some functionalities provided by Spectre.Console, that I used here to print a table)

    HashSet result when no equality rule is defined

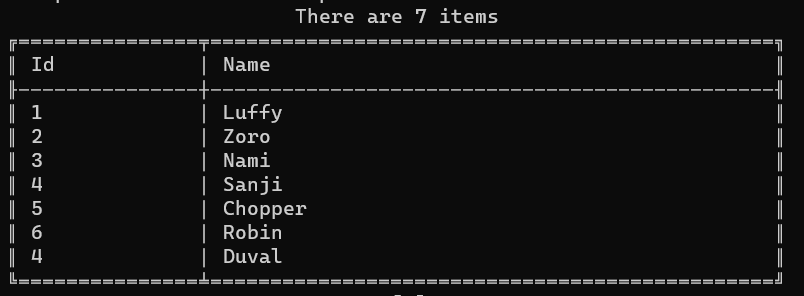
    As you can see, we have both Sanji and Duval: even though their Ids are the same, those are two distinct objects.

    Also, we haven’t told HashSet that the Id property must be used as a discriminator.

    Define a custom IEqualityComparer in a C# HashSet

    In order to add a custom way to tell the HashSet that two objects can be treated as equal, we can define a custom equality comparer: it’s nothing but a class that implements the IEqualityComparer<T> interface, where T is the name of the class we are working on.

    public class PirateComparer : IEqualityComparer<Pirate>
    {
        bool IEqualityComparer<Pirate>.Equals(Pirate? x, Pirate? y)
        {
            Console.WriteLine($"Equals: {x.Name} vs {y.Name}");
            return x.Id == y.Id;
        }
    
        int IEqualityComparer<Pirate>.GetHashCode(Pirate obj)
        {
            Console.WriteLine("GetHashCode " + obj.Name);
            return obj.Id.GetHashCode();
        }
    }
    

    The first method, Equals, compares two instances of a class to tell if they are equal, following the custom rules we write.

    The second method, GetHashCode, defines a way to build an object’s hash code given its internal status. In this case, I’m saying that the hash code of a Pirate object is just the hash code of its Id property.

    To include this custom comparer, you must add a new instance of PirateComparer to the HashSet declaration:

    HashSet<Pirate> hashSet = new HashSet<Pirate>(new PirateComparer());
    

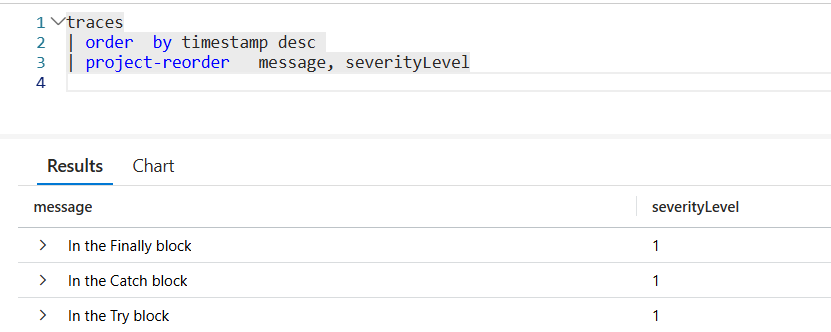
    Let’s rerun the example, and admire the result:

    HashSet result with custom comparer

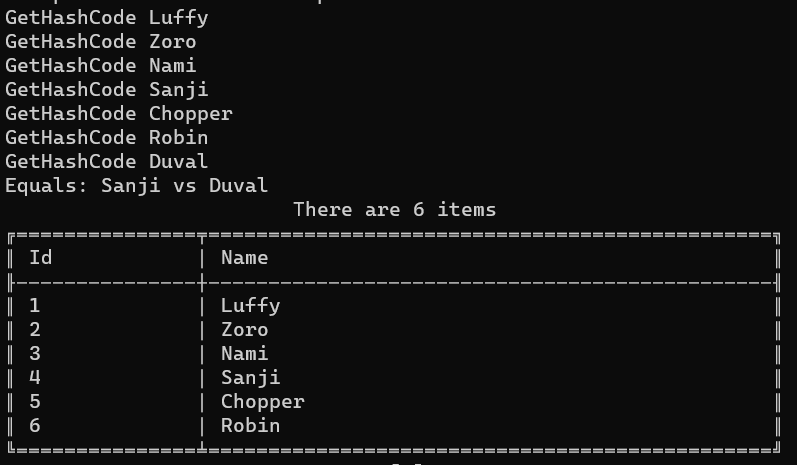
    As you can see, there is only one item whose Id is 4: Sanji.

    Let’s focus a bit on the messages printed when executing Equals and GetHashCode.

    GetHashCode Luffy
    GetHashCode Zoro
    GetHashCode Nami
    GetHashCode Sanji
    GetHashCode Chopper
    GetHashCode Robin
    GetHashCode Duval
    Equals: Sanji vs Duval
    

    Every time we insert an item, we call the GetHashCode method to generate an internal ID used by the HashSet to check if that item already exists.

    As stated by Microsoft’s documentation,

    Two objects that are equal return hash codes that are equal. However, the reverse is not true: equal hash codes do not imply object equality, because different (unequal) objects can have identical hash codes.

    This means that if the Hash Code is already used, it’s not guaranteed that the objects are equal. That’s why we need to implement the Equals method (hint: do not just compare the HashCode of the two objects!).

    Is implementing a custom IEqualityComparer the best choice?

    As always, it depends.

    On the one hand, using a custom IEqualityComparer has the advantage of allowing you to have different HashSets work differently depending on the EqualityComparer passed in input; on the other hand, you are now forced to pass an instance of IEqualityComparer everywhere you use a HashSet — and if you forget one, you’ll have a system with inconsistent behavior.

    There must be a way to ensure consistency throughout the whole codebase.

    Implement the IEquatable interface

    It makes sense to implement the equality checks directly inside the type passed as a generic type to the HashSet.

    To do that, you need to have that class implement the IEquatable<T> interface, where T is the class itself.

    Let’s rework the Pirate class, letting it implement the IEquatable<Pirate> interface.

    public class Pirate : IEquatable<Pirate>
    {
        public int Id { get; }
        public string Name { get; }
    
        public Pirate(int id, string username)
        {
            Id = id;
            Name = username;
        }
    
        bool IEquatable<Pirate>.Equals(Pirate? other)
        {
            Console.WriteLine($"IEquatable Equals: {this.Name} vs {other.Name}");
            return this.Id == other.Id;
        }
    
        public override bool Equals(object obj)
        {
            Console.WriteLine($"Override Equals {this.Name} vs {(obj as Pirate).Name}");
            return Equals(obj as Pirate);
        }
    
        public override int GetHashCode()
        {
            Console.WriteLine($"GetHashCode {this.Id}");
            return (Id).GetHashCode();
        }
    }
    

    The IEquatable interface forces you to implement the Equals method. So, now we have two implementations of Equals (the one for IEquatable and the one that overrides the default implementation). Which one is correct? Is the GetHashCode really used?

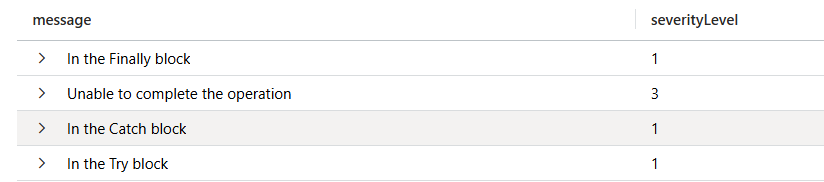
    Let’s see what happens in the next screenshot:

    HashSet result with a class that implements IEquatable

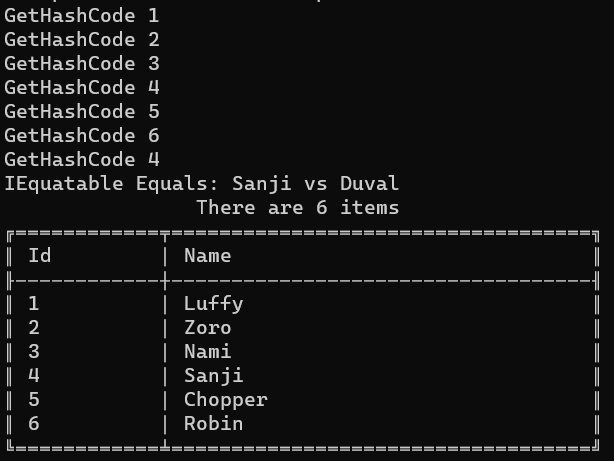
    As you could’ve imagined, the Equals method called in this case is the one needed to implement the IEquatable interface.

    Please note that, as we don’t need to use the custom comparer, the HashSet initialization becomes:

    HashSet<Pirate> hashSet = new HashSet<Pirate>();
    

    What has the precedence: IEquatable or IEqualityComparer?

    What happens when we use both IEquatable and IEqualityComparer?

    Let’s quickly demonstrate it.

    First of all, keep the previous implementation of the Pirate class, where the equality check is based on the Id property:

    public class Pirate : IEquatable<Pirate>
    {
        public int Id { get; }
        public string Name { get; }
    
        public Pirate(int id, string username)
        {
            Id = id;
            Name = username;
        }
    
        bool IEquatable<Pirate>.Equals(Pirate? other)
        {
            Console.WriteLine($"IEquatable Equals: {this.Name} vs {other.Name}");
            return this.Id == other.Id;
        }
    
        public override int GetHashCode()
        {
            Console.WriteLine($"GetHashCode {this.Id}");
            return (Id).GetHashCode();
        }
    }
    

    Now, create a new IEqualityComparer where the equality is based on the Name property.

    public class PirateComparerByName : IEqualityComparer<Pirate>
    {
        bool IEqualityComparer<Pirate>.Equals(Pirate? x, Pirate? y)
        {
            Console.WriteLine($"Equals: {x.Name} vs {y.Name}");
            return x.Name == y.Name;
        }
        int IEqualityComparer<Pirate>.GetHashCode(Pirate obj)
        {
            Console.WriteLine("GetHashCode " + obj.Name);
            return obj.Name.GetHashCode();
        }
    }
    

    Now we have custom checks on both the Name and the Id.

    It’s time to add a new pirate to the list, and initialize the HashSet by passing in the constructor an instance of PirateComparerByName.

    List<Pirate> mugiwara = new List<Pirate>()
    {
        new Pirate(1, "Luffy"),
        new Pirate(2, "Zoro"),
        new Pirate(3, "Nami"),
        new Pirate(4, "Sanji"), // Id = 4
        new Pirate(5, "Chopper"), // Name = Chopper
        new Pirate(6, "Robin"),
        new Pirate(4, "Duval"), // Id = 4
        new Pirate(7, "Chopper") // Name = Chopper
    };
    
    
    HashSet<Pirate> hashSet = new HashSet<Pirate>(new PirateComparerByName());
    
    
    foreach (var pirate in mugiwara)
    {
        hashSet.Add(pirate);
    }
    

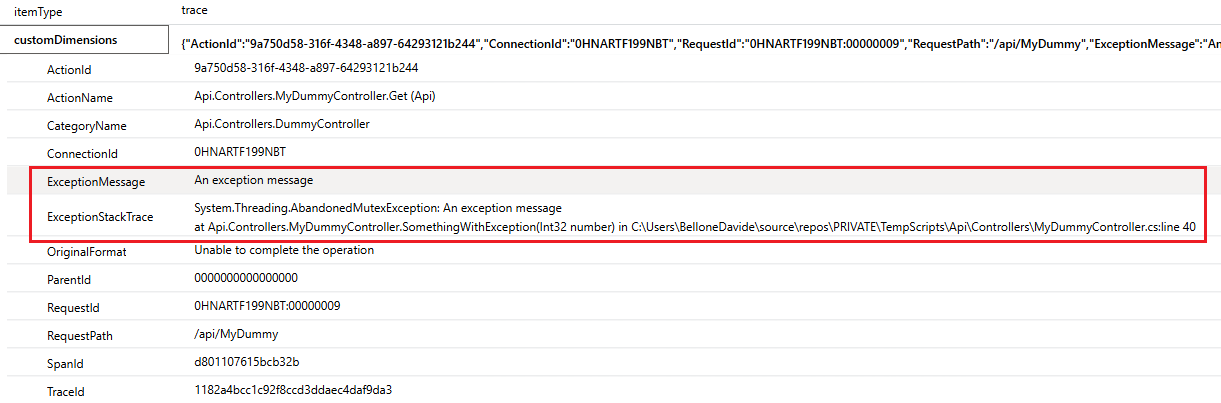
    We now have two pirates with ID = 4 and two other pirates with Name = Chopper.

    Can you foresee what will happen?

    HashSet items when defining both IEqualityComparare and IEquatable

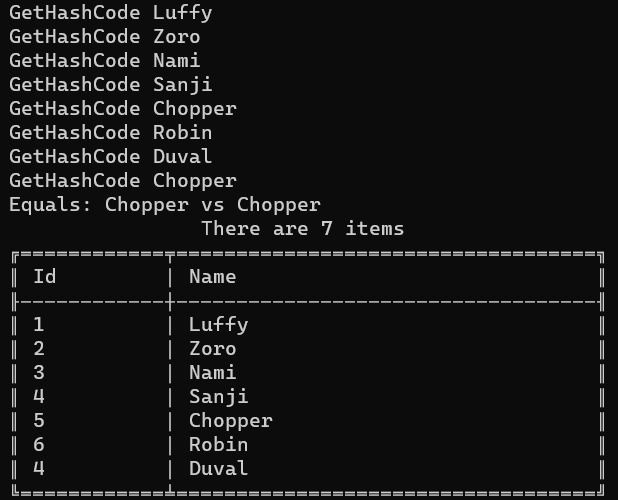
    The checks on the ID are totally ignored: in fact, the final result contains both Sanji and Duval, even if their IDs are the same. The custom IEqualityComparer has the precedence over the IEquatable interface.

    This article first appeared on Code4IT 🐧

    Wrapping up

    This started as a short article but turned out to be a more complex topic.

    There is actually more to discuss, like performance considerations, code readability, and more. Maybe we’ll tackle those topics in a future article.

    I hope you enjoyed this article! Let’s keep in touch on LinkedIn or Twitter! 🤜🤛

    Happy coding!

    🐧


    Source link

  • IEnumerable vs ICollection, and why it matters &vert; Code4IT

    IEnumerable vs ICollection, and why it matters | Code4IT


    Just a second! 🫷
    If you are here, it means that you are a software developer.
    So, you know that storage, networking, and domain management have a cost .

    If you want to support this blog, please ensure that you have disabled the adblocker for this site.
    I configured Google AdSense to show as few ADS as possible – I don’t want to bother you with lots of ads, but I still need to add some to pay for the resources for my site.

    Thank you for your understanding.
    Davide

    Defining the best return type is crucial to creating a shared library whose behaviour is totally under your control.

    You should give the consumers of your libraries just the right amount of freedom to integrate and use the classes and structures you have defined.

    That’s why it is important to know the differences between interfaces like IEnumerable<T> and ICollection<T>: these interfaces are often used together but have totally different meanings.

    IEnumerable: loop through the items in the collection

    Suppose that IAmazingInterface is an interface you expose so that clients can interact with it without knowing the internal behaviour.

    You have defined it this way:

    public interface IAmazingInterface
    {
        IEnumerable<int> GetNumbers(int[] numbers);
    }
    

    As you can see, the GetNumbers returns an IEnumerable<int>: this means that (unless they do some particular tricks like using reflection), clients will only be able to loop through the collection of items.

    Clients don’t know that, behind the scenes, AmazingClass uses a custom class MySpecificEnumberable.

    public class AmazingClass: IAmazingInterface
    {
        public IEnumerable<int> GetNumbers(int[] numbers)
            => new MySpecificEnumberable(numbers);
    }
    

    MySpecificEnumberable is a custom class whose purpose is to store the initial values in a sorted way. It implements IEnumerable<int>, so the only operations you have to support are the two implementations of GetEnumerator() – pay attention to the returned data type!

    public class MySpecificEnumberable : IEnumerable<int>
    {
        private readonly int[] _numbers;
    
        public MySpecificEnumberable(int[] numbers)
        {
            _numbers = numbers.OrderBy(_ => _).ToArray();
        }
    
        public IEnumerator<int> GetEnumerator()
        {
            foreach (var number in _numbers)
            {
                yield return number;
            }
        }
    
        IEnumerator IEnumerable.GetEnumerator()
            => _numbers.GetEnumerator();
    }
    

    Clients will then be able to loop all the items in the collection:

    IAmazingInterface something = new AmazingClass();
    var numbers = something.GetNumbers([1, 5, 6, 9, 8, 7, 3]);
    
    foreach (var number in numbers)
    {
        Console.WriteLine(number);
    }
    

    But you cannot add or remove items from it.

    ICollection: list, add, and remove items

    As we saw, IEnumerable<T> only allows you to loop through all the elements. However, you cannot add or remove items from an IEnumerable<T>.

    To do so, you need something that implements ICollection<T>, like the following class (I haven’t implemented any of these methods: I want you to focus on the operations provided, not on the implementation details).

    class MySpecificCollection : ICollection<int>
    {
        public int Count => throw new NotImplementedException();
    
        public bool IsReadOnly => throw new NotImplementedException();
    
        public void Add(int item) => throw new NotImplementedException();
    
        public void Clear() => throw new NotImplementedException();
    
        public bool Contains(int item) => throw new NotImplementedException();
    
        public void CopyTo(int[] array, int arrayIndex) => throw new NotImplementedException();
    
        public IEnumerator<int> GetEnumerator() => throw new NotImplementedException();
    
        public bool Remove(int item) => throw new NotImplementedException();
    
        IEnumerator IEnumerable.GetEnumerator() => throw new NotImplementedException();
    }
    

    ICollection<T> is a subtype of IEnumerable<T>, so everything we said before is still valid.

    However, having a class that implements ICollection<T> gives you full control over how items can be added or removed from the collection, allowing you to define custom behaviour. For instance, you can define that the Add method adds an integer only if it’s an odd number.

    Why knowing the difference actually matters

    Classes and interfaces are meant to be used. If you are like me, you work on both the creation of the class and its consumption.

    So, if an interface must return a sequence of items, you most probably use the List shortcut: define the return type of the method as List<Item>, and then use it, regardless of having it looped through or having the consumer add items to the sequence.

    // in the interface
    public interface ISomething
    {
        List<Item> PerformSomething(int[] numbers);
    }
    
    
    // in the consumer class
    ISomething instance = //omitted
    List<Item> myItems = instance.PerformSomething([2, 3, 4, 5]);
    

    Everything works fine, but it works because we are in control of both the definition and the consumer.

    What if you have to expose the library to something outside your control?

    You have to consider two elements:

    • consumers should not be able to tamper with your internal implementation (for example, by adding items when they are not supposed to);
    • you should be able to change the internal implementation as you wish without breaking changes.

    So, if you want your users to just enumerate the items within a collection, you may start this way:

    // in the interface
    public interface ISomething
    {
        IEnumerable<Item> PerformSomething(int[] numbers);
    }
    
    // in the implementation
    
    IEnumerable<Item> PerformSomething(int[] numbers)
    {
        return numbers.Select(x => new Item(x)).ToList();
    }
    
    // in the consumer class
    
    ISomething instance = //omitted
    IEnumerable<Item> myItems = instance.PerformSomething([2, 3, 4, 5]);
    

    Then, when the time comes, you can change the internal implementation of PerformSomething with a more custom class:

    // custom IEnumerable definition
    public class MyCustomEnumberable : IEnumerable<Item> { /*omitted*/ }
    
    // in the interface
    IEnumerable<Item> PerformSomething(int[] numbers)
    {
        MyCustomEnumberable customEnumerable = new MyCustomEnumberable();
        customEnumerable.DoSomething(numbers);
        return customEnumerable;
    }
    

    And the consumer will not notice the difference. Again, unless they try to use tricks to tamper with your code!

    This article first appeared on Code4IT 🐧

    Wrapping up

    While understanding the differences between IEnumerable and ICollection is trivial, understanding why you should care about them is not.

    IEnumerable and ICollection hierarchy

    I hope this article helped you understand that yeah, you can take the easy way and return everywhere a List, but it’s a choice that you cannot always apply to a project, and that probably will make breaking changes more frequent in the long run.

    I hope you enjoyed this article! Let’s keep in touch on LinkedIn or Twitter! 🤜🤛

    Happy coding!

    🐧


    Source link

  • Enhancing Retry Patterns with a bit of randomness &vert; Code4IT

    Enhancing Retry Patterns with a bit of randomness | Code4IT


    Operations may fail for transient reasons. How can you implement retry patterns? And how can a simple Jitter help you stabilize the system?

    Table of Contents

    Just a second! 🫷
    If you are here, it means that you are a software developer.
    So, you know that storage, networking, and domain management have a cost .

    If you want to support this blog, please ensure that you have disabled the adblocker for this site.
    I configured Google AdSense to show as few ADS as possible – I don’t want to bother you with lots of ads, but I still need to add some to pay for the resources for my site.

    Thank you for your understanding.
    Davide

    When building complex systems, you may encounter situations where you have to retry an operation several times before giving up due to transient errors.

    How can you implement proper retry strategies? And how can a little thing called “Jitter” help avoid the so-called “Thundering Herd problem”?.

    Retry Patterns and their strategies

    Retry patterns are strategies for retrying operations caused by transient, temporary errors, such as packet loss or a temporarily unavailable resource.

    Suppose you have a database that can handle up to 3 requests per second (yay! so performant!).

    Accidentally, three clients try to execute an operation at the exact same instant. What happens now?

    Well, the DB becomes temporarily unavailable, and it won’t be able to serve those requests. So, since this issue occurred by chance, you just have to wait and retry.

    How long should we wait before the next tentative?

    You can imagine that the timeframe between a tentative and the next one follows a mathematical function, where the wait time (called Backoff) depends on the tentative number:

    Backoff = f(RetryAttemptNumber)
    

    With that in mind, we can think of two main retry strategies: linear backoff retries and exponential backoff retries.

    Linear backoff retries

    The simplest way to handle retries is with Linear backoff.

    Let’s continue with the mathematical function analogy. In this case, the function we can use is a linear function.

    We can simplify the idea by saying that, regardless of the attempt number, the delay between one retry and the next one stays constant.

    Linear backoff

    Let’s see an example in C#. Say that you have defined an operation that may fail randomly, stored in an Action instance. You can call the following RetryOperationWithLinearBackoff method to execute the operation passed in input with a linear retry.

    static void RetryOperationWithLinearBackoff(Action operation)
    {
        int maxRetries = 5;
        double delayInSeconds = 5.0;
    
        for (int attempt = 0; attempt < maxRetries; attempt++)
        {
            try
            {
                operation();
                return;
            }
            catch (Exception e)
            {
                Console.WriteLine($"Retrying in {delayInSeconds:F2} seconds...");
                Thread.Sleep(TimeSpan.FromSeconds(delayInSeconds));
            }
        }
    }
    

    The input opertation will be retried for up to 5 times, and every time an operation fails, the system waits 5 seconds before the next retry.

    Linear backoff is simple to implement, as you just saw. However, it falls short when the system is in a faulty state and takes a long time to get back to work. Having linear retries and a fixed amount of maximum retries limits the timespan an operation can be retried. You can end up finishing your attempts while the downstream system is still recovering.

    There may be better ways.

    Exponential backoff retries

    An alternative is to use Exponential Backoff.

    With this approach, the backoff becomes longer after every attempt — usually, it doubles at every retry, that’s why it is called “exponential” backoff.

    This way, if the downstream system takes a long time to recover, the top-level operation has a better chance of being completed successfully.

    Exponential Backoff

    Of course, the downside of this approach is that to get a response from the operation (did it complete? did it fail?), you will have to wait longer — it all depends on the number of retries.
    So, the top-level operation can go into timeout because it tries to access a resource, but the retries become increasingly diluted.

    A simple implementation in C# would be something like this:

    static void RetryOperationWithExponentialBackoff(Action operation)
    {
        int maxRetries = 5;
        double baseDelayInSeconds = 2.0;
    
        for (int attempt = 0; attempt < maxRetries; attempt++)
        {
            try
            {
                operation();
                return;
            }
            catch (Exception e)
            {
                double exponentialDelay = baseDelayInSeconds * Math.Pow(2, attempt);
                Console.WriteLine($"Retrying in {exponentialDelay:F2} seconds...");
                Thread.Sleep(TimeSpan.FromSeconds(exponentialDelay));
            }
        }
    }
    

    The key to understanding the exponential backoff is how the delay is calculated:

    double exponentialDelay = baseDelayInSeconds * Math.Pow(2, attempt);
    

    Understanding the Thundering Herd problem

    The “basic” versions of these retry patterns are effective in overcoming temporary service unavailability, but they can inadvertently cause a thundering herd problem. This occurs when multiple clients retry simultaneously, overwhelming the system with a surge of requests, potentially leading to further failures.

    Suppose that a hypothetical downstream system becomes unavailable if 5 or more requests occur simultaneously.

    What happens when five requests start at the exact same moment? They start, overwhelm the system, and they all fail.

    Their retries will always be in sync, since the backoff is fixed (yes, it can grow in time, but it’s still a fixed value).

    So, all five requests will wait for a fixed amount of time before the next retry. This means that they will always stay in sync.

    Let’s make it more clear with these simple diagrams, where each color represents a different client trying to perform the operation, and the number inside the star represents the attempt number.

    In the case of linear backoff, all the requests are always in sync.

    Multiple retries with linear backoff

    The same happens when using exponential backoff: even if the backoff grows exponentially, all the requests stay in sync, making the system unstable.

    Multiple retries with exponential backoff

    What is Jitter?

    Jitter refers to the introduction of randomness into timing mechanisms: the term was first adopted when talking about network communications, but then became in use for in other areas of system design.

    Jitter helps to mitigate the risk of synchronized retries that can lead to spikes in server load, forcing clients that try to simultanously access a resource to perform their operations with a slightly randomized delay.

    In fact, by randomizing the delay intervals between retries, jitter ensures that retries are spread out over time, reducing the likelihood of overwhelming a service.

    Benefits of Jitter in Distributed Systems

    This is where Jitter comes in handy: it adds a random interval around the moment a retry should happen to minimize excessive retries in sync.

    Exponential Backoff with Jitter

    Jitter introduces randomness to the delay intervals between retries. By staggering these retries, jitter helps distribute the load more evenly over time.

    This reduces the risk of server overload and allows backend systems to recover and process requests efficiently. Implementing jitter can transform a simple retry mechanism into a robust strategy that enhances system reliability and performance.

    Incorporating jitter into your system design offers several advantages:

    • Reduced Load Spikes: By spreading out retries, Jitter minimizes sudden surges in traffic, preventing server overload.
    • Enhanced System Stability: With less synchronized activity, systems remain more stable, even during peak usage times.
    • Improved Resource Utilization: Jitter allows for more efficient use of resources, as requests are processed more evenly.
    • Greater Resilience: Systems become more resilient to transient errors and network fluctuations, improving overall reliability.
    • Avoiding Synchronization: Jitter prevents multiple clients from retrying at the same time, which can lead to server overload.
    • Improved Resource Utilization: By spreading out retries, jitter helps maintain a more consistent load on servers, improving resource utilization.
    • Enhanced Reliability: Systems become more resilient to transient errors, reducing the likelihood of cascading failures.

    Let’s review the retry methods we defined before.

    static void RetryOperationWithLinearBackoffAndJitter(Action operation)
    {
        int maxRetries = 5;
        double baseDelayInSeconds = 5.0;
    
        Random random = new Random();
    
        for (int attempt = 0; attempt < maxRetries; attempt++)
        {
            try
            {
                operation();
                return;
            }
            catch (Exception e)
            {
                double jitter = random.NextDouble() * 4 - 2; // Random jitter between -2 and 2 seconds
                double delay = baseDelayInSeconds + jitter;
                Console.WriteLine($"Retrying in {delay:F2} seconds...");
                Thread.Sleep(TimeSpan.FromSeconds(delay));
            }
        }
    }
    

    And, for Exponential Backoff,

    static void RetryOperationWithExponentialBackoffAndJitter(Action operation)
    {
        int maxRetries = 5;
        double baseDelayInSeconds = 2.0;
    
        Random random = new Random();
    
        for (int attempt = 0; attempt < maxRetries; attempt++)
        {
            try
            {
                operation();
                return;
            }
            catch (Exception e)
            {
                // Exponential backoff with jitter
                double exponentialDelay = baseDelayInSeconds * Math.Pow(2, attempt);
                double jitter = random.NextDouble() * (exponentialDelay / 2);
                double delay = exponentialDelay + jitter;
                Console.WriteLine($"Retrying in {delay:F2} seconds...");
                Thread.Sleep(TimeSpan.FromSeconds(delay));
            }
        }
    }
    

    In both cases, the key is in creating the delay variable: a random value (the Jitter) is added to the delay.

    Notice that the Jitter can also be a negative value!

    Further readings

    Retry patterns and Jitter make your system more robust, but if badly implemented, they can make your code a mess. So, a question arises: should you focus on improving performances or on writing cleaner code?

    🔗 Code opinion: performance or clean code? | Code4IT

    This article first appeared on Code4IT 🐧

    Clearly, if the downstream system is not able to handle too many requests, you may need to implement a way to limit the number of incoming requests in a timeframe. You can choose between 4 well-known algorithms to implement Rate Limiting.

    🔗 4 algorithms to implement Rate Limiting, with comparison | Code4IT

    Wrapping up

    While adding jitter may seem like a minor tweak, its impact on distributed systems can be significant. By introducing randomness into retry patterns, jitter helps create a more balanced, efficient, and robust system.

    As we continue to build and scale our systems, incorporating jitter is a best practice that can prevent cascading failures and optimize performance. All in all, a little randomness can be just what your system needs to thrive.

    I hope you enjoyed this article! Let’s keep in touch on LinkedIn, Twitter or BlueSky! 🤜🤛

    Happy coding!

    🐧


    Source link

  • Easy logging management with Seq and ILogger in ASP.NET &vert; Code4IT

    Easy logging management with Seq and ILogger in ASP.NET | Code4IT


    Seq is one of the best Log Sinks out there : it’s easy to install and configure, and can be added to an ASP.NET application with just a line of code.

    Table of Contents

    Just a second! 🫷
    If you are here, it means that you are a software developer.
    So, you know that storage, networking, and domain management have a cost .

    If you want to support this blog, please ensure that you have disabled the adblocker for this site.
    I configured Google AdSense to show as few ADS as possible – I don’t want to bother you with lots of ads, but I still need to add some to pay for the resources for my site.

    Thank you for your understanding.
    Davide

    Logging is one of the most essential parts of any application.

    Wouldn’t it be great if we could scaffold and use a logging platform with just a few lines of code?

    In this article, we are going to learn how to install and use Seq as a destination for our logs, and how to make an ASP.NET 8 API application send its logs to Seq by using the native logging implementation.

    Seq: a sink and dashboard to manage your logs

    In the context of logging management, a “sink” is a receiver of the logs generated by one or many applications; it can be a cloud-based system, but it’s not mandatory: even a file on your local file system can be considered a sink.

    Seq is a Sink, and works by exposing a server that stores logs and events generated by an application. Clearly, other than just storing the logs, Seq allows you to view them, access their details, perform queries over the collection of logs, and much more.

    It’s free to use for individual usage, and comes with several pricing plans, depending on the usage and the size of the team.

    Let’s start small and install the free version.

    We have two options:

    1. Download it locally, using an installer (here’s the download page);
    2. Use Docker: pull the datalust/seq image locally and run the container on your Docker engine.

    Both ways will give you the same result.

    However, if you already have experience with Docker, I suggest you use the second approach.

    Once you have Docker installed and running locally, open a terminal.

    First, you have to pull the Seq image locally (I know, it’s not mandatory, but I prefer doing it in a separate step):

    Then, when you have it downloaded, you can start a new instance of Seq locally, exposing the UI on a specific port.

    docker run --name seq -d --restart unless-stopped -e ACCEPT_EULA=Y -p 5341:80 datalust/seq:latest
    

    Let’s break down the previous command:

    • docker run: This command is used to create and start a new Docker container.
    • --name seq: This option assigns the name seq to the container. Naming containers can make them easier to manage.
    • -d: This flag runs the container in detached mode, meaning it runs in the background.
    • --restart unless-stopped: This option ensures that the container will always restart unless it is explicitly stopped. This is useful for ensuring that the container remains running even after a reboot or if it crashes.
    • -e ACCEPT_EULA=Y: This sets an environment variable inside the container. In this case, it sets ACCEPT_EULA to Y, which likely indicates that you accept the End User License Agreement (EULA) for the software running in the container.
    • -p 5341:80: This maps port 5341 on your host machine to port 80 in the container. This allows you to access the service running on port 80 inside the container via port 5341 on your host.
    • datalust/seq:latest: This specifies the Docker image to use for the container. datalust/seq is the image name, and latest is the tag, indicating that you want to use the latest version of this image.

    So, this command runs a container named seq in the background, ensures it restarts unless stopped, sets an environment variable to accept the EULA, maps a host port to a container port, and uses the latest version of the datalust/seq image.

    It’s important to pay attention to the used port: by default, Seq uses port 5341 to interact with the UI and the API. If you prefer to use another port, feel free to do that – just remember that you’ll need some additional configuration.

    Now that Seq is installed on your machine, you can access its UI. Guess what? It’s on localhost:5341!

    Seq brand new instance

    However, Seq is “just” a container for our logs – but we have to produce them.

    A sample ASP.NET API project

    I’ve created a simple API project that exposes CRUD operations for a data model stored in memory (we don’t really care about the details).

    [ApiController]
    [Route("[controller]")]
    public class BooksController : ControllerBase
    {
        public BooksController()
        {
    
        }
    
        [HttpGet("{id}")]
        public ActionResult<Book> GetBook([FromRoute] int id)
        {
    
            Book? book = booksCatalogue.SingleOrDefault(x => x.Id == id);
            return book switch
            {
                null => NotFound(),
                _ => Ok(book)
            };
        }
    }
    

    As you can see, the details here are not important.

    Even the Main method is the default one:

    var builder = WebApplication.CreateBuilder(args);
    
    builder.Services.AddControllers();
    
    builder.Services.AddEndpointsApiExplorer();
    builder.Services.AddSwaggerGen();
    
    var app = builder.Build();
    
    if (app.Environment.IsDevelopment())
    {
        app.UseSwagger();
        app.UseSwaggerUI();
    }
    
    app.UseHttpsRedirection();
    
    app.MapControllers();
    
    app.Run();
    

    We have the Controllers, we have Swagger… well, nothing fancy.

    Let’s mix it all together.

    How to integrate Seq with an ASP.NET application

    If you want to use Seq in an ASP.NET application (may it be an API application or whatever else), you have to add it to the startup pipeline.

    First, you have to install the proper NuGet package: Seq.Extensions.Logging.

    The Seq.Extensions.Logging NuGet package

    Then, you have to add it to your Services, calling the AddSeq() method:

    var builder = WebApplication.CreateBuilder(args);
    
    builder.Services.AddControllers();
    
    builder.Services.AddEndpointsApiExplorer();
    builder.Services.AddSwaggerGen();
    
    + builder.Services.AddLogging(lb => lb.AddSeq());
    
    var app = builder.Build();
    

    Now, Seq is ready to intercept whatever kind of log arrives at the specified port (remember, in our case, we are using the default one: 5341).

    We can try it out by adding an ILogger to the BooksController constructor:

    private readonly ILogger<BooksController> _logger;
    
    public BooksController(ILogger<BooksController> logger)
    {
        _logger = logger;
    }
    

    So that we can use the _logger instance to create logs as we want, using the necessary Log Level:

    [HttpGet("{id}")]
    public ActionResult<Book> GetBook([FromRoute] int id)
    {
        _logger.LogInformation("I am Information");
        _logger.LogWarning("I am Warning");
        _logger.LogError("I am Error");
        _logger.LogCritical("I am Critical");
    
        Book? book = booksCatalogue.SingleOrDefault(x => x.Id == id);
        return book switch
        {
            null => NotFound(),
            _ => Ok(book)
        };
    }
    

    Log messages on Seq

    Using Structured Logging with ILogger and Seq

    One of the best things about Seq is that it automatically handles Structured Logging.

    [HttpGet("{id}")]
    public ActionResult<Book> GetBook([FromRoute] int id)
    {
        _logger.LogInformation("Looking if in my collection with {TotalBooksCount} books there is one with ID {SearchedId}"
     , booksCatalogue.Count, id);
    
        Book? book = booksCatalogue.SingleOrDefault(x => x.Id == id);
        return book switch
        {
            null => NotFound(),
            _ => Ok(book)
        };
    }
    

    Have a look at this line:

    _logger.LogInformation("Looking if in my collection with {TotalBooksCount} books there is one with ID {SearchedId}"
     , booksCatalogue.Count, id);
    

    This line generates a string message, replaces all the placeholders, and, on top of that, creates two properties, SearchedId and TotalBooksCount; you can now define queries using these values.

    Structured Logs in Seq allow you to view additional logging properties

    Further readings

    I have to admit it: logging management is one of my favourite topics.

    I’ve already written a sort of introduction to Seq in the past, but at that time, I did not use the native ILogger, but Serilog, a well-known logging library that added some more functionalities on top of the native logger.

    🔗 Logging with Serilog and Seq | Code4IT

    This article first appeared on Code4IT 🐧

    In particular, Serilog can be useful for propagating Correlation IDs across multiple services so that you can fetch all the logs generated by a specific operation, even though they belong to separate applications.

    🔗 How to log Correlation IDs in .NET APIs with Serilog

    Feel free to search through my blog all the articles related to logging – I’m sure you will find interesting stuff!

    Wrapping up

    I think Seq is the best tool for local development: it’s easy to download and install, supports structured logging, and can be easily added to an ASP.NET application with just a line of code.

    I usually add it to my private projects, especially when the operations I run are complex enough to require some well-structured log.

    Given how it’s easy to install, sometimes I use it for my work projects too: when I have to fix a bug, but I don’t want to use the centralized logging platform (since it’s quite complex to use), I add Seq as a destination sink, run the application, and analyze the logs in my local machine. Then, of course, I remove its reference, as I want it to be just a discardable piece of configuration.

    I hope you enjoyed this article! Let’s keep in touch on LinkedIn, Twitter or BlueSky! 🤜🤛

    Happy coding!

    🐧


    Source link

  • 2 ways to generate realistic data using Bogus &vert; Code4IT

    2 ways to generate realistic data using Bogus | Code4IT


    Just a second! 🫷
    If you are here, it means that you are a software developer.
    So, you know that storage, networking, and domain management have a cost .

    If you want to support this blog, please ensure that you have disabled the adblocker for this site.
    I configured Google AdSense to show as few ADS as possible – I don’t want to bother you with lots of ads, but I still need to add some to pay for the resources for my site.

    Thank you for your understanding.
    Davide

    In a previous article, we delved into the creation of realistic data using Bogus, an open-source library that allows you to generate data with plausible values.

    Bogus contains several properties and methods that generate realistic data such as names, addresses, birthdays, and so on.

    In this article, we will learn two ways to generate data with Bogus: both ways generate the same result; the main change is on the reusability and the modularity. But, in my opinion, it’s just a matter of preference: there is no approach absolutely better than the other. However, both methods can be preferred in specific cases.

    For the sake of this article, we are going to use Bogus to generate instances of the Book class, defined like this:

    public class Book
    {
        public Guid Id { get; set; }
        public string Title { get; set; }
        public int PagesCount { get; set; }
        public Genre[] Genres { get; set; }
        public DateOnly PublicationDate { get; set; }
        public string AuthorFirstName { get; set; }
        public string AuthorLastName { get; set; }
    }
    
    public enum Genre
    {
        Thriller, Fantasy, Romance, Biography
    }
    

    Expose a Faker inline or with a method

    It is possible to create a specific object that, using a Builder approach, allows you to generate one or more items of a specified type.

    It all starts with the Faker<T> generic type, where T is the type you want to generate.

    Once you create it, you can define the rules to be used when initializing the properties of a Book by using methods such as RuleFor and RuleForType.

    public static class BogusBookGenerator
    {
        public static Faker<Book> CreateFaker()
        {
            Faker<Book> bookFaker = new Faker<Book>()
             .RuleFor(b => b.Id, f => f.Random.Guid())
             .RuleFor(b => b.Title, f => f.Lorem.Text())
             .RuleFor(b => b.Genres, f => f.Random.EnumValues<Genre>())
             .RuleFor(b => b.AuthorFirstName, f => f.Person.FirstName)
             .RuleFor(b => b.AuthorLastName, f => f.Person.LastName)
             .RuleFor(nameof(Book.PagesCount), f => f.Random.Number(100, 800))
             .RuleForType(typeof(DateOnly), f => f.Date.PastDateOnly());
    
            return bookFaker;
        }
    }
    

    In this way, thanks to the static method, you can simply create a new instance of Faker<Book>, ask it to generate one or more books, and enjoy the result:

    Faker<Book> generator = BogusBookGenerator.CreateFaker();
    var books = generator.Generate(10);
    

    Clearly, it’s not necessary for the class to be marked as static: it all depends on what you need to achieve!

    Expose a subtype of Faker, specific for the data type to be generated

    If you don’t want to use a method (static or not static, it doesn’t matter), you can define a subtype of Faker<Book> whose customization rules are all defined in the constructor.

    public class BookGenerator : Faker<Book>
    {
        public BookGenerator()
        {
            RuleFor(b => b.Id, f => f.Random.Guid());
            RuleFor(b => b.Title, f => f.Lorem.Text());
            RuleFor(b => b.Genres, f => f.Random.EnumValues<Genre>());
            RuleFor(b => b.AuthorFirstName, f => f.Person.FirstName);
            RuleFor(b => b.AuthorLastName, f => f.Person.LastName);
            RuleFor(nameof(Book.PagesCount), f => f.Random.Number(100, 800));
            RuleForType(typeof(DateOnly), f => f.Date.PastDateOnly());
        }
    }
    

    Using this way, you can simply create a new instance of BookGenerator and, again, call the Generate method to create new book instances.

    var generator = new BookGenerator();
    var books = generator.Generate(10);
    

    Method vs Subclass: When should we use which?

    As we saw, both methods bring the same result, and their usage is almost identical.

    So, which way should I use?

    Use the method approach (the first one) when you need:

    • Simplicity: If you need to generate fake data quickly and your rules are straightforward, using a method is the easiest approach.
    • Ad-hoc Data Generation: Ideal for one-off or simple scenarios where you don’t need to reuse the same rules across your application.

    Or use the subclass (the second approach) when you need:

    • Reusability: If you need to generate the same type of fake data in multiple places, defining a subclass allows you to encapsulate the rules and reuse them easily.
    • Complex scenarios and extensibility: Better suited for more complex data generation scenarios where you might have many rules or need to extend the functionality.
    • Maintainability: Easier to maintain and update the rules in one place.

    Further readings

    If you want to learn a bit more about Bogus and use it to populate data used by Entity Framework, I recently published an article about this topic:

    🔗Seeding in-memory Entity Framework with realistic data with Bogus | Code4IT

    This article first appeared on Code4IT 🐧

    But, clearly, the best place to learn about Bogus is by reading the official documentation, that you can find on GitHub.

    🔗 Bogus repository | GitHub

    Wrapping up

    This article sort of complements the previous article about Bogus.

    I think Bogus is one of the best libraries in the .NET universe, as having realistic data can help you improve the intelligibility of the test cases you generate. Also, Bogus can be a great tool when you want to showcase demo values without accessing real data.

    I hope you enjoyed this article! Let’s keep in touch on LinkedIn, Twitter or BlueSky! 🤜🤛

    Happy coding!

    🐧


    Source link

  • measuring things to ensure prosperity &vert; Code4IT

    measuring things to ensure prosperity | Code4IT


    Non-functional requirements matter, but we often forget to validate them. You can measure them by setting up Fitness Functions.

    Table of Contents

    Just a second! 🫷
    If you are here, it means that you are a software developer.
    So, you know that storage, networking, and domain management have a cost .

    If you want to support this blog, please ensure that you have disabled the adblocker for this site.
    I configured Google AdSense to show as few ADS as possible – I don’t want to bother you with lots of ads, but I still need to add some to pay for the resources for my site.

    Thank you for your understanding.
    Davide

    Just creating an architecture is not enough; you should also make sure that the pieces of stuff you are building are, in the end, the once needed by your system.

    Is your system fast enough? Is it passing all the security checks? What about testability, maintainability, and other -ilities?

    Fitness Functions are components of the architecture that do not execute functional operations, but, using a set of tests and measurements, allow you to validate that the system respects all the non-functional requirements defined upfront.

    Fitness Functions: because non-functional requirements matter

    An architecture is made of two main categories of requirements: functional requirements and non-functional requirements.

    Functional requirements are the most easy to define and to test: if one of the requirements is “a user with role Admin must be able to see all data”, then writing a suite of tests for this specific requirement is pretty straightforward.

    Non-functional requirements are, for sure, as important as functional requirements, but are often overlooked or not detailed. “The system must be fast”: ok, how fast? What do you mean with “fast”? What is an acceptable value of “fast”?

    If we don’t have a clear understanding of non-functional requirements, then it’s impossible to measure them.

    And once we have defined a way to measure them, how can we ensure that we are meeting our expectations? Here’s where Fitness Functions come in handy.

    In fact, Fitness Functions are specific components that focus on non-functional requirements, executing some calculations and providing metrics that help architects and developers ensure that the system’s architecture aligns with business goals, technical requirements, and other quality attributes.

    Why Fitness Functions are crucial for future-proof architectures

    When creating an architecture, you must think of the most important -ilities for that specific case. How can you ensure that the technical choices we made meet the expectations?

    By being related to specific and measurable metrics, Fitness Functions provide a way to assess the architecture’s quality and performance, reducing the reliance on subjective opinions by using objective measurements. A metric can be a simple number (e.g., “maximum number of requests per second”), a percentage value (like “percentage of code covered by tests”) or other values that are still measurable.

    Knowing how the system behaves in regards to these measures allows architects to work on the continuous improvement of the system: teams can identify areas for improvement and make decisions based not on personal opinion but on actual data to enhance the system.

    Having a centralized place to view the historical values of a measure helps understanding if you have done progresses or, as time goes by, the quality has degraded.

    Still talking about the historical values of the measures, having a clear understanding of what is the current status of such metrics can help in identifying potential issues early in the development process, allowing teams to address them before they become critical problems.

    For example, by using Fitness Functions, you can ensure that the system is able to handle a certain amount of users per second: having proper measurements, you can identify which functionalities are less performant and, in case of high traffic, may bring the whole system down.

    You are already using Fitness Functions, but you didn’t know

    Fitness Functions sound like complex things to handle.

    Even though you can create your own functions, most probably you are already using them without knowing it. Lots of tools are available out there that cover several metrics, and I’m sure you’ve already used some of them (or, at least, you’ve already heard of them).

    Tools like SonarQube and NDepend use Fitness Functions to evaluate code quality based on metrics such as code complexity, duplication, and adherence to coding standards. Those metrics are calculated based on static analysis of the code, and teams can define thresholds under which a system can be at risk of losing maintainability. An example of metric related to code quality is Code Coverage: the higher, the better (even though 100% of code coverage does not guarantee your code is healthy).

    Tools like JMeter or K6 help you measure system performance under various conditions: having a history of load testing results can help ensure that, as you add new functionalities to the system, the performance on some specific modules does not downgrade.

    All in all, most of the Fitness Functions can be set to be part of CI/CD pipelines: for example, you can configure a CD pipeline to block the deployment of the code on a specific system if the load testing results of the new code are worse than the previous version. Or you could block a Pull Request if the code coverage percentage is getting lower.

    Further readings

    A good way to start experimenting with Load Testing is by running them locally. A nice open-source project is K6: you can install it on your local machine, define the load phases, and analyze the final result.

    🔗 Getting started with Load testing with K6 on Windows 11 | Code4IT

    This article first appeared on Code4IT 🐧

    But, even if you don’t really care about load testing (maybe because your system is not expected to handle lots of users), I’m sure you still care about code quality and their tests. When using .NET, you can collect code coverage reports using Cobertura. Then, if you are using Azure DevOps, you may want to stop a Pull Request if the code coverage percentage has decreased.

    Here’s how to do all of this:

    🔗 Cobertura, YAML, and Code Coverage Protector: how to view Code Coverage report on Azure DevOps | Code4IT

    Wrapping up

    Sometimes, there are things that we use every day, but we don’t know how to name them: Fitness Functions are one of them – and they are the foundation of future-proof software systems.

    You can create your own Fitness Functions based on whatever you can (and need to) measure: from average page loading to star-rated customer satisfaction. In conjunction with a clear dashboard, you can provide a clear view of the history of such metrics.

    I hope you enjoyed this article! Let’s keep in touch on LinkedIn, Twitter or BlueSky! 🤜🤛

    Happy coding!

    🐧


    Source link

  • How to create Custom Attributes, and why they are useful &vert; Code4IT

    How to create Custom Attributes, and why they are useful | Code4IT


    Just a second! 🫷
    If you are here, it means that you are a software developer.
    So, you know that storage, networking, and domain management have a cost .

    If you want to support this blog, please ensure that you have disabled the adblocker for this site.
    I configured Google AdSense to show as few ADS as possible – I don’t want to bother you with lots of ads, but I still need to add some to pay for the resources for my site.

    Thank you for your understanding.
    Davide

    In C#, attributes are used to describe the meaning of some elements, such as classes, methods, and interfaces.

    I’m sure you’ve already used them before. Examples are:

    • the [Required] attribute when you define the properties of a model to be validated;
    • the [Test] attribute when creating Unit Tests using NUnit;
    • the [Get] and the [FromBody] attributes used to define API endpoints.

    As you can see, all the attributes do not specify the behaviour, but rather, they express the meaning of a specific element.

    In this article, we will learn how to create custom attributes in C# and some possible interesting usages of such custom attributes.

    Create a custom attribute by inheriting from System.Attribute

    Creating a custom attribute is pretty straightforward: you just need to create a class that inherits from System.Attribute.

    [AttributeUsage(AttributeTargets.Interface | AttributeTargets.Class | AttributeTargets.Method, AllowMultiple = true)]
    public class ApplicationModuleAttribute : Attribute
    {
     public Module BelongingModule { get; }
    
     public ApplicationModuleAttribute(Module belongingModule)
       {
     BelongingModule = belongingModule;
       }
    }
    
    public enum Module
    {
     Authentication,
     Catalogue,
     Cart,
     Payment
    }
    

    Ideally, the class name should end with the suffix -Attribute: in this way, you can use the attribute using the short form [ApplicationModule] rather than using the whole class name, like [ApplicationModuleAttribute]. In fact, C# attributes can be resolved by convention.

    Depending on the expected usage, a custom attribute can have one or more constructors and can expose one or more properties. In this example, I created a constructor that accepts an enum.
    I can then use this attribute by calling [ApplicationModule(Module.Cart)].

    Define where a Custom Attribute can be applied

    Have a look at the attribute applied to the class definition:

    [AttributeUsage(AttributeTargets.Interface | AttributeTargets.Class | AttributeTargets.Method, AllowMultiple = true)]
    

    This attribute tells us that the ApplicationModule can be applied to interfaces, classes, and methods.

    System.AttributeTargets is an enum that enlists all the points you can attach to an attribute. The AttributeTargets enum is defined as:

    [Flags]
    public enum AttributeTargets
    {
     Assembly = 1,
     Module = 2,
     Class = 4,
     Struct = 8,
     Enum = 16,
     Constructor = 32,
     Method = 64,
     Property = 128,
     Field = 256,
     Event = 512,
     Interface = 1024,
     Parameter = 2048,
     Delegate = 4096,
     ReturnValue = 8192,
     GenericParameter = 16384,
     All = 32767
    }
    

    Have you noticed it? It’s actually a Flagged enum, whose values are powers of 2: this trick allows us to join two or more values using the OR operator.

    There’s another property to notice: AllowMultiple. When set to true, this property tells us that it’s possible to use apply more than one attribute of the same type to the same element, like this:

    [ApplicationModule(Module.Cart)]
    [ApplicationModule(Module.Catalogue)]
    public class ItemDetailsService { }
    

    Or, if you want, you can inline them:

    [ApplicationModule(Module.Cart), ApplicationModule(Module.Catalogue)]
    public class ItemDetailsService { }
    

    Practical usage of Custom Attributes

    You can use custom attributes to declare which components or business areas an element belongs to.

    In the previous example, I defined an enum that enlists all the business modules supported by my application:

    public enum Module
    {
        Authentication,
        Catalogue,
        Cart,
        Payment
    }
    

    This way, whenever I define an interface, I can explicitly tell which components it belongs to:

    [ApplicationModule(Module.Catalogue)]
    public interface IItemDetails
    {
        [ApplicationModule(Module.Catalogue)]
        string ShowItemDetails(string itemId);
    }
    
    [ApplicationModule(Module.Cart)]
    public interface IItemDiscounts
    {
        [ApplicationModule(Module.Cart)]
        bool CanHaveDiscounts(string itemId);
    }
    

    Not only that: I can have one single class implement both interfaces and mark it as related to both the Catalogue and the Cart areas.

    [ApplicationModule(Module.Cart)]
    [ApplicationModule(Module.Catalogue)]
    public class ItemDetailsService : IItemDetails, IItemDiscounts
    {
        [ApplicationModule(Module.Catalogue)]
        public string ShowItemDetails(string itemId) => throw new NotImplementedException();
    
        [ApplicationModule(Module.Cart)]
        public bool CanHaveDiscounts(string itemId) => throw new NotImplementedException();
    }
    

    Notice that I also explicitly enriched the two inner methods with the related attribute – even if it’s not necessary.

    Further readings

    As you noticed, the AttributeTargets is a Flagged Enum. Don’t you know what they are and how to define them? I’ve got you covered! I wrote two articles about Enums, and you can find info about Flagged Enums in both articles:

    🔗 5 things you should know about enums in C# | Code4IT

    and
    🔗 5 more things you should know about enums in C# | Code4IT

    This article first appeared on Code4IT 🐧

    There are some famous but not-so-obvious examples of attributes that you should know: DebuggerDisplay and InternalsVisibleTo.

    DebuggerDisplay can be useful for improving your debugging sessions.

    🔗 Simplify debugging with DebuggerDisplay attribute dotNET | Code4IT

    IntenalsVisibleTo can be used to give access to internal classes to external projects:;for example, you can use that attribute when writing unit tests.

    🔗 Testing internal members with InternalsVisibleTo | Code4IT

    Wrapping up

    In this article, I showed you how to create custom attributes in C# to specify which modules a class or a method belongs to. This trick can be useful if you want to speed up the analysis of your repository: if you need to retrieve all the classes that are used for the Cart module (for example, because you want to move them to an external library), you can just search for Module.Cart across the repository and have a full list of elements.

    In particular, this approach can be useful for the exposed components, such as API controllers. Knowing that two or more modules use the same Controller can help you understand if a change in the API structure is necessary.

    Another good usage of this attribute is automatic documentation: you could create a tool that automatically enlists all the interfaces, API endpoints, and classes grouped by the belonging module. The possibilities are infinite!

    I hope you enjoyed this article! Let’s keep in touch on LinkedIn, Twitter or BlueSky! 🤜🤛

    Happy coding!

    🐧


    Source link

  • like Mermaid, but better. Syntax, installation, and practical usage tips &vert; Code4IT

    like Mermaid, but better. Syntax, installation, and practical usage tips | Code4IT


    D2 is an open-source tool to design architectural layouts using a declarative syntax. It’s a textual format, which can also be stored under source control. Let’s see how it works, how you can install it, and some practical usage tips.

    Table of Contents

    Just a second! 🫷
    If you are here, it means that you are a software developer.
    So, you know that storage, networking, and domain management have a cost .

    If you want to support this blog, please ensure that you have disabled the adblocker for this site.
    I configured Google AdSense to show as few ADS as possible – I don’t want to bother you with lots of ads, but I still need to add some to pay for the resources for my site.

    Thank you for your understanding.
    Davide

    When defining the architecture of a system, I believe in the adage that says that «A picture is worth a thousand words».

    Proper diagramming helps in understanding how the architecture is structured, the dependencies between components, how the different components communicate, and their responsibilities.

    A clear architectural diagram can also be useful for planning. Once you have a general idea of the components, you can structure the planning according to the module dependencies and the priorities.

    A lack of diagramming leads to a “just words” definition: how many times have you heard people talk about modules that do not exist or do not work as they were imagining?

    The whole team can benefit from having a common language: a clear diagram brings clear thoughts, helping all the stakeholders (developers, architects, managers) understand the parts that compose a system.

    I tried several approaches: both online WYSIWYG tools like Draw.IO and DSL like Structurizr and Mermaid. For different reasons, I wasn’t happy with any of them.

    Then I stumbled upon D2: its rich set of elements makes it my new go-to tool for describing architectures. Let’s see how it works!

    A quick guide to D2 syntax

    Just like the more famous Mermaid, when using D2, you have to declare all the elements and connections as textual nodes.

    You can generate diagrams online by using the Playground section available on the official website, or you can install it locally (as you will see later).

    Elements: the basic components of every diagram

    Elements are defined as a set of names that can be enriched with a label and other metadata.

    Here’s an example of the most straightforward configurations for standalone elements.

    service
    
    user: Application User
    
    job: {
      shape: hexagon
    }
    

    For each element, you can define its internal name (service), a label (user: Application User) and a shape (shape: hexagon).

    A simple diagram with only two unrelated elements

    Other than that, I love the fact that you can define elements to be displayed as multiple instances: this can be useful when a service has multiple instances of the same type, and you want to express it clearly without the need to manually create multiple elements.

    You can do it by setting the multiple property to true.

    apiGtw: API Gateway {
      shape: cloud
    }
    be: BackEnd {
      style.multiple: true
    }
    
    apiGtw -> be
    

    Simple diagram with multiple backends

    Grouping: nesting elements hierarchically

    You may want to group elements. You can do that by using a hierarchical structure.

    In the following example, the main container represents my e-commerce application, composed of a website and a background job. The website is composed of a frontend, a backend, and a database.

    ecommerce: E-commerce {
      website: User Website {
        frontend
        backend
        database: DB {
          shape: cylinder
        }
      }
    
      job: {
        shape: hexagon
      }
    }
    

    As you can see from the diagram definition, elements can be nested in a hierarchical structure using the {} symbols. Of course, you can still define styles and labels to nested elements.

    Diagram with nested elements

    Connections: making elements communicate

    An architectural diagram is helpful only if it can express connections between elements.

    To connect two elements, you must use the --, the -> or the <- connector. You have to link their IDs, not their labels.

    ecommerce: E-commerce {
        website: User Website {
            frontend
        backend
        database: DB {
            shape: cylinder
        }
        frontend -> backend
        backend -> database: retrieve records {
            style.stroke: red
        }
      }
    
      job: {
          shape: hexagon
      }
      job -> website.database: update records
    }
    

    The previous example contains some interesting points.

    • Elements within the same container can be referenced directly using their ID: frontend -> backend.
    • You can add labels to a connection: backend -> database: retrieve records.
    • You can apply styles to a connection, like choosing the arrow colour with style.stroke: red.
    • You can create connections between elements from different containers: job -> website.database.

    Connections between elements from different containers

    When referencing items from different containers, you must always include the container ID: job -> website.database works, but job -> database doesn’t because database is not defined (so it gets created from scratch).

    SQL Tables: represent the table schema

    An interesting part of D2 diagrams is the possibility of adding the description of SQL tables.

    Obviously, the structure cannot be validated: the actual syntax depends on the database vendor.

    However, having the table schema defined in the diagram can be helpful in reasoning around the dependencies needed to complete a development.

    serv: Products Service
    
    db: Database Schema {
      direction: right
      shape: cylinder
      userTable: dbo.user {
        shape: sql_table
        Id: int {constraint: primary_key}
        FirstName: text
        LastName: text
        Birthday: datetime2
      }
    
      productsTable: dbo.products {
        shape: sql_table
        Id: int {constraint: primary_key}
        Owner: int {constraint: foreign_key}
        Description: text
      }
    
      productsTable.Owner -> userTable.Id
    }
    
    serv -> db.productsTable: Retrieve products by user id
    

    Diagram with database tables

    Notice how you can also define constraints to an element, like {constraint: foreign_key}, and specify the references from one table to another.

    How to install and run D2 locally

    D2 is a tool written in Go.

    Go is not natively present in every computer, so you have to install it. You can learn how to install it from the official page.

    Once Go is ready, you can install D2 in several ways. I use Windows 11, so my preferred installation approach is to use a .msi installer, as described here.

    If you are on macOS, you can use Homebrew to install it by running:

    Regardless of the Operating System, you can have Go directly install D2 by running the following command:

    go install oss.terrastruct.com/d2@latest
    

    It’s even possible to install it via Docker. However, this approach is quite complex, so I prefer installing D2 directly with the other methods I explained before.

    You can find more information about the several installation approaches on the GitHub page of the project.

    Use D2 via command line

    To work with D2 diagrams, you need to create a file with the .d2 extension. That file will contain the textual representation of the diagrams, following the syntax we saw before.

    Once D2 is installed and the file is present in the file system (in my case, I named the file my-diagram.d2), you can use the console to generate the diagram locally – remember, I’m using Windows11, so I need to run the exe file:

    d2.exe --watch .\my-diagram.d2
    

    Now you can open your browser, head to the localhost page displayed on the shell, and see how D2 renders the local file. Thanks to the --watch flag, you can update the file locally and see the result appear on the browser without the need to restart the application.

    When the diagram is ready, you can export it as a PNG or SVG by running

    d2.exe .\my-diagram.d2 my-wonderful-design.png
    

    Create D2 Diagrams on Visual Studio Code

    Another approach is to install the D2 extension on VS Code.

    D2 extension on Visual Studio Code

    Thanks to this extension, you can open any D2 file and, by using the command palette, see a preview of the final result. You can also format the document to have the diagram definition tidy and well-structured.

    D2 extension command palette

    How to install and use D2 Diagrams on Obsidian

    Lastly, D2 can be easily integrated with tools like Obsidian. Among the community plugins, you can find the official D2 plugin.

    D2 plugin for Obsidian

    As you can imagine, Go is required on your machine.
    And, if necessary, you are required to explicitly set the path to the bin folder of Go. In my case, I had to set it to C:\Users\BelloneDavide\go\bin\.

    D2 plugin settings for Obsidian

    To insert a D2 diagram in a note generated with Obsidian, you have to use d2 as a code fence language.

    Practical tips for using D2

    D2 is easy to use once you have a basic understanding of how to create elements and connections.

    However, some tips may be useful to ease the process of creating the diagrams. Or, at least, these tips helped me write and maintain my diagrams.

    Separate elements and connections definition

    A good approach is to declare the application’s structure first, and then list all the connections between elements unless the elements are within the same components and are not expected to change.

    ecommerce: E-commerce {
      website: User Website {
        backend
        database: DB {
          shape: cylinder
        }
    
        backend -> database: retrieve records {
          style.stroke: red
        }
      }
    
      job -> website.database: update records
    }
    

    Here, the connection between backend and database is internal to the website element, so it makes sense to declare it directly within the website element.

    However, the other connection between the job and the database is cross-element. In the long run, it may bring readability problems.

    So, you could update it like this:

    ecommerce: E-commerce {
     website: User Website {
     backend
     database: DB {
     shape: cylinder
     }
    
     backend -> database: retrieve records {
     style.stroke: red
     }
     }
    
    - job -> website.database: update records
    }
    
    + ecommerce.job -> ecommerce.website.database: update records
    

    This tip can be extremely useful when you have more than one element with the same name belonging to different parents.

    Needless to say, since the order of the connection declarations does not affect the final rendering, write them in an organized way that best fits your needs. In general, I prefer creating sections (using comments to declare the area), and grouping connections by the outbound module.

    Pick a colour theme (and customize it, if you want!)

    D2 allows you to specify a theme for the diagram. There are some predefined themes (which are a set of colour palettes), each with a name and an ID.

    To use a theme, you have to specify it in the vars element on top of the diagram:

    vars: {
      d2-config: {
        theme-id: 103
      }
    }
    

    103 is the theme named “Earth tones”, using a brown-based palette that, when applied to the diagram, renders it like this.

    Diagram using the 103 colour palette

    However, if you have a preferred colour palette, you can use your own colours by overriding the default values:

    vars: {
      d2-config: {
        # Terminal theme code
        theme-id: 103
        theme-overrides: {
          B4: "#C5E1A5"
        }
      }
    }
    

    Diagram with a colour overridden

    You can read more about themes and customizations here.

    What is that B4 key overridden in the previous example? Unfortunately, I don’t know: you must try all the variables to understand how the diagram is rendered.

    Choose the right layout engine

    You can choose one of the three supported layout engines to render the elements in a different way (more info here).

    DAGRE and ELK are open source, but quite basic. TALA is more sophisticated, but it requires a paid licence.

    Here’s an example of how the same diagram is rendered using the three different engines.

    A comparison betweel DAGRE, ELK and TALA layout engines

    You can decide which engine to use by declaring it in the layout-engine element:

    vars: {
      d2-config: {
        layout-engine: tala
      }
    }
    

    Choosing the right layout engine can be beneficial because sometimes some elements are not rendered correctly: here’s a weird rendering with the DAGRE engine.

    DAGRE engine with a weird rendering

    Use variables to simplify future changes

    D2 allows you to define variables in a single place and have the same value repeated everywhere it’s needed.

    So, for example, instead of having

    mySystem: {
      reader: Magazine Reader
      writer: Magazine Writer
    }
    

    With the word “Magazine” repeated, you can move it to a variable, so that it can change in the future:

    vars: {
      entityName: Magazine
    }
    
    mySystem: {
      reader: ${entityName} Reader
      writer: ${entityName} Writer
    }
    

    If in the future you’ll have to handle not only Magazines but also other media types, you can simply replace the value of entityName in one place and have it updated all over the diagram.

    D2 vs Mermaid: a comparison

    D2 and Mermaid are similar but have some key differences.

    They both are diagram-as-a-code tools, meaning that the definition of a diagram is expressed as a text file, thus making it available under source control.

    Mermaid is already supported by many tools, like Azure DevOps wikis, GitHub pages, and so on.
    On the contrary, D2 must be installed (along with the Go language).

    Mermaid is quite a “close” system: even if it allows you to define some basic styles, it’s not that flexible.

    On the contrary, D2 allows you to choose a theme for the whole diagram, as well as choosing different layout engines.
    Also, D2 has some functionalities that are (currently) missing on Mermaid:

    Mermaid, on the contrary, allows us to define more types of diagrams: State Diagrams, Gantt, Mindmaps, and so on. Also, as we saw, it’s already supported on many platforms.

    So, my (current) choice is: use D2 for architectural diagrams, and use Mermaid for everything else.

    I haven’t tried D2 for Sequence Diagrams yet, so I won’t express an opinion on that.

    Further readings

    D2 is available online with a playground you can use to try things out in a sandboxed environment.

    🔗 D2 Playground

    All the documentation can be found on GitHub or on the official website:

    🔗 D2 documentation

    And, if you want, you can use icons to create better diagrams: D2 exposes a set of SVG icons that can be easily integrated into your diagrams. You can find them here:

    🔗 D2 predefined icons

    This article first appeared on Code4IT 🐧

    Ok, but diagrams have to live in a context. How can you create useful and maintainable documentation for your future self?

    A good way to document your architectural choices is to define ADRs (Architecture Decision Records), as explained here:

    🔗 Tracking decision with Architecture Decision Records (ADRs) | Code4IT

    And, of course, just the architectural diagram is not enough: you should also describe the dependencies, the constraints, the deployment strategies, and so on. Arc42 is a template that can guide you to proper system documentation:

    🔗 Arc42 Documentation, for a comprehensive description of your project | Code4IT

    Wrapping up

    I hope you enjoyed this article! Let’s keep in touch on LinkedIn, Twitter or BlueSky! 🤜🤛

    Happy coding!

    🐧


    Source link

  • How to log to Azure Application Insights using ILogger in ASP.NET Core &vert; Code4IT

    How to log to Azure Application Insights using ILogger in ASP.NET Core | Code4IT


    Application Insights is a great tool for handling high volumes of logs. How can you configure an ASP.NET application to send logs to Azure Application Insights? What can I do to have Application Insights log my exceptions?

    Table of Contents

    Just a second! 🫷
    If you are here, it means that you are a software developer.
    So, you know that storage, networking, and domain management have a cost .

    If you want to support this blog, please ensure that you have disabled the adblocker for this site.
    I configured Google AdSense to show as few ADS as possible – I don’t want to bother you with lots of ads, but I still need to add some to pay for the resources for my site.

    Thank you for your understanding.
    Davide

    Logging is crucial for any application. However, generating logs is not enough: you must store them somewhere to access them.

    Application Insights is one of the tools that allows you to store your logs in a cloud environment. It provides a UI and a query editor that allows you to drill down into the details of your logs.

    In this article, we will learn how to integrate Azure Application Insights with an ASP.NET Core application and how Application Insights treats log properties such as Log Levels and exceptions.

    For the sake of this article, I’m working on an API project with HTTP Controllers with only one endpoint. The same approach can be used for other types of applications.

    How to retrieve the Azure Application Insights connection string

    Azure Application Insights can be accessed via any browser by using the Azure Portal.

    Once you have an instance ready, you can simply get the value of the connection string for that resource.

    You can retrieve it in two ways.

    You can get the connection string by looking at the Connection String property in the resource overview panel:

    Azure Application Insights overview panel

    The alternative is to navigate to the Configure > Properties page and locate the Connection String field.

    Azure Application Insights connection string panel

    How to add Azure Application Insights to an ASP.NET Core application

    Now that you have the connection string, you can place it in the configuration file or, in general, store it in a place that is accessible from your application.

    To configure ASP.NET Core to use Application Insights, you must first install the Microsoft.Extensions.Logging.ApplicationInsights NuGet package.

    Now you can add a new configuration to the Program class (or wherever you configure your services and the ASP.NET core pipeline):

    builder.Logging.AddApplicationInsights(
    configureTelemetryConfiguration: (config) =>
     config.ConnectionString = "InstrumentationKey=your-connection-string",
     configureApplicationInsightsLoggerOptions: (options) => { }
    );
    

    The configureApplicationInsightsLoggerOptions allows you to configure some additional properties: TrackExceptionsAsExceptionTelemetry, IncludeScopes, and FlushOnDispose. These properties are by default set to true, so you probably don’t want to change the default behaviour (except one, which we’ll modify later).

    And that’s it! You have Application Insights ready to be used.

    How log levels are stored and visualized on Application Insights

    I have this API endpoint that does nothing fancy: it just returns a random number.

    [Route("api/[controller]")]
    [ApiController]
    public class MyDummyController(ILogger<DummyController> logger) : ControllerBase
    {
     private readonly ILogger<DummyController> _logger = logger;
    
        [HttpGet]
        public async Task<IActionResult> Get()
        {
            int number = Random.Shared.Next();
            return Ok(number);
        }
    }
    

    We can use it to run experiments on how logs are treated using Application Insights.

    First, let’s add some simple log messages in the Get endpoint:

    [HttpGet]
    public async Task<IActionResult> Get()
    {
        int number = Random.Shared.Next();
    
        _logger.LogDebug("A debug log");
        _logger.LogTrace("A trace log");
        _logger.LogInformation("An information log");
        _logger.LogWarning("A warning log");
        _logger.LogError("An error log");
        _logger.LogCritical("A critical log");
    
        return Ok(number);
    }
    

    These are just plain messages. Let’s search for them in Application Insights!

    You first have to run the application – duh! – and wait for a couple of minutes for the logs to be ready on Azure. So, remember not to close the application immediately: you have to give it a few seconds to send the log messages to Application Insights.

    Then, you can open the logs panel and access the logs stored in the traces table.

    Log levels displayed on Azure Application Insights

    As you can see, the messages appear in the query result.

    There are three important things to notice:

    • in .NET, the log level is called “Log Level”, while on Application Insights it’s called “severity level”;
    • the log levels lower than Information are ignored by default (in fact, you cannot see them in the query result);
    • the Log Levels are exposed as numbers in the severityLevel column: the higher the value, the higher the log level.

    So, if you want to update the query to show only the log messages that are at least Warnings, you can do something like this:

    traces
    | where severityLevel >= 2
    | order  by timestamp desc
    | project timestamp, message, severityLevel
    

    How to log exceptions on Application Insights

    In the previous example, we logged errors like this:

    _logger.LogError("An error log");
    

    Fortunately, ILogger exposes an overload that accepts an exception in input and logs all the details.

    Let’s try it by throwing an exception (I chose AbandonedMutexException because it’s totally nonsense in this simple context, so it’s easy to spot).

    private void SomethingWithException(int number)
    {
        try
        {
            _logger.LogInformation("In the Try block");
    
            throw new AbandonedMutexException("An exception message");
        }
        catch (Exception ex)
        {
            _logger.LogInformation("In the Catch block");
            _logger.LogError(ex, "Unable to complete the operation");
        }
        finally
        {
            _logger.LogInformation("In the Finally block");
        }
    }
    

    So, when calling it, we expect to see 4 log entries, one of which contains the details of the AbandonedMutexException exception.

    The Exception message in Application Insights

    Hey, where is the exception message??

    It turns out that ILogger, when creating log entries like _logger.LogError("An error log");, generates objects of type TraceTelemetry. However, the overload that accepts as a first parameter an exception (_logger.LogError(ex, "Unable to complete the operation");) is internally handled as an ExceptionTelemetry object. Since internally, it’s a different type of Telemetry object, and it gets ignored by default.

    To enable logging exceptions, you have to update the way you add Application Insights to your application by setting the TrackExceptionsAsExceptionTelemetry property to false:

    builder.Logging.AddApplicationInsights(
    configureTelemetryConfiguration: (config) =>
     config.ConnectionString = connectionString,
     configureApplicationInsightsLoggerOptions: (options) => options.TrackExceptionsAsExceptionTelemetry = false);
    

    This way, ExceptionsTelemetry objects are treated as TraceTelemetry logs, making them available in Application Insights logs:

    The Exception log appears in Application Insights

    Then, to access the details of the exception like the message and the stack trace, you can look into the customDimensions element of the log entry:

    Details of the Exception log

    Even though this change is necessary to have exception logging work, it is barely described in the official documentation.

    Further readings

    It’s not the first time we have written about logging in this blog.

    For example, suppose you don’t want to use Application Insights but prefer an open-source, vendor-independent log sink. In that case, my suggestion is to try Seq:

    🔗 Easy logging management with Seq and ILogger in ASP.NET | Code4IT

    Logging manually is nice, but you may be interested in automatically logging all the data related to incoming HTTP requests and their responses.

    🔗 HTTP Logging in ASP.NET: how to automatically log all incoming HTTP requests (and its downsides!) | Code4IT

    This article first appeared on Code4IT 🐧

    You can read the official documentation here (even though I find it not much complete and does not show the results):

    🔗 Application Insights logging with .NET | Microsoft docs

    Wrapping up

    This article taught us how to set up Azure Application Insights in an ASP.NET application.
    We touched on the basics, discussing log levels and error handling. In future articles, we’ll delve into some other aspects of logging, such as correlating logs, understanding scopes, and more.

    I hope you enjoyed this article! Let’s keep in touch on LinkedIn, Twitter or BlueSky! 🤜🤛

    Happy coding!

    🐧


    Source link

  • An In-Depth Look at CallerMemberName (and some Compile-Time trivia) &vert; Code4IT

    An In-Depth Look at CallerMemberName (and some Compile-Time trivia) | Code4IT


    Let’s dive deep into the CallerMemberName attribute and explore its usage from multiple angles. We’ll see various methods of invoking it, shedding light on how it is defined at compile time.

    Table of Contents

    Just a second! 🫷
    If you are here, it means that you are a software developer.
    So, you know that storage, networking, and domain management have a cost .

    If you want to support this blog, please ensure that you have disabled the adblocker for this site.
    I configured Google AdSense to show as few ADS as possible – I don’t want to bother you with lots of ads, but I still need to add some to pay for the resources for my site.

    Thank you for your understanding.
    Davide

    Method names change. And, if you are using method names in some places specifying them manually, you’ll spend a lot of time updating them.

    Luckily for us, in C#, we can use an attribute named CallerMemberName.

    This attribute can be applied to a parameter in the method signature so that its runtime value is the caller method’s name.

    public void SayMyName([CallerMemberName] string? methodName = null) =>
     Console.WriteLine($"The method name is {methodName ?? "NULL"}!");
    

    It’s important to note that the parameter must be a nullable string: this way if the caller sets its value, the actual value is set. Otherwise, the name of the caller method is used. Well, if the caller method has a name! 👀

    Getting the caller method’s name via direct execution

    The easiest example is the direct call:

    private void DirectCall()
    {
      Console.WriteLine("Direct call:");
      SayMyName();
    }
    

    Here, the method prints:

    Direct call:
    The method name is DirectCall!
    

    In fact, we are not specifying the value of the methodName parameter in the SayMyName method, so it defaults to the caller’s name: DirectCall.

    CallerMemberName when using explicit parameter name

    As we already said, we can specify the value:

    private void DirectCallWithOverriddenName()
    {
      Console.WriteLine("Direct call with overridden name:");
      SayMyName("Walter White");
    }
    

    Prints:

    Direct call with overridden name:
    The method name is Walter White!
    

    It’s important to note that the compiler sets the methodName parameter only if it is not otherwise specified.

    This means that if you call SayMyName(null), the value will be null – because you explicitly declared the value.

    private void DirectCallWithNullName()
    {
      Console.WriteLine("Direct call with null name:");
      SayMyName(null);
    }
    

    The printed text is then:

    Direct call with null name:
    The method name is NULL!
    

    CallerMemberName when the method is called via an Action

    Let’s see what happens when calling it via an Action:

    public void CallViaAction()
    {
      Console.WriteLine("Calling via Action:");
    
      Action<int> action = (_) => SayMyName();
      var singleElement = new List<int> { 1 };
      singleElement.ForEach(s => action(s));
    }
    

    This method prints this text:

    Calling via Action:
    The method name is CallViaAction!
    

    Now, things get interesting: the CallerMemberName attribute recognizes the method’s name that contains the overall expression, not just the actual caller.

    We can see that, syntactically, the caller is the ForEach method (which is a method of the List<T> class). But, in the final result, the ForEach method is ignored, as the method is actually called by the CallViaAction method.

    This can be verified by accessing the compiler-generated code, for example by using Sharplab.

    Compiled code of Action with pre-set method name

    At compile time, since no value is passed to the SayMyName method, it gets autopopulated with the parent method name. Then, the ForEach method calls SayMyName, but the methodName is already defined at compiled time.

    Lambda executions and the CallerMemberName attribute

    The same behaviour occurs when using lambdas:

    private void CallViaLambda()
    {
      Console.WriteLine("Calling via lambda expression:");
    
      void lambdaCall() => SayMyName();
      lambdaCall();
    }
    

    The final result prints out the name of the caller method.

    Calling via lambda expression:
    The method name is CallViaLambda!
    

    Again, the magic happens at compile time:

    Compiled code for a lambda expression

    The lambda is compiled into this form:

    [CompilerGenerated]
    private void <CallViaLambda>g__lambdaCall|0_0()
    {
      SayMyName("CallViaLambda");
    }
    

    Making the parent method name available.

    CallerMemberName when invoked from a Dynamic type

    What if we try to execute the SayMyName method by accessing the root class (in this case, CallerMemberNameTests) as a dynamic type?

    private void CallViaDynamicInvocation()
    {
      Console.WriteLine("Calling via dynamic invocation:");
    
      dynamic dynamicInstance = new CallerMemberNameTests(null);
      dynamicInstance.SayMyName();
    }
    

    Oddly enough, the attribute does not work as could have expected, but it prints NULL:

    Calling via dynamic invocation:
    The method name is NULL!
    

    This happens because, at compile time, there is no reference to the caller method.

    private void CallViaDynamicInvocation()
    {
      Console.WriteLine("Calling via dynamic invocation:");
      
      object arg = new C();
      if (<>o__0.<>p__0 == null)
      {
        Type typeFromHandle = typeof(C);
        CSharpArgumentInfo[] array = new CSharpArgumentInfo[1];
        array[0] = CSharpArgumentInfo.Create(CSharpArgumentInfoFlags.None, null);
        <>o__0.<>p__0 = CallSite<Action<CallSite, object>>.Create(Microsoft.CSharp.RuntimeBinder.Binder.InvokeMember(CSharpBinderFlags.ResultDiscarded, "SayMyName", null, typeFromHandle, array));
      }
      <>o__0.<>p__0.Target(<>o__0.<>p__0, arg);
    }
    

    I have to admit that I don’t understand why this happens: if you want, drop a comment to explain to us what is going on, I’d love to learn more about it! 📩

    Event handlers can get the method name

    Then, we have custom events.

    We define events in one place, but they are executed indirectly.

    private void CallViaEventHandler()
    {
      Console.WriteLine("Calling via events:");
      var eventSource = new MyEventClass();
      eventSource.MyEvent += (sender, e) => SayMyName();
      eventSource.TriggerEvent();
    }
    
    public class MyEventClass
    {
      public event EventHandler MyEvent;
      public void TriggerEvent() =>
      // Raises an event which in our case calls SayMyName via subscribing lambda method
      MyEvent?.Invoke(this, EventArgs.Empty);
    }
    

    So, what will the result be? “Who” is the caller of this method?

    Calling via events:
    The method name is CallViaEventHandler!
    

    Again, it all boils down to how the method is generated at compile time: even if the actual execution is performed “asynchronously” – I know, it’s not the most obvious word for this case – at compile time the method is declared by the CallViaEventHandler method.

    CallerMemberName from the Class constructor

    Lastly, what happens when we call it from the constructor?

    public CallerMemberNameTests(IOutput output) : base(output)
    {
     Console.WriteLine("Calling from the constructor");
     SayMyName();
    }
    

    We can consider constructors to be a special kind of method, but what’s in their names? What can we find?

    Calling from the constructor
    The method name is .ctor!
    

    Yes, the actual method name is .ctor! Regardless of the class name, the constructor is considered to be a method with that specific internal name.

    Wrapping up

    In this article, we started from a “simple” topic but learned a few things about how code is compiled and the differences between runtime and compile time.

    As always, things are not as easy as they appear!

    This article first appeared on Code4IT 🐧

    I hope you enjoyed this article! Let’s keep in touch on LinkedIn, Twitter or BlueSky! 🤜🤛

    Happy coding!

    🐧


    Source link