برچسب: way

  • The Journey Behind inspo.page: A Better Way to Collect Web Design Inspiration

    The Journey Behind inspo.page: A Better Way to Collect Web Design Inspiration


    Have you ever landed on a website and thought, “Wow, this is absolutely beautiful”? You know that feeling when every little animation flows perfectly, when clicking a button feels satisfying, when the whole experience just feels premium.

    That’s exactly what happened to me a few years ago, and it changed everything.

    The Moment Everything Clicked

    I was browsing the web when I stumbled across one of those websites. You know the type where every micro-animation has been crafted with care, where every transition feels intentional. It wasn’t just pretty; it made me feel something.

    That’s when I got hooked on web design.

    But here’s the thing: I wanted to create websites like that too. I wanted to capture that same magic, those same emotions. So I started doing what any curious designer does. I began collecting inspiration.

    Spotting a Gap

    At first, I used the usual inspiration websites. They’re fantastic for discovering beautiful sites and getting that creative spark. But I noticed something: they showed you the whole website, which is great for overall inspiration.

    The thing is, sometimes I’d get obsessed with just one specific detail. Maybe it was a button animation, or how an accordion opened, or a really smooth page transition. I’d bookmark the entire site, but then later I’d spend ages trying to find that one perfect element again.

    I started thinking there might be room for something more specific. Something where you could find inspiration at the component level, not just the full-site level.

    Starting Small

    So I started building my own library. Whenever I saw something cool (a smooth page transition, an elegant pricing section, a cool navigation animation) I’d record it and save it with really specific tags like “card,” “hero section,” or “page transition.”

    Early versions of my local library I had on Eagle

    Real, useful categories that actually helped me find what I needed later. I did this for years. It became my secret weapon for client projects and personal work.

    From Personal Tool to Public Resource

    After a few years of building this personal collection, I had a thought: “If this helps me so much, maybe other designers and developers could use it too.”

    That’s when I decided I should share this with the world. But I didn’t want to just dump my library online and call it a day. It was really important to me that people could filter stuff easily, that it would be intuitive, and that it would work well on both mobile and desktop. I wanted it to look good and actually be useful.

    Early version of inspo.page, filters where not sticky at the bottom

    That’s how inspo.page was born.

    How It Actually Works

    The idea behind inspo.page is simple: instead of broad categories, I built three specific filter systems:

    • What – All the different components and layouts. Looking for card designs? Different types of lists? Different types of modals? It’s all here.
    • Where – Sections of websites. Need inspiration for a hero section? A pricing page? Social proof section? Filter by where it appears on a website.
    • Motion – Everything related to movement. Page transitions, parallax effects, hover animations.

    The magic happens when you combine these filters. Want to see card animations specifically for pricing sections? Or parallax effects used for presenting services? Just stack the filters and get exactly what you’re looking for.

    The Technical Side

    On the technical side, I’m using Astro and Sanity. Because I’m sometimes lazy and I really wanted a project that’s future-proof, I wanted to make it as simple as possible for me to curate inspiration.

    That’s why I came up with this automation system where I just hit record and that’s it. It automatically grabs the URL, creates different video versions, compresses everything, hosts it to Bunny.net, and then sends it to the CMS so I just have to tag it and publish.

    Tagging system inside Sanity

    I really wanted to find a system that makes it as easy as possible for me to do what I want to do because I knew if there was too much resistance, I’d eventually stop doing it.

    The Hardest Part

    You’d probably think the hardest part was all the technical stuff like setting up automations and managing video uploads. But honestly, that was the easy part.

    The real challenge was figuring out how to organize everything so people could actually find what they’re looking for.

    I must have redesigned the entire tagging system at least 10 times. Every time I thought I had it figured out, I’d realize it was either way too complicated or way too vague. Too many specific tags and people get overwhelmed scrolling through endless options. Too few broad categories and everything just gets lumped together uselessly.

    It’s this weird balancing act. You need enough categories to be helpful, but not so many that people give up before they even start filtering. And the categories have to make sense to everyone, not just me.

    I think I’ve got a system now that works pretty well, but it might change in the future. If users tell me there’s a better way to organize things, I’m really all ears because honestly, it’s a difficult problem to solve. Even though I have something that seems to work now, there might be a much better approach out there.

    The Human Touch in an AI World

    Here’s something I think about a lot: AI can build a decent-looking website in minutes now. Seriously, it’s pretty impressive.

    But there’s still something missing. AI can handle layouts and basic styling, but it can’t nail the human stuff yet. Things like the timing of a hover effect, the weight of a transition, or knowing exactly how a micro-interaction should feel. That’s pure taste and intuition.

    Those tiny details are what make websites feel alive instead of just functional. And in a world where anyone can generate a website in 5 minutes, those details are becoming more valuable than ever.

    That’s exactly where inspo.page comes in. It helps you find inspiration for the things that separate good websites from unforgettable ones.

    What’s Next

    Every week, I’m adding more inspiration to the platform. I’m not trying to build the biggest collection out there, just something genuinely useful. If I can help a few designers and developers find that perfect animation a little bit faster, then I’m happy.

    Want to check it out? Head over to inspo.page and see if you can find your next favorite interaction. You can filter by specific components (like cards, buttons, modals, etc.), website sections (hero, pricing, etc.), or motion patterns (parallax, page transitions, you name it).

    And if you stumble across a website with some really nice animations or micro-interactions, feel free to share it using the feedback button (top right) on the site. I’m always on the lookout for inspiration pieces that have that special touch. Can’t promise I’ll add everything, but I definitely check out what people send.

    Hope you find something that sparks your next great design!


    Source link

  • a smart and secure way to manage configurations | Code4IT

    a smart and secure way to manage configurations | Code4IT


    Centralizing configurations can be useful for several reasons: security, consistency, deployability. In this article, we’re gonna use Azure App Configuration to centralize the configurations used in a .NET API application.

    Table of Contents

    Just a second! 🫷
    If you are here, it means that you are a software developer.
    So, you know that storage, networking, and domain management have a cost .

    If you want to support this blog, please ensure that you have disabled the adblocker for this site.
    I configured Google AdSense to show as few ADS as possible – I don’t want to bother you with lots of ads, but I still need to add some to pay for the resources for my site.

    Thank you for your understanding.
    Davide

    Almost every application requires some sort of configuration: connection strings, default values, and so on.

    It’s not a good practice to keep all the configurations in your codebase: if your code leaks online, you’ll have all your connection strings, private settings, and API keys exposed online.

    In previous articles, we’ve learned how to set up configurations in a .NET application, as well as how to access them in our code using the IOptions family.

    In this article, we’re gonna make our application more secure by moving our configurations to the cloud and using Azure App Configurations to securely use such configs in our applications.

    But first, as always, we need a dummy project to demonstrate such capabilities.

    I created a simple .NET 7 API project with just one endpoint, /ConfigDemo, that returns the values from the settings.

    In the appsettings.json file I have these values:

    {
      "MyNiceConfig": {
        "PageSize": 6,
        "Host": {
          "BaseUrl": "https://www.mydummysite.com",
          "Password": "123-go"
        }
      }
    }
    

    These values are mapped to a MyConfig class:

    public class MyConfig
    {
        public int PageSize { get; set; }
        public MyHost Host { get; set; }
    }
    
    public class MyHost
    {
        public Uri BaseUrl { get; set; }
        public string Password { get; set; }
    }
    

    by using this instruction in the Program class.

    builder.Services.Configure<MyConfig>(builder.Configuration.GetSection("MyNiceConfig"));
    

    Finally, the API Controller just returns the value

    [ApiController]
    [Route("[controller]")]
    public class ConfigDemoController : ControllerBase
    {
        private readonly IOptions<MyConfig> _config;
    
        public ConfigDemoController(IOptions<MyConfig> config)
            => _config = config;
    
        [HttpGet()]
        public IActionResult Get()
        {
            return Ok(_config.Value);
        }
    }
    

    As you can see, it’s all pretty straightforward. We can call the endpoint and see the exact same values that are present in our appsettings file.

    Default values coming from the appsettings.json file

    How to create an Azure App Configuration instance

    Now we can move to the cloud ☁

    First of all, head to the Azure Portal and create a new App Configuration instance.

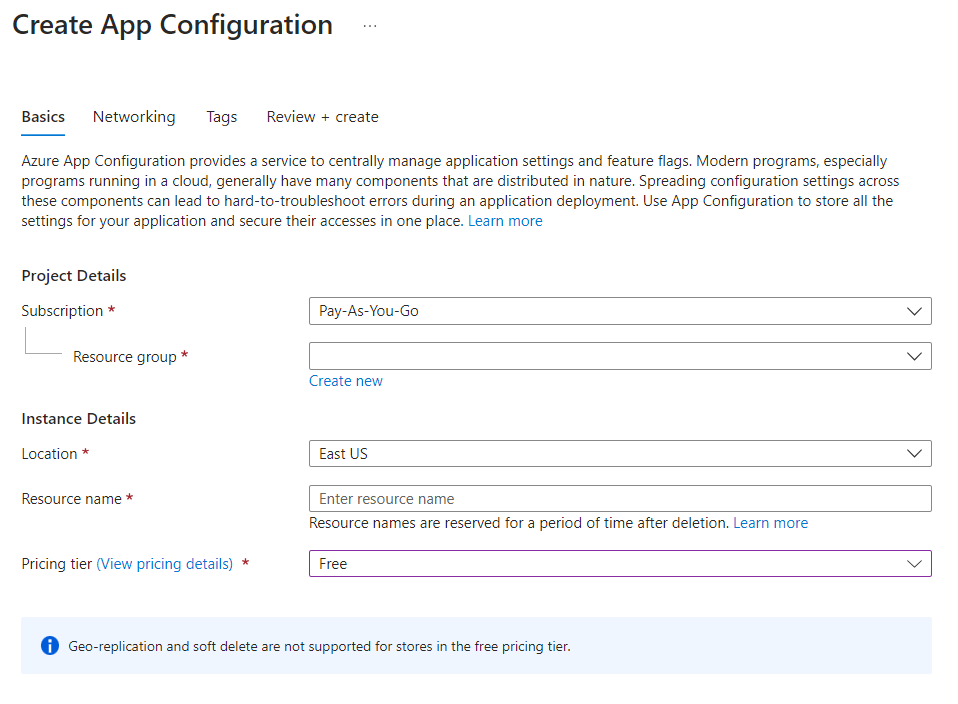
    You will be asked to specify the subscription and the resource group, and also to specify the instance location and name.

    Finally, you can pick the best Pricing Tier for you:

    • Free: well, it’s free, but with fewer capabilities;
    • Standard: you pay to have Geo-replication and the possibility to recover deleted configurations.

    Azure App Configuration wizard

    I will choose the Free tier, and complete the resource creation.

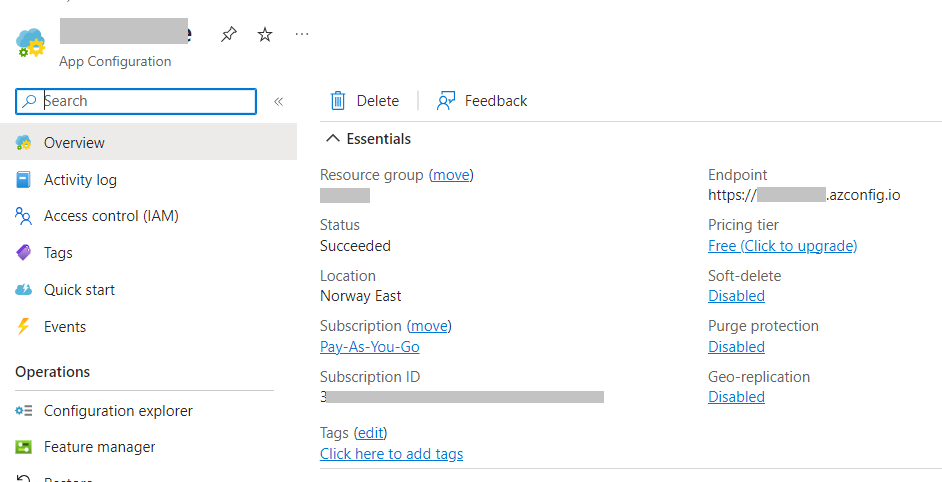
    After a while, you will finally see the resource overview with its basics info:

    Azure App Configuration instance overview

    Now we can update our configurations. As you recall, the settings structure is:

    {
      "MyNiceConfig": {
        "PageSize": 6,
        "Host": {
          "BaseUrl": "https://www.mydummysite.com",
          "Password": "123-go"
        }
      }
    }
    

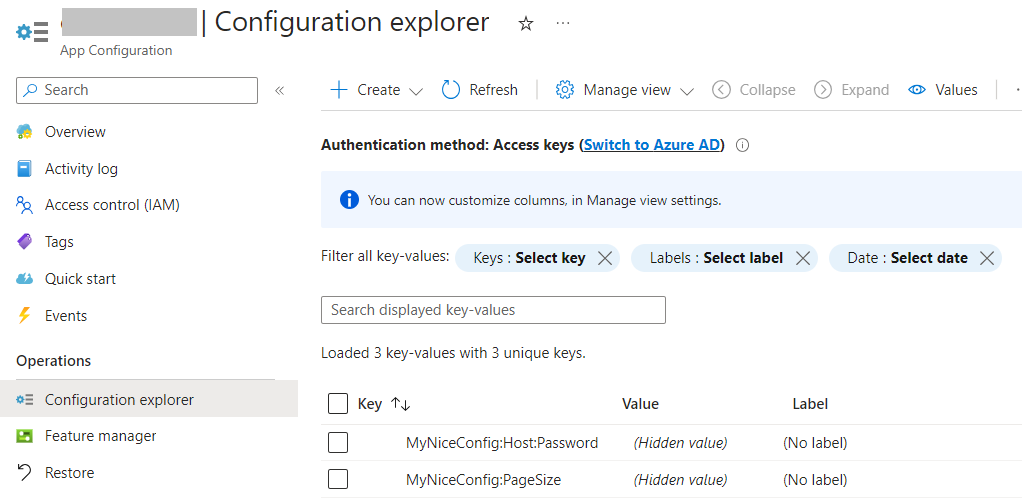
    We want to update the page size and the password. Locate Configuration Explorer in the left menu, click on Create, and add a new value for each configuration. Remember: nested configurations can be defined using the : sign: to update the password, the key must be MyNiceConfig:Host:Password. Important: do not set labels or tags, for now: they are advanced topics, and require some additional settings that we will probably explore in future articles.

    Once you’ve overridden both values, you should be able to see something like this:

    Simple settings on Azure App Configuration

    How to integrate Azure App Configuration in a .NET application

    Now we are ready to integrate Azure App Configuration with our .NET APIs.

    First things first: we must install the Microsoft.Azure.AppConfiguration.AspNetCore NuGet Package:

    AppConfiguration.AspNetCore NuGet package

    Then, we need to find a way to connect to our App Configuration instance. There are two ways: using Azure Active Directory (Azure AD) or using a simple Access Key. We’re gonna use the latter.

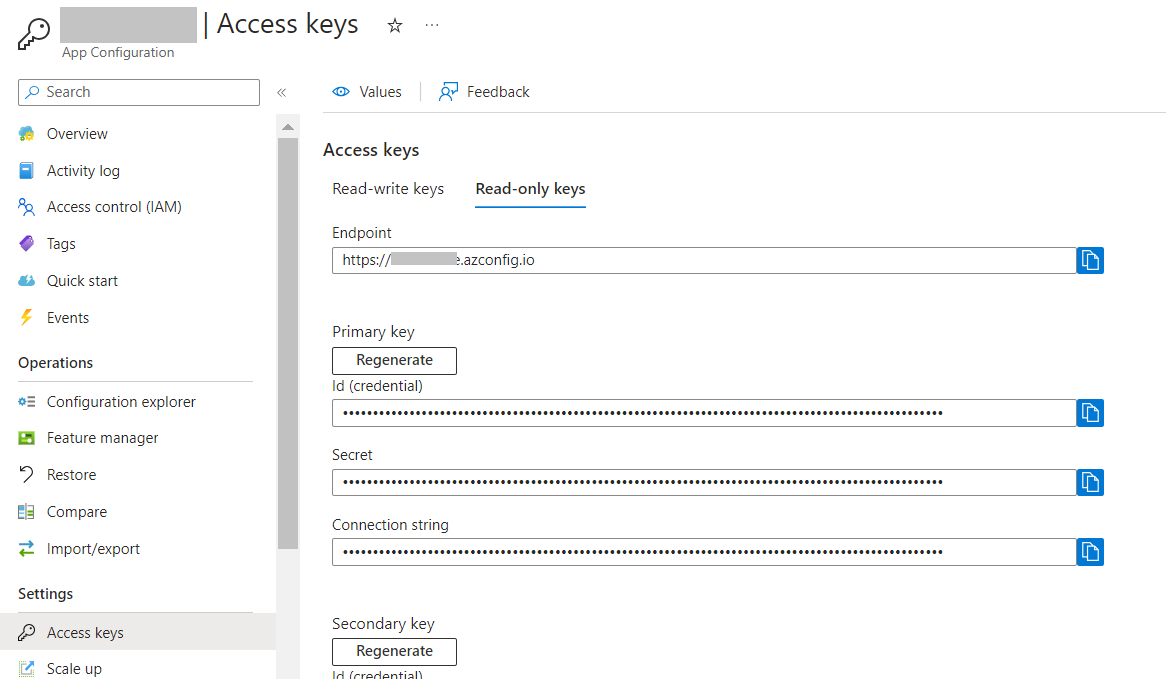
    Get back to Azure, and locate the Access Keys menu item. Then head to Read-only keys, and copy the full connection string.

    Access Keys on Azure Portal

    Do NOT store it on your repository! There are smarter, more secure ways to store use such connection strings:

    • Environment variables: for example, run the application with dotnet run --MYKEY=<your_connection_string>;
    • launchsettings.json key: you can use different configurations based on the current profile;
    • secrets store: hidden values only available on your machine. Can be set using dotnet user-secrets set MyKey "<your_connection_string>";
    • pipeline configurations: you can define such values in your CI/CD pipelines;

    But still, for the sake of this example, I will store the connection string in a local variable 😁

    const string ConnectionString = "Endpoint=https://<my-host>.azconfig.io;Id=<Id>;Secret=<Secret>";
    

    Now, integrating the remote configurations is just a matter of adding one instruction:

    builder.Configuration.AddAzureAppConfiguration(ConnectionString);
    

    You can now run the APIs and call the previous endpoint to see the new results

    Configurations now come also from Azure App Configuration

    Why should you use Azure App Configuration?

    In my opinion, having a proper way to handle configurations is crucial for the success of a project.

    Centralizing configurations can be useful in three different ways:

    1. Your application is more secure since you don’t risk having the credentials exposed on the web;
    2. You can share configurations across different services: say that you have 4 services that access the same external APIs that require a Client Secret. Centralizing the config helps in having consistent values across the different services and, for example, updating the secret for all the applications in just one place;
    3. Use different configs based on the environment: with Azure App Configuration you can use a set of tags and labels to determine which configs must be loaded in which environment. This simplifies a lot the management of configurations across different environments.

    But notice that, using the basic approach that we used in this article, configurations coming from Azure are loaded at the startup of the application: configs are static until you restart the application. You can configure your application to poll Azure App Configuration to always have the most updated values without the need of restarting the application, but it will be the topic of a future article.

    Further readings

    Configuration management is one of the keys to the success of a project: if settings are difficult to manage and difficult to set locally for debugging, you’ll lose a lot of time (true story! 😩).

    However, there are several ways to set configurations for a .NET application, such as Environment Variables, launchSettings, and so on.

    🔗 3 (and more) ways to set configuration values in .NET | Code4IT

    This article first appeared on Code4IT 🐧

    Also, handling config in a smart way is easy, if you know what to do. You can follow some best practices.

    🔗Azure App Configuration best practices | Microsoft Docs

    Wrapping up

    In this article, we’ve learned a smart way to handle configurations using Azure App Configuration.

    This product can be used for free, but, of course, with limitations.

    In a future article, we will learn how to make those configurations dynamic so that you can apply updates without restarting the applications.

    I hope you enjoyed this article! Let’s keep in touch on Twitter or LinkedIn! 🤜🤛

    Happy coding!

    🐧


    Source link

  • Is Random.GetItems the best way to get random items in C# 12? &vert; Code4IT

    Is Random.GetItems the best way to get random items in C# 12? | Code4IT


    You have a collection of items. You want to retrieve N elements randomly. Which alternatives do we have?

    Table of Contents

    Just a second! 🫷
    If you are here, it means that you are a software developer.
    So, you know that storage, networking, and domain management have a cost .

    If you want to support this blog, please ensure that you have disabled the adblocker for this site.
    I configured Google AdSense to show as few ADS as possible – I don’t want to bother you with lots of ads, but I still need to add some to pay for the resources for my site.

    Thank you for your understanding.
    Davide

    One of the most common operations when dealing with collections of items is to retrieve a subset of these elements taken randomly.

    Before .NET 8, the most common way to retrieve random items was to order the collection using a random value and then take the first N items of the now sorted collection.

    From .NET 8 on, we have a new method in the Random class: GetItems.

    So, should we use this method or stick to the previous version? Are there other alternatives?

    For the sake of this article, I created a simple record type, CustomRecord, which just contains two properties.

    public record CustomRecord(int Id, string Name);
    

    I then stored a collection of such elements in an array. This article’s final goal is to find the best way to retrieve a random subset of such items. Spoiler alert: it all depends on your definition of best!

    Method #1: get random items with Random.GetItems

    Starting from .NET 8, released in 2023, we now have a new method belonging to the Random class: GetItems.

    There are three overloads:

    public T[] GetItems<T>(T[] choices, int length);
    public T[] GetItems<T>(ReadOnlySpan<T> choices, int length);
    public void GetItems<T>(ReadOnlySpan<T> choices, Span<T> destination);
    

    We will focus on the first overload, which accepts an array of items (choices) in input and returns an array of size length.

    We can use it as such:

    CustomRecord[] randomItems = Random.Shared.GetItems(Items, TotalItemsToBeRetrieved);
    

    Simple, neat, efficient. Or is it?

    Method #2: get the first N items from a shuffled copy of the initial array

    Another approach is to shuffle the whole initial array using Random.Shuffle. It takes in input an array and shuffles the items in-place.

    Random.Shared.Shuffle(Items);
    CustomRecord[] randomItems = copy.Take(TotalItemsToBeRetrieved).ToArray();
    

    If you need to preserve the initial order of the items, you should create a copy of the initial array and shuffle only the copy. You can do this by using this syntax:

    CustomRecord[] copy = [.. Items];
    

    If you just need some random items and don’t care about the initial array, you can shuffle it without making a copy.

    Once we’ve shuffled the array, we can pick the first N items to get a subset of random elements.

    Method #3: order by Guid, then take N elements

    Before .NET 8, one of the most used approaches was to order the whole collection by a random value, usually a newly generated Guid, and then take the first N items.

    var randomItems = Items
        .OrderBy(_ => Guid.NewGuid()) // THIS!
        .Take(TotalItemsToBeRetrieved)
        .ToArray();
    

    This approach works fine but has the disadvantage that it instantiates a new Guid value for every item in the collection, which is an expensive memory-wise operation.

    Method #4: order by Number, then take N elements

    Another approach was to generate a random number used as a discriminator to order the collection; then, again, we used to get the first N items.

    var randomItems = Items
        .OrderBy(_ => Random.Shared.Next()) // THIS!
        .Take(TotalItemsToBeRetrieved)
        .ToArray();
    

    This approach is slightly better because generating a random integer is way faster than generating a new Guid.

    Benchmarks of the different operations

    It’s time to compare the approaches.

    I used BenchmarkDotNet to generate the reports and ChartBenchmark to represent the results visually.

    Let’s see how I structured the benchmark.

    [MemoryDiagnoser]
    public class RandomItemsBenchmark
    {
        [Params(100, 10_000, 1_000_000)]
        public int Size;
    
        private CustomRecord[] Items;
        private int TotalItemsToBeRetrieved;
        private CustomRecord[] Copy;
    
        [IterationSetup]
        public void Setup()
        {
            var ids = Enumerable.Range(0, Size).ToArray();
            Items = ids.Select(i => new CustomRecord(i, $"Name {i}")).ToArray();
            Copy = [.. Items];
    
            TotalItemsToBeRetrieved = Random.Shared.Next(Size);
        }
    
        [Benchmark(Baseline = true)]
        public void WithRandomGetItems()
        {
            CustomRecord[] randomItems = Random.Shared.GetItems(Items, TotalItemsToBeRetrieved);
            _ = randomItems.Length;
        }
    
        [Benchmark]
        public void WithRandomGuid()
        {
            CustomRecord[] randomItems = Items
                .OrderBy(_ => Guid.NewGuid())
                .Take(TotalItemsToBeRetrieved)
                .ToArray();
    
            _ = randomItems.Length;
        }
    
        [Benchmark]
        public void WithRandomNumber()
        {
            CustomRecord[] randomItems = Items
                .OrderBy(_ => Random.Shared.Next())
                .Take(TotalItemsToBeRetrieved)
                .ToArray();
    
            _ = randomItems.Length;
        }
    
        [Benchmark]
        public void WithShuffle()
        {
            CustomRecord[] copy = [.. Items];
    
            Random.Shared.Shuffle(copy);
            CustomRecord[] randomItems = copy.Take(TotalItemsToBeRetrieved).ToArray();
    
            _ = randomItems.Length;
        }
    
        [Benchmark]
        public void WithShuffleNoCopy()
        {
            Random.Shared.Shuffle(Copy);
            CustomRecord[] randomItems = Copy.Take(TotalItemsToBeRetrieved).ToArray();
    
            _ = randomItems.Length;
        }
    }
    

    We are going to run the benchmarks on arrays with different sizes. We will start with a smaller array with 100 items and move to a bigger one with one million items.

    We generate the initial array of CustomRecord instances for every iteration and store it in the Items property. Then, we randomly choose the number of items to get from the Items array and store it in the TotalItemsToBeRetrieved property.

    We also generate a copy of the initial array at every iteration; this way, we can run Random.Shuffle without modifying the original array.

    Finally, we define the body of the benchmarks using the implementations we saw before.

    Notice: I marked the benchmark for the GetItems method as a baseline, using [Benchmark(Baseline = true)]. This way, we can easily see the results ratio for the other methods compared to this specific method.

    When we run the benchmark, we can see this final result (for simplicity, I removed the Error, StdDev, and Median columns):

    Method Size Mean Ratio Allocated Alloc Ratio
    WithRandomGetItems 100 6.442 us 1.00 424 B 1.00
    WithRandomGuid 100 39.481 us 6.64 3576 B 8.43
    WithRandomNumber 100 22.219 us 3.67 2256 B 5.32
    WithShuffle 100 7.038 us 1.16 1464 B 3.45
    WithShuffleNoCopy 100 4.254 us 0.73 624 B 1.47
    WithRandomGetItems 10000 58.401 us 1.00 5152 B 1.00
    WithRandomGuid 10000 2,369.693 us 65.73 305072 B 59.21
    WithRandomNumber 10000 1,828.325 us 56.47 217680 B 42.25
    WithShuffle 10000 180.978 us 4.74 84312 B 16.36
    WithShuffleNoCopy 10000 156.607 us 4.41 3472 B 0.67
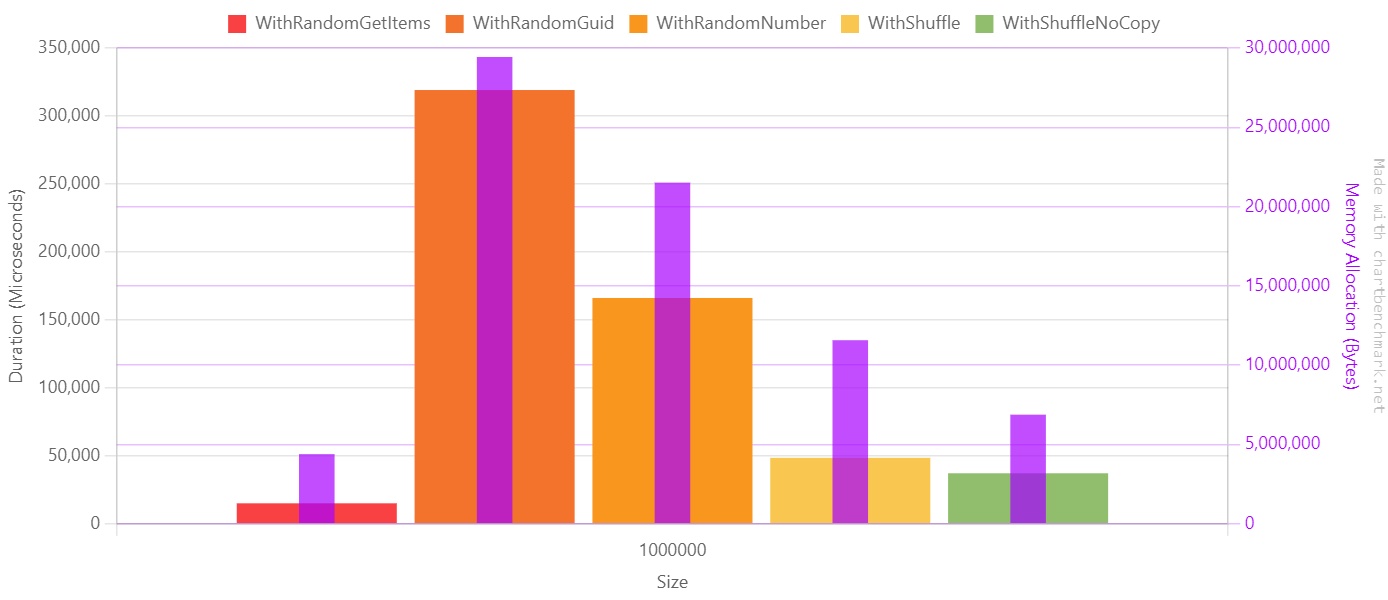
    WithRandomGetItems 1000000 15,069.781 us 1.00 4391616 B 1.00
    WithRandomGuid 1000000 319,088.446 us 42.79 29434720 B 6.70
    WithRandomNumber 1000000 166,111.193 us 22.90 21512408 B 4.90
    WithShuffle 1000000 48,533.527 us 6.44 11575304 B 2.64
    WithShuffleNoCopy 1000000 37,166.068 us 4.57 6881080 B 1.57

    By looking at the numbers, we can notice that:

    • GetItems is the most performant method, both for time and memory allocation;
    • using Guid.NewGuid is the worst approach: it’s 10 to 60 times slower than GetItems, and it allocates, on average, 4x the memory;
    • sorting by random number is a bit better: it’s 30 times slower than GetItems, and it allocates around three times more memory;
    • shuffling the array in place and taking the first N elements is 4x slower than GetItems; if you also have to preserve the original array, notice that you’ll lose some memory allocation performance because you must allocate more memory to create the cloned array.

    Here’s the chart with the performance values. Notice that, for better readability, I used a Log10 scale.

    Results comparison for all executions

    If we move our focus to the array with one million items, we can better understand the impact of choosing one approach instead of the other. Notice that here I used a linear scale since values are on the same magnitude order.

    The purple line represents the memory allocation in bytes.

    Results comparison for one-million-items array

    So, should we use GetItems all over the place? Well, no! Let me tell you why.

    The problem with Random.GetItems: repeated elements

    There’s a huge problem with the GetItems method: it returns duplicate items. So, if you need to get N items without duplicates, GetItems is not the right choice.

    Here’s how you can demonstrate it.

    First, create an array of 100 distinct items. Then, using Random.Shared.GetItems, retrieve 100 items.

    The final array will have 100 items; the array may or may not contain duplicates.

    int[] source = Enumerable.Range(0, 100).ToArray();
    
    StringBuilder sb = new StringBuilder();
    
    for (int i = 1; i <= 200; i++)
    {
        HashSet<int> ints = Random.Shared.GetItems(source, 100).ToHashSet();
        sb.AppendLine($"run-{i}, {ints.Count}");
    }
    
    var finalCsv = sb.ToString();
    

    To check the number of distinct elements, I put the resulting array in a HashSet<int>. The final size of the HashSet will give us the exact percentage of unique values.

    If the HashSet size is exactly 100, it means that GetItems retrieved each element from the original array exactly once.

    For simplicity, I formatted the result in CSV format so that I could generate plots with it.

    Unique values percentage returned by GetItems

    As you can see, on average, we have 65% of unique items and 35% of duplicate items.

    Further readings

    I used the Enumerable.Range method to generate the initial items.

    I wrote an article to explain how to use it, which are some parts to consider when using it, and more.

    🔗 LINQ’s Enumerable.Range to generate a sequence of consecutive numbers | Code4IT

    This article first appeared on Code4IT 🐧

    Wrapping up

    You should not replace the way you get random items from the array by using Random.GetItems. Well, unless you are okay with having duplicates.

    If you need unique values, you should rely on other methods, such as Random.Shuffle.

    All in all, always remember to validate your assumptions by running experiments on the methods you are not sure you can trust!

    I hope you enjoyed this article! Let’s keep in touch on Twitter or LinkedIn! 🤜🤛

    Happy coding!

    🐧


    Source link

  • Path.Combine and Path.Join are similar but way different. &vert; Code4IT

    Path.Combine and Path.Join are similar but way different. | Code4IT


    Just a second! 🫷
    If you are here, it means that you are a software developer.
    So, you know that storage, networking, and domain management have a cost .

    If you want to support this blog, please ensure that you have disabled the adblocker for this site.
    I configured Google AdSense to show as few ADS as possible – I don’t want to bother you with lots of ads, but I still need to add some to pay for the resources for my site.

    Thank you for your understanding.
    Davide

    When you need to compose the path to a folder or file location, you can rely on the Path class. It provides several static methods to create, analyze and modify strings that represent a file system.

    Path.Join and Path.Combine look similar, yet they have some important differences that you should know to get the result you are expecting.

    Path.Combine: take from the last absolute path

    Path.Combine concatenates several strings into a single string that represents a file path.

    Path.Combine("C:", "users", "davide");
    // C:\users\davide
    

    However, there’s a tricky behaviour: if any argument other than the first contains an absolute path, all the previous parts are discarded, and the returned string starts with the last absolute path:

    Path.Combine("foo", "C:bar", "baz");
    // C:bar\baz
    
    Path.Combine("foo", "C:bar", "baz", "D:we", "ranl");
    // D:we\ranl
    

    Path.Join: take everything

    Path.Join does not try to return an absolute path, but it just joins the string using the OS path separator:

    Path.Join("C:", "users", "davide");
    // C:\users\davide
    

    This means that if there is an absolute path in any argument position, all the previous parts are not discarded:

    Path.Join("foo", "C:bar", "baz");
    // foo\C:bar\baz
    
    Path.Join("foo", "C:bar", "baz", "D:we", "ranl");
    // foo\C:bar\baz\D:we\ranl
    

    Final comparison

    As you can see, the behaviour is slightly different.

    Let’s see a table where we call the two methods using the same input strings:

    Path.Combine Path.Join
    ["singlestring"] singlestring singlestring
    ["foo", "bar", "baz"] foo\bar\baz foo\bar\baz
    ["foo", " bar ", "baz"] foo\ bar \baz foo\ bar \baz
    ["C:", "users", "davide"] C:\users\davide C:\users\davide
    ["foo", " ", "baz"] foo\ \baz foo\ \baz
    ["foo", "C:bar", "baz"] C:bar\baz foo\C:bar\baz
    ["foo", "C:bar", "baz", "D:we", "ranl"] D:we\ranl foo\C:bar\baz\D:we\ranl
    ["C:", "/users", "/davide"] /davide C:/users/davide
    ["C:", "users/", "/davide"] /davide C:\users//davide
    ["C:", "\users", "\davide"] \davide C:\users\davide

    Have a look at some specific cases:

    • neither methods handle white and empty spaces: ["foo", " ", "baz"] are transformed to foo\ \baz. Similarly, ["foo", " bar ", "baz"] are combined into foo\ bar \baz, without removing the head and trail whitespaces. So, always remove white spaces and empty values!
    • Path.Join handles in a not-so-obvious way the case of a path starting with / or \: if a part starts with \, it is included in the final path; if it starts with /, it is escaped as //. This behaviour depends on the path separator used by the OS: in my case, I’m running these methods using Windows 11.

    Finally, always remember that the path separator depends on the Operating System that is running the code. Don’t assume that it will always be /: this assumption may be correct for one OS but wrong for another one.

    This article first appeared on Code4IT 🐧

    Wrapping up

    As we have learned, Path.Combine and Path.Join look similar but have profound differences.

    Dealing with path building may look easy, but it hides some complexity. Always remember to:

    • validate and clean your input before using either of these methods (remove empty values, white spaces, and head or trailing path separators);
    • always write some Unit Tests to cover all the necessary cases;

    I hope you enjoyed this article! Let’s keep in touch on Twitter or LinkedIn! 🤜🤛

    Happy coding!

    🐧


    Source link