In unit tests, sometimes you need to perform deep checks on the object passed to the mocked service. We will learn 3 ways to do that with Moq and C#
Table of Contents
Just a second! 🫷 If you are here, it means that you are a software developer.
So, you know that storage, networking, and domain management have a cost .
If you want to support this blog, please ensure that you have disabled the adblocker for this site. I configured Google AdSense to show as few ADS as possible – I don’t want to bother you with lots of ads, but I still need to add some to pay for the resources for my site.
Thank you for your understanding. – Davide
When writing unit tests, you can use Mocks to simulate the usage of class dependencies.
Even though some developers are harshly against the usage of mocks, they can be useful, especially when the mocked operation does not return any value, but still, you want to check that you’ve called a specific method with the correct values.
In this article, we will learn 3 ways to check the values passed to the mocks when using Moq in our C# Unit Tests.
To better explain those 3 ways, I created this method:
publicvoid UpdateUser(User user, Preference preference)
{
var userDto = new UserDto
{
Id = user.id,
UserName = user.username,
LikesBeer = preference.likesBeer,
LikesCoke = preference.likesCoke,
LikesPizza = preference.likesPizza,
};
_userRepository.Update(userDto);
}
UpdateUser simply accepts two objects, user and preference, combines them into a single UserDto object, and then calls the Update method of _userRepository, which is an interface injected in the class constructor.
As you can see, we are not interested in the return value from _userRepository.Update. Rather, we are interested in checking that we are calling it with the right values.
We can do it in 3 ways.
Verify each property with It.Is
The simplest, most common way is by using It.Is<T> within the Verify method.
This approach works well when you have to perform checks on only a few fields. But the more fields you add, the longer and messier that code becomes.
Also, a problem with this approach is that if it fails, it becomes hard to understand which is the cause of the failure, because there is no indication of the specific field that did not match the expectations.
Here’s an example of an error message:
Expected invocation on the mock at least once, but was never performed: _ => _.Update(It.Is<UserDto>(u => (((u.Id == 1 && u.UserName == "Davidde") && u.LikesPizza == True) && u.LikesBeer == True) && u.LikesCoke == False))

Performed invocations:

Mock<IUserRepository:1> (_):
    IUserRepository.Update(UserDto { UserName = Davide, Id = 1, LikesPizza = True, LikesCoke = False, LikesBeer = True })
Can you spot the error? And what if you were checking 15 fields instead of 5?
Verify with external function
Another approach is by externalizing the function.
[Test]publicvoid WithExternalFunction()
{
//Arrangevar user = new User(1, "Davide");
var preferences = new Preference(true, true, false);
UserDto expected = new UserDto
{
Id = 1,
UserName = "Davide",
LikesBeer = true,
LikesCoke = false,
LikesPizza = true,
};
//Act userUpdater.UpdateUser(user, preferences);
//Assert userRepo.Verify(_ => _.Update(It.Is<UserDto>(u => AreEqual(u, expected))));
}
privatebool AreEqual(UserDto u, UserDto expected)
{
Assert.AreEqual(expected.UserName, u.UserName);
Assert.AreEqual(expected.Id, u.Id);
Assert.AreEqual(expected.LikesBeer, u.LikesBeer);
Assert.AreEqual(expected.LikesCoke, u.LikesCoke);
Assert.AreEqual(expected.LikesPizza, u.LikesPizza);
returntrue;
}
Here, we are passing an external function to the It.Is<T> method.
This approach allows us to define more explicit and comprehensive checks.
The good parts of it are that you will gain more control over the assertions, and you will also have better error messages in case a test fails:
Expected string length 6 but was 7. Strings differ at index 5.
Expected: "Davide"
But was:  "Davidde"
The bad part is that you will stuff your test class with lots of different methods, and the class can easily become hard to maintain. Unluckily, we cannot use local functions.
On the other hand, having external functions allows us to combine them when we need to do some tests that can be reused across test cases.
Intercepting the function parameters with Callback
Lastly, we can use a hidden gem of Moq: Callbacks.
With Callbacks, you can store in a local variable the reference to the item that was called by the method.
[Test]publicvoid CompareWithCallback()
{
// Arrangevar user = new User(1, "Davide");
var preferences = new Preference(true, true, false);
UserDto actual = null;
userRepo.Setup(_ => _.Update(It.IsAny<UserDto>()))
.Callback(new InvocationAction(i => actual = (UserDto)i.Arguments[0]));
UserDto expected = new UserDto
{
Id = 1,
UserName = "Davide",
LikesBeer = true,
LikesCoke = false,
LikesPizza = true,
};
//Act userUpdater.UpdateUser(user, preferences);
//Assert Assert.IsTrue(AreEqual(expected, actual));
}
In this way, you can use it locally and run assertions directly to that object without relying on the Verify method.
Or, if you use records, you can use the auto-equality checks to simplify the Verify method as I did in the previous example.
Wrapping up
In this article, we’ve explored 3 ways to perform checks on the objects passed to dependencies mocked with Moq.
Each way has its pros and cons, and it’s up to you to choose the approach that fits you the best.
I personally prefer the second and third approaches, as they allow me to perform better checks on the passed values.
Every application relies on some configurations. Many devs set them up using only the appsettings file. But there’s more!
Table of Contents
Just a second! 🫷 If you are here, it means that you are a software developer.
So, you know that storage, networking, and domain management have a cost .
If you want to support this blog, please ensure that you have disabled the adblocker for this site. I configured Google AdSense to show as few ADS as possible – I don’t want to bother you with lots of ads, but I still need to add some to pay for the resources for my site.
Thank you for your understanding. – Davide
Needless to say, almost every application needs to deal with some configurations. There are tons of use cases, and you already have some of them in mind, don’t you?
If you’re working with .NET, you’ve probably already used the appsettings.json file. It’s a good starting point, but it may be not enough in the case of complex applications (and complex deployments).
In this article, we will learn some ways to set configurations in a .NET API application. We will use the appsettings file, of course, and some other ways such as the dotnet CLI. Let’s go! 🚀
Project setup
First things first: let’s set up the demo project.
I have created a simple .NET 6 API application using Minimal APIs. This is my whole application (yes, less than 50 lines!)
In short, I scaffold the WebApplicationBuilder, configure that I want to map the settings section with root named RootConfig to my class of type MyRootConfig, and then run the application.
I then expose a single endpoint, /config, which returns the current configurations, wrapped within an IOptionsSnapshot<MyRootConfig> object.
Where is the source of the application’s configurations?
As stated on the Microsoft docs website, here 🔗, the WebApplicationBuilder…
Loads app configuration in the following order from:
appsettings.json.
appsettings.{Environment}.json.
User secrets when the app runs in the Development environment using the entry assembly.
Environment variables.
Command-line arguments.
So, yeah, we have several possible sources, and the order does matter.
Let’s see a bunch of them.
Define settings within the appsetting.json file
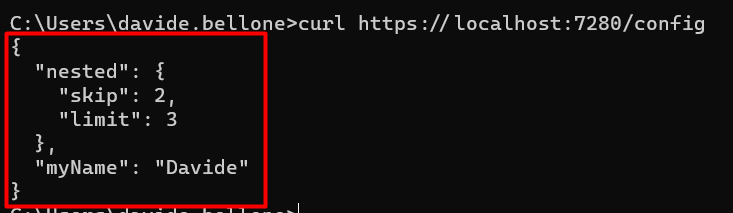
The most common way is by using the appsettings.json file. Here, in a structured and hierarchical way, you can define all the logs used as a baseline for your application.
With this file, all the fields within the RootConfig element will be mapped to the MyRootConfig class at startup. That object can then be returned using the /config endpoint.
Running the application (using Visual Studio or the dotnet CLI) you will be able to call that endpoint and see the expected result.
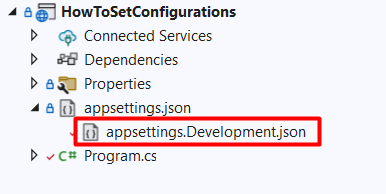
Use environment-specific appsettings.json
Now, you probably know that you can use other appsettings files with a name such as appsettings.Development.json.
With that file, you can override specific configurations using the same structure, but ignoring all the configs that don’t need to be changed.
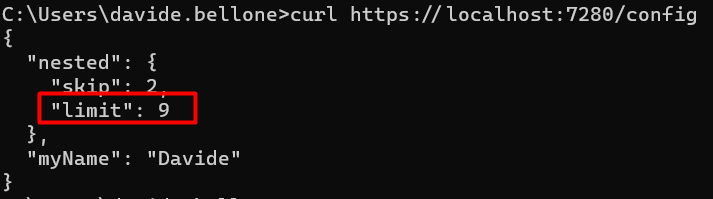
Let’s update the Limit field defined in the “base” appsettings. You don’t need to recreate the whole structure just for one key; you can use this JSON instead:
{
  "RootConfig": {
    "Nested": {
      "Limit": 9
    }
  }
}
Now, if we run the application using VS we will see this result:
Ok, but what made .NET understand that I wanted to use that file?? It’s a matter of Environment variables and Launch profiles.
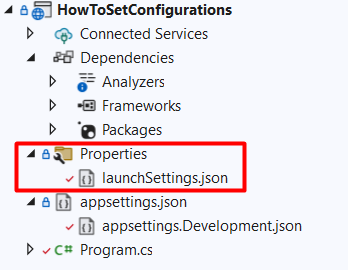
How to define profiles within the launchSettings.json file
Within the Properties folder in your project, you can see a launchSettings.json file. As you might expect, that file describes how you can launch the application.
Here we have some Launch profiles, and each of them specifies an ASPNETCORE_ENVIRONMENT variable. By default, its value is set to Development.
Now, recall that the environment-specific appsettings file name is defined as appsettings.{Environment}.json. Therefore, by running your application with Visual Studio using the HowToSetConfigurations launch profile, you’re gonna replace that {Environment} with Development, thus using the appsettings.Development.json.
Ça va sans dire that you can use every value you prefer – such as Staging, MyCustomEnvironmentName, and so on.
How to define the current Environment with the CLI
If you are using the dotnet CLI you can set that environment variable as
dotnet run --ASPNETCORE_ENVIRONMENT=Development
or, in a simpler way, you can use
dotnet run --environment Development
and get the same result.
How do nested configurations get resolved?
As we’ve seen in a previous article, even if we are using configurations defined in a hierarchical structure, in the end, they are transformed into key-value pairs.
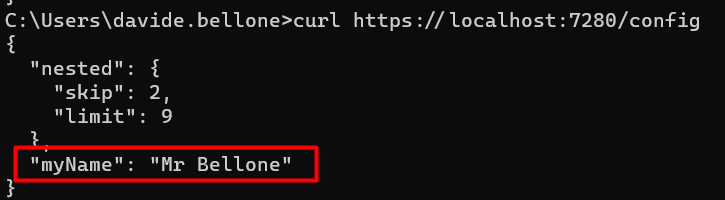
so that, when I run the application using that profile, I will get this result:
Have you noticed the key RootConfig:MyName? 😉
🔎 Notice that now we have both MyName = Mr Bellone, as defined in the lauchSettings file, and Limit = 9, since we’re still using the appsettings.Development.json file (because of that “ASPNETCORE_ENVIRONMENT”: “Development” ).
How to define the current profile with the CLI
Clearly, we can use the dotnet CLI to load the whole environment profile. We just need to specify it using the --launch-profile flag:
dotnet run --launch-profile=HowToSetConfigurations
Define application settings using the dotnet CLI
Lastly, we can specify config values directly using the CLI.
It’s just a matter of specifying the key-value pairs as such:
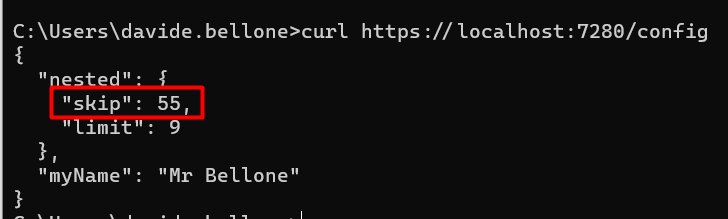
dotnet run --RootConfig:Nested:Skip=55
And – TAH-DAH! – you will see this result:
❓ A question for you! Notice that, even though I specified only the Skip value, both Limit and MyName have the value defined before. Do you know why it happens? Drop a message below if you know the answer! 📩
Further readings
As always, there’s more!
If you want to know more about how dotNET APIs load and start, you should have a look at this page:
Health Checks are fundamental to keep track of the health of a system. How can we check if MongoDB is healthy?
Table of Contents
Just a second! 🫷 If you are here, it means that you are a software developer.
So, you know that storage, networking, and domain management have a cost .
If you want to support this blog, please ensure that you have disabled the adblocker for this site. I configured Google AdSense to show as few ADS as possible – I don’t want to bother you with lots of ads, but I still need to add some to pay for the resources for my site.
Thank you for your understanding. – Davide
In any complex system, you have to deal with external dependencies.
More often than not, if one of the external systems (a database, another API, or an authentication provider) is down, the whole system might be affected.
In this article, we’re going to learn what Health Checks are, how to create custom ones, and how to check whether a MongoDB instance can be reached or not.
What are Health Checks?
A Health Check is a special type of HTTP endpoint that allows you to understand the status of the system – well, it’s a check on the health of the whole system, including external dependencies.
You can use it to understand whether the application itself and all of its dependencies are healthy and responding in a reasonable amount of time.
Those endpoints are also useful for humans, but are even more useful for tools that monitor the application and can automatically fix some issues if occurring – for example, they can restart the application if it’s in a degraded status.
How to add Health Checks in dotNET
Lucky for us, .NET already comes with Health Check capabilities, so we can just follow the existing standard without reinventing the wheel.
For the sake of this article, I created a simple .NET API application.
Head to the Program class – or, in general, wherever you configure the application – and add this line:
builder.Services.AddHealthChecks();
and then, after var app = builder.Build();, you must add the following line to have the health checks displayed under the /healtz path.
app.MapHealthChecks("/healthz");
To sum up, the minimal structure should be:
var builder = WebApplication.CreateBuilder(args);

builder.Services.AddControllers();

builder.Services.AddHealthChecks();

var app = builder.Build();

app.MapHealthChecks("/healthz");

app.MapControllers();

app.Run();
So that, if you run the application and navigate to /healthz, you’ll just see an almost empty page with two characteristics:
the status code is 200;
the only printed result is Healthy
Clearly, that’s not enough for us.
How to create a custom Health Check class in .NET
Every project has its own dependencies and requirements. We should be able to build custom Health Checks and add them to our endpoint.
It’s just a matter of creating a new class that implements IHealthCheck, an interface that lives under the Microsoft.Extensions.Diagnostics.HealthChecks namespace.
Then, you have to implement the method that tells us whether the system under test is healthy or degraded:
Now, you can create a stub class that implements IExternalDependency to toy with the different result types. In fact, if we create and inject a stub class like this:
and we run the application, we can see that the final result of the application is Unhealthy.
A question for you: why should we specify a name to health checks, such as “A custom name”? Drop a comment below 📩
Adding a custom Health Check Provider for MongoDB
Now we can create a custom Health Check for MongoDB.
Of course, we will need to use a library to access Mongo: so simply install via NuGet the package MongoDB.Driver – we’ve already used this library in a previous article.
Clearly, we create a reference to a specific DB instance: new MongoClient(url).GetDatabase(url.DatabaseName). Notice that we’re requiring access to the Secondary node, to avoid performing operations on the Primary node.
Then, we send the PING command: dbInstance.RunCommandAsync<BsonDocument>(new BsonDocument { { "ping", 1 } }).
Now what? The PING command either returns an object like this:
or, if the command cannot be executed, it throws a System.TimeoutException.
MongoDB Health Checks with AspNetCore.Diagnostics.HealthChecks
If we don’t want to write such things on our own, we can rely on pre-existing libraries.
AspNetCore.Diagnostics.HealthChecks is a library you can find on GitHub that automatically handles several types of Health Checks for .NET applications.
Note that this library is NOT maintained or supported by Microsoft – but it’s featured in the official .NET documentation.
This library exposes several NuGet packages for tens of different dependencies you might want to consider in your Health Checks. For example, we have Azure.IoTHub, CosmosDb, Elasticsearch, Gremlin, SendGrid, and many more.
Obviously, we’re gonna use the one for MongoDB. It’s quite easy.
First, you have to install the AspNetCore.HealthChecks.MongoDb NuGet package.
Then, you have to just add a line of code to the initial setup:
Ok, if we can just add a line of code instead of creating a brand-new class, why should we bother creating the whole custom class?
There are some reasons to create a custom provider:
You want more control over the DB access: for example, you want to ping only Secondary nodes, as we did before;
You don’t just want to check if the DB is up, but also the performance of doing some specific operations, such as retrieving all the documents from a specified collection.
But, yes, in general, you can simply use the NuGet package we used in the previous section, and you’re good to go.
Further readings
As usual, the best way to learn more about a topic is by reading the official documentation:
Customizing the behavior of an HTTP request is easy: you can use a middleware defined as a delegate or as a class.
Table of Contents
Just a second! 🫷 If you are here, it means that you are a software developer.
So, you know that storage, networking, and domain management have a cost .
If you want to support this blog, please ensure that you have disabled the adblocker for this site. I configured Google AdSense to show as few ADS as possible – I don’t want to bother you with lots of ads, but I still need to add some to pay for the resources for my site.
Thank you for your understanding. – Davide
Sometimes you need to create custom logic that must be applied to all HTTP requests received by your ASP.NET Core application. In these cases, you can create a custom middleware: pieces of code that are executed sequentially for all incoming requests.
The order of middlewares matters. Here’s a nice schema published on the Microsoft website:
A Middleware, in fact, can manipulate the incoming HttpRequest and the resulting HttpResponse objects.
In this article, we’re gonna learn 2 ways to create a middleware in .NET.
Middleware as inline delegates
The easiest way is to define a delegate function that must be defined after building the WebApplication.
By calling the Use method, you can update the HttpContext object passed as a first parameter.
Note that you have to call the Invoke method to call the next middleware.
There is a similar overload that accepts in input a RequestDelegate instance instead of Func<Task>, but it is considered to be less performant: you should, in fact, use the one with Func<Task>.
Middleware as standalone classes
The alternative to delegates is by defining a custom class.
You can call it whatever you want, but you have some constraints to follow when creating the class:
it must have a public constructor with a single parameter whose type is RequestDelegate (that will be used to invoke the next middleware);
it must expose a public method named Invoke or InvokeAsync that accepts as a first parameter an HttpContext and returns a Task;
Then, to add it to your application, you have to call
app.UseMiddleware<MyCustomMiddleware>();
Delegates or custom classes?
Both are valid methods, but each of them performs well in specific cases.
For simple scenarios, go with inline delegates: they are easy to define, easy to read, and quite performant. But they are a bit difficult to test.
For complex scenarios, go with custom classes: this way you can define complex behaviors in a single class, organize your code better, use Dependency Injection to pass services and configurations to the middleware. Also, defining the middleware as a class makes it more testable. The downside is that, as of .NET 7, using a middleware resides on reflection: UseMiddleware invokes the middleware by looking for a public method named Invoke or InvokeAsync. So, theoretically, using classes is less performant than using delegates (I haven’t benchmarked it yet, though!).
Wrapping up
On Microsoft documentation you can find a well-explained introduction to Middlewares:
C# devs have the bad habit of creating interfaces for every non-DTO class because «we need them for mocking!». Are you sure it’s the only way?
Table of Contents
Just a second! 🫷 If you are here, it means that you are a software developer.
So, you know that storage, networking, and domain management have a cost .
If you want to support this blog, please ensure that you have disabled the adblocker for this site. I configured Google AdSense to show as few ADS as possible – I don’t want to bother you with lots of ads, but I still need to add some to pay for the resources for my site.
Thank you for your understanding. – Davide
One of the most common traits of C# developers is the excessive usage of interfaces.
For every non-DTO class we define, we usually also create the related interface. Most of the time, we don’t need it because we have multiple implementations of an interface. Instead, we say that we need an interface to enable mocking.
That’s true; it’s pretty straightforward to mock an interface: lots of libraries, like Moq and NSubstitute, allow you to create mocks and pass them to the class under test. What if there were another way?
In this article, we will learn how to have complete control over a dependency while having the concrete class, and not the related interface, injected in the constructor.
C# devs always add interfaces, just in case
If you’re a developer like me, you’ve been taught something like this:
One of the SOLID principles is Dependency Inversion; to achieve it, you need Dependency Injection. The best way to do that is by creating an interface, injecting it in the consumer’s constructor, and then mapping the interface and the concrete class.
Sometimes, somebody explains that we don’t need interfaces to achieve Dependency Injection. However, there are generally two arguments proposed by those who keep using interfaces everywhere: the “in case I need to change the database” argument and, even more often, the “without interfaces, I cannot create mocks”.
Are we sure?
The “Just in case I need to change the database” argument
One phrase that I often hear is:
Injecting interfaces allows me to change the concrete implementation of a class without worrying about the caller. You know, just in case I had to change the database engine…
Yes, that’s totally right – using interfaces, you can change the internal implementation in a bat of an eye.
Let’s be honest: in all your career, how many times have you changed the underlying database? In my whole career, it happened just once: we tried to build a solution using Gremlin for CosmosDB, but it turned out to be too expensive – so we switched to a simpler MongoDB.
But, all in all, it wasn’t only thanks to the interfaces that we managed to switch easily; it was because we strictly separated the classes and did not leak the models related to Gremlin into the core code. We structured the code with a sort of Hexagonal Architecture, way before this term became a trend in the tech community.
Still, interfaces can be helpful, especially when dealing with multiple implementations of the same methods or when you want to wrap your head around the methods, inputs, and outputs exposed by a module.
The “I need to mock” argument
Another one I like is this:
Interfaces are necessary for mocking dependencies! Otherwise, how can I create Unit Tests?
Well, I used to agree with this argument. I was used to mocking interfaces by using libraries like Moq and defining the behaviour of the dependency using the SetUp method.
It’s still a valid way, but my point here is that that’s not the only one!
One of the simplest tricks is to mark your classes as abstract. But… this means you’ll end up with every single class marked as abstract. Not the best idea.
We have other tools in our belt!
A realistic example: Dependency Injection without interfaces
Let’s start with a real-ish example.
We have a NumbersRepository that just exposes one method: GetNumbers().
publicclassNumbersRepository{
privatereadonlyint[] _allNumbers;
public NumbersRepository()
{
_allNumbers = Enumerable.Range(0, int.MaxValue).ToArray();
}
public IEnumerable<int> GetNumbers() => Random.Shared.GetItems(_allNumbers, 50);
}
Generally, one would be tempted to add an interface with the same name as the class, INumbersRepository, and include the GetNumbers method in the interface definition.
We are not going to do that – the interface is not necessary, so why clutter the code with something like that?
Now, for the consumer. We have a simple NumbersSearchService that accepts, via Dependency Injection, an instance of NumbersRepository (yes, the concrete class!) and uses it to perform a simple search:
We have overridden the GetNumbers method, but to do so, we had to include a new method, SetNumbers, to define the expected result of the former method.
We then can use it in our tests like this:
[Test]publicvoid Should_WorkWithStubRepo()
{
// Arrangevar repository = new StubNumberRepo();
repository.SetNumbers(1, 2, 3);
var service = new NumbersSearchService(repository);
// Actvar result = service.Contains(3);
// Assert Assert.That(result, Is.True);
}
You now have the full control over the subclass. But this approach comes with a problem: if you have multiple methods marked as virtual, and you are going to use all of them in your test classes, then you will need to override every single method (to have control over them) and work out how to decide whether to use the concrete method or the stub implementation.
For example, we can update the StubNumberRepo to let the consumer choose if we need the dummy values or the base implementation:
With this approach, by default, we use the concrete implementation of NumbersRepository because _useStubNumbers is false. If we call the SetNumbers method, we also specify that we don’t want to use the original implementation.
Way 2: Use the virtual keyword in the service to avoid calling the dependency
Similar to the previous approach, we can mark some methods of the caller as virtual to allow us to change parts of our class while keeping everything else as it was.
To achieve it, we have to refactor a little our Service class:
public class NumbersSearchService
{
private readonly NumbersRepository _repository;
public NumbersSearchService(NumbersRepository repository)
{
_repository = repository;
}
public bool Contains(int number)
{
- var numbers = _repository.GetNumbers();
+ var numbers = GetNumbers();
return numbers.Contains(number);
}
+ public virtual IEnumerable<int> GetNumbers() => _repository.GetNumbers();
}
The key is that we moved the calls to the external references to a separate method, marking it as virtual.
This way, we can create a stub class of the Service itself without the need to stub its dependencies:
The approach is almost identical to the one we saw before. The difference can be seen in your tests:
[Test]publicvoid Should_UseStubService()
{
// Arrangevar service = new StubNumberSearch();
service.SetNumbers(12, 15, 30);
// Actvar result = service.Contains(15);
// Assert Assert.That(result, Is.True);
}
There is a problem with this approach: many devs (correctly) add null checks in the constructor to ensure that the dependencies are not null:
public NumbersSearchService(NumbersRepository repository)
{
ArgumentNullException.ThrowIfNull(repository);
_repository = repository;
}
While this approach makes it safe to use the NumbersSearchService reference within the class’ methods, it also stops us from creating a StubNumberSearch. Since we want to create an instance of NumbersSearchService without the burden of injecting all the dependencies, we call the base constructor passing null as a value for the dependencies. If we validate against null, the stub class becomes unusable.
There’s a simple solution: adding a protected empty constructor:
We mark it as protected because we want that only subclasses can access it.
Way 3: Use the “new” keyword in methods to hide the base implementation
Similar to the virtual keyword is the new keyword, which can be applied to methods.
We can then remove the virtual keyword from the base class and hide its implementation by marking the overriding method as new.
public class NumbersSearchService
{
private readonly NumbersRepository _repository;
public NumbersSearchService(NumbersRepository repository)
{
ArgumentNullException.ThrowIfNull(repository);
_repository = repository;
}
public bool Contains(int number)
{
var numbers = _repository.GetNumbers();
return numbers.Contains(number);
}
- public virtual IEnumerable<int> GetNumbers() => _repository.GetNumbers();
+ public IEnumerable<int> GetNumbers() => _repository.GetNumbers();
}
We have restored the original implementation of the Repository.
Now, we can update the stub by adding the new keyword.
internal class StubNumberSearch : NumbersSearchService
{
private IEnumerable<int> _numbers;
private bool _useStubNumbers;
public void SetNumbers(params int[] numbers)
{
_numbers = numbers.ToArray();
_useStubNumbers = true;
}
- public override IEnumerable<int> GetNumbers() => _useStubNumbers ? _numbers : base.GetNumbers();
+ public new IEnumerable<int> GetNumbers() => _useStubNumbers ? _numbers : base.GetNumbers();
}
We haven’t actually solved any problem except for one: we can now avoid cluttering all our classes with the virtual keyword.
A question for you! Is there any difference between using the new and the virtual keyword? When you should pick one instead of the other? Let me know in the comments section! 📩
Way 4: Mock concrete classes by marking a method as virtual
Sometimes, I hear developers say that mocks are the absolute evil, and you should never use them.
Oh, come on! Don’t be so silly!
That’s true, when using mocks you are writing tests on a irrealistic environment. But, well, that’s exactly the point of having mocks!
If you think about it, at school, during Science lessons, we were taught to do our scientific calculations using approximations: ignore the air resistance, ignore friction, and so on. We knew that that world did not exist, but we removed some parts to make it easier to validate our hypothesis.
In my opinion, it’s the same for testing. Mocks are useful to have full control of a specific behaviour. Still, only relying on mocks makes your tests pretty brittle: you cannot be sure that your system is working under real conditions.
That’s why, as I explained in a previous article, I prefer the Testing Diamond over the Testing Pyramid. In many real cases, five Integration Tests are more valuable than fifty Unit Tests.
But still, mocks can be useful. How can we use them if we don’t have interfaces?
If we try to use Moq to create a mock of NumbersRepository (again, the concrete class) like this:
[Test]publicvoid Should_WorkWithMockRepo()
{
// Arrangevar repository = new Moq.Mock<NumbersRepository>();
repository.Setup(_ => _.GetNumbers()).Returns(newint[] { 1, 2, 3 });
var service = new NumbersSearchService(repository.Object);
// Actvar result = service.Contains(3);
// Assert Assert.That(result, Is.True);
}
It will fail with this error:
System.NotSupportedException : Unsupported expression: _ => _.GetNumbers()
Non-overridable members (here: NumbersRepository.GetNumbers) may not be used in setup / verification expressions.
This error occurs because the implementation GetNumbers is fixed as defined in the NumbersRepository class and cannot be overridden.
Unless you mark it as virtual, as we did before.
public class NumbersRepository
{
    private readonly int[] _allNumbers;

    public NumbersRepository()
    {
        _allNumbers = Enumerable.Range(0, 100).ToArray();
    }

-    public IEnumerable<int> GetNumbers() => Random.Shared.GetItems(_allNumbers, 50);
+    public virtual IEnumerable<int> GetNumbers() => Random.Shared.GetItems(_allNumbers, 50);
}
Now the test passes: we have successfully mocked a concrete class!
Further readings
Testing is a crucial part of any software application. I personally write Unit Tests even for throwaway software – this way, I can ensure that I’m doing the correct thing without the need for manual debugging.
However, one part that is often underestimated is the code quality of tests. Tests should be written even better than production code. You can find more about this topic here:
Also, Unit Tests are not enough. You should probably write more Integration Tests than Unit Tests. This one is a testing strategy called Testing Diamond.
In this article, we learned that it’s not necessary to create interfaces for the sake of having mocks.
We have different other options.
Honestly speaking, I’m still used to creating interfaces and using them with mocks.
I find it easy to do, and this approach provides a quick way to create tests and drive the behaviour of the dependencies.
Also, I recognize that interfaces created for the sole purpose of mocking are quite pointless: we have learned that there are other ways, and we should consider trying out these solutions.
Still, interfaces are quite handy for two “non-technical” reasons:
using interfaces, you can understand in a glimpse what are the operations that you can call in a clean and concise way;
interfaces and mocks allow you to easily use TDD: while writing the test cases, you also define what methods you need and the expected behaviour. I know you can do that using stubs, but I find it easier with interfaces.
I know, this is a controversial topic – I’m not saying that you should remove all your interfaces (I think it’s a matter of personal taste, somehow!), but with this article, I want to highlight that you can avoid interfaces.
I hope you enjoyed this article! Let’s keep in touch on Twitter or LinkedIn! 🤜🤛
With HashSet, you can get a list of different items in a performant way. What if you need a custom way to define when two objects are equal?
Table of Contents
Just a second! 🫷 If you are here, it means that you are a software developer.
So, you know that storage, networking, and domain management have a cost .
If you want to support this blog, please ensure that you have disabled the adblocker for this site. I configured Google AdSense to show as few ADS as possible – I don’t want to bother you with lots of ads, but I still need to add some to pay for the resources for my site.
Thank you for your understanding. – Davide
Sometimes, object instances can be considered equal even though some of their properties are different. Consider a movie translated into different languages: the Italian and French versions are different, but the movie is the same.
If we want to store unique values in a collection, we can use a HashSet<T>. But how can we store items in a HashSet when we must follow a custom rule to define if two objects are equal?
In this article, we will learn two ways to add custom equality checks when using a HashSet.
Let’s start with a dummy class: Pirate.
publicclassPirate{
publicint Id { get; }
publicstring Name { get; }
public Pirate(int id, string username)
{
Id = id;
Name = username;
}
}
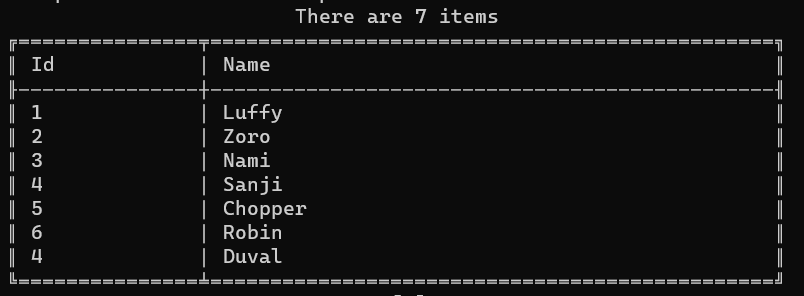
I’m going to add some instances of Pirate to a HashSet. Please, note that there are two pirates whose Id is 4:
List<Pirate> mugiwara = new List<Pirate>()
{
new Pirate(1, "Luffy"),
new Pirate(2, "Zoro"),
new Pirate(3, "Nami"),
new Pirate(4, "Sanji"), // This ...new Pirate(5, "Chopper"),
new Pirate(6, "Robin"),
new Pirate(4, "Duval"), // ... and this};
HashSet<Pirate> hashSet = new HashSet<Pirate>();
foreach (var pirate in mugiwara)
{
hashSet.Add(pirate);
}
_output.WriteAsTable(hashSet);
(I really hope you’ll get the reference 😂)
Now, what will we print on the console? (ps: output is just a wrapper around some functionalities provided by Spectre.Console, that I used here to print a table)
As you can see, we have both Sanji and Duval: even though their Ids are the same, those are two distinct objects.
Also, we haven’t told HashSet that the Id property must be used as a discriminator.
Define a custom IEqualityComparer in a C# HashSet
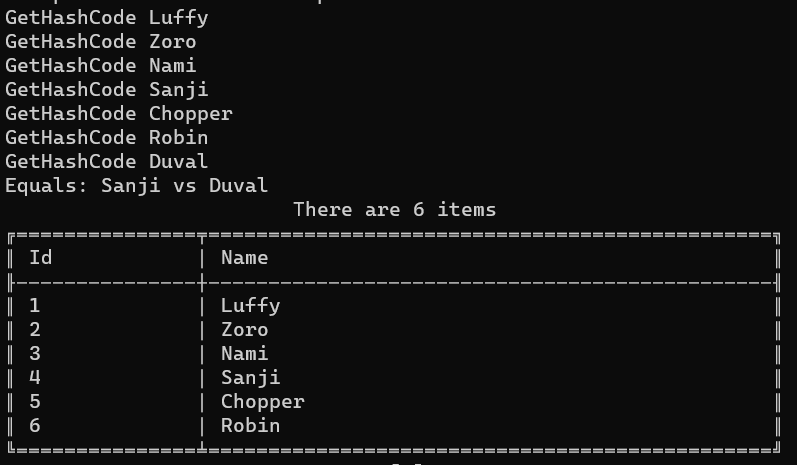
In order to add a custom way to tell the HashSet that two objects can be treated as equal, we can define a custom equality comparer: it’s nothing but a class that implements the IEqualityComparer<T> interface, where T is the name of the class we are working on.
The first method, Equals, compares two instances of a class to tell if they are equal, following the custom rules we write.
The second method, GetHashCode, defines a way to build an object’s hash code given its internal status. In this case, I’m saying that the hash code of a Pirate object is just the hash code of its Id property.
To include this custom comparer, you must add a new instance of PirateComparer to the HashSet declaration:
HashSet<Pirate> hashSet = new HashSet<Pirate>(new PirateComparer());
Let’s rerun the example, and admire the result:
As you can see, there is only one item whose Id is 4: Sanji.
Let’s focus a bit on the messages printed when executing Equals and GetHashCode.
GetHashCode Luffy
GetHashCode Zoro
GetHashCode Nami
GetHashCode Sanji
GetHashCode Chopper
GetHashCode Robin
GetHashCode Duval
Equals: Sanji vs Duval
Every time we insert an item, we call the GetHashCode method to generate an internal ID used by the HashSet to check if that item already exists.
Two objects that are equal return hash codes that are equal. However, the reverse is not true: equal hash codes do not imply object equality, because different (unequal) objects can have identical hash codes.
This means that if the Hash Code is already used, it’s not guaranteed that the objects are equal. That’s why we need to implement the Equals method (hint: do not just compare the HashCode of the two objects!).
Is implementing a custom IEqualityComparer the best choice?
As always, it depends.
On the one hand, using a custom IEqualityComparer has the advantage of allowing you to have different HashSets work differently depending on the EqualityComparer passed in input; on the other hand, you are now forced to pass an instance of IEqualityComparer everywhere you use a HashSet — and if you forget one, you’ll have a system with inconsistent behavior.
There must be a way to ensure consistency throughout the whole codebase.
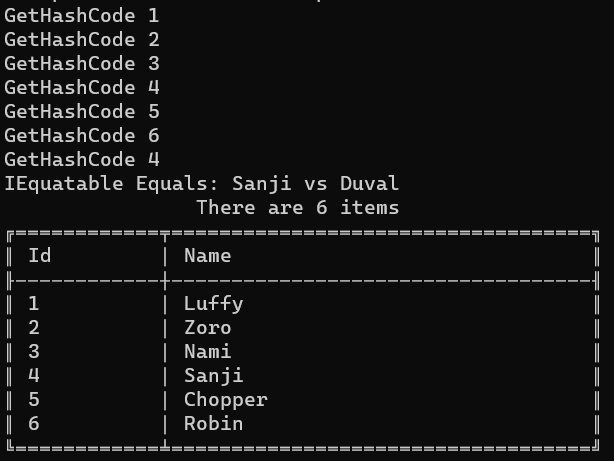
Implement the IEquatable interface
It makes sense to implement the equality checks directly inside the type passed as a generic type to the HashSet.
To do that, you need to have that class implement the IEquatable<T> interface, where T is the class itself.
Let’s rework the Pirate class, letting it implement the IEquatable<Pirate> interface.
publicclassPirate : IEquatable<Pirate>
{
publicint Id { get; }
publicstring Name { get; }
public Pirate(int id, string username)
{
Id = id;
Name = username;
}
bool IEquatable<Pirate>.Equals(Pirate? other)
{
Console.WriteLine($"IEquatable Equals: {this.Name} vs {other.Name}");
returnthis.Id == other.Id;
}
publicoverridebool Equals(object obj)
{
Console.WriteLine($"Override Equals {this.Name} vs {(obj as Pirate).Name}");
return Equals(obj as Pirate);
}
publicoverrideint GetHashCode()
{
Console.WriteLine($"GetHashCode {this.Id}");
return (Id).GetHashCode();
}
}
The IEquatable interface forces you to implement the Equals method. So, now we have two implementations of Equals (the one for IEquatable and the one that overrides the default implementation). Which one is correct? Is the GetHashCode really used?
Let’s see what happens in the next screenshot:
As you could’ve imagined, the Equals method called in this case is the one needed to implement the IEquatable interface.
Please note that, as we don’t need to use the custom comparer, the HashSet initialization becomes:
HashSet<Pirate> hashSet = new HashSet<Pirate>();
What has the precedence: IEquatable or IEqualityComparer?
What happens when we use both IEquatable and IEqualityComparer?
Let’s quickly demonstrate it.
First of all, keep the previous implementation of the Pirate class, where the equality check is based on the Id property:
publicclassPirate : IEquatable<Pirate>
{
publicint Id { get; }
publicstring Name { get; }
public Pirate(int id, string username)
{
Id = id;
Name = username;
}
bool IEquatable<Pirate>.Equals(Pirate? other)
{
Console.WriteLine($"IEquatable Equals: {this.Name} vs {other.Name}");
returnthis.Id == other.Id;
}
publicoverrideint GetHashCode()
{
Console.WriteLine($"GetHashCode {this.Id}");
return (Id).GetHashCode();
}
}
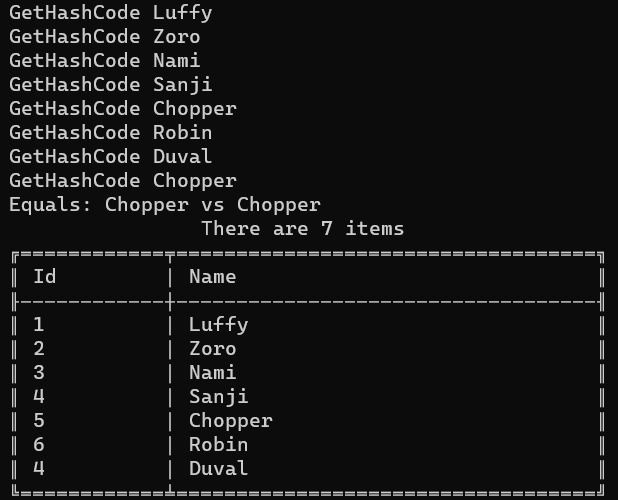
Now, create a new IEqualityComparer where the equality is based on the Name property.
Now we have custom checks on both the Name and the Id.
It’s time to add a new pirate to the list, and initialize the HashSet by passing in the constructor an instance of PirateComparerByName.
List<Pirate> mugiwara = new List<Pirate>()
{
new Pirate(1, "Luffy"),
new Pirate(2, "Zoro"),
new Pirate(3, "Nami"),
new Pirate(4, "Sanji"), // Id = 4new Pirate(5, "Chopper"), // Name = Choppernew Pirate(6, "Robin"),
new Pirate(4, "Duval"), // Id = 4new Pirate(7, "Chopper") // Name = Chopper};
HashSet<Pirate> hashSet = new HashSet<Pirate>(new PirateComparerByName());
foreach (var pirate in mugiwara)
{
hashSet.Add(pirate);
}
We now have two pirates with ID = 4 and two other pirates with Name = Chopper.
Can you foresee what will happen?
The checks on the ID are totally ignored: in fact, the final result contains both Sanji and Duval, even if their IDs are the same. The custom IEqualityComparer has the precedence over the IEquatable interface.
Just a second! 🫷 If you are here, it means that you are a software developer.
So, you know that storage, networking, and domain management have a cost .
If you want to support this blog, please ensure that you have disabled the adblocker for this site. I configured Google AdSense to show as few ADS as possible – I don’t want to bother you with lots of ads, but I still need to add some to pay for the resources for my site.
Thank you for your understanding. – Davide
In a previous article, we delved into the creation of realistic data using Bogus, an open-source library that allows you to generate data with plausible values.
Bogus contains several properties and methods that generate realistic data such as names, addresses, birthdays, and so on.
In this article, we will learn two ways to generate data with Bogus: both ways generate the same result; the main change is on the reusability and the modularity. But, in my opinion, it’s just a matter of preference: there is no approach absolutely better than the other. However, both methods can be preferred in specific cases.
For the sake of this article, we are going to use Bogus to generate instances of the Book class, defined like this:
It is possible to create a specific object that, using a Builder approach, allows you to generate one or more items of a specified type.
It all starts with the Faker<T> generic type, where T is the type you want to generate.
Once you create it, you can define the rules to be used when initializing the properties of a Book by using methods such as RuleFor and RuleForType.
publicstaticclassBogusBookGenerator{
publicstatic Faker<Book> CreateFaker()
{
Faker<Book> bookFaker = new Faker<Book>()
.RuleFor(b => b.Id, f => f.Random.Guid())
.RuleFor(b => b.Title, f => f.Lorem.Text())
.RuleFor(b => b.Genres, f => f.Random.EnumValues<Genre>())
.RuleFor(b => b.AuthorFirstName, f => f.Person.FirstName)
.RuleFor(b => b.AuthorLastName, f => f.Person.LastName)
.RuleFor(nameof(Book.PagesCount), f => f.Random.Number(100, 800))
.RuleForType(typeof(DateOnly), f => f.Date.PastDateOnly());
return bookFaker;
}
}
In this way, thanks to the static method, you can simply create a new instance of Faker<Book>, ask it to generate one or more books, and enjoy the result:
Faker<Book> generator = BogusBookGenerator.CreateFaker();
var books = generator.Generate(10);
Clearly, it’s not necessary for the class to be marked as static: it all depends on what you need to achieve!
Expose a subtype of Faker, specific for the data type to be generated
If you don’t want to use a method (static or not static, it doesn’t matter), you can define a subtype of Faker<Book> whose customization rules are all defined in the constructor.
publicclassBookGenerator : Faker<Book>
{
public BookGenerator()
{
RuleFor(b => b.Id, f => f.Random.Guid());
RuleFor(b => b.Title, f => f.Lorem.Text());
RuleFor(b => b.Genres, f => f.Random.EnumValues<Genre>());
RuleFor(b => b.AuthorFirstName, f => f.Person.FirstName);
RuleFor(b => b.AuthorLastName, f => f.Person.LastName);
RuleFor(nameof(Book.PagesCount), f => f.Random.Number(100, 800));
RuleForType(typeof(DateOnly), f => f.Date.PastDateOnly());
}
}
Using this way, you can simply create a new instance of BookGenerator and, again, call the Generate method to create new book instances.
var generator = new BookGenerator();
var books = generator.Generate(10);
Method vs Subclass: When should we use which?
As we saw, both methods bring the same result, and their usage is almost identical.
So, which way should I use?
Use the method approach (the first one) when you need:
Simplicity: If you need to generate fake data quickly and your rules are straightforward, using a method is the easiest approach.
Ad-hoc Data Generation: Ideal for one-off or simple scenarios where you don’t need to reuse the same rules across your application.
Or use the subclass (the second approach) when you need:
Reusability: If you need to generate the same type of fake data in multiple places, defining a subclass allows you to encapsulate the rules and reuse them easily.
Complex scenarios and extensibility: Better suited for more complex data generation scenarios where you might have many rules or need to extend the functionality.
Maintainability: Easier to maintain and update the rules in one place.
Further readings
If you want to learn a bit more about Bogus and use it to populate data used by Entity Framework, I recently published an article about this topic:
I think Bogus is one of the best libraries in the .NET universe, as having realistic data can help you improve the intelligibility of the test cases you generate. Also, Bogus can be a great tool when you want to showcase demo values without accessing real data.
I hope you enjoyed this article! Let’s keep in touch on LinkedIn, Twitter or BlueSky! 🤜🤛


