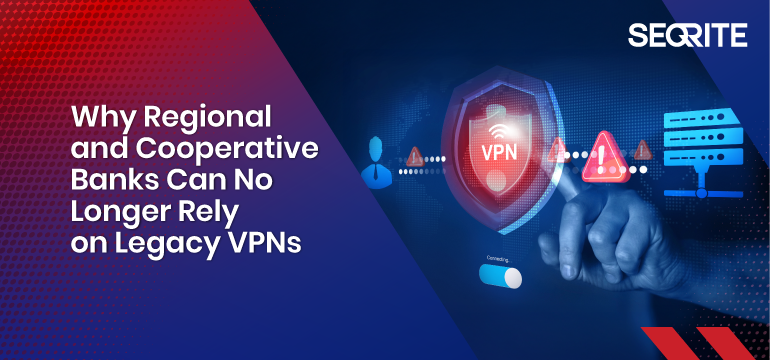
Virtual Private Networks (VPNs) have been the go-to solution for securing remote access to banking systems for decades. They created encrypted tunnels for employees, vendors, and auditors to connect with core banking applications. But as cyber threats become more sophisticated, regulatory bodies tighten their grip, and branch operations spread into rural areas, it becomes increasingly clear that VPNs are no longer sufficient for regional and cooperative banks in India.
The Cybersecurity Reality for Banks
The numbers speak for themselves:
In just 10 months of 2023, Indian banks faced 13 lakh cyberattacks, averaging 4,400 daily.
Over the last five years, banks reported 248 successful data breaches.
In the first half of 2025 alone, the RBI imposed ₹15.63 crore in penalties on cooperative banks for compliance failures, many linked to weak cybersecurity practices.
The most concerning factor is that most of these incidents were linked to unauthorized access. With their flat network access model, traditional VPNs make banks highly vulnerable when even one compromised credential slips into the wrong hands.
Why VPNs Are No Longer Enough
Over-Privileged Access
VPNs were built to provide broad network connectivity. Once logged in, users often gain excessive access to applications and systems beyond their role. This “all-or-nothing” model increases the risk of insider threats and lateral movement by attackers.
VPNs were built to provide broad network connectivity. Once logged in, users often gain excessive access to applications and systems beyond their roles.
Lack of Granularity
Banks require strict control over who accesses what. VPNs cannot enforce role-based or context-aware access controls. For example, an external auditor should only be able to view specific reports, not navigate through the entire network.
Operational Complexity
VPN infrastructure is cumbersome to deploy and maintain across hundreds of branches. The overhead of managing configurations, licenses, and updates adds strain to already stretched IT teams in regional banks.
Poor Fit for Hybrid and Remote Work
Banking operations are no longer confined to branch premises. Remote staff, vendors, and regulators need secure but seamless access. VPNs slow down connectivity, especially in rural low-bandwidth areas, hampering productivity.
Audit and Compliance Gaps
VPNs don’t inherently provide built-in audit logs, geo-restriction policies, or continuous verification—making compliance audits more painful and penalties more likely.
The Rise of Zero Trust Network Access (ZTNA)
Zero Trust Network Access (ZTNA) addresses the shortcomings of VPNs by adopting a “never trust, always verify” mindset. Every user, device, and context is continuously authenticated before and during access. Instead of broad tunnels, ZTNA grants access only to the specific application or service a user is authorized for—nothing more.
For regional and cooperative banks, this shift is a game-changer:
Least-Privilege Access ensures employees, vendors, and auditors only see what they can.
Built-in Audit Trails support RBI inspections without manual effort.
Agentless Options allow quick deployment across diverse user groups.
Resilience in Low-Bandwidth Environments ensures rural branches stay secure without connectivity struggles.
Seqrite ZTNA: Tailored for Banks
Unlike generic ZTNA solutions, Seqrite ZTNA has been designed with India’s banking landscape in mind. It supports various applications, including core banking systems, RDP, SSH, ERP, and CRM, while seamlessly integrating with existing IT infrastructure.
Key differentiators include:
Support for Thick Clients, such as core banking and ERP systems, is critical for cooperative banks.
Out-of-the-Box SaaS Support for modern banking applications.
Centralized Policy Control to simplify access across branches, vendors, and staff.
In fact, a cooperative bank in Western Maharashtra replaced its legacy VPN with Seqrite ZTNA and immediately reduced its security risks. By implementing granular, identity-based access policies, the bank achieved secure branch connectivity, simplified audits, and stronger resilience against unauthorized access.
The Way Forward
The RBI has already stated that cybersecurity resilience will depend on zero-trust approaches. Cooperative and regional banks that continue to rely on legacy VPNs are exposing themselves to cyber risks, regulatory penalties, and operational inefficiencies.
By moving from VPNs to ZTNA, banks can protect their sensitive data, secure their branches and remote workforce, and stay one step ahead of attackers—all while ensuring compliance.
Legacy VPNs are relics of the past. The future of secure banking access is Zero Trust.
Secure your bank’s core systems with Seqrite ZTNA, which is built for India’s cooperative and regional banks to replace risky VPNs with identity-based, least-privilege access. Stay compliant, simplify audits, and secure every branch with Zero Trust.
Just a second! 🫷 If you are here, it means that you are a software developer.
So, you know that storage, networking, and domain management have a cost .
If you want to support this blog, please ensure that you have disabled the adblocker for this site. I configured Google AdSense to show as few ADS as possible – I don’t want to bother you with lots of ads, but I still need to add some to pay for the resources for my site.
Thank you for your understanding. – Davide
Even though many developers underestimate this part, tests should be written even more clearly than production code.
This is true because, while production code is meant to be executed by the application, good tests allow you to document the behavior of the production code. So, the first consumers of the tests are the developers themselves.
So, how can we write better tests? A simple trick is following the «Arrange, Act, Assert» pattern.
A working (but bad) example
As long as the tests pass, they are fine.
Take this example:
[Test]publicvoid TestDateRange_WithFutureDate()
{
var diff = (new DateTime(2021, 2, 8) - new DateTime(2021, 2, 3)).Days;
Assert.AreEqual(5, diff);
}
Yes, the test passes, but when you need to read and understand it, everything becomes less clear.
So, it’s better to explicitly separate the sections of the test. In the end, it’s just a matter of readability.
AAA: Arrange, Act, Assert
A better way to organize tests is by following the AAA pattern: Arrange, Act, Assert.
During the Arrange part, you define all the preconditions needed for your tests. You set up the input values, the mocked dependencies, and everything else needed to run the test.
The Act part is where you eventually run the production code. The easiest example is to run a method in the System Under Test.
Finally, the Assert part, where you check that everything worked as expected.
[Test]publicvoid TestDateRange_WithFutureDate()
{
// Arrangevar today = new DateTime(2021, 2, 3);
var otherDate = new DateTime(2021, 2, 8);
// Actvar diff = (otherDate.Date - today.Date).Days;
// Assert Assert.AreEqual(5, diff);
}
You don’t need to specify in every method the three different parts, but personally, I find it more readable.
Think of tests as physics experiments: first, you set up the environment, then you run the test, and finally, you check if the result is the one you were expecting.
This is a really simple way to improve your tests: keep every part separated from the others. It helps developers understand what is the meaning of each test, and allows for easier updates.
In the ever-evolving landscape of cyber threats, organizations are no longer asking if they’ll be targeted but when. Traditional cybersecurity measures, such as firewalls, antivirus software, and access control, remain essential. But they’re often reactive, responding only after a threat has emerged. In contrast, threat intelligence enables organizations to get ahead of the curve by proactively identifying and preparing for risks before they strike.
What is Threat Intelligence?
At its core, threat intelligence is the process of gathering, analyzing, and applying information about existing and potential attacks. This includes data on threat actors, tactics and techniques, malware variants, phishing infrastructure, and known vulnerabilities.
The value of threat intelligence lies not just in raw data, but in its context—how relevant it is to your environment, and how quickly you can act on it.
Why Organizations Need Threat Intelligence
Cyber Threats Are Evolving Rapidly
New ransomware variants, phishing techniques, and zero-day vulnerabilities emerge daily. Threat intelligence helps organizations stay informed about these developments in real time, allowing them to adjust their defenses accordingly.
Contextual Awareness Improves Response
When a security event occurs, knowing whether it’s a one-off anomaly or part of a broader attack campaign is crucial. Threat intelligence provides this clarity, helping teams prioritize incidents that pose real risk over false alarms.
It Powers Proactive Defense
With actionable intelligence, organizations can proactively patch vulnerabilities, block malicious domains, and tighten controls on specific threat vectors—preventing breaches before they occur.
Supports Compliance and Risk Management
Many data protection regulations require businesses to demonstrate risk-based security practices. Threat intelligence can support compliance with frameworks like ISO 27001, GDPR, and India’s DPDP Act by providing documented risk assessments and preventive actions.
Essential for Incident Detection and Response
Modern SIEMs, SOAR platforms, and XDR solutions rely heavily on enriched threat feeds to detect threats early and respond faster. Without real-time intelligence, these systems are less effective and may overlook critical indicators of compromise.
Types of Threat Intelligence
Strategic Intelligence: High-level trends and risks to inform business decisions.
Tactical Intelligence: Insights into attacker tools, techniques, and procedures (TTPs).
Operational Intelligence: Real-time data on active threats, attack infrastructure, and malware campaigns.
Technical Intelligence: Specific IOCs (indicators of compromise) like IP addresses, hashes, or malicious URLs.
Each type plays a unique role in creating a layered defense posture.
Challenges in Implementing Threat Intelligence
Despite its benefits, threat intelligence can be overwhelming. The sheer volume of data, lack of context, and integration issues often dilute its impact. To be effective, organizations need:
Curated, relevant intelligence feeds
Automated ingestion into security tools
Clear mapping to business assets and risks
Skilled analysts to interpret and act on the data
The Way Forward: Intelligence-Led Security
Security teams must shift from passive monitoring to intelligence-led security operations. This means treating threat intelligence as a core input for every security decision, such as prioritizing vulnerabilities, hardening cloud environments, or responding to an incident.
In a world where attackers collaborate, automate, and innovate, defenders need every edge. Threat intelligence provides that edge.
Ready to Build an Intelligence-Driven Defense?
Seqrite Threat Intelligence helps enterprises gain real-time visibility into global and India—specific emerging threats. Backed by over 10 million endpoint signals and advanced malware analysis, it’s designed to supercharge your SOC, SIEM, or XDR. Explore Seqrite Threat Intelligence to strengthen your cybersecurity strategy.
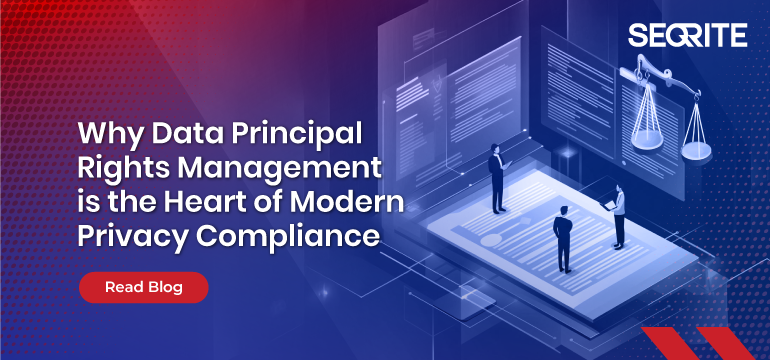
As data privacy laws evolve globally—from the GDPR to India’s Digital Personal Data Protection Act (DPDPA)—one common theme emerges: empowering individuals with control over their data. This shift places data principal rights at the center of privacy compliance.
Respecting these rights isn’t just a legal obligation for organizations; it’s a business imperative. Efficiently operationalizing and fulfilling data principal rights is now a cornerstone of modern privacy programs.
Understanding Data Principal Rights
Data principal rights refer to the entitlements granted to individuals regarding their data. Under laws like the DPDPA and GDPR, these typically include:
Right to Access: Individuals can request a copy of the personal data held about them.
Right to Correction: They can demand corrections to inaccurate or outdated data.
Right to Erasure (Right to Be Forgotten): They can request deletion of their data under specific circumstances.
Right to Data Portability: They can request their data in a machine-readable format.
Right to Withdraw Consent: They can withdraw previously given consent for data processing.
Right to Grievance Redressal: They can lodge complaints if their rights are not respected.
While these rights sound straightforward, fulfilling them at scale is anything but simple, especially when data is scattered across cloud platforms, internal systems, and third-party applications.
Why Data Principal Rights Management is Critical
Regulatory Compliance and Avoidance of Penalties
Non-compliance can result in substantial fines, regulatory scrutiny, and reputational harm. For instance, DPDPA empowers the Data Protection Board of India to impose heavy penalties for failure to honor data principal rights on time.
Customer Trust and Transparency
Respecting user rights builds transparency and demonstrates that your organization values privacy. This can increase customer loyalty and strengthen brand reputation in privacy-conscious markets.
Operational Readiness and Risk Reduction
Organizations risk delays, errors, and missed deadlines when rights requests are handled manually. An automated and structured rights management process reduces legal risk and improves operational agility.
Auditability and Accountability
Every action taken to fulfill a rights request must be logged and documented. This is essential for proving compliance during audits or investigations.
The Role of Data Discovery in Rights Fulfilment
To respond to any data principal request, you must first know where the relevant personal data resides. This is where Data Discovery plays a crucial supporting role.
A robust data discovery framework enables organizations to:
Identify all systems and repositories that store personal data.
Correlate data to specific individuals or identifiers.
Retrieve, correct, delete, or port data accurately and quickly.
Without comprehensive data visibility, any data principal rights management program will fail, resulting in delays, partial responses, or non-compliance.
Key Challenges in Rights Management
Despite its importance, many organizations struggle with implementing effective data principal rights management due to:
Fragmented data environments: Personal data is often stored in silos, making it challenging to aggregate and act upon.
Manual workflows: Fulfilling rights requests often involves slow, error-prone manual processes.
Authentication complexities: Verifying the identity of the data principal securely is essential to prevent abuse of rights.
Lack of audit trails: Without automated tracking, it’s hard to demonstrate compliance.
Building a Scalable Data Principal Rights Management Framework
To overcome these challenges, organizations must invest in technologies and workflows that automate and streamline the lifecycle of rights requests. A mature data principal rights management framework should include:
Centralized request intake: A portal or dashboard where individuals can easily submit rights requests.
Automated data mapping: Leveraging data discovery tools to locate relevant personal data quickly.
Workflow automation: Routing requests to appropriate teams with built-in deadlines and escalation paths.
Verification and consent tracking: Only verified individuals can initiate requests and track their consent history.
Comprehensive logging: Maintaining a tamper-proof audit trail of all actions to fulfill requests.
The Future of Privacy Lies in Empowerment
As data privacy regulations mature, the focus shifts from mere protection to empowerment. Data principles are no longer passive subjects but active stakeholders in handling their data. Organizations that embed data principal rights management into their core data governance strategy will stay compliant and gain a competitive edge in building customer trust.
Empower Your Privacy Program with Seqrite
Seqrite’s Data Privacy Suite is purpose-built to help enterprises manage data principal rights confidently. From automated request intake and identity verification to real-time data discovery and audit-ready logs, Seqrite empowers you to comply faster, smarter, and at scale.
In today’s always-connected, mobile-first world, employees are working on the go—from airports, cafes, living rooms, and everywhere in between. That’s great for flexibility and productivity—but what about security? How do you protect sensitive business data when it’s spread across dozens or hundreds of mobile devices? This is where Mobile Device Management (MDM) steps in. Let’s see what is MDM.
What is MDM?
MDM, short for Mobile Device Management, is a system that allows IT teams to monitor, manage, and secure employees’ mobile devices—whether company-issued or BYOD (Bring Your Own Device).
It’s like a smart control panel for your organization’s phones and tablets. From pushing software updates and managing apps to enforcing security policies and wiping lost devices—MDM gives you full visibility and control, all from a central dashboard.
MDM helps ensure that only secure, compliant, and authorized devices can access your company’s network and data.
Why is MDM Important?
As the modern workforce becomes more mobile, data security risks also rise. Devices can be lost, stolen, or compromised. Employees may install risky apps or access corporate files from unsecured networks. Without MDM, IT teams are essentially blind to these risks.
A few common use cases of MDM:
A lost smartphone with access to business emails.
An employee downloading malware-infected apps.
Data breaches due to unsecured Wi-Fi use on personal devices.
Non-compliance with industry regulations due to lack of control.
MDM helps mitigate all these risks while still enabling flexibility.
Key Benefits of MDM Solution
Enhanced Security
Remotely lock, wipe, or locate lost devices. Prevent unauthorized access, enforce passcodes, and control which apps are installed.
Centralized Management
Manage all mobile devices, iOS and Android from a single dashboard. Push updates, install apps, and apply policies in bulk.
Improved Productivity
Set devices in kiosk mode for focused app usage. Push documents, apps, and files on the go. No downtime, no waiting.
Compliance & Monitoring
Track usage, enforce encryption, and maintain audit trails. Ensure your devices meet industry compliance standards at all times.
Choosing the Right MDM Solution
There are many MDM solutions out there, but the right one should go beyond basic management. It should make your life easier, offer deep control, and scale with your organization’s needs—without compromising user experience.
Why Seqrite MDM is Built for Today’s Mobile Workforce
Unified Management Console: Manage all enrolled mobile devices in one place—track location, group devices, apply custom policies, and more.
AI-Driven Security: Built-in antivirus, anti-theft features, phishing protection, and real-time web monitoring powered by artificial intelligence.
Virtual Fencing: Set geo, Wi-Fi, and time-based restrictions to control device access and usage great for field teams and remote employees.
App & Kiosk Mode Management: Push apps, lock devices into single- or multi-app kiosk mode, and publish custom apps to your enterprise app store.
Remote File Transfer & Troubleshooting: Send files to one or multiple devices instantly and troubleshoot issues remotely to reduce device downtime.
Automation & Reporting: Get visual dashboards, schedule regular exports, and access real-time logs and audit reports to stay ahead of compliance.
Final Thoughts
As work continues to shift beyond the boundaries of the office, MDM is no longer a luxury, it’s a necessity. Whether you’re a growing startup or a large enterprise, protecting your mobile workforce is key to maintaining both productivity and security.
With solutions like Seqrite Enterprise Mobility Management, businesses get the best of both worlds powerful control and seamless management, all wrapped in a user-friendly experience.
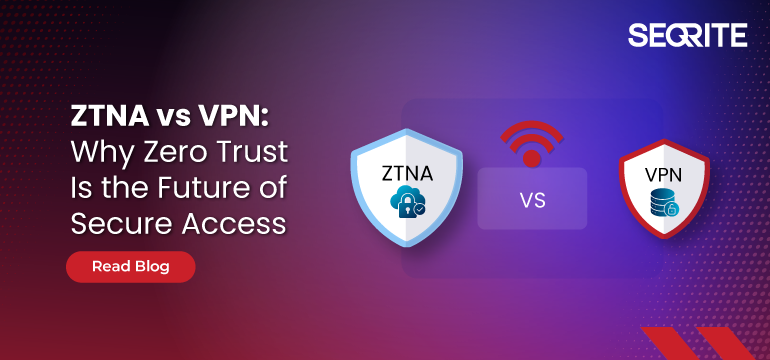
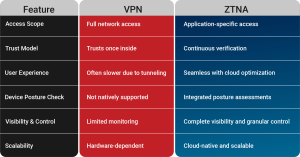
ZTNA vs VPN is a critical comparison in today’s hyperconnected world, where remote workforces, cloud-driven data flows, and ever-evolving threats make securing enterprise network access more complex than ever. Traditional tools like Virtual Private Networks (VPNs), which once stood as the gold standard of secure connectivity, are now showing their age. Enter Zero Trust Network Access (ZTNA) is a modern, identity-centric approach rapidly replacing VPNs in forward-thinking organizations.
The Rise and Fall of VPNs
VPNs have long been trusted to provide secure remote access by creating an encrypted “tunnel” between the user and the corporate network. While VPNs are still widely used, they operate on a fundamental assumption: they can be trusted once a user is inside the network. This “castle and moat” model may have worked in the past, but in today’s threat landscape, it creates glaring vulnerabilities:
Over-privileged access: VPNs often grant users broad network access, increasing the risk of lateral movement by malicious actors.
Lack of visibility: VPNs provide limited user activity monitoring once access is granted.
Poor scalability: As remote workforces grow, VPNs become performance bottlenecks, especially under heavy loads.
Susceptibility to credential theft: VPNs rely heavily on usernames and passwords, which can be stolen or reused in credential stuffing attacks.
What is Zero Trust Network Access (ZTNA)
ZTNA redefines secure access by flipping the trust model. It’s based on the principle of “never trust, always verify.” Instead of granting blanket access to the entire network, ZTNA enforces granular, identity-based access controls. Access is provided only after the user, device, and context are continuously verified.
ZTNA architecture typically operates through a broker that evaluates user identity, device posture, and other contextual factors before granting access to a specific application, not the entire network. This minimizes exposure and helps prevent the lateral movement of threats.
Security for the Cloud Era: ZTNA is designed for modern environments—cloud, hybrid, or multi-cloud. It secures access across on-prem and SaaS apps without the complexity of legacy infrastructure.
Adaptive Access Controls: Access isn’t just based on credentials. ZTNA assesses user behavior, device health, location, and risk level in real time to dynamically permit or deny access.
Enhanced User Experience: Unlike VPNs that slow down application performance, ZTNA delivers faster, direct-to-app connectivity, reducing latency and improving productivity.
Minimized Attack Surface: Because ZTNA only exposes what’s necessary and hides the rest, the enterprise’s digital footprint becomes nearly invisible to attackers.
Better Compliance & Visibility: With robust logging, analytics, and policy enforcement, ZTNA helps organizations meet compliance standards and gain detailed insights into access behaviors.
While ZTNA vs VPN continues to be a key consideration for IT leaders, it’s clear that Zero Trust offers a more future-ready approach. Although VPNs still serve specific legacy use cases, organizations aiming to modernize should begin their ZTNA vs VPN transition now. Adopting a phased, hybrid model enables businesses to secure critical applications with ZTNA while still leveraging VPN access for systems that require it.
The key is to evaluate access needs, identify high-risk entry points, and prioritize business-critical applications for ZTNA implementation. Over time, enterprises can reduce their dependency on VPNs and shift toward a more resilient, Zero Trust architecture.
Ready to Take the First Step Toward Zero Trust?
Explore how Seqrite ZTNA enables secure, seamless, and scalable access for the modern workforce. Make the shift from outdated VPNs to a future-ready security model today.
As organizations continue to embrace digital transformation, how we think about personal data has changed fundamentally. Data is no longer just a by-product of business processes; it is often the product itself. This shift brings a pressing responsibility: privacy cannot be treated as an after-the-fact fix. It must be part of the architecture from the outset.
This is the thinking behind Privacy by Design. This concept is gaining renewed attention not just because regulators endorse it but also because it is increasingly seen as a marker of digital maturity.
So, what is Privacy by Design?
At a basic level, Privacy by Design (often abbreviated as PbD) means designing systems, products, and processes with privacy built into them from the start. It’s not a tool or a checklist; it’s a way of thinking.
Rather than waiting until the end of the development cycle to address privacy risks, teams proactively factor privacy into the design, architecture, and decision-making stages. This means asking the right questions early:
Do we need to collect this data?
How will it be stored, shared, and eventually deleted?
Are there less invasive ways to achieve the same business goal?
This mindset goes beyond technology. It is as much about product strategy and organizational alignment as it is about encryption or access controls.
Why It’s Becoming Non-Negotiable
The global regulatory environment is a key driver here. GDPR, for instance, formalized this approach in Article 25, which explicitly calls for “data protection by design and by default.” However, the need for privacy by design is not just about staying compliant.
Customers today are more aware than ever of how their data is used. Organizations that respect that reality – minimizing collection, improving transparency, and offering control – tend to earn more trust. And in a landscape where trust is hard to gain and easy to lose, that’s a competitive advantage.
Moreover, designing with privacy in mind from an engineering perspective reduces technical debt. Fixing privacy issues after launch usually means expensive rework and rushed patches. Building it right from day one leads to better outcomes.
Turning Principles into Practice
For many teams, the challenge is not agreeing with the idea but knowing how to apply it. Here’s what implementation often looks like in practice:
Product & Engineering Collaboration
Product teams define what data is needed and why. Engineering teams determine how it’s collected, stored, and protected. Early conversations between both help identify red flags and trade-offs before anything goes live.
Embedding Privacy into Architecture
This includes designing data flows with limitations, such as separating identifiers, encrypting sensitive attributes at rest, and ensuring role-based access to personal data. These aren’t just compliance tasks; they are innovative design practices that also improve security posture.
Privacy as a Default Setting
Instead of asking users to configure privacy settings after onboarding, PbD insists on secure defaults. If a feature collects data, users should have to opt in, not find a buried toggle to opt out.
Periodic Reviews, Not Just One-Time Checks
Privacy by Design isn’t a one-and-done activity. As systems evolve and new features roll out, periodic reviews help ensure that decisions made early on still hold up in practice.
Cross-Functional Awareness
Not every developer needs to be a privacy expert, but everyone in the development lifecycle—from analysts to QA—should be familiar with core privacy principles. A shared vocabulary goes a long way toward spotting and resolving issues early.
Going Beyond Compliance
A common mistake is to treat Privacy by Design as a box to tick. However, the organizations that do it well tend to treat it differently.
They don’t ask, “What’s the minimum we need to do to comply?” Instead, they ask, “How do we build responsibly?”
They don’t design features and then layer privacy on top. They create privacy into the feature.
They don’t stop at policies. They create workflows and tooling that enforce those policies consistently.
This mindset fosters resilience, reduces risk, and, over time, becomes part of the organization’s culture. In this mindset, product ideas are evaluated for feasibility and market fit and ethical and privacy alignment.
Final Thoughts
Privacy by Design is about intent. When teams build with privacy in mind, they send a message that the organization values the people behind the data.
This approach is very much expected in an era where privacy concerns are at the centre of digital discourse. For those leading security, compliance, or product teams, the real opportunity lies in making privacy a requirement and a differentiator.
Seqrite brings Privacy by Design to life with automated tools for data discovery, classification, and protection—right from the start. Our solutions embed privacy into every layer of your IT infrastructure, ensuring compliance and building trust. Explore how Seqrite can simplify your privacy journey.
Average teams aim at 100% Code Coverage just to reach the number. Great teams don’t. Why?
Table of Contents
Just a second! 🫷 If you are here, it means that you are a software developer.
So, you know that storage, networking, and domain management have a cost .
If you want to support this blog, please ensure that you have disabled the adblocker for this site. I configured Google AdSense to show as few ADS as possible – I don’t want to bother you with lots of ads, but I still need to add some to pay for the resources for my site.
Thank you for your understanding. – Davide
Code Coverage is a valuable metric in software development, especially when it comes to testing. It provides insights into how much of your codebase is exercised by your test suite.
However, we must recognize that Code Coverage alone should not be the ultimate goal of your testing strategy. It has some known limitations, and 100% Code Coverage does not guarantee your code to be bug-free.
In this article, we’ll explore why Code Coverage matters, its limitations, and how to balance achieving high coverage and effective testing. We’ll use C# to demonstrate when Code Coverage works well and how you can cheat on the result.
What Is Code Coverage?
Code Coverage measures the percentage of code lines, branches, or statements executed during testing. It helps answer questions like:
How much of my code is tested?
Are there any untested paths or dead code?
Which parts of the application need additional test coverage?
In C#, tools like Cobertura, dotCover, and Visual Studio’s built-in coverage analysis provide Code Coverage reports.
You may be tempted to think that the higher the coverage, the better the quality of your tests. However, we will soon demonstrate why this assumption is misleading.
Why Code Coverage Matters
Clearly, if you write valuable tests, Code Coverage is a great ally.
A high value of Code Coverage helps you with:
Risk mitigation: High Code Coverage reduces the risk of undiscovered defects. If a piece of code isn’t covered, it will likely contain bugs.
Preventing regressions: code is destined to evolve over time. If you ensure that most of your code is covered by tests, whenever you’ll add some more code you will discover which parts of the existing system are impacted by your changes. If you update the production code and no test fails, it might be a bad sign: you probably need to cover the code you are modifying with enough tests.
Quality assurance: Code Coverage ensures that critical parts of your application are tested thoroughly. Good tests focus on the functional aspects of the code (what) rather than on the technical aspects (how). A good test suite is a safety net against regressions.
Guidance for Testing Efforts: Code Coverage highlights areas that need more attention. It guides developers in writing additional tests where necessary.
The Limitations of Code Coverage
While Code Coverage is valuable, it has limitations:
False Sense of Security: Achieving 100% coverage doesn’t guarantee bug-free software. It’s possible to have well-covered code that still contains subtle defects. This is especially true when mocking dependencies.
They focus on Lines, Not Behavior: Code Coverage doesn’t consider the quality of tests. It doesn’t guarantee that the tests covers all possible scenarios.
Ignored Edge Cases: Some code paths (exception handling, rare conditions) are complex to cover. High coverage doesn’t necessarily mean thorough testing.
3 Practical reasons why Code Coverage percentage can be misleading
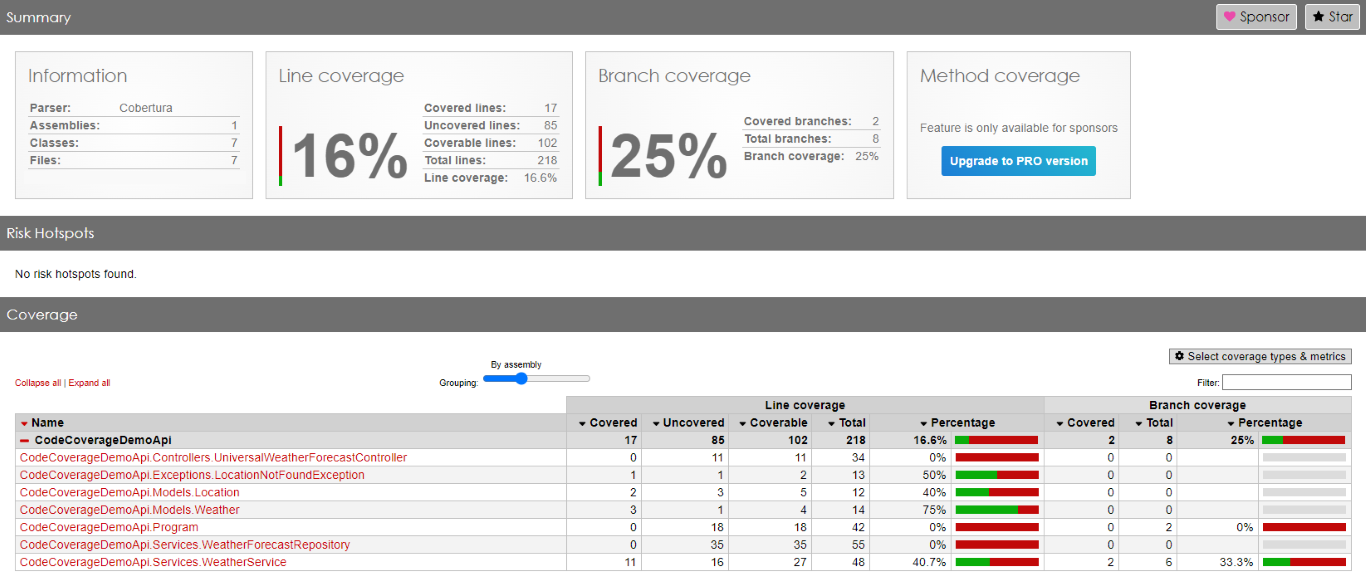
For the sake of this article, I’ve created a dummy .NET API project with the typical three layers: controller, service, and repository.
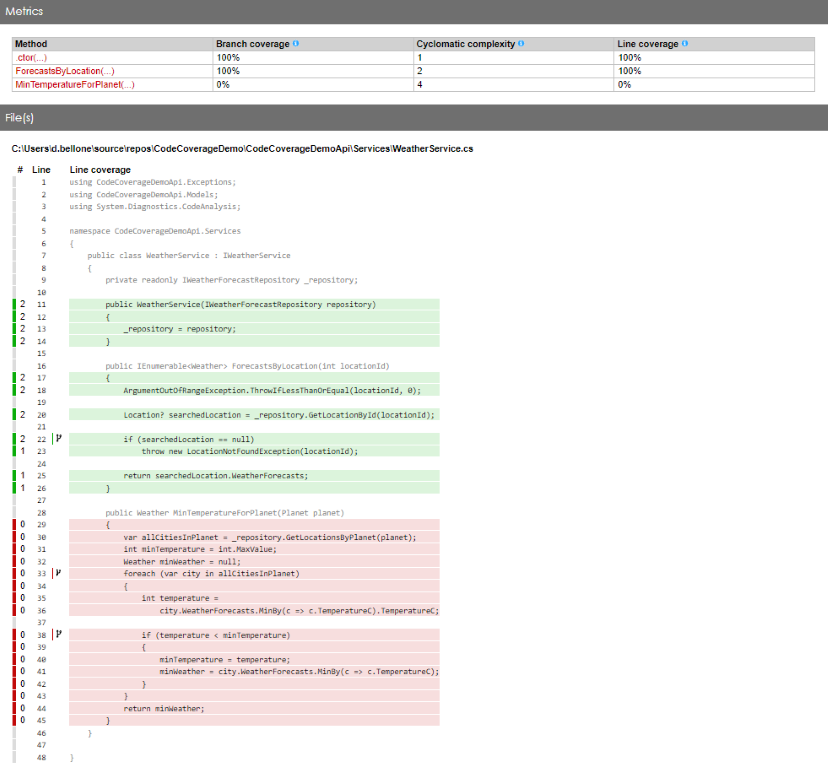
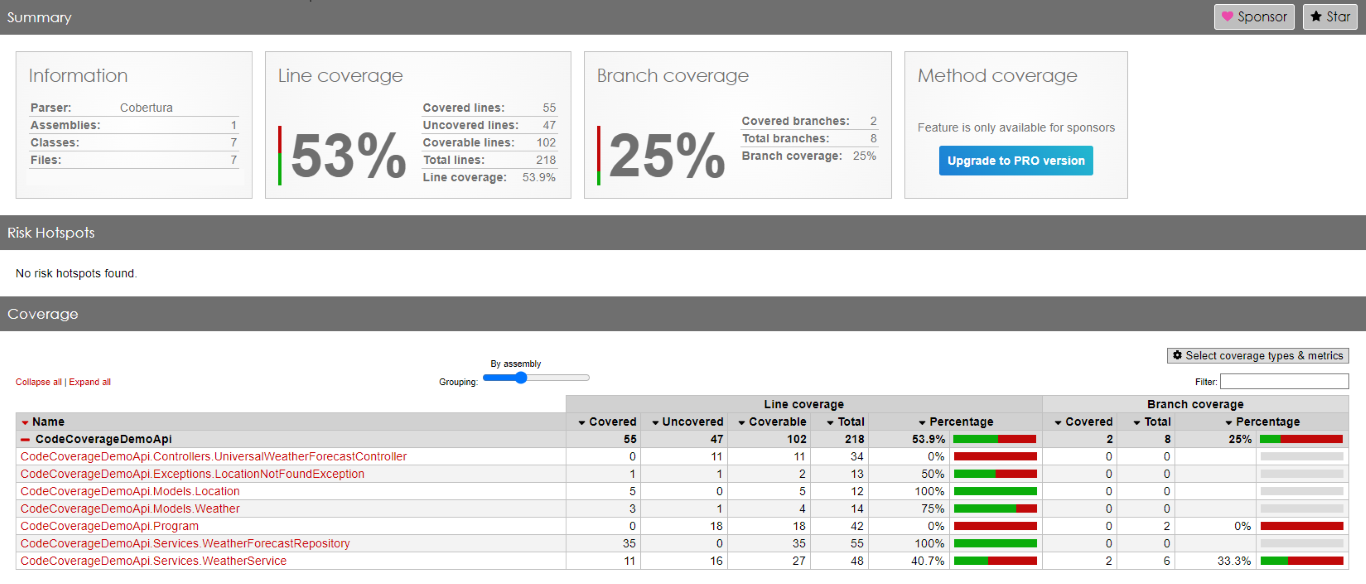
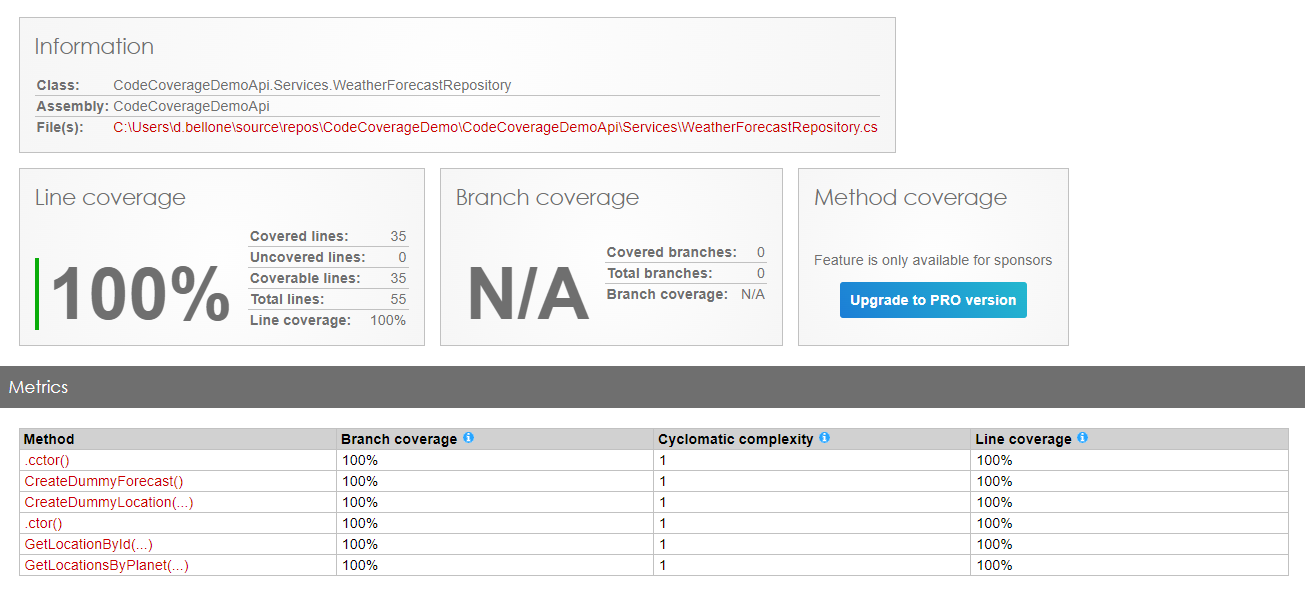
Here we are: we have reached 53% of total Code Coverage by adding one single test, which does not provide any value!
As you can see, in fact, the WeatherForecastRepository has now reached 100% Code Coverage.
Great job! Or is it?
You can cheat by excluding parts of the code
In C# there is a handy attribute that you can apply to methods and classes: ExcludeFromCodeCoverage.
While this attribute can be useful for classes that you cannot test, it can be used to inflate the Code Coverage percentage by applying it to classes and methods you don’t want to test (maybe because you are lazy?).
We can, in fact, add that attribute to every single class like this:
You can then add the same attribute to all the other classes – even the Program class! – to reach 100% Code Coverage without writing lots of test.
Note: to reach 100% I had to exclude everything but the tests on the Repository: otherwise, if I had exactly zero methods under tests, the final Code Coverage would’ve been 0.
As we saw, high Code Coverage is not enough. It’s a good starting point, but it must not be the final goal.
We can, indeed, focus our efforts in different areas:
Test Quality: Prioritize writing meaningful tests over chasing high coverage. Focus on edge cases, boundary values, and scenarios that matter to users.
Mutation Testing: Instead of just measuring coverage, consider mutation testing. It introduces artificial defects and checks if tests catch them.
Finally, my suggestion is to focus on integration tests rather than on unit tests: this testing strategy is called Testing Diamond.
Further readings
To generate Code Coverage reports, I used Coverlet, as I explained in this article (which refers to Visual Studio 2019, but the steps are still valid with newer versions).
In my opinion, we should not focus all our efforts on Unit Tests. On the contrary, we should write more Integration Tests to ensure that the functionality, as a whole, works correctly.
This way of defining tests is called Testing Diamond, and I explained it here:
Code Coverage is a useful metric but should not be the end goal. Aim for a balance: maintain good coverage while ensuring effective testing. Remember that quality matters more than mere numbers. Happy testing! 🚀
I hope you enjoyed this article! Let’s keep in touch on Twitter or LinkedIn! 🤜🤛
Just a second! 🫷 If you are here, it means that you are a software developer.
So, you know that storage, networking, and domain management have a cost .
If you want to support this blog, please ensure that you have disabled the adblocker for this site. I configured Google AdSense to show as few ADS as possible – I don’t want to bother you with lots of ads, but I still need to add some to pay for the resources for my site.
Thank you for your understanding. – Davide
Defining the best return type is crucial to creating a shared library whose behaviour is totally under your control.
You should give the consumers of your libraries just the right amount of freedom to integrate and use the classes and structures you have defined.
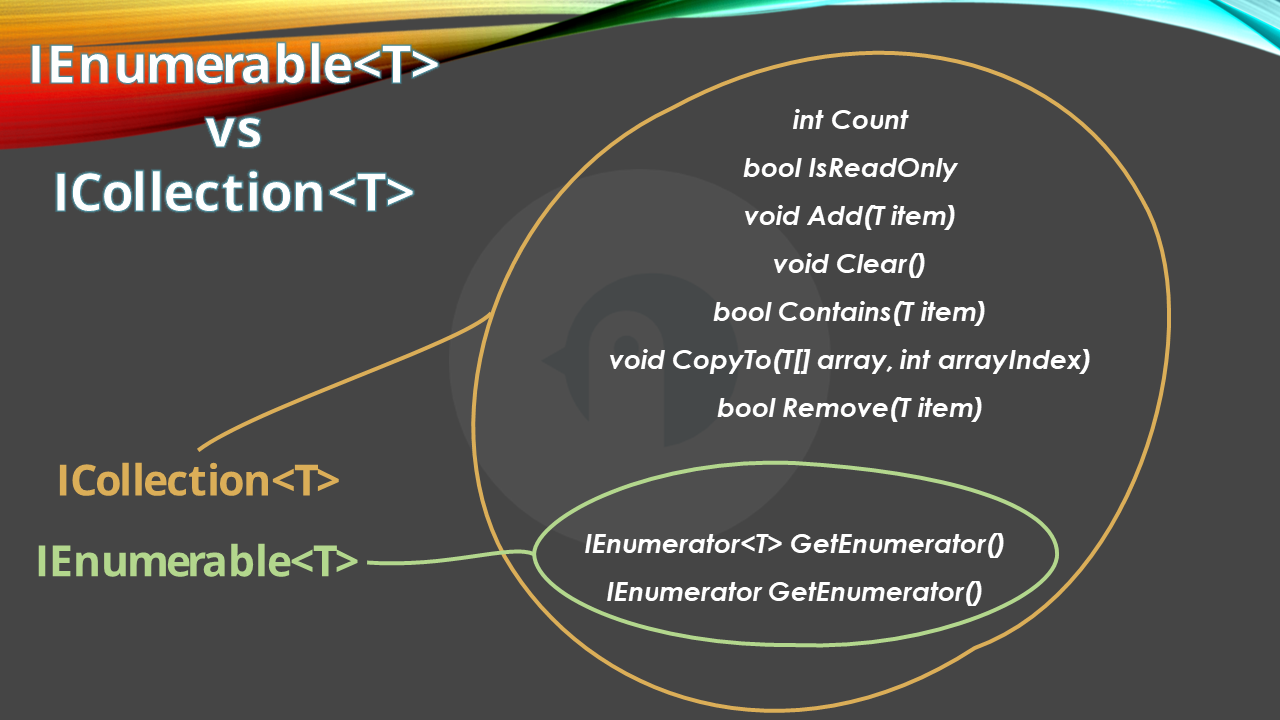
That’s why it is important to know the differences between interfaces like IEnumerable<T> and ICollection<T>: these interfaces are often used together but have totally different meanings.
IEnumerable: loop through the items in the collection
Suppose that IAmazingInterface is an interface you expose so that clients can interact with it without knowing the internal behaviour.
As you can see, the GetNumbers returns an IEnumerable<int>: this means that (unless they do some particular tricks like using reflection), clients will only be able to loop through the collection of items.
Clients don’t know that, behind the scenes, AmazingClass uses a custom class MySpecificEnumberable.
publicclassAmazingClass: IAmazingInterface
{
public IEnumerable<int> GetNumbers(int[] numbers)
=> new MySpecificEnumberable(numbers);
}
MySpecificEnumberable is a custom class whose purpose is to store the initial values in a sorted way. It implements IEnumerable<int>, so the only operations you have to support are the two implementations of GetEnumerator() – pay attention to the returned data type!
publicclassMySpecificEnumberable : IEnumerable<int>
{
privatereadonlyint[] _numbers;
public MySpecificEnumberable(int[] numbers)
{
_numbers = numbers.OrderBy(_ => _).ToArray();
}
public IEnumerator<int> GetEnumerator()
{
foreach (var number in _numbers)
{
yieldreturn number;
}
}
IEnumerator IEnumerable.GetEnumerator()
=> _numbers.GetEnumerator();
}
Clients will then be able to loop all the items in the collection:
IAmazingInterface something = new AmazingClass();
var numbers = something.GetNumbers([1, 5, 6, 9, 8, 7, 3]);

foreach (var number in numbers)
{
    Console.WriteLine(number);
}
But you cannot add or remove items from it.
ICollection: list, add, and remove items
As we saw, IEnumerable<T> only allows you to loop through all the elements. However, you cannot add or remove items from an IEnumerable<T>.
To do so, you need something that implements ICollection<T>, like the following class (I haven’t implemented any of these methods: I want you to focus on the operations provided, not on the implementation details).
ICollection<T> is a subtype of IEnumerable<T>, so everything we said before is still valid.
However, having a class that implements ICollection<T> gives you full control over how items can be added or removed from the collection, allowing you to define custom behaviour. For instance, you can define that the Add method adds an integer only if it’s an odd number.
Why knowing the difference actually matters
Classes and interfaces are meant to be used. If you are like me, you work on both the creation of the class and its consumption.
So, if an interface must return a sequence of items, you most probably use the List shortcut: define the return type of the method as List<Item>, and then use it, regardless of having it looped through or having the consumer add items to the sequence.
// in the interfacepublicinterfaceISomething{
List<Item> PerformSomething(int[] numbers);
}
// in the consumer classISomething instance = //omittedList<Item> myItems = instance.PerformSomething([2, 3, 4, 5]);
Everything works fine, but it works because we are in control of both the definition and the consumer.
What if you have to expose the library to something outside your control?
You have to consider two elements:
consumers should not be able to tamper with your internal implementation (for example, by adding items when they are not supposed to);
you should be able to change the internal implementation as you wish without breaking changes.
So, if you want your users to just enumerate the items within a collection, you may start this way:
// in the interfacepublicinterfaceISomething{
IEnumerable<Item> PerformSomething(int[] numbers);
}
// in the implementationIEnumerable<Item> PerformSomething(int[] numbers)
{
return numbers.Select(x => new Item(x)).ToList();
}
// in the consumer classISomething instance = //omittedIEnumerable<Item> myItems = instance.PerformSomething([2, 3, 4, 5]);
Then, when the time comes, you can change the internal implementation of PerformSomething with a more custom class:
// custom IEnumerable definitionpublicclassMyCustomEnumberable : IEnumerable<Item> { /*omitted*/ }
// in the interfaceIEnumerable<Item> PerformSomething(int[] numbers)
{
MyCustomEnumberable customEnumerable = new MyCustomEnumberable();
customEnumerable.DoSomething(numbers);
return customEnumerable;
}
And the consumer will not notice the difference. Again, unless they try to use tricks to tamper with your code!
While understanding the differences between IEnumerable and ICollection is trivial, understanding why you should care about them is not.
I hope this article helped you understand that yeah, you can take the easy way and return everywhere a List, but it’s a choice that you cannot always apply to a project, and that probably will make breaking changes more frequent in the long run.
I hope you enjoyed this article! Let’s keep in touch on LinkedIn or Twitter! 🤜🤛