برچسب: without

  • Building Aether 1: Sound Without Boundaries

    Building Aether 1: Sound Without Boundaries


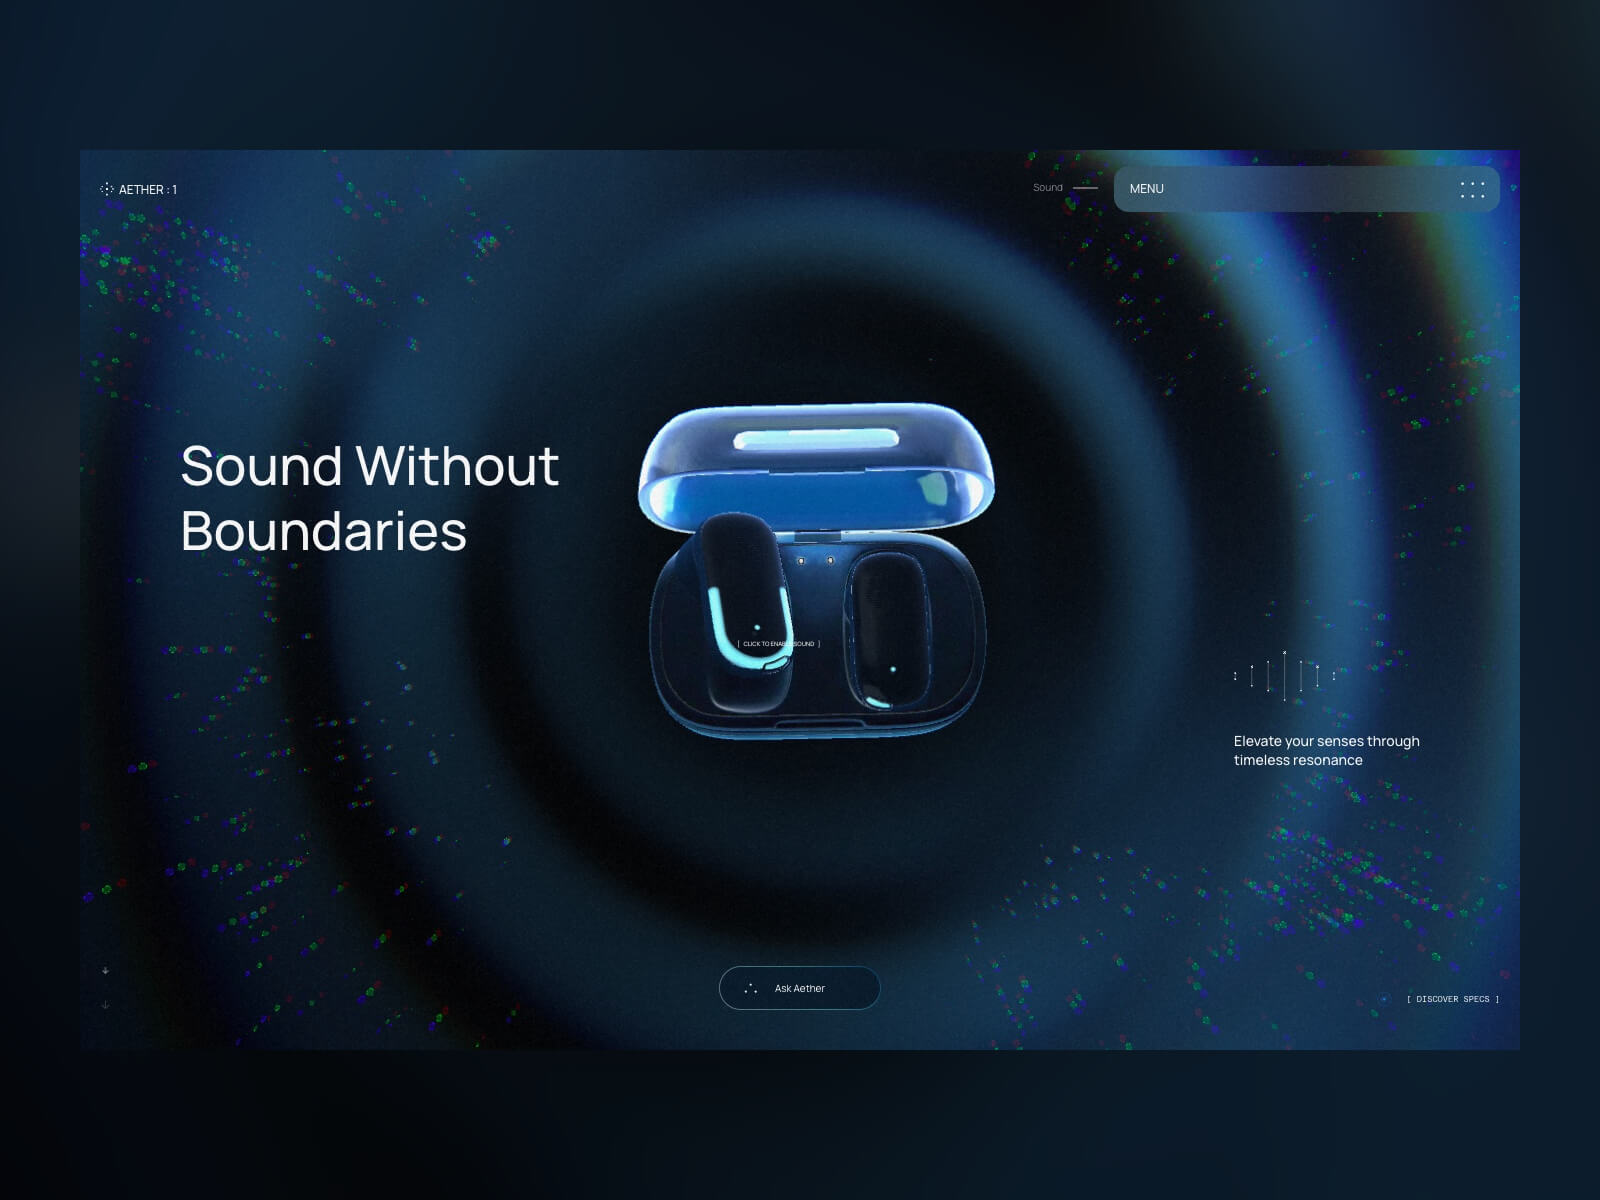
    Aether 1 began as an internal experiment at OFF+BRAND: Could we craft a product‑launch site so immersive that visitors would feel the sound?

    The earbuds themselves are fictional, but every pixel of the experience is real – an end‑to‑end sandbox where our brand, 3D, and engineering teams pushed WebGL, AI‑assisted tooling, and narrative design far beyond a typical product page.

    This technical case study is the living playbook of that exploration. Inside you’ll find:

    • 3D creation workflow – how we sculpted, animated, and optimised the earphones and their charging case.
    • Interactive WebGL architecture – the particle flow‑fields, infinite scroll, audio‑reactive shaders, and custom controllers that make the site feel alive.
    • Performance tricks – GPU‑friendly materials, faux depth‑of‑field, selective bloom, and other tactics that kept the project running at 60 FPS on mobile hardware.
    • Tool stack & takeaways – what worked, what didn’t, and why every lesson here can translate to your own projects.

    Whether you’re a developer, designer, or producer, the next sections unpack the decisions, experiments, and hard‑won optimizations that helped us prove that “sound without boundaries” can exist on the web.

    1. 3D Creation Workflow

    By Celia Lopez

    3D creation of the headphone and case

    For the headphone shape, we needed to create one from scratch. To help ourselves quickly sketch out the ideas we had in mind, we used Midjourney. Thanks to references from the internet and the help of AI, we agreed on an artistic direction.

    Size reference and headphone creation

    To ensure the size matched a real-life reference, we used Apple headphones and iterated until we found something interesting. We used Figma to present all the iterations to the team, exporting three images – front, side, and back – each time to help them better visualize the object.

    Same for the case.

    Storyboard

    For the storyboard, we first sketched our ideas and tried to match each specific scene with a 3D visualization. 

    We iterated for a while before finalizing the still frames for each part. Some parts were too tricky to represent in 3D, so we adjusted the workflow accordingly.

    Motion

    So that everyone agrees on the flow, look, and feel, we created a full-motion version of it.

    Unwrapping and renaming

    To prepare the scene for a developer, we needed to spend some time unwrapping the UVs, cleaning the file, and renaming the elements. We used C4D exclusively for unwrapping since the shapes weren’t too complex. It’s also very important to rename all parts and organize the file so the developer can easily recognize which object is which. (In the example below, we show the technique – not the full workflow or a perfect unwrap.)

    Fluid flow baked

    Almost all the animations were baked from C4D to Blender and exported as .glb files.

    Timing

    We decided to start with an infinite scroll and a looped experience. When the user releases the scroll, seven anchors subtly and automatically guide the progression. To make it easier for the developer to divide the baked animation, we used specific timing for each step — 200 keyframes between each anchor.

    AO baking

    Because the headphones were rotating, we couldn’t bake the lighting. We only baked the Ambient Occlusion shadows to enhance realism. For that, after unwrapping the objects, we combined all the different parts of the headphones into a single object, applied a single texture with the Ambient Occlusion, and baked it in Redshift. Same for the case.

    Normal map baked

    For the Play‑Stade touchpad only, we needed a normal map, so we exported it. However, since the AO was already baked, the UVs had to remain the same.

    Camera path and target

    In order to ensure a smooth flow during the web experience, it was crucial to use a single camera. However, since we have different focal points, we needed two separate circular paths with different centers and sizes, along with a null object to serve as a target reference throughout the flow.

    2. WebGL Features and Interactive Architecture

    By Adrian Gubrica

    GPGPU particles

    Particles are a great way to add an extra layer of detail to 3D scenes, as was the case with Aether 1. To complement the calming motion of the audio waves, a flow‑field simulation was used — a technique known for producing believable and natural movement in particle systems. With the right settings, the resulting motion can also be incredibly relaxing to watch.

    To calculate the flow fields, noise algorithms — specifically Simplex4D — were used. Since these can be highly performance-intensive on the CPU, a GPGPU technique (essentially the WebGL equivalent of a compute shader) was implemented to run the simulation efficiently on the GPU. The results were stored and updated across two textures, enabling smooth and high-performance motion.

    Smooth scene transitions

    To create a seamless transition between scenes, I developed a custom controller to manage when each scene should or shouldn’t render. I also implemented a manual way of controlling their scroll state, allowing me, for example, to display the last position of a scene without physically scrolling there. By combining this with a custom transition function that primarily uses GSAP to animate values, I was able to create both forward and backward animations to the target scene.

    It is important to note that all scenes and transitions are displayed within a “post‑processing scene,” which consists of an orthographic camera and a full‑screen plane. In the fragment shader, I merge all the renders together.

    This transition technique became especially tricky when transitioning at the end of each scroll in the main scene to create an infinite loop. To achieve this, I created two instances of the main scene (A and B) and swapped between them whenever a transition occurred.

    Custom scroll controller for infinite scrolling

    As mentioned earlier, the main scene features an infinite loop at both the start and end of the scroll, which triggers a transition back to the beginning or end of the scene. This behavior is enhanced with some resistance during the backward movement and other subtle effects. Achieving this required careful manual tweaking of the Lenis library.

    My initial idea was to use Lenis’ infinite: true property, which at first seemed like a quick solution – especially for returning to the starting scroll position. However, this approach required manually listening to the scroll velocity and predicting whether the scroll would pass a certain threshold to stop it at the right moment and trigger the transition. While possible, it quickly proved unreliable, often leading to unpredictable behavior like broken scroll states, unintended transitions, or a confused browser scroll history.

    Because of these issues, I decided to remove the infinite: true property and handle the scroll transitions manually. By combining Lenis.scrollTo(), Lenis.stop(), and Lenis.start(), I was able to recreate the same looping effect at the end of each scroll with greater control and reliability. An added benefit was being able to retain Lenis’s default easing at the beginning and end of the scroll, which contributed a smooth and polished feel.

    Cursor with fluid simulation pass

    Fluid simulation triggered by mouse or touch movement has become a major trend on immersive websites in recent years. But beyond just being trendy, it consistently enhances the visual appeal and adds a satisfying layer of interactivity to the user experience.

    In my implementation, I used the fluid simulation as a blue overlay that follows the pointer movement. It also served as a mask for the Fresnel pass (explained in more detail below) and was used to create a dynamic displacement and RGB shift effect in the final render.

    Because fluid simulations can be performance‑intensive – requiring multiple passes to calculate realistic behavior – I downscaled it to just 7.5 percent of the screen resolution. This optimization still produced a visually compelling effect while maintaining smooth overall performance.

    Fresnel pass on the earphones

    In the first half of the main scene’s scroll progression, users can see the inner parts of the earphones when hovering over them, adding a nice interactive touch to the scene. I achieved this effect by using the fluid simulation pass as a mask on the earphones’ material.

    However, implementing this wasn’t straightforward at first, since the earphones and the fluid simulation use different coordinate systems. My initial idea was to create a separate render pass for the earphones and apply the fluid mask in that specific pass. But this approach would have been costly and introduced unnecessary complexity to the post‑processing pipeline.

    After some experimentation, I realized I could use the camera’s view position as a kind of screen‑space UV projection onto the material. This allowed me to accurately sample the fluid texture directly in the earphones’ material – exactly what I needed to make the effect work without additional rendering overhead.

    Audio reactivity

    Since the project is a presentation of earphones, some scene parameters needed to become audio‑reactive. I used one of the background audio’s frequency channels – the one that produced the most noticeable “jumps,” as the rest of the track had a very stable tone – which served as the input to drive various effects. This included modifying the pace and shape of the wave animations, influencing the strength of the particles’ flow field, and shaping the touchpad’s visualizer.

    The background audio itself was also processed using the Web Audio API, specifically a low‑pass filter. This filter was triggered when the user hovered over the earphones in the first section of the main scene, as well as during the scene transitions at the start and end. The low‑pass effect helped amplify the impact of the animations, creating a subtle sensation of time slowing down.

    Animation and empties

    Most of the animations were baked directly into the .glb file and controlled via the scroll progress using THREE.js’s AnimationMixer. This included the camera movement as well as the earphone animations.

    This workflow proved to be highly effective when collaborating with another 3D artist, as it gave them control over multiple aspects of the experience – such as timing, motion, and transitions – while allowing me to focus solely on the real‑time interactions and logic.

    Speaking of real‑time actions, I extended the scene by adding multiple empties, animating their position and scale values to act as drivers for various interactive events – such as triggering interactive points or adjusting input strength during scroll. This approach made it easy to fine‑tune these events directly in Blender’s timeline and align them precisely with other baked animations.

    3. Optimization Techniques

    Visual expectations were set very high for this project, making it clear from the start that performance optimization would be a major challenge. Because of this, I closely monitored performance metrics throughout development, constantly looking for opportunities to save resources wherever possible. This often led to unexpected yet effective solutions to problems that initially seemed too demanding or impractical for our goals. Some of these optimizations have already been mentioned – such as using GPGPU techniques for particle simulation and significantly reducing the resolution of the cursor’s fluid simulation. However, there were several other key optimizations that played a crucial role in maintaining solid performance:

    Artificial depth of field

    One of that was using depth of field during the close‑up view on the headphones. Depth of field is usually used as a post‑processing layer using some kind of convolution to simulate progressive blurring of the rendered scene. I considered this as a good‑to‑have from the beginning in case we will be left with some additional fps, but not as a realistic option.

    However, after implementing the particles simulation, which used smoothstep function in the particle’s fragment shader to draw the blue circle, I was wondering if it might not be enough to simply modify its values to make it look like it’s blurred. After few little tweaks, the particles became blurry.

    The only problem left was that the blur was not progressive like in a real camera, meaning it was not getting blurry according to the focus point of the camera. So I decided to try the camera’s view position to get some kind of depth value, which surprisingly did the job well.

    I applied the same smoothstep technique to the rotating tube in the background, but now without the progressive effect since it was almost at a constant distance most of the time.

    Voilà. Depth of field for almost free (not perfect, but does the job well).
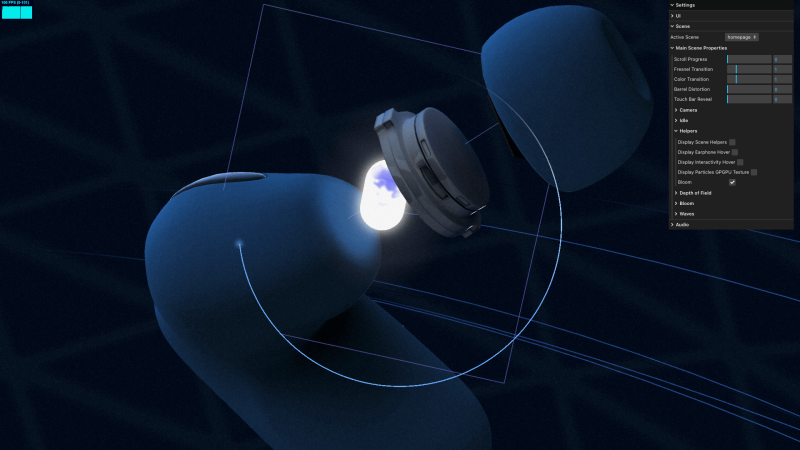
    Artificial bloom

    Bloom was also part of the post‑processing stack – typically a costly effect due to the additional render pass it requires. This becomes even more demanding when using selective bloom, which I needed to make the core of the earphones glow. In that case, the render pass is effectively doubled to isolate and blend only specific elements.

    To work around this performance hit, I replaced the bloom effect with a simple plane using a pre‑generated bloom texture that matched the shape of the earphone core. The plane was set to always face the camera (a billboard technique), creating the illusion of bloom without the computational overhead.

    Surprisingly, this approach worked very well. With a bit of fine‑tuning – especially adjusting the depth write settings – I was even able to avoid visible overlaps with nearby geometry, maintaining a clean and convincing look.

    Custom performant glass material

    A major part of the earphones’ visual appeal came from the glossy surface on the back. However, achieving realistic reflections in WebGL is always challenging – and often expensive – especially when using double‑sided materials.

    To tackle this, I used a strategy I often rely on: combining a MeshStandardMaterial for the base physical lighting model with a glass matcap texture, injected via the onBeforeCompile callback. This setup provided a good balance between realism and performance.

    To enhance the effect further, I added Fresnel lighting on the edges and introduced a slight opacity, which together helped create a convincing glass‑like surface. The final result closely matched the visual concept provided for the project – without the heavy cost of real‑time reflections or more complex materials.

    Simplified raycasting

    Raycasting on high‑polygon meshes can be slow and inefficient. To optimise this, I used invisible low‑poly proxy meshes for the points of interest – such as the earphone shapes and their interactive areas.

    This approach significantly reduced the performance cost of raycasting while giving me much more flexibility. I could freely adjust the size and position of the raycastable zones without affecting the visual mesh, allowing me to fine‑tune the interactions for the best possible user experience.

    Mobile performance

    Thanks to the optimisation techniques mentioned above, the experience maintains a solid 60 FPS – even on older devices like the iPhone SE (2020).

    • Three.js: For a project of this scale, Three.js was the clear choice. Its built‑in materials, loaders, and utilities made it ideal for building highly interactive WebGL scenes. It was especially useful when setting up the GPGPU particle simulation, which is supported via a dedicated addon provided by the Three.js ecosystem.
    • lil‑gui: Commonly used alongside Three.js, was instrumental in creating a debug environment during development. It also allowed designers to interactively tweak and fine‑tune various parameters of the experience without needing to dive into the code.
    • GSAP: Most linear animations were handled with GSAP and its timeline system. It proved particularly useful when manually syncing animations to the scroll progress provided by Lenis, offering precise control over timing and transitions.
    • Lenis: As mentioned earlier, Lenis provided a smooth and reliable foundation for scroll behavior. Its syncTouch parameter helped manage DOM shifting on mobile devices, which can be a common challenge in scroll‑based experiences.

    5. Results and Takeaways

    Aether 1 successfully demonstrated how brand narrative, advanced WebGL interactions, and rigorous 3D workflows can blend into a single, performant, and emotionally engaging web experience. 

    By baking key animations, using empties for event triggers, and leaning on tools like Three.js, GSAP, and Lenis, the team was able to iterate quickly without sacrificing polish. Meanwhile, the 3D pipeline- from Midjourney concept sketches through C4D unwrapping and Blender export ensured the visual fidelity stayed aligned with the brand vision.

    Most importantly, every technique outlined here is transferable. Whether you are considering audio‑reactive visuals, infinite scroll adventures, or simply trying to squeeze extra frames per second out of a heavy scene, the solutions documented above show that thoughtful planning and a willingness to experiment can push WebGL far beyond typical product‑page expectations.

    6. Author Contributions

    General – Ross Anderson
    3D – Celia Lopez
    WebGL – Adrian Gubrica

    7. Site credits

    Art Direction – Ross Anderson
    Design – Gilles Tossoukpe
    3D – Celia Lopez
    WebGL – Adrian Gubrica
    AI Integration – Federico Valla
    Motion – Jason Kearley
    Front End / Webflow – Youness Benammou


    Source link

  • 4 ways to create Unit Tests without Interfaces in C# | Code4IT

    4 ways to create Unit Tests without Interfaces in C# | Code4IT


    C# devs have the bad habit of creating interfaces for every non-DTO class because «we need them for mocking!». Are you sure it’s the only way?

    Table of Contents

    Just a second! 🫷
    If you are here, it means that you are a software developer.
    So, you know that storage, networking, and domain management have a cost .

    If you want to support this blog, please ensure that you have disabled the adblocker for this site.
    I configured Google AdSense to show as few ADS as possible – I don’t want to bother you with lots of ads, but I still need to add some to pay for the resources for my site.

    Thank you for your understanding.
    Davide

    One of the most common traits of C# developers is the excessive usage of interfaces.

    For every non-DTO class we define, we usually also create the related interface. Most of the time, we don’t need it because we have multiple implementations of an interface. Instead, we say that we need an interface to enable mocking.

    That’s true; it’s pretty straightforward to mock an interface: lots of libraries, like Moq and NSubstitute, allow you to create mocks and pass them to the class under test. What if there were another way?

    In this article, we will learn how to have complete control over a dependency while having the concrete class, and not the related interface, injected in the constructor.

    C# devs always add interfaces, just in case

    If you’re a developer like me, you’ve been taught something like this:

    One of the SOLID principles is Dependency Inversion; to achieve it, you need Dependency Injection. The best way to do that is by creating an interface, injecting it in the consumer’s constructor, and then mapping the interface and the concrete class.

    Sometimes, somebody explains that we don’t need interfaces to achieve Dependency Injection. However, there are generally two arguments proposed by those who keep using interfaces everywhere: the “in case I need to change the database” argument and, even more often, the “without interfaces, I cannot create mocks”.

    Are we sure?

    The “Just in case I need to change the database” argument

    One phrase that I often hear is:

    Injecting interfaces allows me to change the concrete implementation of a class without worrying about the caller. You know, just in case I had to change the database engine…

    Yes, that’s totally right – using interfaces, you can change the internal implementation in a bat of an eye.

    Let’s be honest: in all your career, how many times have you changed the underlying database? In my whole career, it happened just once: we tried to build a solution using Gremlin for CosmosDB, but it turned out to be too expensive – so we switched to a simpler MongoDB.

    But, all in all, it wasn’t only thanks to the interfaces that we managed to switch easily; it was because we strictly separated the classes and did not leak the models related to Gremlin into the core code. We structured the code with a sort of Hexagonal Architecture, way before this term became a trend in the tech community.

    Still, interfaces can be helpful, especially when dealing with multiple implementations of the same methods or when you want to wrap your head around the methods, inputs, and outputs exposed by a module.

    The “I need to mock” argument

    Another one I like is this:

    Interfaces are necessary for mocking dependencies! Otherwise, how can I create Unit Tests?

    Well, I used to agree with this argument. I was used to mocking interfaces by using libraries like Moq and defining the behaviour of the dependency using the SetUp method.

    It’s still a valid way, but my point here is that that’s not the only one!

    One of the simplest tricks is to mark your classes as abstract. But… this means you’ll end up with every single class marked as abstract. Not the best idea.

    We have other tools in our belt!

    A realistic example: Dependency Injection without interfaces

    Let’s start with a real-ish example.

    We have a NumbersRepository that just exposes one method: GetNumbers().

    public class NumbersRepository
    {
        private readonly int[] _allNumbers;
    
        public NumbersRepository()
        {
            _allNumbers = Enumerable.Range(0, int.MaxValue).ToArray();
        }
    
        public IEnumerable<int> GetNumbers() => Random.Shared.GetItems(_allNumbers, 50);
    }
    

    Generally, one would be tempted to add an interface with the same name as the class, INumbersRepository, and include the GetNumbers method in the interface definition.

    We are not going to do that – the interface is not necessary, so why clutter the code with something like that?

    Now, for the consumer. We have a simple NumbersSearchService that accepts, via Dependency Injection, an instance of NumbersRepository (yes, the concrete class!) and uses it to perform a simple search:

    public class NumbersSearchService
    {
        private readonly NumbersRepository _repository;
    
        public NumbersSearchService(NumbersRepository repository)
        {
            _repository = repository;
        }
    
        public bool Contains(int number)
        {
            var numbers = _repository.GetNumbers();
            return numbers.Contains(number);
        }
    }
    

    To add these classes to your ASP.NET project, you can add them in the DI definition like this:

    builder.Services.AddSingleton<NumbersRepository>();
    builder.Services.AddSingleton<NumbersSearchService>();
    

    Without adding any interface.

    Now, how can we test this class without using the interface?

    Way 1: Use the “virtual” keyword in the dependency to create stubs

    We can create a subclass of the dependency, even if it is a concrete class, by overriding just some of its functionalities.

    For example, we can choose to mark the GetNumbers method in the NumbersRepository class as virtual, making it easily overridable from a subclass.

    public class NumbersRepository
    {
        private readonly int[] _allNumbers;
    
        public NumbersRepository()
        {
            _allNumbers = Enumerable.Range(0, 100).ToArray();
        }
    
    -    public IEnumerable<int> GetNumbers() => Random.Shared.GetItems(_allNumbers, 50);
    +    public virtual IEnumerable<int> GetNumbers() => Random.Shared.GetItems(_allNumbers, 50);
    }
    

    Yes, we can mark a method as virtual even if the class is concrete!

    Now, in our Unit Tests, we can create a subtype of NumbersRepository to have complete control of the GetNumbers method:

    internal class StubNumberRepo : NumbersRepository
    {
        private IEnumerable<int> _numbers;
    
        public void SetNumbers(params int[] numbers) => _numbers = numbers;
    
        public override IEnumerable<int> GetNumbers() => _numbers;
    }
    

    We have overridden the GetNumbers method, but to do so, we had to include a new method, SetNumbers, to define the expected result of the former method.

    We then can use it in our tests like this:

    [Test]
    public void Should_WorkWithStubRepo()
    {
        // Arrange
        var repository = new StubNumberRepo();
        repository.SetNumbers(1, 2, 3);
        var service = new NumbersSearchService(repository);
    
        // Act
        var result = service.Contains(3);
    
        // Assert
        Assert.That(result, Is.True);
    }
    

    You now have the full control over the subclass. But this approach comes with a problem: if you have multiple methods marked as virtual, and you are going to use all of them in your test classes, then you will need to override every single method (to have control over them) and work out how to decide whether to use the concrete method or the stub implementation.

    For example, we can update the StubNumberRepo to let the consumer choose if we need the dummy values or the base implementation:

    internal class StubNumberRepo : NumbersRepository
    {
        private IEnumerable<int> _numbers;
        private bool _useStubNumbers;
    
        public void SetNumbers(params int[] numbers)
        {
            _numbers = numbers;
            _useStubNumbers = true;
        }
    
        public override IEnumerable<int> GetNumbers()
        {
            if (_useStubNumbers)
                return _numbers;
            return base.GetNumbers();
        }
    }
    

    With this approach, by default, we use the concrete implementation of NumbersRepository because _useStubNumbers is false. If we call the SetNumbers method, we also specify that we don’t want to use the original implementation.

    Way 2: Use the virtual keyword in the service to avoid calling the dependency

    Similar to the previous approach, we can mark some methods of the caller as virtual to allow us to change parts of our class while keeping everything else as it was.

    To achieve it, we have to refactor a little our Service class:

    public class NumbersSearchService
    {
        private readonly NumbersRepository _repository;
    
        public NumbersSearchService(NumbersRepository repository)
        {
            _repository = repository;
        }
    
        public bool Contains(int number)
        {
    -       var numbers = _repository.GetNumbers();
    +       var numbers = GetNumbers();
            return numbers.Contains(number);
        }
    
    +    public virtual IEnumerable<int> GetNumbers() => _repository.GetNumbers();
    }
    

    The key is that we moved the calls to the external references to a separate method, marking it as virtual.

    This way, we can create a stub class of the Service itself without the need to stub its dependencies:

    internal class StubNumberSearch : NumbersSearchService
    {
        private IEnumerable<int> _numbers;
        private bool _useStubNumbers;
    
        public StubNumberSearch() : base(null)
        {
        }
    
        public void SetNumbers(params int[] numbers)
        {
            _numbers = numbers.ToArray();
            _useStubNumbers = true;
        }
    
        public override IEnumerable<int> GetNumbers()
            => _useStubNumbers ? _numbers : base.GetNumbers();
    }
    

    The approach is almost identical to the one we saw before. The difference can be seen in your tests:

    [Test]
    public void Should_UseStubService()
    {
        // Arrange
        var service = new StubNumberSearch();
        service.SetNumbers(12, 15, 30);
    
        // Act
        var result = service.Contains(15);
    
        // Assert
        Assert.That(result, Is.True);
    }
    

    There is a problem with this approach: many devs (correctly) add null checks in the constructor to ensure that the dependencies are not null:

    public NumbersSearchService(NumbersRepository repository)
    {
        ArgumentNullException.ThrowIfNull(repository);
        _repository = repository;
    }
    

    While this approach makes it safe to use the NumbersSearchService reference within the class’ methods, it also stops us from creating a StubNumberSearch. Since we want to create an instance of NumbersSearchService without the burden of injecting all the dependencies, we call the base constructor passing null as a value for the dependencies. If we validate against null, the stub class becomes unusable.

    There’s a simple solution: adding a protected empty constructor:

    public NumbersSearchService(NumbersRepository repository)
    {
        ArgumentNullException.ThrowIfNull(repository);
        _repository = repository;
    }
    
    protected NumbersSearchService()
    {
    }
    

    We mark it as protected because we want that only subclasses can access it.

    Way 3: Use the “new” keyword in methods to hide the base implementation

    Similar to the virtual keyword is the new keyword, which can be applied to methods.

    We can then remove the virtual keyword from the base class and hide its implementation by marking the overriding method as new.

    public class NumbersSearchService
    {
        private readonly NumbersRepository _repository;
    
        public NumbersSearchService(NumbersRepository repository)
        {
            ArgumentNullException.ThrowIfNull(repository);
            _repository = repository;
        }
    
        public bool Contains(int number)
        {
            var numbers = _repository.GetNumbers();
            return numbers.Contains(number);
        }
    
    -    public virtual IEnumerable<int> GetNumbers() => _repository.GetNumbers();
    +    public IEnumerable<int> GetNumbers() => _repository.GetNumbers();
    }
    

    We have restored the original implementation of the Repository.

    Now, we can update the stub by adding the new keyword.

    internal class StubNumberSearch : NumbersSearchService
    {
        private IEnumerable<int> _numbers;
        private bool _useStubNumbers;
    
        public void SetNumbers(params int[] numbers)
        {
            _numbers = numbers.ToArray();
            _useStubNumbers = true;
        }
    
    -    public override IEnumerable<int> GetNumbers() => _useStubNumbers ? _numbers : base.GetNumbers();
    +    public new IEnumerable<int> GetNumbers() => _useStubNumbers ? _numbers : base.GetNumbers();
    }
    

    We haven’t actually solved any problem except for one: we can now avoid cluttering all our classes with the virtual keyword.

    A question for you! Is there any difference between using the new and the virtual keyword? When you should pick one instead of the other? Let me know in the comments section! 📩

    Way 4: Mock concrete classes by marking a method as virtual

    Sometimes, I hear developers say that mocks are the absolute evil, and you should never use them.

    Oh, come on! Don’t be so silly!

    That’s true, when using mocks you are writing tests on a irrealistic environment. But, well, that’s exactly the point of having mocks!

    If you think about it, at school, during Science lessons, we were taught to do our scientific calculations using approximations: ignore the air resistance, ignore friction, and so on. We knew that that world did not exist, but we removed some parts to make it easier to validate our hypothesis.

    In my opinion, it’s the same for testing. Mocks are useful to have full control of a specific behaviour. Still, only relying on mocks makes your tests pretty brittle: you cannot be sure that your system is working under real conditions.

    That’s why, as I explained in a previous article, I prefer the Testing Diamond over the Testing Pyramid. In many real cases, five Integration Tests are more valuable than fifty Unit Tests.

    But still, mocks can be useful. How can we use them if we don’t have interfaces?

    Let’s start with the basic example:

    public class NumbersRepository
    {
        private readonly int[] _allNumbers;
    
        public NumbersRepository()
        {
            _allNumbers = Enumerable.Range(0, 100).ToArray();
        }
    
        public IEnumerable<int> GetNumbers() => Random.Shared.GetItems(_allNumbers, 50);
    }
    
    public class NumbersSearchService
    {
        private readonly NumbersRepository _repository;
    
        public NumbersSearchService(NumbersRepository repository)
        {
            ArgumentNullException.ThrowIfNull(repository);
            _repository = repository;
        }
    
        public bool Contains(int number)
        {
            var numbers = _repository.GetNumbers();
            return numbers.Contains(number);
        }
    }
    

    If we try to use Moq to create a mock of NumbersRepository (again, the concrete class) like this:

    [Test]
    public void Should_WorkWithMockRepo()
    {
        // Arrange
        var repository = new Moq.Mock<NumbersRepository>();
        repository.Setup(_ => _.GetNumbers()).Returns(new int[] { 1, 2, 3 });
        var service = new NumbersSearchService(repository.Object);
    
        // Act
        var result = service.Contains(3);
    
        // Assert
        Assert.That(result, Is.True);
    }
    

    It will fail with this error:

    System.NotSupportedException : Unsupported expression: _ => _.GetNumbers()
    Non-overridable members (here: NumbersRepository.GetNumbers) may not be used in setup / verification expressions.

    This error occurs because the implementation GetNumbers is fixed as defined in the NumbersRepository class and cannot be overridden.

    Unless you mark it as virtual, as we did before.

    public class NumbersRepository
    {
        private readonly int[] _allNumbers;
    
        public NumbersRepository()
        {
            _allNumbers = Enumerable.Range(0, 100).ToArray();
        }
    
    -    public IEnumerable<int> GetNumbers() => Random.Shared.GetItems(_allNumbers, 50);
    +    public virtual IEnumerable<int> GetNumbers() => Random.Shared.GetItems(_allNumbers, 50);
    }
    

    Now the test passes: we have successfully mocked a concrete class!

    Further readings

    Testing is a crucial part of any software application. I personally write Unit Tests even for throwaway software – this way, I can ensure that I’m doing the correct thing without the need for manual debugging.

    However, one part that is often underestimated is the code quality of tests. Tests should be written even better than production code. You can find more about this topic here:

    🔗 Tests should be even more well-written than production code | Code4IT

    Also, Unit Tests are not enough. You should probably write more Integration Tests than Unit Tests. This one is a testing strategy called Testing Diamond.

    🔗 Testing Pyramid vs Testing Diamond (and how they affect Code Coverage) | Code4IT

    This article first appeared on Code4IT 🐧

    Clearly, you can write Integration Tests for .NET APIs easily. In this article, I explain how to create and customize Integration Tests using NUnit:

    🔗 Advanced Integration Tests for .NET 7 API with WebApplicationFactory and NUnit | Code4IT

    Wrapping up

    In this article, we learned that it’s not necessary to create interfaces for the sake of having mocks.

    We have different other options.

    Honestly speaking, I’m still used to creating interfaces and using them with mocks.

    I find it easy to do, and this approach provides a quick way to create tests and drive the behaviour of the dependencies.

    Also, I recognize that interfaces created for the sole purpose of mocking are quite pointless: we have learned that there are other ways, and we should consider trying out these solutions.

    Still, interfaces are quite handy for two “non-technical” reasons:

    • using interfaces, you can understand in a glimpse what are the operations that you can call in a clean and concise way;
    • interfaces and mocks allow you to easily use TDD: while writing the test cases, you also define what methods you need and the expected behaviour. I know you can do that using stubs, but I find it easier with interfaces.

    I know, this is a controversial topic – I’m not saying that you should remove all your interfaces (I think it’s a matter of personal taste, somehow!), but with this article, I want to highlight that you can avoid interfaces.

    I hope you enjoyed this article! Let’s keep in touch on Twitter or LinkedIn! 🤜🤛

    Happy coding!

    🐧


    Source link

  • JavaScript and TypeScript Projects with React, Angular, or Vue in Visual Studio 2022 with or without .NET

    JavaScript and TypeScript Projects with React, Angular, or Vue in Visual Studio 2022 with or without .NET


    I was reading Gabby’s blog post about the new TypeScript/JavaScript project experience in Visual Studio 2022. You should read the docs on JavaScript and TypeScript in Visual Studio 2022.

    If you’re used to ASP.NET apps when you think about apps that are JavaScript heavy, “front end apps” or TypeScript focused, it can be confusing as to “where does .NET fit in?”

    You need to consider the responsibilities of your various projects or subsystems and the multiple totally valid ways you can build a web site or web app. Let’s consider just a few:

    1. An ASP.NET Web app that renders HTML on the server but uses TS/JS
      • This may have a Web API, Razor Pages, with or without the MVC pattern.
      • You maybe have just added JavaScript via <script> tags
      • Maybe you added a script minimizer/minifier task
      • Can be confusing because it can feel like your app needs to ‘build both the client and the server’ from one project
    2. A mostly JavaScript/TypeScript frontend app where the HTML could be served from any web server (node, kestrel, static web apps, nginx, etc)
      • This app may use Vue or React or Angular but it’s not an “ASP.NET app”
      • It calls backend Web APIs that may be served by ASP.NET, Azure Functions, 3rd party REST APIs, or all of the above
      • This scenario has sometimes been confusing for ASP.NET developers who may get confused about responsibility. Who builds what, where do things end up, how do I build and deploy this?

    VS2022 brings JavaScript and TypeScript support into VS with a full JavaScript Language Service based on TS. It provides a TypeScript NuGet Package so you can build your whole app with MSBuild and VS will do the right thing.

    NEW: Starting in Visual Studio 2022, there is a new JavaScript/TypeScript project type (.esproj) that allows you to create standalone Angular, React, and Vue projects in Visual Studio.

    The .esproj concept is great for folks familiar with Visual Studio as we know that a Solution contains one or more Projects. Visual Studio manages files for a single application in a Project. The project includes source code, resources, and configuration files. In this case we can have a .csproj for a backend Web API and an .esproj that uses a client side template like Angular, React, or Vue.

    Thing is, historically when Visual Studio supported Angular, React, or Vue, it’s templates were out of date and not updated enough. VS2022 uses the native CLIs for these front ends, solving that problem with Angular CLI, Create React App, and Vue CLI.

    If I am in VS and go “File New Project” there are Standalone templates that solve Example 2 above. I’ll pick JavaScript React.

    Standalone JavaScript Templates in VS2022

    Then I’ll click “Add integration for Empty ASP.NET Web API. This will give me a frontend with javascript ready to call a ASP.NET Web API backend. I’ll follow along here.

    Standalone JavaScript React Template

    It then uses the React CLI to make the front end, which again, is cool as it’s whatever version I want it to be.

    React Create CLI

    Then I’ll add my ASP.NET Web API backend to the same solution, so now I have an esproj and a csproj like this

    frontend and backend

    Now I have a nice clean two project system – in this case more JavaScript focused than .NET focused. This one uses npm to startup the project using their web development server and proxyMiddleware to proxy localhost:3000 calls over to the ASP.NET Web API project.

    Here is a React app served by npm calling over to the Weather service served from Kestrel on ASP.NET.

    npm app running in VS 2022 against an ASP.NET Web API

    This is inverted than most ASP.NET Folks are used to, and that’s OK. This shows me that Visual Studio 2022 can support either development style, use the CLI that is installed for whatever Frontend Framework, and allow me to choose what web server and web browser (via Launch.json) I want.

    If you want to flip it, and put ASP.NET Core as the primary and then bring in some TypeScript/JavaScript, follow this tutorial because that’s also possible!


    Sponsor: Make login Auth0’s problem. Not yours. Provide the convenient login features your customers want, like social login, multi-factor authentication, single sign-on, passwordless, and more. Get started for free.


    About Scott

    Scott Hanselman is a former professor, former Chief Architect in finance, now speaker, consultant, father, diabetic, and Microsoft employee. He is a failed stand-up comic, a cornrower, and a book author.

    facebook
    bluesky
    subscribe
    About   Newsletter

    Hosting By
    Hosted on Linux using .NET in an Azure App Service


    Source link

  • Use your own user @ domain for Mastodon discoverability with the WebFinger Protocol without hosting a server

    Use your own user @ domain for Mastodon discoverability with the WebFinger Protocol without hosting a server


    Mastodon is a free, open-source social networking service that is decentralized and distributed. It was created in 2016 as an alternative to centralized social media platforms such as Twitter and Facebook.

    One of the key features of Mastodon is the use of the WebFinger protocol, which allows users to discover and access information about other users on the Mastodon network. WebFinger is a simple HTTP-based protocol that enables a user to discover information about other users or resources on the internet by using their email address or other identifying information. The WebFinger protocol is important for Mastodon because it enables users to find and follow each other on the network, regardless of where they are hosted.

    WebFinger uses a “well known” path structure when calling an domain. You may be familiar with the robots.txt convention. We all just agree that robots.txt will sit at the top path of everyone’s domain.

    The WebFinger protocol is a simple HTTP-based protocol that enables a user or search to discover information about other users or resources on the internet by using their email address or other identifying information. My is first name at last name .com, so…my personal WebFinger API endpoint is here https://www.hanselman.com/.well-known/webfinger

    The idea is that…

    1. A user sends a WebFinger request to a server, using the email address or other identifying information of the user or resource they are trying to discover.

    2. The server looks up the requested information in its database and returns a JSON object containing the information about the user or resource. This JSON object is called a “resource descriptor.”

    3. The user’s client receives the resource descriptor and displays the information to the user.

    The resource descriptor contains various types of information about the user or resource, such as their name, profile picture, and links to their social media accounts or other online resources. It can also include other types of information, such as the user’s public key, which can be used to establish a secure connection with the user.

    There’s a great explainer here as well. From that page:

    When someone searches for you on Mastodon, your server will be queried for accounts using an endpoint that looks like this:

    GET https://${MASTODON_DOMAIN}/.well-known/webfinger?resource=acct:${MASTODON_USER}@${MASTODON_DOMAIN}

    Note that Mastodon user names start with @ so they are @username@someserver.com. Just like twiter would be @shanselman@twitter.com I can be @shanselman@hanselman.com now!

    Searching for me with Mastodon

    So perhaps https://www.hanselman.com/.well-known/webfinger?resource=acct:FRED@HANSELMAN.COM

    Mine returns

    {
    "subject":"acct:shanselman@hachyderm.io",
    "aliases":
    [
    "https://hachyderm.io/@shanselman",
    "https://hachyderm.io/users/shanselman"
    ],
    "links":
    [
    {
    "rel":"http://webfinger.net/rel/profile-page",
    "type":"text/html",
    "href":"https://hachyderm.io/@shanselman"
    },
    {
    "rel":"self",
    "type":"application/activity+json",
    "href":"https://hachyderm.io/users/shanselman"
    },
    {
    "rel":"http://ostatus.org/schema/1.0/subscribe",
    "template":"https://hachyderm.io/authorize_interaction?uri={uri}"
    }
    ]
    }

    This file should be returned as a mime type of application/jrd+json

    My site is an ASP.NET Razor Pages site, so I just did this in Startup.cs to map that well known URL to a page/route that returns the JSON needed.

    services.AddRazorPages().AddRazorPagesOptions(options =>
    {
    options.Conventions.AddPageRoute("/robotstxt", "/Robots.Txt"); //i did this before, not needed
    options.Conventions.AddPageRoute("/webfinger", "/.well-known/webfinger");
    options.Conventions.AddPageRoute("/webfinger", "/.well-known/webfinger/{val?}");
    });

    then I made a webfinger.cshtml like this. Note I have to double escape the @@ sites because it’s Razor.

    @page
    @{
    Layout = null;
    this.Response.ContentType = "application/jrd+json";
    }
    {
    "subject":"acct:shanselman@hachyderm.io",
    "aliases":
    [
    "https://hachyderm.io/@@shanselman",
    "https://hachyderm.io/users/shanselman"
    ],
    "links":
    [
    {
    "rel":"http://webfinger.net/rel/profile-page",
    "type":"text/html",
    "href":"https://hachyderm.io/@@shanselman"
    },
    {
    "rel":"self",
    "type":"application/activity+json",
    "href":"https://hachyderm.io/users/shanselman"
    },
    {
    "rel":"http://ostatus.org/schema/1.0/subscribe",
    "template":"https://hachyderm.io/authorize_interaction?uri={uri}"
    }
    ]
    }

    This is a static response, but if I was hosting pages for more than one person I’d want to take in the url with the user’s name, and then map it to their aliases and return those correctly.

    Even easier, you can just use the JSON file of your own Mastodon server’s webfinger response and SAVE IT as a static json file and copy it to your own server!

    As long as your server returns the right JSON from that well known URL then it’ll work.

    So this is my template https://hachyderm.io/.well-known/webfinger?resource=acct:shanselman@hachyderm.io from where I’m hosted now.

    If you want to get started with Mastodon, start here. https://github.com/joyeusenoelle/GuideToMastodon/ it feels like Twitter circa 2007 except it’s not owned by anyone and is based on web standards like ActivityPub.

    Hope this helps!


    About Scott

    Scott Hanselman is a former professor, former Chief Architect in finance, now speaker, consultant, father, diabetic, and Microsoft employee. He is a failed stand-up comic, a cornrower, and a book author.

    facebook
    bluesky
    subscribe
    About   Newsletter

    Hosting By
    Hosted on Linux using .NET in an Azure App Service


    Source link