Hi, I’m Mengchu Yao from Taiwan, and I am currently based in Tokyo, Japan, where I work as a web designer at baqemono.inc.
I’m truly grateful to be able to pursue my design career in a cross-cultural environment. The life here allows me to appreciate small things and encourages me to stay curious and open minded.
We created the website for AI model Inc., a company that leverages AI models and virtual personalities to offer digital transformation (DX) services. The site was created to showcase their AI video generation solutions.
Personal notes
This website design is centered around the concept of “natural and elegant AI-generated visuals”. One of the key challenges was to present a large number of dynamic, immersive visual elements and interactions within a single-page layout. We spent a lot of time finding the right balance between animation and delivering messages, ensuring that every motion looks beautiful and meaningful at the same time
This was also time that I sketched the animation for almost every section myself, working closely with developers to fine-tune the motion expressions. The process was both challenging and fascinating, which is why it was rewarding and significant for my growth.
We created the official website for “Vlag yokohama,” a new members-only creative lounge and workspace located on the top (42nd) floor of the THE YOKOHAMA FRONT at Yokohama Station.
Personal notes
This project was a rare opportunity that allowed me to explore and be creative while using the brand guidelines as a foundation, in response to the request “to use the Yokohama cityscape as the backbone of visuals while incorporating elements that evoke the feeling of wind and motion.”
One thoughtful touch was the main visual on the homepage. It automatically changes during the time of day: morning, afternoon, and evening, which represents Yokohama’s ambiances and gives a subtle delight to the browsing experience.
We created a brand-new corporate website for Angelux Co., Ltd., a company founded in 1987 that specializes in beauty salons and spas operations, with product development and sales in cosmetics.
Personal notes
This project began with the client’s request to clearly distinguish between the service website and the corporate site, and to position the latter as a recruitment platform that authentically reflects the people behind the brand.
To embody Angelux’s strong emphasis on craftsmanship, we featured actual treatment scenes in the main visual. The overall design blends a sense of classic professionalism with a soft modern aesthetic, creating a calm and reassuring atmosphere. This approach not only helps build trust in the company but also effectively appeals to potential talent interested in joining Angelux.
The visual design incorporated elements reminiscent of high-quality cosmetics that conveys the clean beauty and clarity of skincare.
We redesigned the official website for Infodio Inc., a company that specializes in advanced technologies such as AI-OCR and Natural Language Processing (NLP), and offers high-speed, automated transcription products and services.
Personal notes
The original website failed to effectively communicate “AI as core”, and often mislead the client’s applicants. To resolve the issue, our strategy was to emphesize the products. The revamp successfully gives the true essence of the brand and attracts the right potential talents with clear messaging.
For the visuals, we started from scratch. It was challenging but also the most fun part. As the products were the focal point of the design, the key was to show both the authenticity and visual appeal.
Background
After getting my master’s degree in Information Design, I joined the Tokyo-based digital design studio, baqemono.inc., I have had the opportunity to lead several challenging and creatively fulfilling projects from the early stages of my career.
These experiences have shaped me tremendously and deepened my passion for this field. Throughout this journey, the studio’s founder has remained the designer I admire the most — a constant source of inspiration whose presence reminds me to approach every project with both respect and enthusiasm.
Design Philosophy
A strong concept is your north star
I believe every design should be built upon a clear and compelling core idea. Whenever I begin a project, I always ask myself: “What am I designing for?”
Structure comes first
Before diving into visuals, I make sure I spend enough time on wireframes and the overall structure. If the content and hierarchy aren’t clearly defined at the start, the rest of the bits and pieces become noises that cloud judgment. A solid framework helps me stay focused and gives me room to refine the details.
Listen to the discomfort in your gut
Whenever I feel that something’s “not quite right”, I always know I’d have to come back to take another look because these subtle feelings often point to something important. I believe that as designers we should be honest with ourselves, take a pause to examine, and revise. Each small tweak is a step closer to your truth.
You have to genuinely love it
I also believe that every designer should love his/her own work so the work will bring its impact. This isn’t just about aesthetics — it’s about fully owning the concept, the details, and the final outcome.
Teamwork is everything
No project is ever completed by me alone — it’s always the result of a team effort. I deeply respect every member involved, and I constantly ask myself: “What can I do to make the collaboration smoother for everyone?”
Tools and Techniques
Photoshop
Figma
After Effects
Eagle
Future goals
My main goal for the year is to start building my portfolio website. I’ve been mainly sharing my work on social media, but as I’ve gained more hands-on experience and creative outputs over time, I realized that it’s important to have a dedicated space that fully reflects who I am as a designer today.
Recently, I started to make some changes in my daily routine, such as better sleeping hours and becoming a morning person to be more focused and productive for my work. My mind is clearer, and my body feels great, just as if I’m preparing myself for the next chapter of my creative journey.
Final Thoughts
Giving someone advice is always a little tricky for me, but one phrase that has resonated deeply with me throughout my journey is: “Go slow to go fast”. Finding your own balance between creating and resting while continuing to stay passionate about life is, to me, the most important thing of all.
Thank you so much for taking the time to read this. I hope you enjoyed the works and thoughts I’ve shared!
A heartfelt thanks as well to Codrops and Manoela for inviting me to be part of this Designer Spotlight. Ever since I stepped into the world of web design, Codrops has been a constant source of inspiration, showing me so many amazing works and creators. I’m truly honored and grateful to be featured among them.
Contact
I’m always excited to connect with people to share ideas and explore new opportunities together. If anything here speaks to you, feel free to reach out — I’d love to chat more and hear your thoughts! I also share updates on my latest projects from time to time on social media, so feel free to drop by and say hi 😊
My name is Enrico Gisana, and I’m a creative director, graphic and motion designer.
I’m the co-founder of GG—OFFICE, a small independent visual arts studio based in Modica, Sicily. I consider myself a multidisciplinary designer because I bring together different skills and visual languages. I work across analog and digital media, combining graphic design, typography, and animation, often blending these elements through experimental approaches. My design approach aims to push the boundaries of traditional graphic conventions, constantly questioning established norms to explore new visual possibilities.
My work mainly focuses on branding, typography, and motion design, with a particular emphasis on kinetic typography.
Between 2017 and 2025, I led numerous graphic and motion design workshops at various universities and art academies in Italy, including Abadir (Catania), Accademia di Belle Arti di Frosinone, Accademia di Belle Arti di Roma, CFP Bauer (Milan), and UNIRSM (San Marino). Since 2020, I’ve been teaching motion design at Abadir Academy in Catania, and since 2025, kinetic typography at CFP Bauer in Milan.
Featured work
TYPEXCEL — Variable font
I designed an online half-day workshop for high school students on the occasion of an open day at the Academy of Design and Visual Communication Abadir, held in 2021.
The goal of this workshop was to create a first contact with graphic design, but most of all with typography, using an Excel spreadsheet as a modular grid composed of editable and variable cells, instead of professional software which requires specific knowledge.
The cell pattern allowed the students to create letters, icons, and glyphs. It was a stimulating exercise that helped them discover and develop their own design and creative skills.
This project was published in Slanted Magazine N°40 “Experimental Type”.
DEMO Festival
DEMO Festival (Design in Motion Festival) is one of the world’s most prominent motion design festivals, founded by the renowned Dutch studio Studio Dumbar. The festival takes over the entire digital screen network of Amsterdam Central Station, transforming public space into a 24-hour exhibition of cutting-edge motion work from around the globe.
I’ve had the honor of being selected multiple times to showcase my work at DEMO: in 2019 with EYE SEQUENCE; in 2022 with ALIEN TYPE and VERTICAL; and again in 2025 with ALIEN TRIBE, HELLOCIAOHALLOSALUTHOLA, and FREE JAZZ.
In the 2025 edition, ALIEN TRIBE and HELLOCIAOHALLOSALUTHOLA were also selected for the Special Screens program, which extended the festival’s presence beyond the Netherlands. These works were exhibited in digital spaces across cities including Eindhoven, Rotterdam, Tilburg, Utrecht, Hamburg, and Düsseldorf, reaching a broader international audience.
ALIEN TRIBE — Amsterdam Central Station (2025)ALIEN TRIBE (2025)ALIEN TRIBE — Hamburg (2015)HELLOCIAOHALLOSALUTHOLA — Düsseldorf (2025)HELLOCIAOHALLOSALUTHOLA (2025)HELLOCIAOHALLOSALUTHOLA — Amsterdam Central Station (2025) ALIEN TYPE — Amsterdam Central Station (2022)VERTICAL — Amsterdam Central Station (2022)EYE SEQUENCE — Amsterdam Central Station (2019)
MARCO FORMENTINI
My collaboration with Italian footwear designer Marco Formentini, based in Amsterdam, began with the creation of his visual identity and gradually expanded into other areas, including apparel experiments and the design of his personal website.
Each phase of the project reflects his eclectic and process-driven approach to design, while also allowing me to explore form, texture, and narrative through different media.
Below is a closer look at the three main outputs of this collaboration: logo, t-shirt, and website.
Logo
Designed for Italian footwear designer Marco Formentini, this logo reflects his broad, exploratory approach to design. Rather than sticking to a traditional monogram, I fused the letters “M” and “F” into a single, abstract shape, something that feels more like a symbol than a set of initials. The result is a wild, otherworldly mark that evokes movement, edge, and invention, mirroring Marco’s ability to shift across styles and scales while always keeping his own perspective.
Website
I conceived Marco Formentini’s website as a container, a digital portfolio without a fixed structure. It gathers images, sketches, prototypes, and renderings not through a linear narrative but through a visual flow that embraces randomness.
The layout is split into two vertical columns, each filled with different types of visual content. By moving the cursor left or right, the columns dynamically resize, allowing the user to shift focus and explore the material in an intuitive and fluid way. This interactive system reflects Marco’s eclectic approach to footwear design, a space where experimentation and process take visual form.
Shortly after working on his personal brand, I shared with Marco Formentini a few early graphic proposals for a potential t-shirt design, while he happened to be traveling through the Philippines with his friend Jo.
Without waiting for a full release, he spontaneously had a few pieces printed at a local shop he stumbled upon during the trip, mixing one of the designs on the front with a different proposal on the back. An unexpected real-world test run for the identity, worn into the streets before even hitting the studio.
Ditroit
This poster was created to celebrate the 15th anniversary of Ditroit, a motion design and 3D studio based in Milan.
At the center is an expressive “15”, a tribute to the studio’s founder, a longtime friend and former graffiti companion. The design reconnects the present with our shared creative roots and the formative energy of those early years.
Silver on black: a color pairing rooted in our early graffiti experiments, reimagined here to celebrate fifteen years of visual exploration.
Tightype
A series of typographic animations I created for the launch of Habitas, the typeface designed by Tightype and released in 2021.
The project explores type in motion, not just as a vehicle for content but as a form of visual expression in itself. Shapes bounce, rotate and multiply, revealing the personality of the font through rhythm and movement.
Jane Machine
SH SH SH SH is the latest LP from Jane Machine.
The cover is defined by the central element of the lips, directly inspired by the album’s title. The lips not only mimic the movement of the “sh” sound but also evoke the noise of tearing paper. I amplified this effect through the creative process by first printing a photograph of the lips and then tearing it, introducing a tactile quality that contrasts with and complements the more electronic aesthetic of the colors and typography.
Background
I’m a creative director and graphic & motion designer with a strong focus on typography.
My visual journey started around the age of 12, shaped by underground culture: I was into graffiti, hip hop, breakdancing, and skateboarding.
As I grew up, I explored other scenes, from punk to tekno, from drum and bass to more experimental electronic music. What always drew me in, beyond the music itself, was the visual world around it: free party flyers, record sleeves, logos, and type everywhere.
Between 2004 and 2010, I produced tekno music, an experience that deeply shaped my approach to design. That’s where I first learned about timelines, beats, and rhythm, all elements that today are at the core of how I work with motion.
Art has also played a major role in shaping my visual culture, from the primitive signs of hieroglyphs to Cubism, Dadaism, Russian Constructivism, and the expressive intensity of Antonio Ligabue.
The aesthetics and attitude of those worlds continue to influence everything I do and how I see things.
In 2013, I graduated in Graphic Design from IED Milano and started working with various agencies. In 2014, I moved back to Modica, Sicily, where I’m still based today.
Some of my animation work has been featured at DEMO Festival, the international motion design event curated by Studio Dumbar, in the 2019, 2022, and 2025 editions.
In 2022, I was published in Slanted Magazine #40 (EXPERIMENTAL TYPE) with TYPEXCEL, Variable font, a project developed for a typography workshop aimed at high school students, entirely built inside an Excel spreadsheet.
Since 2020, I’ve been teaching Motion Design at Abadir, Academy of Design and Visual Communication in Catania, and in 2025 I started teaching Type in Motion at Bauer in Milan.
In 2021, together with Francesca Giampiccolo, I founded GG—OFFICE, a small independent visual studio based in Modica, Sicily.
GG—OFFICE is a design space where branding and motion meet through a tailored and experimental approach. Every project grows from dialogue, evolves through research, and aims to shape contemporary, honest, and visually forward identities.
In 2025, Francesca and I gave a talk on the theme of madness at Desina Festival in Naples, a wild, fun, and beautifully chaotic experience.
Design Philosophy
My approach to design is rooted in thought, I think a lot, as well as in research, rhythm, and an almost obsessive production of drafts.
Every project is a unique journey where form always follows meaning, and never simply does what the client says.
This is not about being contrary; it’s about bringing depth, intention and a point of view to the process.
I channel the raw energy and DIY mindset of the subcultures that shaped me early on. I’m referring to those gritty, visual sound-driven scenes that pushed boundaries and blurred the line between image and sound. I’m not talking about the music itself, but about the visual culture that surrounded it. That spirit still fuels my creative engine today.
Typography is my playground, not just a visual tool but a way to express structure, rhythm and movement.
Sometimes I push letterforms to their limit, to the point where they lose readability and become pure visual matter.
Whether I’m building a brand identity or animating graphics, I’m always exploring new visual languages, narrative rhythms and spatial poetry.
Tools and Techniques
I work across analog and digital tools, but most of my design and animation takes shape in Adobe Illustrator, After Effects, InDesign and Photoshop. And sometimes even Excel 🙂 especially when I want to break the rules and rethink typography in unconventional ways.
I’m drawn to processes that allow for exploration and controlled chaos. I love building visual systems, breaking them apart and reconstructing them with intention.
Typography, to me, is a living structure, modular, dynamic and often influenced by visual or musical rhythm.
My workflow starts with in-depth research and a large amount of hand sketching.
I then digitize the material, print it, manipulate it manually by cutting, collaging and intervening physically, then scan it again and bring it back into the digital space.
This back-and-forth between mediums helps me achieve a material quality and a sense of imperfection that pure digital work often lacks.
Inspiration
Beyond the underground scenes and art movements I mentioned earlier, my inspiration comes from everything around me. I’m a keen observer and deeply analytical. Since I was a kid, I’ve been fascinated by people’s gestures, movements, and subtle expressions.
For example, when I used to go to parties, I would often stand next to the DJ, not just to watch their technique, but to study their body language, movements, and micro-expressions. Even the smallest gesture can spark an idea.
I believe inspiration is everywhere. It’s about being present and training your eye to notice the details most people overlook.
Future Goals
I don’t have a specific goal or destination. My main aim is to keep doing things well and to never lose my curiosity. For me, curiosity is the fuel that drives creativity and growth, so I want to stay open, keep exploring, and enjoy the process without forcing a fixed outcome.
Message to Readers
Design is not art!
Design is method, planning, and process. However, that method can, and sometimes should, be challenged, as long as you remain fully aware of what you are doing. It is essential that what you create can be reproduced consistently and, depending on the project, works effectively across different media and formats. I always tell my students that you need to know the rules before you can break them. To do good design, you need a lot of passion and a lot of patience.
When two creatives collaborate, the design process becomes a shared stage — each bringing their own strengths, perspectives, and instincts. This project united designer/art director Artem Shcherban and 3D/motion designer Andrew Moskvin to help New York–based scenographer and costume designer Christian Fleming completely reimagine how his work is presented.
What began as a portfolio refresh evolved into a cohesive visual system: a rigorously minimal print catalog, a single-page website concept, and a cinematic 3D visualization. Together, Artem and Andrew shaped an experience that distilled Christian’s theatrical sensibility into clear, atmospheric design across both physical and digital formats.
From here, Artem picks up the story, walking us through how he approached the portfolio’s structure, the visual rules it would live by, and the thinking that shaped both its print and on-screen presence.
Starting the Design Conversation
Christian Fleming is a prominent designer and director based in New York City who works with theaters around the world creating visual spaces for performances. He approached me with a challenge: to update and rethink his portfolio, to make it easy to send out to theater directors and curators. Specifically the print format.
Christian had a pretty clear understanding of what he wanted to show and how it should look: rigid Scandinavian minimalism, extreme clarity of composition, a minimum of elements and a presentation that would be understandable to absolutely anyone – regardless of age, profession or context.
It was important to create a system that would:
be updated regularly (approximately every 3 weeks),
adapt to new projects,
and at the same time remain visually and semantically stable.
There also needed to be an “About Christian” section in the structure, but this too had to fit within a strict framework of visual language.
Designing a Flexible Visual System
I started by carefully analyzing how Christian works. His primary language is visual. He thinks in images, light, texture and composition. So it was important to retain a sense of air and rhythm, but build a clear modular structure that he could confidently work with on his own.
We came up with a simple adaptive system:
it easily adapts to images of different formats,
scalable for everything from PDFs to presentations,
and can be used both digitally and offline.
In the first stages, we tried several structures. However, Christian still felt that there was something missing in the layout – the visuals and logic were in conflict. We discussed which designs he wanted to show openly and which he didn’t. Some works had global reviews and important weight, but could not be shown in all details.
The solution was to divide them into two meaningful blocks:
“Selected Projects”, with full submission, and “Archival Projects”, with a focus on awards, reviews, and context. This approach preserved both structure and tone. The layout became balanced – and Christian immediately responded to this.
After gathering the structure and understanding how it would work, we began creating the design itself and populating it with content. It was important from the start to train Kristan to add content on his own, as there was a lot of project and they change quite often.
One of the key pluses of our work is versatility. Not only could the final file be emailed, but it could also be used as a print publication. This gave Christian the opportunity to give physical copies at meetings, premieres and professional events where tactility and attention to detail are important.
Christian liked the first result, both in the way the system was laid out and the way I approached the task. Then I suggested: let’s update the website as well.
Translating the Portfolio to a Single-Page Site
This phase proved to be the most interesting, and the most challenging.
Although the website looks simple, it took almost 3 months to build. From the very beginning, Christian and I tried to understand why he needed to update the site and how it should work together with the already established portfolio system.
The main challenge was to show the visual side of his projects. Not just text or logos, but the atmosphere, the light, the costumes, the feeling of the scene.
One of the restrictions that Christian set was the requirement to make the site as concise as possible, without a large number of pages, or better to limit it to one, and without unnecessary transitions. It had to be simple, clear and intuitive, but still user-friendly and quite informative. This was a real challenge, given the amount of content that needed to be posted.
Designing with Stage Logic
One of the key constraints that started the work on the site was Christian’s wish: no multiple pages. Everything had to be compact, coherent, clear and yet rich. This posed a special challenge. It was necessary to accommodate a fairly large amount of information without overloading the perception.
I proposed a solution built on a theatrical metaphor: as in a stage blackout, the screen darkens and a new space appears. Each project becomes its own scene, with the user as a spectator — never leaving their seat, never clicking through menus. Navigation flows in smooth, seamless transitions, keeping attention focused and the emotional rhythm intact.
Christian liked the idea, but immediately faced a new challenge: how to fit everything important on one screen:
a short text about him,
social media links and a resume,
the job title and description,
and, if necessary, reviews.
At the same time, the main visual content – photos and videos – had to remain in the center of attention and not overlap with the interface.
Solving the Composition Puzzle
We explored several layouts — from centered titles and multi-level disclosures to diagonal structures and thumbnail navigation. Some looked promising, but they lacked the sense of theatrical rhythm we wanted. The layouts felt crowded, with too much design and not enough air.
The breakthrough came when we shifted focus from pure visuals to structural logic. We reduced each project view to four key elements: minimal information about Christian, the production title with the director’s name, a review (when available), and a button to select the project. Giving each element its own space created a layout that was both clear and flexible, without overloading the screen.
Refining Through Iteration
As with the book, the site went through several iterations:
In the first prototype, the central layout quickly proved unworkable – long play titles and director names didn’t fit on the screen, especially in the mobile version. We were losing scalability and not using all the available space.
In the second version, we moved the information blocks upwards – this gave us a logical hierarchy and allowed us not to burden the center of the screen. The visual focus remained on the photos, and the text did not interfere with the perception of the scenography.
In the third round, the idea of “titles” appeared – a clear typographic structure, where titles are highlighted only by boldness, without changing the lettering. This was in keeping with the overall minimalist aesthetic, and Christian specifically mentioned that he didn’t want to use more than one font or style unless necessary.
We also decided to stylistically separate the reviews from the main description. We italicized them and put them just below. This made it clear what belonged to the author and what was a response to the author’s work.
Bringing Theatrical Flow to Navigation
The last open issue was navigation between projects. I proposed two scenarios:
Navigating with arrows, as if the viewer were leafing through the play scene by scene.
A clickable menu with a list of works for those who want to go directly.
Christian was concerned about the question: wouldn’t the user lose their bearings if they didn’t see the list all the time? We discussed this and came to the conclusion that most visitors don’t come to the site to “look for the right job”. They come to feel the atmosphere and “experience” its theater. So the basic scenario is a consistent browsing experience, like moving through a play. The menu is available, but not in the way – it should not break the effect of involvement.
What We Learned About Theatrical Design
We didn’t build just a website. We built an experience. It is not a digital storefront, but a space that reflects the way Christian works. He is an artist who thinks in the rhythm of the stage, and it was essential not to break that rhythm.
The result is a place where the viewer isn’t distracted; they inhabit it. Navigation, structure, and interface quietly support this experience. Much of that comes from Christian’s clear and thoughtful feedback, which shaped the process at every step. This project is a reminder that even work which appears simple is defined by countless small decisions, each influencing not only how it functions but also the mood it creates from the very beginning.
Extending the Design from Screen to Print
Once the site was complete, a new question emerged: how should this work be presented in the most meaningful way?
The digital format was only part of the answer. We also envisioned a printed edition — something that could be mailed or handed over in person as a physical object. In the theater world, where visual presence and tactility carry as much weight as the idea itself, this felt essential.
We developed a set of layouts, but bringing the catalog to life as intended proved slow. Christian’s schedule with his theater work left little time to finalize the print production. We needed an alternative that could convey not only the design but also the atmosphere and weight of the finished book.
Turning the Book into a Cinematic Object
At this stage, 3D and motion designer Andrew Moskvin joined the project. We shared the brief with him — not just to present the catalog, but to embed it within the theatrical aesthetic, preserving the play of light, texture, air, and mood that defined the website.
Andrew was immediately enthusiastic. After a quick call, he dove into the process. I assembled all the pages of the print version we had, and together we discussed storyboards, perspectives, atmosphere, possible scenes, and materials that could deepen the experience. The goal was more than simply showing the layout — we wanted cinematic shots where every fold of fabric and every spot of light served a single dramaturgy.
The result exceeded expectations. Andrew didn’t just recreate the printed version; he brought it to life. His work was subtle and precise, with a deep respect for context. He captured not only the mood but also the intent behind each spread, giving the book weight, materiality, and presence — the kind we imagined holding in our hands and leafing through in person.
Andrew will share his development process below.
Breaking Down the 3D Process
The Concept
At the very start, I wanted my work to blend fluently in the ideas that were already made. Christian Fleming is a scenographer and costume designer, so the visual system needed to reflect his world. Since the project was deeply rooted in the theatrical aesthetic, my 3D work had to naturally blend into that atmosphere. Artem’s direction played a key role in shaping the unique look envisioned by Christian Fleming — rich with stage-like presence, bold compositions, and intentional use of space. My task was to ensure that the 3D elements not only supported this world, but also felt like an organic extension of it — capturing the same mood, lighting nuances, and visual rhythm that define a theatrical setting.
The Tools
For the entire 3D pipeline, I worked in:
Cinema 4D for modeling and scene setup
Redshift for rendering
After Effects for compositing
Photoshop for color correcting static images
Modeling the Book
The book was modeled entirely from scratch. Me and Artem discussed the form and proportions, and after several iterations, we finalized the design direction. I focused on the small details that bring realism: the curvature of the hardcover spine, beveled edges, the separation between the cover and pages, and the layered structure of the paper block. I also modeled the cloth texture wrapping the spine, giving the book a tactile, fabric-like look. The geometry was built to hold up in close-up shots and fit the theatrical lighting.
Lighting with a Theatrical Eye
Lighting was one of the most important parts of this process. I wanted the scenes to feel theatrical — as if the objects were placed on a stage under carefully controlled spotlights. Using a combination of area lights and spotlights in Redshift, I shaped the lighting to create soft gradients and shadows on the surfaces. The setup was designed to emphasize the geometry without flattening it, always preserving depth and direction. A subtle backlight highlight played a key role in defining the edges and enhancing the overall form.
I think I spent more time on lighting than on modeling, since lighting has always been more experimental for me — even in product scenes.
One small but impactful trick I always use is setting up a separate HDRI map just for reflections. I disable its contribution to diffuse lighting by setting the diffuse value to 0, while keeping reflections at 1. This allows the reflections to pop more without affecting the overall lighting of the scene. It’s a simple setup, but it gives you way more control over how materials respond — especially in stylized or highly art-directed environments.
Building the Materials
When I was creating the materials, I noticed that Artem had used a checkerboard texture for the cover. So I thought — why not take that idea further and implement it directly into the material? I added a subtle bump using a checker texture on the sides and front part of the book.
I also experimented quite a bit with displacement. Initially, I had the idea to make the title metallic, but it felt too predictable. So instead, I went with a white title featuring embossed details, while keeping the checker bump texture underneath.
This actually ties back to the modeling process — for the displacement to work properly, the geometry had to be evenly dense and ready for subdivision.
I created a mask in Photoshop and applied a procedural Gaussian blur using a Smart Object. Without the blur, the displacement looked harsh and unrefined — even a slight blur made a noticeable difference.
The main challenge with using white, as always, was avoiding blown-out highlights. I had to carefully balance the lighting and tweak the material settings to make the title clean and visible without overexposing it.
One of the more unusual challenges in this project was animating the page slide and making the pages differ. I didn’t want the pages to feel too repetitive, but I also didn’t want to create dozens of individual materials for each page. To find a balance, I created two different materials for two pages and made them random inside of the cloner. It was a bit of a workaround — mostly due to limitations inside the Shader switch node — but it worked well enough to create the illusion of variety without significantly increasing the complexity of the setup.
There’s a really useful node in Redshift called Color User Data — especially when working with the MoGraph system to trigger object index values. One of the strangest (and probably least intuitive) things I did in this setup was using a Change Range node to remap those index values properly according to the number of textures I had. With that in place, I built a system that used an index to mix between all the textures inside a Shader Switch node. This allowed me to get true variation across the pages without manually assigning materials to each one.
You might’ve noticed that the pages look a bit too bright for a real-world scenario — and that was actually a deliberate choice. I often use a trick that helps me art-direct material brightness independently of the scene’s lighting. The key node here is Color Correct Node.
Inside it, there’s a parameter called Level. If you set it higher than 1, it increases the overall brightness of the texture output — without affecting shadows or highlights too aggressively. This also works in reverse: if your texture has areas that are too bright (like pure white), lowering the Level value below 1 will tone it down without needing to modify the source texture.
It’s a simple trick, but incredibly useful when you want fine control over how materials react in stylized or theatrical lighting setups.
The red cloth material I used throughout the scene is another interesting part of the project. I wanted it to have a strong tactile feel — something that looks thick, textured, and physically present. To achieve that, I relied heavily on geometry. I used a Redshift Object Tag with Subdivision (under the Geometry tab) enabled to add more detail where it was needed. This helped the cloth catch light properly and hold up in close-up shots.
For the translucent look, I originally experimented with Subsurface Scattering, but it didn’t give me the control I wanted. So instead, I used an Opacity setup driven by a Ramp and Change Range nodes. That gave me just enough falloff and variation to fake the look of light passing through thinner areas of the fabric — and in the end, it worked surprisingly well.
Animating the Pages
This was by far the most experimental part of the project for me. The amount of improvisation — and the complete lack of confidence in what the next frame would be — made the process both fun and flexible.
What you’re about to see might look a bit chaotic, so let me quickly walk you through how it all started.
The simulation started with a subject — in our case, a page. It had to have the proper form, and by that I mean the right typology. Specifically, it needed to consist only of horizontal segments; otherwise, it would bend unevenly under the forces present in the scene. (And yes, I did try versions with even polygons — it got messy.)
I set up all the pages in a Cloner so I could easily adjust any parameters I needed, and added a bit of randomness using a Random Effector.
In the video, you can see a plane on the side that connects to the pages — that was actually the first idea I had when thinking about how to run the simulation. The plane has a Connect tag that links all the pages to it, so when it rotates, they all follow along.
I won’t go into all the force settings — most of them were experimental, and animations like this always require a bit of creative adjustment.
The main force was wind. The pages did want to slide just from the plane with the Connect tag, but I needed to give them an extra push from underneath — that’s where wind came in handy.
I also used a Field Force to move the pages mid-air, from the center outward to the other side.
Probably the most important part was how I triggered the “Mix Animation.” I used a Vertex Map tag on the Cloner to paint a map using a Field, which then drove the Mix Animation parameter in the Cloth tag. This setup made the pages activate one by one, creating a natural, finger-like sliding motion as seen in Video.
Postprocessing
I didn’t go too heavy on post-processing, but there’s one plugin I have to mention — Deep Glow. It gives amazing results. By tweaking the threshold, you can make it react only to the brightest areas, which creates a super clean, glowing effect.
The Final Theatrical Ecosystem
In the end, Christian was delighted with the outcome. Together we had built more than a portfolio — we had created a cohesive theatrical ecosystem. It moved fluidly from digital performance to printed object, from live stage to interface, and from emotion to technology.
The experience is pared back to its essence: no superfluous effects, no unnecessary clicks, nothing to pull focus. What remains is what matters most — the work itself, framed in a way that stays quietly behind the scenes yet comes fully alive in the viewer’s hands and on their screen.
Why buy a whole tool when you can build your own? Learn how the Type system works in .NET, and create your own minimal type analyser.
Table of Contents
Just a second! 🫷 If you are here, it means that you are a software developer.
So, you know that storage, networking, and domain management have a cost .
If you want to support this blog, please ensure that you have disabled the adblocker for this site. I configured Google AdSense to show as few ADS as possible – I don’t want to bother you with lots of ads, but I still need to add some to pay for the resources for my site.
Thank you for your understanding. – Davide
Analysing your code is helpful to get an idea of the overall quality. At the same time, having an automatic tool that identifies determinate characteristics or performs some analysis for you can be useful.
Sure, there are many fantastic tools available, but having a utility class that you can build as needed and run without setting up a complex infrastructure is sufficient.
In this article, we are going to see how to navigate assemblies, classes, methods and parameters to perfor some custom analysis.
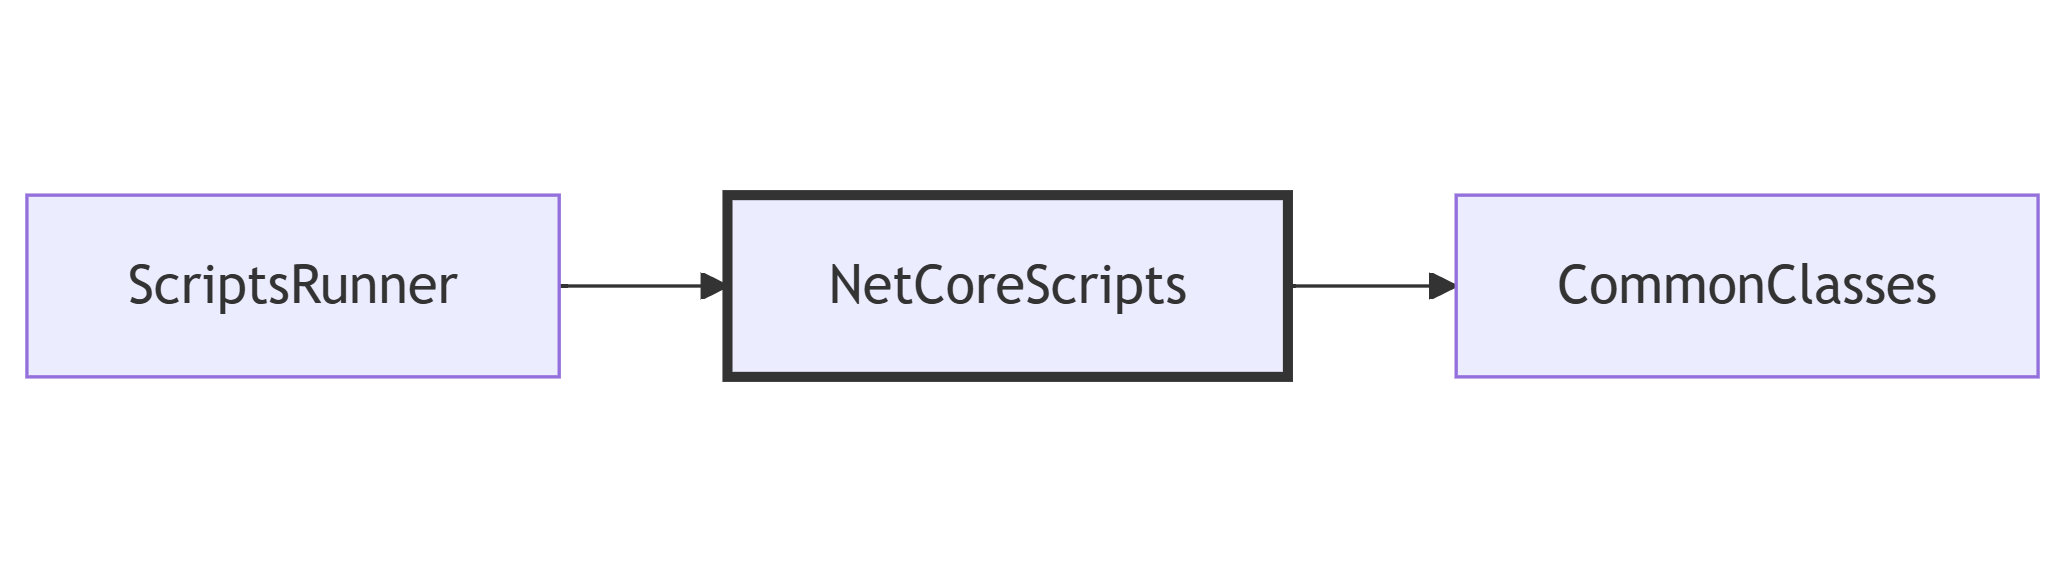
For this article, my code is structured into 3 Assemblies:
CommonClasses, a Class Library that contains some utility classes;
NetCoreScripts, a Class Library that contains the code we are going to execute;
ScriptsRunner, a Console Application that runs the scripts defined in the NetCoreScripts library.
The dependencies between the modules are shown below: ScriptsRunner depends on NetCoreScripts, and NetCoreScripts depends on CommonClasses.
In this article, we are going to write the examples in the NetCoreScripts class library, in a class named AssemblyAnalysis.
How to load an Assembly in C#, with different methods
The starting point to analyse an Assembly is, well, to have an Assembly.
So, in the Scripts Class Library (the middle one), I wrote:
var assembly = DefineAssembly();
In the DefineAssembly method we can choose the Assembly we are going to analyse.
In short, you can access the Assembly info of whichever class you know – if you can reference it directly, of course!
Load the current, the calling, and the executing Assembly
The Assembly class provides you with some methods that may look similar, but give you totally different info depending on how your code is structured.
Remember the ScriptsRunner –> NetCoreScripts –> CommonClasses sequence? To better explain how things work, let’s run the following examples in a method in the CommonClasses class library (the last one in the dependency chain).
var executing = System.Reflection.Assembly.GetExecutingAssembly();
var calling = System.Reflection.Assembly.GetCallingAssembly();
var entry = System.Reflection.Assembly.GetEntryAssembly();
Assembly.GetExecutingAssembly returns the Assembly that contains the actual code instructions (so, in short, the Assembly that actually contains the code). In this case, it’s the CommonClasses Assembly.
Assembly.GetCallingAssembly returns the caller Assembly, so the one that references the Executing Assembly. In this case, given that the CommonClasses library is referenced only by the NetCoreScripts library, well, we are getting info about the NetCoreScripts class library.
Assembly.GetEntryAssembly returns the info of the Assembly that is executing the whole application – so, the entry point. In our case, it’s the ScriptsRunner Console Application.
Deciding which one to choose is crucial, especially when you are going to distribute your libraries, for example, as NuGet packages. For sure, you’ll know the Executing Assembly. Most probably, depending on how the project is structured, you’ll also know the Calling Assembly. But almost certainly you won’t know the Entry Assembly.
Method name
Meaning
In this example…
GetExecutingAssembly
The current Assembly
CommonClasses
GetCallingAssembly
The caller Assembly
NetCoreScripts
GetEntryAssembly
The top-level executor
ScriptsRunner
How to retrieve classes of a given .NET Assembly
Now you have an Assembly to analyse. It’s time to load the classes belonging to your Assembly.
You can start with assembly.GetTypes(): this method returns all the types (in the form of a Type array) belonging to the Assembly.
For each Type you can access several properties, such as IsClass, IsPublic, IsAbstract, IsGenericType, IsEnum and so on. The full list of properties of a Type is available 🔗here.
You may want to analyse public classes: therefore, you can do something like:
If we have a look at its parameters, we will find the following values:
Bonus tip: Auto-properties act as Methods
Let’s focus a bit more on the properties of a class.
Consider this class:
publicclassUser{
publicstring Name { get; set; }
}
There are no methods; only one public property.
But hey! It turns out that properties, under the hood, are treated as methods. In fact, you can find two methods, named get_Name and set_Name, that act as an access point to the Name property.
Further readings
Do you remember that exceptions are, in the end, Types?
And that, in the catch block, you can filter for exceptions of a specific type or with a specific condition?
From here, you can use all this info to build whatever you want. Personally, I used it to analyse my current project, checking how many methods accept more than N parameters as input, and which classes have the highest number of public methods.
In short, an example of a simple code analyser can be this one:
publicvoid Execute()
{
var assembly = DefineAssembly();
var paramsInfo = AnalyzeAssembly(assembly);
AnalyzeParameters(paramsInfo);
}
privatestatic Assembly DefineAssembly()
=> Assembly.GetExecutingAssembly();
publicstatic List<ParamsMethodInfo> AnalyzeAssembly(Assembly assembly)
{
List<ParamsMethodInfo> all = new List<ParamsMethodInfo>();
var types = GetAllPublicTypes(assembly);
foreach (var type in types)
{
var publicMethods = GetPublicMethods(type);
foreach (var method in publicMethods)
{
var parameters = method.GetParameters();
if (parameters.Length > 0)
{
var f = parameters.First();
}
all.Add(new ParamsMethodInfo(
assembly.GetName().Name,
type.Name,
method
));
}
}
return all;
}
privatestatic MethodInfo[] GetPublicMethods(Type type) =>
type.GetMethods(BindingFlags.Instance | BindingFlags.Static | BindingFlags.Public | BindingFlags.DeclaredOnly);
privatestatic List<Type> GetAllPublicTypes(Assembly assembly) => assembly.GetTypes()
.Where(t => t.IsClass && t.IsPublic)
.ToList();
publicclassParamsMethodInfo(string AssemblyName, string ClassName, MethodInfo Method)
{
publicstring MethodName => Method.Name;
public ParameterInfo[] Parameters => Method.GetParameters();
}
And then, in the AnalyzeParameters, you can add your own logic.
As you can see, you don’t need to adopt complex tools to perform operations like this: just knowing that you can access the static details of each class and method can be enough (of course, it depends on the use!).
I hope you enjoyed this article! Let’s keep in touch on LinkedIn, Twitter or BlueSky! 🤜🤛