نویسنده: AliBina

  • Docker + Python CRUD API + Excel VBA – All for beginners – Useful code


    import os, sqlite3

    from typing import List, Optional

    from fastapi import FastAPI, HTTPException

    from pydantic import BaseModel


    DB_PATH = os.getenv(“DB_PATH”, “/data/app.db”)  


    app = FastAPI(title=“Minimal Todo CRUD”, description=“Beginner-friendly, zero frontend.”)


    class TodoIn(BaseModel):

        title: str

        completed: bool = False


    class TodoUpdate(BaseModel):

        title: Optional[str] = None

        completed: Optional[bool] = None


    class TodoOut(TodoIn):

        id: int


    def row_to_todo(row) -> TodoOut:

        return TodoOut(id=row[“id”], title=row[“title”], completed=bool(row[“completed”]))


    def get_conn():

        conn = sqlite3.connect(DB_PATH)

        conn.row_factory = sqlite3.Row

        return conn


    @app.on_event(“startup”)

    def init_db():

        os.makedirs(os.path.dirname(DB_PATH), exist_ok=True)

        conn = get_conn()

        conn.execute(“””

            CREATE TABLE IF NOT EXISTS todos(

                id INTEGER PRIMARY KEY AUTOINCREMENT,

                title TEXT NOT NULL,

                completed INTEGER NOT NULL DEFAULT 0

            )

        “””)

        conn.commit(); conn.close()


    @app.post(“/todos”, response_model=TodoOut, status_code=201)

    def create_todo(payload: TodoIn):

        conn = get_conn()

        cur = conn.execute(

            “INSERT INTO todos(title, completed) VALUES(?, ?)”,

            (payload.title, int(payload.completed))

        )

        conn.commit()

        row = conn.execute(“SELECT * FROM todos WHERE id=?”, (cur.lastrowid,)).fetchone()

        conn.close()

        return row_to_todo(row)


    @app.get(“/todos”, response_model=List[TodoOut])

    def list_todos():

        conn = get_conn()

        rows = conn.execute(“SELECT * FROM todos ORDER BY id DESC”).fetchall()

        conn.close()

        return [row_to_todo(r) for r in rows]


    @app.get(“/todos/{todo_id}”, response_model=TodoOut)

    def get_todo(todo_id: int):

        conn = get_conn()

        row = conn.execute(“SELECT * FROM todos WHERE id=?”, (todo_id,)).fetchone()

        conn.close()

        if not row:

            raise HTTPException(404, “Todo not found”)

        return row_to_todo(row)


    @app.patch(“/todos/{todo_id}”, response_model=TodoOut)

    def update_todo(todo_id: int, payload: TodoUpdate):

        data = payload.model_dump(exclude_unset=True)

        if not data:

            return get_todo(todo_id)  # nothing to change


        fields, values = [], []

        if “title” in data:

            fields.append(“title=?”); values.append(data[“title”])

        if “completed” in data:

            fields.append(“completed=?”); values.append(int(data[“completed”]))

        if not fields:

            return get_todo(todo_id)


        conn = get_conn()

        cur = conn.execute(f“UPDATE todos SET {‘, ‘.join(fields)} WHERE id=?”, (*values, todo_id))

        if cur.rowcount == 0:

            conn.close(); raise HTTPException(404, “Todo not found”)

        conn.commit()

        row = conn.execute(“SELECT * FROM todos WHERE id=?”, (todo_id,)).fetchone()

        conn.close()

        return row_to_todo(row)


    @app.delete(“/todos/{todo_id}”, status_code=204)

    def delete_todo(todo_id: int):

        conn = get_conn()

        cur = conn.execute(“DELETE FROM todos WHERE id=?”, (todo_id,))

        conn.commit(); conn.close()

        if cur.rowcount == 0:

            raise HTTPException(404, “Todo not found”)

        return  # 204 No Content


    Source link

  • Exploring SOAP Web Services – From Browser Console to Python – Useful code

    Exploring SOAP Web Services – From Browser Console to Python – Useful code


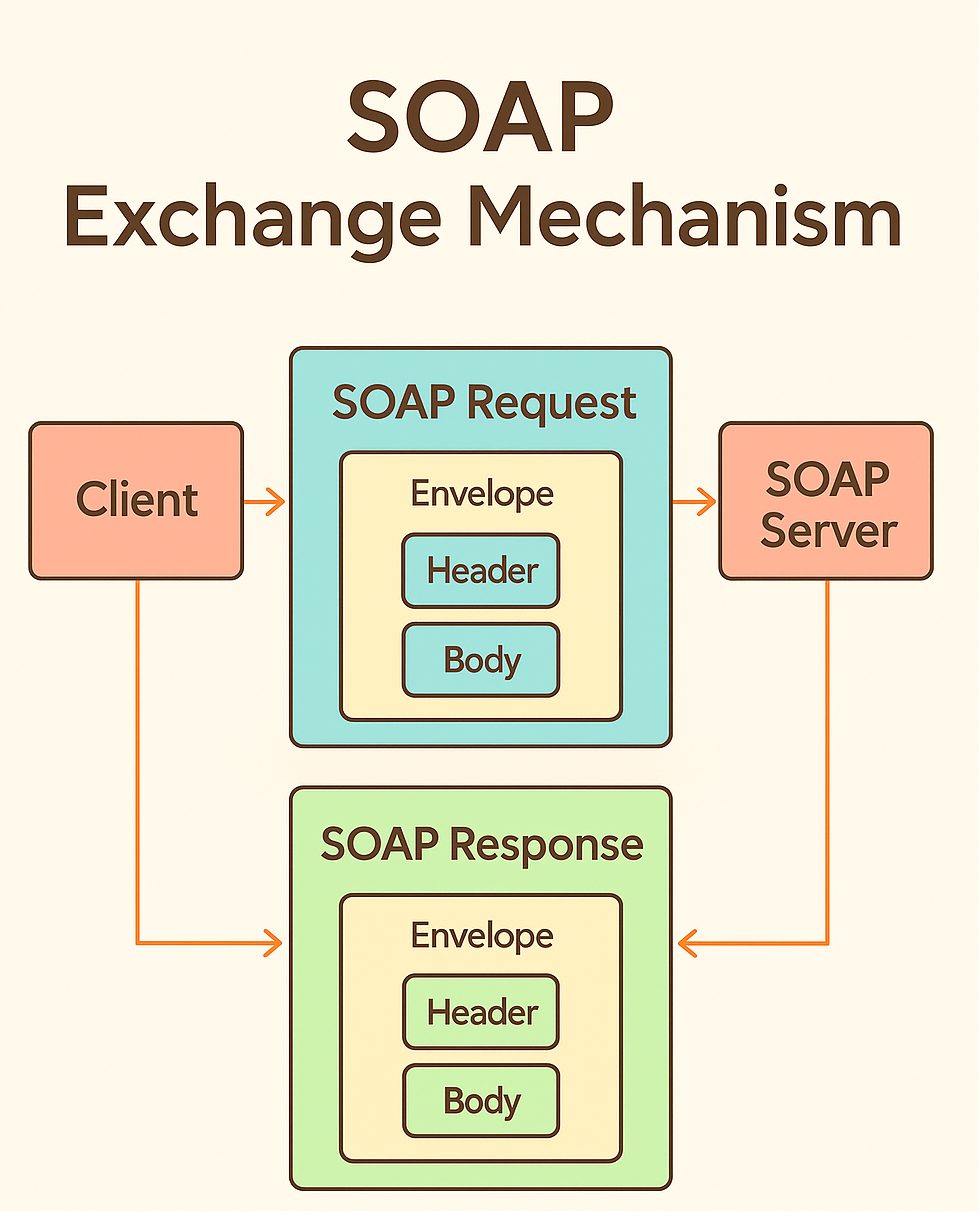
    SOAP (Simple Object Access Protocol) might sound intimidating (or funny) but it is actually a straightforward way for systems to exchange structured messages using XML. In this article, I am introducing SOAP through YouTube video, where it is explored through 2 different angles – first in the Chrome browser console, then with Python and Jupyter Notebook.

    The SOAP Exchange Mechanism uses requests and response.

    Part 1 – Soap in the Chrome Browser Console

    We start by sending SOAP requests directly from the browser’s JS console. This is a quick way to see the raw XML
    <soap>  envelopes in action. Using a public integer calculator web service, we perform basic operations – additions, subtraction, multiplication, division – and observe how the requests and responses happen in real time!

    For the browser, the entire SOAP journey looks like that:

    Chrome Browser -> HTTP POST -> SOAP XML -> Server (http://www.dneonline.com/calculator.asmx?WSDL) -> SOAP XML -> Chrome Browser

    A simple way to call it is with constants, to avoid the strings:

    Like that:

    Part 2 – Soap with Python and Jupyter Notebook

    Here we jump into Python. With the help of libaries, we load the the WSDL (Web Services Description Language) file, inspect the available operations, and call the same calculator service programmatically.


    https://www.youtube.com/watch?v=rr0r1GmiyZg
    Github code – https://github.com/Vitosh/Python_personal/tree/master/YouTube/038_Python-SOAP-Basics!

    Enjoy it! 🙂


    Source link

  • Shortest route between points in a city – with Python and OpenStreetMap – Useful code

    Shortest route between points in a city – with Python and OpenStreetMap – Useful code


    After the article for introduction to Graphs in Python, I have decided to put the graph theory into practice and start looking for the shortest points between points in a city. Parts of the code are inspired from the book Optimization Algorithms by Alaa Khamis, other parts are mine 🙂

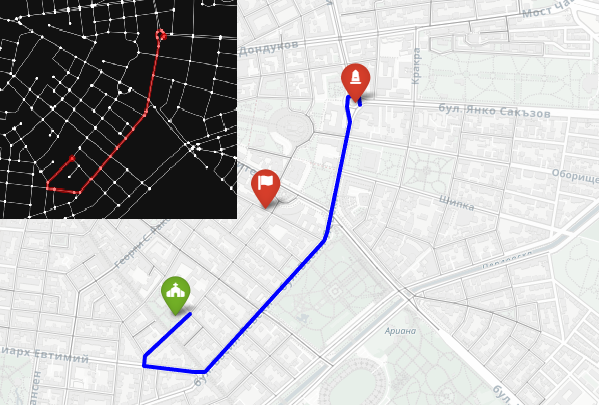
    The idea is to go from the monument to the church with a car. The flag marks the middle, between the two points.

    The solution uses several powerful Python libraries:

    • OSMnx to download and work with real road networks from OpenStreetMap
    • NetworkX to model the road system as a graph and calculate the shortest path using Dijkstra’s algorithm
    • Folium for interactive map visualization

    We start by geocoding the two landmarks to get their latitude and longitude. Then we build a drivable street network centered around the Levski Monument using ox.graph_from_address. After snapping both points to the nearest graph nodes, we compute the shortest route by distance. Finally, we visualize everything both in an interactive map and in a clean black-on-white static graph where the path is drawn in yellow.


    Nodes and edges in radius of 1000 meters around the center point


    Red and green are the nodes, that are the closest to the start and end points.


    The closest driving route between the two points is in blue.

    The full code is implemented in a Jupyter Notebook in GitHub and explained in the video.

    https://www.youtube.com/watch?v=kQIK2P7erAA

    GitHub link:

    Enjoy the rest of your day! 🙂


    Source link

  • Introduction to Graphs in Python – Useful code

    Introduction to Graphs in Python – Useful code


    Lately, I am reading the book Optimization Algorithms by Alaa Khamis and the chapter 3 – Blind Search Algorithms, has caught my attention. The chapter starts with explaining what graphs are how these are displayed in python and I have decided to make a YT video, presenting the code of the book with Jupyter Notebook.

    Trees are different, when we talk about graphs in python

    Why graphs? Because they are everywhere:

    • A road map is a graph
    • Your social-media friends form a graph
    • Tasks in a to-do list, with dependables on each other, can be a graph

    With Python we can build and draw these structures in just a few lines of code.

    Setup

    Undirected graph

    • Edges have no arrows
    • Use it for two‑way streets or mutual friendships.

    Undirected graph

    Directed graph

    • Arrowheads show direction.
    • Good for “A follows B” but not the other way around.

    Directed graph

    Multigraph

    • Allows two or more edges between the same nodes.
    • Think of two train lines that join the same pair of cities.

    Multigraph

    Directed Acyclic Graph (Tree)

    • No cycles = no way to loop back.
    • Used in task schedulers and Git histories.

    Directed Acyclic Graph (Tree)

    Hypergraph

    • One “edge” can touch many nodes.
    • We simulate it with a bipartite graph: red squares = hyper‑edges.

    Hypergraph

    Weighted Graph

    • Graph with weights on the edges
    • Idea for mapping distances between cities on a map

    Weighted Graph

    https://www.youtube.com/watch?v=8vnu_5QRC74

    🙂


    Source link

  • Python – Solving 7 Queen Problem with Tabu Search – Useful code

    Python – Solving 7 Queen Problem with Tabu Search – Useful code


    The n-queens problem is a classic puzzle that involves placing n chess queens on an n × n chessboard in such a way that no two queens threaten each other. In other words,
    no two queens should share the same row, column, or diagonal. This is a constraintsatisfaction problem (CSP) that does not define an explicit objective function. Let’s
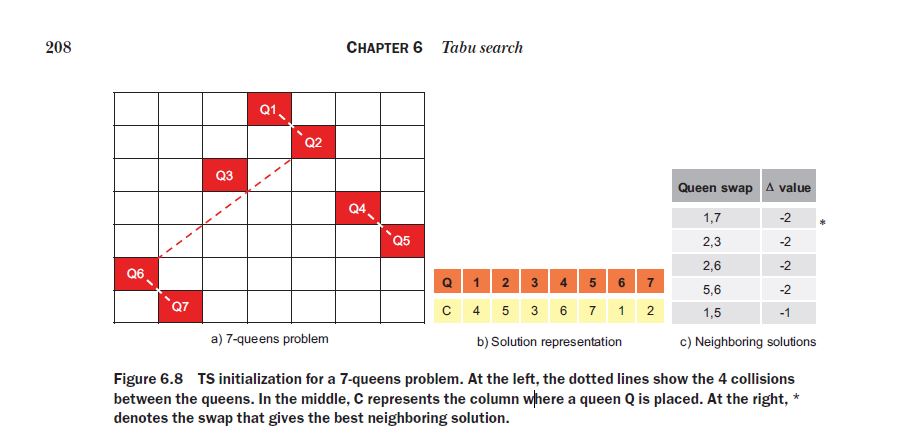
    suppose we are attempting to solve a 7-queens problem using tabu search. In this problem, the number of collisions in the initial random configuration shown in figure 6.8a is 4: {Q1– Q2}, {Q2– Q6}, {Q4– Q5}, and {Q6– Q7}.

    The above is part of the book Optimization Algorithms by Alaa Khamis, which I have used as a stepstone, in order to make a YT video, explaining the core of the tabu search with the algorithm. The solution of the n-queens problem is actually interesting, as its idea is to swap queen’s columns until these are allowed to be swaped and until the constrains are solved. The “tabu tenure” is just a type of record, that does not allow a certain change to be carried for a number of moves after it has been carried out. E.g., once you replace the columns of 2 queens, you are not allowed to do the same for the next 3 moves. This allows you to avoid loops.

    https://www.youtube.com/watch?v=m7uAw3cNMAM

    Github code:

    Thank you and have a nice day! 🙂


    Source link

  • Create PDF in PHP Using FPDF.

    Create PDF in PHP Using FPDF.


    In this post, I  will explain how to create a pdf file in php. To create a PDF file in PHP we will use the FPDF library. It is a PHP library that is used to generate a PDF. FPDF is an open-source library. It is the best server-side PDF generation PHP library. It has rich features right from adding a PDF page to creating grids and more.

    Example:

    <?Php
    require('fpdf/fpdf.php');
    $pdf = new FPDF(); 
    $pdf->AddPage();
    $pdf->SetFont('Arial','B',16);
    $pdf->Cell(80,10,'Hello World From FPDF!');
    $pdf->Output('test.pdf','I'); // Send to browser and display
    ?>

    Output:


    Source link

  • Angular Code Review Checklist. – PHPFOREVER

    Angular Code Review Checklist. – PHPFOREVER


    Introduction:

    Code review is a process where developers have their work reviewed by their peers to check the code’s quality and functionality. In the case of Angular, there are specific points that we must check to ensure code effectiveness, which we will be discussing in detail in our upcoming blog post. Effective code reviews are crucial to delivering high-quality applications to end-users. This process involves a peer review of developers’ work. The main aim of this evaluation is to detect any bugs, syntax issues, and other factors that could impact the application’s performance. However, code reviews can be time-consuming. Therefore, we have created a comprehensive list of the most crucial elements to consider during your Angular code reviews.

    Imports Organization:

    You should group your imports by source and arrange them alphabetically, which will help keep your import section organized and tidy.

    Bad Code Example:
    import { Component, OnInit, Input } from '@angular/core';
    import { FormsModule } from '@angular/forms';
    
    import { AuthService } from '../services/auth.service';
    import { BehaviorSubject, Observable, Subject, timer } from 'rxjs';
    import { UserService } from '../services/user.service';
    import { SomeOtherService } from '../services/some-other.service';
    import { SomeComponent } from '../some-component/some-component.component';
    import { AnotherComponent } from '../another-component/another-component.component';
    import { SharedModule } from '../shared/shared.module';
    import { ActivatedRoute, Router } from '@angular/router';
    import { HttpClient, HttpHeaders } from '@angular/common/http';
    
    @Component({
      selector: 'app-component',
      templateUrl: './app.component.html',
      styleUrls: ['./app.component.css']
    })
    export class AppComponent implements OnInit {
      // ...
    }


    Good Example (Organized imports order) 

    // Organize Angular modules separately
    import { Component, OnInit, Input } from '@angular/core';
    import { ActivatedRoute, Router } from '@angular/router';
    import { HttpClient, HttpHeaders } from '@angular/common/http';
    import { FormsModule } from '@angular/forms'; 
    
    
    // Organize Rxjs imports separetly 
    import { BehaviorSubject, Observable, Subject, timer } from 'rxjs';
    
    // Organize services imports separetly
    import { AuthService } from '../services/auth.service';
    import { UserService } from '../services/user.service';
    import { SomeOtherService } from '../services/some-other.service';
    
    import { SomeComponent } from '../some-component/some-component.component';
    import { AnotherComponent } from '../another-component/another-component.component';
    
    Service Injection:

    It is recommended to review dependency injection in components and utilize TypeScript’s access modifiers (public, private, etc.).

    Bad Code Example:
    @Component({
      selector: 'app-example',
      templateUrl: './example.component.html',
      styleUrls: ['./example.component.css']
    })
    export class ExampleComponent implements OnInit {
      // ...
     constructor(
        public dialog: MatDialog,
        authService: JobService,
        userService,
        public ref: ChangeDetectorRef,
    
      ) {
      }
    }
    
    Good Example (With private access modifier ):
    @Component({
      selector: 'app-example',
      templateUrl: './example.component.html',
      styleUrls: ['./example.component.css']
    })
    export class ExampleComponent implements OnInit {
      // ...
     constructor(
        private dialog: MatDialog,
        private authService: JobService,
        private userService,
        private ref: ChangeDetectorRef,
    
      ) {
      }
    }


    Observable Cleanup:

    Use the async pipe to simplify the component code instead of etching data with observables, doing the subscribe and cleanup in ngOnDestroy.

    Bad Code Example:
    import { Component, OnDestroy, OnInit } from '@angular/core';
    import { Subscription } from 'rxjs';
    import { DataService } from './data.service';
    
    @Component({
      selector: 'app-data-list',
      template: `
        <h2>Data List</h2>
        <ul>
          <li *ngFor="let item of data">{{ item }}</li>
        </ul>
      `,
    })
    export class DataListComponent implements OnInit, OnDestroy {
      data: string[] = [];
      private dataSubscription: Subscription;
    
      constructor(private dataService: DataService) {}
    
      ngOnInit() {
        this.dataSubscription = this.dataService.getData().subscribe((result) => {
          this.data = result;
        });
      }
    
      ngOnDestroy() {
        if (this.dataSubscription) {
          this.dataSubscription.unsubscribe();
        }
      }
    }
    Good Example ( With async pipe):
    import { Component } from '@angular/core';
    import { Observable } from 'rxjs';
    import { DataService } from './data.service';
    
    @Component({
      selector: 'app-data-list',
      template: `
        <h2>Data List</h2>
        <ul>
          <li *ngFor="let item of data$ | async">{{ item }}</li>
        </ul>
      `,
    })
    export class DataListComponent {
      data$: Observable<string[]>;
    
      constructor(private dataService: DataService) {
        this.data$ = this.dataService.getData();
      }
    }
    Property Initialization:

    It is considered a best practice to set default values for properties to prevent runtime errors.

    Bad Code Example ():
    import { Component } from '@angular/core';
    
    @Component({
      selector: 'app-data-grid',
      template: `
        <!-- Data grid rendering code -->
      `,
    })
    export class DataGridComponent {
      data; // No initialization
    
      constructor() {
        // Imagine some logic to populate dataArray dynamically.
      }
    }
    Good Example:
    import { Component } from '@angular/core';
    
    @Component({
      selector: 'app-data-grid',
      template: `
        <!-- Data grid rendering code -->
      `,
    })
    export class DataGridComponent {
      data: any[] = []; // Initialize with an empty array
    
      constructor() {
        // Logic to populate dataArray dynamically.
      }
    }


    Component Initialization:

    I recommend reviewing the ngOnInit  method, don’t make it too long. Try to break it into smaller methods for better readability and maintainability.

    Bad Code Example :

    import { Component, OnInit } from '@angular/core';
    import { DataService } from './data.service';
    
    @Component({
      selector: 'app-data-list',
      template: `
        <h2>Data List</h2>
        <ul>
          <li *ngFor="let item of data">{{ item }}</li>
        </ul>
      `,
    })
    export class DataListComponent implements OnInit {
      data: string[] = [];
    
      constructor(private dataService: DataService) {}
    
      ngOnInit() {
        // Fetch data from the service
        this.dataService.getData().subscribe((result) => {
          // Filter and transform the data
          const filteredData = result.filter((item) => item.length > 5);
          const transformedData = filteredData.map((item) => item.toUpperCase());
    
          // Sort the data
          transformedData.sort();
    
          // Set the component data
          this.data = transformedData;
        });
      }
    }

    Good Example (Breaking Down ngOnInit)


    import { Component, OnInit } from '@angular/core';
    import { DataService } from './data.service';
    
    @Component({
      selector: 'app-data-list',
      template: `
        <h2>Data List</h2>
        <ul>
          <li *ngFor="let item of data">{{ item }}</li>
        </ul>
      `,
    })
    export class DataListComponent implements OnInit {
      data: string[] = [];
    
      constructor(private dataService: DataService) {}
    
      ngOnInit() {
        this.loadData();
      }
    
      private loadData() {
        this.dataService.getData().subscribe((result) => {
          const filteredData = this.filterData(result);
          const transformedData = this.transformData(filteredData);
          this.data = this.sortData(transformedData);
        });
      }
    
      private filterData(data: string[]): string[] {
        return data.filter((item) => item.length > 5);
      }
    
      private transformData(data: string[]): string[] {
        return data.map((item) => item.toUpperCase());
      }
    
      private sortData(data: string[]): string[] {
        return [...data].sort();
      }
    }
    Consider Extracting Logic to Services:

    If a component logic can be reused in multiple places, we can extract it into services for better code organization and reusability.

    Bad Code Example:

    import { Component } from '@angular/core';
    import { User } from './user.model'; // Assuming User model is imported
    
    @Component({
      selector: 'app-user-management',
      template: `
        <h2>User Management</h2>
        <button Angular Code Review Checklist. - PHPFOREVER="generateTooltipForEditButton(currentUser)">Edit User</button>
      `,
    })
    export class UserManagementComponent {
      currentUser: User;
    
      constructor() {
        // Initialize the currentUser based on user data retrieval
        this.currentUser = this.getUser(/* specify user ID or other criteria */);
      }
    
      generateTooltipForEditButton(user: User): string {
        if (user) {
          if (user.state === 'SUSPENDED') {
            return 'This user is suspended and cannot be edited';
          } else if (user.state === 'INACTIVE') {
            return 'This user is inactive and cannot be edited';
          } else if (!user.authorizedToUpdate) {
            return 'You are not authorized to edit this user';
          } else {
            return 'Edit';
          }
        }
        return 'Edit';
      }
    
      // Simulated method to retrieve a user, replace with actual logic
      getUser(userId: number): User {
        return {
          id: userId,
          name: 'John Doe',
          state: 'ACTIVE',
          authorizedToUpdate: true,
        };
      }
    }


    Good Example:

    import { Injectable } from '@angular/core';
    
    @Injectable({
      providedIn: 'root',
    })
    export class UserService {
      // Other user-related methods and properties
    // move the component fucntion to the service 
      getEditUserButtonTooltip(user: User): string {
        if (user) {
          if (user.state === 'SUSPENDED') {
            return 'This user is suspended and cannot be edited';
          } else if (user.state === 'INACTIVE') {
            return 'This user is inactive and cannot be edited';
          } else if (!user.authorizedToUpdate) {
            return 'You are not authorized to edit this user';
          } else {
            return 'Edit';
          }
        }
        return 'Edit';
      }
    }


    import { Component } from '@angular/core';
    import { UserService, User } from '../user.service';
    
    @Component({
      selector: 'app-user-management',
      template: `
        <h2>User Management</h2>
        <button Angular Code Review Checklist. - PHPFOREVER="generateTooltipForEditButton(currentUser)">Edit User</button>
      `,
    })
    export class UserManagementComponent {
      currentUser: User;
    
      constructor(private userService: UserService) {
        // Initialize the currentUser based on user data retrieval
        this.currentUser = this.userService.getUser(/* specify user ID or other criteria */);
      }
    
      generateTooltipForEditButton(user: User): string {
        return this.userService.generateTooltipForEditButton(user);
      }
    }
    Hard-Coded Styles:

    It’s important to avoid using inline styles as they can be difficult to maintain. Instead, it’s recommended to define appropriate styling classes.

    Bad Example (Hard-Coded Styles in Template):

    <!-- bad-example.component.html -->
    <div>
      <h2 style="font-size: 24px; color: red;">Welcome to our website</h2>
      <p style="font-size: 18px; color: blue;">This is some text with hard-coded styles.</p>
      <button style="background-color: green; color: white;">Click me</button>
    </div>

    Good Example (Separate Styles in a CSS File) :

    <!-- good-example.component.html -->
    <div>
      <h2>Welcome to our website</h2>
      <p>This is some text with Angular-applied styles.</p>
      <button (click)="onButtonClick()">Click me</button>
    </div>
    
    /* styles.css or component-specific styles file */
    h2 {
      font-size: 24px;
      color: red;
    }
    
    p {
      font-size: 18px;
      color: blue;
    }
    
    button {
      background-color: green;
      color: white;
    }


    Angular Dropdown With Search And Multi Select.   Quiz App In Angular.


    Source link

  • How to Style Even and Odd Div.

    How to Style Even and Odd Div.


    We can easily change the background color of div’s even and odd index using the:nth-child pseudo-class with the even and odd keywords, respectively. Odd and even are keywords that can be used to match child elements whose index is odd or even (the index of the first child is 1). Here, we specify two different background colors for odd and even p elements.

    Example:

    <!DOCTYPE html>
    <html>
    <head>
        <title>Even Odd Example</title>
        <style type="text/css">
        div :nth-child(even){
            background-color: yellow;
        }
        div :nth-child(odd){
            background-color: blue;
        }
        </style>
    </head>
    <body>
    <div id="main">
        <div>1</div>
        <div>2</div>
        <div>3</div>
        <div>4</div>
        <div>5</div>
        <div>6</div>
        <div>7</div>
        <div>8</div>
        <div>9</div>
        <div>10</div>
    </div>	
    
    </body>
    </html>


    Source link

  • Custom Pipe Example In Angular. Pipe example get month name.

    Custom Pipe Example In Angular. Pipe example get month name.


    Custom Pipe Example In Angular.

    This tutorial will show you how to create an Angular Custom Pipe. It is handy if we want to reuse some logic across our applications. It allows us to change the format in which data is displayed on the pages. For instance, consider the date of birth as 01-01-2024 and we want to display it as 01-January-2023. To achieve this we will make one pipe that can be used anywhere in our application. In angular

    Types of Pipe.
    •  Pure Pipe.
    •  Impure pipes.
    Pure Pipe.

    The pure pipe is a pipe called when a pure change is detected in the value. It is called fewer times than the latter.

    Impure Pipes.

    This pipe is often called after every change detection. Be it a pure change or not, the impure pipe is called repeatedly.

    Steps to Create Pipe

    Below are the steps to create the custom pipe.

    1. Create a pipe class.
    2. Decorate the class with the @Pipe decorator.
    3. Give a pipe name under name metadata in @Pipe decorator.
    4. Implement the PipeTransform interface and it will contain only one method that is transform.
    5. The transform method must transform the value and return the result.
    6. Import the pipe class in the component.
    7. Use the custom pipe by its name in the HTML file.
    Example.

    Create a pipe class and add the below code.

    import { Pipe,PipeTransform } from '@angular/core';
    
    @Pipe({
        name: 'custompipe',
        standalone: true,
    })
    
    export class custompipePipe implements PipeTransform {
    
        monthNumbers:any = ['January','February','March','April','May','June','July','August','September','October','November','December'];
        transform(value: any) {
            let date = value.split(/[.,\/ -]/);
            if(date[1]>12 || date[1]<1 || isNaN(date[1])){
                return "Invalid Month";
            }else{
                date[1] = this.monthNumbers[date[1]-1];
                return date.join('-');
            }   
             
        }
    }

    Import the custom pipe in pipe-example.componenet.ts file and add the below code.

    import { Component } from '@angular/core';
    import { custompipePipe } from '../custompipe/custompipe.pipe';
    
    @Component({
      selector: 'app-pipe-example',
      standalone: true,
      imports: [custompipePipe],
      templateUrl: './pipe-example.component.html',
      styleUrl: './pipe-example.component.css'
    })
    
    export class PipeExampleComponent{
    
      monthName:number = 0;
      ngOnIt(){
    
      }
    
      getMonthName(event:any){
        this.monthName = event.target.value;
      }
    }
    

    Add the below code in pipe-example.component.html file

     <input type="text" placeholder="Enter Month Name" (keyup)="getMonthName($event)" autofocus>    
    Month Name: {{ monthName | custompipe}}

    Input: 12-02-2023

    Output: 12-February-2023


    JavaScript Program To Count The Frequency Of Given Character In String.          Angular Dropdown With Search And Multi Select.


    Source link

  • how to generate qr code in angular.

    how to generate qr code in angular.


    How To Generate QR Code In Angular:

    In the modern digital era, QR codes have become essential for quickly sharing information through a simple scan. QR codes provide a versatile solution for marketing purposes, linking to a website, or sharing contact details. In this blog post, we’ll explore how to generate QR codes in your Angular applications using the angularx-qrcode library.

    We’ll guide you through the installation process, show you how to integrate the library into your Angular project and provide a complete example to get you started. By the end of this tutorial, you’ll be able to create and customize QR codes effortlessly, adding an extra layer of interactivity and functionality to your applications. Perfect for developers of all levels, this step-by-step guide ensures you can implement QR code generation quickly and efficiently. Join us as we dive into the world of QR codes and enhance your Angular projects with this powerful feature!

    Below are the steps to implement it.

    Step 1: Set Up Your Angular Project.

    If you don’t have an existing Angular project, create a new one using the Angular CLI:

    ng new qr-code-app
    cd qr-code-app
    Step 2: Install angularx-qrcode
    Install the angularx-qrcode library using npm:
    npm install angularx-qrcode

    Step 3: Create a Component and import the QRCodeModule.


    import { Component } from '@angular/core';
    import { MatFormFieldModule } from '@angular/material/form-field';
    import { QrCodeModule } from 'ng-qrcode';
    
    
    @Component({
      selector: 'app-qrcode',
      standalone: true,
      imports: [MatFormFieldModule,QrCodeModule],
      templateUrl: './qrcode.component.html',
      styleUrl: './qrcode.component.css'
    })
    export class QrcodeComponent {
    
      value: string = 'QRCODE Generator';
    }
    
    4. Update the QR Code Component.


    <div class="container">   
        <h1>Generate QR Codes Example</h1>
        <qr-code value="{{value}}" size="300" errorCorrectionLevel="M"></qr-code>
    </div>
    
    
    5. Run the Application.
    ng serve

    Navigate to http://localhost:4200/ in your web browser. You should see a QR code generated based on the data provided.

    Summary

    1. Set up your Angular project.
    2. Install the angularx-qrcode library.
    3. Import QRCodeModule in the imports section.
    4. Create a new component for the QR code.
    5. Update the component to generate and display the QR code.
    6. Run your application.

    This setup allows you to generate and display QR codes in your Angular application easily.

    Weather App In JavaScript                 Custom Pipe Example In Angular.

    https://www.npmjs.com/package/angularx-qrcode


    Source link