In today’s fast-evolving threat landscape, enterprises often focus heavily on external cyberattacks, overlooking one of the most potent and damaging risks: insider threats. Whether it’s a malicious employee, a careless contractor, or a compromised user account, insider threats strike from within the perimeter, making them harder to detect, contain, and mitigate.
As organizations become more hybrid, decentralized, and cloud-driven, moving away from implicit trust is more urgent than ever. Zero Trust Network Access (ZTNA) is emerging as a critical solution, silently transforming how businesses do insider threat mitigation.
Understanding the Insider Threat Landscape
Insider threats are not always malicious. They can stem from:
Disgruntled or rogue employees intentionally leaking data
Well-meaning staff misconfiguring systems or falling for phishing emails
Contractors or third-party vendors with excessive access
Compromised user credentials obtained via social engineering
According to multiple cybersecurity studies, insider incidents now account for over 30% of all breaches, and their average cost rises yearly.
The real challenge? Traditional security models operate on implicit trust. Once inside the network, users often have wide, unchecked access, which creates fertile ground for lateral movement, privilege abuse, and data exfiltration.
ZTNA in Action: Redefining Trust, Access, and Visibility
Zero Trust Network Access challenges the outdated notion of “trust but verify.” Instead, it enforces “never trust, always verify”—even for users already inside the network.
ZTNA provides access based on identity, device posture, role, and context, ensuring that every access request is continuously validated. This approach is a game-changer for insider threat mitigation.
Granular Access Control
ZTNA enforces least privilege access, meaning users only get access to the specific applications or data they need—nothing more. Even if an insider intends to exfiltrate data, their reach is limited.
For example, a finance team member can access their accounting software, but cannot see HR or R&D files, no matter how hard they try.
Micro-Segmentation for Blast Radius Reduction
ZTNA divides the network into isolated micro-segments. This restricts lateral movement, so even if an insider compromises one segment, they cannot hop across systems undetected.
This segmentation acts like watertight compartments in a ship, containing the damage and preventing full-scale breaches.
Device and Risk Posture Awareness
ZTNA solutions assess device health before granting access. Access can be denied or limited if an employee logs in from an outdated or jailbroken device. This becomes crucial when insider risks stem from compromised endpoints.
Continuous Monitoring and Behavioral Analytics
ZTNA enables real-time visibility into who accessed what, from where, and for how long. Any deviation from expected behavior can trigger alerts or require re-authentication. For instance:
A user downloading an unusually high volume of files
Repeated access attempts outside business hours
Use of shadow IT apps or unauthorized tools
With continuous risk scoring and adaptive access, suspicious insider behavior can be curtailed before damage is done.
Real-World Relevance: Insider Threats in Indian Enterprises
As Indian organizations ramp up their digital transformation and cloud adoption, they face new risks tied to employee churn, contractor access, and remote work culture. In addition to the growing compliance pressure from laws like the Digital Personal Data Protection (DPDP) Act, it has become clear that relying on static access controls is no longer an option.
ZTNA’s dynamic, context-aware model perfectly fits this reality, offering a more resilient and regulation-ready access framework.
How Seqrite ZTNA Helps with Insider Threat Mitigation
Seqrite ZTNA is built to offer secure, identity-based access for modern Indian enterprises. It goes beyond authentication to deliver:
Role-based, micro-segmented access to specific apps and data
Granular control policies based on risk level, device posture, and location
Centralized visibility and detailed audit logs for every user action
Seamless experience for users, without the complexity of traditional solutions
Whether you’re securing remote teams, contractors, or sensitive internal workflows, Seqrite ZTNA gives you the tools to limit, monitor, and respond to insider threats—without slowing down productivity.
Final Thoughts
Insider threats aren’t hypothetical—they’re already inside your network. And as organizations become more distributed, the threat surface only widens. Traditional access models offer little defense for insider threat mitigation.
ZTNA isn’t just about external threats; it’s a silent guardian against internal risks. Enforcing continuous validation, granular access, and real-time visibility transforms your weakest points into strongholds.
Sometimes just a minor change can affect performance. Here’s a simple trick: initialize your collections by specifying the initial size!
Table of Contents
Just a second! 🫷 If you are here, it means that you are a software developer.
So, you know that storage, networking, and domain management have a cost .
If you want to support this blog, please ensure that you have disabled the adblocker for this site. I configured Google AdSense to show as few ADS as possible – I don’t want to bother you with lots of ads, but I still need to add some to pay for the resources for my site.
Thank you for your understanding. – Davide
When you initialize a collection, like a List, you create it with the default size.
Whenever you add an item to a collection, .NET checks that there is enough capacity to hold the new item. If not, it resizes the collection by doubling the inner capacity.
Resizing the collection takes time and memory.
Therefore, when possible, you should initialize the collection with the expected number of items it will contain.
Initialize a List
In the case of a List, you can simply replace new List<T>() with new List<T>(size). By specifying the initial size in the constructor’s parameters, you’ll have a good performance improvement.
Let’s create a benchmark using BenchmarkDotNet and .NET 8.0.100-rc.1.23455.8 (at the time of writing, .NET 8 is still in preview. However, we can get an idea of the average performance).
The benchmark is pretty simple:
[MemoryDiagnoser]publicclassCollectionWithSizeInitializationBenchmarks{
[Params(100, 1000, 10000, 100000)]publicint Size;
[Benchmark]publicvoid WithoutInitialization()
{
List<int> list = new List<int>();
for (int i = 0; i < Size; i++)
{
list.Add(i);
}
}
[Benchmark(Baseline = true)]publicvoid WithInitialization()
{
List<int> list = new List<int>(Size);
for (int i = 0; i < Size; i++)
{
list.Add(i);
}
}
}
The only difference is in the list initialization: in the WithInitialization, we have List<int> list = new List<int>(Size);.
Have a look at the benchmark result, split by time and memory execution.
Starting with the execution time, we can see that without list initialization, we have an average 1.7x performance degradation.
Method
Size
Mean
Ratio
WithoutInitialization
100
299.659 ns
1.77
WithInitialization
100
169.121 ns
1.00
WithoutInitialization
1000
1,549.343 ns
1.58
WithInitialization
1000
944.862 ns
1.00
WithoutInitialization
10000
16,307.082 ns
1.80
WithInitialization
10000
9,035.945 ns
1.00
WithoutInitialization
100000
388,089.153 ns
1.73
WithInitialization
100000
227,040.318 ns
1.00
If we talk about memory allocation, we waste an overage of 2.5x memory if compared to collections with size initialized.
Method
Size
Allocated
Alloc Ratio
WithoutInitialization
100
1184 B
2.60
WithInitialization
100
456 B
1.00
WithoutInitialization
1000
8424 B
2.08
WithInitialization
1000
4056 B
1.00
WithoutInitialization
10000
131400 B
3.28
WithInitialization
10000
40056 B
1.00
WithoutInitialization
100000
1049072 B
2.62
WithInitialization
100000
400098 B
1.00
Initialize an HashSet
Similar to what we’ve done with List’s, we can see significant improvements when initializing correctly other data types, such as HashSet’s.
Let’s run the same benchmarks, but this time, let’s initialize a HashSet<int> instead of a List<int>.
The code is pretty similar:
[Benchmark]publicvoid WithoutInitialization()
{
varset = new HashSet<int>();
for (int i = 0; i < Size; i++)
{
set.Add(i);
}
}
[Benchmark(Baseline = true)]publicvoid WithInitialization()
{
varset = new HashSet<int>(Size);
for (int i = 0; i < Size; i++)
{
set.Add(i);
}
}
What can we say about performance improvements?
If we talk about execution time, we can see an average of 2x improvements.
Method
Size
Mean
Ratio
WithoutInitialization
100
1,122.2 ns
2.02
WithInitialization
100
558.4 ns
1.00
WithoutInitialization
1000
12,215.6 ns
2.74
WithInitialization
1000
4,478.4 ns
1.00
WithoutInitialization
10000
148,603.7 ns
1.90
WithInitialization
10000
78,293.3 ns
1.00
WithoutInitialization
100000
1,511,011.6 ns
1.96
WithInitialization
100000
810,657.8 ns
1.00
If we look at memory allocation, if we don’t initialize the HashSet, we are slowing down the application by a factor of 3x. Impressive!
Method
Size
Allocated
Alloc Ratio
WithoutInitialization
100
5.86 KB
3.28
WithInitialization
100
1.79 KB
1.00
WithoutInitialization
1000
57.29 KB
3.30
WithInitialization
1000
17.35 KB
1.00
WithoutInitialization
10000
526.03 KB
3.33
WithInitialization
10000
157.99 KB
1.00
WithoutInitialization
100000
4717.4 KB
2.78
WithInitialization
100000
1697.64 KB
1.00
Wrapping up
Do you need other good reasons to initialize your collection capacity when possible? 😉
I used BenchmarkDotNet to create these benchmarks. If you want an introduction to this tool, you can have a look at how I used it to measure the performance of Enums:
Hello Robo is a New York based digital product design agency that turns complex technology into intuitive, usable interfaces. We work with forward-thinking teams to create market-ready digital products that are easy to use and hard to ignore.
Earlier this year, the design team at Hello Robo decided to update our brand and website site to speak the language of our current clients — AI, space, aviation, and robotics — after realizing the old, “startup-y” look sold us short.
The new design and copy showcase our ability to tame complex systems with clear thinking and precise interfaces, signaling to deep-tech teams that we understand their world and can make their products make sense.
We wanted our site to do only 2 things but well:
Have the design language to appeal to our existing and new target clients
Most of our work is not allowed to be shared. Our second goal was to let design, motion and interaction give our visitors a sense of what we are great at.
Research
Before we sketching a single screen, our design lead on this project Daria Krauskopf, did what we do before we starting any project at Hello Robo. She decided to talk with our customers. We asked every existing client two questions:
What do you think we do?
What’s one thing you think we’re absolutely great at?
The replies were almost word-for-word:
“You do excellent product design—not crazy, unachievable vision design, and not MVPs either. You’re absolutely great at taking complex, technical systems and turning them into beautiful interfaces that our users actually love to use.”
That became the foundation for how we approached the new site.
Design & Art Direction
We love robots—and robotics inspires everything we do. For the new site, we moved away from soft colors and rounded corners and leaned into a more hi-tech visual language: dark backgrounds, thin lines, sharper shapes. Daria wanted the design to feel more precise, more engineered—something that would resonate with the kind of clients we work with in aviation, robotics, and defense. Every visual choice was about clarity, control, and intention.
A few boards from Hello Robo new brand, reimagined by our design Hanna Shpak
Animation and Interaction
All of our interface work is rooted in interaction and motion—because real-world products aren’t static. They always change and respond to users input and actions. We wanted the site to reflect that. Not with flashy effects or distracting transitions, but with just enough subtle animation to guide, respond, and feel alive. Everything moves with purpose—quiet, responsive, and smooth.
Case Studies
We didn’t want our case studies to be just a scroll of pretty images. Each one is built as a story—showing not just what we made, but how it worked and why it mattered. We walk through key features, the thinking behind UX decisions, and the problems we solved for each client. It’s less about showing off visuals, and more about showing how we think.
Final words
In the end, we got what we set out to build: a clearer visual and verbal language that reflects who we are and who we work with. The site feels more aligned with the complexity and ambition of our clients—and with the way we approach design: thoughtful, precise, and grounded in real product work. It’s not trying to impress with noise. It’s built to resonate with the kind of teams who care about clarity, systems, and getting things right.
XDR solutions are revolutionizing how security teams handle threats by dramatically reducing false positives and streamlining operations. In fact, modern XDR platforms generate significantly fewer false positives than traditional SIEM threat analytics, allowing security teams to focus on genuine threats rather than chasing shadows. We’ve seen firsthand how security operations centers (SOCs) struggle with alert fatigue, fragmented visibility, and resource constraints. However, an XDR platform addresses these challenges by unifying information from multiple sources and providing a holistic view of threats. This integration enables organizations to operate advanced threat detection and response with fewer SOC resources, making it a cost-effective approach to modern security operations.
An XDR platform consolidates security data into a single system, ensuring that SOC teams and surrounding departments can operate from the same information base. Consequently, this unified approach not only streamlines operations but also minimizes breach risks, making it an essential component of contemporary cybersecurity strategies.
In this article, we’ll explore how XDR transforms SOC operations, why traditional tools fall short, and the practical benefits of implementing this technology in your security framework.
The SOC Challenge: Why Traditional Tools Fall Short
Security Operations Centers (SOCs) today face unprecedented challenges with their traditional security tools. While security teams strive to protect organizations, they’re increasingly finding themselves overwhelmed by fundamental limitations in their security infrastructure.
Alert overload and analyst fatigue
Modern SOC teams are drowning in alerts. As per Vectra AI, an overwhelming 71% of SOC practitioners worry they’ll miss real attacks buried in alert floods, while 51% believe they simply cannot keep pace with mounting security threats. The statistics paint a troubling picture:
Siloed tools and fragmented visibility
The tool sprawl in security operations creates massive blind spots. According to Vectra AI findings, 73% of SOCs have more than 10 security tools in place, while 45% juggle more than 20 different tools. Despite this arsenal, 47% of practitioners don’t trust their tools to work as needed.
Many organizations struggle with siloed security data across disparate systems. Each department stores logs, alerts, and operational details in separate repositories that rarely communicate with one another. This fragmentation means threat hunting becomes guesswork because critical artifacts sit in systems that no single team can access.
Slow response times and manual processes
Traditional SOCs rely heavily on manual processes, significantly extending detection and response times. When investigating incidents, analysts must manually piece together information from different silos, losing precious time during active cyber incidents.
According to research by Palo Alto Networks, automation can reduce SOC response times by up to 50%, significantly limiting breach impacts. Unfortunately, most traditional SOCs lack this capability. The workflow in traditional environments is characterized by manual processes that exacerbate alert fatigue while dealing with massive threat alert volumes.
The complexity of investigations further slows response. When an incident occurs, analysts must combine data from various sources to understand the full scope of an attack, a time-consuming process that allows threats to linger in systems longer than necessary.
What is an XDR Platform and How Does It Work?
Extended Detection and Response (XDR) platforms represent the evolution of cybersecurity technology, breaking down traditional barriers between security tools. Unlike siloed solutions, XDR solutions provide a holistic approach to threat management through unified visibility and coordinated response.
Unified data collection across endpoints, network, and cloud
At its core, an XDR platform aggregates and correlates data from multiple security layers into a centralized repository. This comprehensive data collection encompasses:
Endpoints (computers, servers, mobile devices)
Network infrastructure and traffic
Cloud environments and workloads
Email systems and applications
Identity and access management
This integration eliminates blind spots that typically plague security operations. By collecting telemetry from across the entire attack surface, XDR platforms provide security teams with complete visibility into potential threats. The system automatically ingests, cleans, and standardizes this data, ensuring consistent, high-quality information for analysis.
Real-time threat detection using AI and ML
XDR platforms leverage advanced analytics, artificial intelligence, and machine learning to identify suspicious patterns and anomalies that human analysts might miss. These capabilities enable:
Automatic correlation of seemingly unrelated events across different security layers
Identification of sophisticated multi-vector attacks through pattern recognition
Real-time monitoring and analysis of data streams for immediate threat identification
Reduction in false positives through contextual understanding of alerts
The AI-powered capabilities enable XDR platforms to detect threats at a scale and speed impossible for human analysts alone. Moreover, these systems continuously learn and adapt to evolving threats through machine learning models.
Automated response and orchestration capabilities
Once threats are detected, XDR platforms can initiate automated responses without requiring manual intervention. This automation includes:
Isolation of compromised devices to contain threats
Blocking of malicious IP addresses and domains
Execution of predefined response playbooks for consistent remediation
Prioritization of incidents based on severity for efficient resource allocation
Key Benefits of XDR for SOC Operations
Implementing an XDR platform delivers immediate, measurable advantages to security operations centers struggling with traditional tools and fragmented systems. SOC teams gain specific capabilities that fundamentally transform their effectiveness against modern threats.
Faster threat detection and reduced false positives
The strategic advantage of XDR solutions begins with their ability to dramatically reduce alert volume. XDR tools automatically group related alerts into unified incidents, representing entire attack sequences rather than isolated events. This correlation across different security layers identifies complex attack patterns that traditional solutions might miss.
Improved analyst productivity through automation
As per the Tines report, 64% of analysts spend over half their time on tedious manual work, with 66% believing that half of their tasks could be automated. XDR platforms address this challenge through built-in orchestration and automation that offload repetitive tasks. Specifically, XDR can automate threat detection through machine learning, streamline incident response processes, and generate AI-powered incident reports. This automation allows SOC teams to detect sophisticated attacks with fewer resources while reducing response time.
Centralized visibility and simplified workflows
XDR provides a single pane view that eliminates “swivel chair integration,” where analysts manually interface across multiple security systems. This unified approach aggregates data from endpoints, networks, applications, and cloud environments into a consolidated platform. As a result, analysts gain swift investigation capabilities with instant access to all forensic artifacts, events, and threat intelligence in one location. This centralization particularly benefits teams during complex investigations, enabling them to quickly understand the complete attack story.
Better alignment with compliance and audit needs
XDR strengthens regulatory compliance through detailed documentation and monitoring capabilities. The platform generates comprehensive logs and audit trails of security events, user activities, and system changes, helping organizations demonstrate compliance to regulators. Additionally, XDR’s continuous monitoring adapts to new threats and regulatory changes, ensuring consistent compliance over time. Through centralized visibility and data aggregation, XDR effectively monitors data flows and access patterns, preventing unauthorized access to sensitive information.
Conclusion
XDR platforms clearly represent a significant advancement in cybersecurity technology. At Seqrite, we offer a comprehensive XDR platform designed to help organizations simplify their SOC operations, improve detection accuracy, and automate responses. If you are looking to strengthen your cybersecurity posture with an effective and scalable XDR solution, Seqrite XDR is built to help you stay ahead of evolving threats.
Learn how to use Feature Flags in ASP.NET Core apps and read values from Azure App Configuration. Understand how to use filters, like the Percentage filter, to control feature activation, and learn how to take full control of the cache expiration of the values.
Table of Contents
Just a second! 🫷 If you are here, it means that you are a software developer.
So, you know that storage, networking, and domain management have a cost .
If you want to support this blog, please ensure that you have disabled the adblocker for this site. I configured Google AdSense to show as few ADS as possible – I don’t want to bother you with lots of ads, but I still need to add some to pay for the resources for my site.
Thank you for your understanding. – Davide
Feature Flags let you remotely control the activation of features without code changes. They help you to test, release, and manage features safely and quickly by driving changes using centralized configurations.
In this article, we are going to join the two streams in a single article: in fact, we will learn how to manage Feature Flags using Azure App Configuration to centralize our configurations.
It’s a sort of evolution from the previous article. Instead of changing the static configurations and redeploying the whole application, we are going to move the Feature Flags to Azure so that you can enable or disable those flags in just one click.
A recap of Feature Flags read from the appsettings file
Let’s reuse the example shown in the previous article.
We have an ASP.NET Core application (in that case, we were building a Razor application, but it’s not important for the sake of this article), with some configurations defined in the appsettings file under the Feature key:
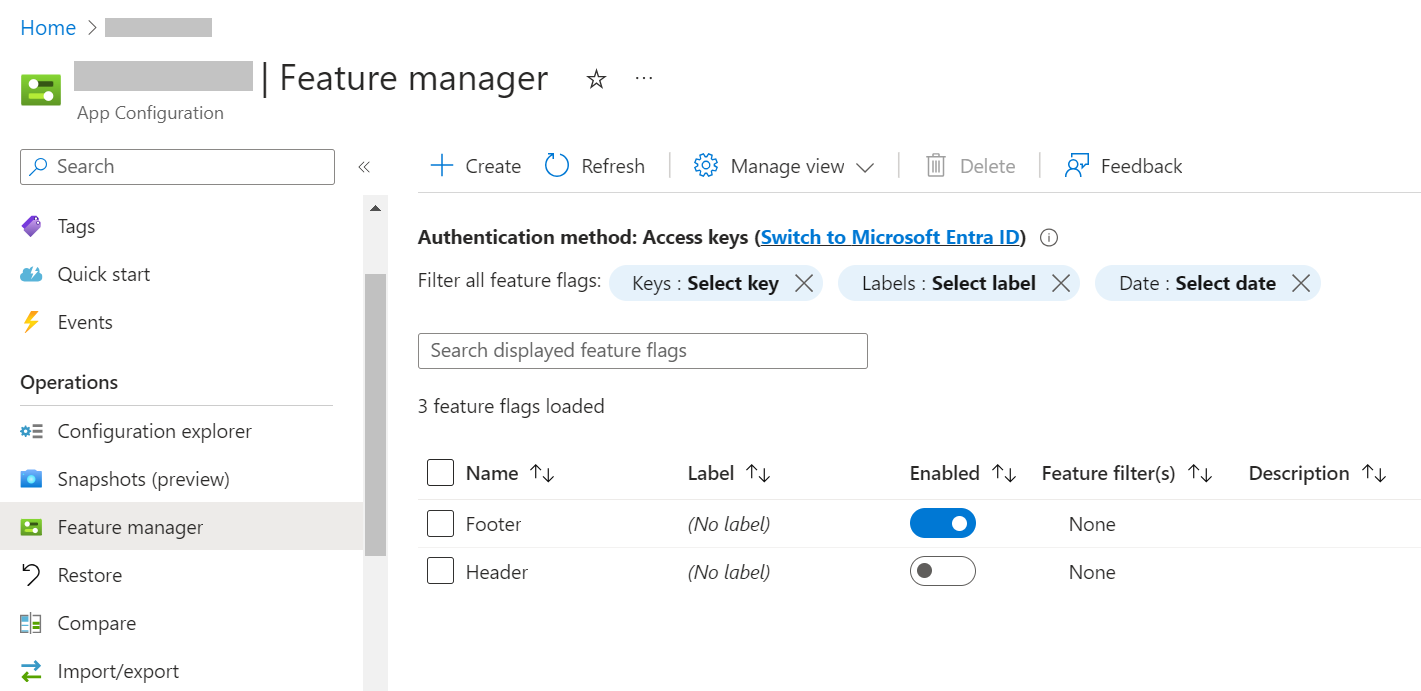
Now we have to configure the same keys defined in the appsettings file: Header, Footer, and PrivacyPage.
Open the App Configuration instance and locate the “Feature Manager” menu item in the left panel. This is the central place for creating, removing, and managing your Feature Flags. Here, you can see that I have already added the Header and Footer, and you can see their current state: “Footer” is enabled, while “Header” is not.
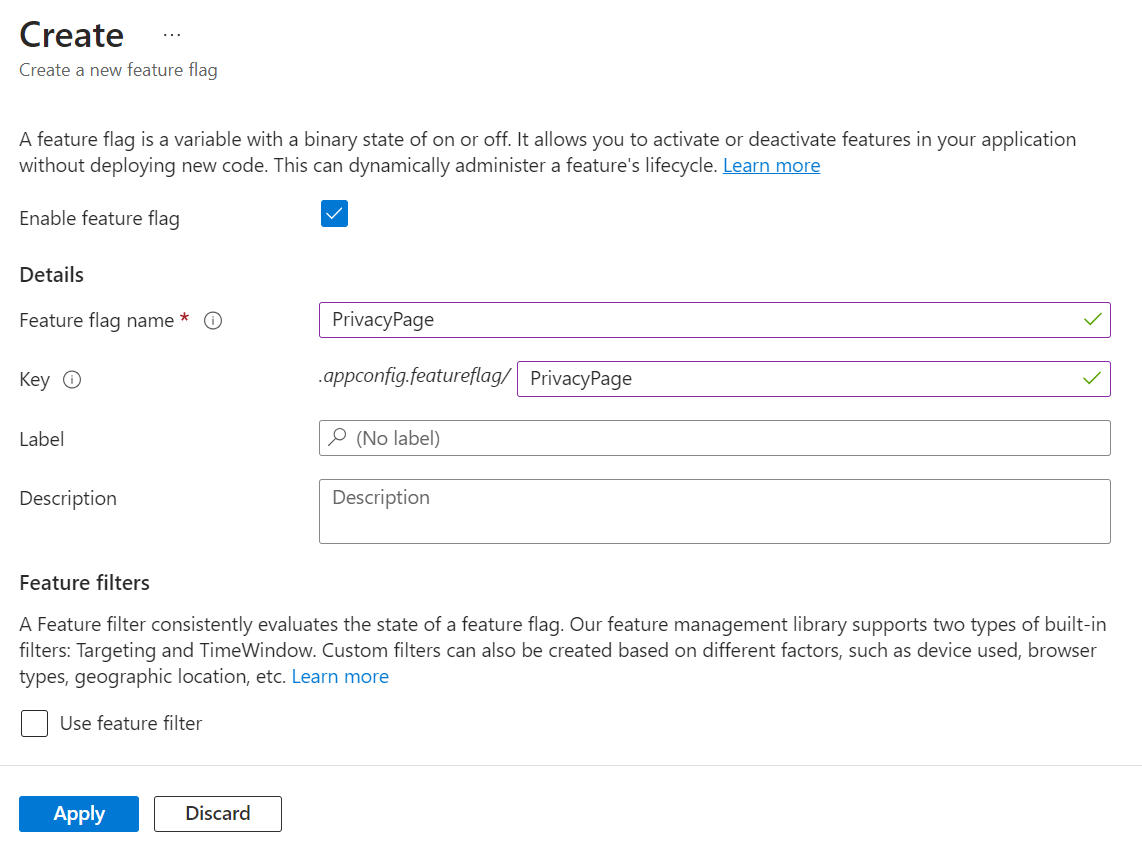
How can I add the PrivacyPage flag? It’s elementary: click the “Create” button and fill in the fields.
You have to define a Name and a Key (they can also be different), and if you want, you can add a Label and a Description. You can also define whether the flag should be active by checking the “Enable feature flag” checkbox.
Read Feature Flags from Azure App Configuration in an ASP.NET Core application
It’s time to integrate Azure App Configuration with our ASP.NET Core application.
Before moving to the code, we have to locate the connection string and store it somewhere.
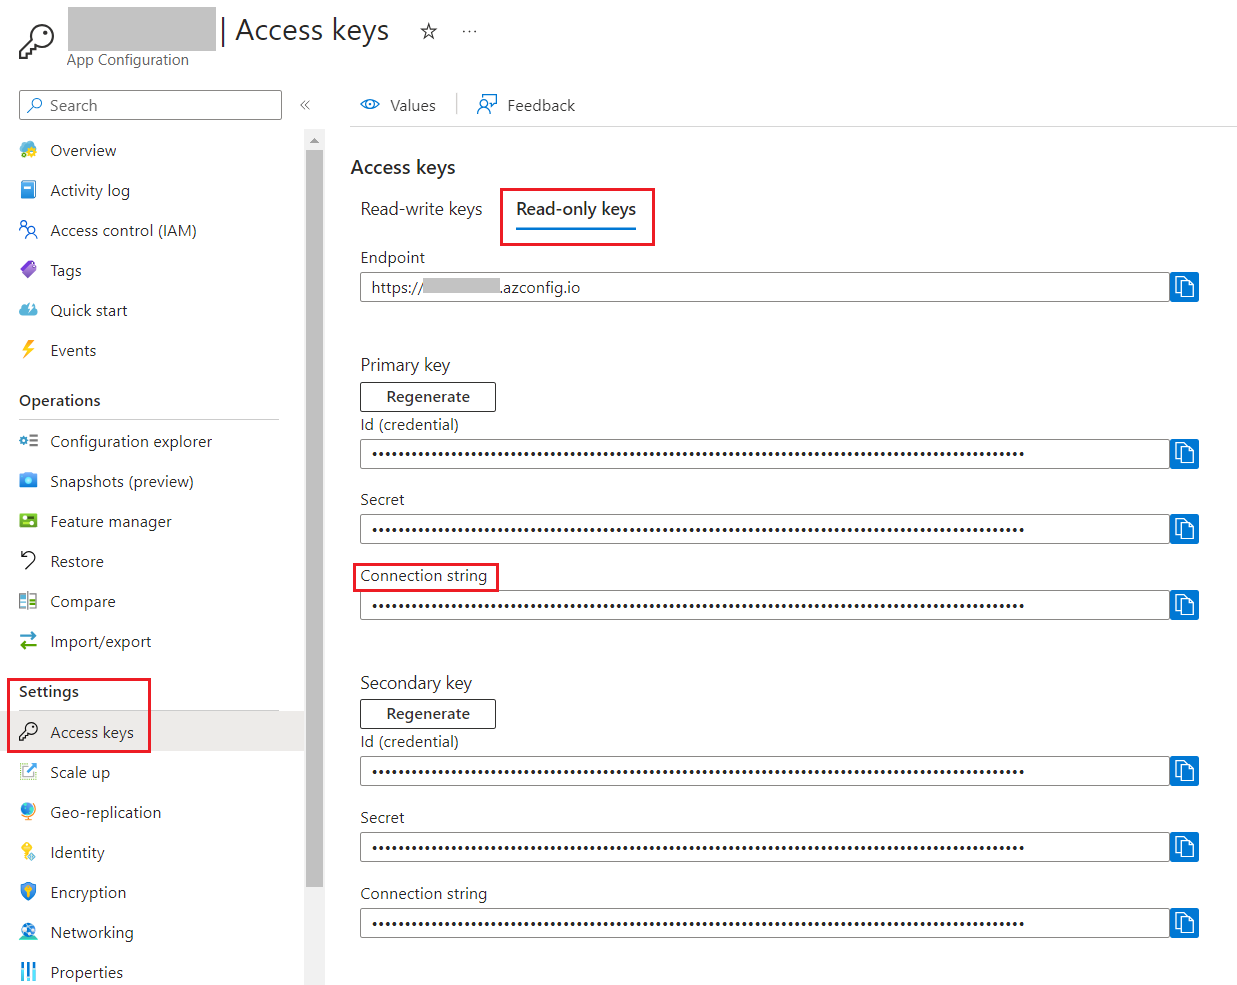
Head back to the App Configuration resource and locate the “Access keys” menu item under the “Settings” section.
From here, copy the connection string (I suggest that you use the Read-only Keys) and store it somewhere.
Before proceeding, you have to install the Microsoft.Azure.AppConfiguration.AspNetCore NuGet package.
Now, we can add Azure App Configuration as a source for our configurations by connecting to the connection string and by declaring that we are going to use Feature Flags:
Finally, once we have built our application with the usual builder.Build(), we have to add the Azure App Configuration middleware:
app.UseAzureAppConfiguration();
To try it out, run the application and validate that the flags are being applied. You can enable or disable those flags on Azure, restart the application, and check that the changes to the flags are being applied. Otherwise, you can wait 30 seconds to have the flag values refreshed and see the changes applied to your application.
Using the Percentage filter on Azure App Configuration
Suppose you want to enable a functionality only to a percentage of sessions (sessions, not users!). In that case, you can use the Percentage filter.
The previous article had a specific section dedicated to the PercentageFilter, so you might want to check it out.
Clearly, we can define such flags on Azure as well.
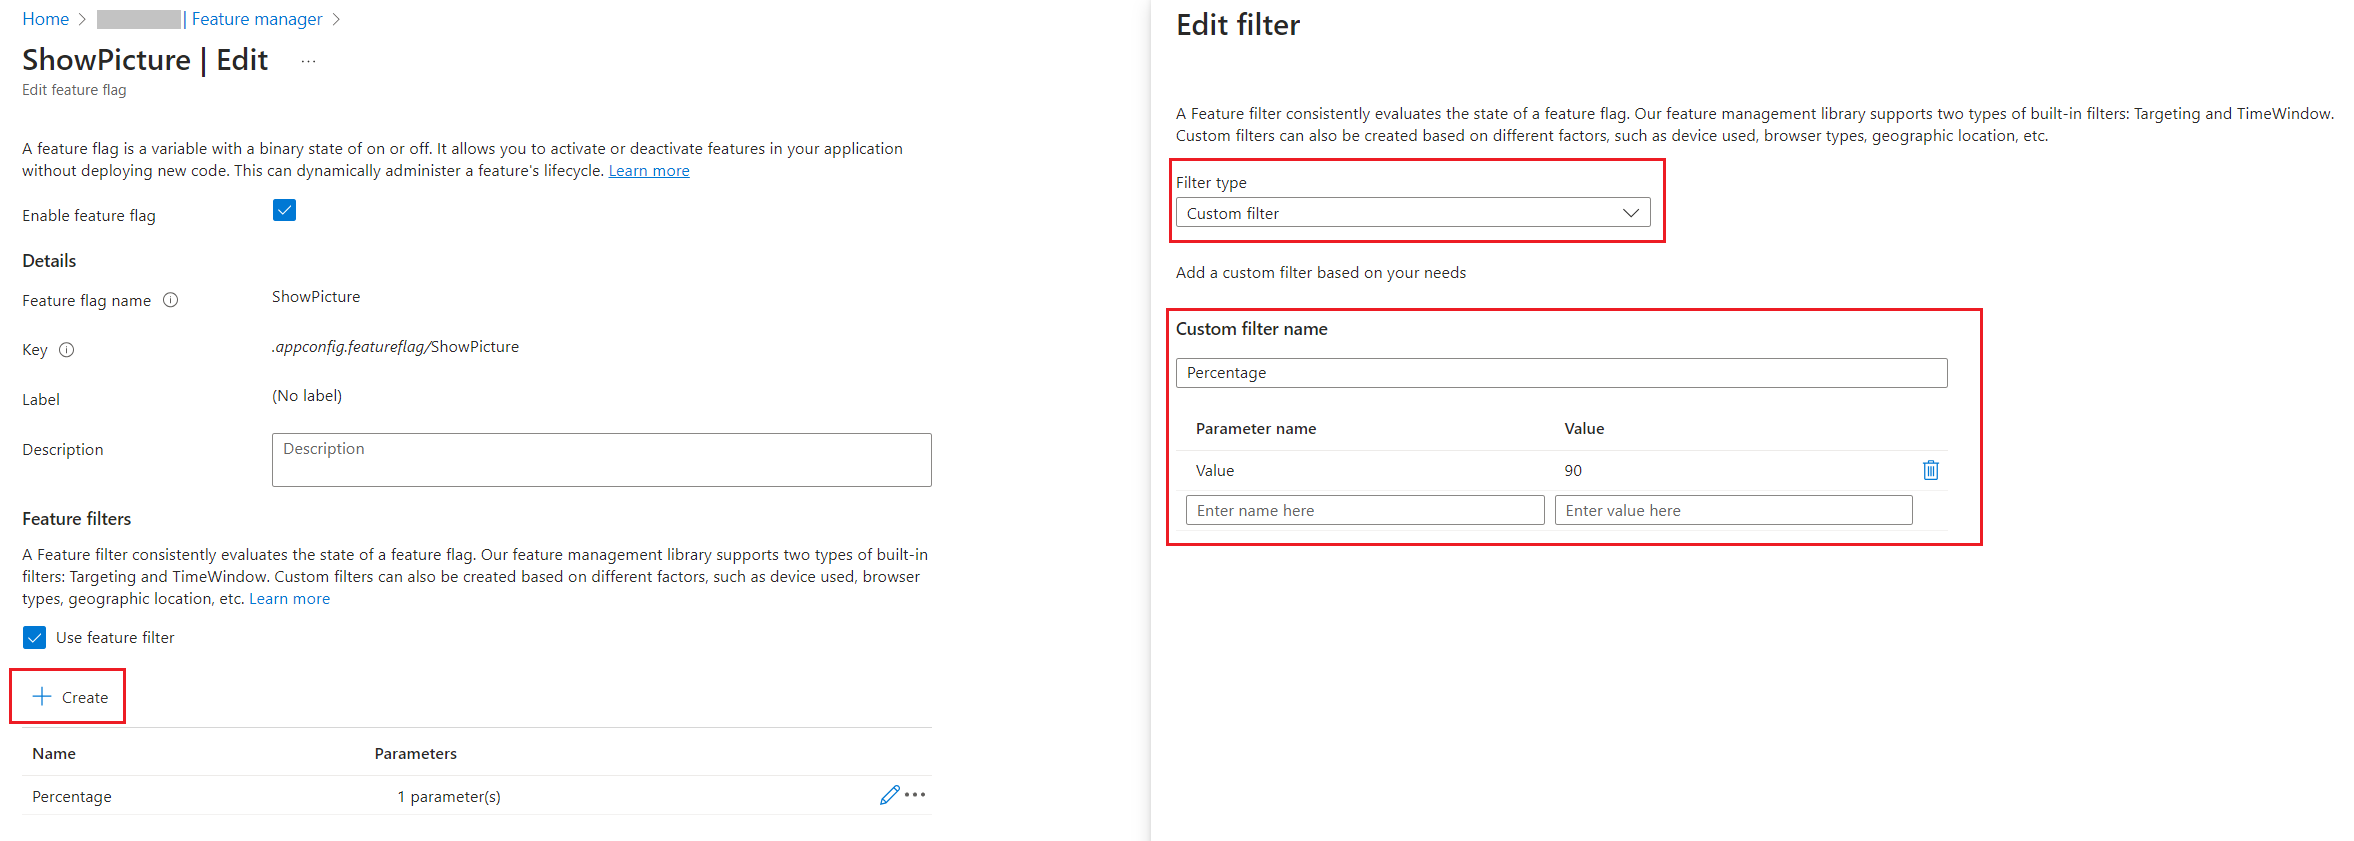
Head back to the Azure Portal and add a new Feature Flag. This time, you have to add a new Feature Filter to any existing flag. Even though the PercentageFilter is out-of-the-box in the FeatureManagement NuGet package, it is not available on the Azure portal.
You have to define the filter with the following values:
Filter Type must be “Custom”;
Custom filter name must be “Percentage”
You must add a new key, “Value”, and set its value to “60”.
The configuration we just added reflects the JSON value we previously had in the appsettings file: 60% of the requests will activate the flag, while the remaining 40% will not.
Define the cache expiration interval for Feature Flags
By default, Feature Flags are stored in an internal cache for 30 seconds.
Sometimes, it’s not the best choice for your project; you may prefer a longer duration to avoid additional calls to the App Configuration platform; other times, you’d like to have the changes immediately available.
You can then define the cache expiration interval you need by configuring the options for the Feature Flags:
This way, Feature Flag values are stored in the internal cache for 10 seconds. Then, when you reload the page, the configurations are reread from Azure App Configuration and the flags are applied with the new values.
Further readings
This is the final article of a path I built during these months to explore how to use configurations in ASP.NET Core.
We started by learning how to set configuration values in an ASP.NET Core application, as explained here:
A Git commit represents the status of a system. Learn how to validate that your code builds, is well-formatted, and all the tests pass by adding a Git hook!
Table of Contents
Just a second! 🫷 If you are here, it means that you are a software developer.
So, you know that storage, networking, and domain management have a cost .
If you want to support this blog, please ensure that you have disabled the adblocker for this site. I configured Google AdSense to show as few ADS as possible – I don’t want to bother you with lots of ads, but I still need to add some to pay for the resources for my site.
Thank you for your understanding. – Davide
If you need to run operations before completing a Git commit, you can rely on Git Hooks.
Git hooks are scripts that run automatically whenever a particular event occurs in a Git repository. They let you customize Git’s internal behaviour and trigger customizable actions at key points in the development life cycle.
Extending Git hooks allows you to plug in custom functionalities to the regular Git flow, such as Git message validation, code formatting, etc.
I’ve already described how to use Husky with NPM, but here I’m gonna use Husky.NET, the version of Husky created for .NET-based applications.
Git hooks: a way to extend Git operations
As we said, Git hooks are actions that run during specific phases of Git operations.
Git hooks fall into 4 categories:
client-side hooks related to the committing workflow: they execute when you run git commit on your local repository;
client-side hooks related to the email workflow: they are executed when running git am, which is a command that allows you to integrate mails and Git repositories (I’ve never used it. If you are interested in this functionality, here’s the official documentation);
client-side hooks related to other operations: these hooks run on your local repository when performing operations like git rebase;
server-side hooks: they run after a commit is received on the remote repository, and they can reject a git push operation.
Let’s focus on the client-side hooks that run when you commit changes using git commit.
Hook name
Description
pre-commit
This hook is the first invoked by git commit (if you don’t use the -m flag, it is invoked before asking you to insert a commit message) and can be used to inspect the snapshot that is about to be committed.
prepare-commit-msg
This hook is invoked by git commit and can be used to edit the default commit message when it is generated by an automated tool.
commit-msg
This hook is invoked by git commit and can be used to validate or modify the commit message after it is entered by the user.
post-commit
This hook is invoked after the git commit execution has run correctly, and it is generally used to fire notifications.
How to install Husky.NET and its dependencies in a .NET Application
Husky.NET must be installed in the root folder of the solution.
You first have to create a tool-manifest file in the root folder by running:
This command creates a file named dotnet-tools.json under the .config folder: here you can see the list of external tools used by dotnet.
After running the command, you will see that the dotnet-tools.json file contains this element:
{
  "version": 1,
  "isRoot": true,
  "tools": {}
}
Now you can add Husky as a dotnet tool by running:
dotnet tool install Husky
After running the command, the file will contain something like this:
This command creates a new file, pre-commit (without file extension), under the .husky folder. By default, it appears like this:
#!/bin/sh
. "$(dirname "$0")/_/husky.sh"## husky task runner examples -------------------## Note : for local installation use 'dotnet' prefix. e.g. 'dotnet husky'## run all tasks#husky run### run all tasks with group: 'group-name'#husky run --group group-name## run task with name: 'task-name'#husky run --name task-name## pass hook arguments to task#husky run --args "$1" "$2"## or put your custom commands -------------------#echo 'Husky.Net is awesome!'echo 'Hello world!'
The default content is pretty useless; it’s time to customize that hook.
Notice that the latest command has also generated a task-runner.json file; we will use it later.
Your first pre-commit hook
To customize the script, open the file located at .husky/pre-commit.
Here, you can add whatever you want.
In the example below, I run commands that compile the code, format the text (using dotnet format with the rules defined in the .editorconfig file), and then run all the tests.
#!/bin/sh
. "$(dirname "$0")/_/husky.sh"echo 'Building code'
dotnet build
echo 'Formatting code'
dotnet format
echo 'Running tests'
dotnet test
Then, add it to Git, and you are ready to go. 🚀 But wait…
3 ways to manage dotnet format with Husky.NET
There is a problem with the approach in the example above.
Let’s simulate a usage flow:
you modify a C# class;
you run git commit -m "message";
the pre-commit hook runs dotnet build;
the pre-commit hook runs dotnet format;
the pre-commit hook runs dotnet test;
after the hooks, the commit is created.
What is the final result?
Since dotnet format modifies the source files, and given that the snapshot has already been created before executing the hook, all the modified files will not be part of the final commit!
Also, dotnet format executes linting on every file in the solution, not only those that are part of the current snapshot. The operation might then take a lot of time, depending on the size of the repository, and most of the time, it will not update any file (because you’ve already formatted everything in a previous run).
We have to work out a way to fix this issue. I’ll suggest three approaches.
Include all the changes using Git add
The first approach is quite simple: run git add . after dotnet format.
So, the flow becomes:
you modify a C# class;
you run git commit -m "message";
the pre-commit hook runs dotnet build;
the pre-commit hook runs dotnet format;
the pre-commit hook runs git add .;
the pre-commit hook runs dotnet test;
Git creates the commit.
This is the most straightforward approach, but it has some downsides:
dotnet format is executed on every file in the solution. The more your project grows, the slower your commits become;
git add . adds to the current snapshot all the files modified, even those you did not add to this commit on purpose (maybe because you have updated many files and want to create two distinct commits).
So, it works, but we can do better.
Execute a dry run of dotnet-format
You can add the --verify-no-changes to the dotnet format command: this flag returns an error if at least one file needs to be updated because of a formatting rule.
Let’s see how the flow changes if one file needs to be formatted.
you modify a C# class;
you run git commit -m "message";
the pre-commit hook runs dotnet build;
the pre-commit hook runs dotnet format --verify-no-changes;
the pre-commit hook returns an error and aborts the operation;
you run dotnet format on the whole solution to fix all the formatting issues;
you run git add .;
you run git commit -m "message";
the pre-commit hook runs dotnet build;
the pre-commit hook runs dotnet format --verify-no-changes. Now, there is nothing to format, and we can proceed;
the pre-commit hook runs dotnet test;
Git creates the commit.
Notice that, this way, if there is something to format, the whole commit is aborted. You will then have to run dotnet format on the entire solution, fix the errors, add the changes to the snapshot, and restart the flow.
It’s a longer process, but it allows you to have complete control over the formatted files.
Also, you won’t risk including in the snapshot the files you want to keep staged in order to add them to a subsequent commit.
Run dotnet-format only on the staged files using Husky.NET Task Runner
The third approach is the most complex but with the best result.
If you recall, during the initialization, Husky added two files in the .husky folder: pre-commit and task-runner.json.
The key to this solution is the task-runner.json file. This file allows you to create custom scripts with a name, a group, the command to be executed, and its related parameters.
Here, we have specified a name, dotnet-format-staged-files, the command to run, dotnet, with some parameters listed in the args array. Notice that we can filter the list of files to be formatted by using the ${staged} parameter, which is populated by Husky.NET.
We have also added this task to a group named pre-commit-operations that we can use to reference a list of tasks to be executed together.
If you want to run a specific task, you can use dotnet husky run --name taskname. In our example, the command would be dotnet husky run --name dotnet-format-staged-files.
If you want to run a set of tasks belonging to the same group, you can run dotnet husky run --group groupname. In our example, the command would be dotnet husky run --group pre-commit-operations.
The last step is to call these tasks from within our pre-commit file. So, replace the old dotnet format command with one of the above commands.
Final result and optimizations of the pre-commit hook
Now that everything is in place, we can improve the script to make it faster.
Let’s see which parts we can optimize.
The first step is the build phase. For sure, we have to run dotnet build to see if the project builds correctly. You can consider adding the --no-restore flag to skip the restore step before building.
Then we have the format phase: we can avoid formatting every file using one of the steps defined before. I’ll replace the plain dotnet format with the execution of the script defined in the Task Runner (it’s the third approach we saw).
Then, we have the test phase. We can add both the --no-restore and the --no-build flag to the command since we have already built everything before. But wait! The format phase updated the content of our files, so we still have to build the whole solution. Unless we swap the build and the format phases.
So, here we have the final pre-commit file:
#!/bin/sh
. "$(dirname "$0")/_/husky.sh"echo 'Ready to commit changes!'echo 'Format'dotnet husky run --name dotnet-format-staged-files
echo 'Build'dotnet build --no-restore
echo 'Test'dotnet test --no-restore
echo 'Completed pre-commit changes'
Yes, I know that when you run the dotnet test command, you also build the solution, but I prefer having two separate steps just for clarity!
Ah, and don’t remove the #!/bin/sh at the beginning of the script!
How to skip Git hooks
To trigger the hook, just run git commit -m "message". Before completing the commit, the hook will run all the commands. If one of them fails, the whole commit operation is aborted.
There are cases when you have to skip the validation. For example, if you have integration tests that rely on an external source currently offline. In that case, some tests will fail, and you will be able to commit your code only once the external system gets working again.
You can skip the commit validation by adding the --no-verify flag:
git commit -m "my message" --no-verify
Further readings
Husky.NET is a porting of the Husky tool we already used in a previous article, using it as an NPM dependency. In that article, we also learned how to customize Conventional Commits using Git hooks.
One last thing: we installed Husky.NET using dotnet tools. If you want to learn more about this topic, I found an excellent article online that you might want to read:
Just a second! 🫷 If you are here, it means that you are a software developer.
So, you know that storage, networking, and domain management have a cost .
If you want to support this blog, please ensure that you have disabled the adblocker for this site. I configured Google AdSense to show as few ADS as possible – I don’t want to bother you with lots of ads, but I still need to add some to pay for the resources for my site.
Thank you for your understanding. – Davide
Model validation is fundamental to any project: it brings security and robustness acting as a first shield against an invalid state.
You should then add Unit Tests focused on model validation. In fact, when defining the input model, you should always consider both the valid and, even more, the invalid models, making sure that all the invalid models are rejected.
BDD is a good approach for this scenario, and you can use TDD to implement it gradually.
Okay, but how can you validate that the models and model attributes you defined are correct?
Have we defined our model correctly? Are we covering all the edge cases? A well-written Unit Test suite is our best friend here!
We have two choices: we can write Integration Tests to send requests to our system, which is running an in-memory server, and check the response we receive. Or we can use the internal Validator class, the one used by ASP.NET to validate input models, to create slim and fast Unit Tests. Let’s use the second approach.
Here’s a utility method we can use in our tests:
publicstatic IList<ValidationResult> ValidateModel(object model)
{
var results = new List<ValidationResult>();
var validationContext = new ValidationContext(model, null, null);
Validator.TryValidateObject(model, validationContext, results, true);
if (model is IValidatableObject validatableModel)
results.AddRange(validatableModel.Validate(validationContext));
return results;
}
In short, we create a validation context without any external dependency, focused only on the input model: new ValidationContext(model, null, null).
Next, we validate each field by calling TryValidateObject and store the validation results in a list, result.
Finally, if the Model implements the IValidatableObject interface, which exposes the Validate method, we call that Validate() method and store the returned validation errors in the final result list created before.
As you can see, we can handle both validation coming from attributes on the fields, such as [Required], and custom validation defined in the model class’s Validate() method.
Now, we can use this method to verify whether the validation passes and, in case it fails, which errors are returned:
[Test]publicvoid User_ShouldPassValidation_WhenModelIsValid()
{
var model = new User { FirstName = "Davide", LastName = "Bellone", Age = 32 };
var validationResult = ModelValidationHelper.ValidateModel(mode);
Assert.That(validationResult, Is.Empty);
}
[Test]publicvoid User_ShouldNotPassValidation_WhenLastNameIsEmpty()
{
var model = new User { FirstName = "Davide", LastName = null, Age = 32 };
var validationResult = ModelValidationHelper.ValidateModel(mode);
Assert.That(validationResult, Is.Not.Empty);
}
[Test]publicvoid User_ShouldNotPassValidation_WhenAgeIsLessThan18()
{
var model = new User { FirstName = "Davide", LastName = "Bellone", Age = 10 };
var validationResult = ModelValidationHelper.ValidateModel(mode);
Assert.That(validationResult, Is.Not.Empty);
}
Further readings
Model Validation allows you to create more robust APIs. To improve robustness, you can follow Postel’s law:
Model validation, in my opinion, is one of the cases where Unit Tests are way better than Integration Tests. This is a perfect example of Testing Diamond, the best (in most cases) way to structure a test suite:
If you still prefer writing Integration Tests for this kind of operation, you can rely on the WebApplicationFactory class and use it in your NUnit tests:
Learn how to integrate Oh My Posh, a cross-platform tool that lets you create beautiful and informative prompts for PowerShell.
Table of Contents
Just a second! 🫷 If you are here, it means that you are a software developer.
So, you know that storage, networking, and domain management have a cost .
If you want to support this blog, please ensure that you have disabled the adblocker for this site. I configured Google AdSense to show as few ADS as possible – I don’t want to bother you with lots of ads, but I still need to add some to pay for the resources for my site.
Thank you for your understanding. – Davide
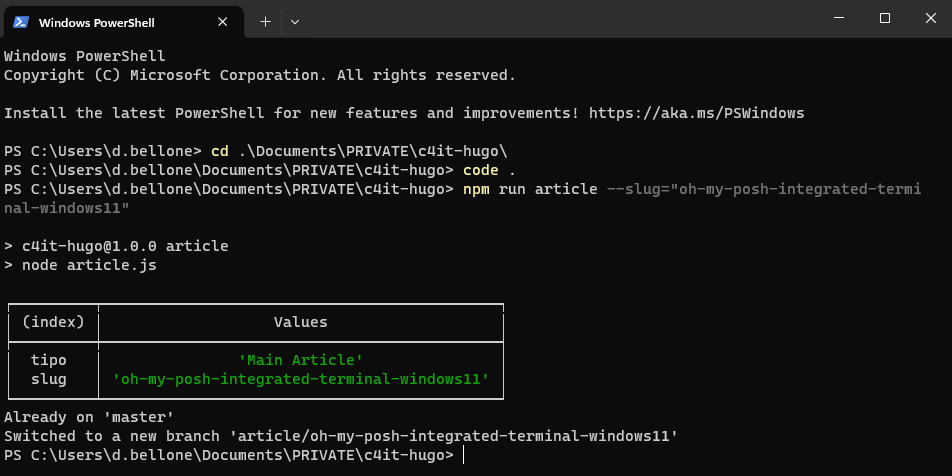
The content of the blog you are reading right now is stored in a Git repository. Every time I create an article, I create a new Git Branch to isolate the changes.
To generate the skeleton of the articles, I use the command line (well, I generally use PowerShell); in particular, given that I’m using both Windows 10 and Windows 11 – depending on the laptop I’m working on – I use the Integrated Terminal, which allows you to define the style, the fonts, and so on of every terminal configured in the settings.
The default profile is pretty basic: no info is shown except for the current path – I want to customize the appearance.
I want to show the status of the Git repository, including:
repository name
branch name
outgoing commits
There are lots of articles that teach how to use OhMyPosh with Cascadia Code. Unfortunately, I couldn’t make them work.
In this article, I teach you how I fixed it on my local machine. It’s a step-by-step guide I wrote while installing it on my local machine. I hope it works for you as well!
Step 1: Create the $PROFILE file if it does not exist
In PowerShell, you can customize the current execution by updating the $PROFILE file.
Clearly, you first have to check if the profile file exists.
Open the PowerShell and type:
$PROFILE # You can also use $profile lowercase - it's the same!
This command shows you the expected path of this file. The file, if it exists, is stored in that location.
In this case, the $Profile file should be available under the folder C:\Users\d.bellone\Documents\WindowsPowerShell. In my case, it does not exist, though!
Therefore, you must create it manually: head to that folder and create a file named Microsoft.PowerShell_profile.ps1.
Note: it might happen that not even the WindowsPowerShell folder exists. If it’s missing, well, create it!
Step 2: Install OhMyPosh using Winget, Scoop, or PowerShell
To use OhMyPosh, we have to – of course – install it.
As explained in the official documentation, we have three ways to install OhMyPosh, depending on the tool you prefer.
And, if you like working with PowerShell, execute:
Set-ExecutionPolicy Bypass -Scope Process -Force; Invoke-Expression ((New-Object System.Net.WebClient).DownloadString('https://ohmyposh.dev/install.ps1'))
I used Winget, and you can see the installation process here:
Now, to apply these changes, you have to restart the PowerShell.
Step 3: Add OhMyPosh to the PowerShell profile
Open the Microsoft.PowerShell_profile.ps1 file and add the following line:
oh-my-posh init pwsh | Invoke-Expression
This command is executed every time you open the PowerShell with the default profile, and it initializes OhMyPosh to have it available during the current session.
Now, you can save and close the file.
Hint: you can open the profile file with Notepad by running notepad $PROFILE.
Step 4: Set the Execution Policy to RemoteSigned
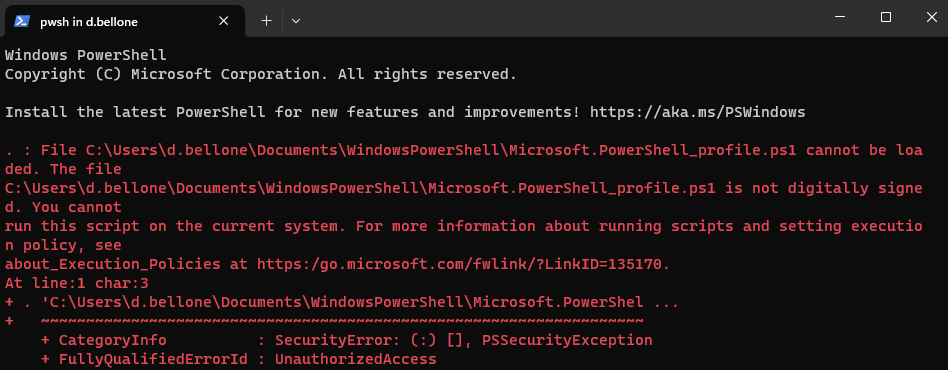
Restart the terminal. In all probability, you will see an error like this:
The error message
The file <path>\Microsoft.PowerShell_profile.ps1 is
not digitally signed. You cannot run this script on the current system
means that PowerShell does not trust the script it’s trying to load.
To see which Execution Policy is currently active, run:
You’ll probably see that the value is AllSigned.
To enable the execution of scripts created on your local machine, you have to set the Execution Policy value to RemoteSigned, using this command by running the PowerShell in administrator mode:
Set-ExecutionPolicy RemoteSigned
Let’s see the definition of the RemoteSigned Execution policy as per SQLShack’s article:
This is also a safe PowerShell Execution policy to set in an enterprise environment. This policy dictates that any script that was not created on the system that the script is running on, should be signed. Therefore, this will allow you to write your own script and execute it.
So, yeah, feel free to proceed and set the new Execution policy to have your PowerShell profile loaded correctly every time you open a new PowerShell instance.
Now, OhMyPosh can run in the current profile.
Head to a Git repository and notice that… It’s not working!🤬 Or, well, we have the Git information, but we are missing some icons and glyphs.
Step 5: Use CaskaydiaCove, not Cascadia Code, as a font
We still have to install the correct font with the missing icons.
We will install it using Chocolatey, a package manager available for Windows 11.
To check if you have it installed, run:
Now, to install the correct font family, open a PowerShell with administration privileges and run:
choco install cascadia-code-nerd-font
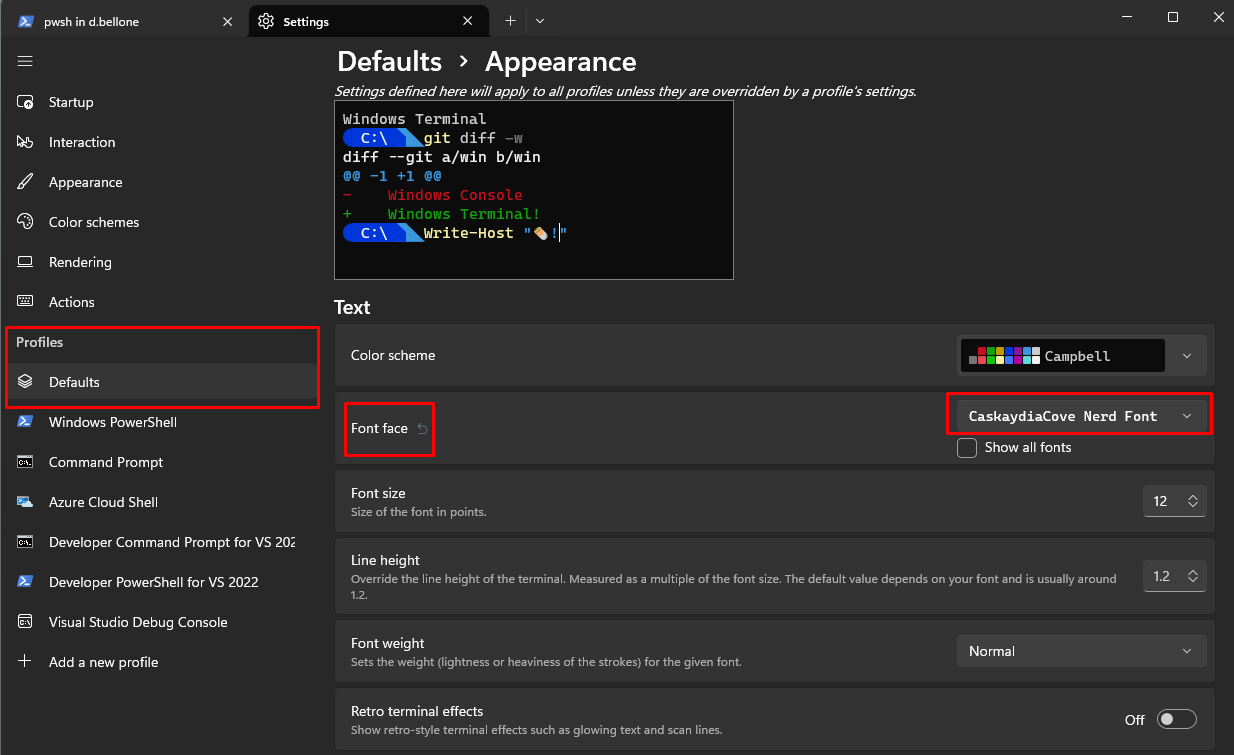
Once the installation is complete, you must tell Integrated Terminal to use the correct font by following these steps:
open to the Settings page (by hitting CTRL + ,)
select the profile you want to update (in my case, I’ll update the default profile)
open the Appearance section
under Font faceselect CaskaydiaCove Nerd Font
Now close the Integrated Terminal to apply the changes.
Open it again, navigate to a Git repository, and admire the result.
Further readings
The first time I read about OhMyPosh, it was on Scott Hanselman’s blog. I couldn’t make his solution work – and that’s the reason I wrote this article. However, in his article, he shows how he customized his own Terminal with more glyphs and icons, so you should give it a read.
We customized our PowerShell profile with just one simple configuration. However, you can do a lot more. You can read Ruud’s in-depth article about PowerShell profiles.
Finally, as I said at the beginning of this article, I use Git and Git Branches to handle the creation and management of my blog articles. That’s just the tip of the iceberg! 🏔️
If you want to steal my (previous) workflow, have a look at the behind-the-scenes of my blogging process (note: in the meanwhile, a lot of things have changed, but these steps can still be helpful for you)
Hi, I’m Ivan—a Dubai-based designer focused on fintech products and branding. I run Moonsight, where we craft thoughtful digital experiences and sharp visual identities for financial companies around the world.
Background
My path into design wasn’t a childhood calling—I wasn’t drawing wireframes at age ten or dreaming of Helvetica (can you imagine XD). I just knew I didn’t want the typical office life. I wanted freedom, movement, and a way to create things that felt useful. Design turned out to be the sweet spot between independence and impact.
So I studied design at university by day, and took on agency work by night—what you might call the full-stack student hustle. That rhythm—study, work, repeat—taught me discipline. I also kept learning on the side, exploring tools, trends, and techniques to sharpen my craft.
Eventually, I found myself gravitating toward fintech.
Why fintech? Because it’s real. It’s personal. Everyone interacts with money. And when you build something that helps them feel more in control of it—you’re not just improving UX, you’re improving lives.
You’re designing trust. That’s a responsibility I take seriously.
From there, I explored both sides of the industry: in-house roles at product companies, and fast-paced agency work. Later, I shifted into consultancy—partnering with fintechs across Europe, the Gulf, and Asia. That chapter taught me a lot—not just about design, but about people, culture, and how different teams think about trust and money.
All of that led me to start Moonsight—a space where I could bring all those experiences together. Today, we partner with fintechs and financial companies to create sharp, useful, brand-led digital experiences. And while I still stay hands-on, I’m also building a team that’s just as obsessed with clarity, thoughtfulness, and execution as I am.
Featured Work
Monetto
A game-changer in the world of freelancing. Designed to simplify and elevate the financial journey for freelancers, Monetto is more than just an app – it’s a holistic solution that empowers creatives like me to manage their finances with confidence.
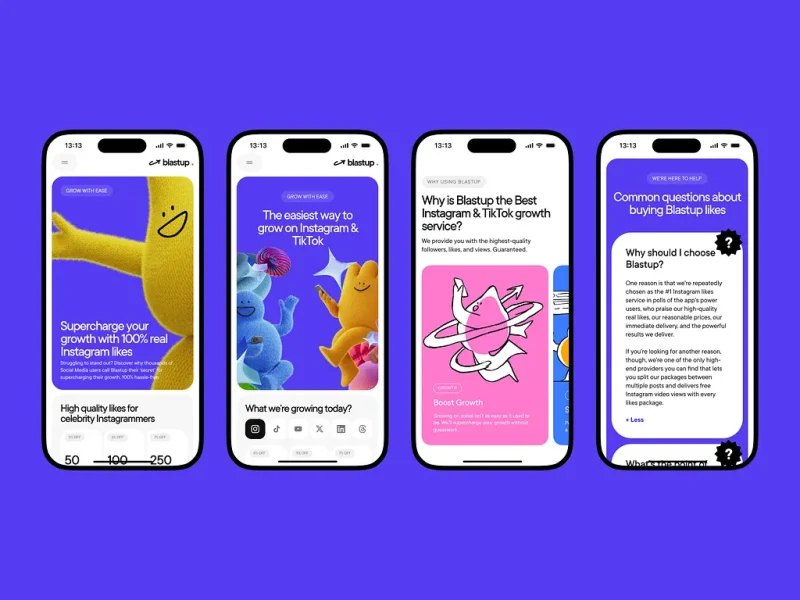
BlastUp
Blastup’s mission is simple—help users grow their social media presence, fast. We crafted a bold, dynamic identity that reflects Blastup’s energetic and friendly personality as well is their website.
Alinma Bank
This project for Alinma Bank involved a comprehensive redesign across all brand touchpoints: the logo, physical cards, website, and mobile app. The goal was to modernize and streamline the visual identity while maintaining the bank’s core values.
Coinly
Coinly is more than just a banking app — it’s a full-fledged financial literacy ecosystem for kids, designed to empower the next generation with money skills that grow with them. Built around an engaging coin mascot and a colorful 3D world, Coinly blends gamification, interactive storytelling, and real financial tools.
Design Philosophy
Design should be highly functional and intuitive, solving both business and user problems while delivering an engaging experience that users want to return to.
Design is clarity. And clarity builds trust.
Especially in fintech—where most of my projects happen—you don’t have the luxury of vague. Your design has to work, first and foremost. It has to feel smart, trustworthy, smooth. When people trust your interface, they trust your product. And when they trust your product, they’re more likely to use it again. That’s where design really proves its value.
My job is to make things useful first, beautiful second. But ideally, both at once.
The way I approach projects is structured but adaptable.
I start with full immersion—understanding the business, the audience, and the problem we’re solving. From there, I look for a unique angle, something that gives the product or brand a distinct voice. Then I push that idea as far as I can—visually, functionally, and emotionally.
And no, I don’t believe in reinventing everything 🙂
Use the patterns that work. But when something feels off or underwhelming, be bold enough to rethink it. That’s where the real creative work lives—not in chaos, but in considered evolution.
I don’t want to be known for a style. I want to be known for range.
For every project, I try to find a distinct visual language. That means experimenting—pulling in 3D, motion, illustration—whatever it takes to bring the concept to life.
And I rarely do it alone.
I collaborate closely with animators, developers, motion designers, illustrators—the kind of people who not only support the vision, but expand it. When everyone brings their strengths to the table, the result is always richer, sharper, more memorable.
What matters most is that the end result has presence. That it feels alive, intentional, and built with care.
And I care deeply about how work is presented. Every project—client or personal—is framed with context, rationale, and craft. Because good design solves problems, but great design tells a story.
Process In Bits
My process is structured, but not rigid. Usually, it looks something like this:
Polish and present Clear storytelling. Clean handoff. Confident rationale.
Understand the business What’s broken? What’s needed? What are we really solving?
Understand the user What do they expect? What’s familiar to them? What do they fear?
Build and iterate Fast feedback loops with clients and the team
One benchmark I use: if I don’t understand what I designed, how can I expect a user to?
For me, good design starts with intention. Every screen, every button, every microinteraction—there should be a reason it exists. So when a feature’s built, I walk through it in my head as if I’ve never seen it before. What would I click? What would I expect next? Can I explain what each part does without second-guessing?
After working on financial interfaces for so long, you start to internalize these flows—you almost know them by muscle memory. But that doesn’t mean you skip the test. You still go through each stage. You still assume nothing.
Sometimes, the best insights come from a teammate asking, “Wait, what does this do?” That’s your cue to look closer.
And when it comes to working with clients?
I walk clients through every stage—from moodboards to microinteractions—so there are no surprises and no last-minute pivots.
It’s about mutual trust: they trust my process, and I trust their vision.
This structure helps me manage expectations, prevent scope drift, and deliver thoughtful work—on time, without the drama.
What keeps me inspired? Looking outside the bubble.
I don’t have a list of designers I religiously follow. What inspires me is great work—wherever it lives. Sometimes it’s a slick piece of web design, sometimes a brutalist poster on the street, art style from a video game, or the typography on a jazz record sleeve.
Music plays a huge role in my creative life—I sing a bit, and I think that kind of rhythm and structure naturally finds its way into how I build interfaces.
I’m also a huge gamer, and I’m fascinated by how game mechanics influence user behavior. There’s a lot designers can learn from how games guide, reward, and surprise users.
Sometimes I’ll see a cool effect, a character design, or even just a motion detail and immediately think:
That could be the anchor for a whole experience
Not necessarily for the project I’m working on in the moment, but something I’d love to build around later. So I sort, I collect, I sketch.
I’m often looking for inspiration for one project, but bookmarking ideas for two or three others. It’s not just moodboarding—it’s pattern recognition, and planting seeds for future concepts.
Inspiration can come from anywhere—but only if you keep your eyes open.
What’s Next
Right now, I’m fully focused on building Moonsight into a studio known for bold, strategic fintech design—especially across the MENA region.
On my personal radar:
Master 3D
Launch my own product
Speak at more design events
Make Moonsight’s design Conference in Dubai happen
Join awwwards jury panel
Do more meaningful work
Mostly? Just grow. As a designer, a founder, and a creative
Parting Thoughts
If I could give one piece of advice to younger designers, it would be this:
Find what excites you. Stay obsessed with it. And don’t waste time comparing yourself to others.
We’re overexposed to each other’s work these days. It’s easy to feel behind.
But your only competition is yourself a year ago. That’s where growth lives.
This industry moves fast. But if you move with intent, your work will always find its place.