Downloading a file from a remote resource seems an easy task: download the byte stream and copy it to a local file. Beware of edge cases!
Table of Contents
Just a second! 🫷 If you are here, it means that you are a software developer.
So, you know that storage, networking, and domain management have a cost .
If you want to support this blog, please ensure that you have disabled the adblocker for this site. I configured Google AdSense to show as few ADS as possible – I don’t want to bother you with lots of ads, but I still need to add some to pay for the resources for my site.
Thank you for your understanding. – Davide
Downloading files from an online source and saving them on the local machine seems an easy task.
And guess what? It is!
In this article, we will learn how to download an online file, perform some operations on it – such as checking its file extension – and store it in a local folder. We will also learn how to deal with edge cases: what if the file does not exist? Can we overwrite existing files?
How to download a file stream from an online resource using HttpClient
Ok, this is easy. If you have the file URL, it’s easy to just download it using HttpClient.
HttpClient httpClient = new HttpClient();
Stream fileStream = await httpClient.GetStreamAsync(fileUrl);
Using HttpClient can cause some trouble, especially when you have a huge computational load. As a matter of fact, using HttpClientFactory is preferred, as we’ve already explained in a previous article.
But, ok, it looks easy – way too easy! There are two more parts to consider.
How to handle errors while downloading a stream of data
You know, shit happens!
There are at least 2 cases that stop you from downloading a file: the file does not exist or the file requires authentication to be accessed.
In both cases, an HttpRequestException exception is thrown, with the following stack trace:
at System.Net.Http.HttpResponseMessage.EnsureSuccessStatusCode()
at System.Net.Http.HttpClient.GetStreamAsyncCore(HttpRequestMessage request, CancellationToken cancellationToken)
As you can see, we are implicitly calling EnsureSuccessStatusCode while getting the stream of data.
You can tell the consumer that we were not able to download the content in two ways: throw a custom exception or return Stream.Null. We will use Stream.Null for the sake of this article.
Note: always throw custom exceptions and add context to them: this way, you’ll add more useful info to consumers and logs, and you can hide implementation details.
So, let me refactor the part that downloads the file stream and put it in a standalone method:
so that we can use Stream.Null to check for the existence of the stream.
How to store a file in your local machine
Now we have our stream of data. We need to store it somewhere.
We will need to copy our input stream to a FileStream object, placed within a using block.
using (FileStream outputFileStream = new FileStream(path, FileMode.Create))
{
    await fileStream.CopyToAsync(outputFileStream);
}
Possible errors and considerations
When creating the FileStream instance, we have to pass the constructor both the full path of the image, with also the file name, and FileMode.Create, which tells the stream what type of operations should be supported.
FileMode is an enum coming from the System.IO namespace, and has different values. Each value fits best for some use cases.
Again, there are some edge cases that we have to consider:
the destination folder does not exist: you will get an DirectoryNotFoundException exception. You can easily fix it by calling Directory.CreateDirectory to generate all the hierarchy of folders defined in the path;
the destination file already exists: depending on the value of FileMode, you will see a different behavior. FileMode.Create overwrites the image, while FileMode.CreateNew throws an IOException in case the image already exists.
When Flash was taken from us all those years ago, it felt like losing a creative home — suddenly, there were no tools left for building truly interactive experiences on the web. In its place, the web flattened into a static world of HTML and CSS.
But those days are finally behind us. We’re picking up where we left off nearly two decades ago, and the web is alive again with rich, immersive experiences — thanks in large part to powerful tools like Three.js.
I’ve been working with images, video, and interactive projects for 15 years, using things like Processing, p5.js, OpenFrameworks, and TouchDesigner. Last year, I added Three.js to the mix as a creative tool, and I’ve been loving the learning process. That ongoing exploration leads to little experiments like the one I’m sharing in this tutorial.
Project Structure
The structure of our script is going to be simple: one function to preload assets, and another one to build the scene.
Since we’ll be working with 3D text, the first thing we need to do is load a font in .json format — the kind that works with Three.js.
To convert a .ttf font into that format, you can use the Facetype.js tool, which generates a .typeface.json file.
const Resources = {
	font: null
};

function preload() {

	const _font_loader = new FontLoader();
	_font_loader.load( "../static/font/Times New Roman_Regular.json", ( font ) => {

		Resources.font = font;
		init();

	} );

}

function init() {

}

window.onload = preload;
Scene setup & Environment
A classic Three.js scene — the only thing to keep in mind is that we’re working with Three Shader Language (TSL), which means our renderer needs to be a WebGPURenderer.
const scene = new THREE.Scene();
const camera = new THREE.PerspectiveCamera(75, window.innerWidth / window.innerHeight, 0.1, 1000);
const renderer = new THREE.WebGPURenderer({ antialias: true });

document.body.appendChild(renderer.domElement);

renderer.setSize(window.innerWidth, window.innerHeight);
camera.position.z = 5;

scene.add(camera);
Next, we’ll set up the scene environment to get some lighting going.
To keep things simple and avoid loading more assets, we’ll use the default RoomEnvironment that “comes” with Three.js. We’ll also add a DirectionalLight to the scene.
By default, the origin of the text sits at (0, 0), but we want it centered. To do that, we need to compute its BoundingBox and manually apply a translation to the geometry:
Now that we have the mesh and material ready, we can move on to the function that lets us blow everything up 💥
Three Shader Language
I really love TSL — it’s closed the gap between ideas and execution, in a context that’s not always the friendliest… shaders.
The effect we’re going to implement deforms the geometry’s vertices based on the pointer’s position, and uses spring physics to animate those deformations in a dynamic way.
But before we get to that, let’s grab a few attributes we’ll need to make everything work properly:
//  Original position of each vertex — we’ll use it as a reference
//  so unaffected vertices can "return" to their original spot
const initial_position = storage( text_geo.attributes.position, "vec3", count );

//  Normal of each vertex — we’ll use this to know which direction to "push" in
const normal_at = storage( text_geo.attributes.normal, "vec3", count );

//  Number of vertices in the geometry
const count = text_geo.attributes.position.count;
Next, we’ll create a storage buffer to hold the simulation data — and we’ll also write a function. But not a regular JavaScript function — this one’s a compute function, written in the context of TSL.
It runs on the GPU and we’ll use it to set up the initial values for our buffers, getting everything ready for the simulation.
// In this buffer we’ll store the modified positions of each vertex —
// in other words, their current state in the simulation.
const   position_storage_at = storage(new THREE.StorageBufferAttribute(count,3),"vec3",count);

const compute_init = Fn( ()=>{

	position_storage_at.element( instanceIndex ).assign( initial_position.element( instanceIndex ) );

} )().compute( count );

// Run the function on the GPU. This runs compute_init once per vertex.
renderer.computeAsync( compute_init );
Now we’re going to create another one of these functions — but unlike the previous one, this one will run inside the animation loop, since it’s responsible for updating the simulation on every frame.
This function runs on the GPU and needs to receive values from the outside — like the pointer position, for example.
To send that kind of data to the GPU, we use what’s called uniforms. They work like bridges between our “regular” code and the code that runs inside the GPU shader.
With this, we can calculate the distance between the pointer position and each vertex of the geometry.
Then we clamp that value so the deformation only affects vertices within a certain radius. To do that, we use the step function — it acts like a threshold, and lets us apply the effect only when the distance is below a defined value.
Finally, we use the vertex normal as a direction to push it outward.
const compute_update = Fn(() => {

    // Original position of the vertex — also its resting position
    const base_position = initial_position.element(instanceIndex);

    // The vertex normal tells us which direction to push
    const normal = normal_at.element(instanceIndex);

    // Current position of the vertex — we’ll update this every frame
    const current_position = position_storage_at.element(instanceIndex);

    // Calculate distance between the pointer and the base position of the vertex
    const distance = length(u_input_pos.sub(base_position));

    // Limit the effect's range: it only applies if distance is less than 0.5
    const pointer_influence = step(distance, 0.5).mul(1.0);

    // Compute the new displaced position along the normal.
    // Where pointer_influence is 0, there’ll be no deformation.
    const disorted_pos = base_position.add(normal.mul(pointer_influence));

    // Assign the new position to update the vertex
    current_position.assign(disorted_pos);

})().compute(count);
To make this work, we’re missing two key steps: we need to assign the buffer with the modified positions to the material, and we need to make sure the renderer runs the compute function on every frame inside the animation loop.
// Assign the buffer with the modified positions to the material
mesh.material.positionNode = position_storage_at.toAttribute();

// Animation loop
function animate() {
	// Run the compute function
	renderer.computeAsync(compute_update_0);

	// Render the scene
	renderer.renderAsync(scene, camera);
}
Right now the function doesn’t produce anything too exciting — the geometry moves around in a kinda clunky way. We’re about to bring in springs, and things will get much better.
// Spring — how much force we apply to reach the target value
velocity += (target_value - current_value) * spring;

// Friction controls the damping, so the movement doesn’t oscillate endlessly
velocity *= friction;

current_value += velocity;
But before that, we need to store one more value per vertex, the velocity, so let’s create another storage buffer.
const position_storage_at = storage(new THREE.StorageBufferAttribute(count, 3), "vec3", count);

// New buffer for velocity
const velocity_storage_at = storage(new THREE.StorageBufferAttribute(count, 3), "vec3", count);

const compute_init = Fn(() => {

    position_storage_at.element(instanceIndex).assign(initial_position.element(instanceIndex));

    // We initialize it too
    velocity_storage_at.element(instanceIndex).assign(vec3(0.0, 0.0, 0.0));

})().compute(count);
Now we’ve got everything we need — time to start fine-tuning.
We’re going to add two things. First, we’ll use the TSL function mx_noise_vec3 to generate some noise for each vertex. That way, we can tweak the direction a bit so things don’t feel so stiff.
We’re also going to rotate the vertices using another TSL function — surprise, it’s called rotate.
Here’s what our updated compute_update function looks like:
const compute_update = Fn(() => {

    const base_position = initial_position.element(instanceIndex);
    const current_position = position_storage_at.element(instanceIndex);
    const current_velocity = velocity_storage_at.element(instanceIndex);

    const normal = normal_at.element(instanceIndex);

    // NEW: Add noise so the direction in which the vertices "explode" isn’t too perfectly aligned with the normal
    const noise = mx_noise_vec3(current_position.mul(0.5).add(vec3(0.0, time, 0.0)), 1.0).mul(u_noise_amp);

    const distance = length(u_input_pos.sub(base_position));
    const pointer_influence = step(distance, 0.5).mul(1.5);

    const disorted_pos = base_position.add(noise.mul(normal.mul(pointer_influence)));

    // NEW: Rotate the vertices to give the animation a more chaotic feel
    disorted_pos.assign(rotate(disorted_pos, vec3(normal.mul(distance)).mul(pointer_influence)));

    disorted_pos.assign(mix(base_position, disorted_pos, u_input_pos_press));

    current_velocity.addAssign(disorted_pos.sub(current_position).mul(u_spring));
    current_position.addAssign(current_velocity);
    current_velocity.assign(current_velocity.mul(u_friction));

})().compute(count);
Now that the motion feels right, it’s time to tweak the material colors a bit and add some post-processing to the scene.
We’re going to work on the emissive color — meaning it won’t be affected by lights, and it’ll always look bright and explosive. Especially once we throw some bloom on top. (Yes, bloom everything.)
We’ll start from a base color (whichever you like), passed in as a uniform. To make sure each vertex gets a slightly different color, we’ll offset its hue a bit using values from the buffers — in this case, the velocity buffer.
The hue function takes a color and a value to shift its hue, kind of like how offsetHSL works in THREE.Color.
// Base emissive color
const emissive_color = color(new THREE.Color("0000ff"));

const vel_at = velocity_storage_at.toAttribute();
const hue_rotated = vel_at.mul(Math.PI*10.0);

// Multiply by the length of the velocity buffer — this means the more movement,
// the more the vertex color will shift
const emission_factor = length(vel_at).mul(10.0);

// Assign the color to the emissive node and boost it as much as you want
mesh.material.emissiveNode = hue(emissive_color, hue_rotated).mul(emission_factor).mul(5.0);
Finally! Lets change scene background color and add Fog:
scene.fog = new THREE.Fog(new THREE.Color("#41444c"),0.0,8.5);
scene.background = scene.fog.color;
Now, let’s spice up the scene with a bit of post-processing — one of those things that got way easier to implement thanks to TSL.
We’re going to include three effects: ambient occlusion, bloom, and noise. I always like adding some noise to what I do — it helps break up the flatness of the pixels a bit.
I won’t go too deep into this part — I grabbed the AO setup from the Three.js examples.
We all use switch statements in our code. Do you use them at their full potential?
Table of Contents
Just a second! 🫷 If you are here, it means that you are a software developer.
So, you know that storage, networking, and domain management have a cost .
If you want to support this blog, please ensure that you have disabled the adblocker for this site. I configured Google AdSense to show as few ADS as possible – I don’t want to bother you with lots of ads, but I still need to add some to pay for the resources for my site.
Thank you for your understanding. – Davide
We all use switch statements in our code: they are a helpful way to run different code paths based on an check on a variable.
In this short article, we’re gonna learn different ways to write switch blocks, and some nice tricks to create clean and easy-to-read filters on such statements.
For the sake of this example, we will use a dummy hierarchy of types: a base User record with three subtypes: Player, Gamer, and Dancer.
Let’s see different usages of switch statements and switch expressions.
Switch statements
Switch statements are those with the standard switch (something) block. They allow for different executions of paths, acting as a list of if – else if blocks.
They can be used to return a value, but it’s not mandatory: you can simply use switch statements to execute code that does not return any value.
Switch statements with checks on the type
The most simple example we can have is the plain check on the type.
User user = new Gamer(30, "Nintendo Switch");

string message = "";

switch (user)
{
    case Gamer:
    {
        message = "I'm a gamer";
        break;
    }
    case Player:
    {
        message = "I'm a player";
        break;
    }
    default:
    {
        message = "My type is not handled!";
        break;
    }
}

Console.WriteLine(message); // I'm a player
Here we execute a different path based on the value the user variable has at runtime.
We can also have an automatic casting to the actual type, and then use the runtime data within the case block:
User user = new Gamer(30, "Nintendo Switch");

string message = "";

switch (user)
{
    case Gamer g:
    {
        message = "I'm a gamer, and I have a " + g.Console;
        break;
    }
    case Player:
    {
        message = "I'm a player";
        break;
    }
    default:
    {
        message = "My type is not handled!";
        break;
    }
}

Console.WriteLine(message); //I'm a gamer, and I have a Nintendo Switch
As you can see, since useris aGamer, within the related branch we cast the user to Gamer in a variable named g, so that we can use its public properties and methods.
Filtering using the WHEN keyword
We can add additional filters on the actual value of the variable by using the when clause:
User user = new Gamer(3, "Nintendo");

string message = "";

switch (user)
{
    case Gamer g when g.Age < 10:
    {
        message = "I'm a gamer, but too young";
        break;
    }
    case Gamer g:
    {
        message = "I'm a gamer, and I have a " + g.Console;
        break;
    }
    case Player:
    {
        message = "I'm a player";
        break;
    }
    default:
    {
        message = "My type is not handled!";
        break;
    }
}

Console.WriteLine(message); // I'm a gamer, but too young
Here we have the when g.Age < 10 filter applied to the Gamer g variable.
Clearly, if we set the age to 30, we will see I’m a gamer, and I have a Nintendo Switch.
Switch Expression
Switch expressions act like Switch Statements, but they return a value that can be assigned to a variable or, in general, used immediately.
They look like a lightweight, inline version of Switch Statements, and have a slightly different syntax.
To reach the same result we saw before, we can write:
User user = new Gamer(30, "Nintendo Switch");
string message = user switch{
Gamer g => "I'm a gamer, and I have a " + g.Console,
Player => "I'm a player",
_ => "My type is not handled!"};
Console.WriteLine(message);
By looking at the syntax, we can notice a few things:
instead of having switch(variable_name){}, we now have variable_name switch {};
we use the arrow notation => to define the cases;
we don’t have the default keyword, but we use the discard value _.
When keyword vs Property Pattern in Switch Expressions
Similarly, we can use the when keyword to define better filters on the cases.
string message = user switch{
Gamer gg when gg.Age < 10 => "I'm a gamer, but too young",
Gamer g => "I'm a gamer, and I have a " + g.Console,
Player => "I'm a player",
_ => "My type is not handled!"};
You can finally use a slightly different syntax to achieve the same result. Instead of using when gg.Age < 10 you can write Gamer { Age: < 10 }. This is called Property Pattern
string message = user switch{
Gamer { Age: < 10 } => "I'm a gamer, but too young",
Gamer g => "I'm a gamer, and I have a " + g.Console,
Player => "I'm a player",
_ => "My type is not handled!"};
Further readings
We actually just scratched the surface of all the functionalities provided by the C# language.
First of all, you can learn more about how to use Relational Patterns in a switch expression.
There are several ways to handle configurations in a .NET Application. In this article, we’re going to learn how to use IOptions<T>, IOptionsSnapshot<T>, and IOptionsMonitor<T>
Table of Contents
Just a second! 🫷 If you are here, it means that you are a software developer.
So, you know that storage, networking, and domain management have a cost .
If you want to support this blog, please ensure that you have disabled the adblocker for this site. I configured Google AdSense to show as few ADS as possible – I don’t want to bother you with lots of ads, but I still need to add some to pay for the resources for my site.
Thank you for your understanding. – Davide
When dealing with configurations in a .NET application, we can choose different strategies. For example, you can simply inject an IConfiguration instance in your constructor, and retrieve every value by name.
Or you can get the best out of Strongly Typed Configurations – you won’t have to care about casting those values manually because everything is already done for you by .NET.
In this article, we are going to learn about IOptions, IOptionsSnapshot, and IOptionsMonitor. They look similar, but there are some key differences that you need to understand to pick the right one.
For the sake of this article, I’ve created a dummy .NET API that exposes only one endpoint.
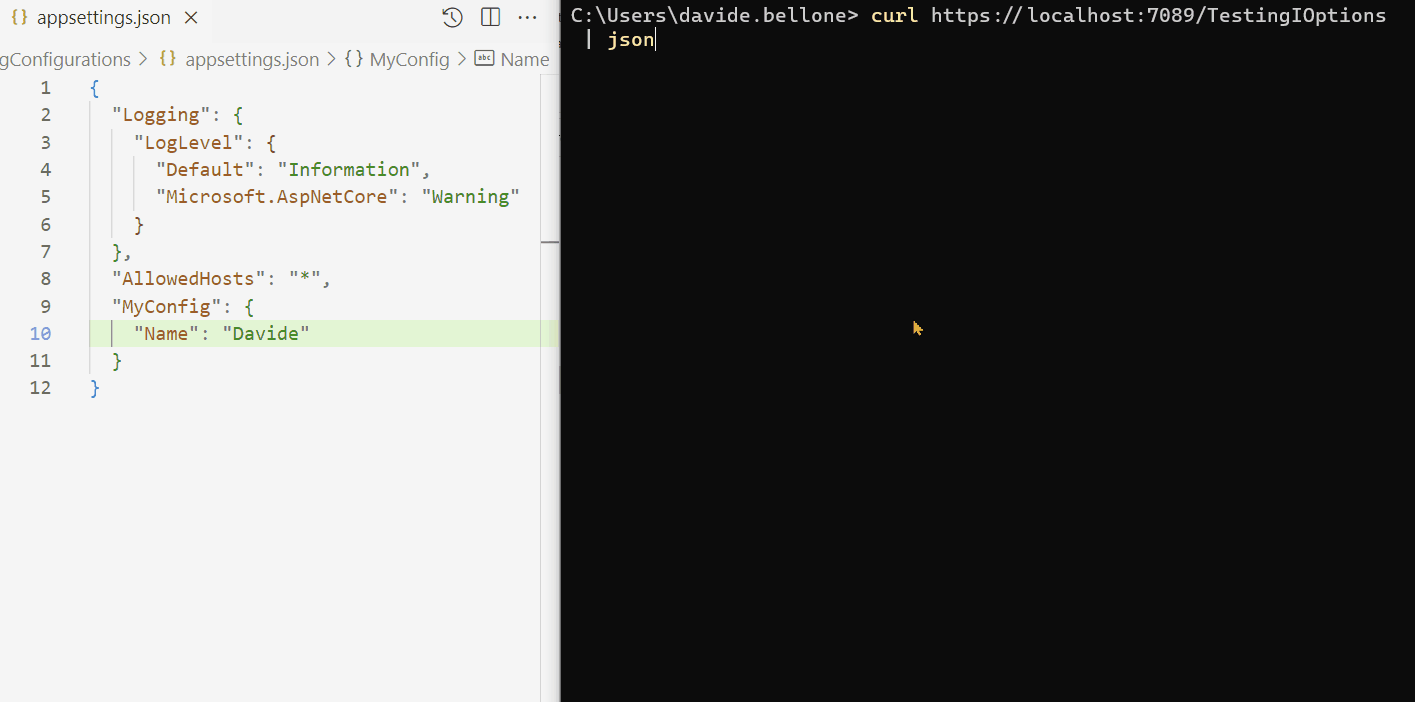
In my appsettings.json file, I added a node:
{
  "MyConfig": {
    "Name": "Davide"
  }
}
that will be mapped to a POCO class:
publicclassGeneralConfig{
publicstring Name { get; set; }
}
To add it to the API project, we can add this line to the Program.cs file:
As you can see, it takes the content with the name “MyConfig” and maps it to an object of type GeneralConfig.
To test such types, I’ve created a set of dummy API Controllers. Each Controller exposes one single method, Get(), that reads the value from the configuration and returns it in an object.
We are going to inject IOptions, IOptionsSnapshot, and IOptionsMonitor into the constructor of the related Controllers so that we can try the different approaches.
IOptions: Simple, Singleton, doesn’t support config reloads
IOptions<T> is the most simple way to inject such configurations. We can inject it into our constructors and access the actual value using the Value property:
Now we have direct access to the GeneralConfig object, with the values populated as we defined in the appsettings.json file.
There are a few things to consider when using IOptions<T>:
This service is injected as a Singleton instance: the whole application uses the same instance, and it is valid throughout the whole application lifetime.
all the configurations are read at startup time. Even if you update the appsettings file while the application is running, you won’t see the values updated.
Some people prefer to store the IOptions<T> instance as a private field, and access the value when needed using the Value property, like this:
privatereadonly IOptions<GeneralConfig> _config;
privateint updates = 0;
public TestingController(IOptions<GeneralConfig> config)
{
_config = config;
}
[HttpGet]public ActionResult<Result> Get()
{
var name = _config.Value.Name;
returnnew Result
{
MyName = name,
Updates = updates
};
}
It works, but it’s useless: since IOptions<T> is a Singleton, we don’t need to access the Value property every time. It won’t change over time, and accessing it every single time is a useless operation. We can use the former approach: it’s easier to write and (just a bit) more performant.
One more thing.
When writing Unit Tests, we can inject an IOptions<T> in the system under test using a static method, Options.Create<T>, and pass it an instance of the required type.
[SetUp]publicvoid Setup()
{
var config = new GeneralConfig { Name = "Test" };
var options = Options.Create(config);
_sut = new TestingController(options);
}
Demo: the configuration does not change at runtime
Below you can find a GIF that shows that the configurations do not change when the application is running.
As you can see, I performed the following steps:
start the application
call the /TestingIOptions endpoint: it returns the name Davide
now I update the content of the appsettings.json file, setting the name to Davide Bellone.
when I call again the same endpoint, I don’t see the updated value.
Similar to IOptions<T> we have IOptionsSnapshot<T>. They work similarly, but there is a huge difference: IOptionsSnapshot<T> is recomputed at every request.
public TestingController(IOptionsSnapshot<GeneralConfig> config)
{
    _config = config.Value;
}
With IOptionsSnapshot<T> you have always the most updated values: this service is injected with a Scoped lifetime, meaning that the values are read from configuration at every HTTP request. This also means that you can update the settings values while the application is running, and you’ll be able to see the updated results.
Since .NET rebuilds the configurations at every HTTP call, there is a slight performance overhead. So, if not necessary, always use IOptions<T>.
There is no way to test an IOptionsSnapshot<T> as we did with IOptions<T>, so you have to use stubs or mocks (maybe with Moq or NSubstitute 🔗).
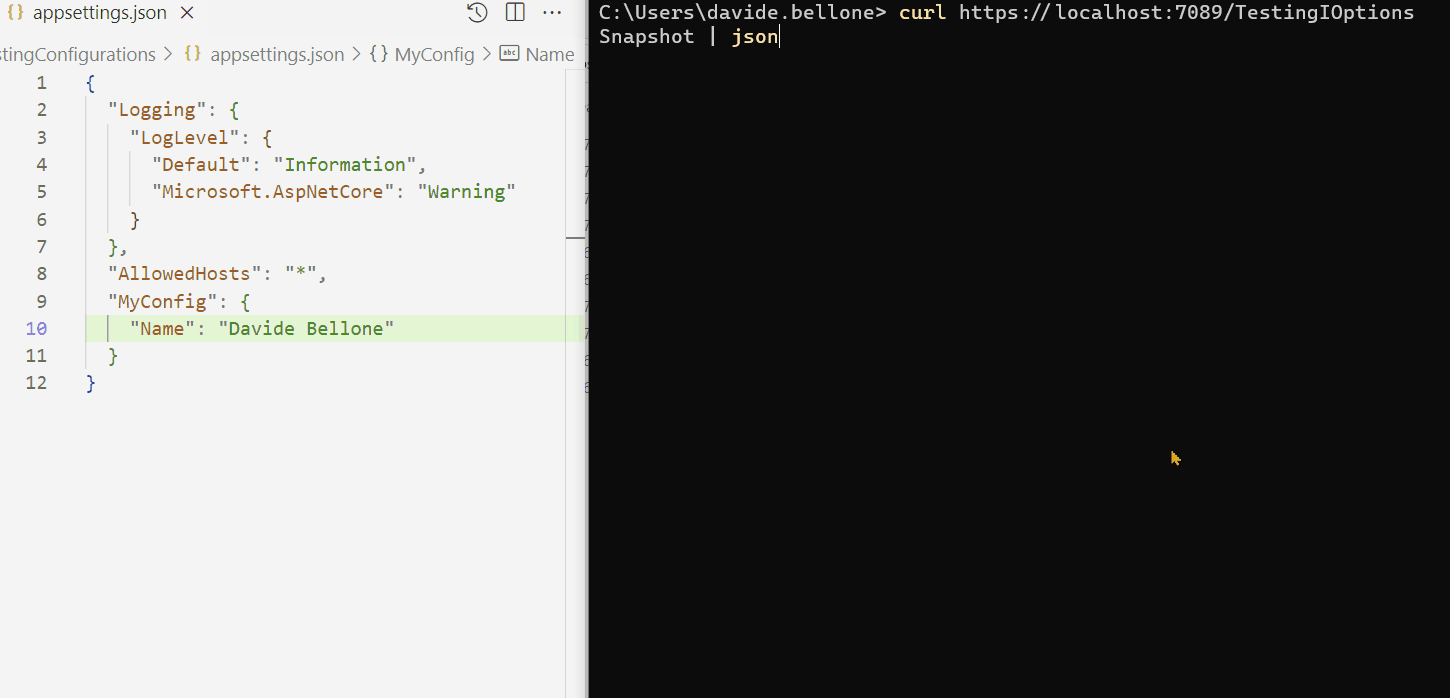
Demo: the configuration changes while the application is running
Look at the GIF below: here I run the application and call the /TestingIOptionsSnapshot endpoint.
I performed the following steps:
run the application
call the /TestingIOptionsSnapshot endpoint. The returned value is the same on the appsettings.json file: Davide Bellone.
I then update the value on the configuration file
when calling again /TestingIOptionsSnapshot, I can see that the returned value reflects the new value in the appsettings file.
Finally, the last one of the trio: IOptionsMonitor<T>.
Using IOptionsMonitor<T> you can have the most updated value on the appsettings.json file.
We also have a callback event that is triggered every time the configuration file is updated.
It’s injected as a Singleton service, so the same instance is shared across the whole application lifetime.
There are two main differences with IOptions<T>:
the name of the property that stores the config value is CurrentValue instead of Value;
there is a callback that is called every time you update the settings file: OnChange(Action<TOptions, string?> listener). You can use it to perform operations that must be triggered every time the configuration changes.
Note: OnChange returns an object that implements IDisposable that you need to dispose. Otherwise, as Chris Elbert noticed (ps: follow him on Twitter!) , the instance of the class that uses IOptionsMonitor<T> will never be disposed.
I also learned IOptionsMonitor.OnChange returns a disposable reference that you need to dispose, otherwise your instance of a class will never be disposed because there’s a reference to it from IOptionsMonitor.
Again, there is no way to test an IOptionsMonitor<T> as we did with IOptions<T>. So you should rely on stubs and mocks (again, maybe with Moq or NSubstitute 🔗).
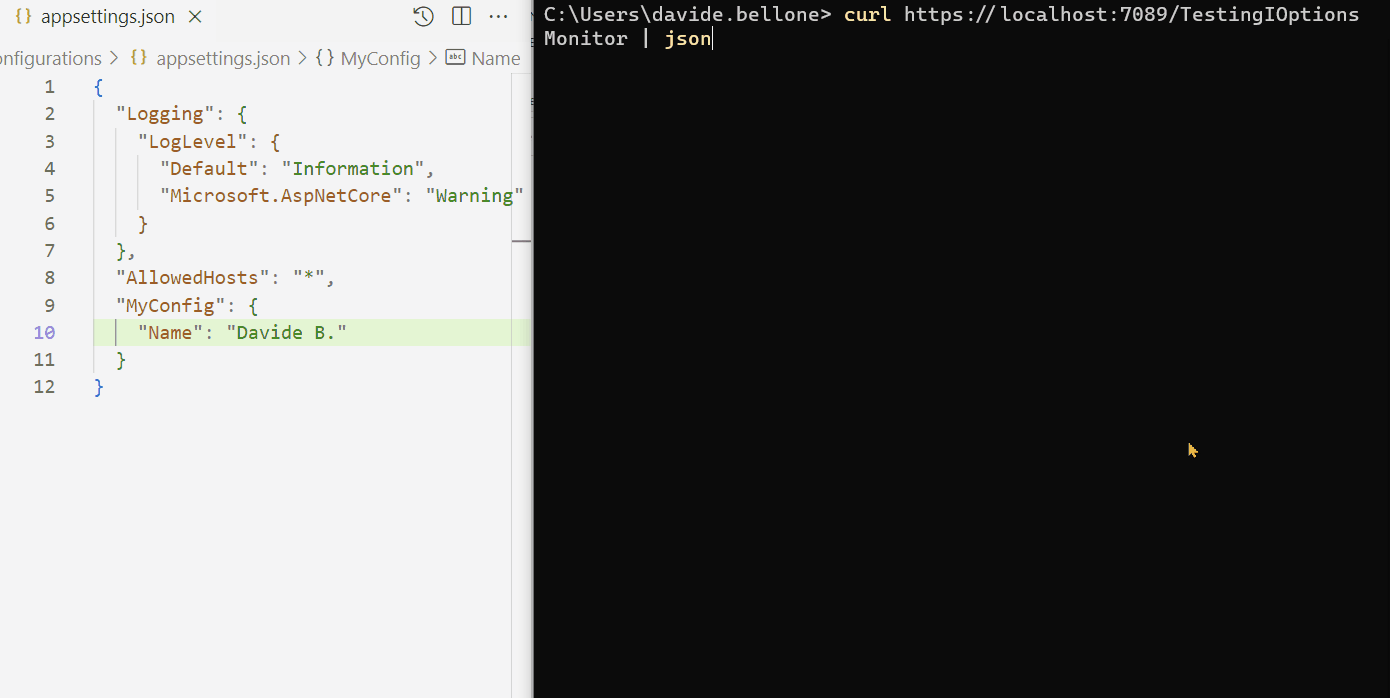
Demo: the configuration changes, and the callback is called
In the GIF below I demonstrate the usage of IOptionsMonitor.
I created an API controller that listens to changes in the configuration, updates a static counter, and returns the final result from the API:
By running it and modifying the config content while the application is up and running, you can see the full usage of IOptionsMonitor<T>:
As you can see, I performed these steps:
run the application
call the /TestionIOptionsMonitor endpoint. The MyName field is read from config, and Updates is 0;
I then update and save the config file. In the background, the OnChange callback is fired, and the Updates value is updated;
Oddly, the callback is called more times than expected. I updated the file only twice, but the counter is set to 6. That’s weird behavior. If you know why it happens, drop a message below 📩
IOptions vs IOptionsSnapshot vs IOptionsMonitor in .NET
We’ve seen a short introduction to IOptions, IOptionsSnapshot, and IOptionsMonitor.
There are some differences, of course. Here’s a table with a recap of what we learned from this article.
Type
DI Lifetime
Best way to inject in unit tests
Allows live reload
Has callback function
IOptions<T>
Singleton
Options.Create<T>
❌
❌
IOptionsSnapshot<T>
Scoped
Stub / Mock
🟢
❌
IOptionsMonitor<T>
Singleton
Stub / Mock
🟢
🟢
There’s actually more: for example, with IOptionsSnapshot and IOptionsMonitor you can use named options, so that you can inject more instances of the same type that refer to different nodes in the JSON file.
But that will be the topic for a future article, so stay tuned 😎
Further readings
There is a lot more about how to inject configurations.
For sure, one of the best resources is the official documentation:
I insisted on explaining that IOptions and IOptionsMonitor are Singleton, while IOptionsSnapshot is Scoped.
If you don’t know what they mean, here’s a short but thorough explanation:
In particular, I want you to focus on the Bonus tip, where I explain the problems of having Transient or Scoped services injected into a Singleton service:
In this article, I stored my configurations in an appsettings.json file. There are more ways to set configuration values – for example, Environment Variables and launchSettings.json.
In this article, we learned how to use IOptions<T>, IOptionsSnapshot<T>, and IOptionsMonitor<T> in a .NET 7 application.
There are many other ways to handle configurations: for instance, you can simply inject the whole object as a singleton, or use IConfiguration to get single values.
When would you choose an approach instead of another? Drop a comment below! 📩
I hope you enjoyed this article! Let’s keep in touch on Twitter or LinkedIn! 🤜🤛
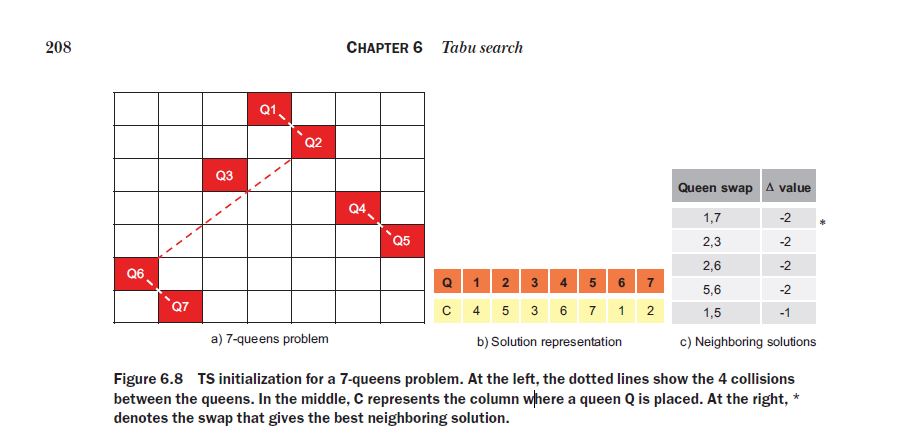
The n-queens problem is a classic puzzle that involves placing n chess queens on an n × n chessboard in such a way that no two queens threaten each other. In other words, no two queens should share the same row, column, or diagonal. This is a constraintsatisfaction problem (CSP) that does not define an explicit objective function. Let’s suppose we are attempting to solve a 7-queens problem using tabu search. In this problem, the number of collisions in the initial random configuration shown in figure 6.8a is 4: {Q1– Q2}, {Q2– Q6}, {Q4– Q5}, and {Q6– Q7}.
The above is part of the book Optimization Algorithms by Alaa Khamis, which I have used as a stepstone, in order to make a YT video, explaining the core of the tabu search with the algorithm. The solution of the n-queens problem is actually interesting, as its idea is to swap queen’s columns until these are allowed to be swaped and until the constrains are solved. The “tabu tenure” is just a type of record, that does not allow a certain change to be carried for a number of moves after it has been carried out. E.g., once you replace the columns of 2 queens, you are not allowed to do the same for the next 3 moves. This allows you to avoid loops.
21 TSI isn’t your typical sports holding company. Overseeing a portfolio of brands in the sports equipment space, the team set out to break from the mold of the standard corporate website. Instead, they envisioned a digital experience that would reflect their DNA—where innovation, design, and technology converge into a rich, immersive journey.
The result is a site that goes beyond static content, inviting users to explore through motion, interactivity, and meticulously crafted visuals. Developed through a close collaboration between type8 Studio and DEPARTMENT Maison de Création, the project pushes creative and technical boundaries to deliver a seamless, engaging experience.
Concept & Art Direction
The creative direction led by Paul Barbin played a crucial role in shaping the website’s identity. The design embraces a minimalist yet bold aesthetic—strictly monochromatic, anchored by a precise and structured typographic system. The layout is intentionally clean, but the experience stays dynamic thanks to well-orchestrated WebGL animations and subtle interactions.
Grid & Style
The definition of the grid played a fundamental role in structuring and clarifying the brand’s message. More than just a layout tool, the grid became a strategic framework—guiding content organization, enhancing readability, and ensuring visual consistency across all touchpoints.
We chose an approach inspired by the Swiss style, also known as the International Typographic Style, celebrated for its clarity, precision, and restraint. This choice reflects our commitment to clear, direct, and functional communication, with a strong focus on user experience. The grid allows each message to be delivered with intention, striking a subtle balance between aesthetics and efficiency.
A unique aspect of the project was the integration of AI-generated imagery. These visuals were thoughtfully curated and refined to align with the brand’s futuristic and enigmatic identity, further reinforcing the immersive nature of the website.
Interaction & Motion Design
The experience of 21 TSI is deeply rooted in movement. The site feels alive—constantly shifting and morphing in response to user interactions. Every detail works together to evoke a sense of fluidity:
WebGL animations add depth and dimension, making the site feel tactile and immersive.
Cursor distortion effects introduce a subtle layer of interactivity, letting users influence their journey through motion.
Scroll-based animations strike a careful balance between engagement and clarity, ensuring motion enhances the experience without overwhelming it.
This dynamic approach creates a browsing experience that feels both organic and responsive—keeping users engaged without ever overwhelming them.
Technical Implementation & Motion Design
For this project, we chose a technology stack designed to deliver high performance and smooth interactions, all while maintaining the flexibility needed for creative exploration:
OGL: A lightweight alternative to Three.js, used for WebGL-powered animations and visual effects.
Anime.js: Handles motion design elements and precise animation timing.
Locomotive Scroll: Enables smooth, controlled scroll behavior throughout the site.
Eleventy (11ty): A static site generator that ensures fast load times and efficient content management.
Netlify: Provides seamless deployment and version control, keeping the development workflow agile.
One of the key technical challenges was optimizing performance across devices while preserving the same fluid motion experience. Carefully balancing GPU-intensive WebGL elements with lightweight animations made seamless performance possible.
Challenges & Solutions
One of the primary challenges was ensuring that the high level of interactivity didn’t compromise usability. The team worked extensively to refine transitions so they felt natural, while keeping navigation intuitive. Balancing visual complexity with performance was equally critical—avoiding unnecessary elements while preserving a rich, engaging experience.
Another challenge was the use of AI-generated visuals. While they introduced unique artistic possibilities, these assets required careful curation and refinement to align with the creative vision. Ensuring coherence between the AI-generated content and the designed elements was a meticulous process.
Conclusion
The 21 TSI website is a deep exploration of digital storytelling through design and interactivity. It captures the intersection of technology and aesthetics, offering an experience that goes well beyond a traditional corporate presence.
The project was recognized with multiple awards, including Website of the Day on CSS Design Awards, FWA of the Day, and Awwwards, reinforcing its impact in the digital design space.
This collaboration between type8 Studio and Paul Barbin of DEPARTMENT Maison de Création showcases how thoughtful design, innovative technology, and a strong artistic vision can come together to craft a truly immersive web experience.
By default, you cannot use Dependency Injection, custom logging, and configurations from settings in a Console Application. Unless you create a custom Host!
Table of Contents
Just a second! 🫷 If you are here, it means that you are a software developer.
So, you know that storage, networking, and domain management have a cost .
If you want to support this blog, please ensure that you have disabled the adblocker for this site. I configured Google AdSense to show as few ADS as possible – I don’t want to bother you with lots of ads, but I still need to add some to pay for the resources for my site.
Thank you for your understanding. – Davide
Sometimes, you just want to create a console application to run a complex script. Just because it is a “simple” console application, it doesn’t mean that you should not use best practices, such as using Dependency Injection.
Also, you might want to test the code: Dependency Injection allows you to test the behavior of a class without having a strict dependency on the referenced concrete classes: you can use stubs and mocks, instead.
In this article, we’re going to learn how to add Dependency Injection in a .NET 7 console application. The same approach can be used for other versions of .NET. We will also add logging, using Serilog, and configurations coming from an appsettings.json file.
We’re going to start small, with the basic parts, and gradually move on to more complex scenarios. We’re gonna create a simple, silly console application: we will inject a bunch of services, and print a message on the console.
We have a root class:
publicclassNumberWorker{
privatereadonly INumberService _service;
public NumberWorker(INumberService service) => _service = service;
publicvoid PrintNumber()
{
var number = _service.GetPositiveNumber();
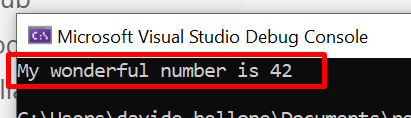
Console.WriteLine($"My wonderful number is {number}");
}
}
that injects an INumberService, implemented by NumberService:
publicinterfaceINumberService{
int GetPositiveNumber();
}
publicclassNumberService : INumberService
{
privatereadonly INumberRepository _repo;
public NumberService(INumberRepository repo) => _repo = repo;
publicint GetPositiveNumber()
{
int number = _repo.GetNumber();
return Math.Abs(number);
}
}
which, in turn, uses an INumberRepository implemented by NumberRepository:
The console application will create a new instance of NumberWorker and call the PrintNumber method.
Now, we have to build the dependency tree and inject such services.
How to create an IHost to use a host for a Console Application
The first step to take is to install some NuGet packages that will allow us to add a custom IHost container so that we can add Dependency Injection and all the customization we usually add in projects that have a StartUp (or a Program) class, such as .NET APIs.
We need to install 2 NuGet packages: Microsoft.Extensions.Hosting.Abstractions and Microsoft.Extensions.Hosting will be used to create a new IHost that will be used to build the dependencies tree.
By navigating your csproj file, you should be able to see something like this:
Host.CreateDefaultBuilder() creates the default IHostBuilder – similar to the IWebHostBuilder, but without any reference to web components.
Then we add all the dependencies, using services.AddSingleton<T, K>. Notice that it’s not necessary to add services.AddSingleton<NumberWorker>: when we will use the concrete instance, the dependency tree will be resolved, without the need of having an indication of the root itself.
Finally, once we have everything in place, we call Build() to create a new instance of IHost.
Now, we just have to run it!
In the Main method, create the IHost instance by calling CreateHost(). Then, by using the ActivatorUtilities class (coming from the Microsoft.Externsions.DependencyInjection namespace), create a new instance of NumberWorker, so that you can call PrintNumber();
Now you are ready to run the application, and see the message on the console:
Read configurations from appsettings.json for a Console Library
We want to make our system configurable and place our configurations in an appsettings.json file.
As we saw in a recent article 🔗, we can use IOptions<T> to inject configurations in the constructor. For the sake of this article, I’m gonna use a POCO class, NumberConfig, that is mapped to a configuration section and injected into the classes.
Now we need to manually create an appsettings.json file within the project folder, and add a new section that will hold the values of the configuration:
{
  "Number": {
    "DefaultNumber": -899
  }
}
and now we can add the configuration binding in our CreateHost() method, within the ConfigureServices section:
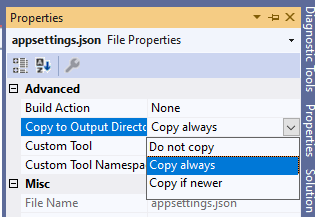
Run the project to admire the result, and… BOOM! It will not work! You should see the message “My wonderful number is 0”, even though the number we set on the config file is -899.
This happens because we must include the appsettings.json file in the result of the compilation. Right-click on that file, select the Properties menu, and set the “Copy to Output Directory” to “Copy always”:
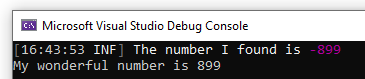
Now, build and run the project, and you’ll see the correct message: “My wonderful number is 899”.
Clearly, the same values can be accessed via IConfigurations.
Add Serilog logging to log on Console and File
Finally, we can add Serilog logs to our console applications – as well as define Sinks.
To add Serilog, you first have to install these NuGet packages:
Serilog.Extensions.Hosting and Serilog.Formatting.Compact to add the basics of Serilog;
Serilog.Settings.Configuration to read logging configurations from settings (if needed);
Serilog.Sinks.Console and Serilog.Sinks.File to add the Console and the File System as Sinks.
Let’s get back to the CreateHost() method, and add a new section right after ConfigureServices:
Here we’re telling that we need to read the config from Settings, add logging context, and write both on Console and on File (only if the log message level is greater or equal than Warning).
Then, add an ILogger here and there, and admire the final result:
Final result
To wrap up, here’s the final implementation of the Program class and the
CreateHost method:
In this article, we’ve learned how we can customize a .NET Console application to use dependency injection, external configurations, and Serilog logging.
I hope you enjoyed this article! Let’s keep in touch on Twitter or LinkedIn! 🤜🤛
When writing unit tests, there are smarter ways to check if two objects are equal than just comparing every field one by one.
Table of Contents
Just a second! 🫷 If you are here, it means that you are a software developer.
So, you know that storage, networking, and domain management have a cost .
If you want to support this blog, please ensure that you have disabled the adblocker for this site. I configured Google AdSense to show as few ADS as possible – I don’t want to bother you with lots of ads, but I still need to add some to pay for the resources for my site.
Thank you for your understanding. – Davide
When writing unit tests, you might want to check that the result returned by a method is equal to the one you’re expecting.
publicstatic Player GetClone(Player source)
=> new Player
{
Id = source.Id,
UserName = source.UserName,
Score = source.Score
};
and call it this way:
[Test]publicvoid GetClone()
{
var originalPlayer = new Player { Id = 1, UserName = "me", Score = 1 };
var clonedPlayer = MyUtils.GetClone(originalPlayer);
Assert.That(clonedPlayer, Is.EqualTo(originalPlayer));
}
Even though logically originalPlayer and clonedPlayer are equal, they are not the same: the test will fail!
Lucky for us, we can specify the comparison rules!
Equality function: great for simple checks
Say that we don’t want to check that all the values match. We only care about Id and UserName.
When we have just a few fields to check, we can use a function to specify that two items are equal:
[Test]publicvoid GetClone_WithEqualityFunction()
{
var originalPlayer = new Player { Id = 1, UserName = "me", Score = 1 };
var clonedPlayer = MyUtils.GetClone(originalPlayer);
Assert.That(clonedPlayer, Is.EqualTo(originalPlayer).Using<Player>(
(Player a, Player b) => a.Id == b.Id && a.UserName == b.UserName)
);
}
Clearly, if the method becomes unreadable, you can refactor the comparer function as so:
[Test]publicvoid GetClone_WithEqualityFunction()
{
var originalPlayer = new Player { Id = 1, UserName = "me", Score = 1 };
var clonedPlayer = MyUtils.GetClone(originalPlayer);
Func<Player, Player, bool> comparer = (Player a, Player b) => a.Id == b.Id && a.UserName == b.UserName;
Assert.That(clonedPlayer, Is.EqualTo(originalPlayer).Using<Player>(comparer));
}
EqualityComparer class: best for complex scenarios
If you have a complex scenario to validate, you can create a custom class that implements the IEqualityComparer interface. Here, you have to implement two methods: Equals and GetHashCode.
Instead of just implementing the same check inside the Equals method, we’re gonna try a different approach: we’re gonna use GetHashCode to determine how to identify a Player, by generating a string used as a simple identifier, and then we’re gonna use the HashCode of the result string for the actual comparison:
Clearly, I’ve also added a check on nullability: (x is null && y is null).
Now we can instantiate a new instance of PlayersComparer and use it to check whether two players are equivalent:
[Test]publicvoid GetClone_WithEqualityComparer()
{
var originalPlayer = new Player { Id = 1, UserName = "me", Score = 1 };
var clonedPlayer = MyUtils.GetClone(originalPlayer);
Assert.That(clonedPlayer, Is.EqualTo(originalPlayer).Using<Player>(new PlayersComparer()));
}
Of course, you can customize the Equals method to use whichever condition to validate the equivalence of two instances, depending on your business rules. For example, you can say that two vectors are equal if they have the exact same length and direction, even though the start and end points are different.
❓ A question for you: where would you put the equality check: in the production code or in the tests project?
Wrapping up
As we’ve learned in this article, there are smarter ways to check if two objects are equal than just comparing every field one by one.
I hope you enjoyed this article! Let’s keep in touch on Twitter or LinkedIn! 🤜🤛
Centralizing configurations can be useful for several reasons: security, consistency, deployability. In this article, we’re gonna use Azure App Configuration to centralize the configurations used in a .NET API application.
Table of Contents
Just a second! 🫷 If you are here, it means that you are a software developer.
So, you know that storage, networking, and domain management have a cost .
If you want to support this blog, please ensure that you have disabled the adblocker for this site. I configured Google AdSense to show as few ADS as possible – I don’t want to bother you with lots of ads, but I still need to add some to pay for the resources for my site.
Thank you for your understanding. – Davide
Almost every application requires some sort of configuration: connection strings, default values, and so on.
It’s not a good practice to keep all the configurations in your codebase: if your code leaks online, you’ll have all your connection strings, private settings, and API keys exposed online.
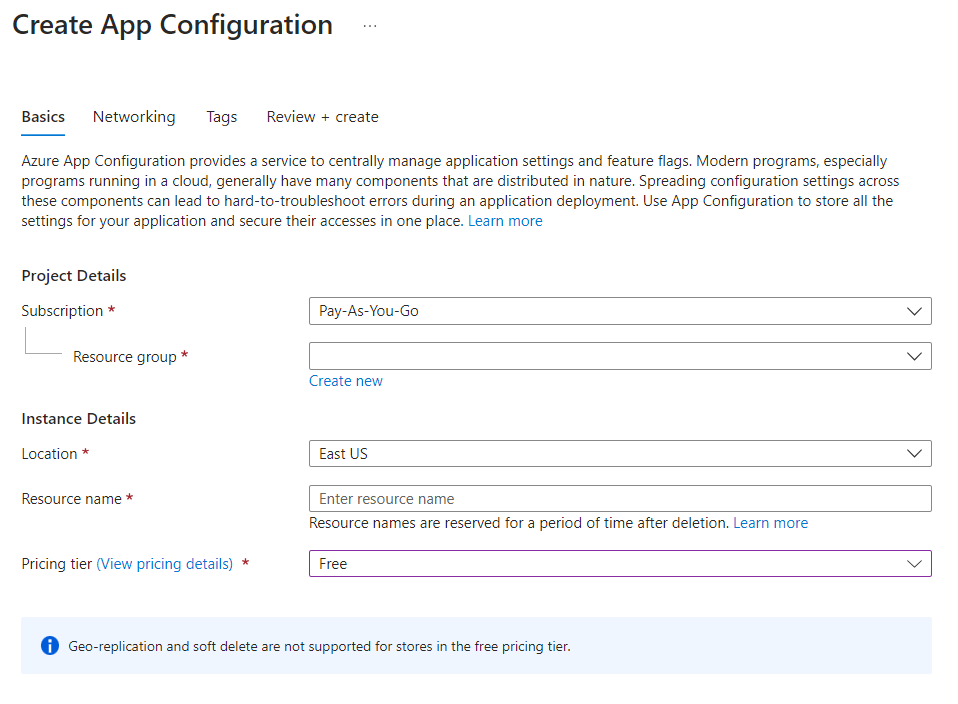
In this article, we’re gonna make our application more secure by moving our configurations to the cloud and using Azure App Configurations to securely use such configs in our applications.
But first, as always, we need a dummy project to demonstrate such capabilities.
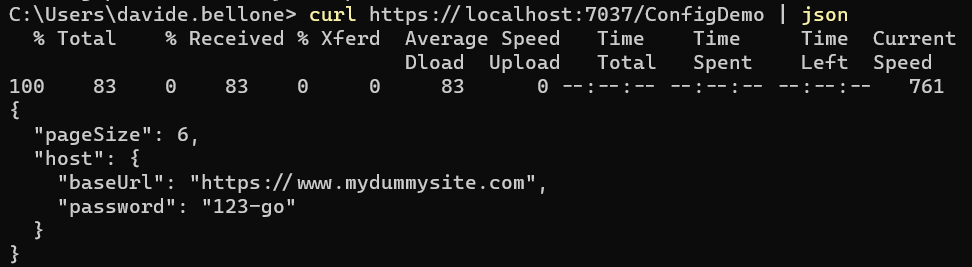
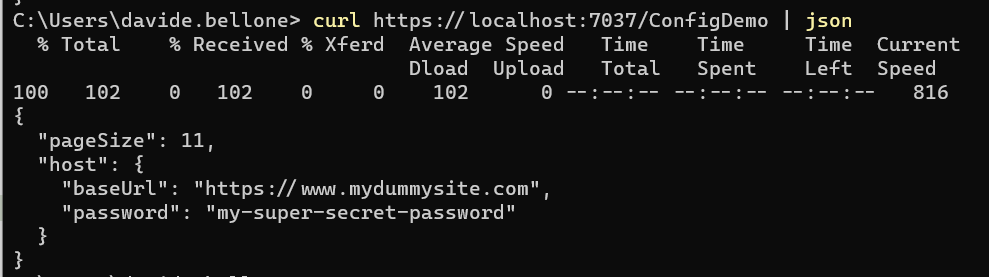
I created a simple .NET 7 API project with just one endpoint, /ConfigDemo, that returns the values from the settings.
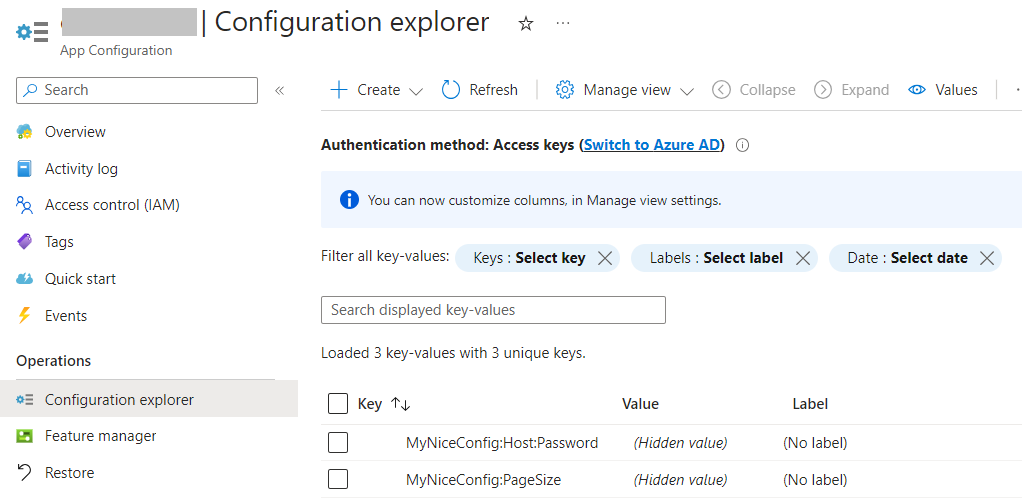
We want to update the page size and the password. Locate Configuration Explorer in the left menu, click on Create, and add a new value for each configuration. Remember: nested configurations can be defined using the : sign: to update the password, the key must be MyNiceConfig:Host:Password. Important: do not set labels or tags, for now: they are advanced topics, and require some additional settings that we will probably explore in future articles.
Once you’ve overridden both values, you should be able to see something like this:
How to integrate Azure App Configuration in a .NET application
Now we are ready to integrate Azure App Configuration with our .NET APIs.
First things first: we must install the Microsoft.Azure.AppConfiguration.AspNetCore NuGet Package:
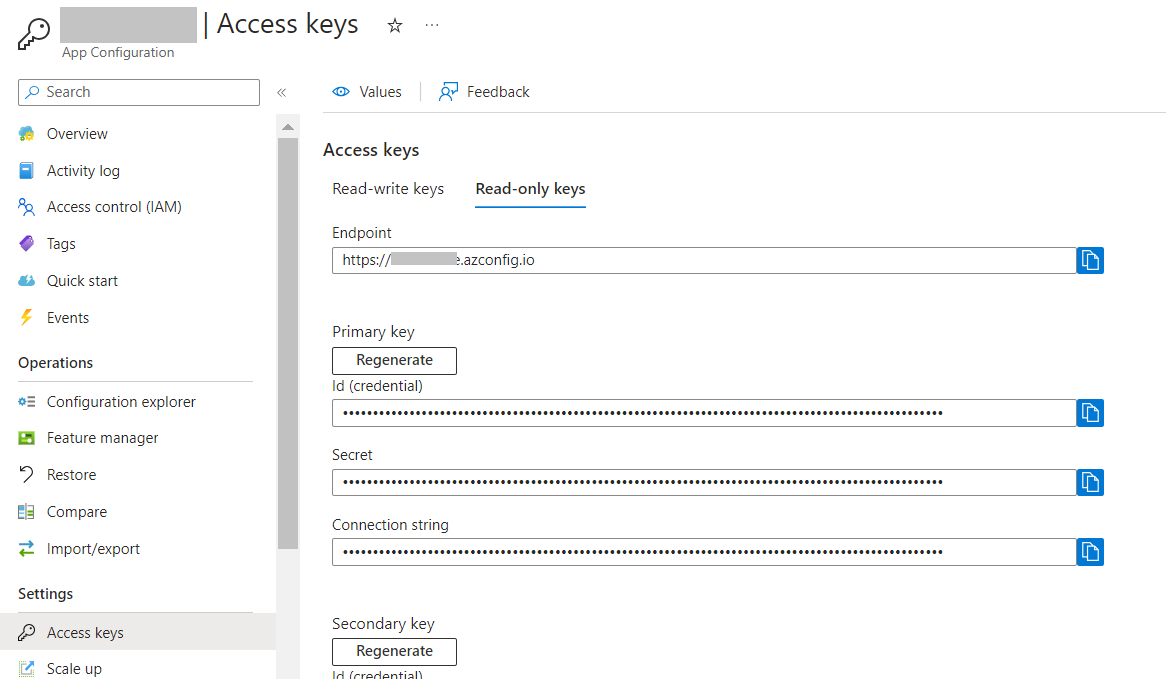
Then, we need to find a way to connect to our App Configuration instance. There are two ways: using Azure Active Directory (Azure AD) or using a simple Access Key. We’re gonna use the latter.
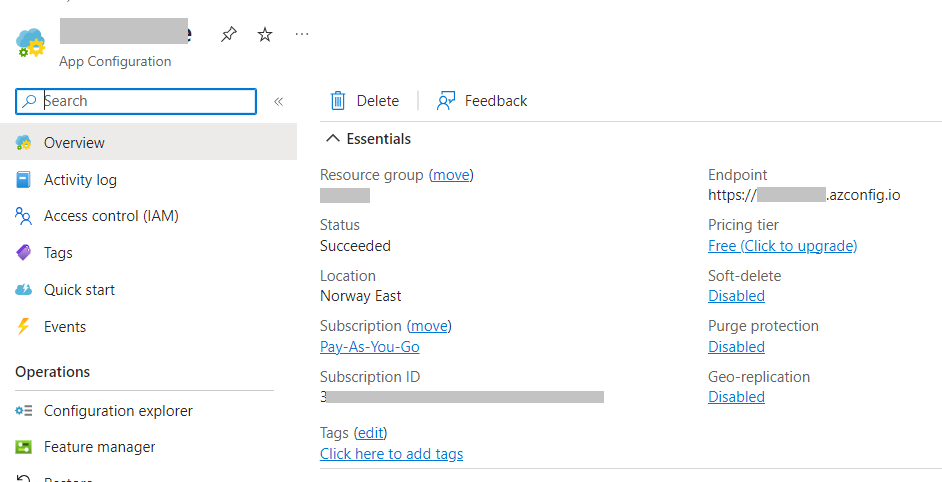
Get back to Azure, and locate the Access Keys menu item. Then head to Read-only keys, and copy the full connection string.
Do NOT store it on your repository! There are smarter, more secure ways to store use such connection strings:
Environment variables: for example, run the application with dotnet run --MYKEY=<your_connection_string>;
launchsettings.json key: you can use different configurations based on the current profile;
secrets store: hidden values only available on your machine. Can be set using dotnet user-secrets set MyKey "<your_connection_string>";
pipeline configurations: you can define such values in your CI/CD pipelines;
But still, for the sake of this example, I will store the connection string in a local variable 😁
You can now run the APIs and call the previous endpoint to see the new results
Why should you use Azure App Configuration?
In my opinion, having a proper way to handle configurations is crucial for the success of a project.
Centralizing configurations can be useful in three different ways:
Your application is more secure since you don’t risk having the credentials exposed on the web;
You can share configurations across different services: say that you have 4 services that access the same external APIs that require a Client Secret. Centralizing the config helps in having consistent values across the different services and, for example, updating the secret for all the applications in just one place;
Use different configs based on the environment: with Azure App Configuration you can use a set of tags and labels to determine which configs must be loaded in which environment. This simplifies a lot the management of configurations across different environments.
But notice that, using the basic approach that we used in this article, configurations coming from Azure are loaded at the startup of the application: configs are static until you restart the application. You can configure your application to poll Azure App Configuration to always have the most updated values without the need of restarting the application, but it will be the topic of a future article.
Further readings
Configuration management is one of the keys to the success of a project: if settings are difficult to manage and difficult to set locally for debugging, you’ll lose a lot of time (true story! 😩).
However, there are several ways to set configurations for a .NET application, such as Environment Variables, launchSettings, and so on.