Success! Uber Freight, a leader in freight logistics, is now a Browserling customer!
It’s another small step for a ling but one giant leap for ling kind.
What Is Browserling?
Browserling is a cross-browser testing service that lets users test websites and web applications in different browsers to ensure they work correctly. It also works as a browser sandbox, allowing users to safely check suspicious links and web pages without affecting their own devices. Developers, testers, and regular users can use it to see how websites look and behave across different browsers. IT security professionals find it useful for safely analyzing links and identifying potential vulnerabilities in a secure environment.
Who Uses Browserling?
Browserling has now become the cross-browser testing service of choice and it’s used by hundreds of thousands of users around the world every month. Browserling’s customers include governments, states, cities, banks, stock exchanges, universities, newspapers, and Fortune 100 companies.
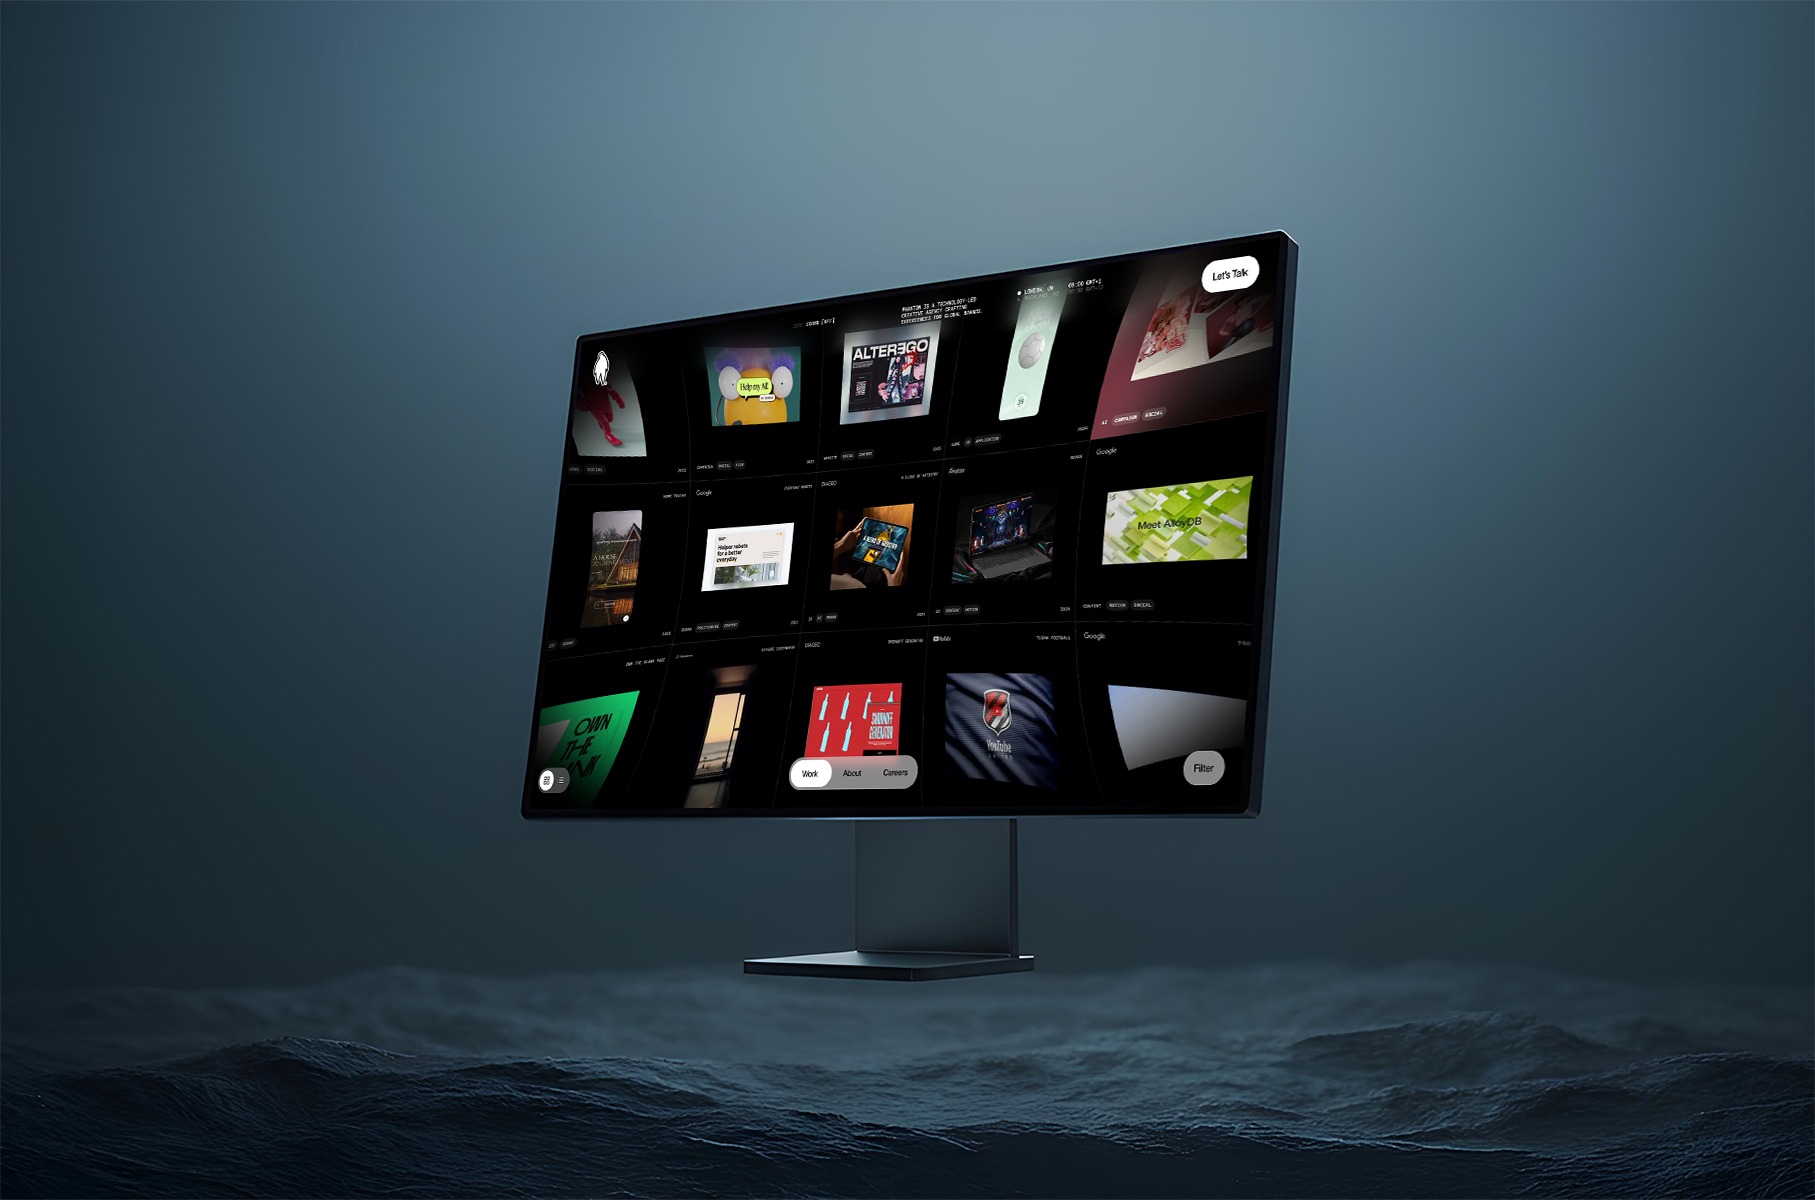
From the outset, we knew we wanted something that subverted any conventional agency website formulas. Instead,
inspired by the unseen energy that drives creativity, connection and transformation, we arrived at the idea of invisible forces
. Could we take the powerful yet intangible elements that shape our world—motion, emotion, intuition, and
inspiration—and manifest them in a digital space?
We were excited about creating something that included many custom interactions and a very experiential feel. However,
our concern was picking a set of tools that would allow most of our developers to contribute to and maintain the site
after launch.
We chose to start from a Next / React base, as we often do at Phantom. React also has the advantage of being
compatible with the excellent React Three Fiber library, which we used to seamlessly bridge the gap between our DOM
components and the WebGL contexts used across the site. For styles, we are using our very own CSS components
as well as SASS.
For interactive behaviours and animation, we chose to use GSAP for two main reasons. Firstly, it contains a lot of
plugins we know and love, such as SplitText, CustomEase and ScrollTrigger. Secondly, GSAP allows us to use a single
animation framework across DOM and WebGL components.
We could go on and on talking about the details behind every single animation and micro-interaction on the site, but
for this piece we have chosen to focus our attention on two of the most unique components of our site: the homepage
grid and the scrollable employee face particle carousel.
The Homepage Grid
It took us a very long time to get this view to perform and feel just how we wanted it to. In this article, we will focus on the interactive part. For more info on how we made things performant, head to our previous article: Welcome back to Phantomland
Grid View
The project’s grid view is integrated into the homepage by incorporating a primitive Three.js object into a React
Three Fiber scene.
We initially wanted to write all the code for the grid using React Three Fiber but realised that, due to the
complexity of our grid component, a vanilla Three.js
class would be easier to maintain.
One of the key elements that gives our grid its iconic feel is our post-processing distortion effect. We implemented
this feature by creating a custom shader pass within our post-processing pipeline:
When the grid transitions in and out on the site, the distortion intensity changes to make the transition feel
natural. This animation is done through a simple tween in our DistortionShader
class:
We also added a vignette effect to our post-processing shader to darken the corners of the viewport, focusing the
user’s attention toward the center of the screen.
In order to make our home view as smooth as possible, we also spent a fair amount of time crafting the
micro-interactions and transitions of the grid.
Ambient mouse offset
When the user moves their cursor around the grid, the grid moves slightly in the opposite direction, creating a very
subtle ambient floating effect. This was simply achieved by calculating the mouse position on the grid and moving the
grid mesh accordingly:
getAmbientCursorOffset() {
  // Get the pointer coordinates in UV space ( 0 - 1 ) range
  const uv = this.navigation.pointerUv;
  const offset = uv.subScalar(0.5).multiplyScalar(0.2);
  return offset;
}

update() {
  ...
  // Apply cursor offset to grid position
  const cursorOffset = getAmbientCursorOffset();
  this.mesh.position.x += cursorOffset.x;
  this.mesh.position.y += cursorOffset.y;
}
Drag Zoom
When the grid is dragged around, a zoom-out effect occurs and the camera seems to pan away from the grid. We created
this effect by detecting when the user starts and stops dragging their cursor, then using that to trigger a GSAP
animation with a custom ease for extra control.
Last but not least, when the user drags across the grid and releases their cursor, the grid slides through with a
certain amount of inertia.
drag(offset: Vector2) {
  this.dragAction = offset;

  // Gradually increase velocity with drag time and distance
  this.velocity.lerp(offset, 0.8);
}

// Every frame
update() {
  // positionOffset is later used to move the grid mesh
  if(this.isDragAction) {
    // if the user is dragging their cursor, add the drag value to offset
    this.positionOffset.add(this.dragAction.clone());
  } else {
    // if the user is not dragging, add the velocity to the offset
    this.positionOffset.add(this.velocity);
  }

  this.dragAction.set(0, 0);
  // Attenuate velocity with time
  this.velocity.lerp(new Vector2(), 0.1);
}
Face Particles
The second major component we want to highlight is our employee face carousel, which presents team members through a
dynamic 3D particle system. Built with React Three Fiber’s BufferGeometry
and custom GLSL shaders, this implementation leverages custom shader materials for lightweight performance and
flexibility, allowing us to generate entire 3D face representations using only a 2D colour photograph and its
corresponding depth map—no 3D models required.
Core Concept: Depth-Driven Particle Generation
The foundation of our face particle system lies in converting 2D imagery into volumetric 3D representations. We’ve
kept things efficient, with each face using only two optimized 256×256 WebP images (under 15KB each).
To capture the images, each member of the Phantom team was 3D scanned using RealityScan
from Unreal Engine on iPhone, creating a 3D model of their face.
These scans were cleaned up and then rendered from Cinema4D with a position and colour pass.
The position pass was converted into a greyscale depth map in Photoshop, and this—along with the colour pass—was
retouched where needed, cropped, and then exported from Photoshop to share with the dev team.
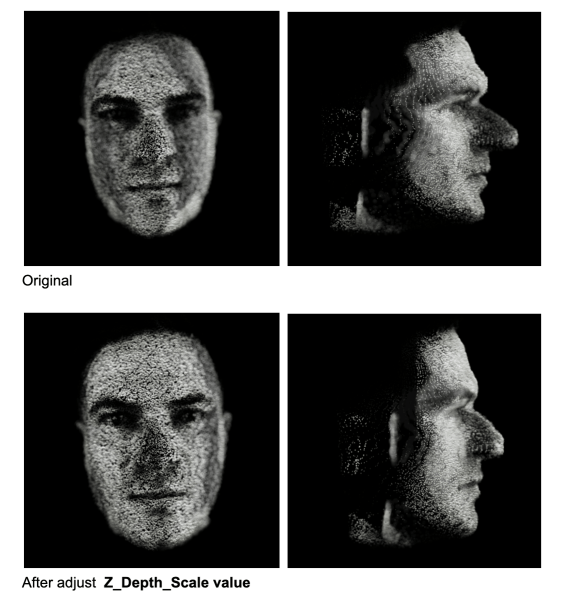
Each face is constructed from approximately 78,400 particles (280×280 grid), where each particle’s position and
appearance is determined by sampling data from our two source textures.
The depth map provides normalized values (0–1) that directly translate to Z-depth positioning. A value of 0 represents
the furthest point (background), while 1 represents the closest point (typically the nose tip).
/* vertex shader */

// sample depth and color data for each particle
vec3 depthTexture1 = texture2D(depthMap1, vIndex.xy).xyz;

// convert depth to Z-position
float zDepth = (1. - depthValue.z);
pos.z = (zDepth * 2.0 - 1.0) * zScale;
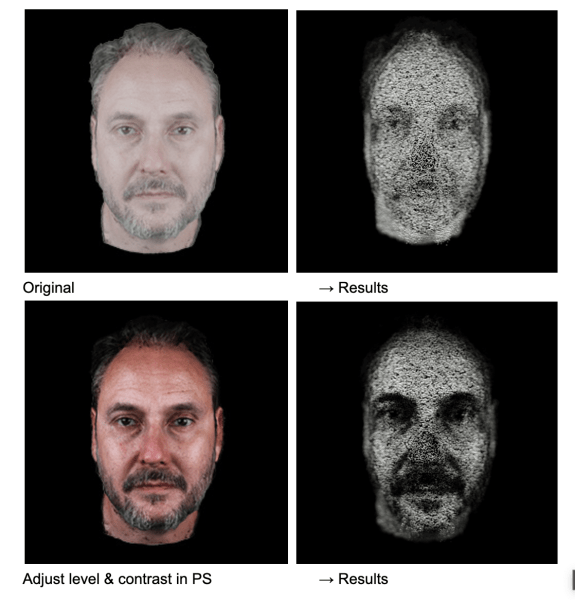
Dynamic Particle Scaling Through Colour Analysis
One of the key methods that brings our faces to life is utilizing colour data to influence particle scale. In our
vertex shader, rather than using uniform particle sizes, we analyze the colour density of each pixel so that brighter,
more colourful areas of the face (like eyes, lips, or well-lit cheeks) generate larger, more prominent particles,
while darker areas (shadows, hair) create smaller, subtler particles. The result is a more organic, lifelike
representation that emphasizes facial features naturally.
/* vertex shader */

vec3 colorTexture1 = texture2D(colorMap1, vIndex.xy).xyz;

// calculate color density
float density = (mainColorTexture.x + mainColorTexture.y + mainColorTexture.z) / 3.;

// map density to particle scale
float pScale = mix(pScaleMin, pScaleMax, density);
The calibration below demonstrates the influence of colour (contrast, brightness, etc.) on the final 3D particle formation.
Ambient Noise Animation
To prevent static appearances and maintain visual interest, we apply continuous noise-based animation to all
particles. This ambient animation system uses curl noise to create subtle, flowing movement across the entire
face structure.
To add visual interest during transitions, we further inject additional noise that’s strongest at the midpoint of the
transition. This creates a subtle “disturbance” effect where particles temporarily deviate from their target
positions, making transitions feel more dynamic and organic.
To enhance the three-dimensional perception, we implemented a custom depth of field effect directly in our shader
material. It calculates view-space distance for each particle and modulates both opacity and size based on proximity
to a configurable focus plane.
One of the challenges we faced was achieving visual consistency across different team members’ photos. Each photograph
was captured under slightly different conditions—varying lighting, camera distances, and facial proportions.
Therefore, we went through each face to calibrate multiple scaling factors:
Depth scale calibration
to ensure no nose protrudes too aggressively
Colour density balancing
to maintain consistent particle size relationships
Focus plane optimization
to prevent excessive blur on any individual face
Our face particle system demonstrates how simple yet careful technical implementation can create fun visual
experiences from minimal assets. By combining lightweight WebP textures, custom shader materials, and animations,
we’ve created a system that transforms simple 2D portraits into interactive 3D figures.
Now each month, on the last day of June, we show a 50% discount offer to all users who visit our site.
Buy a Subscription Now!
What Is Browserling?
Browserling is an online service that lets you test how other websites look and work in different web browsers, like Chrome, Firefox, or Safari, without needing to install them. It runs real browsers on real machines and streams them to your screen, kind of like remote desktop but focused on browsers. This helps web developers and regular users check for bugs, suspicious links, and weird stuff that happens in certain browsers. You just go to Browserling, pick a browser and version, and then enter the site you want to test. It’s quick, easy, and works from your browser with no downloads or installs.
What Are Online Tools?
Online Tools is an online service that offers free, browser-based productivity tools for everyday tasks like editing text, converting files, editing images, working with code, and way more. It’s an all-in-one Digital Swiss Army Knife with 1500+ utilities, so you can find the exact tool you need without installing anything. Just open the site, use what you need, and get things done fast.
Who Uses Browserling and Online Tools?
Browserling and Online Tools are used by millions of regular internet users, developers, designers, students, and even Fortune 100 companies. Browserling is handy for testing websites in different browsers without having to install them. Online Tools are used for simple tasks like resizing or converting images, or even fixing small file problems quickly without downloading any apps.
Success! Publuu, a leader in digital publishing, is now a Browserling customer!
It’s another small step for a ling but one giant leap for ling kind.
What Is Browserling?
Browserling is a cross-browser testing service that lets users test websites and web applications in different browsers to ensure they work correctly. It also works as a browser sandbox, allowing users to safely check suspicious links and web pages without affecting their own devices. Developers, testers, and regular users can use it to see how websites look and behave across different browsers. IT security professionals find it useful for safely analyzing links and identifying potential vulnerabilities in a secure environment.
Who Uses Browserling?
Browserling has now become the cross-browser testing service of choice and it’s used by hundreds of thousands of users around the world every month. Browserling’s customers include governments, states, cities, banks, stock exchanges, universities, newspapers, and Fortune 100 companies.
Success! Pelican, a top provider of protective equipment, is now a Browserling customer!
It’s another small step for a ling but one giant leap for ling kind.
What Is Browserling?
Browserling is a cross-browser testing service that lets users test websites and web applications in different browsers to ensure they work correctly. It also works as a browser sandbox, allowing users to safely check suspicious links and web pages without affecting their own devices. Developers, testers, and regular users can use it to see how websites look and behave across different browsers. IT security professionals find it useful for safely analyzing links and identifying potential vulnerabilities in a secure environment.
Who Uses Browserling?
Browserling has now become the cross-browser testing service of choice and it’s used by hundreds of thousands of users around the world every month. Browserling’s customers include governments, states, cities, banks, stock exchanges, universities, newspapers, and Fortune 100 companies.
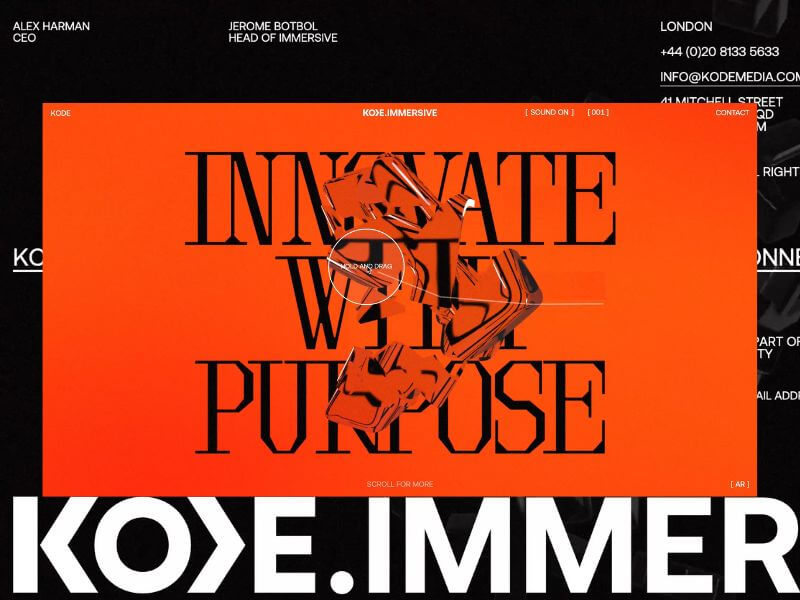
KODE Immersive fuses AR, VR, real-time 3D, and spatial computing to craft high-impact, interactive experiences. It’s not just a platform – it’s a portal. Designed to ignite emotion, shatter expectations, and redefine digital engagement.
Our challenge? To bring this pioneering vision to life, not just by explaining what KODE Immersive is, but by making visitors experience what it’s like to be inside it.
Background
Our relationship with KODE began in 2022 when we extended their brand identity and reimagined their digital home. What started as a brand refresh quickly evolved into a creative partnership rooted in shared values and a mutual obsession with crafted brand experience and beautiful design.
In late 2024, KODE approached us with a new venture. This time, they were diving headfirst into emerging technologies (AI, WebXR, and real-time 3D) to expand their service offering. We knew immediately, this was the kind of project you dream about. It was a timely opportunity and got us excited to push boundaries.
The Brief
The brief was as open as it gets. Beyond a few core objectives (namely, budget and timeline), there were no strict constraints. We received a three-slide deck: a name, a positioning statement, three brand pillars (CREATE, IDEATE, DELIVER), and a few straplines.
No case studies. No visual identity. Just a bold vision.
And that freedom became our greatest asset. We built everything from scratch, visual language, tone, interactions, while staying mindful of budget and speed. Our approach: move fast, iterate often, and push boundaries.
To pull it off, we adopted a phased R&D process. We teamed up with the brilliant Francesco Michelini (who previously helped build the Malvah website). Francesco lives and breathes WebGL. He once spent a week refining a mechanic we had already agreed to abandon, just because he couldn’t accept defeat. That kind of drive made him the perfect collaborator.
Our Process
We used KODE Immersive as a live testing ground for our refined four-phase process, aimed at delivering the best creative solutions while avoiding unnecessary feedback loops. Here’s how it shaped the final outcome.
01 Discover
We kicked things off with an in-depth strategy session where we unpacked the brief, explored concepts, discussed competitors, and mapped out technical possibilities. Style tiles helped form the foundation of our visual language.
Typography was the key differentiator. We knew the right typeface would communicate innovation and intent. After multiple rounds, we landed on Brut by Off-Type – an unconventional mono-inspired form that struck just the right balance of structure and tension.
Colour took cues from the parent brand, but we flipped the hierarchy. Orange became the dominant tone, with bold black moments layered throughout. Familiar, yet distinctive.
Iconography evolved from KODE’s chevron mark. We repurposed it as a modular, dynamic system to guide interactions and reflect the brand’s three core pillars.
02 Create
This phase became interesting, since the experience would rely heavily on user interaction, this phase was driven more by prototyping than traditional design. We worked in tight, iterative loops with the client, across design, 3D, and development to test feasibility early and often. It became an it was extremely organic process and ideal to reach the deadline while stretching limitations.
From the start, we knew we didn’t just want users to interact—we wanted them to feel immersed. To lose track of time by being emotionally and mentally engaged.
We developed a range of 3D concepts in Cinema 4D and funnelled them through R&D cycles. The process required a lot of iterating and relooking creative solutions, but was always collaborative – and ultimately, essential for innovation.
03 Craft
This is where the magic happens.
Our craft is what we consider our special sauce at Malvah – this is where we like to push, refine, and design with intent and clarity. It’s hard not to get lost in the sauce. Massive respect for Francesco during this phase as it is the most intense in terms of iterations, from shader logic to ambient lighting to the haptic quality of cursor interactions, and every component was built to feel immersive yet effortless. Luckily, Francesco is an actual living wizard and provided us with testing environments where we could craft all these elements seamlessly.
Still, something was missing! The high-fidelity 3D was clashing with the flat backgrounds. The fix? A subtle layer of pixel distortion and soft noise texture. Minimal, but transformative. Suddenly, the whole experience felt unified – like everything belonged as one unified, harmonious experience.
04 Deliver
By final QA, most of the heavy lifting was done. We stress-tested performance across browsers, devices, and connection speeds. We refined micro-interactions and polished details based on early user feedback.
Tech Stack
Nerd stuff alert.
From the outset, this was always going to be a Three.js and WebGL project – not for the novelty, but for the storytelling power. Real-time 3D let us turn a static brand into a living, breathing experience. We used Cinema 4D for concepting and prototyping, from early ideation through to final modelling and meta-cap creation.
One of the most impactful performance optimisations came through the use of BatchedMesh, which enabled us to draw multiple meshes sharing the same material in a single draw call. Since draw calls are among the most expensive operations in WebGL, this dramatically improved efficiency, reducing calls from 40 or 50 down to just one. You’ll see this in action in both the hero section and the footer, where we also implemented the Rapier physics engine for dynamic interaction.
The real breakthrough, however, was moving the rendering of our most resource-intensive canvases to an OffscreenCanvas, with all related logic handled inside a WebWorker. This shift happened later in the project and required significant reworking, but the gains in performance and responsiveness were undeniable. It was a technically ambitious move, but one that paid off.
Features
The site follows a continuous scroll narrative—a careful dance between interactivity, emotion, and information. With the primary goal to provoke curiosity and invite deep engagement, rom top to bottom, here’s a rundown of our favourite features.
Chevron
We land on the hero of the brand, the logo-mark. The chevron is the anchor, both literally and metaphorically. The driving force behind the iconography that would funnel through the experience. We wanted the entry point to set the tone, bold, dynamic, and intuitive for the user to explore.
Shifting Text
One of those happy accidents. Inspired by a line that didn’t make the final copy, we developed a mechanic where text splits and shifts as the cursor moves. A metaphor for deconstruction and reformation – fluid, dynamic, alive.
Icons
A playful space to explore, discover, and interact. Designed to echo the brand’s chevron and embody its core pillars.
Menu
One of our favourite elements. It subverts the typical UX pattern by growing from the base and transforming into the footer as users scroll; a small disruption that makes a big impact.
SFX
Sound is often the unsung hero. We follow the 80/20 rule here, also known as the Pareto Principle —just the right amount to amplify emotion without overwhelming the experience. From section transitions to hover feedback, the layered soundscape adds depth and atmosphere. The transition from the landing section to the services has the user feeling as if they are entering a new realm.
We worked with Martin Leitner from Sounds Good to curate the sound elements in aiding the experience and bringing the interaction with the 3D elements to life. This was such a great experience, and Martin’s enthusiasm helped drive the process and the team’s excitement.
Easter Egg
We always planned for an easter egg, we just didn’t know what it was until it revealed itself.
A sketch mechanic, pulled from KODE’s visual identity, was integrated into the cursor. Users can draw on the screen to reveal a hidden layer; a playful nod to the analogue-digital duality of the brand.
Early testers were missing it entirely. So we added a subtle auto-activation trigger at just the right moment. Problem solved.
Reflections
This project reminded us that the best results often emerge from ambiguity. No case studies. No visual assets. No roadmap. Just vision and trust.
While we’re proud of what we’ve delivered, we’ve only scratched the surface. Phase Two will introduce interactive case studies and deeper storytelling. We’re especially excited to explore a z-axis scroll journey through each service, bringing dimension and discovery to the next level.For now, KODE Immersive is live.
Success! Amnesty International, a global advocate for human rights, is now a Browserling customer!
It’s another small step for a ling but one giant leap for ling kind.
What Is Browserling?
Browserling is a cross-browser testing service that lets users test websites and web applications in different browsers to ensure they work correctly. It also works as a browser sandbox, allowing users to safely check suspicious links and web pages without affecting their own devices. Developers, testers, and regular users can use it to see how websites look and behave across different browsers. IT security professionals find it useful for safely analyzing links and identifying potential vulnerabilities in a secure environment.
Who Uses Browserling?
Browserling has now become the cross-browser testing service of choice and it’s used by hundreds of thousands of users around the world every month. Browserling’s customers include governments, states, cities, banks, stock exchanges, universities, newspapers, and Fortune 100 companies.
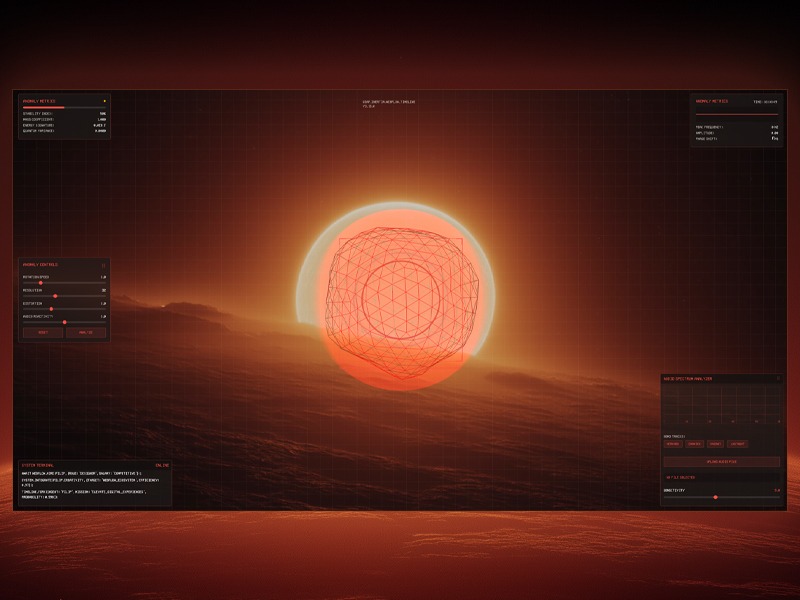
Sound is vibration, vision is vibration you can see. I’m always chasing the moment those waves overlap. For a recent Webflow & GSAP community challenge focusing on GSAP Draggable and Inertia Plugin, I decided to push the idea further by building a futuristic audio-reactive visualizer. The concept was to create a sci-fi “anomaly detector” interface that reacts to music in real time, blending moody visuals with sound.
The concept began with a simple image in my mind: a glowing orange-to-white sphere sitting alone in a dark void, the core that would later pulse with the music. To solidify the idea, I ran this prompt through Midjourney: “Glowing orange and white gradient sphere, soft blurry layers, smooth distortion, dark black background, subtle film-grain, retro-analog vibe, cinematic lighting.” After a few iterations I picked the frame that felt right, gave it a quick color pass in Photoshop, and used that clean, luminous orb as the visual foundation for the entire audio-reactive build.
Midjourney explorations
The project was originally built as an entry for the Webflow × GSAP Community Challenge (Week 2: “Draggable & Inertia”), which encouraged the use of GSAP’s dragging and inertia capabilities. This context influenced the features: I made the on-screen control panels draggable with momentum, and even gave the 3D orb a subtle inertia-driven movement when “flung”. In this article, I’ll walk you through the entire process – from setting up the Three.js scene and analyzing audio with the Web Audio API, to creating custom shaders and adding GSAP animations and interactivity. By the end, you’ll see how code, visuals, and sound come together to create an immersive audio visualizer.
Setting Up the Three.js Scene
To build the 3D portion, I used Three.js to create a scene containing a dynamic sphere (the “anomaly”) and other visual elements.
We start with the usual Three.js setup: a scene, a camera, and a renderer. I went with a perspective camera to get a nice 3D view of our orb and placed it a bit back so the object is fully in frame.
An OrbitControls is used to allow basic click-and-drag orbiting around the object (with some damping for smoothness). Here’s a simplified snippet of the initial setup:
// Initialize Three.js scene, camera, renderer
const scene = new THREE.Scene();
const camera = new THREE.PerspectiveCamera(75, window.innerWidth/window.innerHeight, 0.1, 100);
camera.position.set(0, 0, 10);  // camera back a bit from origin

const renderer = new THREE.WebGLRenderer({ antialias: true });
renderer.setSize(window.innerWidth, window.innerHeight);
document.body.appendChild(renderer.domElement);

// Add OrbitControls for camera rotation
const controls = new THREE.OrbitControls(camera, renderer.domElement);
controls.enableDamping = true;
controls.dampingFactor = 0.1;
controls.rotateSpeed = 0.5;
controls.enableZoom = false; // lock zoom for a more fixed view
Next, I created the anomaly object. This is the main feature: a spiky wireframe sphere that reacts to audio. Three.js provides shapes like SphereGeometry or IcosahedronGeometry that we can use for a sphere. I chose an icosahedron geometry because it gives an interesting multi sided look and allows easy control of detail (via a subdivision level). The anomaly is actually composed of two overlapping parts:
Outer wireframe sphere: An IcosahedronGeometry with a custom ShaderMaterial that draws it as a glowing wireframe. This part will distort based on music (imagine it “vibrating” and morphing with the beat).
Inner glow sphere: A slightly larger SphereGeometry drawn with a semi-transparent, emissive shader (using the backside of the geometry) to create a halo or aura around the wireframe. This gives the orb a warm glow effect, like an energy field.
I also added in some extra visuals: a field of tiny particles floating in the background (for a depth effect, like dust or sparks) and a subtle grid overlay in the UI (more on the UI later). The scene’s background is set to a dark color, and I layered a background image (the edited Midjourney visual) behind the canvas to create the mysterious-alien landscape horizon. This combination of 3D objects and 2D backdrop creates the illusion of a holographic display over a planetary surface.
Integrating the Web Audio API for Music Analysis
With the 3D scene in place, the next step was making it respond to music. This is where the Web Audio API comes in. I allowed the user to either upload an audio file or pick one of the four provided tracks. When the audio plays, we tap into the audio stream and analyze its frequencies in real-time using an AnalyserNode. The AnalyserNode gives us access to frequency data. This is a snapshot of the audio spectrum (bass, mids, treble levels, etc.) at any given moment, which we can use to drive animations.
To set this up, I created an AudioContext and an AnalyserNode, and connected an audio source to it. If you’re using an <audio> element for playback, you can create a MediaElementSource from it and pipe that into the analyser. For example:
// Create AudioContext and Analyser
const audioContext = new (window.AudioContext || window.webkitAudioContext)();
const analyser = audioContext.createAnalyser();
analyser.fftSize = 2048;                  // Use an FFT size of 2048 for analysis
analyser.smoothingTimeConstant = 0.8;     // Smooth out the frequencies a bit

// Connect an audio element source to the analyser
const audioElement = document.getElementById('audio-player');  // <audio> element
const source = audioContext.createMediaElementSource(audioElement);
source.connect(analyser);
analyser.connect(audioContext.destination);  // connect to output so sound plays
Here we set fftSize to 2048, which means the analyser will break the audio into 1024 frequency bins (frequencyBinCount is half of fftSize). We also set a smoothingTimeConstant to make the data less jumpy frame-to-frame. Now, as the audio plays, we can repeatedly query the analyser for data. The method analyser.getByteFrequencyData(array) fills an array with the current frequency magnitudes (0–255) across the spectrum. Similarly, getByteTimeDomainData gives waveform amplitude data. In our animation loop, I call analyser.getByteFrequencyData() on each frame to get fresh data:
const frequencyData = new Uint8Array(analyser.frequencyBinCount);

function animate() {
  requestAnimationFrame(animate);

  // ... update Three.js controls, etc.
  if (analyser) {
    analyser.getByteFrequencyData(frequencyData);
    // Compute an average volume level from frequency data
    let sum = 0;
    for (let i = 0; i < frequencyData.length; i++) {
      sum += frequencyData[i];
    }
    const average = sum / frequencyData.length;
    let audioLevel = average / 255;  // normalize to 0.0–1.0
    // Apply a sensitivity scaling (from a UI slider)
    audioLevel *= (sensitivity / 5.0);
    // Now audioLevel represents the intensity of the music (0 = silence, ~1 = very loud)
  }

  // ... (use audioLevel to update visuals)
  renderer.render(scene, camera);
}
In my case, I also identified a “peak frequency” (the frequency bin with the highest amplitude at a given moment) and some other metrics just for fun, which I display on the UI (e.g. showing the dominant frequency in Hz, amplitude, etc., as “Anomaly Metrics”). But the key takeaway is the audioLevel – a value representing overall music intensity – which we’ll use to drive the 3D visual changes.
Syncing Audio with Visuals: Once we have audioLevel, we can inject it into our Three.js world. I passed this value into the shaders as a uniform every frame, and also used it to tweak some high-level motion (like rotation speed). Additionally, GSAP animations were triggered by play/pause events (for example, a slight camera zoom when music starts, which we’ll cover next). The result is that the visuals move in time with the music:louder or more intense moments in the audio make the anomaly glow brighter and distort more, while quiet moments cause it to settle down.
Creating the Audio-Reactive Shaders
To achieve the dynamic look for the anomaly, I used custom GLSL shaders in the material. Three.js lets us write our own shaders via THREE.ShaderMaterial, which is perfect for this because it gives fine-grained control over vertex positions and fragment colors. This might sound difficult if you’re new to shaders, but conceptually we did two major things in the shader:
Vertex Distortion with Noise: We displace the vertices of the sphere mesh over time to make it wobble and spike. I included a 3D noise function (Simplex noise) in the vertex shader – it produces a smooth pseudo-random value for any 3D coordinate. For each vertex, I calculate a noise value based on its position (plus a time factor to animate it). Then I move the vertex along its normal by an amount proportional to that noise. We also multiply this by our audioLevel and a user-controlled distortion factor. Essentially, when the music is intense (high audioLevel), the sphere gets spikier and more chaotic; when the music is soft or paused, the sphere is almost smooth.
Fresnel Glow in Fragment Shader: To make the wireframe edges glow and fade realistically, I used a fresnel effect in the fragment shader. This effect makes surfaces more luminous at glancing angles. We calculate it by taking the dot product of the view direction and the vertex normal – it results in a value that’s small on edges (grazing angles) and larger on faces directly facing the camera. By inverting and exponentiating this, we get a nice glow on the outline of the sphere that intensifies at the edges. I modulated the fresnel intensity with the audioLevel as well, so the glow pulsates with the beat.
Let’s look at a simplified version of the shader code for the outer wireframe sphere material:
const outerMaterial = new THREE.ShaderMaterial({
  uniforms: {
    time:      { value: 0 },
    audioLevel:{ value: 0 },            // this will be updated each frame
    distortion:{ value: 1.0 },
    color:     { value: new THREE.Color(0xff4e42) }  // a reddish-orange base color
  },
  wireframe: true,
  transparent: true,
  vertexShader: `
    uniform float time;
    uniform float audioLevel;
    uniform float distortion;
    // (noise function omitted for brevity)

    void main() {
      // Start with the original position
      vec3 pos = position;
      // Calculate procedural noise value for this vertex (using its position and time)
      float noise = snoise(pos * 0.5 + vec3(0.0, 0.0, time * 0.3));
      // Displace vertex along its normal
      pos += normal * noise * distortion * (1.0 + audioLevel);
      // Standard transformation
      gl_Position = projectionMatrix * modelViewMatrix * vec4(pos, 1.0);
    }
  `,
  fragmentShader: `
    uniform vec3 color;
    uniform float audioLevel;
    varying vec3 vNormal;
    varying vec3 vPosition;

    void main() {
      // Calculate fresnel (view-angle dependent) term
      vec3 viewDir = normalize(cameraPosition - vPosition);
      float fresnel = 1.0 - max(0.0, dot(viewDir, vNormal));
      fresnel = pow(fresnel, 2.0 + audioLevel * 2.0);
      // Make the fragment color brighter on edges (fresnel) and pulse it slightly with time
      float pulse = 0.8 + 0.2 * sin(time * 2.0);
      vec3 emissiveColor = color * fresnel * pulse * (1.0 + audioLevel * 0.8);
      // Alpha fade out a bit when audio is high (to make spikes more ethereal)
      float alpha = fresnel * (0.7 - audioLevel * 0.3);
      gl_FragColor = vec4(emissiveColor, alpha);
    }
  `
});
In this shader, snoise is a Simplex noise function (not shown above) producing values ~-1 to 1. The vertex shader uses it to offset each vertex (pos += normal * noise * …). We multiply the noise by (1.0 + audioLevel) so that when audioLevel rises, the displacement increases. The distortion uniform is controlled by a slider in the UI, so the user can manually dial the overall spikiness. The fragment shader calculates a fresnel factor to make the wireframe edges glow. Notice how audioLevel factors into the power and into the final color intensity – louder audio makes the fresnel exponent higher (sharper glow) and also increases brightness a bit. We also included a gentle pulsing (sin(time)) independent of audio, just to give a constant breathing motion.
For the inner glow sphere, we used a separate ShaderMaterial: it’s basically a sphere drawn with side: THREE.BackSide (so we see the inner surface) and Additive Blending to give a blooming halo. Its fragment shader also uses a fresnel term, but with a much lower alpha so it appears as a soft haze around the orb. The inner sphere’s size is slightly larger (I used about 1.2× the radius of the outer sphere) so that the glow extends beyond the wireframe. When combined, the outer and inner shaders create the effect of a translucent, energy-filled orb whose surface ripples with music.
To tie it all together, every frame in the render loop I update the shader uniforms with the current time and audio level:
// in the animation loop:
outerMaterial.uniforms.time.value = elapsedTime;
outerMaterial.uniforms.audioLevel.value = audioLevel;
outerMaterial.uniforms.distortion.value = currentDistortion;
glowMaterial.uniforms.time.value = elapsedTime;
glowMaterial.uniforms.audioLevel.value = audioLevel;
The result is a 3D object that truly feels alive with the music, it oscillates, pulses, and glows in sync with whatever track is playing. Even the one you add.
Animations and Interactions with GSAP
With the visuals reacting to sound, I added GSAP to handle smooth animations and user interactions. GSAP is great for creating timeline sequences and tweening properties with easing, and it also comes with plugins that were perfect for this project: Draggable for click-and-drag UI, and InertiaPlugin for momentum. Best of all, every GSAP plugin is now completely free to use. Below are the key ways I used GSAP in the project:
Intro Animation & Camera Movement: When the user selects a track and hits play, I trigger a brief “activation” sequence. This involves some text appearing in the “terminal” and a slight camera zoom-in toward the orb to signal that the system is online. The camera movement was done with a simple GSAP tween of the camera’s position. For example, I defined a default camera position and a slightly closer “zoomed” position. On play, I use gsap.to() to interpolate the camera position to the zoomed-in coordinates, and on pause/stop I tween it back out. GSAP makes this kind of 3D property animation straightforward:
const defaultCameraPos = { x: 0, y: 0, z: 10 };
const zoomedCameraPos = { x: 0, y: 0, z: 7 }; // move camera closer on zoom

function zoomCameraForAudio(zoomIn) {
  const target = zoomIn ? zoomedCameraPos : defaultCameraPos;
  gsap.to(camera.position, {
    x: target.x,
    y: target.y,
    z: target.z,
    duration: 1.5,
    ease: "power2.inOut"
  });
}

// When audio starts:
zoomCameraForAudio(true);
// When audio ends or is stopped:
zoomCameraForAudio(false);
This smooth zoom adds drama when the music kicks in, drawing the viewer into the scene. The power2.inOut easing gives it a nice gentle start and stop. I also used GSAP timelines for any other scripted sequences (like fading out the “Analyzing…” overlay text after a few seconds, etc.), since GSAP’s timeline control is very handy for orchestrating arranging multiple animations in order.
Draggable UI Panels: The interface has a few UI components overlaying the 3D canvas – e.g. an “Anomaly Controls” panel (with sliders for rotation speed, distortion amount, etc.), an “Audio Spectrum Analyzer” panel (showing a bar graph of frequencies and track selection buttons), and a “System Terminal” readout (displaying log messages like a console). To make the experience playful, I made these panels draggable. Using GSAP’s Draggable plugin, I simply turned each .panel element into a draggable object:
Draggable.create(".panel", {
  type: "x,y",
  bounds: "body",         // confine dragging within the viewport
  inertia: true,          // enable momentum after release
  edgeResistance: 0.65,   // a bit of resistance at the edges
  onDragStart: () => { /* bring panel to front, etc. */ },
  onDragEnd: function() {
    // Optionally, log the velocity or other info for fun
    console.log("Panel thrown with velocity:", this.getVelocity());
  }
});
Setting inertia: true means when the user releases a panel, it will continue moving in the direction they tossed it, gradually slowing to a stop (thanks to InertiaPlugin). This little touch makes the UI feel more tactile and real – you can flick the panels around and they slide with some “weight.” According to GSAP’s docs, Draggable will automatically handle the physics when inertia is enabled , so it was plug-and-play. I also constrained dragging within the body bounds so panels don’t get lost off-screen. Each panel has a clickable header (a drag handle area), set via the handle option, to restrict where a user can grab it. Under the hood, InertiaPlugin calculates the velocity of the drag and creates a tween that smoothly decelerates the element after you let go, mimicking friction.
Interactive Orb Drag (Bonus): As a creative experiment, I even made the 3D anomaly orb itself draggable. This was a bit more involved since it’s not a DOM element, but I implemented it by raycasting for clicks on the 3D object and then rotating the object based on mouse movement. I applied a similar inertia effect manually: when you “throw” the orb, it keeps spinning and slowly comes to rest. This wasn’t using GSAP’s Draggable directly (since that works in screen space), but I did use the InertiaPlugin concept by capturing the drag velocity and then using an inertial decay on that velocity each frame. It added a fun way to interact with the visualizer – you can nudge the orb and see it respond physically. For example, if you drag and release quickly, the orb will continue rotating with momentum. This kind of custom 3D dragging is outside the scope of a basic tutorial, but it shows how you can combine your own logic with GSAP’s physics concepts to enrich interactions.
GSAP Draggable and Inertia in action
In summary, GSAP handles all the non-audio animations: the camera moves, panel drags, and little transitions in the UI. The combination of sound-reactive shader animations (running every frame based on audio data) and event-based GSAP tweens (triggered on user actions or certain times) gives a layered result where everything feels responsive and alive.
UI and Atmosphere
Finally, a few words about the surrounding UI/atmosphere which glue the experience together. The visualizer’s style was inspired by sci-fi control panels, so I leaned into that:
Control Panels and Readouts: I built the overlay UI with HTML/CSS, keeping it minimalistic (just semi-transparent dark panels with light text and a few sliders/buttons). Key controls include rotation speed (how fast the orb spins), resolution (tessellation level of the icosahedron mesh), distortion amount, audio reactivity (scaling of audio impact), and sensitivity (which adjusts how the audio’s volume is interpreted). Changing these in real-time immediately affects the Three.js scene – for example, dragging the “Resolution” slider rebuilds the icosahedron geometry with more or fewer triangles, which is a cool way to see the orb go from coarse to finely subdivided. The “Audio Spectrum Analyzer” panel displays a classic bar graph of frequencies (drawn on a canvas using the analyser data) so you have a 2D visualization accompanying the 3D one. There’s also a console-style terminal readout that logs events (like “AUDIO ANALYSIS SYSTEM INITIALIZED” or the velocity of drags in a playful GSAP log format) to reinforce the concept of a high-tech system at work.
Design elements: To boost the sci-fi feel, I added a subtle grid overlay across the whole screen. This was done with pure CSS – a pair of repeating linear gradients forming horizontal and vertical lines (1px thin, very transparent) over a transparent background . It’s barely noticeable but gives a technical texture, especially against the glow of the orb. I also added some drifting ambient particles (tiny dots) floating slowly in the background, implemented as simple divs animated with JavaScript. They move in pseudo-random orbits.
Soundtrack: I curated three atmospheric and moody tracks, along with one of my own unreleased tracks, under my music alias LXSTNGHT. The track was produced in Ableton, and it’s unfinished. The end result is an experience where design, code, and music production collide in real time.
Bringing all these elements together, the final result is an interactive art piece: you load a track, the “Audio ARK” system comes online with a flurry of text feedback, the ambient music starts playing, and the orb begins to pulse and mutate in sync with the sound. You can tweak controls or toss around panels (or the orb itself) to explore different visuals.
The combination of Three.js (for rendering and shader effects), Web Audio API (for sound analysis), and GSAP (for polished interactions) showcases how creative coding tools can merge to produce an immersive experience that engages multiple senses.
As data privacy laws evolve globally—from the GDPR to India’s Digital Personal Data Protection Act (DPDPA)—one common theme emerges: empowering individuals with control over their data. This shift places data principal rights at the center of privacy compliance.
Respecting these rights isn’t just a legal obligation for organizations; it’s a business imperative. Efficiently operationalizing and fulfilling data principal rights is now a cornerstone of modern privacy programs.
Understanding Data Principal Rights
Data principal rights refer to the entitlements granted to individuals regarding their data. Under laws like the DPDPA and GDPR, these typically include:
Right to Access: Individuals can request a copy of the personal data held about them.
Right to Correction: They can demand corrections to inaccurate or outdated data.
Right to Erasure (Right to Be Forgotten): They can request deletion of their data under specific circumstances.
Right to Data Portability: They can request their data in a machine-readable format.
Right to Withdraw Consent: They can withdraw previously given consent for data processing.
Right to Grievance Redressal: They can lodge complaints if their rights are not respected.
While these rights sound straightforward, fulfilling them at scale is anything but simple, especially when data is scattered across cloud platforms, internal systems, and third-party applications.
Why Data Principal Rights Management is Critical
Regulatory Compliance and Avoidance of Penalties
Non-compliance can result in substantial fines, regulatory scrutiny, and reputational harm. For instance, DPDPA empowers the Data Protection Board of India to impose heavy penalties for failure to honor data principal rights on time.
Customer Trust and Transparency
Respecting user rights builds transparency and demonstrates that your organization values privacy. This can increase customer loyalty and strengthen brand reputation in privacy-conscious markets.
Operational Readiness and Risk Reduction
Organizations risk delays, errors, and missed deadlines when rights requests are handled manually. An automated and structured rights management process reduces legal risk and improves operational agility.
Auditability and Accountability
Every action taken to fulfill a rights request must be logged and documented. This is essential for proving compliance during audits or investigations.
The Role of Data Discovery in Rights Fulfilment
To respond to any data principal request, you must first know where the relevant personal data resides. This is where Data Discovery plays a crucial supporting role.
A robust data discovery framework enables organizations to:
Identify all systems and repositories that store personal data.
Correlate data to specific individuals or identifiers.
Retrieve, correct, delete, or port data accurately and quickly.
Without comprehensive data visibility, any data principal rights management program will fail, resulting in delays, partial responses, or non-compliance.
Key Challenges in Rights Management
Despite its importance, many organizations struggle with implementing effective data principal rights management due to:
Fragmented data environments: Personal data is often stored in silos, making it challenging to aggregate and act upon.
Manual workflows: Fulfilling rights requests often involves slow, error-prone manual processes.
Authentication complexities: Verifying the identity of the data principal securely is essential to prevent abuse of rights.
Lack of audit trails: Without automated tracking, it’s hard to demonstrate compliance.
Building a Scalable Data Principal Rights Management Framework
To overcome these challenges, organizations must invest in technologies and workflows that automate and streamline the lifecycle of rights requests. A mature data principal rights management framework should include:
Centralized request intake: A portal or dashboard where individuals can easily submit rights requests.
Automated data mapping: Leveraging data discovery tools to locate relevant personal data quickly.
Workflow automation: Routing requests to appropriate teams with built-in deadlines and escalation paths.
Verification and consent tracking: Only verified individuals can initiate requests and track their consent history.
Comprehensive logging: Maintaining a tamper-proof audit trail of all actions to fulfill requests.
The Future of Privacy Lies in Empowerment
As data privacy regulations mature, the focus shifts from mere protection to empowerment. Data principles are no longer passive subjects but active stakeholders in handling their data. Organizations that embed data principal rights management into their core data governance strategy will stay compliant and gain a competitive edge in building customer trust.
Empower Your Privacy Program with Seqrite
Seqrite’s Data Privacy Suite is purpose-built to help enterprises manage data principal rights confidently. From automated request intake and identity verification to real-time data discovery and audit-ready logs, Seqrite empowers you to comply faster, smarter, and at scale.