Just a second! 🫷 If you are here, it means that you are a software developer.
So, you know that storage, networking, and domain management have a cost .
If you want to support this blog, please ensure that you have disabled the adblocker for this site. I configured Google AdSense to show as few ADS as possible – I don’t want to bother you with lots of ads, but I still need to add some to pay for the resources for my site.
Thank you for your understanding. – Davide
Duplication is not only about lines of code, but also about data usage and meaning.
Reducing it will help us minimize the impact of every change.
Take this class as an example:
classBookShelf{
private Book[] myBooks = new Book[]
{
new Book(1, "C# in depth"),
new Book(2, "I promessi paperi")
};
publicint Count() => myBooks.Length;
publicbool IsEmpty() => myBooks.Length == 0;
publicbool HasElements() => myBooks.Length > 0;
}
Here, both Count and IsEmpty use the same logical way to check the length of the collection: by calling myBooks.Length.
What happens if you have to change the myBooks collection and replace the array of Books with a collection that does not expose the Length property? You will have to replace the logic everywhere!
So, a better approach is to “centralize” the way to count the items in the collection in this way:
classBookShelf{
private Book[] myBooks = new Book[]
{
new Book(1, "C# in depth"),
new Book(2, "I promessi paperi")
};
publicint Count() => myBooks.Length;
publicbool IsEmpty() => Count() == 0;
publicbool HasElements() => Count() > 0;
}
If you will need to replace the myBooks data type, you will simply have to update the Count method – everything else will be the same.
Also, HasElements and IsEmpty are a logical duplication. If they’re not necessary, you should remove one. Remove the one most used in its negative form: if you find lots of if(!HasElements()), you should consider replacing it with if(IsEmpty()): always prefer the positive form!
Yes, I know, this is an extreme example: it’s too simple. But think of a more complex class or data flow in which you reuse the same logical flow, even if you’re not really using the exact same lines of code.
By duplicating the logic, you will need to write more tests that do the same thing. Also, it may happen that if you found a flaw in your logic, and you fix it in some places and forget to fix it in other methods.
Centralizing it will allow you to build safer code that is easier to test and update.
A simple way to avoid “logical” duplication? Abstract classes!
Well, there are many others… that I expect you to tell me in the comments section!
Just a second! 🫷 If you are here, it means that you are a software developer.
So, you know that storage, networking, and domain management have a cost .
If you want to support this blog, please ensure that you have disabled the adblocker for this site. I configured Google AdSense to show as few ADS as possible – I don’t want to bother you with lots of ads, but I still need to add some to pay for the resources for my site.
Thank you for your understanding. – Davide
Do you need to tune up the performance of your code? You can create some StopWatch objects and store the execution times or rely on external libraries like MiniProfiler.
Note: of course, we’re just talking about time duration, and not about memory usage!
How to profile code using Stopwatch
A Stopwatch object acts as a (guess what?) stopwatch.
You can manually make it start and stop, and keep track of the elapsed time:
It’s useful, but you have to do it manually. There’s a better choice.
How to profile code using MiniProfiler
A good alternative is MiniProfiler: you can create a MiniProfiler object that holds all the info related to the current code execution. You then can add some Steps, which can have a name, and even nest them.
Finally, you can print the result using RenderPlainText.
MiniProfiler profiler = MiniProfiler.StartNew();

using (profiler.Step("With 100"))
{
    DoSomeOperations(100);
}


using (profiler.Step("With 2000"))
{
    DoSomeOperations(2000);
}

Console.WriteLine(profiler.RenderPlainText());
You won’t anymore stop and start any StopWatch instance.
You can even use inline steps, to profile method execution and store its return value:
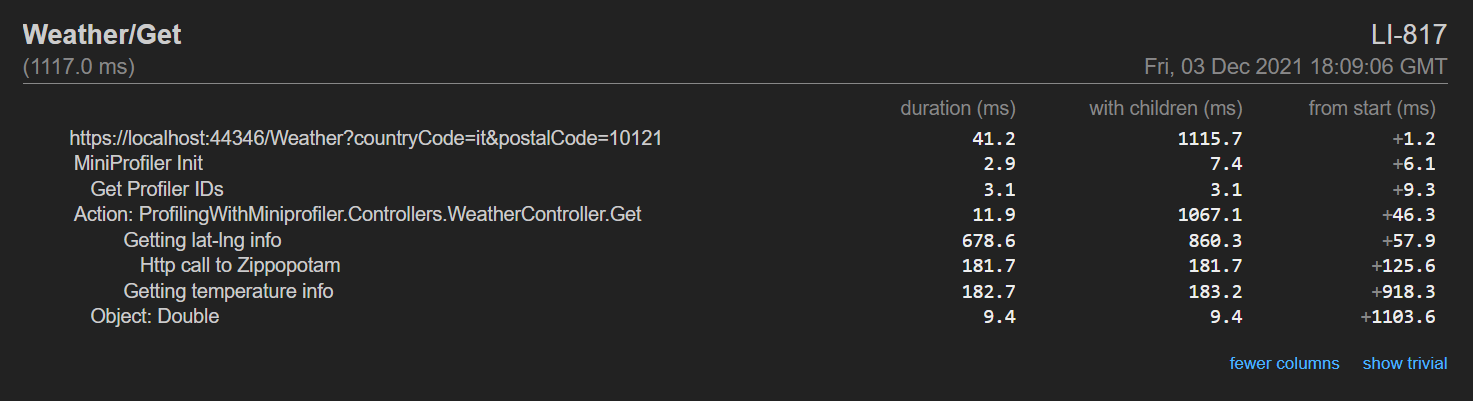
Here I decided to print the result on the Console. You can even create HTML reports, which are quite useful when profiling websites. You can read more here, where I experimented with MiniProfiler in a .NET API project.
Here’s an example of what you can get:
Further readings
We’ve actually already talked about MiniProfiler in an in-depth article you can find here:
The idea is to go from the monument to the church with a car. The flag marks the middle, between the two points.
The solution uses several powerful Python libraries:
OSMnx to download and work with real road networks from OpenStreetMap
NetworkX to model the road system as a graph and calculate the shortest path using Dijkstra’s algorithm
Folium for interactive map visualization
We start by geocoding the two landmarks to get their latitude and longitude. Then we build a drivable street network centered around the Levski Monument using ox.graph_from_address. After snapping both points to the nearest graph nodes, we compute the shortest route by distance. Finally, we visualize everything both in an interactive map and in a clean black-on-white static graph where the path is drawn in yellow.
Lately, I am reading the book Optimization Algorithms by Alaa Khamis and the chapter 3 – Blind Search Algorithms, has caught my attention. The chapter starts with explaining what graphs are how these are displayed in python and I have decided to make a YT video, presenting the code of the book with Jupyter Notebook.
Trees are different, when we talk about graphs in python
Why graphs? Because they are everywhere:
A road map is a graph
Your social-media friends form a graph
Tasks in a to-do list, with dependables on each other, can be a graph
With Python we can build and draw these structures in just a few lines of code.
Setup
importshutup
shutup.please()
%matplotlibinline
importpandas aspd
importmatplotlib.pyplot asplt
importnumpy asnp
importnetworkx asnx
importhypernetx ashnx
plt.rcParams[“figure.figsize”]=(6,4)
Undirected graph
Edges have no arrows
Use it for two‑way streets or mutual friendships.
# Undirected Graph
graph=nx.Graph()
nodes=list(range(5))
graph.add_nodes_from(nodes)
edges=[(0,1),(3,4),(3,0),(3,5),(2,0)]
graph.add_edges_from(edges)
nx.draw_networkx(graph,font_color=“white”)
Undirected graph
Directed graph
Arrowheads show direction.
Good for “A follows B” but not the other way around.
# Directed Graph
digraph=nx.DiGraph()
nodes=list(range(5))
edges=[(0,0),(4,0),(1,0),(3,0),(2,0)]
digraph.add_nodes_from(nodes)
digraph.add_edges_from(edges)
nx.draw_networkx(digraph,font_color=“white”)
Directed graph
Multigraph
Allows two or more edges between the same nodes.
Think of two train lines that join the same pair of cities.
Why buy a whole tool when you can build your own? Learn how the Type system works in .NET, and create your own minimal type analyser.
Table of Contents
Just a second! 🫷 If you are here, it means that you are a software developer.
So, you know that storage, networking, and domain management have a cost .
If you want to support this blog, please ensure that you have disabled the adblocker for this site. I configured Google AdSense to show as few ADS as possible – I don’t want to bother you with lots of ads, but I still need to add some to pay for the resources for my site.
Thank you for your understanding. – Davide
Analysing your code is helpful to get an idea of the overall quality. At the same time, having an automatic tool that identifies determinate characteristics or performs some analysis for you can be useful.
Sure, there are many fantastic tools available, but having a utility class that you can build as needed and run without setting up a complex infrastructure is sufficient.
In this article, we are going to see how to navigate assemblies, classes, methods and parameters to perfor some custom analysis.
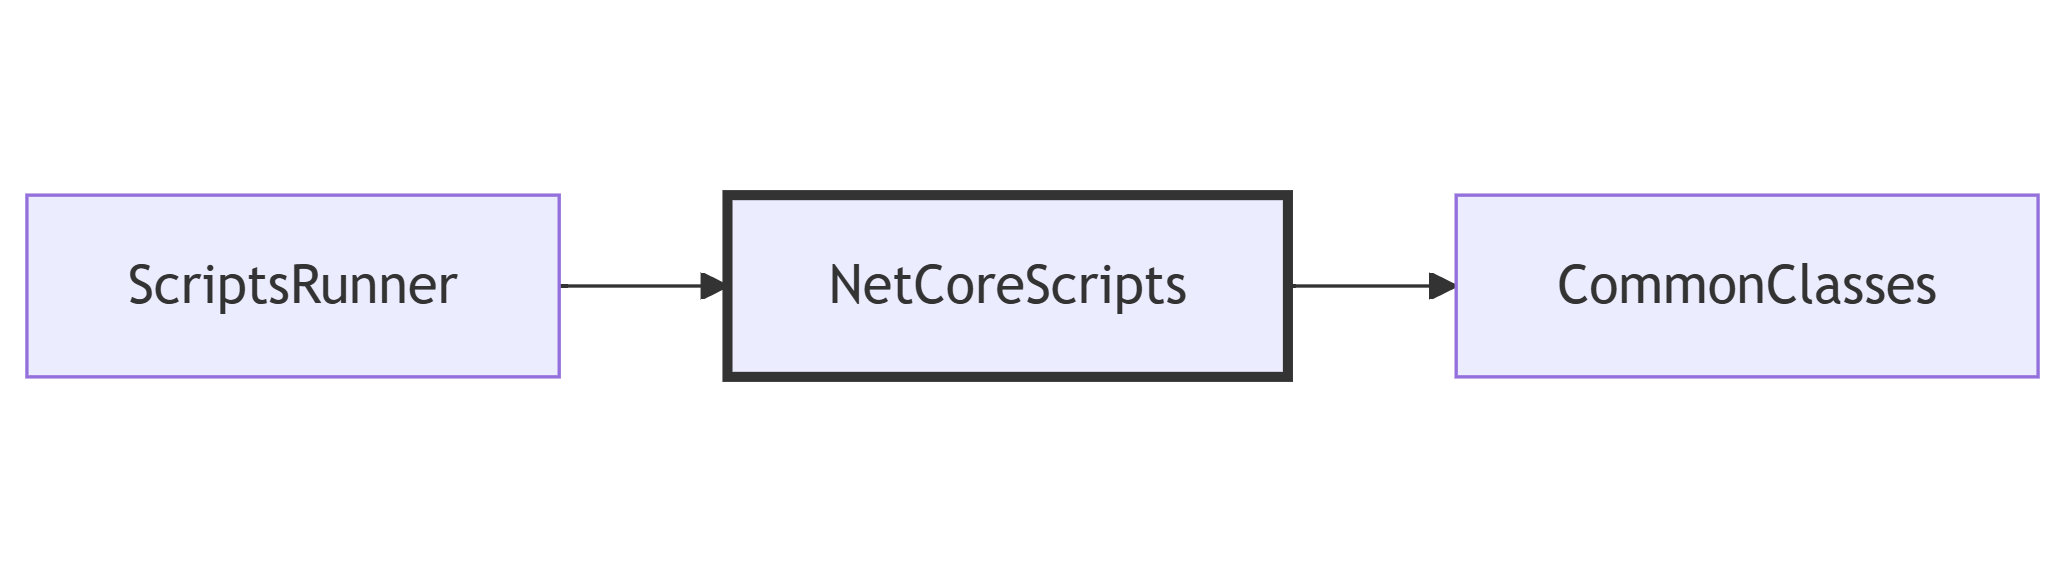
For this article, my code is structured into 3 Assemblies:
CommonClasses, a Class Library that contains some utility classes;
NetCoreScripts, a Class Library that contains the code we are going to execute;
ScriptsRunner, a Console Application that runs the scripts defined in the NetCoreScripts library.
The dependencies between the modules are shown below: ScriptsRunner depends on NetCoreScripts, and NetCoreScripts depends on CommonClasses.
In this article, we are going to write the examples in the NetCoreScripts class library, in a class named AssemblyAnalysis.
How to load an Assembly in C#, with different methods
The starting point to analyse an Assembly is, well, to have an Assembly.
So, in the Scripts Class Library (the middle one), I wrote:
var assembly = DefineAssembly();
In the DefineAssembly method we can choose the Assembly we are going to analyse.
In short, you can access the Assembly info of whichever class you know – if you can reference it directly, of course!
Load the current, the calling, and the executing Assembly
The Assembly class provides you with some methods that may look similar, but give you totally different info depending on how your code is structured.
Remember the ScriptsRunner –> NetCoreScripts –> CommonClasses sequence? To better explain how things work, let’s run the following examples in a method in the CommonClasses class library (the last one in the dependency chain).
var executing = System.Reflection.Assembly.GetExecutingAssembly();
var calling = System.Reflection.Assembly.GetCallingAssembly();
var entry = System.Reflection.Assembly.GetEntryAssembly();
Assembly.GetExecutingAssembly returns the Assembly that contains the actual code instructions (so, in short, the Assembly that actually contains the code). In this case, it’s the CommonClasses Assembly.
Assembly.GetCallingAssembly returns the caller Assembly, so the one that references the Executing Assembly. In this case, given that the CommonClasses library is referenced only by the NetCoreScripts library, well, we are getting info about the NetCoreScripts class library.
Assembly.GetEntryAssembly returns the info of the Assembly that is executing the whole application – so, the entry point. In our case, it’s the ScriptsRunner Console Application.
Deciding which one to choose is crucial, especially when you are going to distribute your libraries, for example, as NuGet packages. For sure, you’ll know the Executing Assembly. Most probably, depending on how the project is structured, you’ll also know the Calling Assembly. But almost certainly you won’t know the Entry Assembly.
Method name
Meaning
In this example…
GetExecutingAssembly
The current Assembly
CommonClasses
GetCallingAssembly
The caller Assembly
NetCoreScripts
GetEntryAssembly
The top-level executor
ScriptsRunner
How to retrieve classes of a given .NET Assembly
Now you have an Assembly to analyse. It’s time to load the classes belonging to your Assembly.
You can start with assembly.GetTypes(): this method returns all the types (in the form of a Type array) belonging to the Assembly.
For each Type you can access several properties, such as IsClass, IsPublic, IsAbstract, IsGenericType, IsEnum and so on. The full list of properties of a Type is available 🔗here.
You may want to analyse public classes: therefore, you can do something like:
If we have a look at its parameters, we will find the following values:
Bonus tip: Auto-properties act as Methods
Let’s focus a bit more on the properties of a class.
Consider this class:
publicclassUser{
publicstring Name { get; set; }
}
There are no methods; only one public property.
But hey! It turns out that properties, under the hood, are treated as methods. In fact, you can find two methods, named get_Name and set_Name, that act as an access point to the Name property.
Further readings
Do you remember that exceptions are, in the end, Types?
And that, in the catch block, you can filter for exceptions of a specific type or with a specific condition?
From here, you can use all this info to build whatever you want. Personally, I used it to analyse my current project, checking how many methods accept more than N parameters as input, and which classes have the highest number of public methods.
In short, an example of a simple code analyser can be this one:
publicvoid Execute()
{
var assembly = DefineAssembly();
var paramsInfo = AnalyzeAssembly(assembly);
AnalyzeParameters(paramsInfo);
}
privatestatic Assembly DefineAssembly()
=> Assembly.GetExecutingAssembly();
publicstatic List<ParamsMethodInfo> AnalyzeAssembly(Assembly assembly)
{
List<ParamsMethodInfo> all = new List<ParamsMethodInfo>();
var types = GetAllPublicTypes(assembly);
foreach (var type in types)
{
var publicMethods = GetPublicMethods(type);
foreach (var method in publicMethods)
{
var parameters = method.GetParameters();
if (parameters.Length > 0)
{
var f = parameters.First();
}
all.Add(new ParamsMethodInfo(
assembly.GetName().Name,
type.Name,
method
));
}
}
return all;
}
privatestatic MethodInfo[] GetPublicMethods(Type type) =>
type.GetMethods(BindingFlags.Instance | BindingFlags.Static | BindingFlags.Public | BindingFlags.DeclaredOnly);
privatestatic List<Type> GetAllPublicTypes(Assembly assembly) => assembly.GetTypes()
.Where(t => t.IsClass && t.IsPublic)
.ToList();
publicclassParamsMethodInfo(string AssemblyName, string ClassName, MethodInfo Method)
{
publicstring MethodName => Method.Name;
public ParameterInfo[] Parameters => Method.GetParameters();
}
And then, in the AnalyzeParameters, you can add your own logic.
As you can see, you don’t need to adopt complex tools to perform operations like this: just knowing that you can access the static details of each class and method can be enough (of course, it depends on the use!).
I hope you enjoyed this article! Let’s keep in touch on LinkedIn, Twitter or BlueSky! 🤜🤛
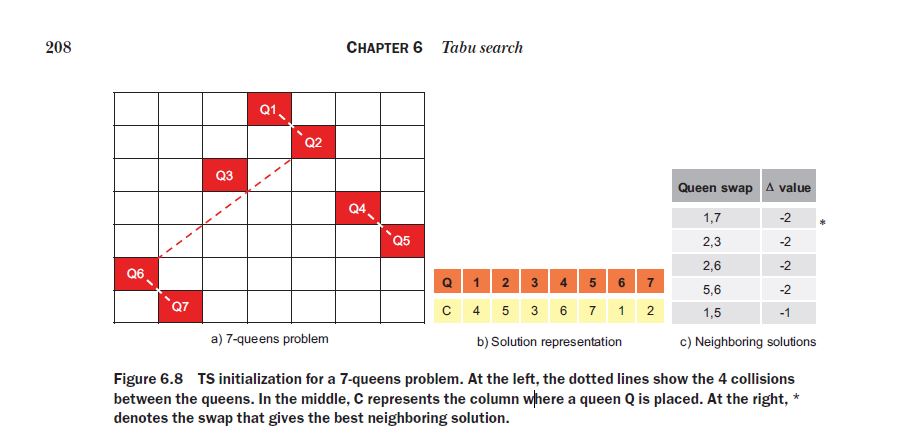
The n-queens problem is a classic puzzle that involves placing n chess queens on an n × n chessboard in such a way that no two queens threaten each other. In other words, no two queens should share the same row, column, or diagonal. This is a constraintsatisfaction problem (CSP) that does not define an explicit objective function. Let’s suppose we are attempting to solve a 7-queens problem using tabu search. In this problem, the number of collisions in the initial random configuration shown in figure 6.8a is 4: {Q1– Q2}, {Q2– Q6}, {Q4– Q5}, and {Q6– Q7}.
The above is part of the book Optimization Algorithms by Alaa Khamis, which I have used as a stepstone, in order to make a YT video, explaining the core of the tabu search with the algorithm. The solution of the n-queens problem is actually interesting, as its idea is to swap queen’s columns until these are allowed to be swaped and until the constrains are solved. The “tabu tenure” is just a type of record, that does not allow a certain change to be carried for a number of moves after it has been carried out. E.g., once you replace the columns of 2 queens, you are not allowed to do the same for the next 3 moves. This allows you to avoid loops.
TLDR: You can grab a discount for Browserling (a super handy online browser) by using the coupon code ONLINEBROWSER at browserling.com. It gives you 30% off premium plans. Works for developers, hackers, testers, and anyone browsing online.
What’s the Online Browser Coupon For?
This code gives you a discount on Browserling‘s premium plans. If you’ve been using the free version but keep hitting the time limit, now’s your chance to upgrade. Just head to Browserling’s pricing page and enter ONLINEBROWSER when checking out.
Why Use an Online Browser?
It’s basically a browser that runs in the cloud. No installs, no setup. Just click and you’re inside a live Chrome, Firefox, Edge, or even Internet Explorer (yeah, really). It streams right into your browser.
This is super useful when you:
Want to open sketchy links without risking your machine.
Need to cross-browser test websites in different browsers.
Get suspicious email attachments (open them here instead).
Need to do security research or open malware sites.
Work in dev, QA, pentesting, or sysadmin stuff.
Is an Online Browser Safe?
Yep. Everything runs in a sandbox on remote servers. If something explodes, it doesn’t affect your system. Your IP is hidden too, so it’s also good for private browsing.
Pro Tip: Use It From a Chromebook
An online browser works great on low-power machines like Chromebooks. Since the browser runs remotely, you can do full browser testing or malware link checking without needing a high-end laptop.
What Is Browserling?
Browserling is a secure online browser that lets you open risky links, test email attachments, and run different browsers without installing anything. It all runs in a sandbox, so your device stays safe, even when visiting sketchy sites or doing malware research.
Who Uses Browserling?
Browserling is trusted by developers, bug bounty hunters, cybersecurity researchers, and even major companies that need safe browsers. Teams at banks, governments, and tech firms use it for secure testing, but it’s just as useful for solo testers, students, or anyone who wants to explore the web without putting their device at risk. Whether you’re writing code, checking phishing emails, or analyzing shady links, it’s a tool that fits right in.