برچسب: Code4IT

  • How to integrate Feature Flags stored on Azure App Configuration in an ASP.NET Core Application | Code4IT

    How to integrate Feature Flags stored on Azure App Configuration in an ASP.NET Core Application | Code4IT


    Learn how to use Feature Flags in ASP.NET Core apps and read values from Azure App Configuration. Understand how to use filters, like the Percentage filter, to control feature activation, and learn how to take full control of the cache expiration of the values.

    Table of Contents

    Just a second! 🫷
    If you are here, it means that you are a software developer.
    So, you know that storage, networking, and domain management have a cost .

    If you want to support this blog, please ensure that you have disabled the adblocker for this site.
    I configured Google AdSense to show as few ADS as possible – I don’t want to bother you with lots of ads, but I still need to add some to pay for the resources for my site.

    Thank you for your understanding.
    Davide

    Feature Flags let you remotely control the activation of features without code changes. They help you to test, release, and manage features safely and quickly by driving changes using centralized configurations.

    In a previous article, we learned how to integrate Feature Flags in ASP.NET Core applications. Also, a while ago, we learned how to integrate Azure App Configuration in an ASP.NET Core application.

    In this article, we are going to join the two streams in a single article: in fact, we will learn how to manage Feature Flags using Azure App Configuration to centralize our configurations.

    It’s a sort of evolution from the previous article. Instead of changing the static configurations and redeploying the whole application, we are going to move the Feature Flags to Azure so that you can enable or disable those flags in just one click.

    A recap of Feature Flags read from the appsettings file

    Let’s reuse the example shown in the previous article.

    We have an ASP.NET Core application (in that case, we were building a Razor application, but it’s not important for the sake of this article), with some configurations defined in the appsettings file under the Feature key:

    {
      "FeatureManagement": {
        "Header": true,
        "Footer": true,
        "PrivacyPage": false,
        "ShowPicture": {
          "EnabledFor": [
            {
              "Name": "Percentage",
              "Parameters": { "Value": 60 }
            }
          ]
        }
      }
    }
    

    We have already dove deep into Feature Flags in an ASP.NET Core application in the previous article. However, let me summarize it.

    First of all, you have to define your flags in the appsettings.json file using the structure we saw before.

    To use Feature Flags in ASP.NET Core you have to install the Microsoft.FeatureManagement.AspNetCore NuGet package.

    Then, you have to tell ASP.NET to use Feature Flags by calling:

    builder.Services.AddFeatureManagement();
    

    Finally, you are able to consume those flags in three ways:

    • inject the IFeatureManager interface and call IsEnabled or IsEnabledAsync;
    • use the FeatureGate attribute on a Controller class or a Razor model;
    • use the <feature> tag in a Razor page to show or hide a portion of HTML

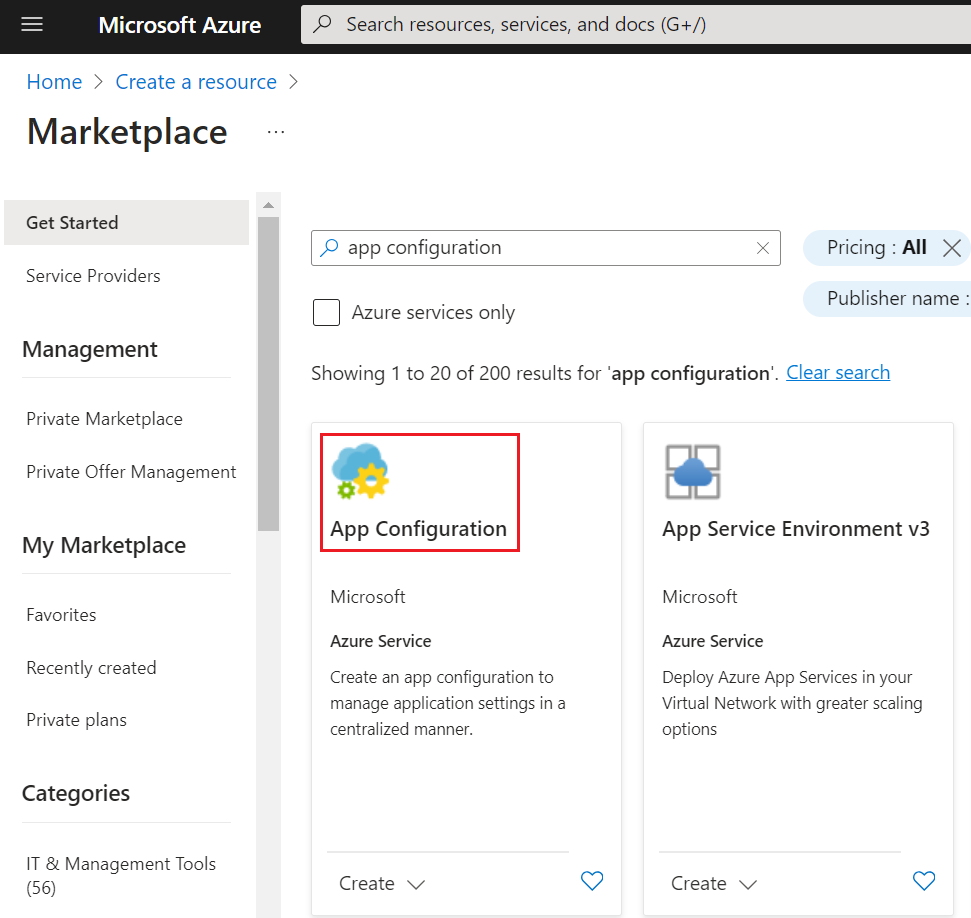
    How to create Feature Flags on Azure App Configuration

    We are ready to move our Feature Flags to Azure App Configuration. Needless to say, you need an Azure subscription 😉

    Log in to the Azure Portal, head to “Create a resource”, and create a new App Configuration:

    Azure App configuration in the Marketplace

    I’m going to reuse the same instance I created in the previous article – you can see the full details in the How to create an Azure App Configuration instance section.

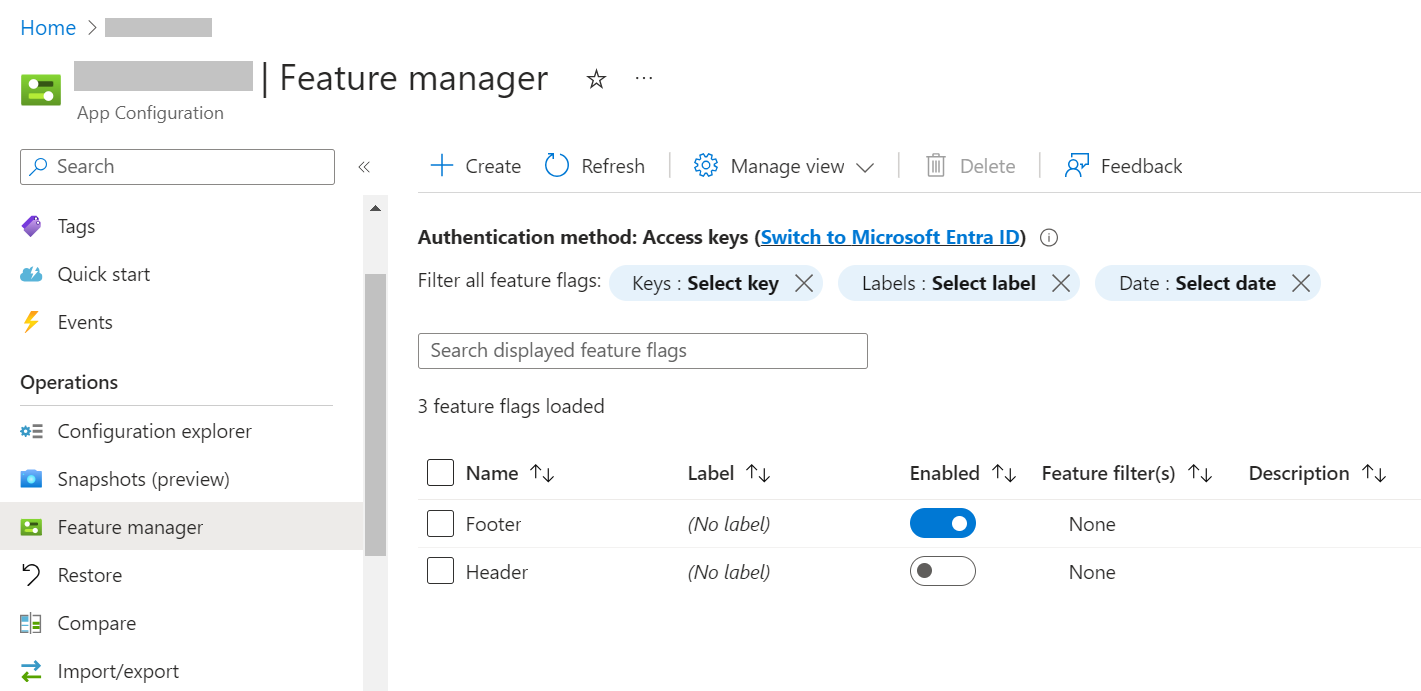
    Now we have to configure the same keys defined in the appsettings file: Header, Footer, and PrivacyPage.

    Open the App Configuration instance and locate the “Feature Manager” menu item in the left panel. This is the central place for creating, removing, and managing your Feature Flags. Here, you can see that I have already added the Header and Footer, and you can see their current state: “Footer” is enabled, while “Header” is not.

    Feature Flags manager dashboard

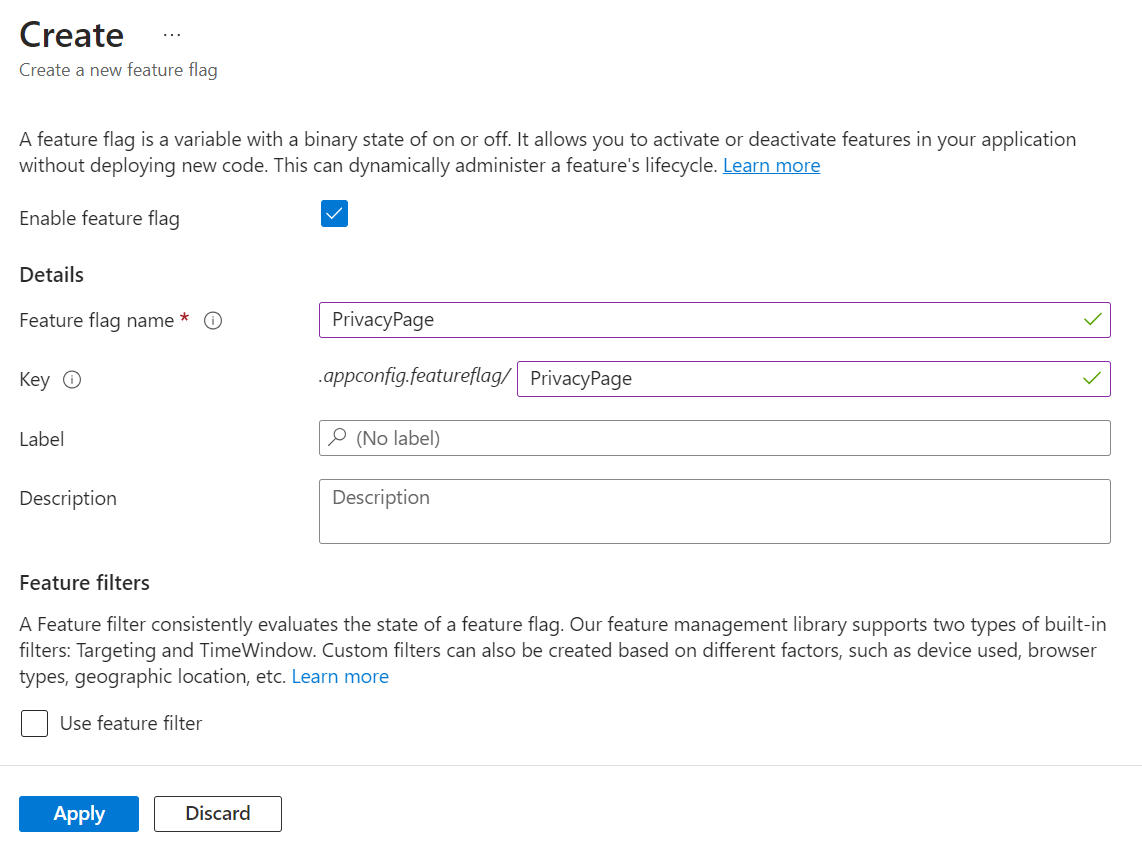
    How can I add the PrivacyPage flag? It’s elementary: click the “Create” button and fill in the fields.

    You have to define a Name and a Key (they can also be different), and if you want, you can add a Label and a Description. You can also define whether the flag should be active by checking the “Enable feature flag” checkbox.

    Feature Flag definition form

    Read Feature Flags from Azure App Configuration in an ASP.NET Core application

    It’s time to integrate Azure App Configuration with our ASP.NET Core application.

    Before moving to the code, we have to locate the connection string and store it somewhere.

    Head back to the App Configuration resource and locate the “Access keys” menu item under the “Settings” section.

    Access Keys page with connection strings

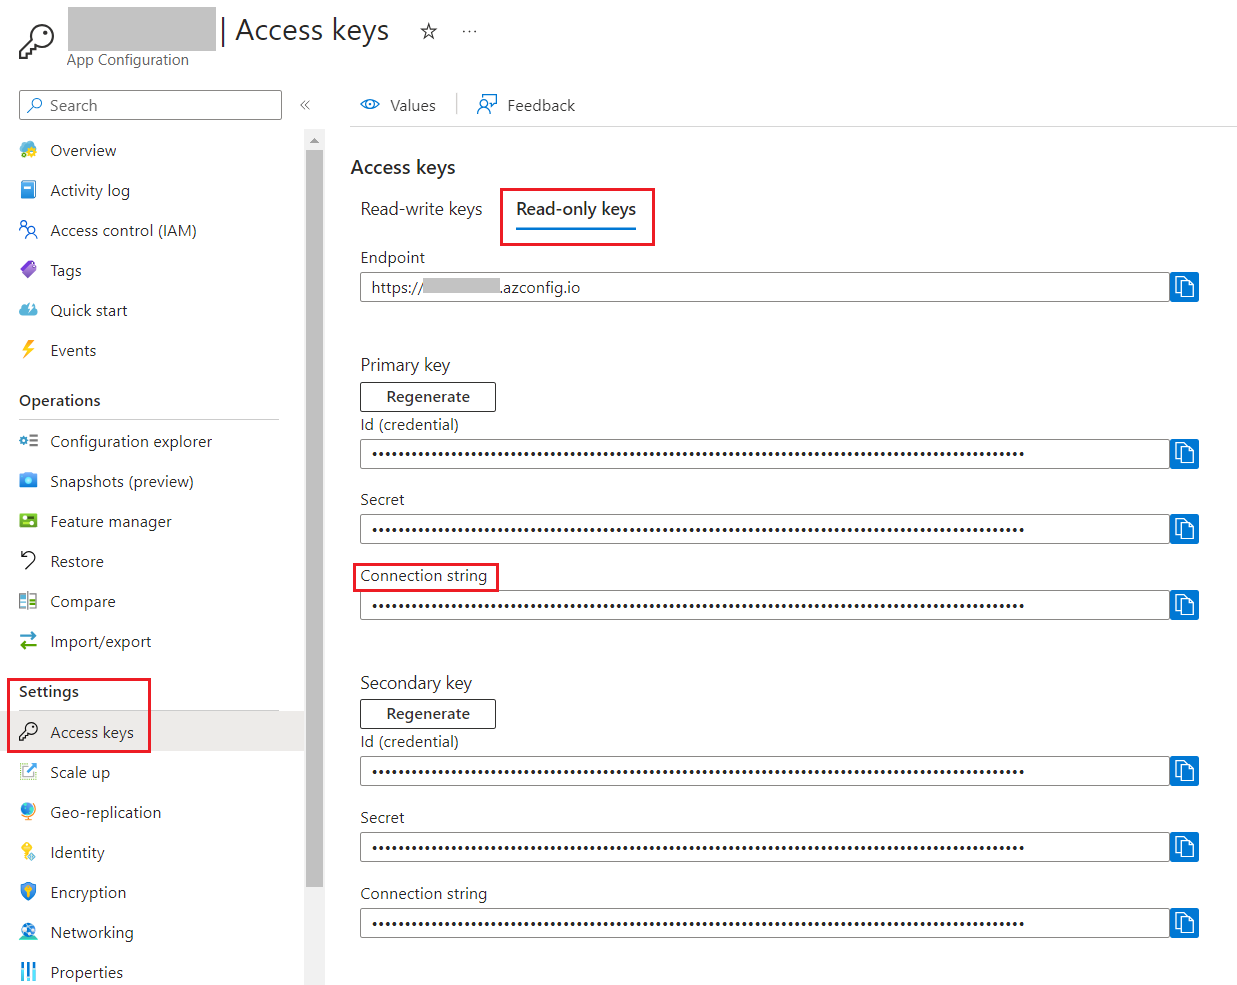
    From here, copy the connection string (I suggest that you use the Read-only Keys) and store it somewhere.

    Before proceeding, you have to install the Microsoft.Azure.AppConfiguration.AspNetCore NuGet package.

    Now, we can add Azure App Configuration as a source for our configurations by connecting to the connection string and by declaring that we are going to use Feature Flags:

    builder.Configuration.AddAzureAppConfiguration(options =>
        options.Connect(connectionString).UseFeatureFlags()
    );
    

    That’s not enough. We need to tell ASP.NET that we are going to consume these configurations by adding such functionalities to the Services property.

    builder.Services.AddAzureAppConfiguration();
    
    builder.Services.AddFeatureManagement();
    

    Finally, once we have built our application with the usual builder.Build(), we have to add the Azure App Configuration middleware:

    app.UseAzureAppConfiguration();
    

    To try it out, run the application and validate that the flags are being applied. You can enable or disable those flags on Azure, restart the application, and check that the changes to the flags are being applied. Otherwise, you can wait 30 seconds to have the flag values refreshed and see the changes applied to your application.

    Using the Percentage filter on Azure App Configuration

    Suppose you want to enable a functionality only to a percentage of sessions (sessions, not users!). In that case, you can use the Percentage filter.

    The previous article had a specific section dedicated to the PercentageFilter, so you might want to check it out.

    As a recap, we defined the flag as:

    {
      "ShowPicture": {
        "EnabledFor": [
          {
            "Name": "Percentage",
            "Parameters": {
              "Value": 60
            }
          }
        ]
      }
    }
    

    And added the PercentageFilter filter to ASP.NET with:

    builder.Services.AddFeatureManagement()
        .AddFeatureFilter<PercentageFilter>();
    

    Clearly, we can define such flags on Azure as well.

    Head back to the Azure Portal and add a new Feature Flag. This time, you have to add a new Feature Filter to any existing flag. Even though the PercentageFilter is out-of-the-box in the FeatureManagement NuGet package, it is not available on the Azure portal.

    You have to define the filter with the following values:

    • Filter Type must be “Custom”;
    • Custom filter name must be “Percentage”
    • You must add a new key, “Value”, and set its value to “60”.

    Custom filter used to create Percentage Filter

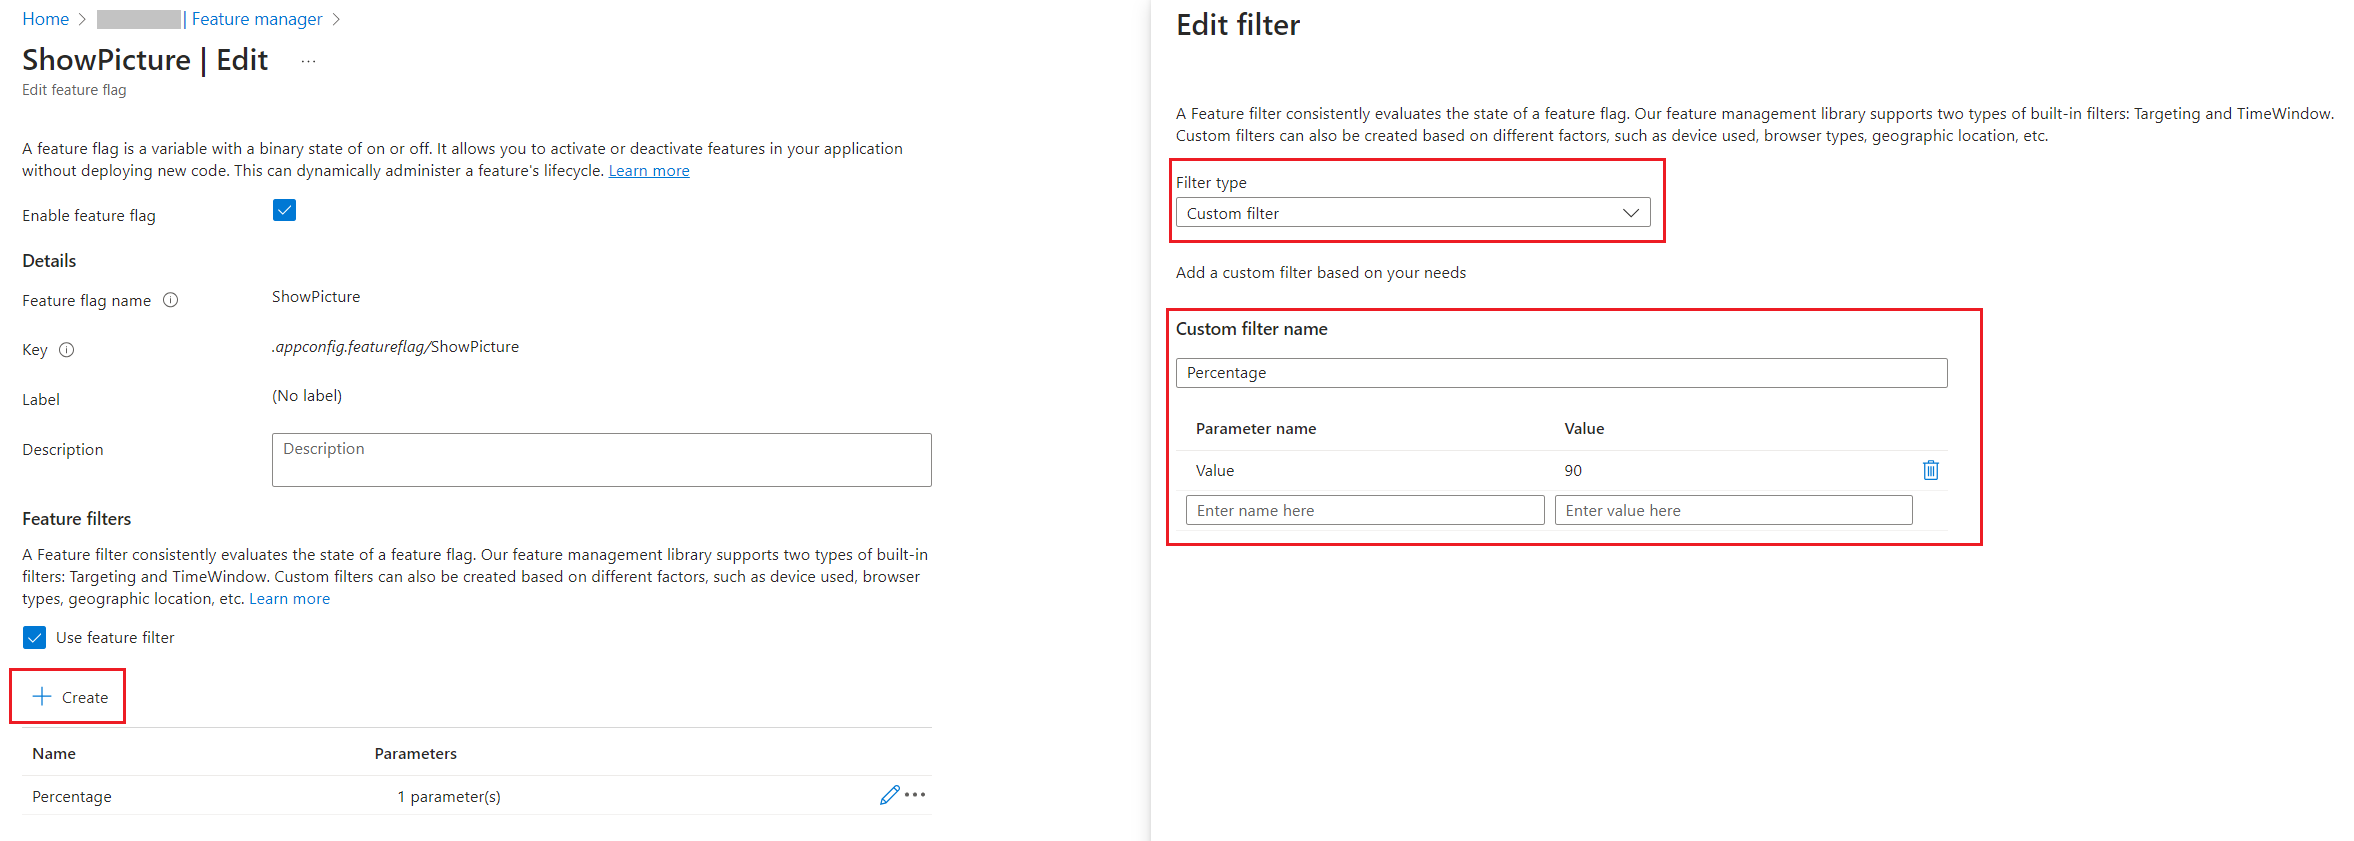
    The configuration we just added reflects the JSON value we previously had in the appsettings file: 60% of the requests will activate the flag, while the remaining 40% will not.

    Define the cache expiration interval for Feature Flags

    By default, Feature Flags are stored in an internal cache for 30 seconds.

    Sometimes, it’s not the best choice for your project; you may prefer a longer duration to avoid additional calls to the App Configuration platform; other times, you’d like to have the changes immediately available.

    You can then define the cache expiration interval you need by configuring the options for the Feature Flags:

    builder.Configuration.AddAzureAppConfiguration(options =>
        options.Connect(connectionString).UseFeatureFlags(featureFlagOptions =>
        {
            featureFlagOptions.CacheExpirationInterval = TimeSpan.FromSeconds(10);
        })
    );
    

    This way, Feature Flag values are stored in the internal cache for 10 seconds. Then, when you reload the page, the configurations are reread from Azure App Configuration and the flags are applied with the new values.

    Further readings

    This is the final article of a path I built during these months to explore how to use configurations in ASP.NET Core.

    We started by learning how to set configuration values in an ASP.NET Core application, as explained here:

    🔗 3 (and more) ways to set configuration values in ASP.NET Core

    Then, we learned how to read and use them with the IOptions family:

    🔗 Understanding IOptions, IOptionsMonitor, and IOptionsSnapshot in ASP.NET Core

    From here, we learned how to read the same configurations from Azure App Configuration, to centralize our settings:

    🔗 Azure App Configuration and ASP.NET Core API: a smart and secure way to manage configurations | Code4IT

    Then, we configured our applications to automatically refresh the configurations using a Sentinel value:

    🔗 How to automatically refresh configurations with Azure App Configuration in ASP.NET Core

    Finally, we introduced Feature Flags in our apps:

    🔗 Feature Flags 101: A Guide for ASP.NET Core Developers | Code4IT

    And then we got to this article!

    This article first appeared on Code4IT 🐧

    Wrapping up

    In this article, we have configured an ASP.NET Core application to read the Feature Flags stored on Azure App Configuration.

    Here’s the minimal code you need to add Feature Flags for ASP.NET Core API Controllers:

    var builder = WebApplication.CreateBuilder(args);
    
    string connectionString = "my connection string";
    
    builder.Services.AddControllers();
    
    builder.Configuration.AddAzureAppConfiguration(options =>
        options.Connect(connectionString)
        .UseFeatureFlags(featureFlagOptions =>
            {
                featureFlagOptions.CacheExpirationInterval = TimeSpan.FromSeconds(10);
            }
        )
    );
    
    builder.Services.AddAzureAppConfiguration();
    
    builder.Services.AddFeatureManagement()
        .AddFeatureFilter<PercentageFilter>();
    
    var app = builder.Build();
    
    app.UseRouting();
    app.UseAzureAppConfiguration();
    app.MapControllers();
    app.Run();
    

    I hope you enjoyed this article! Let’s keep in touch on Twitter or LinkedIn! 🤜🤛

    Happy coding!

    🐧


    Source link

  • Pre-commit hooks with Husky.NET – build, format, and test your .NET application before a Git commit &vert; Code4IT

    Pre-commit hooks with Husky.NET – build, format, and test your .NET application before a Git commit | Code4IT


    A Git commit represents the status of a system. Learn how to validate that your code builds, is well-formatted, and all the tests pass by adding a Git hook!

    Table of Contents

    Just a second! 🫷
    If you are here, it means that you are a software developer.
    So, you know that storage, networking, and domain management have a cost .

    If you want to support this blog, please ensure that you have disabled the adblocker for this site.
    I configured Google AdSense to show as few ADS as possible – I don’t want to bother you with lots of ads, but I still need to add some to pay for the resources for my site.

    Thank you for your understanding.
    Davide

    If you need to run operations before completing a Git commit, you can rely on Git Hooks.

    Git hooks are scripts that run automatically whenever a particular event occurs in a Git repository. They let you customize Git’s internal behaviour and trigger customizable actions at key points in the development life cycle.

    Extending Git hooks allows you to plug in custom functionalities to the regular Git flow, such as Git message validation, code formatting, etc.

    I’ve already described how to use Husky with NPM, but here I’m gonna use Husky.NET, the version of Husky created for .NET-based applications.

    Git hooks: a way to extend Git operations

    As we said, Git hooks are actions that run during specific phases of Git operations.

    Git hooks fall into 4 categories:

    • client-side hooks related to the committing workflow: they execute when you run git commit on your local repository;
    • client-side hooks related to the email workflow: they are executed when running git am, which is a command that allows you to integrate mails and Git repositories (I’ve never used it. If you are interested in this functionality, here’s the official documentation);
    • client-side hooks related to other operations: these hooks run on your local repository when performing operations like git rebase;
    • server-side hooks: they run after a commit is received on the remote repository, and they can reject a git push operation.

    Let’s focus on the client-side hooks that run when you commit changes using git commit.

    Hook name Description
    pre-commit This hook is the first invoked by git commit (if you don’t use the -m flag, it is invoked before asking you to insert a commit message) and can be used to inspect the snapshot that is about to be committed.
    prepare-commit-msg This hook is invoked by git commit and can be used to edit the default commit message when it is generated by an automated tool.
    commit-msg This hook is invoked by git commit and can be used to validate or modify the commit message after it is entered by the user.
    post-commit This hook is invoked after the git commit execution has run correctly, and it is generally used to fire notifications.

    How to install Husky.NET and its dependencies in a .NET Application

    Husky.NET must be installed in the root folder of the solution.

    You first have to create a tool-manifest file in the root folder by running:

    This command creates a file named dotnet-tools.json under the .config folder: here you can see the list of external tools used by dotnet.

    After running the command, you will see that the dotnet-tools.json file contains this element:

    {
      "version": 1,
      "isRoot": true,
      "tools": {}
    }
    

    Now you can add Husky as a dotnet tool by running:

    dotnet tool install Husky
    

    After running the command, the file will contain something like this:

    {
      "version": 1,
      "isRoot": true,
      "tools": {
        "husky": {
          "version": "0.6.2",
          "commands": ["husky"]
        }
      }
    }
    

    Now that we have added it to our dependencies, we can add Husky to an existing .NET application by running:

    If you open the root folder, you should be able to see these 3 folders:

    • .git, which contains the info about the Git repository;
    • .config that contains the description of the tools, such as dotnet-tools;
    • .husky that contains the files we are going to use to define our Git hooks.

    Finally, you can add a new hook by running, for example,

    dotnet husky add pre-commit -c "echo 'Hello world!'"
    git add .husky/pre-commit
    

    This command creates a new file, pre-commit (without file extension), under the .husky folder. By default, it appears like this:

    #!/bin/sh
    . "$(dirname "$0")/_/husky.sh"
    
    ## husky task runner examples -------------------
    ## Note : for local installation use 'dotnet' prefix. e.g. 'dotnet husky'
    
    ## run all tasks
    #husky run
    
    ### run all tasks with group: 'group-name'
    #husky run --group group-name
    
    ## run task with name: 'task-name'
    #husky run --name task-name
    
    ## pass hook arguments to task
    #husky run --args "$1" "$2"
    
    ## or put your custom commands -------------------
    #echo 'Husky.Net is awesome!'
    
    echo 'Hello world!'
    

    The default content is pretty useless; it’s time to customize that hook.

    Notice that the latest command has also generated a task-runner.json file; we will use it later.

    Your first pre-commit hook

    To customize the script, open the file located at .husky/pre-commit.

    Here, you can add whatever you want.

    In the example below, I run commands that compile the code, format the text (using dotnet format with the rules defined in the .editorconfig file), and then run all the tests.

    #!/bin/sh
    . "$(dirname "$0")/_/husky.sh"
    
    echo 'Building code'
    dotnet build
    
    echo 'Formatting code'
    dotnet format
    
    echo 'Running tests'
    dotnet test
    

    Then, add it to Git, and you are ready to go. 🚀 But wait…

    3 ways to manage dotnet format with Husky.NET

    There is a problem with the approach in the example above.

    Let’s simulate a usage flow:

    1. you modify a C# class;
    2. you run git commit -m "message";
    3. the pre-commit hook runs dotnet build;
    4. the pre-commit hook runs dotnet format;
    5. the pre-commit hook runs dotnet test;
    6. after the hooks, the commit is created.

    What is the final result?

    Since dotnet format modifies the source files, and given that the snapshot has already been created before executing the hook, all the modified files will not be part of the final commit!

    Also, dotnet format executes linting on every file in the solution, not only those that are part of the current snapshot. The operation might then take a lot of time, depending on the size of the repository, and most of the time, it will not update any file (because you’ve already formatted everything in a previous run).

    We have to work out a way to fix this issue. I’ll suggest three approaches.

    Include all the changes using Git add

    The first approach is quite simple: run git add . after dotnet format.

    So, the flow becomes:

    1. you modify a C# class;
    2. you run git commit -m "message";
    3. the pre-commit hook runs dotnet build;
    4. the pre-commit hook runs dotnet format;
    5. the pre-commit hook runs git add .;
    6. the pre-commit hook runs dotnet test;
    7. Git creates the commit.

    This is the most straightforward approach, but it has some downsides:

    • dotnet format is executed on every file in the solution. The more your project grows, the slower your commits become;
    • git add . adds to the current snapshot all the files modified, even those you did not add to this commit on purpose (maybe because you have updated many files and want to create two distinct commits).

    So, it works, but we can do better.

    Execute a dry run of dotnet-format

    You can add the --verify-no-changes to the dotnet format command: this flag returns an error if at least one file needs to be updated because of a formatting rule.

    Let’s see how the flow changes if one file needs to be formatted.

    1. you modify a C# class;
    2. you run git commit -m "message";
    3. the pre-commit hook runs dotnet build;
    4. the pre-commit hook runs dotnet format --verify-no-changes;
    5. the pre-commit hook returns an error and aborts the operation;
    6. you run dotnet format on the whole solution to fix all the formatting issues;
    7. you run git add .;
    8. you run git commit -m "message";
    9. the pre-commit hook runs dotnet build;
    10. the pre-commit hook runs dotnet format --verify-no-changes. Now, there is nothing to format, and we can proceed;
    11. the pre-commit hook runs dotnet test;
    12. Git creates the commit.

    Notice that, this way, if there is something to format, the whole commit is aborted. You will then have to run dotnet format on the entire solution, fix the errors, add the changes to the snapshot, and restart the flow.

    It’s a longer process, but it allows you to have complete control over the formatted files.

    Also, you won’t risk including in the snapshot the files you want to keep staged in order to add them to a subsequent commit.

    Run dotnet-format only on the staged files using Husky.NET Task Runner

    The third approach is the most complex but with the best result.

    If you recall, during the initialization, Husky added two files in the .husky folder: pre-commit and task-runner.json.

    The key to this solution is the task-runner.json file. This file allows you to create custom scripts with a name, a group, the command to be executed, and its related parameters.

    By default, you will see this content:

    {
      "tasks": [
        {
          "name": "welcome-message-example",
          "command": "bash",
          "args": ["-c", "echo Husky.Net is awesome!"],
          "windows": {
            "command": "cmd",
            "args": ["/c", "echo Husky.Net is awesome!"]
          }
        }
      ]
    }
    

    To make sure that dotnet format runs only on the staged files, you must create a new task like this:

    {
      "name": "dotnet-format-staged-files",
      "group": "pre-commit-operations",
      "command": "dotnet",
      "args": ["format", "--include", "${staged}"],
      "include": ["**/*.cs"]
    }
    

    Here, we have specified a name, dotnet-format-staged-files, the command to run, dotnet, with some parameters listed in the args array. Notice that we can filter the list of files to be formatted by using the ${staged} parameter, which is populated by Husky.NET.

    We have also added this task to a group named pre-commit-operations that we can use to reference a list of tasks to be executed together.

    If you want to run a specific task, you can use dotnet husky run --name taskname. In our example, the command would be dotnet husky run --name dotnet-format-staged-files.

    If you want to run a set of tasks belonging to the same group, you can run dotnet husky run --group groupname. In our example, the command would be dotnet husky run --group pre-commit-operations.

    The last step is to call these tasks from within our pre-commit file. So, replace the old dotnet format command with one of the above commands.

    Final result and optimizations of the pre-commit hook

    Now that everything is in place, we can improve the script to make it faster.

    Let’s see which parts we can optimize.

    The first step is the build phase. For sure, we have to run dotnet build to see if the project builds correctly. You can consider adding the --no-restore flag to skip the restore step before building.

    Then we have the format phase: we can avoid formatting every file using one of the steps defined before. I’ll replace the plain dotnet format with the execution of the script defined in the Task Runner (it’s the third approach we saw).

    Then, we have the test phase. We can add both the --no-restore and the --no-build flag to the command since we have already built everything before. But wait! The format phase updated the content of our files, so we still have to build the whole solution. Unless we swap the build and the format phases.

    So, here we have the final pre-commit file:

    #!/bin/sh
    . "$(dirname "$0")/_/husky.sh"
    
    echo 'Ready to commit changes!'
    
    echo 'Format'
    
    dotnet husky run --name dotnet-format-staged-files
    
    echo 'Build'
    
    dotnet build --no-restore
    
    echo 'Test'
    
    dotnet test --no-restore
    
    echo 'Completed pre-commit changes'
    

    Yes, I know that when you run the dotnet test command, you also build the solution, but I prefer having two separate steps just for clarity!

    Ah, and don’t remove the #!/bin/sh at the beginning of the script!

    How to skip Git hooks

    To trigger the hook, just run git commit -m "message". Before completing the commit, the hook will run all the commands. If one of them fails, the whole commit operation is aborted.

    There are cases when you have to skip the validation. For example, if you have integration tests that rely on an external source currently offline. In that case, some tests will fail, and you will be able to commit your code only once the external system gets working again.

    You can skip the commit validation by adding the --no-verify flag:

    git commit -m "my message" --no-verify
    

    Further readings

    Husky.NET is a porting of the Husky tool we already used in a previous article, using it as an NPM dependency. In that article, we also learned how to customize Conventional Commits using Git hooks.

    🔗 How to customize Conventional Commits in a .NET application using GitHooks | Code4IT

    As we learned, there are many more Git hooks that we can use. You can see the complete list on the Git documentation:

    🔗 Customizing Git – Git Hooks | Git docs

    This article first appeared on Code4IT 🐧

    Of course, if you want to get the best out of Husky.NET, I suggest you have a look at the official documentation:

    🔗 Husky.Net documentation

    One last thing: we installed Husky.NET using dotnet tools. If you want to learn more about this topic, I found an excellent article online that you might want to read:

    🔗 Using dotnet tools | Gustav Ehrenborg

    Wrapping up

    In this article, we learned how to create a pre-commit Git hook and validate all our changes before committing them to our Git repository.

    We also focused on the formatting of our code: how can we format only the files we have changed without impacting the whole solution?

    I hope you enjoyed this article! Let’s keep in touch on Twitter or LinkedIn! 🤜🤛

    Happy coding!

    🐧


    Source link

  • How to create Unit Tests for Model Validation | Code4IT


    Just a second! 🫷
    If you are here, it means that you are a software developer.
    So, you know that storage, networking, and domain management have a cost .

    If you want to support this blog, please ensure that you have disabled the adblocker for this site.
    I configured Google AdSense to show as few ADS as possible – I don’t want to bother you with lots of ads, but I still need to add some to pay for the resources for my site.

    Thank you for your understanding.
    Davide

    Model validation is fundamental to any project: it brings security and robustness acting as a first shield against an invalid state.

    You should then add Unit Tests focused on model validation. In fact, when defining the input model, you should always consider both the valid and, even more, the invalid models, making sure that all the invalid models are rejected.

    BDD is a good approach for this scenario, and you can use TDD to implement it gradually.

    Okay, but how can you validate that the models and model attributes you defined are correct?

    Let’s define a simple model:

    public class User
    {
        [Required]
        [MinLength(3)]
        public string FirstName { get; set; }
    
        [Required]
        [MinLength(3)]
        public string LastName { get; set; }
    
        [Range(18, 100)]
        public int Age { get; set; }
    }
    

    Have we defined our model correctly? Are we covering all the edge cases? A well-written Unit Test suite is our best friend here!

    We have two choices: we can write Integration Tests to send requests to our system, which is running an in-memory server, and check the response we receive. Or we can use the internal Validator class, the one used by ASP.NET to validate input models, to create slim and fast Unit Tests. Let’s use the second approach.

    Here’s a utility method we can use in our tests:

    public static IList<ValidationResult> ValidateModel(object model)
    {
        var results = new List<ValidationResult>();
    
        var validationContext = new ValidationContext(model, null, null);
    
        Validator.TryValidateObject(model, validationContext, results, true);
    
        if (model is IValidatableObject validatableModel)
           results.AddRange(validatableModel.Validate(validationContext));
    
        return results;
    }
    

    In short, we create a validation context without any external dependency, focused only on the input model: new ValidationContext(model, null, null).

    Next, we validate each field by calling TryValidateObject and store the validation results in a list, result.

    Finally, if the Model implements the IValidatableObject interface, which exposes the Validate method, we call that Validate() method and store the returned validation errors in the final result list created before.

    As you can see, we can handle both validation coming from attributes on the fields, such as [Required], and custom validation defined in the model class’s Validate() method.

    Now, we can use this method to verify whether the validation passes and, in case it fails, which errors are returned:

    [Test]
    public void User_ShouldPassValidation_WhenModelIsValid()
    {
        var model = new User { FirstName = "Davide", LastName = "Bellone", Age = 32 };
        var validationResult = ModelValidationHelper.ValidateModel(mode);
        Assert.That(validationResult, Is.Empty);
    }
    
    [Test]
    public void User_ShouldNotPassValidation_WhenLastNameIsEmpty()
    {
        var model = new User { FirstName = "Davide", LastName = null, Age = 32 };
        var validationResult = ModelValidationHelper.ValidateModel(mode);
        Assert.That(validationResult, Is.Not.Empty);
    }
    
    
    [Test]
    public void User_ShouldNotPassValidation_WhenAgeIsLessThan18()
    {
        var model = new User { FirstName = "Davide", LastName = "Bellone", Age = 10 };
        var validationResult = ModelValidationHelper.ValidateModel(mode);
        Assert.That(validationResult, Is.Not.Empty);
    }
    

    Further readings

    Model Validation allows you to create more robust APIs. To improve robustness, you can follow Postel’s law:

    🔗 Postel’s law for API Robustness | Code4IT

    This article first appeared on Code4IT 🐧

    Model validation, in my opinion, is one of the cases where Unit Tests are way better than Integration Tests. This is a perfect example of Testing Diamond, the best (in most cases) way to structure a test suite:

    🔗 Testing Pyramid vs Testing Diamond (and how they affect Code Coverage) | Code4IT

    If you still prefer writing Integration Tests for this kind of operation, you can rely on the WebApplicationFactory class and use it in your NUnit tests:

    🔗 Advanced Integration Tests for .NET 7 API with WebApplicationFactory and NUnit | Code4IT

    Wrapping up

    Model validation is crucial. Testing the correctness of model validation can make or break your application. Please don’t skip it!

    I hope you enjoyed this article! Let’s keep in touch on Twitter or LinkedIn! 🤜🤛

    Happy coding!

    🐧


    Source link

  • OhMyPosh and CascadiaCode not working on PowerShell? How to fix it in Windows 10 and Windows 11 Integrated Terminal &vert; Code4IT

    OhMyPosh and CascadiaCode not working on PowerShell? How to fix it in Windows 10 and Windows 11 Integrated Terminal | Code4IT


    Learn how to integrate Oh My Posh, a cross-platform tool that lets you create beautiful and informative prompts for PowerShell.

    Table of Contents

    Just a second! 🫷
    If you are here, it means that you are a software developer.
    So, you know that storage, networking, and domain management have a cost .

    If you want to support this blog, please ensure that you have disabled the adblocker for this site.
    I configured Google AdSense to show as few ADS as possible – I don’t want to bother you with lots of ads, but I still need to add some to pay for the resources for my site.

    Thank you for your understanding.
    Davide

    The content of the blog you are reading right now is stored in a Git repository. Every time I create an article, I create a new Git Branch to isolate the changes.

    To generate the skeleton of the articles, I use the command line (well, I generally use PowerShell); in particular, given that I’m using both Windows 10 and Windows 11 – depending on the laptop I’m working on – I use the Integrated Terminal, which allows you to define the style, the fonts, and so on of every terminal configured in the settings.

    Windows terminal with default style

    The default profile is pretty basic: no info is shown except for the current path – I want to customize the appearance.

    I want to show the status of the Git repository, including:

    • repository name
    • branch name
    • outgoing commits

    There are lots of articles that teach how to use OhMyPosh with Cascadia Code. Unfortunately, I couldn’t make them work.

    In this article, I teach you how I fixed it on my local machine. It’s a step-by-step guide I wrote while installing it on my local machine. I hope it works for you as well!

    Step 1: Create the $PROFILE file if it does not exist

    In PowerShell, you can customize the current execution by updating the $PROFILE file.

    Clearly, you first have to check if the profile file exists.

    Open the PowerShell and type:

    $PROFILE # You can also use $profile lowercase - it's the same!
    

    This command shows you the expected path of this file. The file, if it exists, is stored in that location.

    The Profile file is expected to be under a specific folder whose path can be found using the $PROFILE command

    In this case, the $Profile file should be available under the folder C:\Users\d.bellone\Documents\WindowsPowerShell. In my case, it does not exist, though!

    The Profile file is expected to be under a specific path, but it may not exist

    Therefore, you must create it manually: head to that folder and create a file named Microsoft.PowerShell_profile.ps1.

    Note: it might happen that not even the WindowsPowerShell folder exists. If it’s missing, well, create it!

    Step 2: Install OhMyPosh using Winget, Scoop, or PowerShell

    To use OhMyPosh, we have to – of course – install it.

    As explained in the official documentation, we have three ways to install OhMyPosh, depending on the tool you prefer.

    If you use Winget, just run:

    winget install JanDeDobbeleer.OhMyPosh -s winget
    

    If you prefer Scoop, the command is:

    scoop install https://github.com/JanDeDobbeleer/oh-my-posh/releases/latest/download/oh-my-posh.json
    

    And, if you like working with PowerShell, execute:

    Set-ExecutionPolicy Bypass -Scope Process -Force; Invoke-Expression ((New-Object System.Net.WebClient).DownloadString('https://ohmyposh.dev/install.ps1'))
    

    I used Winget, and you can see the installation process here:

    Install OhMyPosh with Winget

    Now, to apply these changes, you have to restart the PowerShell.

    Step 3: Add OhMyPosh to the PowerShell profile

    Open the Microsoft.PowerShell_profile.ps1 file and add the following line:

    oh-my-posh init pwsh | Invoke-Expression
    

    This command is executed every time you open the PowerShell with the default profile, and it initializes OhMyPosh to have it available during the current session.

    Now, you can save and close the file.

    Hint: you can open the profile file with Notepad by running notepad $PROFILE.

    Step 4: Set the Execution Policy to RemoteSigned

    Restart the terminal. In all probability, you will see an error like this:

    &ldquo;The file .ps1 is not digitally signed&rdquo; error

    The error message

    The file <path>\Microsoft.PowerShell_profile.ps1 is
    not digitally signed. You cannot run this script on the current system

    means that PowerShell does not trust the script it’s trying to load.

    To see which Execution Policy is currently active, run:

    You’ll probably see that the value is AllSigned.

    To enable the execution of scripts created on your local machine, you have to set the Execution Policy value to RemoteSigned, using this command by running the PowerShell in administrator mode:

    Set-ExecutionPolicy RemoteSigned
    

    Let’s see the definition of the RemoteSigned Execution policy as per SQLShack’s article:

    This is also a safe PowerShell Execution policy to set in an enterprise environment. This policy dictates that any script that was not created on the system that the script is running on, should be signed. Therefore, this will allow you to write your own script and execute it.

    So, yeah, feel free to proceed and set the new Execution policy to have your PowerShell profile loaded correctly every time you open a new PowerShell instance.

    Now, OhMyPosh can run in the current profile.

    Head to a Git repository and notice that… It’s not working!🤬 Or, well, we have the Git information, but we are missing some icons and glyphs.

    Oh My Posh is loaded correctly, but some icons are missing due to the wrong font

    Step 5: Use CaskaydiaCove, not Cascadia Code, as a font

    We still have to install the correct font with the missing icons.

    We will install it using Chocolatey, a package manager available for Windows 11.

    To check if you have it installed, run:

    Now, to install the correct font family, open a PowerShell with administration privileges and run:

    choco install cascadia-code-nerd-font
    

    Once the installation is complete, you must tell Integrated Terminal to use the correct font by following these steps:

    1. open to the Settings page (by hitting CTRL + ,)
    2. select the profile you want to update (in my case, I’ll update the default profile)
    3. open the Appearance section
    4. under Font face select CaskaydiaCove Nerd Font

    PowerShell profile settings - Font Face should be CaskaydiaCove Nerd Font

    Now close the Integrated Terminal to apply the changes.

    Open it again, navigate to a Git repository, and admire the result.

    OhMyPosh with icons and fonts loaded correctly

    Further readings

    The first time I read about OhMyPosh, it was on Scott Hanselman’s blog. I couldn’t make his solution work – and that’s the reason I wrote this article. However, in his article, he shows how he customized his own Terminal with more glyphs and icons, so you should give it a read.

    🔗 My Ultimate PowerShell prompt with Oh My Posh and the Windows Terminal | Scott Hanselman’s blog

    We customized our PowerShell profile with just one simple configuration. However, you can do a lot more. You can read Ruud’s in-depth article about PowerShell profiles.

    🔗 How to Create a PowerShell Profile – Step-by-Step | Lazyadmin

    One of the core parts of this article is that we have to use CaskaydiaCove as a font instead of the (in)famous Cascadia Code. But why?

    🔗 Why CaskaydiaCove and not Cascadia Code? | GitHub

    Finally, as I said at the beginning of this article, I use Git and Git Branches to handle the creation and management of my blog articles. That’s just the tip of the iceberg! 🏔️

    If you want to steal my (previous) workflow, have a look at the behind-the-scenes of my blogging process (note: in the meanwhile, a lot of things have changed, but these steps can still be helpful for you)

    🔗 From idea to publishing, and beyond: how I automated my blogging workflow with GitHub, PowerShell, and Azure | Code4IT

    This article first appeared on Code4IT 🐧

    Wrapping up

    In this article, we learned how to install OhMyPosh in PowerShell and overcome all the errors you (well, I) don’t see described in other articles.

    I wrote this step-by-step article alongside installing these tools on my local machine, so I’m confident the solution will work.

    Did this solution work for you? Let me know! 📨

    I hope you enjoyed this article! Let’s keep in touch on Twitter or LinkedIn! 🤜🤛

    Happy coding!

    🐧


    Source link

  • How to extract, create, and navigate Zip Files in C# &vert; Code4IT

    How to extract, create, and navigate Zip Files in C# | Code4IT


    Learn how to zip and unzip compressed files with C#. Beware: it’s not as obvious as it might seem!

    Table of Contents

    Just a second! 🫷
    If you are here, it means that you are a software developer.
    So, you know that storage, networking, and domain management have a cost .

    If you want to support this blog, please ensure that you have disabled the adblocker for this site.
    I configured Google AdSense to show as few ADS as possible – I don’t want to bother you with lots of ads, but I still need to add some to pay for the resources for my site.

    Thank you for your understanding.
    Davide

    When working with local files, you might need to open, create, or update Zip files.

    In this article, we will learn how to work with Zip files in C#. We will learn how to perform basic operations such as opening, extracting, and creating a Zip file.

    The main class we will use is named ZipFile, and comes from the System.IO.Compression namespace. It’s been present in C# since .NET Framework 4.5, so we can say it’s pretty stable 😉 Nevertheless, there are some tricky points that you need to know before using this class. Let’s learn!

    Using C# to list all items in a Zip file

    Once you have a Zip file, you can access the internal items without extracting the whole Zip.

    You can use the ZipFile.Open method.

    using ZipArchive archive = ZipFile.Open(zipFilePath, ZipArchiveMode.Read);
    System.Collections.ObjectModel.ReadOnlyCollection<ZipArchiveEntry> entries = archive.Entries;
    

    Notice that I specified the ZipArchiveMode. This is an Enum whose values are Read, Create, and Update.

    Using the Entries property of the ZipArchive, you can access the whole list of files stored within the Zip folder, each represented by a ZipArchiveEntry instance.

    All entries in the current Zip file

    The ZipArchiveEntry object contains several fields, like the file’s name and the full path from the root archive.

    Details of a single ZipEntry item

    There are a few key points to remember about the entries listed in the ZipArchiveEntry.

    1. It is a ReadOnlyCollection<ZipArchiveEntry>: it means that even if you find a way to add or update the items in memory, the changes are not applied to the actual files;
    2. It lists all files and folders, not only those at the root level. As you can see from the image above, it lists both the files at the root level, like File.txt, and those in inner folders, such as TestZip/InnerFolder/presentation.pptx;
    3. Each file is characterized by two similar but different properties: Name is the actual file name (like presentation.pptx), while FullName contains the path from the root of the archive (e.g. TestZip/InnerFolder/presentation.pptx);
    4. It lists folders as if they were files: in the image above, you can see TestZip/InnerFolder. You can recognize them because their Name property is empty and their Length is 0;

    Folders are treated like files, but with no Size or Name

    Lastly, remember that ZipFile.Open returns an IDisposable, so you should place the operations within a using statement.

    ❓❓A question for you! Why do we see an item for the TestZip/InnerFolder folder, but there is no reference to the TestZip folder? Drop a comment below 📩

    Extracting a Zip folder is easy but not obvious.

    We have only one way to do that: by calling the ZipFile.ExtractToDirectory method.

    It accepts as mandatory parameters the path of the Zip file to be extracted and the path to the destination:

    var zipPath = @"C:\Users\d.bellone\Desktop\TestZip.zip";
    var destinationPath = @"C:\Users\d.bellone\Desktop\MyDestination";
    ZipFile.ExtractToDirectory(zipPath, destinationPath);
    

    Once you run it, you will see the content of the Zip copied and extracted to the MyDestination folder.

    Note that this method creates the destination folder if it does not exist.

    This method accepts two more parameters:

    • entryNameEncoding, by which you can specify the encoding. The default value is UTF-8.
    • overwriteFiles allows you to specify whether it must overwrite existing files. The default value is false. If set to false and the destination files already exist, this method throws a System.IO.IOException saying that the file already exists.

    Using C# to create a Zip from a folder

    The key method here is ZipFile.CreateFromDirectory, which allows you to create Zip files in a flexible way.

    The first mandatory value is, of course, the source directory path.

    The second mandatory parameter is the destination of the resulting Zip file.

    It can be the local path to the file:

    string sourceFolderPath = @"\Desktop\myFolder";
    string destinationZipPath = @"\Desktop\destinationFile.zip";
    
    ZipFile.CreateFromDirectory(sourceFolderPath, destinationZipPath);
    

    Or it can be a Stream that you can use later for other operations:

    using (MemoryStream memStream = new MemoryStream())
    {
        string sourceFolderPath = @"\Desktop\myFolder";
        ZipFile.CreateFromDirectory(sourceFolderPath, memStream);
    
        var lenght = memStream.Length;// here the Stream is populated
    }
    

    You can finally add some optional parameters:

    • compressionLevel, whose values are Optimal, Fastest, NoCompression, SmallestSize.
    • includeBaseDirectory: a flag that defines if you have to copy only the first-level files or also the root folder.

    A quick comparison of the four Compression Levels

    As we just saw, we have four compression levels: Optimal, Fastest, NoCompression, and SmallestSize.

    What happens if I use the different values to zip all the photos and videos of my latest trip?

    The source folder’s size is 16.2 GB.

    Let me zip it with the four compression levels:

     private long CreateAndTrack(string sourcePath, string destinationPath, CompressionLevel compression)
     {
         Stopwatch stopwatch = Stopwatch.StartNew();
    
         ZipFile.CreateFromDirectory(
             sourceDirectoryName: sourcePath,
             destinationArchiveFileName: destinationPath,
             compressionLevel: compression,
             includeBaseDirectory: true
             );
         stopwatch.Stop();
    
         return stopwatch.ElapsedMilliseconds;
     }
    
    // in Main...
    
    var smallestTime = CreateAndTrack(sourceFolderPath,
        Path.Combine(rootFolder, "Smallest.zip"),
        CompressionLevel.SmallestSize);
    
    var noCompressionTime = CreateAndTrack(sourceFolderPath,
        Path.Combine(rootFolder, "NoCompression.zip"),
        CompressionLevel.NoCompression);
    
    var fastestTime = CreateAndTrack(sourceFolderPath,
        Path.Combine(rootFolder, "Fastest.zip"),
        CompressionLevel.Fastest);
    
    var optimalTime = CreateAndTrack(sourceFolderPath,
        Path.Combine(rootFolder, "Optimal.zip"),
        CompressionLevel.Optimal);
    

    By executing this operation, we have this table:

    Compression Type Execution time (ms) Execution time (s) Size (bytes) Size on disk (bytes)
    Optimal 483481 483 17,340,065,594 17,340,067,840
    Fastest 661674 661 16,935,519,764 17,004,888,064
    Smallest 344756 344 17,339,881,242 17,339,883,520
    No Compression 42521 42 17,497,652,162 17,497,653,248

    We can see a bunch of weird things:

    • Fastest compression generates a smaller file than Smallest compression.
    • Fastest compression is way slower than Smallest compression.
    • Optimal lies in the middle.

    This is to say: don’t trust the names; remember to benchmark the parts where you need performance, even with a test as simple as this.

    Wrapping up

    This was a quick article about one specific class in the .NET ecosystem.

    As we saw, even though the class is simple and it’s all about three methods, there are some things you should keep in mind before using this class in your code.

    I hope you enjoyed this article! Let’s keep in touch on Twitter or LinkedIn! 🤜🤛

    Happy coding!

    🐧


    Source link

  • Use TestCase to run similar unit tests with NUnit &vert; Code4IT

    Use TestCase to run similar unit tests with NUnit | Code4IT


    Just a second! 🫷
    If you are here, it means that you are a software developer.
    So, you know that storage, networking, and domain management have a cost .

    If you want to support this blog, please ensure that you have disabled the adblocker for this site.
    I configured Google AdSense to show as few ADS as possible – I don’t want to bother you with lots of ads, but I still need to add some to pay for the resources for my site.

    Thank you for your understanding.
    Davide

    In my opinion, Unit tests should be well structured and written even better than production code.

    In fact, Unit Tests act as a first level of documentation of what your code does and, if written properly, can be the key to fixing bugs quickly and without adding regressions.

    One way to improve readability is by grouping similar tests that only differ by the initial input but whose behaviour is the same.

    Let’s use a dummy example: some tests on a simple Calculator class that only performs sums on int values.

    public static class Calculator
    {
        public static int Sum(int first, int second) => first + second;
    }
    

    One way to create tests is by creating one test for each possible combination of values:

    public class SumTests
    {
    
        [Test]
        public void SumPositiveNumbers()
        {
            var result = Calculator.Sum(1, 5);
            Assert.That(result, Is.EqualTo(6));
        }
    
        [Test]
        public void SumNegativeNumbers()
        {
            var result = Calculator.Sum(-1, -5);
            Assert.That(result, Is.EqualTo(-6));
        }
    
        [Test]
        public void SumWithZero()
        {
            var result = Calculator.Sum(1, 0);
            Assert.That(result, Is.EqualTo(1));
        }
    }
    

    However, it’s not a good idea: you’ll end up with lots of identical tests (DRY, remember?) that add little to no value to the test suite. Also, this approach forces you to add a new test method to every new kind of test that pops into your mind.

    When possible, we should generalize it. With NUnit, we can use the TestCase attribute to specify the list of parameters passed in input to our test method, including the expected result.

    We can then simplify the whole test class by creating only one method that accepts the different cases in input and runs tests on those values.

    [Test]
    [TestCase(1, 5, 6)]
    [TestCase(-1, -5, -6)]
    [TestCase(1, 0, 1)]
    public void SumWorksCorrectly(int first, int second, int expected)
    {
        var result = Calculator.Sum(first, second);
        Assert.That(result, Is.EqualTo(expected));
    }
    

    By using TestCase, you can cover different cases by simply adding a new case without creating new methods.

    Clearly, don’t abuse it: use it only to group methods with similar behaviour – and don’t add if statements in the test method!

    There is a more advanced way to create a TestCase in NUnit, named TestCaseSource – but we will talk about it in a future C# tip 😉

    Further readings

    If you are using NUnit, I suggest you read this article about custom equality checks – you might find it handy in your code!

    🔗 C# Tip: Use custom Equality comparers in Nunit tests | Code4IT

    This article first appeared on Code4IT 🐧

    Wrapping up

    I hope you enjoyed this article! Let’s keep in touch on Twitter or LinkedIn! 🤜🤛

    Happy coding!

    🐧


    Source link

  • 4 ways to create Unit Tests without Interfaces in C# &vert; Code4IT

    4 ways to create Unit Tests without Interfaces in C# | Code4IT


    C# devs have the bad habit of creating interfaces for every non-DTO class because «we need them for mocking!». Are you sure it’s the only way?

    Table of Contents

    Just a second! 🫷
    If you are here, it means that you are a software developer.
    So, you know that storage, networking, and domain management have a cost .

    If you want to support this blog, please ensure that you have disabled the adblocker for this site.
    I configured Google AdSense to show as few ADS as possible – I don’t want to bother you with lots of ads, but I still need to add some to pay for the resources for my site.

    Thank you for your understanding.
    Davide

    One of the most common traits of C# developers is the excessive usage of interfaces.

    For every non-DTO class we define, we usually also create the related interface. Most of the time, we don’t need it because we have multiple implementations of an interface. Instead, we say that we need an interface to enable mocking.

    That’s true; it’s pretty straightforward to mock an interface: lots of libraries, like Moq and NSubstitute, allow you to create mocks and pass them to the class under test. What if there were another way?

    In this article, we will learn how to have complete control over a dependency while having the concrete class, and not the related interface, injected in the constructor.

    C# devs always add interfaces, just in case

    If you’re a developer like me, you’ve been taught something like this:

    One of the SOLID principles is Dependency Inversion; to achieve it, you need Dependency Injection. The best way to do that is by creating an interface, injecting it in the consumer’s constructor, and then mapping the interface and the concrete class.

    Sometimes, somebody explains that we don’t need interfaces to achieve Dependency Injection. However, there are generally two arguments proposed by those who keep using interfaces everywhere: the “in case I need to change the database” argument and, even more often, the “without interfaces, I cannot create mocks”.

    Are we sure?

    The “Just in case I need to change the database” argument

    One phrase that I often hear is:

    Injecting interfaces allows me to change the concrete implementation of a class without worrying about the caller. You know, just in case I had to change the database engine…

    Yes, that’s totally right – using interfaces, you can change the internal implementation in a bat of an eye.

    Let’s be honest: in all your career, how many times have you changed the underlying database? In my whole career, it happened just once: we tried to build a solution using Gremlin for CosmosDB, but it turned out to be too expensive – so we switched to a simpler MongoDB.

    But, all in all, it wasn’t only thanks to the interfaces that we managed to switch easily; it was because we strictly separated the classes and did not leak the models related to Gremlin into the core code. We structured the code with a sort of Hexagonal Architecture, way before this term became a trend in the tech community.

    Still, interfaces can be helpful, especially when dealing with multiple implementations of the same methods or when you want to wrap your head around the methods, inputs, and outputs exposed by a module.

    The “I need to mock” argument

    Another one I like is this:

    Interfaces are necessary for mocking dependencies! Otherwise, how can I create Unit Tests?

    Well, I used to agree with this argument. I was used to mocking interfaces by using libraries like Moq and defining the behaviour of the dependency using the SetUp method.

    It’s still a valid way, but my point here is that that’s not the only one!

    One of the simplest tricks is to mark your classes as abstract. But… this means you’ll end up with every single class marked as abstract. Not the best idea.

    We have other tools in our belt!

    A realistic example: Dependency Injection without interfaces

    Let’s start with a real-ish example.

    We have a NumbersRepository that just exposes one method: GetNumbers().

    public class NumbersRepository
    {
        private readonly int[] _allNumbers;
    
        public NumbersRepository()
        {
            _allNumbers = Enumerable.Range(0, int.MaxValue).ToArray();
        }
    
        public IEnumerable<int> GetNumbers() => Random.Shared.GetItems(_allNumbers, 50);
    }
    

    Generally, one would be tempted to add an interface with the same name as the class, INumbersRepository, and include the GetNumbers method in the interface definition.

    We are not going to do that – the interface is not necessary, so why clutter the code with something like that?

    Now, for the consumer. We have a simple NumbersSearchService that accepts, via Dependency Injection, an instance of NumbersRepository (yes, the concrete class!) and uses it to perform a simple search:

    public class NumbersSearchService
    {
        private readonly NumbersRepository _repository;
    
        public NumbersSearchService(NumbersRepository repository)
        {
            _repository = repository;
        }
    
        public bool Contains(int number)
        {
            var numbers = _repository.GetNumbers();
            return numbers.Contains(number);
        }
    }
    

    To add these classes to your ASP.NET project, you can add them in the DI definition like this:

    builder.Services.AddSingleton<NumbersRepository>();
    builder.Services.AddSingleton<NumbersSearchService>();
    

    Without adding any interface.

    Now, how can we test this class without using the interface?

    Way 1: Use the “virtual” keyword in the dependency to create stubs

    We can create a subclass of the dependency, even if it is a concrete class, by overriding just some of its functionalities.

    For example, we can choose to mark the GetNumbers method in the NumbersRepository class as virtual, making it easily overridable from a subclass.

    public class NumbersRepository
    {
        private readonly int[] _allNumbers;
    
        public NumbersRepository()
        {
            _allNumbers = Enumerable.Range(0, 100).ToArray();
        }
    
    -    public IEnumerable<int> GetNumbers() => Random.Shared.GetItems(_allNumbers, 50);
    +    public virtual IEnumerable<int> GetNumbers() => Random.Shared.GetItems(_allNumbers, 50);
    }
    

    Yes, we can mark a method as virtual even if the class is concrete!

    Now, in our Unit Tests, we can create a subtype of NumbersRepository to have complete control of the GetNumbers method:

    internal class StubNumberRepo : NumbersRepository
    {
        private IEnumerable<int> _numbers;
    
        public void SetNumbers(params int[] numbers) => _numbers = numbers;
    
        public override IEnumerable<int> GetNumbers() => _numbers;
    }
    

    We have overridden the GetNumbers method, but to do so, we had to include a new method, SetNumbers, to define the expected result of the former method.

    We then can use it in our tests like this:

    [Test]
    public void Should_WorkWithStubRepo()
    {
        // Arrange
        var repository = new StubNumberRepo();
        repository.SetNumbers(1, 2, 3);
        var service = new NumbersSearchService(repository);
    
        // Act
        var result = service.Contains(3);
    
        // Assert
        Assert.That(result, Is.True);
    }
    

    You now have the full control over the subclass. But this approach comes with a problem: if you have multiple methods marked as virtual, and you are going to use all of them in your test classes, then you will need to override every single method (to have control over them) and work out how to decide whether to use the concrete method or the stub implementation.

    For example, we can update the StubNumberRepo to let the consumer choose if we need the dummy values or the base implementation:

    internal class StubNumberRepo : NumbersRepository
    {
        private IEnumerable<int> _numbers;
        private bool _useStubNumbers;
    
        public void SetNumbers(params int[] numbers)
        {
            _numbers = numbers;
            _useStubNumbers = true;
        }
    
        public override IEnumerable<int> GetNumbers()
        {
            if (_useStubNumbers)
                return _numbers;
            return base.GetNumbers();
        }
    }
    

    With this approach, by default, we use the concrete implementation of NumbersRepository because _useStubNumbers is false. If we call the SetNumbers method, we also specify that we don’t want to use the original implementation.

    Way 2: Use the virtual keyword in the service to avoid calling the dependency

    Similar to the previous approach, we can mark some methods of the caller as virtual to allow us to change parts of our class while keeping everything else as it was.

    To achieve it, we have to refactor a little our Service class:

    public class NumbersSearchService
    {
        private readonly NumbersRepository _repository;
    
        public NumbersSearchService(NumbersRepository repository)
        {
            _repository = repository;
        }
    
        public bool Contains(int number)
        {
    -       var numbers = _repository.GetNumbers();
    +       var numbers = GetNumbers();
            return numbers.Contains(number);
        }
    
    +    public virtual IEnumerable<int> GetNumbers() => _repository.GetNumbers();
    }
    

    The key is that we moved the calls to the external references to a separate method, marking it as virtual.

    This way, we can create a stub class of the Service itself without the need to stub its dependencies:

    internal class StubNumberSearch : NumbersSearchService
    {
        private IEnumerable<int> _numbers;
        private bool _useStubNumbers;
    
        public StubNumberSearch() : base(null)
        {
        }
    
        public void SetNumbers(params int[] numbers)
        {
            _numbers = numbers.ToArray();
            _useStubNumbers = true;
        }
    
        public override IEnumerable<int> GetNumbers()
            => _useStubNumbers ? _numbers : base.GetNumbers();
    }
    

    The approach is almost identical to the one we saw before. The difference can be seen in your tests:

    [Test]
    public void Should_UseStubService()
    {
        // Arrange
        var service = new StubNumberSearch();
        service.SetNumbers(12, 15, 30);
    
        // Act
        var result = service.Contains(15);
    
        // Assert
        Assert.That(result, Is.True);
    }
    

    There is a problem with this approach: many devs (correctly) add null checks in the constructor to ensure that the dependencies are not null:

    public NumbersSearchService(NumbersRepository repository)
    {
        ArgumentNullException.ThrowIfNull(repository);
        _repository = repository;
    }
    

    While this approach makes it safe to use the NumbersSearchService reference within the class’ methods, it also stops us from creating a StubNumberSearch. Since we want to create an instance of NumbersSearchService without the burden of injecting all the dependencies, we call the base constructor passing null as a value for the dependencies. If we validate against null, the stub class becomes unusable.

    There’s a simple solution: adding a protected empty constructor:

    public NumbersSearchService(NumbersRepository repository)
    {
        ArgumentNullException.ThrowIfNull(repository);
        _repository = repository;
    }
    
    protected NumbersSearchService()
    {
    }
    

    We mark it as protected because we want that only subclasses can access it.

    Way 3: Use the “new” keyword in methods to hide the base implementation

    Similar to the virtual keyword is the new keyword, which can be applied to methods.

    We can then remove the virtual keyword from the base class and hide its implementation by marking the overriding method as new.

    public class NumbersSearchService
    {
        private readonly NumbersRepository _repository;
    
        public NumbersSearchService(NumbersRepository repository)
        {
            ArgumentNullException.ThrowIfNull(repository);
            _repository = repository;
        }
    
        public bool Contains(int number)
        {
            var numbers = _repository.GetNumbers();
            return numbers.Contains(number);
        }
    
    -    public virtual IEnumerable<int> GetNumbers() => _repository.GetNumbers();
    +    public IEnumerable<int> GetNumbers() => _repository.GetNumbers();
    }
    

    We have restored the original implementation of the Repository.

    Now, we can update the stub by adding the new keyword.

    internal class StubNumberSearch : NumbersSearchService
    {
        private IEnumerable<int> _numbers;
        private bool _useStubNumbers;
    
        public void SetNumbers(params int[] numbers)
        {
            _numbers = numbers.ToArray();
            _useStubNumbers = true;
        }
    
    -    public override IEnumerable<int> GetNumbers() => _useStubNumbers ? _numbers : base.GetNumbers();
    +    public new IEnumerable<int> GetNumbers() => _useStubNumbers ? _numbers : base.GetNumbers();
    }
    

    We haven’t actually solved any problem except for one: we can now avoid cluttering all our classes with the virtual keyword.

    A question for you! Is there any difference between using the new and the virtual keyword? When you should pick one instead of the other? Let me know in the comments section! 📩

    Way 4: Mock concrete classes by marking a method as virtual

    Sometimes, I hear developers say that mocks are the absolute evil, and you should never use them.

    Oh, come on! Don’t be so silly!

    That’s true, when using mocks you are writing tests on a irrealistic environment. But, well, that’s exactly the point of having mocks!

    If you think about it, at school, during Science lessons, we were taught to do our scientific calculations using approximations: ignore the air resistance, ignore friction, and so on. We knew that that world did not exist, but we removed some parts to make it easier to validate our hypothesis.

    In my opinion, it’s the same for testing. Mocks are useful to have full control of a specific behaviour. Still, only relying on mocks makes your tests pretty brittle: you cannot be sure that your system is working under real conditions.

    That’s why, as I explained in a previous article, I prefer the Testing Diamond over the Testing Pyramid. In many real cases, five Integration Tests are more valuable than fifty Unit Tests.

    But still, mocks can be useful. How can we use them if we don’t have interfaces?

    Let’s start with the basic example:

    public class NumbersRepository
    {
        private readonly int[] _allNumbers;
    
        public NumbersRepository()
        {
            _allNumbers = Enumerable.Range(0, 100).ToArray();
        }
    
        public IEnumerable<int> GetNumbers() => Random.Shared.GetItems(_allNumbers, 50);
    }
    
    public class NumbersSearchService
    {
        private readonly NumbersRepository _repository;
    
        public NumbersSearchService(NumbersRepository repository)
        {
            ArgumentNullException.ThrowIfNull(repository);
            _repository = repository;
        }
    
        public bool Contains(int number)
        {
            var numbers = _repository.GetNumbers();
            return numbers.Contains(number);
        }
    }
    

    If we try to use Moq to create a mock of NumbersRepository (again, the concrete class) like this:

    [Test]
    public void Should_WorkWithMockRepo()
    {
        // Arrange
        var repository = new Moq.Mock<NumbersRepository>();
        repository.Setup(_ => _.GetNumbers()).Returns(new int[] { 1, 2, 3 });
        var service = new NumbersSearchService(repository.Object);
    
        // Act
        var result = service.Contains(3);
    
        // Assert
        Assert.That(result, Is.True);
    }
    

    It will fail with this error:

    System.NotSupportedException : Unsupported expression: _ => _.GetNumbers()
    Non-overridable members (here: NumbersRepository.GetNumbers) may not be used in setup / verification expressions.

    This error occurs because the implementation GetNumbers is fixed as defined in the NumbersRepository class and cannot be overridden.

    Unless you mark it as virtual, as we did before.

    public class NumbersRepository
    {
        private readonly int[] _allNumbers;
    
        public NumbersRepository()
        {
            _allNumbers = Enumerable.Range(0, 100).ToArray();
        }
    
    -    public IEnumerable<int> GetNumbers() => Random.Shared.GetItems(_allNumbers, 50);
    +    public virtual IEnumerable<int> GetNumbers() => Random.Shared.GetItems(_allNumbers, 50);
    }
    

    Now the test passes: we have successfully mocked a concrete class!

    Further readings

    Testing is a crucial part of any software application. I personally write Unit Tests even for throwaway software – this way, I can ensure that I’m doing the correct thing without the need for manual debugging.

    However, one part that is often underestimated is the code quality of tests. Tests should be written even better than production code. You can find more about this topic here:

    🔗 Tests should be even more well-written than production code | Code4IT

    Also, Unit Tests are not enough. You should probably write more Integration Tests than Unit Tests. This one is a testing strategy called Testing Diamond.

    🔗 Testing Pyramid vs Testing Diamond (and how they affect Code Coverage) | Code4IT

    This article first appeared on Code4IT 🐧

    Clearly, you can write Integration Tests for .NET APIs easily. In this article, I explain how to create and customize Integration Tests using NUnit:

    🔗 Advanced Integration Tests for .NET 7 API with WebApplicationFactory and NUnit | Code4IT

    Wrapping up

    In this article, we learned that it’s not necessary to create interfaces for the sake of having mocks.

    We have different other options.

    Honestly speaking, I’m still used to creating interfaces and using them with mocks.

    I find it easy to do, and this approach provides a quick way to create tests and drive the behaviour of the dependencies.

    Also, I recognize that interfaces created for the sole purpose of mocking are quite pointless: we have learned that there are other ways, and we should consider trying out these solutions.

    Still, interfaces are quite handy for two “non-technical” reasons:

    • using interfaces, you can understand in a glimpse what are the operations that you can call in a clean and concise way;
    • interfaces and mocks allow you to easily use TDD: while writing the test cases, you also define what methods you need and the expected behaviour. I know you can do that using stubs, but I find it easier with interfaces.

    I know, this is a controversial topic – I’m not saying that you should remove all your interfaces (I think it’s a matter of personal taste, somehow!), but with this article, I want to highlight that you can avoid interfaces.

    I hope you enjoyed this article! Let’s keep in touch on Twitter or LinkedIn! 🤜🤛

    Happy coding!

    🐧


    Source link

  • Handling exceptions with Task.WaitAll and Task.WhenAll &vert; Code4IT

    Handling exceptions with Task.WaitAll and Task.WhenAll | Code4IT


    Just a second! 🫷
    If you are here, it means that you are a software developer.
    So, you know that storage, networking, and domain management have a cost .

    If you want to support this blog, please ensure that you have disabled the adblocker for this site.
    I configured Google AdSense to show as few ADS as possible – I don’t want to bother you with lots of ads, but I still need to add some to pay for the resources for my site.

    Thank you for your understanding.
    Davide

    Asynchronous programming enables you to execute multiple operations without blocking the main thread.

    In general, we often think of the Happy Scenario, when all the operations go smoothly, but we rarely consider what to do when an error occurs.

    In this article, we will explore how Task.WaitAll and Task.WhenAll behave when an error is thrown in one of the awaited Tasks.

    Prepare the tasks to be executed

    For the sake of this article, we are going to use a silly method that returns the same number passed in input but throws an exception in case the input number can be divided by 3:

    public Task<int> Echo(int value) => Task.Factory.StartNew(
    () =>
    {
        if (value % 3 == 0)
        {
            Console.WriteLine($"[LOG] You cannot use {value}!");
            throw new Exception($"[EXCEPTION] Value cannot be {value}");
        }
        Console.WriteLine($"[LOG] {value} is a valid value!");
        return value;
    }
    );
    

    Those Console.WriteLine instructions will allow us to see what’s happening “live”.

    We prepare the collection of tasks to be awaited by using a simple Enumerable.Range

    var tasks = Enumerable.Range(1, 11).Select(Echo);
    

    And then, we use a try-catch block with some logs to showcase what happens when we run the application.

    try
    {
    
        Console.WriteLine("START");
    
        // await all the tasks
    
        Console.WriteLine("END");
    }
    catch (Exception ex)
    {
        Console.WriteLine("The exception message is: {0}", ex.Message);
        Console.WriteLine("The exception type is: {0}", ex.GetType().FullName);
    
        if (ex.InnerException is not null)
        {
            Console.WriteLine("Inner exception: {0}", ex.InnerException.Message);
        }
    }
    finally
    {
        Console.WriteLine("FINALLY!");
    }
    

    If we run it all together, we can notice that nothing really happened:

    In fact, we just created a collection of tasks (which does not actually exist, since the result is stored in a lazy-loaded enumeration).

    We can, then, call WaitAll and WhenAll to see what happens when an error occurs.

    Error handling when using Task.WaitAll

    It’s time to execute the tasks stored in the tasks collection, like this:

    try
    {
        Console.WriteLine("START");
    
        // await all the tasks
        Task.WaitAll(tasks.ToArray());
    
        Console.WriteLine("END");
    }
    

    Task.WaitAll accepts an array of tasks to be awaited and does not return anything.

    The execution goes like this:

    START
    1 is a valid value!
    2 is a valid value!
    :(  You cannot use 6!
    5 is a valid value!
    :(  You cannot use 3!
    4 is a valid value!
    8 is a valid value!
    10 is a valid value!
    :(  You cannot use 9!
    7 is a valid value!
    11 is a valid value!
    The exception message is: One or more errors occurred. ([EXCEPTION] Value cannot be 3) ([EXCEPTION] Value cannot be 6) ([EXCEPTION] Value cannot be 9)
    The exception type is: System.AggregateException
    Inner exception: [EXCEPTION] Value cannot be 3
    FINALLY!
    

    There are a few things to notice:

    • the tasks are not executed in sequence: for example, 6 was printed before 4. Well, to be honest, we can say that Console.WriteLine printed the messages in that sequence, but maybe the tasks were executed in another different order (as you can deduce from the order of the error messages);
    • all the tasks are executed before jumping to the catch block;
    • the exception caught in the catch block is of type System.AggregateException; we’ll come back to it later;
    • the InnerException property of the exception being caught contains the info for the first exception that was thrown.

    Error handling when using Task.WhenAll

    Let’s replace Task.WaitAll with Task.WhenAll.

    try
    {
        Console.WriteLine("START");
    
        await Task.WhenAll(tasks);
    
        Console.WriteLine("END");
    }
    

    There are two main differences to notice when comparing Task.WaitAll and Task.WhenAll:

    1. Task.WhenAll accepts in input whatever type of collection (as long as it is an IEnumerable);
    2. it returns a Task that you have to await.

    And what happens when we run the program?

    START
    2 is a valid value!
    1 is a valid value!
    4 is a valid value!
    :(  You cannot use 3!
    7 is a valid value!
    5 is a valid value!
    :(  You cannot use 6!
    8 is a valid value!
    10 is a valid value!
    11 is a valid value!
    :(  You cannot use 9!
    The exception message is: [EXCEPTION] Value cannot be 3
    The exception type is: System.Exception
    FINALLY!
    

    Again, there are a few things to notice:

    • just as before, the messages are not printed in order;
    • the exception message contains the message for the first exception thrown;
    • the exception is of type System.Exception, and not System.AggregateException as we saw before.

    This means that the first exception breaks everything, and you lose the info about the other exceptions that were thrown.

    📩 but now, a question for you: we learned that, when using Task.WhenAll, only the first exception gets caught by the catch block. What happens to the other exceptions? How can we retrieve them? Drop a message in the comment below ⬇️

    Comparing Task.WaitAll and Task.WhenAll

    Task.WaitAll and Task.WhenAll are similar but not identical.

    Task.WaitAll should be used when you are in a synchronous context and need to block the current thread until all tasks are complete. This is common in simple old-style console applications or scenarios where asynchronous programming is not required. However, it is not recommended in UI or modern ASP.NET applications because it can cause deadlocks or freeze the UI.

    Task.WhenAll is preferred in modern C# code, especially in asynchronous methods (where you can use async Task). It allows you to await the completion of multiple tasks without blocking the calling thread, making it suitable for environments where responsiveness is important. It also enables easier composition of continuations and better exception handling.

    Let’s wrap it up in a table:

    Feature Task.WaitAll Task.WhenAll
    Return Type void Task or Task<TResult[]>
    Blocking/Non-blocking Blocking (waits synchronously) Non-blocking (returns a Task)
    Exception Handling Throws AggregateException immediately Exceptions observed when awaited
    Usage Context Synchronous code (e.g., console apps) Asynchronous code (e.g., async methods)
    Continuation Not possible (since it blocks) Possible (use .ContinueWith or await)
    Deadlock Risk Higher in UI contexts Lower (if properly awaited)

    Bonus tip: get the best out of AggregateException

    We can expand a bit on the AggregateException type.

    That specific type of exception acts as a container for all the exceptions thrown when using Task.WaitAll.

    It contains a property named InnerExceptions that contains all the exceptions thrown so that you can access them using an Enumerator.

    A common example is this:

    if (ex is AggregateException aggEx)
    {
        Console.WriteLine("There are {0} exceptions in the aggregate exception.", aggEx.InnerExceptions.Count);
        foreach (var innerEx in aggEx.InnerExceptions)
        {
            Console.WriteLine("Inner exception: {0}", innerEx.Message);
        }
    }
    

    Further readings

    This article is all about handling the unhappy path.

    If you want to learn more about Task.WaitAll and Task.WhenAll, I’d suggest you read the following two articles that I find totally interesting and well-written:

    🔗 Understanding Task.WaitAll and Task.WhenAll in C# | Muhammad Umair

    and

    🔗 Understanding WaitAll and WhenAll in .NET | Prasad Raveendran

    This article first appeared on Code4IT 🐧

    But, if you don’t know what asynchronous programming is and how to use TAP in C#, I’d suggest you start from the basics with this article:

    🔗 First steps with asynchronous programming in C# | Code4IT

    Wrapping up

    I hope you enjoyed this article! Let’s keep in touch on LinkedIn, Twitter or BlueSky! 🤜🤛

    Happy coding!

    🐧


    Source link

  • Top 6 Performance Tips when dealing with strings in C# 12 and .NET 8 &vert; Code4IT

    Top 6 Performance Tips when dealing with strings in C# 12 and .NET 8 | Code4IT


    Small changes sometimes make a huge difference. Learn these 6 tips to improve the performance of your application just by handling strings correctly.

    Table of Contents

    Just a second! 🫷
    If you are here, it means that you are a software developer.
    So, you know that storage, networking, and domain management have a cost .

    If you want to support this blog, please ensure that you have disabled the adblocker for this site.
    I configured Google AdSense to show as few ADS as possible – I don’t want to bother you with lots of ads, but I still need to add some to pay for the resources for my site.

    Thank you for your understanding.
    Davide

    Sometimes, just a minor change makes a huge difference. Maybe you won’t notice it when performing the same operation a few times. Still, the improvement is significant when repeating the operation thousands of times.

    In this article, we will learn five simple tricks to improve the performance of your application when dealing with strings.

    Note: this article is part of C# Advent Calendar 2023, organized by Matthew D. Groves: it’s maybe the only Christmas tradition I like (yes, I’m kind of a Grinch 😂).

    Benchmark structure, with dependencies

    Before jumping to the benchmarks, I want to spend a few words on the tools I used for this article.

    The project is a .NET 8 class library running on a laptop with an i5 processor.

    Running benchmarks with BenchmarkDotNet

    I’m using BenchmarkDotNet to create benchmarks for my code. BenchmarkDotNet is a library that runs your methods several times, captures some metrics, and generates a report of the executions. If you follow my blog, you might know I’ve used it several times – for example, in my old article “Enum.HasFlag performance with BenchmarkDotNet”.

    All the benchmarks I created follow the same structure:

    [MemoryDiagnoser]
    public class BenchmarkName()
    {
        [Params(1, 5, 10)] // clearly, I won't use these values
        public int Size;
    
        public string[] AllStrings { get; set; }
    
        [IterationSetup]
        public void Setup()
        {
            AllStrings = StringArrayGenerator.Generate(Size, "hello!", "HELLO!");
        }
    
        [Benchmark(Baseline=true)]
        public void FirstMethod()
        {
            //omitted
        }
    
        [Benchmark]
        public void SecondMethod()
        {
            //omitted
        }
    }
    

    In short:

    • the class is marked with the [MemoryDiagnoser] attribute: the benchmark will retrieve info for both time and memory usage;
    • there is a property named Size with the attribute [Params]: this attribute lists the possible values for the Size property;
    • there is a method marked as [IterationSetup]: this method runs before every single execution, takes the value from the Size property, and initializes the AllStrings array;
    • the methods that are parts of the benchmark are marked with the [Benchmark] attribute.

    Generating strings with Bogus

    I relied on Bogus to create dummy values. This NuGet library allows you to generate realistic values for your objects with a great level of customization.

    The string array generation strategy is shared across all the benchmarks, so I moved it to a static method:

     public static class StringArrayGenerator
     {
         public static string[] Generate(int size, params string[] additionalStrings)
         {
             string[] array = new string[size];
             Faker faker = new Faker();
    
             List<string> fixedValues = [
                 string.Empty,
                 "   ",
                 "\n  \t",
                 null
             ];
    
             if (additionalStrings != null)
                 fixedValues.AddRange(additionalStrings);
    
             for (int i = 0; i < array.Length; i++)
             {
                 if (Random.Shared.Next() % 4 == 0)
                 {
                     array[i] = Random.Shared.GetItems<string>(fixedValues.ToArray(), 1).First();
                 }
                 else
                 {
                     array[i] = faker.Lorem.Word();
                 }
             }
    
             return array;
         }
     }
    

    Here I have a default set of predefined values ([string.Empty, " ", "\n \t", null]), which can be expanded with the values coming from the additionalStrings array. These values are then placed in random positions of the array.

    In most cases, though, the value of the string is defined by Bogus.

    Generating plots with chartbenchmark.net

    To generate the plots you will see in this article, I relied on chartbenchmark.net, a fantastic tool that transforms the output generated by BenchmarkDotNet on the console in a dynamic, customizable plot. This tool created by Carlos Villegas is available on GitHub, and it surely deserves a star!

    Please note that all the plots in this article have a Log10 scale: this scale allows me to show you the performance values of all the executions in the same plot. If I used the Linear scale, you would be able to see only the biggest values.

    We are ready. It’s time to run some benchmarks!

    Tip #1: StringBuilder is (almost always) better than String Concatenation

    Let’s start with a simple trick: if you need to concatenate strings, using a StringBuilder is generally more efficient than concatenating string.

    [MemoryDiagnoser]
    public class StringBuilderVsConcatenation()
    {
        [Params(4, 100, 10_000, 100_000)]
        public int Size;
    
        public string[] AllStrings { get; set; }
    
        [IterationSetup]
        public void Setup()
        {
            AllStrings = StringArrayGenerator.Generate(Size, "hello!", "HELLO!");
        }
    
        [Benchmark]
        public void WithStringBuilder()
        {
            StringBuilder sb = new StringBuilder();
    
            foreach (string s in AllStrings)
            {
                sb.Append(s);
            }
    
            var finalString = sb.ToString();
        }
    
        [Benchmark]
        public void WithConcatenation()
        {
            string finalString = "";
            foreach (string s in AllStrings)
            {
                finalString += s;
            }
        }
    }
    

    Whenever you concatenate strings with the + sign, you create a new instance of a string. This operation takes some time and allocates memory for every operation.

    On the contrary, using a StringBuilder object, you can add the strings in memory and generate the final string using a performance-wise method.

    Here’s the result table:

    Method Size Mean Error StdDev Median Ratio RatioSD Allocated Alloc Ratio
    WithStringBuilder 4 4.891 us 0.5568 us 1.607 us 4.750 us 1.00 0.00 1016 B 1.00
    WithConcatenation 4 3.130 us 0.4517 us 1.318 us 2.800 us 0.72 0.39 776 B 0.76
    WithStringBuilder 100 7.649 us 0.6596 us 1.924 us 7.650 us 1.00 0.00 4376 B 1.00
    WithConcatenation 100 13.804 us 1.1970 us 3.473 us 13.800 us 1.96 0.82 51192 B 11.70
    WithStringBuilder 10000 113.091 us 4.2106 us 12.081 us 111.000 us 1.00 0.00 217200 B 1.00
    WithConcatenation 10000 74,512.259 us 2,111.4213 us 6,058.064 us 72,593.050 us 666.43 91.44 466990336 B 2,150.05
    WithStringBuilder 100000 1,037.523 us 37.1009 us 108.225 us 1,012.350 us 1.00 0.00 2052376 B 1.00
    WithConcatenation 100000 7,469,344.914 us 69,720.9843 us 61,805.837 us 7,465,779.900 us 7,335.08 787.44 46925872520 B 22,864.17

    Let’s see it as a plot.

    Beware of the scale in the diagram!: it’s a Log10 scale, so you’d better have a look at the value displayed on the Y-axis.

    StringBuilder vs string concatenation in C#: performance benchmark

    As you can see, there is a considerable performance improvement.

    There are some remarkable points:

    1. When there are just a few strings to concatenate, the + operator is more performant, both on timing and allocated memory;
    2. When you need to concatenate 100000 strings, the concatenation is ~7000 times slower than the string builder.

    In conclusion, use the StringBuilder to concatenate more than 5 or 6 strings. Use the string concatenation for smaller operations.

    Edit 2024-01-08: turn out that string.Concat has an overload that accepts an array of strings. string.Concat(string[]) is actually faster than using the StringBuilder. Read more this article by Robin Choffardet.

    Tip #2: EndsWith(string) vs EndsWith(char): pick the right overload

    One simple improvement can be made if you use StartsWith or EndsWith, passing a single character.

    There are two similar overloads: one that accepts a string, and one that accepts a char.

    [MemoryDiagnoser]
    public class EndsWithStringVsChar()
    {
        [Params(100, 1000, 10_000, 100_000, 1_000_000)]
        public int Size;
    
        public string[] AllStrings { get; set; }
    
        [IterationSetup]
        public void Setup()
        {
            AllStrings = StringArrayGenerator.Generate(Size);
        }
    
        [Benchmark(Baseline = true)]
        public void EndsWithChar()
        {
        foreach (string s in AllStrings)
        {
            _ = s?.EndsWith('e');
        }
        }
    
        [Benchmark]
        public void EndsWithString()
        {
        foreach (string s in AllStrings)
        {
            _ = s?.EndsWith("e");
        }
        }
    }
    

    We have the following results:

    Method Size Mean Error StdDev Median Ratio
    EndsWithChar 100 2.189 us 0.2334 us 0.6771 us 2.150 us 1.00
    EndsWithString 100 5.228 us 0.4495 us 1.2970 us 5.050 us 2.56
    EndsWithChar 1000 12.796 us 1.2006 us 3.4831 us 12.200 us 1.00
    EndsWithString 1000 30.434 us 1.8783 us 5.4492 us 29.250 us 2.52
    EndsWithChar 10000 25.462 us 2.0451 us 5.9658 us 23.950 us 1.00
    EndsWithString 10000 251.483 us 18.8300 us 55.2252 us 262.300 us 10.48
    EndsWithChar 100000 209.776 us 18.7782 us 54.1793 us 199.900 us 1.00
    EndsWithString 100000 826.090 us 44.4127 us 118.5465 us 781.650 us 4.14
    EndsWithChar 1000000 2,199.463 us 74.4067 us 217.0480 us 2,190.600 us 1.00
    EndsWithString 1000000 7,506.450 us 190.7587 us 562.4562 us 7,356.250 us 3.45

    Again, let’s generate the plot using the Log10 scale:

    EndsWith(char) vs EndsWith(string) in C# performance benchmark

    They appear to be almost identical, but look closely: based on this benchmark, when we have 10000, using EndsWith(string) is 10x slower than EndsWith(char).

    Also, here, the duration ratio on the 1.000.000-items array is ~3.5. At first, I thought there was an error on the benchmark, but when rerunning it on the benchmark, the ratio did not change.

    It looks like you have the best improvement ratio when the array has ~10.000 items.

    Tip #3: IsNullOrEmpty vs IsNullOrWhitespace vs IsNullOrEmpty + Trim

    As you might know, string.IsNullOrWhiteSpace performs stricter checks than string.IsNullOrEmpty.

    (If you didn’t know, have a look at this quick explanation of the cases covered by these methods).

    Does it affect performance?

    To demonstrate it, I have created three benchmarks: one for string.IsNullOrEmpty, one for string.IsNullOrWhiteSpace, and another one that lays in between: it first calls Trim() on the string, and then calls string.IsNullOrEmpty.

    [MemoryDiagnoser]
    public class StringEmptyBenchmark
    {
        [Params(100, 1000, 10_000, 100_000, 1_000_000)]
        public int Size;
    
        public string[] AllStrings { get; set; }
    
        [IterationSetup]
        public void Setup()
        {
            AllStrings = StringArrayGenerator.Generate(Size);
        }
    
        [Benchmark(Baseline = true)]
        public void StringIsNullOrEmpty()
        {
            foreach (string s in AllStrings)
            {
                _ = string.IsNullOrEmpty(s);
            }
        }
    
        [Benchmark]
        public void StringIsNullOrEmptyWithTrim()
        {
            foreach (string s in AllStrings)
            {
                _ = string.IsNullOrEmpty(s?.Trim());
            }
        }
    
        [Benchmark]
        public void StringIsNullOrWhitespace()
        {
            foreach (string s in AllStrings)
            {
                _ = string.IsNullOrWhiteSpace(s);
            }
        }
    }
    

    We have the following values:

    Method Size Mean Error StdDev Ratio
    StringIsNullOrEmpty 100 1.723 us 0.2302 us 0.6715 us 1.00
    StringIsNullOrEmptyWithTrim 100 2.394 us 0.3525 us 1.0282 us 1.67
    StringIsNullOrWhitespace 100 2.017 us 0.2289 us 0.6604 us 1.45
    StringIsNullOrEmpty 1000 10.885 us 1.3980 us 4.0781 us 1.00
    StringIsNullOrEmptyWithTrim 1000 20.450 us 1.9966 us 5.8240 us 2.13
    StringIsNullOrWhitespace 1000 13.160 us 1.0851 us 3.1482 us 1.34
    StringIsNullOrEmpty 10000 18.717 us 1.1252 us 3.2464 us 1.00
    StringIsNullOrEmptyWithTrim 10000 52.786 us 1.2208 us 3.5222 us 2.90
    StringIsNullOrWhitespace 10000 46.602 us 1.2363 us 3.4668 us 2.54
    StringIsNullOrEmpty 100000 168.232 us 12.6948 us 36.0129 us 1.00
    StringIsNullOrEmptyWithTrim 100000 439.744 us 9.3648 us 25.3182 us 2.71
    StringIsNullOrWhitespace 100000 394.310 us 7.8976 us 20.5270 us 2.42
    StringIsNullOrEmpty 1000000 2,074.234 us 64.3964 us 186.8257 us 1.00
    StringIsNullOrEmptyWithTrim 1000000 4,691.103 us 112.2382 us 327.4040 us 2.28
    StringIsNullOrWhitespace 1000000 4,198.809 us 83.6526 us 161.1702 us 2.04

    As you can see from the Log10 table, the results are pretty similar:

    string.IsNullOrEmpty vs string.IsNullOrWhiteSpace vs Trim in C#: performance benchmark

    On average, StringIsNullOrWhitespace is ~2 times slower than StringIsNullOrEmpty.

    So, what should we do? Here’s my two cents:

    1. For all the data coming from the outside (passed as input to your system, received from an API call, read from the database), use string.IsNUllOrWhiteSpace: this way you can ensure that you are not receiving unexpected data;
    2. If you read data from an external API, customize your JSON deserializer to convert whitespace strings as empty values;
    3. Needless to say, choose the proper method depending on the use case. If a string like “\n \n \t” is a valid value for you, use string.IsNullOrEmpty.

    Tip #4: ToUpper vs ToUpperInvariant vs ToLower vs ToLowerInvariant: they look similar, but they are not

    Even though they look similar, there is a difference in terms of performance between these four methods.

    [MemoryDiagnoser]
    public class ToUpperVsToLower()
    {
        [Params(100, 1000, 10_000, 100_000, 1_000_000)]
        public int Size;
    
        public string[] AllStrings { get; set; }
    
        [IterationSetup]
        public void Setup()
        {
            AllStrings = StringArrayGenerator.Generate(Size);
        }
    
        [Benchmark]
        public void WithToUpper()
        {
            foreach (string s in AllStrings)
            {
                _ = s?.ToUpper();
            }
        }
    
        [Benchmark]
        public void WithToUpperInvariant()
        {
            foreach (string s in AllStrings)
            {
                _ = s?.ToUpperInvariant();
            }
        }
    
        [Benchmark]
        public void WithToLower()
        {
            foreach (string s in AllStrings)
            {
                _ = s?.ToLower();
            }
        }
    
        [Benchmark]
        public void WithToLowerInvariant()
        {
            foreach (string s in AllStrings)
            {
                _ = s?.ToLowerInvariant();
            }
        }
    }
    

    What will this benchmark generate?

    Method Size Mean Error StdDev Median P95 Ratio
    WithToUpper 100 9.153 us 0.9720 us 2.789 us 8.200 us 14.980 us 1.57
    WithToUpperInvariant 100 6.572 us 0.5650 us 1.639 us 6.200 us 9.400 us 1.14
    WithToLower 100 6.881 us 0.5076 us 1.489 us 7.100 us 9.220 us 1.19
    WithToLowerInvariant 100 6.143 us 0.5212 us 1.529 us 6.100 us 8.400 us 1.00
    WithToUpper 1000 69.776 us 9.5416 us 27.833 us 68.650 us 108.815 us 2.60
    WithToUpperInvariant 1000 51.284 us 7.7945 us 22.860 us 38.700 us 89.290 us 1.85
    WithToLower 1000 49.520 us 5.6085 us 16.449 us 48.100 us 79.110 us 1.85
    WithToLowerInvariant 1000 27.000 us 0.7370 us 2.103 us 26.850 us 30.375 us 1.00
    WithToUpper 10000 241.221 us 4.0480 us 3.588 us 240.900 us 246.560 us 1.68
    WithToUpperInvariant 10000 339.370 us 42.4036 us 125.028 us 381.950 us 594.760 us 1.48
    WithToLower 10000 246.861 us 15.7924 us 45.565 us 257.250 us 302.875 us 1.12
    WithToLowerInvariant 10000 143.529 us 2.1542 us 1.910 us 143.500 us 146.105 us 1.00
    WithToUpper 100000 2,165.838 us 84.7013 us 223.137 us 2,118.900 us 2,875.800 us 1.66
    WithToUpperInvariant 100000 1,885.329 us 36.8408 us 63.548 us 1,894.500 us 1,967.020 us 1.41
    WithToLower 100000 1,478.696 us 23.7192 us 50.547 us 1,472.100 us 1,571.330 us 1.10
    WithToLowerInvariant 100000 1,335.950 us 18.2716 us 35.203 us 1,330.100 us 1,404.175 us 1.00
    WithToUpper 1000000 20,936.247 us 414.7538 us 1,163.014 us 20,905.150 us 22,928.350 us 1.64
    WithToUpperInvariant 1000000 19,056.983 us 368.7473 us 287.894 us 19,085.400 us 19,422.880 us 1.41
    WithToLower 1000000 14,266.714 us 204.2906 us 181.098 us 14,236.500 us 14,593.035 us 1.06
    WithToLowerInvariant 1000000 13,464.127 us 266.7547 us 327.599 us 13,511.450 us 13,926.495 us 1.00

    Let’s see it as the usual Log10 plot:

    ToUpper vs ToLower comparison in C#: performance benchmark

    We can notice a few points:

    1. The ToUpper family is generally slower than the ToLower family;
    2. The Invariant family is faster than the non-Invariant one; we will see more below;

    So, if you have to normalize strings using the same casing, ToLowerInvariant is the best choice.

    Tip #5: OrdinalIgnoreCase vs InvariantCultureIgnoreCase: logically (almost) equivalent, but with different performance

    Comparing strings is trivial: the string.Compare method is all you need.

    There are several modes to compare strings: you can specify the comparison rules by setting the comparisonType parameter, which accepts a StringComparison value.

    [MemoryDiagnoser]
    public class StringCompareOrdinalVsInvariant()
    {
        [Params(100, 1000, 10_000, 100_000, 1_000_000)]
        public int Size;
    
        public string[] AllStrings { get; set; }
    
        [IterationSetup]
        public void Setup()
        {
            AllStrings = StringArrayGenerator.Generate(Size, "hello!", "HELLO!");
        }
    
        [Benchmark(Baseline = true)]
        public void WithOrdinalIgnoreCase()
        {
            foreach (string s in AllStrings)
            {
                _ = string.Equals(s, "hello!", StringComparison.OrdinalIgnoreCase);
            }
        }
    
        [Benchmark]
        public void WithInvariantCultureIgnoreCase()
        {
            foreach (string s in AllStrings)
            {
                _ = string.Equals(s, "hello!", StringComparison.InvariantCultureIgnoreCase);
            }
        }
    }
    

    Let’s see the results:

    Method Size Mean Error StdDev Ratio
    WithOrdinalIgnoreCase 100 2.380 us 0.2856 us 0.8420 us 1.00
    WithInvariantCultureIgnoreCase 100 7.974 us 0.7817 us 2.3049 us 3.68
    WithOrdinalIgnoreCase 1000 11.316 us 0.9170 us 2.6603 us 1.00
    WithInvariantCultureIgnoreCase 1000 35.265 us 1.5455 us 4.4591 us 3.26
    WithOrdinalIgnoreCase 10000 20.262 us 1.1801 us 3.3668 us 1.00
    WithInvariantCultureIgnoreCase 10000 225.892 us 4.4945 us 12.5289 us 11.41
    WithOrdinalIgnoreCase 100000 148.270 us 11.3234 us 32.8514 us 1.00
    WithInvariantCultureIgnoreCase 100000 1,811.144 us 35.9101 us 64.7533 us 12.62
    WithOrdinalIgnoreCase 1000000 2,050.894 us 59.5966 us 173.8460 us 1.00
    WithInvariantCultureIgnoreCase 1000000 18,138.063 us 360.1967 us 986.0327 us 8.87

    As you can see, there’s a HUGE difference between Ordinal and Invariant.

    When dealing with 100.000 items, StringComparison.InvariantCultureIgnoreCase is 12 times slower than StringComparison.OrdinalIgnoreCase!

    Ordinal vs InvariantCulture comparison in C#: performance benchmark

    Why? Also, why should we use one instead of the other?

    Have a look at this code snippet:

    var s1 = "Aa";
    var s2 = "A" + new string('\u0000', 3) + "a";
    
    string.Equals(s1, s2, StringComparison.InvariantCultureIgnoreCase); //True
    string.Equals(s1, s2, StringComparison.OrdinalIgnoreCase); //False
    

    As you can see, s1 and s2 represent equivalent, but not equal, strings. We can then deduce that OrdinalIgnoreCase checks for the exact values of the characters, while InvariantCultureIgnoreCase checks the string’s “meaning”.

    So, in most cases, you might want to use OrdinalIgnoreCase (as always, it depends on your use case!)

    Tip #6: Newtonsoft vs System.Text.Json: it’s a matter of memory allocation, not time

    For the last benchmark, I created the exact same model used as an example in the official documentation.

    This benchmark aims to see which JSON serialization library is faster: Newtonsoft or System.Text.Json?

    [MemoryDiagnoser]
    public class JsonSerializerComparison
    {
        [Params(100, 10_000, 1_000_000)]
        public int Size;
        List<User?> Users { get; set; }
    
        [IterationSetup]
        public void Setup()
        {
            Users = UsersCreator.GenerateUsers(Size);
        }
    
        [Benchmark(Baseline = true)]
        public void WithJson()
        {
            foreach (User? user in Users)
            {
                var asString = System.Text.Json.JsonSerializer.Serialize(user);
    
                _ = System.Text.Json.JsonSerializer.Deserialize<User?>(asString);
            }
        }
    
        [Benchmark]
        public void WithNewtonsoft()
        {
            foreach (User? user in Users)
            {
                string asString = Newtonsoft.Json.JsonConvert.SerializeObject(user);
                _ = Newtonsoft.Json.JsonConvert.DeserializeObject<User?>(asString);
            }
        }
    }
    

    As you might know, the .NET team has added lots of performance improvements to the JSON Serialization functionalities, and you can really see the difference!

    Method Size Mean Error StdDev Median Ratio RatioSD Gen0 Gen1 Allocated Alloc Ratio
    WithJson 100 2.063 ms 0.1409 ms 0.3927 ms 1.924 ms 1.00 0.00 292.87 KB 1.00
    WithNewtonsoft 100 4.452 ms 0.1185 ms 0.3243 ms 4.391 ms 2.21 0.39 882.71 KB 3.01
    WithJson 10000 44.237 ms 0.8787 ms 1.3936 ms 43.873 ms 1.00 0.00 4000.0000 1000.0000 29374.98 KB 1.00
    WithNewtonsoft 10000 78.661 ms 1.3542 ms 2.6090 ms 78.865 ms 1.77 0.08 14000.0000 1000.0000 88440.99 KB 3.01
    WithJson 1000000 4,233.583 ms 82.5804 ms 113.0369 ms 4,202.359 ms 1.00 0.00 484000.0000 1000.0000 2965741.56 KB 1.00
    WithNewtonsoft 1000000 5,260.680 ms 101.6941 ms 108.8116 ms 5,219.955 ms 1.24 0.04 1448000.0000 1000.0000 8872031.8 KB 2.99

    As you can see, Newtonsoft is 2x slower than System.Text.Json, and it allocates 3x the memory compared with the other library.

    So, well, if you don’t use library-specific functionalities, I suggest you replace Newtonsoft with System.Text.Json.

    Wrapping up

    In this article, we learned that even tiny changes can make a difference in the long run.

    Let’s recap some:

    1. Using StringBuilder is generally WAY faster than using string concatenation unless you need to concatenate 2 to 4 strings;
    2. Sometimes, the difference is not about execution time but memory usage;
    3. EndsWith and StartsWith perform better if you look for a char instead of a string. If you think of it, it totally makes sense!
    4. More often than not, string.IsNullOrWhiteSpace performs better checks than string.IsNullOrEmpty; however, there is a huge difference in terms of performance, so you should pick the correct method depending on the usage;
    5. ToUpper and ToLower look similar; however, ToLower is quite faster than ToUpper;
    6. Ordinal and Invariant comparison return the same value for almost every input; but Ordinal is faster than Invariant;
    7. Newtonsoft performs similarly to System.Text.Json, but it allocates way more memory.

    This article first appeared on Code4IT 🐧

    My suggestion is always the same: take your time to explore the possibilities! Toy with your code, try to break it, benchmark it. You’ll find interesting takes!

    I hope you enjoyed this article! Let’s keep in touch on Twitter or LinkedIn! 🤜🤛

    Happy coding!

    🐧


    Source link

  • How to kill a process running on a local port in Windows &vert; Code4IT

    How to kill a process running on a local port in Windows | Code4IT


    Now you can’t run your application because another process already uses the port. How can you find that process? How to kill it?

    Table of Contents

    Just a second! 🫷
    If you are here, it means that you are a software developer.
    So, you know that storage, networking, and domain management have a cost .

    If you want to support this blog, please ensure that you have disabled the adblocker for this site.
    I configured Google AdSense to show as few ADS as possible – I don’t want to bother you with lots of ads, but I still need to add some to pay for the resources for my site.

    Thank you for your understanding.
    Davide

    Sometimes, when trying to run your ASP.NET application, there’s something stopping you.

    Have you ever found a message like this?

    Failed to bind to address https://127.0.0.1:7261: address already in use.

    You can try over and over again, you can also restart the application, but the port still appears to be used by another process.

    How can you find the process that is running on a local port? How can you kill it to free up the port and, eventually, be able to run your application?

    In this article, we will learn how to find the blocking port in Windows 10 and Windows 11, and then we will learn how to kill that process given its PID.

    How to find the process running on a port on Windows 11 using PowerShell

    Let’s see how to identify the process that is running on port 7261.

    Open a PowerShell and run the netstat command:

    NETSTAT is a command that shows info about the active TCP/IP network connections. It accepts several options. In this case, we will use:

    • -n: Displays addresses and port numbers in numerical form.
    • -o: Displays the owning process ID associated with each connection.
    • -a: Displays all connections and listening ports;
    • -p: Filter for a specific protocol (TCP or UDP)

    Netstat command to show all active TCP connections

    Notice that the last column lists the PID (Process ID) bound to each connection.

    From here, we can use the findstr command to get only the rows with a specific string (the searched port number).

    netstat -noa -p TCP | findstr 7261
    

    Netstat info filtered by string

    Now, by looking at the last column, we can identify the Process ID: 19160.

    How to kill a process given its PID on Windows or PowerShell

    Now that we have the Process ID (PID), we can open the Task Manager, paste the PID value in the topmost textbox, and find the related application.

    In our case, it was an instance of Visual Studio running an API application. We can now kill the process by hitting End Task.

    Using Task Manager on Windows11 to find the process with specified ID

    If you prefer working with PowerShell, you can find the details of the related process by using the Get-Process command:

    Process info found using PowerShell

    Then, you can use the taskkill command by specifying the PID, using the /PID flag, and adding the /F flag to force the killing of the process.

    We have killed the process related to the running application. Visual Studio is still working, of course.

    Further readings

    Hey, what are these fancy colours on the PowerShell?

    It’s a customization I added to show the current folder and the info about the associated GIT repository. It’s incredibly useful while developing and navigating the file system with PowerShell.

    🔗 OhMyPosh and CascadiaCode not working on PowerShell? How to fix it in Windows 10 and Windows 11 Integrated Terminal

    This article first appeared on Code4IT 🐧

    Wrapping up

    As you can imagine, this article exists because I often forget how to find the process that stops my development.

    It’s always nice to delve into these topics to learn more about what you can do with PowerShell and which flags are available for a command.

    I hope you enjoyed this article! Let’s keep in touch on Twitter or LinkedIn! 🤜🤛

    Happy coding!

    🐧


    Source link