We all use switch statements in our code. Do you use them at their full potential?
Table of Contents
Just a second! 🫷 If you are here, it means that you are a software developer.
So, you know that storage, networking, and domain management have a cost .
If you want to support this blog, please ensure that you have disabled the adblocker for this site. I configured Google AdSense to show as few ADS as possible – I don’t want to bother you with lots of ads, but I still need to add some to pay for the resources for my site.
Thank you for your understanding. – Davide
We all use switch statements in our code: they are a helpful way to run different code paths based on an check on a variable.
In this short article, we’re gonna learn different ways to write switch blocks, and some nice tricks to create clean and easy-to-read filters on such statements.
For the sake of this example, we will use a dummy hierarchy of types: a base User record with three subtypes: Player, Gamer, and Dancer.
Let’s see different usages of switch statements and switch expressions.
Switch statements
Switch statements are those with the standard switch (something) block. They allow for different executions of paths, acting as a list of if – else if blocks.
They can be used to return a value, but it’s not mandatory: you can simply use switch statements to execute code that does not return any value.
Switch statements with checks on the type
The most simple example we can have is the plain check on the type.
User user = new Gamer(30, "Nintendo Switch");

string message = "";

switch (user)
{
    case Gamer:
    {
        message = "I'm a gamer";
        break;
    }
    case Player:
    {
        message = "I'm a player";
        break;
    }
    default:
    {
        message = "My type is not handled!";
        break;
    }
}

Console.WriteLine(message); // I'm a player
Here we execute a different path based on the value the user variable has at runtime.
We can also have an automatic casting to the actual type, and then use the runtime data within the case block:
User user = new Gamer(30, "Nintendo Switch");

string message = "";

switch (user)
{
    case Gamer g:
    {
        message = "I'm a gamer, and I have a " + g.Console;
        break;
    }
    case Player:
    {
        message = "I'm a player";
        break;
    }
    default:
    {
        message = "My type is not handled!";
        break;
    }
}

Console.WriteLine(message); //I'm a gamer, and I have a Nintendo Switch
As you can see, since useris aGamer, within the related branch we cast the user to Gamer in a variable named g, so that we can use its public properties and methods.
Filtering using the WHEN keyword
We can add additional filters on the actual value of the variable by using the when clause:
User user = new Gamer(3, "Nintendo");

string message = "";

switch (user)
{
    case Gamer g when g.Age < 10:
    {
        message = "I'm a gamer, but too young";
        break;
    }
    case Gamer g:
    {
        message = "I'm a gamer, and I have a " + g.Console;
        break;
    }
    case Player:
    {
        message = "I'm a player";
        break;
    }
    default:
    {
        message = "My type is not handled!";
        break;
    }
}

Console.WriteLine(message); // I'm a gamer, but too young
Here we have the when g.Age < 10 filter applied to the Gamer g variable.
Clearly, if we set the age to 30, we will see I’m a gamer, and I have a Nintendo Switch.
Switch Expression
Switch expressions act like Switch Statements, but they return a value that can be assigned to a variable or, in general, used immediately.
They look like a lightweight, inline version of Switch Statements, and have a slightly different syntax.
To reach the same result we saw before, we can write:
User user = new Gamer(30, "Nintendo Switch");
string message = user switch{
Gamer g => "I'm a gamer, and I have a " + g.Console,
Player => "I'm a player",
_ => "My type is not handled!"};
Console.WriteLine(message);
By looking at the syntax, we can notice a few things:
instead of having switch(variable_name){}, we now have variable_name switch {};
we use the arrow notation => to define the cases;
we don’t have the default keyword, but we use the discard value _.
When keyword vs Property Pattern in Switch Expressions
Similarly, we can use the when keyword to define better filters on the cases.
string message = user switch{
Gamer gg when gg.Age < 10 => "I'm a gamer, but too young",
Gamer g => "I'm a gamer, and I have a " + g.Console,
Player => "I'm a player",
_ => "My type is not handled!"};
You can finally use a slightly different syntax to achieve the same result. Instead of using when gg.Age < 10 you can write Gamer { Age: < 10 }. This is called Property Pattern
string message = user switch{
Gamer { Age: < 10 } => "I'm a gamer, but too young",
Gamer g => "I'm a gamer, and I have a " + g.Console,
Player => "I'm a player",
_ => "My type is not handled!"};
Further readings
We actually just scratched the surface of all the functionalities provided by the C# language.
First of all, you can learn more about how to use Relational Patterns in a switch expression.
There are several ways to handle configurations in a .NET Application. In this article, we’re going to learn how to use IOptions<T>, IOptionsSnapshot<T>, and IOptionsMonitor<T>
Table of Contents
Just a second! 🫷 If you are here, it means that you are a software developer.
So, you know that storage, networking, and domain management have a cost .
If you want to support this blog, please ensure that you have disabled the adblocker for this site. I configured Google AdSense to show as few ADS as possible – I don’t want to bother you with lots of ads, but I still need to add some to pay for the resources for my site.
Thank you for your understanding. – Davide
When dealing with configurations in a .NET application, we can choose different strategies. For example, you can simply inject an IConfiguration instance in your constructor, and retrieve every value by name.
Or you can get the best out of Strongly Typed Configurations – you won’t have to care about casting those values manually because everything is already done for you by .NET.
In this article, we are going to learn about IOptions, IOptionsSnapshot, and IOptionsMonitor. They look similar, but there are some key differences that you need to understand to pick the right one.
For the sake of this article, I’ve created a dummy .NET API that exposes only one endpoint.
In my appsettings.json file, I added a node:
{
  "MyConfig": {
    "Name": "Davide"
  }
}
that will be mapped to a POCO class:
publicclassGeneralConfig{
publicstring Name { get; set; }
}
To add it to the API project, we can add this line to the Program.cs file:
As you can see, it takes the content with the name “MyConfig” and maps it to an object of type GeneralConfig.
To test such types, I’ve created a set of dummy API Controllers. Each Controller exposes one single method, Get(), that reads the value from the configuration and returns it in an object.
We are going to inject IOptions, IOptionsSnapshot, and IOptionsMonitor into the constructor of the related Controllers so that we can try the different approaches.
IOptions: Simple, Singleton, doesn’t support config reloads
IOptions<T> is the most simple way to inject such configurations. We can inject it into our constructors and access the actual value using the Value property:
Now we have direct access to the GeneralConfig object, with the values populated as we defined in the appsettings.json file.
There are a few things to consider when using IOptions<T>:
This service is injected as a Singleton instance: the whole application uses the same instance, and it is valid throughout the whole application lifetime.
all the configurations are read at startup time. Even if you update the appsettings file while the application is running, you won’t see the values updated.
Some people prefer to store the IOptions<T> instance as a private field, and access the value when needed using the Value property, like this:
privatereadonly IOptions<GeneralConfig> _config;
privateint updates = 0;
public TestingController(IOptions<GeneralConfig> config)
{
_config = config;
}
[HttpGet]public ActionResult<Result> Get()
{
var name = _config.Value.Name;
returnnew Result
{
MyName = name,
Updates = updates
};
}
It works, but it’s useless: since IOptions<T> is a Singleton, we don’t need to access the Value property every time. It won’t change over time, and accessing it every single time is a useless operation. We can use the former approach: it’s easier to write and (just a bit) more performant.
One more thing.
When writing Unit Tests, we can inject an IOptions<T> in the system under test using a static method, Options.Create<T>, and pass it an instance of the required type.
[SetUp]publicvoid Setup()
{
var config = new GeneralConfig { Name = "Test" };
var options = Options.Create(config);
_sut = new TestingController(options);
}
Demo: the configuration does not change at runtime
Below you can find a GIF that shows that the configurations do not change when the application is running.
As you can see, I performed the following steps:
start the application
call the /TestingIOptions endpoint: it returns the name Davide
now I update the content of the appsettings.json file, setting the name to Davide Bellone.
when I call again the same endpoint, I don’t see the updated value.
Similar to IOptions<T> we have IOptionsSnapshot<T>. They work similarly, but there is a huge difference: IOptionsSnapshot<T> is recomputed at every request.
public TestingController(IOptionsSnapshot<GeneralConfig> config)
{
    _config = config.Value;
}
With IOptionsSnapshot<T> you have always the most updated values: this service is injected with a Scoped lifetime, meaning that the values are read from configuration at every HTTP request. This also means that you can update the settings values while the application is running, and you’ll be able to see the updated results.
Since .NET rebuilds the configurations at every HTTP call, there is a slight performance overhead. So, if not necessary, always use IOptions<T>.
There is no way to test an IOptionsSnapshot<T> as we did with IOptions<T>, so you have to use stubs or mocks (maybe with Moq or NSubstitute 🔗).
Demo: the configuration changes while the application is running
Look at the GIF below: here I run the application and call the /TestingIOptionsSnapshot endpoint.
I performed the following steps:
run the application
call the /TestingIOptionsSnapshot endpoint. The returned value is the same on the appsettings.json file: Davide Bellone.
I then update the value on the configuration file
when calling again /TestingIOptionsSnapshot, I can see that the returned value reflects the new value in the appsettings file.
Finally, the last one of the trio: IOptionsMonitor<T>.
Using IOptionsMonitor<T> you can have the most updated value on the appsettings.json file.
We also have a callback event that is triggered every time the configuration file is updated.
It’s injected as a Singleton service, so the same instance is shared across the whole application lifetime.
There are two main differences with IOptions<T>:
the name of the property that stores the config value is CurrentValue instead of Value;
there is a callback that is called every time you update the settings file: OnChange(Action<TOptions, string?> listener). You can use it to perform operations that must be triggered every time the configuration changes.
Note: OnChange returns an object that implements IDisposable that you need to dispose. Otherwise, as Chris Elbert noticed (ps: follow him on Twitter!) , the instance of the class that uses IOptionsMonitor<T> will never be disposed.
I also learned IOptionsMonitor.OnChange returns a disposable reference that you need to dispose, otherwise your instance of a class will never be disposed because there’s a reference to it from IOptionsMonitor.
Again, there is no way to test an IOptionsMonitor<T> as we did with IOptions<T>. So you should rely on stubs and mocks (again, maybe with Moq or NSubstitute 🔗).
Demo: the configuration changes, and the callback is called
In the GIF below I demonstrate the usage of IOptionsMonitor.
I created an API controller that listens to changes in the configuration, updates a static counter, and returns the final result from the API:
By running it and modifying the config content while the application is up and running, you can see the full usage of IOptionsMonitor<T>:
As you can see, I performed these steps:
run the application
call the /TestionIOptionsMonitor endpoint. The MyName field is read from config, and Updates is 0;
I then update and save the config file. In the background, the OnChange callback is fired, and the Updates value is updated;
Oddly, the callback is called more times than expected. I updated the file only twice, but the counter is set to 6. That’s weird behavior. If you know why it happens, drop a message below 📩
IOptions vs IOptionsSnapshot vs IOptionsMonitor in .NET
We’ve seen a short introduction to IOptions, IOptionsSnapshot, and IOptionsMonitor.
There are some differences, of course. Here’s a table with a recap of what we learned from this article.
Type
DI Lifetime
Best way to inject in unit tests
Allows live reload
Has callback function
IOptions<T>
Singleton
Options.Create<T>
❌
❌
IOptionsSnapshot<T>
Scoped
Stub / Mock
🟢
❌
IOptionsMonitor<T>
Singleton
Stub / Mock
🟢
🟢
There’s actually more: for example, with IOptionsSnapshot and IOptionsMonitor you can use named options, so that you can inject more instances of the same type that refer to different nodes in the JSON file.
But that will be the topic for a future article, so stay tuned 😎
Further readings
There is a lot more about how to inject configurations.
For sure, one of the best resources is the official documentation:
I insisted on explaining that IOptions and IOptionsMonitor are Singleton, while IOptionsSnapshot is Scoped.
If you don’t know what they mean, here’s a short but thorough explanation:
In particular, I want you to focus on the Bonus tip, where I explain the problems of having Transient or Scoped services injected into a Singleton service:
In this article, I stored my configurations in an appsettings.json file. There are more ways to set configuration values – for example, Environment Variables and launchSettings.json.
In this article, we learned how to use IOptions<T>, IOptionsSnapshot<T>, and IOptionsMonitor<T> in a .NET 7 application.
There are many other ways to handle configurations: for instance, you can simply inject the whole object as a singleton, or use IConfiguration to get single values.
When would you choose an approach instead of another? Drop a comment below! 📩
I hope you enjoyed this article! Let’s keep in touch on Twitter or LinkedIn! 🤜🤛
By default, you cannot use Dependency Injection, custom logging, and configurations from settings in a Console Application. Unless you create a custom Host!
Table of Contents
Just a second! 🫷 If you are here, it means that you are a software developer.
So, you know that storage, networking, and domain management have a cost .
If you want to support this blog, please ensure that you have disabled the adblocker for this site. I configured Google AdSense to show as few ADS as possible – I don’t want to bother you with lots of ads, but I still need to add some to pay for the resources for my site.
Thank you for your understanding. – Davide
Sometimes, you just want to create a console application to run a complex script. Just because it is a “simple” console application, it doesn’t mean that you should not use best practices, such as using Dependency Injection.
Also, you might want to test the code: Dependency Injection allows you to test the behavior of a class without having a strict dependency on the referenced concrete classes: you can use stubs and mocks, instead.
In this article, we’re going to learn how to add Dependency Injection in a .NET 7 console application. The same approach can be used for other versions of .NET. We will also add logging, using Serilog, and configurations coming from an appsettings.json file.
We’re going to start small, with the basic parts, and gradually move on to more complex scenarios. We’re gonna create a simple, silly console application: we will inject a bunch of services, and print a message on the console.
We have a root class:
publicclassNumberWorker{
privatereadonly INumberService _service;
public NumberWorker(INumberService service) => _service = service;
publicvoid PrintNumber()
{
var number = _service.GetPositiveNumber();
Console.WriteLine($"My wonderful number is {number}");
}
}
that injects an INumberService, implemented by NumberService:
publicinterfaceINumberService{
int GetPositiveNumber();
}
publicclassNumberService : INumberService
{
privatereadonly INumberRepository _repo;
public NumberService(INumberRepository repo) => _repo = repo;
publicint GetPositiveNumber()
{
int number = _repo.GetNumber();
return Math.Abs(number);
}
}
which, in turn, uses an INumberRepository implemented by NumberRepository:
The console application will create a new instance of NumberWorker and call the PrintNumber method.
Now, we have to build the dependency tree and inject such services.
How to create an IHost to use a host for a Console Application
The first step to take is to install some NuGet packages that will allow us to add a custom IHost container so that we can add Dependency Injection and all the customization we usually add in projects that have a StartUp (or a Program) class, such as .NET APIs.
We need to install 2 NuGet packages: Microsoft.Extensions.Hosting.Abstractions and Microsoft.Extensions.Hosting will be used to create a new IHost that will be used to build the dependencies tree.
By navigating your csproj file, you should be able to see something like this:
Host.CreateDefaultBuilder() creates the default IHostBuilder – similar to the IWebHostBuilder, but without any reference to web components.
Then we add all the dependencies, using services.AddSingleton<T, K>. Notice that it’s not necessary to add services.AddSingleton<NumberWorker>: when we will use the concrete instance, the dependency tree will be resolved, without the need of having an indication of the root itself.
Finally, once we have everything in place, we call Build() to create a new instance of IHost.
Now, we just have to run it!
In the Main method, create the IHost instance by calling CreateHost(). Then, by using the ActivatorUtilities class (coming from the Microsoft.Externsions.DependencyInjection namespace), create a new instance of NumberWorker, so that you can call PrintNumber();
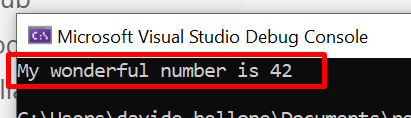
Now you are ready to run the application, and see the message on the console:
Read configurations from appsettings.json for a Console Library
We want to make our system configurable and place our configurations in an appsettings.json file.
As we saw in a recent article 🔗, we can use IOptions<T> to inject configurations in the constructor. For the sake of this article, I’m gonna use a POCO class, NumberConfig, that is mapped to a configuration section and injected into the classes.
Now we need to manually create an appsettings.json file within the project folder, and add a new section that will hold the values of the configuration:
{
  "Number": {
    "DefaultNumber": -899
  }
}
and now we can add the configuration binding in our CreateHost() method, within the ConfigureServices section:
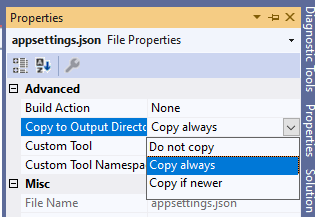
Run the project to admire the result, and… BOOM! It will not work! You should see the message “My wonderful number is 0”, even though the number we set on the config file is -899.
This happens because we must include the appsettings.json file in the result of the compilation. Right-click on that file, select the Properties menu, and set the “Copy to Output Directory” to “Copy always”:
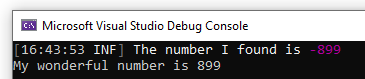
Now, build and run the project, and you’ll see the correct message: “My wonderful number is 899”.
Clearly, the same values can be accessed via IConfigurations.
Add Serilog logging to log on Console and File
Finally, we can add Serilog logs to our console applications – as well as define Sinks.
To add Serilog, you first have to install these NuGet packages:
Serilog.Extensions.Hosting and Serilog.Formatting.Compact to add the basics of Serilog;
Serilog.Settings.Configuration to read logging configurations from settings (if needed);
Serilog.Sinks.Console and Serilog.Sinks.File to add the Console and the File System as Sinks.
Let’s get back to the CreateHost() method, and add a new section right after ConfigureServices:
Here we’re telling that we need to read the config from Settings, add logging context, and write both on Console and on File (only if the log message level is greater or equal than Warning).
Then, add an ILogger here and there, and admire the final result:
Final result
To wrap up, here’s the final implementation of the Program class and the
CreateHost method:
In this article, we’ve learned how we can customize a .NET Console application to use dependency injection, external configurations, and Serilog logging.
I hope you enjoyed this article! Let’s keep in touch on Twitter or LinkedIn! 🤜🤛
When writing unit tests, there are smarter ways to check if two objects are equal than just comparing every field one by one.
Table of Contents
Just a second! 🫷 If you are here, it means that you are a software developer.
So, you know that storage, networking, and domain management have a cost .
If you want to support this blog, please ensure that you have disabled the adblocker for this site. I configured Google AdSense to show as few ADS as possible – I don’t want to bother you with lots of ads, but I still need to add some to pay for the resources for my site.
Thank you for your understanding. – Davide
When writing unit tests, you might want to check that the result returned by a method is equal to the one you’re expecting.
publicstatic Player GetClone(Player source)
=> new Player
{
Id = source.Id,
UserName = source.UserName,
Score = source.Score
};
and call it this way:
[Test]publicvoid GetClone()
{
var originalPlayer = new Player { Id = 1, UserName = "me", Score = 1 };
var clonedPlayer = MyUtils.GetClone(originalPlayer);
Assert.That(clonedPlayer, Is.EqualTo(originalPlayer));
}
Even though logically originalPlayer and clonedPlayer are equal, they are not the same: the test will fail!
Lucky for us, we can specify the comparison rules!
Equality function: great for simple checks
Say that we don’t want to check that all the values match. We only care about Id and UserName.
When we have just a few fields to check, we can use a function to specify that two items are equal:
[Test]publicvoid GetClone_WithEqualityFunction()
{
var originalPlayer = new Player { Id = 1, UserName = "me", Score = 1 };
var clonedPlayer = MyUtils.GetClone(originalPlayer);
Assert.That(clonedPlayer, Is.EqualTo(originalPlayer).Using<Player>(
(Player a, Player b) => a.Id == b.Id && a.UserName == b.UserName)
);
}
Clearly, if the method becomes unreadable, you can refactor the comparer function as so:
[Test]publicvoid GetClone_WithEqualityFunction()
{
var originalPlayer = new Player { Id = 1, UserName = "me", Score = 1 };
var clonedPlayer = MyUtils.GetClone(originalPlayer);
Func<Player, Player, bool> comparer = (Player a, Player b) => a.Id == b.Id && a.UserName == b.UserName;
Assert.That(clonedPlayer, Is.EqualTo(originalPlayer).Using<Player>(comparer));
}
EqualityComparer class: best for complex scenarios
If you have a complex scenario to validate, you can create a custom class that implements the IEqualityComparer interface. Here, you have to implement two methods: Equals and GetHashCode.
Instead of just implementing the same check inside the Equals method, we’re gonna try a different approach: we’re gonna use GetHashCode to determine how to identify a Player, by generating a string used as a simple identifier, and then we’re gonna use the HashCode of the result string for the actual comparison:
Clearly, I’ve also added a check on nullability: (x is null && y is null).
Now we can instantiate a new instance of PlayersComparer and use it to check whether two players are equivalent:
[Test]publicvoid GetClone_WithEqualityComparer()
{
var originalPlayer = new Player { Id = 1, UserName = "me", Score = 1 };
var clonedPlayer = MyUtils.GetClone(originalPlayer);
Assert.That(clonedPlayer, Is.EqualTo(originalPlayer).Using<Player>(new PlayersComparer()));
}
Of course, you can customize the Equals method to use whichever condition to validate the equivalence of two instances, depending on your business rules. For example, you can say that two vectors are equal if they have the exact same length and direction, even though the start and end points are different.
❓ A question for you: where would you put the equality check: in the production code or in the tests project?
Wrapping up
As we’ve learned in this article, there are smarter ways to check if two objects are equal than just comparing every field one by one.
I hope you enjoyed this article! Let’s keep in touch on Twitter or LinkedIn! 🤜🤛
Centralizing configurations can be useful for several reasons: security, consistency, deployability. In this article, we’re gonna use Azure App Configuration to centralize the configurations used in a .NET API application.
Table of Contents
Just a second! 🫷 If you are here, it means that you are a software developer.
So, you know that storage, networking, and domain management have a cost .
If you want to support this blog, please ensure that you have disabled the adblocker for this site. I configured Google AdSense to show as few ADS as possible – I don’t want to bother you with lots of ads, but I still need to add some to pay for the resources for my site.
Thank you for your understanding. – Davide
Almost every application requires some sort of configuration: connection strings, default values, and so on.
It’s not a good practice to keep all the configurations in your codebase: if your code leaks online, you’ll have all your connection strings, private settings, and API keys exposed online.
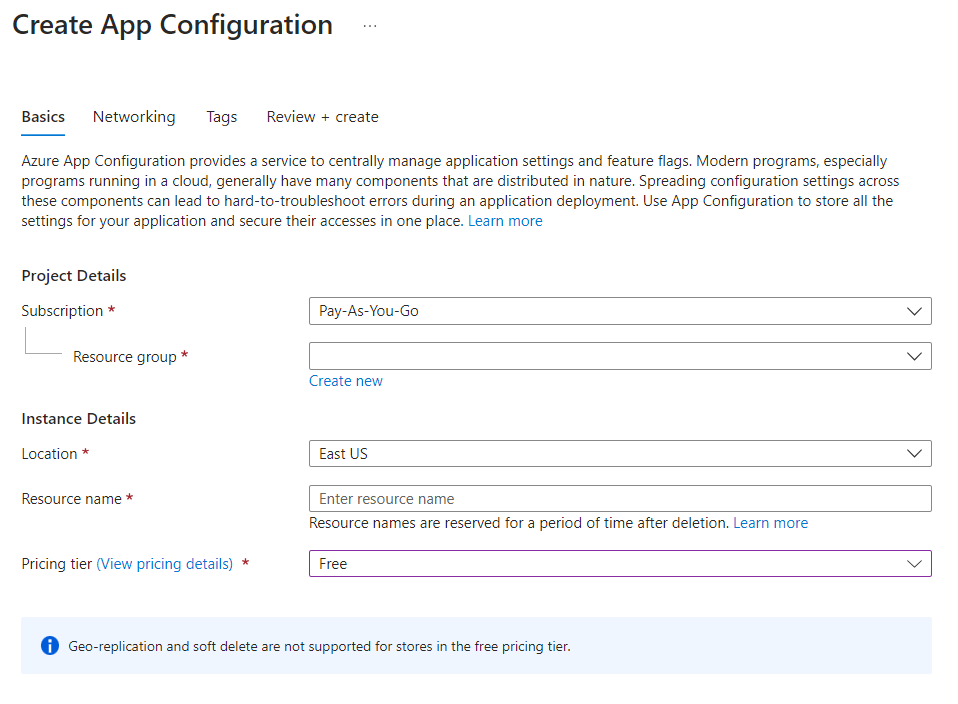
In this article, we’re gonna make our application more secure by moving our configurations to the cloud and using Azure App Configurations to securely use such configs in our applications.
But first, as always, we need a dummy project to demonstrate such capabilities.
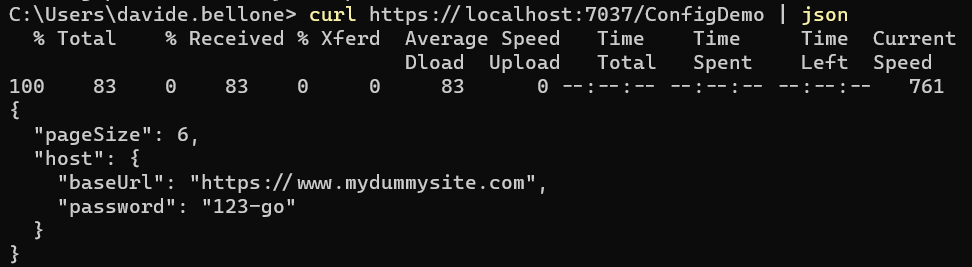
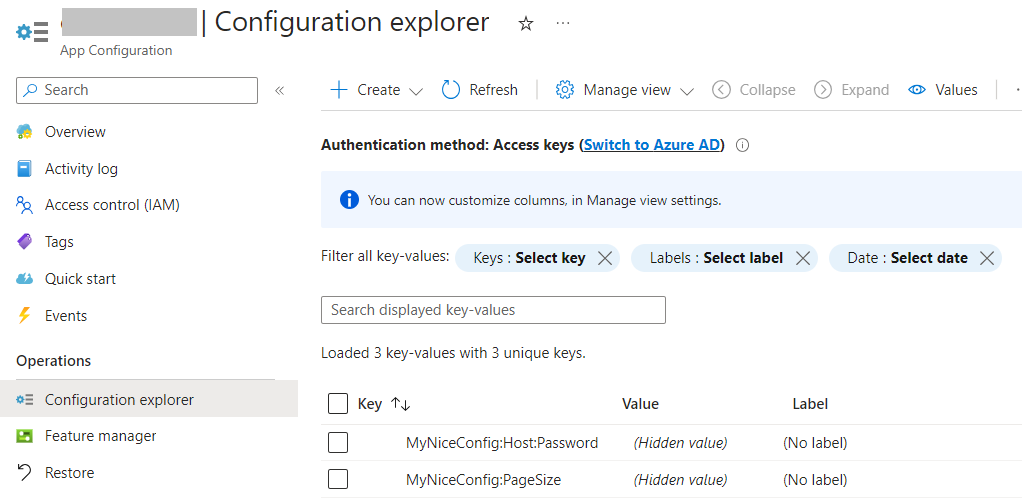
I created a simple .NET 7 API project with just one endpoint, /ConfigDemo, that returns the values from the settings.
We want to update the page size and the password. Locate Configuration Explorer in the left menu, click on Create, and add a new value for each configuration. Remember: nested configurations can be defined using the : sign: to update the password, the key must be MyNiceConfig:Host:Password. Important: do not set labels or tags, for now: they are advanced topics, and require some additional settings that we will probably explore in future articles.
Once you’ve overridden both values, you should be able to see something like this:
How to integrate Azure App Configuration in a .NET application
Now we are ready to integrate Azure App Configuration with our .NET APIs.
First things first: we must install the Microsoft.Azure.AppConfiguration.AspNetCore NuGet Package:
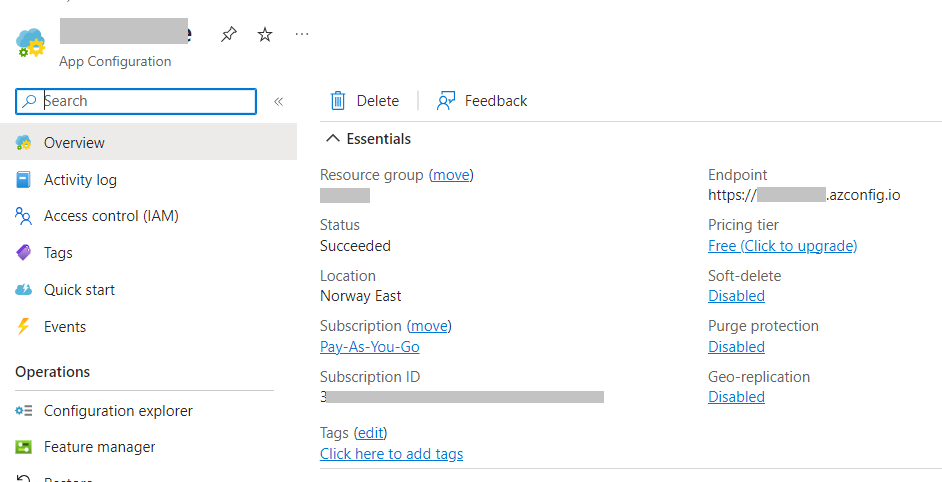
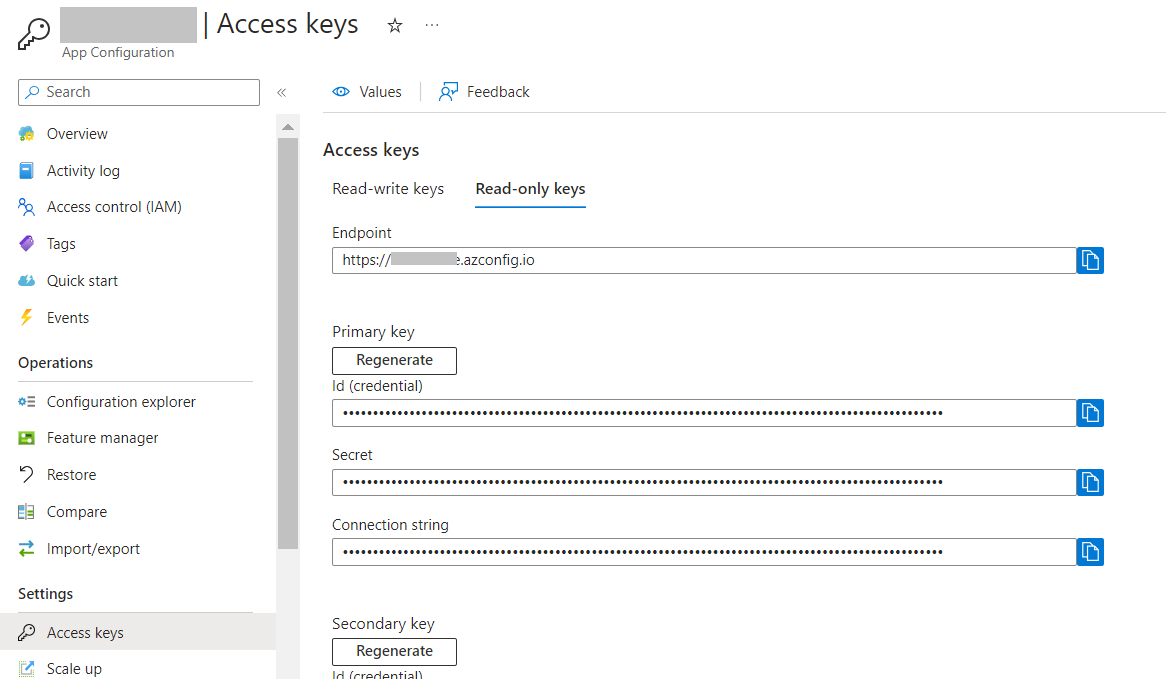
Then, we need to find a way to connect to our App Configuration instance. There are two ways: using Azure Active Directory (Azure AD) or using a simple Access Key. We’re gonna use the latter.
Get back to Azure, and locate the Access Keys menu item. Then head to Read-only keys, and copy the full connection string.
Do NOT store it on your repository! There are smarter, more secure ways to store use such connection strings:
Environment variables: for example, run the application with dotnet run --MYKEY=<your_connection_string>;
launchsettings.json key: you can use different configurations based on the current profile;
secrets store: hidden values only available on your machine. Can be set using dotnet user-secrets set MyKey "<your_connection_string>";
pipeline configurations: you can define such values in your CI/CD pipelines;
But still, for the sake of this example, I will store the connection string in a local variable 😁
You can now run the APIs and call the previous endpoint to see the new results
Why should you use Azure App Configuration?
In my opinion, having a proper way to handle configurations is crucial for the success of a project.
Centralizing configurations can be useful in three different ways:
Your application is more secure since you don’t risk having the credentials exposed on the web;
You can share configurations across different services: say that you have 4 services that access the same external APIs that require a Client Secret. Centralizing the config helps in having consistent values across the different services and, for example, updating the secret for all the applications in just one place;
Use different configs based on the environment: with Azure App Configuration you can use a set of tags and labels to determine which configs must be loaded in which environment. This simplifies a lot the management of configurations across different environments.
But notice that, using the basic approach that we used in this article, configurations coming from Azure are loaded at the startup of the application: configs are static until you restart the application. You can configure your application to poll Azure App Configuration to always have the most updated values without the need of restarting the application, but it will be the topic of a future article.
Further readings
Configuration management is one of the keys to the success of a project: if settings are difficult to manage and difficult to set locally for debugging, you’ll lose a lot of time (true story! 😩).
However, there are several ways to set configurations for a .NET application, such as Environment Variables, launchSettings, and so on.
ASP.NET allows you to poll Azure App Configuration to always get the most updated values without restarting your applications. It’s simple, but you have to think thoroughly.
Table of Contents
Just a second! 🫷 If you are here, it means that you are a software developer.
So, you know that storage, networking, and domain management have a cost .
If you want to support this blog, please ensure that you have disabled the adblocker for this site. I configured Google AdSense to show as few ADS as possible – I don’t want to bother you with lots of ads, but I still need to add some to pay for the resources for my site.
Thank you for your understanding. – Davide
In a previous article, we learned how to centralize configurations using Azure App Configuration, a service provided by Azure to share configurations in a secure way. Using Azure App Configuration, you’ll be able to store the most critical configurations in a single place and apply them to one or more environments or projects.
We used a very simple example with a limitation: you have to restart your applications to make changes effective. In fact, ASP.NET connects to Azure App Config, loads the configurations in memory, and serves these configs until the next application restart.
In this article, we’re gonna learn how to make configurations dynamic: by the end of this article, we will be able to see the changes to our configs reflected in our applications without restarting them.
Since this one is a kind of improvement of the previous article, you should read it first.
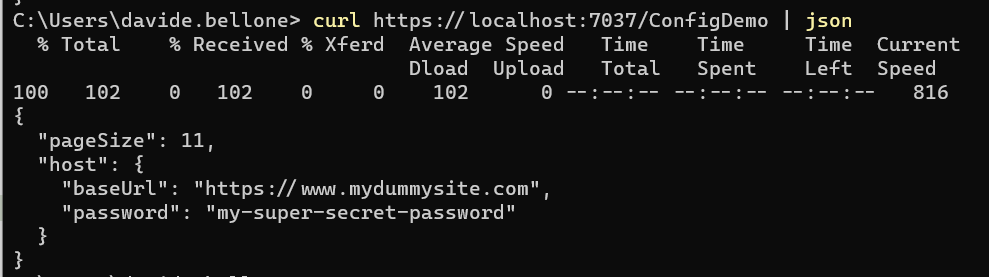
Let me summarize here the code showcased in the previous article. We have an ASP.NET Core API application whose only purpose is to return the configurations stored in an object, whose shape is this one:
Finally, I created a new instance of Azure App Configuration, and I used a connection string to integrate Azure App Configuration with the existing configurations by calling:
Now we can move on and make configurations dynamic.
Sentinel values: a guard value to monitor changes in the configurations
On Azure App Configuration, you have to update the configurations manually one by one. Unfortunately, there is no way to update them in a single batch. You can import them in a batch, but you have to update them singularly.
Imagine that you have a service that accesses an external API whose BaseUrl and API Key are stored on Az App Configuration. We now need to move to another API: we then have to update both BaseUrl and API Key. The application is running, and we want to update the info about the external API. If we updated the application configurations every time something is updated on Az App Configuration, we would end up with an invalid state – for example, we would have the new BaseUrl and the old API Key.
Therefore, we have to define a configuration value that acts as a sort of versioning key for the whole list of configurations. In Azure App Configuration’s jargon, it’s called Sentinel.
A Sentinel is nothing but version key: it’s a string value that is used by the application to understand if it needs to reload the whole list of configurations. Since it’s just a string, you can set any value, as long as it changes over time. My suggestion is to use the UTC date value of the moment you have updated the value, such as 202306051522. This way, in case of errors you can understand when was the last time any of these values have changed (but you won’t know which values have changed), and, depending on the pricing tier you are using, you can compare the current values with the previous ones.
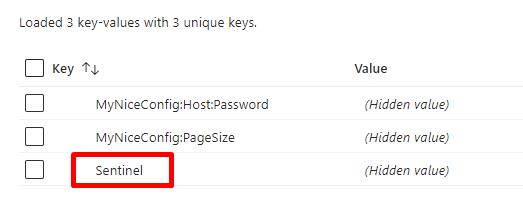
So, head back to the Configuration Explorer page and add a new value: I called it Sentinel.
As I said, you can use any value. For the sake of this article, I’m gonna use a simple number (just for simplicity).
Define how to refresh configurations using ASP.NET Core app startup
We can finally move to the code!
If you recall, in the previous article we added a NuGet package, Microsoft.Azure.AppConfiguration.AspNetCore, and then we added Azure App Configuration as a configurations source by calling
Here we are specifying that all values must be refreshed (refreshAll: true) when the key with value=“Sentinel” (key: "Sentinel") is updated. Then, store those values for 3 seconds (SetCacheExpiration(TimeSpan.FromSeconds(3)).
Here I used 3 seconds as a refresh time. This means that, if the application is used continuously, the application will poll Azure App Configuration every 3 seconds – it’s clearly a bad idea! So, pick the correct value depending on the change expectations. The default value for cache expiration is 30 seconds.
Notice that the previous instruction adds Azure App Configuration to the Configuration object, and not as a service used by .NET. In fact, the method is builder.Configuration.AddAzureAppConfiguration. We need two more steps.
First of all, add Azure App Configuration to the IServiceCollection object:
builder.Services.AddAzureAppConfiguration();
Finally, we have to add it to our existing middlewares by calling
app.UseAzureAppConfiguration();
The final result is this:
publicstaticvoid Main(string[] args)
{
var builder = WebApplication.CreateBuilder(args);
conststring ConnectionString = "......";
// Load configuration from Azure App Configuration builder.Configuration.AddAzureAppConfiguration(options =>
{
options.Connect(ConnectionString)
.Select(KeyFilter.Any, LabelFilter.Null)
// Configure to reload configuration if the registered sentinel key is modified .ConfigureRefresh(refreshOptions =>
refreshOptions.Register(key: "Sentinel", label: LabelFilter.Null, refreshAll: true)
.SetCacheExpiration(TimeSpan.FromSeconds(3)));
});
// Add the service to IServiceCollection builder.Services.AddAzureAppConfiguration();
builder.Services.AddControllers();
builder.Services.Configure<MyConfig>(builder.Configuration.GetSection("MyNiceConfig"));
var app = builder.Build();
// Add the middleware app.UseAzureAppConfiguration();
app.UseHttpsRedirection();
app.MapControllers();
app.Run();
}
IOptionsMonitor: accessing and monitoring configuration values
It’s time to run the project and look at the result: some of the values are coming from Azure App Configuration.
Now we can update them: without restarting the application, update the PageSize value, and don’t forget to update the Sentinel too. Call again the endpoint, and… nothing happens! 😯
This is because in our controller we are using IOptions<T> instead of IOptionsMonitor<T>. As we’ve learned in a previous article, IOptionsMonitor<T> is a singleton instance that always gets the most updated config values. It also emits an event when the configurations have been refreshed.
So, head back to the ConfigDemoController, and replace the way we retrieve the config:
[ApiController][Route("[controller]")]
publicclassConfigDemoController : ControllerBase
{
privatereadonly IOptionsMonitor<MyConfig> _config;
public ConfigDemoController(IOptionsMonitor<MyConfig> config)
{
_config = config;
_config.OnChange(Update);
}
[HttpGet()]public IActionResult Get()
{
return Ok(_config.CurrentValue);
}
privatevoid Update(MyConfig arg1, string? arg2)
{
Console.WriteLine($"Configs have been updated! PageSize is {arg1.PageSize}, " +
$" Password is {arg1.Host.Password}");
}
}
When using IOptionsMonitor<T>, you can retrieve the current values of the configuration object by accessing the CurrentValue property. Also, you can define an event listener that is to be attached to the OnChange event;
We can finally run the application and update the values on Azure App Configuration.
Again, update one of the values, update the sentinel, and wait. After 3 seconds, you’ll see a message popping up in the console: it’s the text defined in the Update method.
Then, call again the application (again, without restarting it), and admire the updated values!
You can see a live demo here:
As you can see, the first time after updating the Sentinel value, the values are still the old ones. But, in the meantime, the values have been updated, and the cache has expired, so that the next time the values will be retrieved from Azure.
My 2 cents on timing
As we’ve learned, the config values are stored in a memory cache, with an expiration time. Every time the cache expires, we need to retrieve again the configurations from Azure App Configuration (in particular, by checking if the Sentinel value has been updated in the meanwhile). Don’t underestimate the cache value, as there are pros and cons of each kind of value:
a short timespan keeps the values always up-to-date, making your application more reactive to changes. But it also means that you are polling too often the Azure App Configuration endpoints, making your application busier and incurring limitations due to the requests count;
a long timespan keeps your application more performant because there are fewer requests to the Configuration endpoints, but it also forces you to have the configurations updated after a while from the update applied on Azure.
There is also another issue with long timespans: if the same configurations are used by different services, you might end up in a dirty state. Say that you have UserService and PaymentService, and both use some configurations stored on Azure whose caching expiration is 10 minutes. Now, the following actions happen:
UserService starts
PaymentService starts
Someone updates the values on Azure
UserService restarts, while PaymentService doesn’t.
We will end up in a situation where UserService has the most updated values, while PaymentService doesn’t. There will be a time window (in our example, up to 10 minutes) in which the configurations are misaligned.
Also, take costs and limitations into consideration: with the Free tier you have 1000 requests per day, while with the Standard tier, you have 30.000 per hour per replica. Using the default cache expiration (30 seconds) in an application with a continuous flow of users means that you are gonna call the endpoint 2880 times per day (2 times a minute * (minutes per day = 1440)). Way more than the available value on the Free tier.
So, think thoroughly before choosing an expiration time!
Further readings
This article is a continuation of a previous one, and I suggest you read the other one to understand how to set up Azure App Configuration and how to integrate it in an ASP.NET Core API application in case you don’t want to use dynamic configuration.
Also, we learned that using IOptions we are not getting the most updated values: in fact, we need to use IOptionsMonitor. Check out this article to understand the other differences in the IOptions family.
In my opinion, smart configuration handling is essential for the hard times when you have to understand why an error is happening only in a specific environment.
Centralizing configurations is a good idea, as it allows developers to simulate a whole environment by just changing a few values on the application.
Making configurations live without restarting your applications manually can be a good idea, but you have to analyze it thoroughly.
I hope you enjoyed this article! Let’s keep in touch on Twitter or LinkedIn! 🤜🤛
Customizing the behavior of an HTTP request is easy: you can use a middleware defined as a delegate or as a class.
Table of Contents
Just a second! 🫷 If you are here, it means that you are a software developer.
So, you know that storage, networking, and domain management have a cost .
If you want to support this blog, please ensure that you have disabled the adblocker for this site. I configured Google AdSense to show as few ADS as possible – I don’t want to bother you with lots of ads, but I still need to add some to pay for the resources for my site.
Thank you for your understanding. – Davide
Sometimes you need to create custom logic that must be applied to all HTTP requests received by your ASP.NET Core application. In these cases, you can create a custom middleware: pieces of code that are executed sequentially for all incoming requests.
The order of middlewares matters. Here’s a nice schema published on the Microsoft website:
A Middleware, in fact, can manipulate the incoming HttpRequest and the resulting HttpResponse objects.
In this article, we’re gonna learn 2 ways to create a middleware in .NET.
Middleware as inline delegates
The easiest way is to define a delegate function that must be defined after building the WebApplication.
By calling the Use method, you can update the HttpContext object passed as a first parameter.
Note that you have to call the Invoke method to call the next middleware.
There is a similar overload that accepts in input a RequestDelegate instance instead of Func<Task>, but it is considered to be less performant: you should, in fact, use the one with Func<Task>.
Middleware as standalone classes
The alternative to delegates is by defining a custom class.
You can call it whatever you want, but you have some constraints to follow when creating the class:
it must have a public constructor with a single parameter whose type is RequestDelegate (that will be used to invoke the next middleware);
it must expose a public method named Invoke or InvokeAsync that accepts as a first parameter an HttpContext and returns a Task;
Then, to add it to your application, you have to call
app.UseMiddleware<MyCustomMiddleware>();
Delegates or custom classes?
Both are valid methods, but each of them performs well in specific cases.
For simple scenarios, go with inline delegates: they are easy to define, easy to read, and quite performant. But they are a bit difficult to test.
For complex scenarios, go with custom classes: this way you can define complex behaviors in a single class, organize your code better, use Dependency Injection to pass services and configurations to the middleware. Also, defining the middleware as a class makes it more testable. The downside is that, as of .NET 7, using a middleware resides on reflection: UseMiddleware invokes the middleware by looking for a public method named Invoke or InvokeAsync. So, theoretically, using classes is less performant than using delegates (I haven’t benchmarked it yet, though!).
Wrapping up
On Microsoft documentation you can find a well-explained introduction to Middlewares:
Integration Tests are incredibly useful: a few Integration Tests are often more useful than lots of Unit Tests. Let’s learn some advanced capabilities of WebApplicationFactory.
Table of Contents
Just a second! 🫷 If you are here, it means that you are a software developer.
So, you know that storage, networking, and domain management have a cost .
If you want to support this blog, please ensure that you have disabled the adblocker for this site. I configured Google AdSense to show as few ADS as possible – I don’t want to bother you with lots of ads, but I still need to add some to pay for the resources for my site.
Thank you for your understanding. – Davide
In a previous article, we learned a quick way to create Integration Tests for ASP.NET API by using WebApplicationFactory. That was a nice introductory article. But now we will delve into more complex topics and examples.
In my opinion, a few Integration Tests and just the necessary number of Unit tests are better than hundreds of Unit Tests and no Integration Tests at all. In general, the Testing Diamond should be preferred over the Testing Pyramid (well, in most cases).
In this article, we are going to create advanced Integration Tests by defining custom application settings, customizing dependencies to be used only during tests, defining custom logging, and performing complex operations in our tests.
For the sake of this article, I created a sample API application that exposes one single endpoint whose purpose is to retrieve some info about the URL passed in the query string. For example,
GET /SocialPostLink?uri=https%3A%2F%2Ftwitter.com%2FBelloneDavide%2Fstatus%2F1682305491785973760
For completeness, instanceName is a value coming from the appsettings.json file, while info is an object that holds some info about the social post URL passed as input.
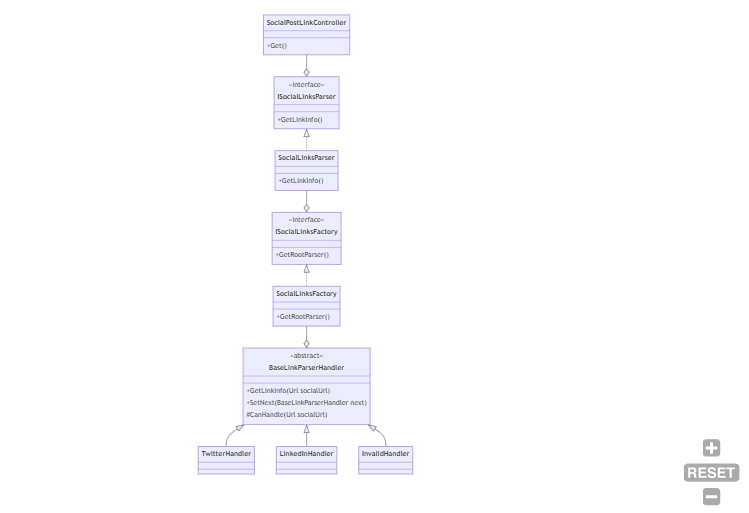
Internally, the code is using the Chain of Responsibility pattern: there is a handler that “knows” if it can handle a specific URL; if so, it just elaborates the input; otherwise, it calls the next handler.
There is also a Factory that builds the chain, and finally, a Service that instantiates the Factory and then resolves the dependencies.
As you can see, this solution can become complex. We could run lots of Unit Tests to validate that the Chain of Responsibility works as expected. We can even write a Unit Tests suite for the Factory.
But, at the end of the day, we don’t really care about the internal structure of the project: as long as it works as expected, we could even use a huge switch block (clearly, with all the consequences of this choice). So, let’s write some Integration Tests.
How to create a custom WebApplicationFactory in .NET
When creating Integration Tests for .NET APIs you have to instantiate a new instance of WebApplicationFactory, a class coming from the Microsoft.AspNetCore.Mvc.Testing NuGet Package.
Since we are going to define it once and reuse it across all the tests, let’s create a new class that extends WebApplicationFactory, and add some custom behavior to it.
Let’s focus on the Program class: as you can see, the WebApplicationFactory class requires an entry point. Generally speaking, it’s the Program class of our application.
If you hover on WebApplicationFactory<Program> and hit CTRL+. on Visual Studio, the autocomplete proposes two alternatives: one is the Program class defined in your APIs, while the other one is the Program class defined in Microsoft.VisualStudio.TestPlatform.TestHost. Choose the one for your API application! The WebApplicationFactory class will then instantiate your API following the instructions defined in your Program class, thus resolving all the dependencies and configurations as if you were running your application locally.
What to do if you don’t have the Program class? If you use top-level statements, you don’t have the Program class, because it’s “implicit”. So you cannot reference the whole class. Unless… You have to create a new partial class named Program, and leave it empty: this way, you have a class name that can be used to reference the API definition:
publicpartialclassProgram { }
Here you can override some definitions of the WebHost to be created by calling ConfigureWebHost:
How to use WebApplicationFactory in your NUnit tests
It’s time to start working on some real Integration Tests!
As we said before, we have only one HTTP endpoint, defined like this:
privatereadonly ISocialLinkParser _parser;
privatereadonly ILogger<SocialPostLinkController> _logger;
privatereadonly IConfiguration _config;
public SocialPostLinkController(ISocialLinkParser parser, ILogger<SocialPostLinkController> logger, IConfiguration config)
{
_parser = parser;
_logger = logger;
_config = config;
}
[HttpGet]public IActionResult Get([FromQuery] string uri)
{
_logger.LogInformation("Received uri {Uri}", uri);
if (Uri.TryCreate(uri, new UriCreationOptions { }, out Uri _uri))
{
var linkInfo = _parser.GetLinkInfo(_uri);
_logger.LogInformation("Uri {Uri} is of type {Type}", uri, linkInfo.SocialNetworkName);
var instance = new Instance
{
InstanceName = _config.GetValue<string>("InstanceName"),
Info = linkInfo
};
return Ok(instance);
}
else {
_logger.LogWarning("Uri {Uri} is not a valid Uri", uri);
return BadRequest();
}
}
We have 2 flows to validate:
If the input URI is valid, the HTTP Status code should be 200;
If the input URI is invalid, the HTTP Status code should be 400;
We could simply write Unit Tests for this purpose, but let me write Integration Tests instead.
First of all, we have to create a test class and create a new instance of IntegrationTestWebApplicationFactory. Then, we will create a new HttpClient every time a test is run that will automatically include all the services and configurations defined in the API application.
As you can see, the test class implements IDisposable so that we can call Dispose() on the IntegrationTestWebApplicationFactory instance.
From now on, we can use the _client instance to work with the in-memory instance of the API.
One of the best parts of it is that, since it’s an in-memory instance, we can even debug our API application. When you create a test and put a breakpoint in the production code, you can hit it and see the actual values as if you were running the application in a browser.
Now that we have the instance of HttpClient, we can create two tests to ensure that the two cases we defined before are valid. If the input string is a valid URI, return 200:
[Test]publicasync Task Should_ReturnHttp200_When_UrlIsValid()
{
string inputUrl = "https://twitter.com/BelloneDavide/status/1682305491785973760";
var result = await _client.GetAsync($"SocialPostLink?uri={inputUrl}");
Assert.That(result.StatusCode, Is.EqualTo(HttpStatusCode.OK));
}
Otherwise, return Bad Request:
[Test]publicasync Task Should_ReturnBadRequest_When_UrlIsNotValid()
{
string inputUrl = "invalid-url";
var result = await _client.GetAsync($"/SocialPostLink?uri={inputUrl}");
Assert.That(result.StatusCode, Is.EqualTo(HttpStatusCode.BadRequest));
}
How to create test-specific configurations using InMemoryCollection
WebApplicationFactory is highly configurable thanks to the ConfigureWebHost method. For instance, you can customize the settings injected into your services.
Usually, you want to rely on the exact same configurations defined in your appsettings.json file to ensure that the system behaves correctly with the “real” configurations.
For example, I defined the key “InstanceName” in the appsettings.json file whose value is “Real”, and whose value is used to create the returned Instance object. We can validate that that value is being read from that source as validated thanks to this test:
[Test]publicasync Task Should_ReadInstanceNameFromSettings()
{
string inputUrl = "https://twitter.com/BelloneDavide/status/1682305491785973760";
var result = await _client.GetFromJsonAsync<Instance>($"/SocialPostLink?uri={inputUrl}");
Assert.That(result.InstanceName, Is.EqualTo("Real"));
}
But some other times you might want to override a specific configuration key.
The ConfigureAppConfiguration method allows you to customize how you manage Configurations by adding or removing sources.
If you want to add some configurations specific to the WebApplicationFactory, you can use AddInMemoryCollection, a method that allows you to add configurations in a key-value format:
protectedoverridevoid ConfigureWebHost(IWebHostBuilder builder)
{
builder.ConfigureAppConfiguration((host, configurationBuilder) =>
{
configurationBuilder.AddInMemoryCollection(
new List<KeyValuePair<string, string?>>
{
new KeyValuePair<string, string?>("InstanceName", "FromTests")
});
});
}
Even if you had the InstanceName configured in your appsettings.json file, the value is now overridden and set to FromTests.
You can validate this change by simply replacing the expected value in the previous test:
[Test]publicasync Task Should_ReadInstanceNameFromSettings()
{
string inputUrl = "https://twitter.com/BelloneDavide/status/1682305491785973760";
var result = await _client.GetFromJsonAsync<Instance>($"/SocialPostLink?uri={inputUrl}");
Assert.That(result.InstanceName, Is.EqualTo("FromTests"));
}
If you also want to discard all the other existing configuration sources, you can call configurationBuilder.Sources.Clear() before AddInMemoryCollection and remove all the other existing configurations.
How to set up custom dependencies for your tests
Maybe you don’t want to resolve all the existing dependencies, but just a subset of them. For example, you might not want to call external APIs with a limited number of free API calls to avoid paying for the test-related calls. You can then rely on Stub classes that simulate the dependency by giving you full control of the behavior.
We want to replace an existing class with a Stub one: we are going to create a stub class that will be used instead of SocialLinkParser:
publicclassStubSocialLinkParser : ISocialLinkParser
{
public LinkInfo GetLinkInfo(Uri postUri) => new LinkInfo
{
SocialNetworkName = "test from stub",
Id = "test id",
SourceUrl = postUri,
Username = "test username" };
}
We can then customize Dependency Injection to use StubSocialLinkParser in place of SocialLinkParser by specifying the dependency within the ConfigureTestServices method:
Finally, we can create a method to validate this change:
[Test]publicasync Task Should_UseStubName()
{
string inputUrl = "https://twitter.com/BelloneDavide/status/1682305491785973760";
var result = await _client.GetFromJsonAsync<Instance>($"/SocialPostLink?uri={inputUrl}");
Assert.That(result.Info.SocialNetworkName, Is.EqualTo("test from stub"));
}
How to create Integration Tests on specific resolved dependencies
Now we are going to test that the SocialLinkParser does its job, regardless of the internal implementation. Right now we have used the Chain of Responsibility pattern, and we rely on the ISocialLinksFactory interface to create the correct sequence of handlers. But we don’t know in the future how we will define the code: maybe we will replace it all with a huge if-else sequence – the most important part is that the code works, regardless of the internal implementation.
We can proceed in two ways: writing tests on the interface or writing tests on the concrete class.
For the sake of this article, we are going to run tests on the SocialLinkParser class. Not the interface, but the concrete class. The first step is to add the class to the DI engine in the Program class:
builder.Services.AddScoped<SocialLinkParser>();
Now we can create a test to validate that it is working:
[Test]publicasync Task Should_ResolveDependency()
{
using (var _scope = _factory.Services.CreateScope())
{
var service = _scope.ServiceProvider.GetRequiredService<SocialLinkParser>();
Assert.That(service, Is.Not.Null);
Assert.That(service, Is.AssignableTo<SocialLinkParser>());
}
}
As you can see, we are creating an IServiceScope by calling _factory.Services.CreateScope(). Since we have to discard this scope after the test run, we have to place it within a using block. Then, we can create a new instance of SocialLinkParser by calling _scope.ServiceProvider.GetRequiredService<SocialLinkParser>() and create all the tests we want on the concrete implementation of the class.
The benefit of this approach is that you have all the internal dependencies already resolved, without relying on mocks. You can then ensure that everything, from that point on, works as you expect.
Here I created the scope within a using block. There is another approach that I prefer: create the scope instance in the SetUp method, and call Dispose() on it the the TearDown phase:
Sometimes you just want to see the logs generated by your application to help you debug an issue (yes, you can simply debug the application!). But, unless properly configured, the application logs will not be available to you.
But you can add logs to the console easily by customizing the adding the Console sink in your ConfigureTestServices method:
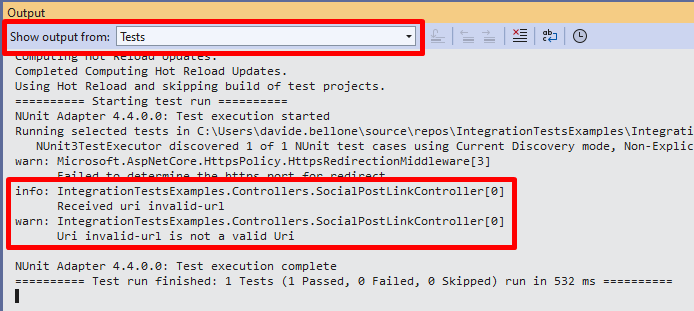
Now you will be able to see all the logs you generated in the Output panel of Visual Studio by selecting the Tests source:
Beware that you are still reading the configurations for logging from the appsettings file! If you have specified in your project to log directly to a sink (such as DataDog or SEQ), your tests will send those logs to the specified sinks. Therefore, you should get rid of all the other logging sources by calling ClearProviders():
As I often say, a few Integration Tests are often more useful than a ton of Unit Tests. Focusing on Integration Tests instead that on Unit Tests has the benefit of ensuring that the system behaves correctly regardless of the internal implementation.
In this article, I used the Chain of Responsibility pattern, so Unit Tests would be tightly coupled to the Handlers. If we decided to move to another pattern, we would have to delete all the existing tests and rewrite everything from scratch.
Therefore, in my opinion, the Testing Diamond is often more efficient than the Testing Pyramid, as I explained here:
Feature Flags are a technique that allows you to control the visibility and functionality of features in your software without changing the code. They enable you to experiment with new features, perform gradual rollouts, and revert changes quickly if needed.
Table of Contents
Just a second! 🫷 If you are here, it means that you are a software developer.
So, you know that storage, networking, and domain management have a cost .
If you want to support this blog, please ensure that you have disabled the adblocker for this site. I configured Google AdSense to show as few ADS as possible – I don’t want to bother you with lots of ads, but I still need to add some to pay for the resources for my site.
Thank you for your understanding. – Davide
To turn functionalities on or off on an application, you can use simple if(condition) statements. That would work, of course. But it would not be flexible, and you’ll have to scatter those checks all around the application.
There is another way, though: Feature Flags. Feature Flags allow you to effortlessly enable and disable functionalities, such as Middlewares, HTML components, and API controllers. Using ASP.NET Core, you have Feature Flags almost ready to be used: it’s just a matter of installing one NuGet package and using the correct syntax.
In this article, we are going to create and consume Feature Flags in an ASP.NET Core application. We will start from the very basics and then see how to use complex, built-in filters. We will consume Feature Flags in a generic C# code, and then we will see how to include them in a Razor application and in ASP.NET Core APIs.
How to add the Feature Flags functionality on ASP.NET Core applications
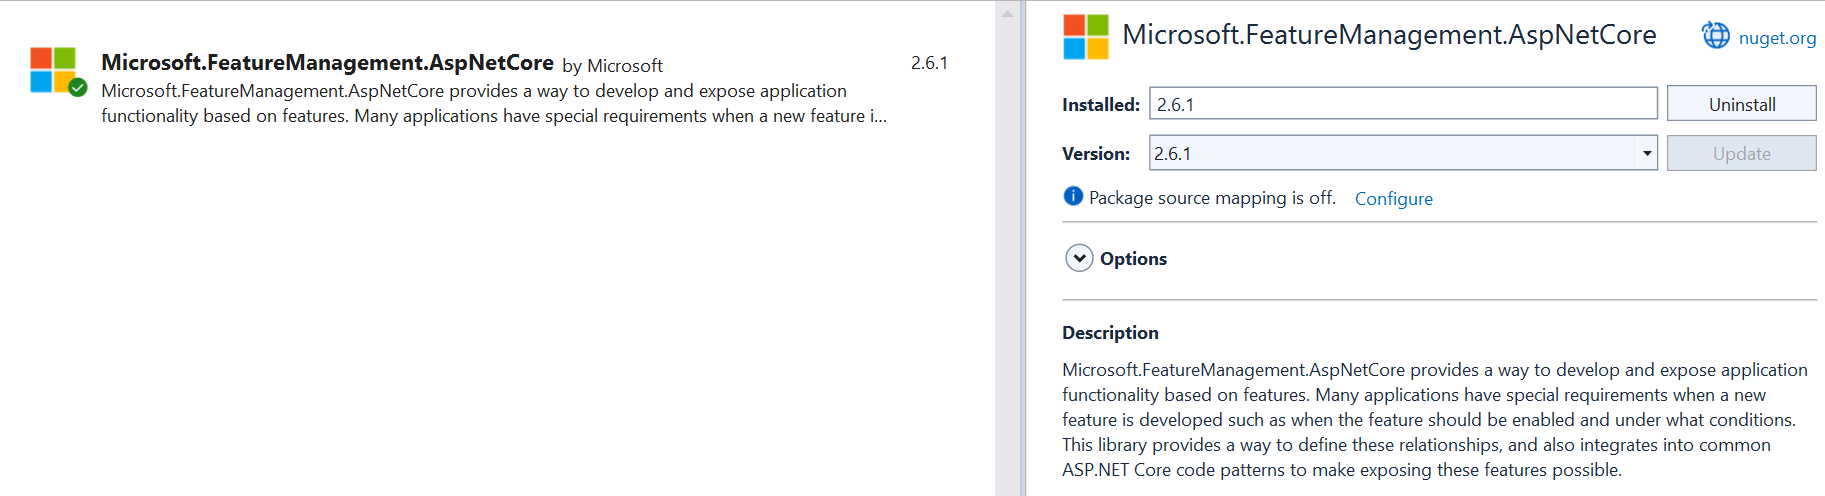
The very first step to do is to install the Microsoft.FeatureManagement.AspNetCore NuGet package:
This package contains everything you need to integrate Feature Flags in an ASP.NET application, from reading configurations from the appsettings.json file to the utility methods we will see later in this article.
Now that we have the package installed, we can integrate it into our application. The first step is to call AddFeatureManagement on the IServiceCollection object available in the Main method:
var builder = WebApplication.CreateBuilder(args);

builder.Services.AddFeatureManagement();
By default, this method looks for Feature Flags in a configuration section named FeatureManagement.
If you want to use another name, you can specify it by accessing the Configuration object. For example, if your section name is MyWonderfulFlags, you must use this line instead of the previous one:
But, for now, let’s stick with the default section name: FeatureManagement.
Define Feature Flag values in the appsettings file
As we saw, we have to create a section named FeatureManagement in the appsettings file. This section will contain a collection of keys, each representing a Feature Flag and an associated value.
For now, let’s say that the value is a simple boolean (we will see an advanced case later!).
The simplest way to use Feature Flags is by accessing the value directly in the C# code.
By calling AddFeatureManagement, we have also injected the IFeatureManager interface, which comes in handy to check whether a flag is enabled.
You can then inject it in a class constructor and reference it:
privatereadonly IFeatureManager _featureManager;
public MyClass(IFeatureManager featureManager)
{
_featureManager = featureManager;
}
publicasync Task DoSomething()
{
bool privacyEnabled = await _featureManager.IsEnabledAsync("PrivacyPage");
if(privacyEnabled)
{
// do something specific }
}
This is the simplest way. Looks like it’s nothing more than a simple if statement. Is it?
Applying a Feature Flag to a Controller or a Razor Model using the FeatureGate attribute
When rolling out new versions of your application, you might want to enable or disable an API Controller or a whole Razor Page, depending on the value of a Feature Flag.
There is a simple way to achieve this result: using the FeatureGate attribute.
Suppose you want to hide the “Privacy” Razor page depending on its related flag, PrivacyPage. You then have to apply the FeatureGate attribute to the whole Model class (in our case, PrivacyModel), specifying that the flag to watch out for is PrivacyPage:
Depending on the value of the flag, we will have two results:
if the flag is enabled, we will see the whole page normally;
if the flag is disabled, we will receive a 404 – Not Found response.
Let’s have a look at the attribute definition:
//
// Summary:// An attribute that can be placed on MVC controllers, controller actions, or Razor// pages to require all or any of a set of features to be enabled.[AttributeUsage(AttributeTargets.Class | AttributeTargets.Method, AllowMultiple = true)]publicclassFeatureGateAttribute : ActionFilterAttribute, IAsyncPageFilter, IFilterMetadata
As you can see, you can apply the attribute to any class or method that is related to API controllers or Razor pages. This allows you to support several scenarios:
add a flag on a whole API Controller by applying the attribute to the related class;
add a flag on a specific Controller Action, allowing you, for example, to expose the GET Action but apply the attribute to the POST Action.
add a flag to a whole Razor Model, hiding or showing the related page depending on the flag value.
You can apply the attribute to a custom class or method unrelated to the MVC pipeline, but it will be ineffective.
the Hello method will be called as usual. The same happens for the OnGet method: yes, it represents the way to access the Razor Page, but you cannot hide it; the only way is to apply the flag to the whole Model.
You can use multiple Feature Flags on the same FeatureGate attribute. If you need to hide or show a component based on various Feature Flags, you can simply add the required keys in the attribute parameters list:
Now, the GET endpoint will be available only if both PrivacyPage and Footer are enabled.
Finally, you can define that the component is available if at least one of the flags is enabled by setting the requirementType parameter to RequirementType.Any:
The Microsoft.FeatureManagement.AspNetCore NuGet package brings a lot of functionalities. Once installed, you can use Feature Flags in your Razor pages.
To use such functionalities, though, you have to add the related tag helper: open the _ViewImports.cshtml file and add the following line:
Say you want to show an HTML tag when the Header flag is on. You can use the feature tag this way:
<featurename="Header"><p>The header flag is on.</p></feature>
You can also show some content when the flag is off, by setting the negate attribute to true. This comes in handy when you want to display alternative content when the flag is off:
<featurename="ShowPicture"><imgsrc="image.png"/></feature><featurename="ShowPicture"negate="true"><p>There should have been an image, here!</p></feature>
Clearly, if ShowPicture is on, it shows the image; otherwise, it displays a text message.
Similar to the FeatureGate attribute, you can apply multiple flags and choose whether all of them or at least one must be on to show the content by setting the requirement attribute to Any (remember: the default value is All):
<featurename="Header, Footer"requirement="All"><p>Both header and footer are enabled.</p></feature><featurename="Header, Footer"requirement="Any"><p>Either header or footer is enabled.</p></feature>
Conditional Feature Filters: a way to activate flags based on specific advanced conditions
Sometimes, you want to activate features using complex conditions. For example:
activate a feature only for a percentage of requests;
activate a feature only during a specific timespan;
Let’s see how to use the percentage filter.
The first step is to add the related Feature Filter to the FeatureManagement functionality. In our case, we will add the Microsoft.FeatureManagement.FeatureFilters.PercentageFilter.
Now we just have to define the related flag in the appsettings file. We cannot use anymore a boolean value, but we need a complex object. Let’s configure the ShowPicture flag to use the Percentage filter.
every object within the array is made of two fields: Name, which must match the filter name, and Parameters, which is a generic object whose value depends on the type of filter.
In this example, we have set "Value": 60. This means that the flag will be active in around 60% of calls. In the remaining 40%, the flag will be off.
Now, I encourage you to toy with this filter:
Apply it to a section or a page.
Run the application.
Refresh the page several times without restarting the application.
You’ll see the component appear and disappear.
Further readings
We learned about setting “simple” configurations in an ASP.NET Core application in a previous article. You should read it to have a better understanding of how we can define configurations.
Here, we focused on the Feature Flags. As we saw, most functionalities come out of the box with ASP.NET Core.
In particular, we learned how to use the <feature> tag on a Razor page. You can read more on the official documentation (even though we already covered almost everything!):
In this article, we learned how to use Feature Flags in an ASP.NET application on Razor pages and API Controllers.
Feature Flags can be tremendously useful when activating or deactivating a feature in some specific cases. For example, you can roll out a functionality in production by activating the related flag. Suppose you find an error in that functionality. In that case, you just have to turn off the flag and investigate locally the cause of the issue.
I hope you enjoyed this article! Let’s keep in touch on Twitter or LinkedIn! 🤜🤛
Sometimes just a minor change can affect performance. Here’s a simple trick: initialize your collections by specifying the initial size!
Table of Contents
Just a second! 🫷 If you are here, it means that you are a software developer.
So, you know that storage, networking, and domain management have a cost .
If you want to support this blog, please ensure that you have disabled the adblocker for this site. I configured Google AdSense to show as few ADS as possible – I don’t want to bother you with lots of ads, but I still need to add some to pay for the resources for my site.
Thank you for your understanding. – Davide
When you initialize a collection, like a List, you create it with the default size.
Whenever you add an item to a collection, .NET checks that there is enough capacity to hold the new item. If not, it resizes the collection by doubling the inner capacity.
Resizing the collection takes time and memory.
Therefore, when possible, you should initialize the collection with the expected number of items it will contain.
Initialize a List
In the case of a List, you can simply replace new List<T>() with new List<T>(size). By specifying the initial size in the constructor’s parameters, you’ll have a good performance improvement.
Let’s create a benchmark using BenchmarkDotNet and .NET 8.0.100-rc.1.23455.8 (at the time of writing, .NET 8 is still in preview. However, we can get an idea of the average performance).
The benchmark is pretty simple:
[MemoryDiagnoser]publicclassCollectionWithSizeInitializationBenchmarks{
[Params(100, 1000, 10000, 100000)]publicint Size;
[Benchmark]publicvoid WithoutInitialization()
{
List<int> list = new List<int>();
for (int i = 0; i < Size; i++)
{
list.Add(i);
}
}
[Benchmark(Baseline = true)]publicvoid WithInitialization()
{
List<int> list = new List<int>(Size);
for (int i = 0; i < Size; i++)
{
list.Add(i);
}
}
}
The only difference is in the list initialization: in the WithInitialization, we have List<int> list = new List<int>(Size);.
Have a look at the benchmark result, split by time and memory execution.
Starting with the execution time, we can see that without list initialization, we have an average 1.7x performance degradation.
Method
Size
Mean
Ratio
WithoutInitialization
100
299.659 ns
1.77
WithInitialization
100
169.121 ns
1.00
WithoutInitialization
1000
1,549.343 ns
1.58
WithInitialization
1000
944.862 ns
1.00
WithoutInitialization
10000
16,307.082 ns
1.80
WithInitialization
10000
9,035.945 ns
1.00
WithoutInitialization
100000
388,089.153 ns
1.73
WithInitialization
100000
227,040.318 ns
1.00
If we talk about memory allocation, we waste an overage of 2.5x memory if compared to collections with size initialized.
Method
Size
Allocated
Alloc Ratio
WithoutInitialization
100
1184 B
2.60
WithInitialization
100
456 B
1.00
WithoutInitialization
1000
8424 B
2.08
WithInitialization
1000
4056 B
1.00
WithoutInitialization
10000
131400 B
3.28
WithInitialization
10000
40056 B
1.00
WithoutInitialization
100000
1049072 B
2.62
WithInitialization
100000
400098 B
1.00
Initialize an HashSet
Similar to what we’ve done with List’s, we can see significant improvements when initializing correctly other data types, such as HashSet’s.
Let’s run the same benchmarks, but this time, let’s initialize a HashSet<int> instead of a List<int>.
The code is pretty similar:
[Benchmark]publicvoid WithoutInitialization()
{
varset = new HashSet<int>();
for (int i = 0; i < Size; i++)
{
set.Add(i);
}
}
[Benchmark(Baseline = true)]publicvoid WithInitialization()
{
varset = new HashSet<int>(Size);
for (int i = 0; i < Size; i++)
{
set.Add(i);
}
}
What can we say about performance improvements?
If we talk about execution time, we can see an average of 2x improvements.
Method
Size
Mean
Ratio
WithoutInitialization
100
1,122.2 ns
2.02
WithInitialization
100
558.4 ns
1.00
WithoutInitialization
1000
12,215.6 ns
2.74
WithInitialization
1000
4,478.4 ns
1.00
WithoutInitialization
10000
148,603.7 ns
1.90
WithInitialization
10000
78,293.3 ns
1.00
WithoutInitialization
100000
1,511,011.6 ns
1.96
WithInitialization
100000
810,657.8 ns
1.00
If we look at memory allocation, if we don’t initialize the HashSet, we are slowing down the application by a factor of 3x. Impressive!
Method
Size
Allocated
Alloc Ratio
WithoutInitialization
100
5.86 KB
3.28
WithInitialization
100
1.79 KB
1.00
WithoutInitialization
1000
57.29 KB
3.30
WithInitialization
1000
17.35 KB
1.00
WithoutInitialization
10000
526.03 KB
3.33
WithInitialization
10000
157.99 KB
1.00
WithoutInitialization
100000
4717.4 KB
2.78
WithInitialization
100000
1697.64 KB
1.00
Wrapping up
Do you need other good reasons to initialize your collection capacity when possible? 😉
I used BenchmarkDotNet to create these benchmarks. If you want an introduction to this tool, you can have a look at how I used it to measure the performance of Enums:


