برچسب: Code4IT

  • Queues vs Topics | Code4IT


    Queues or Topics? How are they similar and how they are different? We’ll see how to use those capabilities in Azure Service Bus with .NET and C#

    Table of Contents

    Just a second! 🫷
    If you are here, it means that you are a software developer.
    So, you know that storage, networking, and domain management have a cost .

    If you want to support this blog, please ensure that you have disabled the adblocker for this site.
    I configured Google AdSense to show as few ADS as possible – I don’t want to bother you with lots of ads, but I still need to add some to pay for the resources for my site.

    Thank you for your understanding.
    Davide

    In the previous article, we’ve seen that with Azure Service Bus, the message broker provided by Microsoft, you can send messages in a queue in a way that the first application that receives it, also removes that message from the queue.

    In this article, we’re gonna see another capability of Azure Service Bus: Topics. With topics, many different applications can read the same message from the Bus; the message will be removed from the Bus only when every application has finished processing that message.

    This is the second article in this series about Azure Service Bus:

    1. Introduction to Azure Service Bus
    2. Azure Service Bus: Queues vs Topics
    3. Handling Azure Service Bus errors with .NET

    So, now, let’s dive into Topics.

    Upgrading the Pricing Tier

    Azure Service Bus comes with 3 pricing tiers:

    • Basic: its price depends on how many messages you send. You only have Queues.
    • Standard: similar to the Basic tier, but allows you to have both Queues and Topics.
    • Premium: zone-redundant, with both Queues and Topics; of course, quite expensive.

    To use Topics, we need to upgrade our subscription tier to Standard or Premium.

    Open Portal Azure, head to the resource details of the Queue and click on the Pricing Tier section.
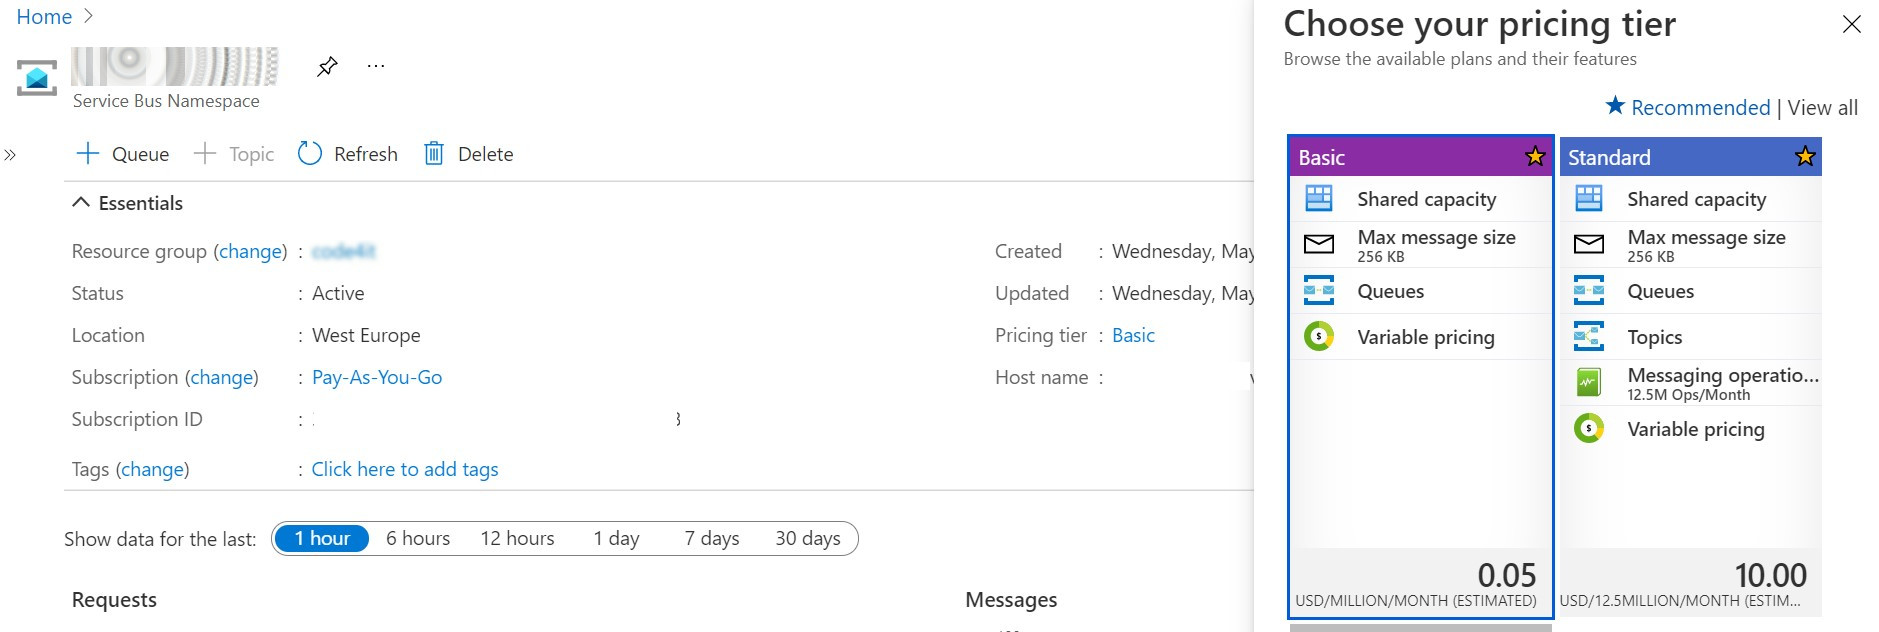
    Available tiers on Azure Service Bus

    Here, select the Standard tier and save.

    Queue vs Topic

    Queues and Topics are similar: when an application sends a message somewhere, a receiver on the other side reads it and performs some operations on the received message.

    But there is a key difference between Queues and Topics. With Queues, the first receiver that completes the reading of the message also removes it from the Queue so that the message cannot be processed by other readers.
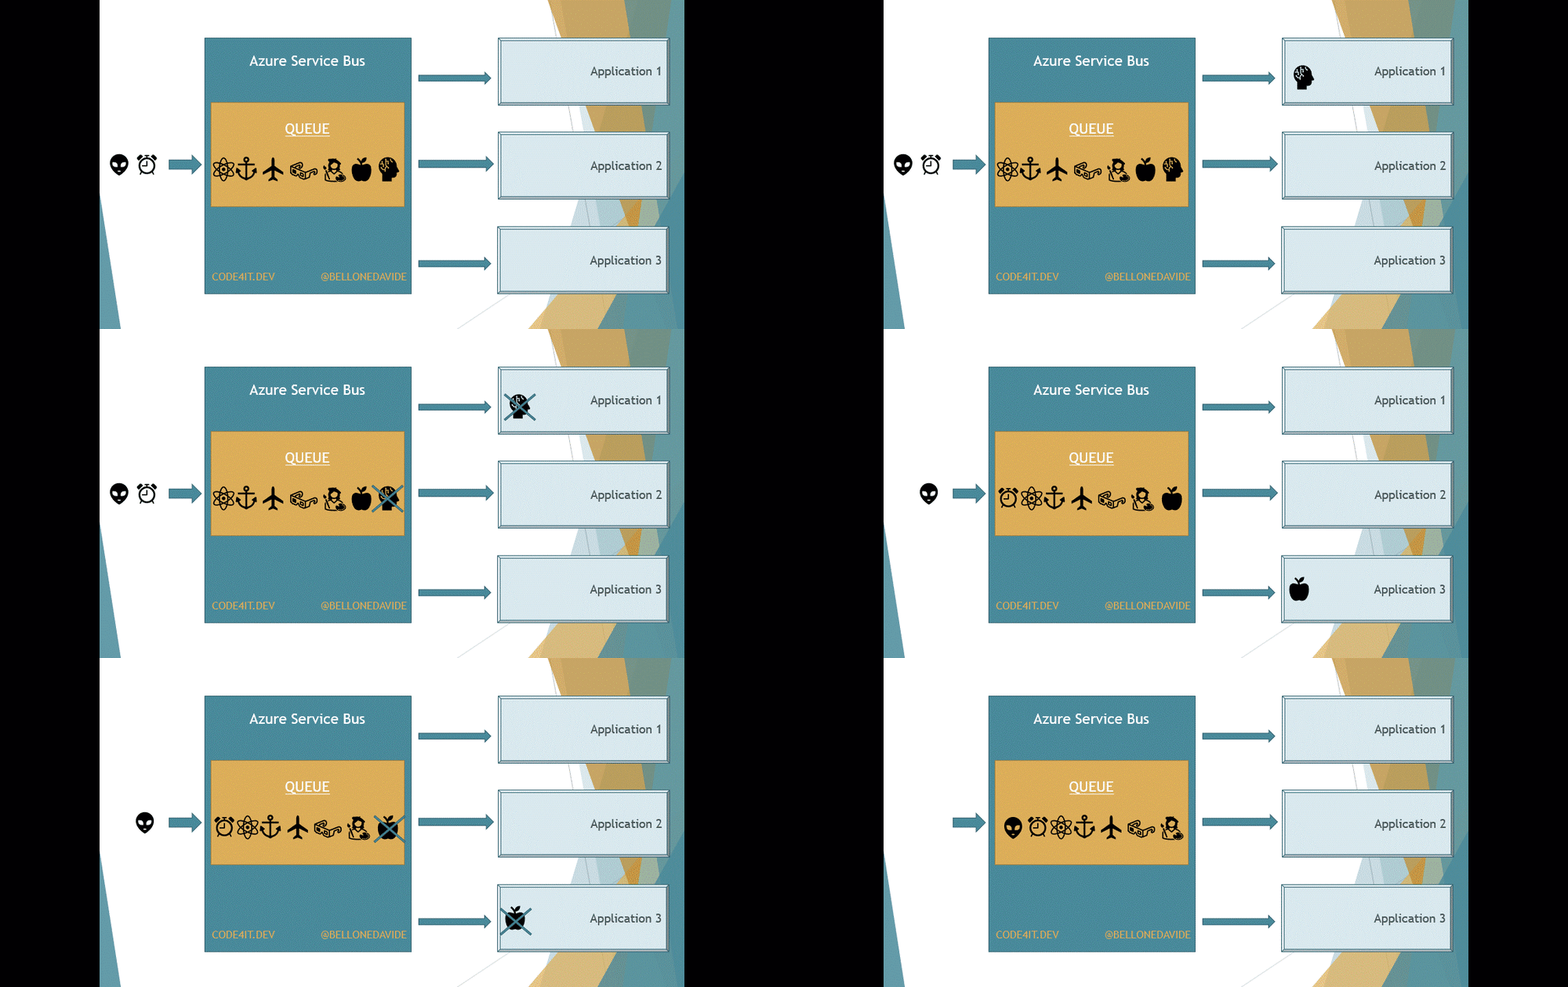
    How items are processed in a Queue

    With Topics, the message is removed only after every receiver has processed the message. Every Topic has one or more Subscribers, a connection between the Topic itself and the applications. All the applications subscribe to a specific Subscription, and receive messages only from it.

    When the message is read from all the Subscribers, the message is removed from the Topic too.
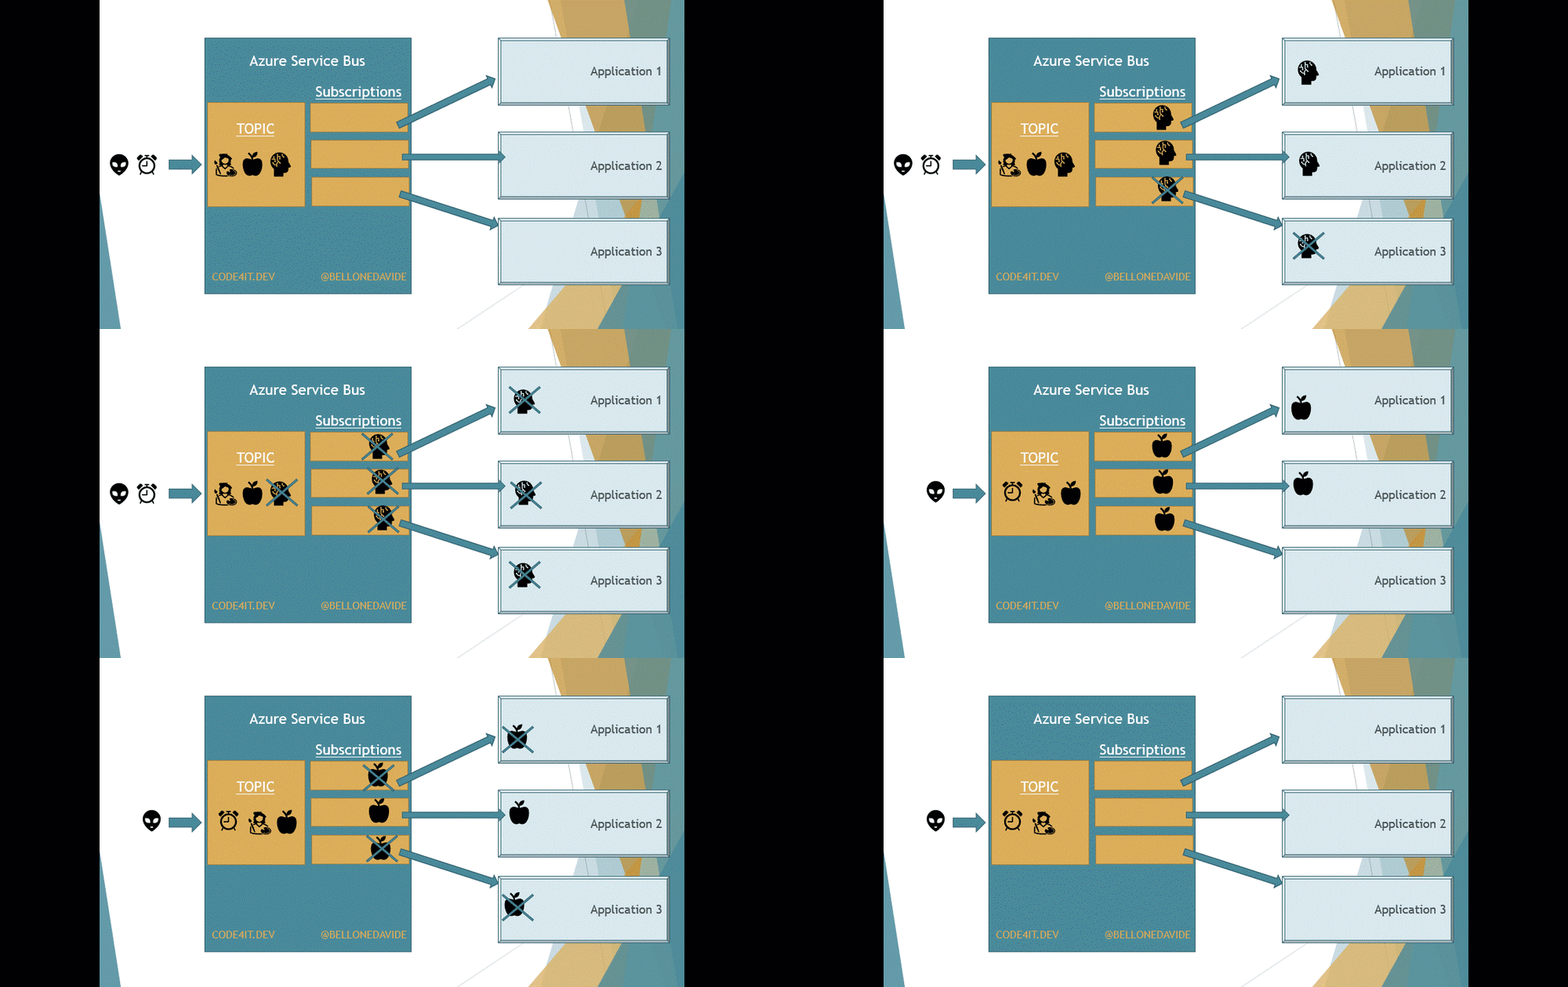
    How items are processed in a Topic

    Subscriptions

    As stated on the official documentation:

    A topic subscription resembles a virtual queue that receives copies of the messages that are sent to the topic. Consumers receive messages from a subscription identically to the way they receive messages from a queue.

    This means that our applications do not access directly the Topic, as we would do if we were talking about Queues. Here we access the Subscriptions to get a copy of the message on the Topic. Once the same message has been removed from all the Subscriptions, the message is also removed from the Topic.

    This is important to remember: when using Topics, the Topic itself is not enough, you also need Subscriptions.

    Create Topics and Subscriptions on Azure

    Once we have upgraded our pricing plan to Standard, we can see the Topic button available:

    Create Topic button is now active

    Click on that button, and start creating your Topic. It’s simple, just choose its name and some optional info.

    Then, navigate to the newly created Topic page and, on the Entities panel on the right, click on Subscriptions. From here, you can manage the subscriptions related to the Topic.
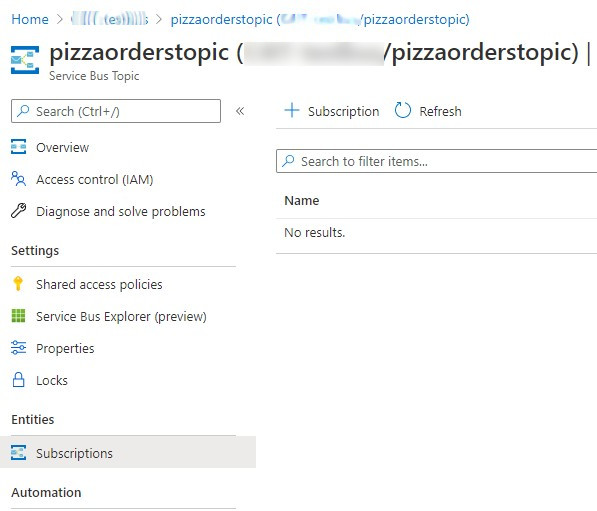
    Subscriptions panel on Azure

    Click on the add button, fill the fields and… voilá! You are ready to go!

    Of course, you can see all the resources directly on the browser. But, as I’ve explained in the previous article, I prefer another tool, ServiceBusExplorer, that you can download from Chocolatey.

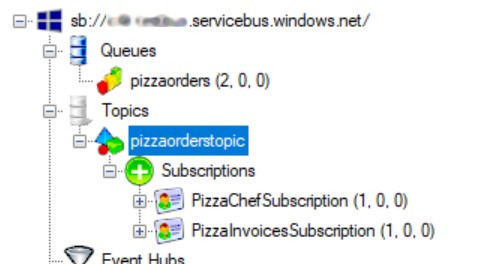
    Open the tool, insert the connection string, and you’ll see something like this:
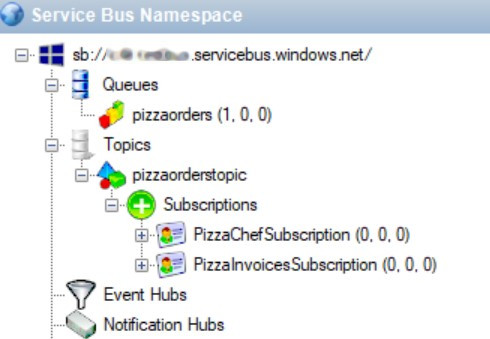
    General hierarchy of Queues, Topics, and Subscriptions

    What does this structure tell us?

    Here we have a Queue, pizzaorders, which is the one we used in the previous example. Then we have a Topic: pizzaorderstopic. Linked to the Topic we have two Subscriptions: PizzaChefSubscription and PizzaInvoicesSubsciption.

    Our applications will send messages into the pizzaorderstopic Topic and read them from the two Subscriptions.

    How to use Azure Service Bus Topics in .NET

    For this article, we’re gonna rework the code we’ve seen in the previous article.

    Now we are gonna handle the pizza orders not only for the pizza chef but also for keeping track of the invoices.

    How to send a message in a Topic with CSharp

    From the developer’s perspective, sending messages on a Queue or a Topic is actually the same, so we can reuse the same code I showed in the previous article.

    We still need to instantiate a new Sender and send a message through it.

    ServiceBusSender sender = client.CreateSender(TopicName);
    
    // create a message as string
    
    await sender.SendMessageAsync(serializedContents);
    

    Of course, we must use the Topic Name instead of the Queue name.

    You can easily say that sending a message on a Topic is transparent to the client just by looking at the CreateSender signature:

    public virtual ServiceBusSender CreateSender(string queueOrTopicName);
    

    Now, if we run the application and order a new pizza, we will see that a new message is ready on the Topic, and it is waiting to be read from all the Subscriptions.
    Subscriptions with the same message ready to be read

    How to receive a message from a Topic with CSharp

    Now that the same message is available for both PizzaChefSubscription and PizzaInvoicesSubscription, we need to write the code to connect to the subscriptions.

    Again, it is similar to what we’ve seen for simple queues. We still need to instantiate a Receiver, but this time we have to specify the Topic name and the Subscription name:

    ServiceBusClient serviceBusClient = new ServiceBusClient(ConnectionString);
    
    _ordersProcessor = serviceBusClient.CreateProcessor(TopicName, SubscriptionName);
    

    The rest of the code is the same.

    As you see, we need only a few updates to move from a Queue to a Topic!

    Final result

    To see what happens, I’ve created a clone of the PizzaChef project, and I’ve named it PizzaOrderInvoices. Both projects reference the same Topic, but each of them is subscribed to its Subscription.

    When receiving a message, the PizzaChef projects prints it in this way:

    string body = args.Message.Body.ToString();
    
    var processedPizza = JsonSerializer.Deserialize<ProcessedPizzaOrder>(body);
    
    Console.WriteLine($"Processing {processedPizza}");
    
    await args.CompleteMessageAsync(args.Message);
    

    and the PizzaOrderInvoices performs the following operations:

    string body = args.Message.Body.ToString();
    
    var processedPizza = JsonSerializer.Deserialize<Pizza>(body);
    
    Console.WriteLine($"Creating invoice for pizza {processedPizza.Name}");
    
    await args.CompleteMessageAsync(args.Message);
    

    Similar things, but with two totally unrelated clients.

    So now, if we run all three applications and send a new request, we will see the same messages processed by both applications.

    Final result: the same message is read by both applications from their own subscriptions

    Wrapping up

    In this article, we’ve seen what are the differences between a Queue and a Topic when talking about Azure Service Bus.

    As we’ve learned, you can insert a new message on a Queue or on a Topic in the same way. The main difference, talking about the code, is that to read a message from a Topic you have to subscribe to a Subscription.

    Now that we’ve learned how to manage both Queues and Topics, we need to learn how to manage errors: and that will be the topic of the next article.

    Happy coding!


    Source link

  • Principle of Least Surprise | Code4IT


    Just a second! 🫷
    If you are here, it means that you are a software developer.
    So, you know that storage, networking, and domain management have a cost .

    If you want to support this blog, please ensure that you have disabled the adblocker for this site.
    I configured Google AdSense to show as few ADS as possible – I don’t want to bother you with lots of ads, but I still need to add some to pay for the resources for my site.

    Thank you for your understanding.
    Davide

    The Principle of least surprise, also called Principle of least astonishment is a quite simple principle about Software design with some interesting aspects.

    Simplifying it a log, this principle says that:

    A function or class should do the most obvious thing you can expect from its name

    Let’s start with an example of what not to do:

    string Concatenate(string firstString, string secondString)
    {
      return string.Concat(firstString, secondString).ToLowerInvariant();
    }
    

    What is the problem with this method? Well, simply, the Client may expect to receive the strings concatenated without other modifications; but internally, the function calls the ToLowerInvariant() method on the returned string, thus modifying the expected behavior.

    So, when calling

    var first ="Abra";
    var second = "Kadabra";
    
    var concatenated = Concatenate(first, second);
    

    The concatenated variable will be abrakadabra instead of AbraKadabra.

    The solution is really simple: use better names!

    string ConcatenateInLowerCase(string firstString, string secondString)
    {
      return string.Concat(firstString, secondString).ToLowerInvariant();
    }
    

    Functions should do what you expect them to do: use clear names, clear variables, good return types.

    Related to this principle, you should not introduce unexpected side effects.

    As an example, let’s store some data on a DB, and wrap the database access with a Repository class. And let’s add an InsertItem method.

    public void InsertItem(Item newItem)
    {
      if(repo.Exists(newItem))
        repo.Update(newItem);
      else
        repo.Add(newItem);
    }
    

    Clearly, the client does not expect this method to replace an existing item. Again, the solution is to give it a better name: InsertOrUpdate, or Upsert.

    Lastly, the function should use the Design Pattern suggested by its name.

    public class RepositoryFactory
    {
        private static Repository instance = null;
        public static Repository Instance
        {
            get {
                    if (instance == null) {
                        instance = new Repository();
                    }
                    return instance;
            }
        }
    }
    

    This article first appeared on Code4IT

    See the point? It looks like we are using the Factory design pattern, but the code is actually the one for a Singleton.

    Again, being clear and obvious is one of the keys to successful clean code.

    The solution? Use better names! It may not be simple, but luckily there are some simple guidelines that you can follow.

    👉 Let’s discuss it on Twitter or on the comment section below!

    🐧


    Source link

  • Handling Azure Service Bus errors with .NET | Code4IT


    Senders and Receivers handle errors on Azure Service Bus differently. We’ll see how to catch them, what they mean and how to fix them. We’ll also introduce Dead Letters.

    Table of Contents

    Just a second! 🫷
    If you are here, it means that you are a software developer.
    So, you know that storage, networking, and domain management have a cost .

    If you want to support this blog, please ensure that you have disabled the adblocker for this site.
    I configured Google AdSense to show as few ADS as possible – I don’t want to bother you with lots of ads, but I still need to add some to pay for the resources for my site.

    Thank you for your understanding.
    Davide

    In this article, we are gonna see which kind of errors you may get on Azure Service Bus and how to fix them. We will look at simpler errors, the ones you get if configurations on your code are wrong, or you’ve not declared the modules properly; then we will have a quick look at Dead Letters and what they represent.

    This is the last part of the series about Azure Service Bus. In the previous parts, we’ve seen

    1. Introduction to Azure Service Bus
    2. Queues vs Topics
    3. Error handling

    For this article, we’re going to introduce some errors in the code we used in the previous examples.

    Just to recap the context, our system receives orders for some pizzas via HTTP APIs, processes them by putting some messages on a Topic on Azure Service Bus. Then, a different application that is listening for notifications on the Topic, reads the message and performs some dummy operations.

    Common exceptions with .NET SDK

    To introduce the exceptions, we’d better keep at hand the code we used in the previous examples.

    Let’s recall that a connection string has a form like this:

    string ConnectionString = "Endpoint=sb://<myHost>.servicebus.windows.net/;SharedAccessKeyName=<myPolicy>;SharedAccessKey=<myKey>=";
    

    To send a message in the Queue, remember that we have 3 main steps:

    1. create a new ServiceBusClient instance using the connection string
    2. create a new ServiceBusSender specifying the name of the queue or topic (in our case, the Topic)
    3. send the message by calling the SendMessageAsync method
    await using (ServiceBusClient client = new ServiceBusClient(ConnectionString))
    {
        ServiceBusSender sender = client.CreateSender(TopicName);
    
        foreach (var order in validOrders)
        {
    
            /// Create Bus Message
            ServiceBusMessage serializedContents = CreateServiceBusMessage(order);
    
            // Send the message on the Bus
            await sender.SendMessageAsync(serializedContents);
        }
    }
    

    To receive messages from a Topic, we need the following steps:

    1. create a new ServiceBusClient instance as we did before
    2. create a new ServiceBusProcessor instance by specifying the name of the Topic and of the Subscription
    3. define a handler for incoming messages
    4. define a handler for error handling
    ServiceBusClient serviceBusClient = new ServiceBusClient(ConnectionString);
    ServiceBusProcessor _ordersProcessor = serviceBusClient.CreateProcessor(TopicName, SubscriptionName);
    _ordersProcessor.ProcessMessageAsync += PizzaInvoiceMessageHandler;
    _ordersProcessor.ProcessErrorAsync += PizzaItemErrorHandler;
    await _ordersProcessor.StartProcessingAsync();
    

    Of course, I recommend reading the previous articles to get a full understanding of the examples.

    Now it’s time to introduce some errors and see what happens.

    No such host is known

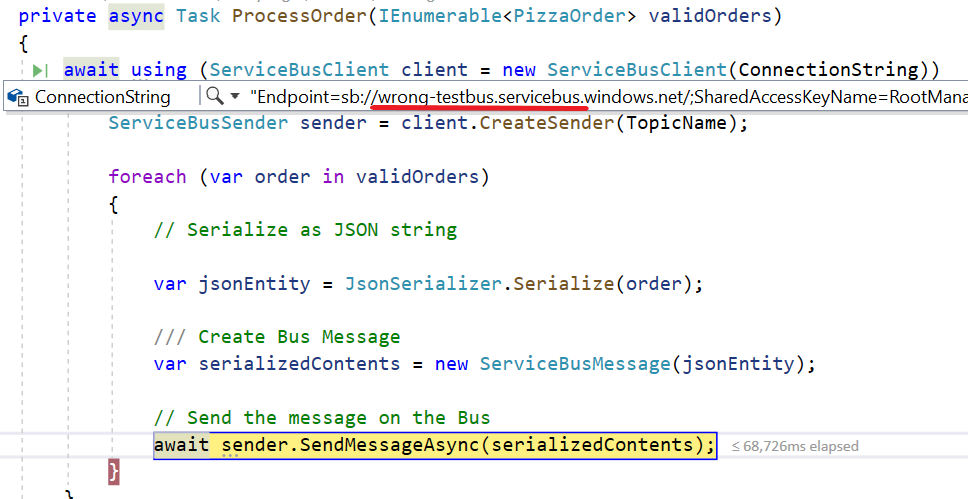
    When the connection string is invalid because the host name is wrong, you get an Azure.Messaging.ServiceBus.ServiceBusException exception with this message: No such host is known. ErrorCode: HostNotFound.

    What is the host? It’s the first part of the connection string. For example, in a connection string like

    Endpoint=sb://myHost.servicebus.windows.net/;SharedAccessKeyName=myPolicy;SharedAccessKey=myKey
    

    the host is myHost.servicebus.net.

    So we can easily understand why this error happens: that host name does not exist (or, more probably, there’s a typo).

    A curious fact about this exception: it is thrown later than I expected. I was expecting it to be thrown when initializing the ServiceBusClient instance, but it is actually thrown only when a message is being sent using SendMessageAsync.

    Code is executed correctly even though the host name is wrong

    You can perform all the operations you want without receiving any error until you really access the resources on the Bus.

    Put token failed: The messaging entity X could not be found

    Another message you may receive is Put token failed. status-code: 404, status-description: The messaging entity ‘X’ could not be found.

    The reason is pretty straightforward: the resource you are trying to use does not exist: by resource I mean Queue, Topic, and Subscription.

    Again, that exception is thrown only when interacting directly with Azure Service Bus.

    Put token failed: the token has an invalid signature

    If the connection string is not valid because of invalid SharedAccessKeyName or SharedAccessKey, you will get an exception of type System.UnauthorizedAccessException with the following message: Put token failed. status-code: 401, status-description: InvalidSignature: The token has an invalid signature.

    The best way to fix it is to head to the Azure portal and copy again the credentials, as I explained in the introductory article.

    Cannot begin processing without ProcessErrorAsync handler set.

    Let’s recall a statement from my first article about Azure Service Bus:

    The PizzaItemErrorHandler, however, must be at least declared, even if empty: you will get an exception if you forget about it.

    That’s odd, but that’s true: you have to define handlers both for manage success and failure.

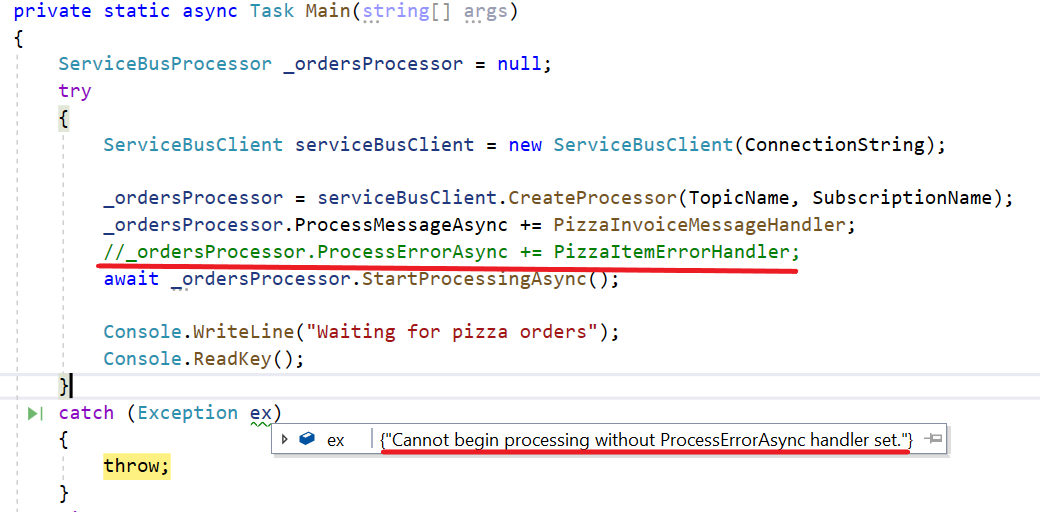
    If you don’t, and you only declare the ProcessMessageAsync handler, like in this example:

    ServiceBusClient serviceBusClient = new ServiceBusClient(ConnectionString);
    ServiceBusProcessor _ordersProcessor = serviceBusClient.CreateProcessor(TopicName, SubscriptionName);
    _ordersProcessor.ProcessMessageAsync += PizzaInvoiceMessageHandler;
    //_ordersProcessor.ProcessErrorAsync += PizzaItemErrorHandler;
    await _ordersProcessor.StartProcessingAsync();
    

    you will get an exception with the message: Cannot begin processing without ProcessErrorAsync handler set.

    An exception is thrown when the ProcessErrorAsync handler is not defined

    So, the simplest way to solve this error is… to create the handler for ProcessErrorAsync, even empty. But why do we need it, then?

    Why do we need the ProcessErrorAsync handler?

    As I said, yes, you could declare that handler and leave it empty. But if it exists, there must be a reason, right?

    The handler has this signature:

    private Task PizzaItemErrorHandler(ProcessErrorEventArgs arg)
    

    and acts as a catch block for the receivers: all the errors we’ve thrown in the first part of the article can be handled here. Of course, we are not directly receiving an instance of Exception, but we can access it by navigating the arg object.

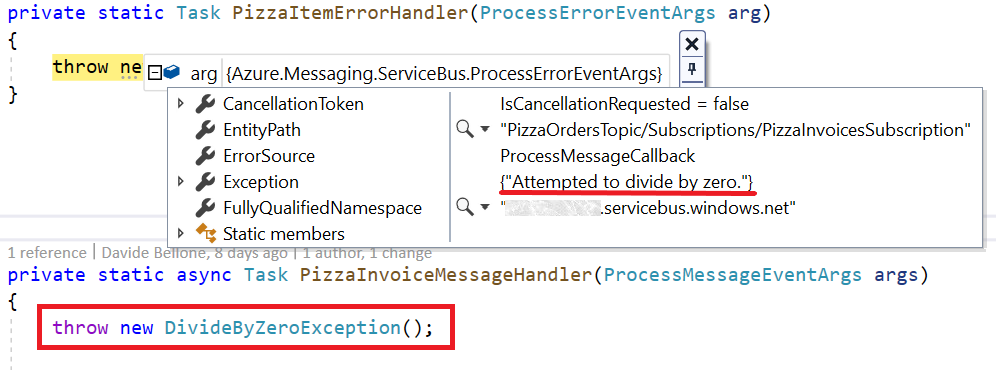
    As an example, let’s update again the host part of the connection string. When running the application, we can see that the error is caught in the PizzaItemErrorHandler method, and the arg argument contains many fields that we can use to handle the error. One of them is Exception, which wraps the Exception types we’ve already seen.

    Error handling on ProcessErrorAsync

    This means that in this method you have to define your error handling, add logs, and whatever may help your application managing errors.

    The same handler can be used to manage errors that occur while performing operations on a message: if an exception is thrown when processing an incoming message, you have two choices: handle it in the ProcessMessageAsync handler, in a try-catch block, or leave the error handling on the ProcessErrorAsync handler.

    ProcessErrorEventArgs details

    In the above picture, I’ve simulated an error while processing an incoming message by throwing a new DivideByZeroException. As a result, the PizzaItemErrorHandler method is called, and the arg argument contains info about the thrown exception.

    I personally prefer separating the two error handling situations: in the ProcessMessageAsync method I handle errors that occur in the business logic, when operating on an already received message; in the ProcessErrorAsync method I handle error coming from the infrastructure, like errors in the connection string, invalid credentials and so on.

    Dead Letters: when messages become stale

    When talking about queues, you’ll often come across the term dead letter. What does it mean?

    Dead letters are unprocessed messages: messages die when a message cannot be processed for a certain period of time. You can ignore that message because it has become obsolete or, anyway, it cannot be processed – maybe because it is malformed.

    Messages like these are moved to a specific queue called Dead Letter Queue (DLQ): messages are moved here to avoid making the normal queue full of messages that will never be processed.

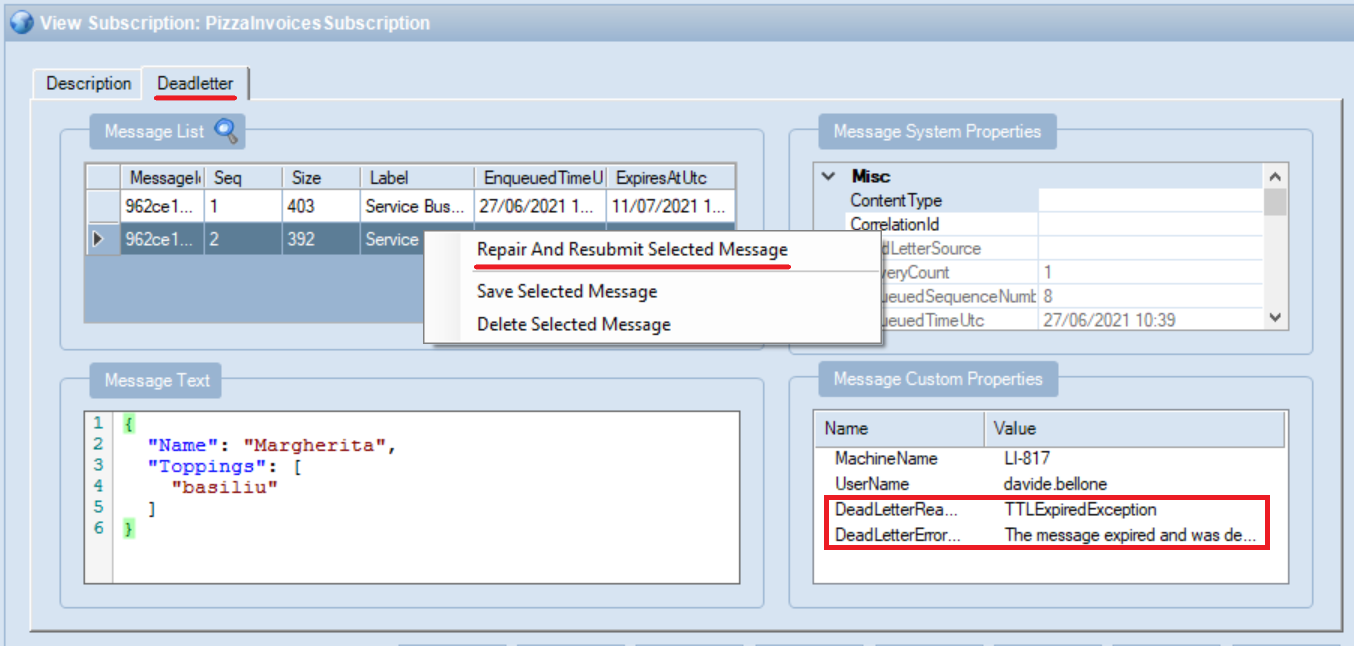
    You can see which messages are present in the DLQ to try to understand the reason they failed and put them again into the main queue.

    Dead Letter Queue on ServiceBusExplorer

    in the above picture, you can see how the DLQ can be navigated using Service Bus Explorer: you can see all the messages in the DLQ, update them (not only the content, but even the associated metadata), and put them again into the main Queue to be processed.

    Wrapping up

    In this article, we’ve seen some of the errors you can meet when working with Azure Service Bus and .NET.

    We’ve seen the most common Exceptions, how to manage them both on the Sender and the Receiver side: on the Receiver you must handle them in the ProcessErrorAsync handler.

    Finally, we’ve seen what is a Dead Letter, and how you can recover messages moved to the DLQ.

    This is the last part of this series about Azure Service Bus and .NET: there’s a lot more to talk about, like dive deeper into DLQ and understanding Retry Patterns.

    For more info, you can read this article about retry mechanisms on the .NET SDK available on Microsoft Docs, and have a look at this article by Felipe Polo Ruiz.

    Happy coding! 🐧


    Source link

  • String.IsNullOrEmpty or String.IsNullOrWhiteSpace? | Code4IT


    Just a second! 🫷
    If you are here, it means that you are a software developer.
    So, you know that storage, networking, and domain management have a cost .

    If you want to support this blog, please ensure that you have disabled the adblocker for this site.
    I configured Google AdSense to show as few ADS as possible – I don’t want to bother you with lots of ads, but I still need to add some to pay for the resources for my site.

    Thank you for your understanding.
    Davide

    Imagine this: you have created a method that creates a new user in your system, like this:

    void CreateUser(string username)
    {
        if (string.IsNullOrEmpty(username))
            throw new ArgumentException("Username cannot be empty");
    
        CreateUserOnDb(username);
    }
    
    void CreateUserOnDb(string username)
    {
        Console.WriteLine("Created");
    }
    

    It looks quite safe, right? Is the first check enough?

    Let’s try it: CreateUser("Loki") prints Created, while CreateUser(null) and CreateUser("") throw an exception.

    What about CreateUser(" ")?

    Unfortunately, it prints Created: this happens because the string is not actually empty, but it is composed of invisible characters.

    The same happens with escaped characters too!

    To avoid it, you can replace String.IsNullOrEmpty with String.IsNullOrWhiteSpace: this method performs its checks on invisible characters too.

    So we have:

    String.IsNullOrEmpty(""); //True
    String.IsNullOrEmpty(null); //True
    String.IsNullOrEmpty("   "); //False
    String.IsNullOrEmpty("\n"); //False
    String.IsNullOrEmpty("\t"); //False
    String.IsNullOrEmpty("hello"); //False
    

    but also

    String.IsNullOrWhiteSpace("");//True
    String.IsNullOrWhiteSpace(null);//True
    String.IsNullOrWhiteSpace("   ");//True
    String.IsNullOrWhiteSpace("\n");//True
    String.IsNullOrWhiteSpace("\t");//True
    String.IsNullOrWhiteSpace("hello");//False
    

    As you can see, the two methods behave in a different way.

    If we want to see the results in a tabular way, we have:

    value IsNullOrEmpty IsNullOrWhiteSpace
    "Hello" false false
    "" true true
    null true true
    " " false true
    "\n" false true
    "\t" false true

    This article first appeared on Code4IT

    Conclusion

    Do you have to replace all String.IsNullOrEmpty with String.IsNullOrWhiteSpace? Probably yes, unless you have a specific reason to consider the latest three values in the table as valid characters.

    Do you have to replace it everything?

    More on this topic can be found here

    👉 Let’s discuss it on Twitter or on the comment section below.

    🐧


    Source link

  • Simplify debugging with DebuggerDisplay attribute dotNET | Code4IT


    Debugging our .NET applications can be cumbersome. With the DebuggerDisplay attribute we can simplify it by displaying custom messages.

    Table of Contents

    Just a second! 🫷
    If you are here, it means that you are a software developer.
    So, you know that storage, networking, and domain management have a cost .

    If you want to support this blog, please ensure that you have disabled the adblocker for this site.
    I configured Google AdSense to show as few ADS as possible – I don’t want to bother you with lots of ads, but I still need to add some to pay for the resources for my site.

    Thank you for your understanding.
    Davide

    Picture this: you are debugging a .NET application, and you need to retrieve a list of objects. To make sure that the items are as you expect, you need to look at the content of each item.

    For example, you are retrieving a list of Movies – an object with dozens of fields – and you are interested only in the Title and VoteAverage fields. How to view them while debugging?

    There are several options: you could override ToString, or use a projection and debug the transformed list. Or you could use the DebuggerDisplay attribute to define custom messages that will be displayed on Visual Studio. Let’s see what we can do with this powerful – yet ignored – attribute!

    Simplify debugging by overriding ToString

    Let’s start with the definition of the Movie object:

    public class Movie
    {
        public string ParentalGuide { get; set; }
        public List<Genre> Genres { get; set; }
        public string Title { get; set; }
        public double VoteAverage { get; set; }
    }
    
    public class Genre
    {
        public long Id { get; set; }
        public string Name { get; set; }
    }
    

    This is quite a small object, but yet it can become cumbersome to view the content of each object while debugging.

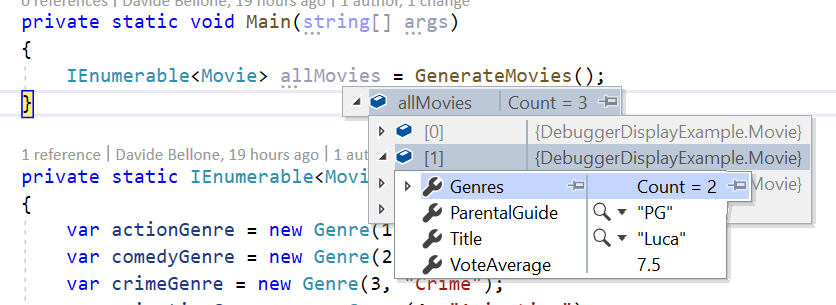
    General way to view the details of an object

    As you can see, to view the content of the items you have to open them one by one. When there are only 3 items like in this example, it still can be fine. But when working with tens of items, that’s not a good idea.

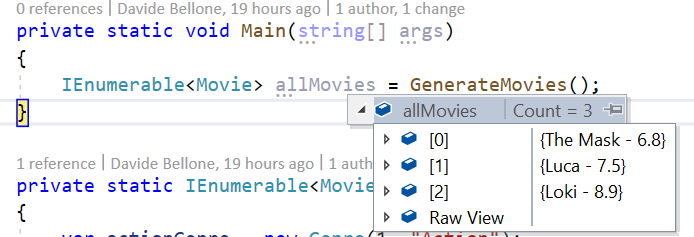
    Notice what is the default text displayed by Visual Studio: does it ring you a bell?

    By default, the debugger shows you the ToString() of every object. So an idea is to override that method to view the desired fields.

    public override string ToString()
    {
        return $"{Title} - {VoteAverage}";
    }
    

    This override allows us to see the items in a much better way:

    Debugging using ToString

    So, yes, this could be a way to achieve this result.

    Using LINQ

    Another way to achieve the same result is by using LINQ. Almost every C# developer has
    already used it, so I won’t explain what it is and what you can do with LINQ.

    By the way, one of the most used methods is Select: it takes a list of items and, by applying a function, returns the result of that function applied to each item in the list.

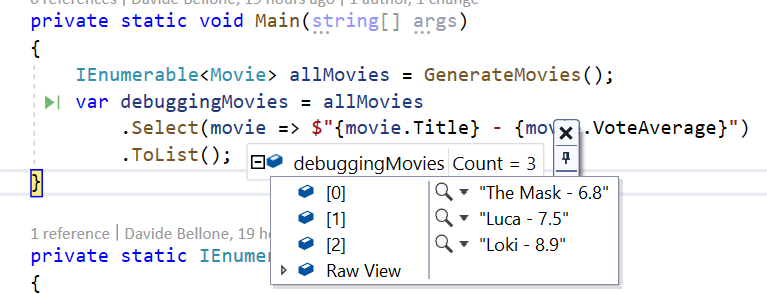
    So, we can create a list of strings that holds the info relevant to us, and then use the debugger to view the content of that list.

    IEnumerable<Movie> allMovies = GenerateMovies();
    var debuggingMovies = allMovies
            .Select(movie => $"{movie.Title} - {movie.VoteAverage}")
            .ToList();
    

    This will result in a similar result to what we’ve already seen before.

    Debugging using LINQ

    But there’s still a better way: DebuggerDisplay.

    Introducing DebuggerDisplay

    DebuggerDisplay is a .NET attribute that you can apply to classes, structs, and many more, to create a custom view of an object while debugging.

    The first thing to do to get started with it is to include the System.Diagnostics namespace. Then you’ll be able to use that attribute.

    But now, it’s time to try our first example. If you want to view the Title and VoteAverage fields, you can use that attribute in this way:

    [DebuggerDisplay("{Title} - {VoteAverage}")]
    public class Movie
    {
        public string ParentalGuide { get; set; }
        public List<Genre> Genres { get; set; }
        public string Title { get; set; }
        public double VoteAverage { get; set; }
    }
    

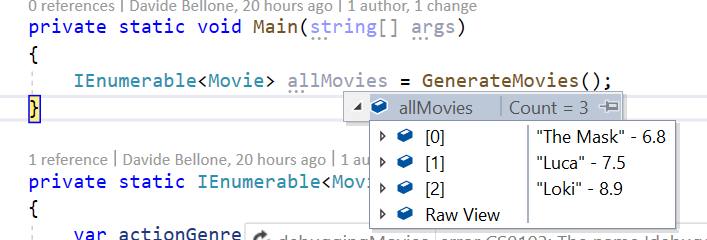
    This will generate the following result:

    Simple usage of DebuggerDisplay

    There are a few things to notice:

    1. The fields to be displayed are wrapped in { and }: it’s "{Title}", not "Title";
    2. The names must match with the ones of the fields;
    3. You are viewing the ToString() representation of each displayed field (notice the VoteAverage field, which is a double);
    4. When debugging, you don’t see the names of the displayed fields;
    5. You can write whatever you want, not only the fields name (see the hyphen between the fields)

    The 5th point brings us to another example: adding custom text to the display attribute:

    [DebuggerDisplay("Title: {Title} - Average Vote: {VoteAverage}")]
    

    So we can customize the content as we want.

    DebuggerDisplay with custom text

    What if you rename a field? Since the value of the attribute is a simple string, it will not notice any update, so you’ll miss that field (it does not match any object field, so it gets used as a simple text).

    To avoid this issue you can simply use string concatenation and the nameof expression:

    [DebuggerDisplay("Title: {" + nameof(Title) + "} - Average Vote: {" + nameof(VoteAverage) + "}")]
    

    I honestly don’t like this way, but it is definitely more flexible!

    Getting rid of useless quotes with ’nq’

    There’s one thing that I don’t like about how this attribute renders string values: it adds quotes around them.

    Nothing important, I know, but it just clutters the view.

    [DebuggerDisplay("Title: {Title} ( {ParentalGuide} )")]
    

    shows this result:

    DebuggerDisplay with quotes

    You can get rid of quotes by adding nq to the string: add that modifier to every string you want to escape, and it will remove the quotes (in fact, nq stands for no-quotes).

    [DebuggerDisplay("Title: {Title,nq} ( {ParentalGuide,nq} )")]
    

    Notice that I added nq to every string I wanted to escape. This simple modifier makes my debugger look like this:

    DebuggerDisplay with nq: no-quotes

    There are other format specifiers, but not that useful. You can find the complete list here.

    How to access nested fields

    What if one of the fields you are interested in is a List<T>, and you want to see one of its fields?

    You can use the positional notation, like this:

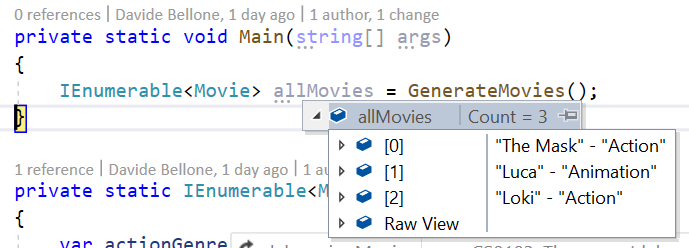
    [DebuggerDisplay("{Title} - {Genres[0].Name}")]
    

    As you can see, we are accessing the first element of the list, and getting the value of the Name field.

    DebuggerDisplay can access elements of a list

    Of course, you can also add the DebuggerDisplay attribute to the nested class, and leave to it the control of how to be displayed while debugging:

    [DebuggerDisplay("{Title} - {Genres[0]}")]
    public class Movie
    {
        public List<Genre> Genres { get; set; }
    }
    
    [DebuggerDisplay("Genre name: {Name}")]
    public class Genre
    {
        public long Id { get; set; }
        public string Name { get; set; }
    }
    

    This results in this view:

    DebuggerDisplay can be used in nested objects

    Advanced views

    Lastly, you can write complex messages by adding method calls directly in the message definition:

    [DebuggerDisplay("{Title.ToUpper()} - {Genres[0].Name.Substring(0,2)}")]
    

    In this way, we are modifying how the fields are displayed directly in the attribute.

    I honestly don’t like it so much: you don’t have control over the correctness of the expression, and it can become hard to read.

    A different approach is to create a read-only field used only for this purpose, and reference it in the Attribute:

    [DebuggerDisplay("{DebugDisplay}")]
    public class Movie
    {
        public string ParentalGuide { get; set; }
        public List<Genre> Genres { get; set; }
        public string Title { get; set; }
        public double VoteAverage { get; set; }
    
        private string DebugDisplay => $"{Title.ToUpper()} - {Genres.FirstOrDefault().Name.Substring(0, 2)}";
    }
    

    In this way, we achieve the same result, and we have the help of the Intellisense in case our expression is not valid.

    Why not overriding ToString or using LINQ?

    Ok, DebuggerDisplay is neat and whatever. But why can’t we use LINQ, or override ToString?

    That’s because of the side effect of those two approaches.

    By overriding the ToString method you are changing its behavior all over the application. This means that, if somewhere you print on console that object (like in Console.WriteLine(movie)), the result will be the one defined in the ToString method.

    By using the LINQ approach you are performing “useless” operations: every time you run the application, even without the debugger attached, you will perform the transformation on every object in the collection.This is fine if your collection has 3 elements, but it can cause performance issues on huge collections.

    That’s why you should use the DebuggerDisplay attribute: it has no side effects on your application, both talking about results and performance – it will only be used when debugging.

    Additional resources

    🔗 DebuggerDisplay Attribute | Microsoft Docs

    🔗 C# debugging: DebuggerDisplay or ToString()? | StackOverflow

    🔗 DebuggerDisplay attribute best practices | Microsoft Docs

    Wrapping up

    In this article, we’ve seen how the DebuggerDisplay attribute provided by .NET is useful to perform smarter and easier debugging sessions.

    With this Attribute, you can display custom messages to watch the state of an object, and even see the state of nested fields.

    We’ve seen that you can customize the message in several ways, like by calling ToUpper on the string result. We’ve also seen that for complex messages you should consider creating a new internal field whose sole purpose is to be used during debugging sessions.

    So, for now, happy coding!
    🐧


    Source link

  • Use pronounceable and searchable names | Code4IT


    Just a second! 🫷
    If you are here, it means that you are a software developer.
    So, you know that storage, networking, and domain management have a cost .

    If you want to support this blog, please ensure that you have disabled the adblocker for this site.
    I configured Google AdSense to show as few ADS as possible – I don’t want to bother you with lots of ads, but I still need to add some to pay for the resources for my site.

    Thank you for your understanding.
    Davide

    Ok, you write code. Maybe alone. But what happens when you have to talk about the code with someone else? To help clear communication, you should always use easily pronounceable name.

    Choosing names with this characteristic is underrated, but often a game-changer.

    Have a look at this class definition:

    class DPContent
    {
        public int VID { get; set; }
        public long VidDurMs { get; set; }
        public bool Awbtu { get; set; }
    }
    

    Would you say aloud

    Hey, Tom, have a look at the VidDurMs field!
    ?

    No, I don’t think so. That’s unnatural. Even worse for the other field, Awbtu. Aw-b-too or a-w-b-t-u? Neither of them makes sense when speaking aloud. That’s because this is a meaningless abbreviation.

    Blah blah blah

    Avoid using uncommon acronyms or unreadable abbreviations: this helps readers understand better the meaning of your code, helps you communicate by voice with your colleagues or searching for a specific field using your IDE

    Code is meant to be read by humans, computers do not care about the length of a field name. Don’t be afraid of using long names to help clarity.

    Use full names, like in this example:

    class DisneyPlusContent
    {
        int VideoID { get; set; }
        long VideoDurationInMs { get; set; }
        bool AlreadyWatchedByThisUser { get; set; }
    }
    

    Yes, ID and Ms are still abbreviations for Identifier and Milliseconds. But they are obvious, so you don’t have to use complete words.

    Of course, all those considerations are valid not only for pronouncing names but also for searching (and remembering) them. Would you rather search VideoID or Vid in your text editor?

    What do you prefer? Short or long names?

    👉 Let’s discuss it on Twitter or on the comment section below!

    🐧


    Source link

  • performance or clean code? | Code4IT


    In any application, writing code that is clean and performant is crucial. But we often can’t have both. What to choose?

    Table of Contents

    Just a second! 🫷
    If you are here, it means that you are a software developer.
    So, you know that storage, networking, and domain management have a cost .

    If you want to support this blog, please ensure that you have disabled the adblocker for this site.
    I configured Google AdSense to show as few ADS as possible – I don’t want to bother you with lots of ads, but I still need to add some to pay for the resources for my site.

    Thank you for your understanding.
    Davide

    A few weeks ago I had a nice discussion on Twitter with Visakh Vijayan about the importance of clean code when compared to performance.

    The idea that triggered that discussion comes from a Tweet by Daniel Moka

    Wrap long conditions!

    A condition statement with multiple booleans makes your code harder to read.

    The longer a piece of code is, the more difficult it is to understand.

    It’s better to extract the condition into a well-named function that reveals the intent.

    with an example that showed how much easier is to understand an if statement when the condition evaluation is moved to a different, well-named function, rather than keeping the same condition directly in the if statement.

    So, for example:

    if(hasValidAge(user)){...}
    
    bool hasValidAge(User user)
    {
        return user.Age>= 18 && user.Age < 100;
    }
    

    is much easier to read than

    if(user.Age>= 18 && user.Age < 100){...}
    

    I totally agree with him. But then, I noticed Visakh’s point of view:

    If this thing runs in a loop, it just got a whole lot more function calls which is basically an added operation of stack push-pop.

    He’s actually right! Clearly, the way we write our code affects our application’s performance.

    So, what should be a developer’s focus? Performance or Clean code?

    In my opinion, clean code. But let’s see the different points of view.

    In favor of performance

    Obviously, an application of whichever type must be performant. Would you use prefer a slower or a faster application?

    So, we should optimize performance to the limit because:

    • every nanosecond is important
    • memory is a finite resource
    • final users are the most important users of our application

    This means that every useless stack allocation, variable, loop iteration, should be avoided. We should bring our applications to the limits.

    Another Visakh’s good point from that thread was that

    You don’t keep reading something every day … The code gets executed every day though. I would prefer performance over readability any day. Obviously with decent readability tho.

    And, again, that is true: we often write our code, test it, and never touch it again; but the application generated by our code is used every day by end-users, so our choices impact their day-by-day experience with the application.

    Visakh’s points are true. But yet I don’t agree with him. Let’s see why.

    In favor of clean code

    First of all, let’s break a myth: end user is not the final user of our code: the dev team is. A user can totally ignore how the dev team implemented their application. C#, JavaScript, Python? TDD, BDD, AOD? They will never know (unless the source code is online). So, end users are not affected by our code: they are affected by the result of the compilation of our code.

    This means that we should not write good code for them, but for ourselves.

    But, to retain users in the long run, we should focus on another aspect: maintainability.

    Given this IEEE definition of maintainability,

    a program is maintainable if it meets the following two conditions:

    • There is a high probability of determining the cause of a problem in a timely manner the first time it occurs,

    • There is a high probability of being able to modify the program without causing an error in some other part of the program.

    so, simplifying the definition, we should be able to:

    • easily identify and fix bugs
    • easily add new features

    In particular, splitting the code into different methods helps you identify bugs because:

    • the code is easier to read, as if it was a novel;
    • in C#, we can easily identify which method threw an Exception, by looking at the stack trace details.

    To demonstrate the first point, let’s read again the two snippets at the beginning of this article.

    When skimming the code, you may incur in this code:

    if(hasValidAge(user)){...}
    

    or in this one:

    if(user.Age>= 18 && user.Age < 100){...}
    

    The former gives you clearly the idea of what’s going on. If you are interested in the details, you can simply jump to the definition of hasValidAge.

    The latter forces you to understand the meaning of that condition, even if it’s not important to you – without reading it first, how would you know if it is important to you?

    And what if user was null and an exception is thrown? With the first way, the stack trace info will hint you to look at the hasValidAge method. With the second way, you have to debug the whole application to get to those breaking instructions.

    So, clean code helps you fixing bugs and then providing a more reliable application to your users.

    But they will lose some ns because of stack allocation. Do they?

    Benchmarking inline instructions vs nested methods

    The best thing to do when in doubt about performance is… to run a benchmark.

    As usual, I’ve created a benchmark with BenchmarkDotNet. I’ve already explained how to get started with it in this article, and I’ve used it to benchmark loops performances in C# in this other article.

    So, let’s see the two benchmarked methods.

    Note: those operations actually do not make any sense. They are there only to see how the stack allocation affects performance.

    The first method under test is the one with all the operations on a single level, without nested methods:

    [Benchmark]
    [ArgumentsSource(nameof(Arrays))]
    public void WithSingleLevel(int[] array)
    {
        PerformOperationsWithSingleLevel(array);
    }
    
    private void PerformOperationsWithSingleLevel(int[] array)
    {
        int[] filteredNumbers = array.Where(n => n % 12 != 0).ToArray();
    
        foreach (var number in filteredNumbers)
        {
            string status = "";
            var isOnDb = number % 3 == 0;
            if (isOnDb)
            {
                status = "onDB";
            }
            else
            {
                var isOnCache = (number + 1) % 7 == 0;
                if (isOnCache)
                {
                    status = "onCache";
                }
                else
                {
                    status = "toBeCreated";
                }
            }
        }
    }
    

    No additional calls, no stack allocations.

    The other method under test does the same thing, but exaggerating the method calls:

    
    [Benchmark]
    [ArgumentsSource(nameof(Arrays))]
    public void WithNestedLevels(int[] array)
    {
        PerformOperationsWithMultipleLevels(array);
    }
    
    private void PerformOperationsWithMultipleLevels(int[] array)
    {
        int[] filteredNumbers = GetFilteredNumbers(array);
    
        foreach (var number in filteredNumbers)
        {
            CalculateStatus(number);
        }
    }
    
    private static void CalculateStatus(int number)
    {
        string status = "";
        var isOnDb = IsOnDb(number);
        status = isOnDb ? GetOnDBStatus() : GetNotOnDbStatus(number);
    }
    
    private static string GetNotOnDbStatus(int number)
    {
        var isOnCache = IsOnCache(number);
        return isOnCache ? GetOnCacheStatus() : GetToBeCreatedStatus();
    }
    
    private static string GetToBeCreatedStatus() => "toBeCreated";
    
    private static string GetOnCacheStatus() => "onCache";
    
    private static bool IsOnCache(int number) => (number + 1) % 7 == 0;
    
    private static string GetOnDBStatus() => "onDB";
    
    private static bool IsOnDb(int number) => number % 3 == 0;
    
    private static int[] GetFilteredNumbers(int[] array) => array.Where(n => n % 12 != 0).ToArray();
    

    Almost everything is a function.

    And here’s the result of that benchmark:

    Method array Mean Error StdDev Median
    WithSingleLevel Int32[10000] 46,384.6 ns 773.95 ns 1,997.82 ns 45,605.9 ns
    WithNestedLevels Int32[10000] 58,912.2 ns 1,152.96 ns 1,539.16 ns 58,536.7 ns
    WithSingleLevel Int32[1000] 5,184.9 ns 100.54 ns 89.12 ns 5,160.7 ns
    WithNestedLevels Int32[1000] 6,557.1 ns 128.84 ns 153.37 ns 6,529.2 ns
    WithSingleLevel Int32[100] 781.0 ns 18.54 ns 51.99 ns 764.3 ns
    WithNestedLevels Int32[100] 910.5 ns 17.03 ns 31.98 ns 901.5 ns
    WithSingleLevel Int32[10] 186.7 ns 3.71 ns 9.43 ns 182.9 ns
    WithNestedLevels Int32[10] 193.5 ns 2.48 ns 2.07 ns 193.7 ns

    As you see, by increasing the size of the input array, the difference between using nested levels and staying on a single level increases too.

    But for arrays with 10 items, the difference is 7 nanoseconds (0.000000007 seconds).

    For arrays with 10000 items, the difference is 12528 nanoseconds (0.000012528 seconds).

    I don’t think the end user will ever notice that every operation is performed without calling nested methods. But the developer that has to maintain the code, he surely will.

    Conclusion

    As always, we must find a balance between clean code and performance: you should not write an incredibly elegant piece of code that takes 3 seconds to complete an operation that, using a dirtier approach, would have taken a bunch of milliseconds.

    Also, remember that the quality of the code affects the dev team, which must maintain that code. If the application uses every ns available, but it’s full of bugs, users will surely complain (and stop using it).

    So, write code for your future self and for your team, not for the average user.

    Of course, that is my opinion. Drop a message in the comment section, or reach me on Twitter!

    Happy coding!
    🐧


    Source link

  • create correct DateTimes with DateTimeKind | Code4IT


    Just a second! 🫷
    If you are here, it means that you are a software developer.
    So, you know that storage, networking, and domain management have a cost .

    If you want to support this blog, please ensure that you have disabled the adblocker for this site.
    I configured Google AdSense to show as few ADS as possible – I don’t want to bother you with lots of ads, but I still need to add some to pay for the resources for my site.

    Thank you for your understanding.
    Davide

    One of the most common issues we face when developing applications is handling dates, times, and time zones.

    Let’s say that we need the date for January 1st, 2020, exactly 30 minutes after midnight. We would be tempted to do something like:

    var plainDate = new DateTime(2020, 1, 1, 0, 30, 0);
    

    It makes sense. And plainDate.ToString() returns 2020/1/1 0:30:00, which is correct.

    But, as I explained in a previous article, while ToString does not care about time zone, when you use ToUniversalTime and ToLocalTime, the results differ, according to your time zone.

    Let’s use a real example. Please, note that I live in UTC+1, so pay attention to what happens to the hour!

    var plainDate = new DateTime(2020, 1, 1, 0, 30, 0);
    
    Console.WriteLine(plainDate);  // 2020-01-01 00:30:00
    Console.WriteLine(plainDate.ToUniversalTime());  // 2019-12-31 23:30:00
    Console.WriteLine(plainDate.ToLocalTime());  // 2020-01-01 01:30:00
    

    This means that ToUniversalTime considers plainDate as Local, so, in my case, it subtracts 1 hour.
    On the contrary, ToLocalTime considers plainDate as UTC, so it adds one hour.

    So what to do?

    Always specify the DateTimeKind parameter when creating DateTimes__. This helps the application understanding which kind of date is it managing.

    var specificDate = new DateTime(2020, 1, 1, 0, 30, 0, DateTimeKind.Utc);
    
    Console.WriteLine(specificDate); //2020-01-01 00:30:00
    Console.WriteLine(specificDate.ToUniversalTime()); //2020-01-01 00:30:00
    Console.WriteLine(specificDate.ToLocalTime()); //2020-01-01 00:30:00
    

    As you see, it’s always the same date.

    Ah, right! DateTimeKind has only 3 possible values:

    public enum DateTimeKind
    {
        Unspecified,
        Utc,
        Local
    }
    

    So, my suggestion is to always specify the DateTimeKind parameter when creating a new DateTime.

    If you want to know more about Time and Timezones, I’d suggest watching this YouTube video by Computerphile.

    👉 Let’s discuss it on Twitter or on the comment section below.

    🐧


    Source link

  • How to add a caching layer in .NET 5 with Decorator pattern and Scrutor | Code4IT


    You should not add the caching logic in the same component used for retrieving data from external sources: you’d better use the Decorator Pattern. We’ll see how to use it, what benefits it brings to your application, and how to use Scrutor to add it to your .NET projects.

    Table of Contents

    Just a second! 🫷
    If you are here, it means that you are a software developer.
    So, you know that storage, networking, and domain management have a cost .

    If you want to support this blog, please ensure that you have disabled the adblocker for this site.
    I configured Google AdSense to show as few ADS as possible – I don’t want to bother you with lots of ads, but I still need to add some to pay for the resources for my site.

    Thank you for your understanding.
    Davide

    When fetching external resources – like performing a GET on some remote APIs – you often need to cache the result. Even a simple caching mechanism can boost the performance of your application: the fewer actual calls to the external system, the faster the response time of the overall application.

    We should not add the caching layer directly to the classes that get the data we want to cache, because it will make our code less extensible and testable. On the contrary, we might want to decorate those classes with a specific caching layer.

    In this article, we will see how we can use the Decorator Pattern to add a cache layer to our repositories (external APIs, database access, or whatever else) by using Scrutor, a NuGet package that allows you to decorate services.

    Before understanding what is the Decorator Pattern and how we can use it to add a cache layer, let me explain the context of our simple application.

    We are exposing an API with only a single endpoint, GetBySlug, which returns some data about the RSS item with the specified slug if present on my blog.

    To do that, we have defined a simple interface:

    public interface IRssFeedReader
    {
        RssItem GetItem(string slug);
    }
    

    That interface is implemented by the RssFeedReader class, which uses the SyndicationFeed class (that comes from the System.ServiceModel.Syndication namespace) to get the correct item from my RSS feed:

    public class RssFeedReader : IRssFeedReader
    {
        public RssItem GetItem(string slug)
        {
            var url = "https://www.code4it.dev/rss.xml";
            using var reader = XmlReader.Create(url);
            var feed = SyndicationFeed.Load(reader);
    
            SyndicationItem item = feed.Items.FirstOrDefault(item => item.Id.EndsWith(slug));
    
            if (item == null)
                return null;
    
            return new RssItem
            {
                Title = item.Title.Text,
                Url = item.Links.First().Uri.AbsoluteUri,
                Source = "RSS feed"
            };
        }
    }
    

    The RssItem class is incredibly simple:

    public class RssItem
    {
        public string Title { get; set; }
        public string Url { get; set; }
        public string Source { get; set; }
    }
    

    Pay attention to the Source property: we’re gonna use it later.

    Then, in the ConfigureServices method, we need to register the service:

    services.AddSingleton<IRssFeedReader, RssFeedReader>();
    

    Singleton, Scoped, or Transient? If you don’t know the difference, here’s an article for you!

    Lastly, our endpoint will use the IRssFeedReader interface to perform the operations, without knowing the actual type:

    public class RssInfoController : ControllerBase
    {
        private readonly IRssFeedReader _rssFeedReader;
    
        public RssInfoController(IRssFeedReader rssFeedReader)
        {
            _rssFeedReader = rssFeedReader;
        }
    
        [HttpGet("{slug}")]
        public ActionResult<RssItem> GetBySlug(string slug)
        {
            var item = _rssFeedReader.GetItem(slug);
    
            if (item != null)
                return Ok(item);
            else
                return NotFound();
        }
    }
    

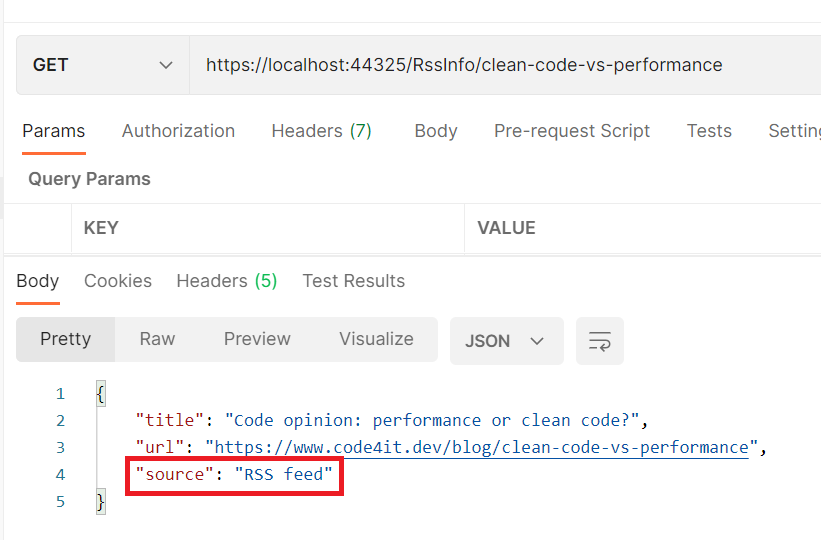
    When we run the application and try to find an article I published, we retrieve the data directly from the RSS feed (as you can see from the value of Source).

    Retrieving data directly from the RSS feed

    The application is quite easy, right?

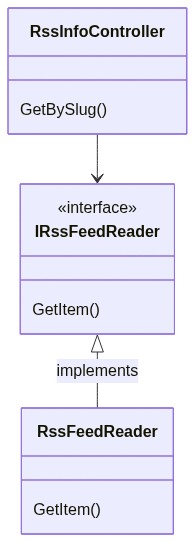
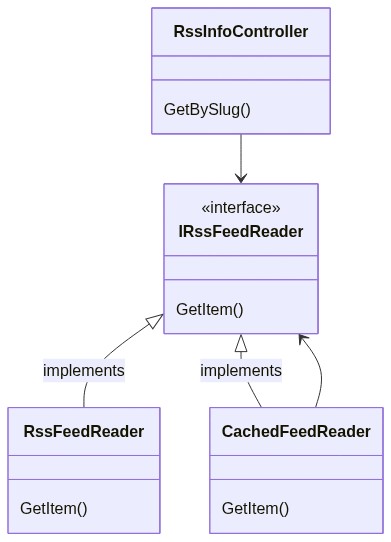
    Let’s translate it into a simple diagram:

    Base Class diagram

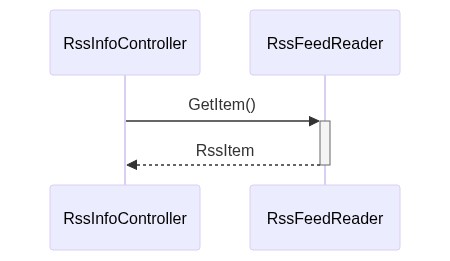
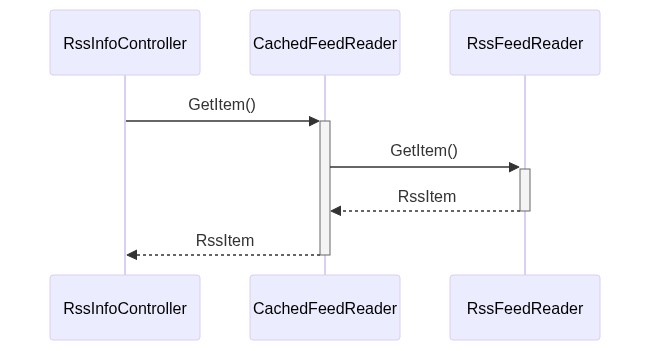
    The sequence diagram is simple as well- it’s almost obvious!

    Base sequence diagram

    Now it’s time to see what is the Decorator pattern, and how we can apply it to our situation.

    Introducing the Decorator pattern

    The Decorator pattern is a design pattern that allows you to add behavior to a class at runtime, without modifying that class. Since the caller works with interfaces and ignores the type of the concrete class, it’s easy to “trick” it into believing it is using the simple class: all we have to do is to add a new class that implements the expected interface, make it call the original class, and add new functionalities to that.

    Quite confusing, uh?

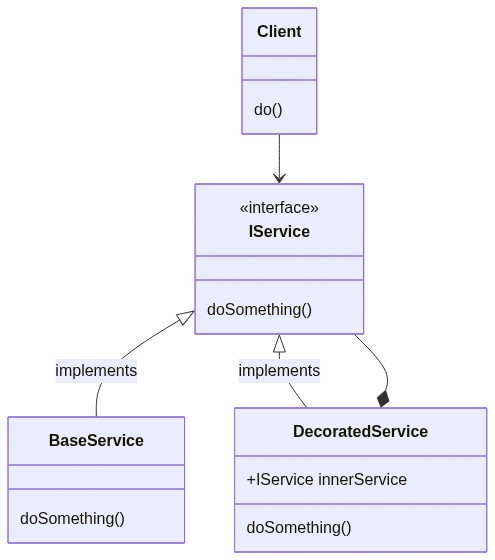
    To make it easier to understand, I’ll show you a simplified version of the pattern:

    Simplified Decorator pattern Class diagram

    In short, the Client needs to use an IService. Instead of passing a BaseService to it (as usual, via Dependency Injection), we pass the Client an instance of DecoratedService (which implements IService as well). DecoratedService contains a reference to another IService (this time, the actual type is BaseService), and calls it to perform the doSomething operation. But DecoratedService not only calls IService.doSomething(), but enriches its behavior with new capabilities (like caching, logging, and so on).

    In this way, our services are focused on a single aspect (Single Responsibility Principle) and can be extended with new functionalities (Open-close Principle).

    Enough theory! There are plenty of online resources about the Decorator pattern, so now let’s see how the pattern can help us adding a cache layer.

    Ah, I forgot to mention that the original pattern defines another object between IService and DecoratedService, but it’s useless for the purpose of this article, so we are fine anyway.

    Implementing the Decorator with Scrutor

    Have you noticed that we almost have all our pieces already in place?

    If we compare the Decorator pattern objects with our application’s classes can notice that:

    • Client corresponds to our RssInfoController controller: it’s the one that calls our services
    • IService corresponds to IRssFeedReader: it’s the interface consumed by the Client
    • BaseService corresponds to RssFeedReader: it’s the class that implements the operations from its interface, and that we want to decorate.

    So, we need a class that decorates RssFeedReader. Let’s call it CachedFeedReader: it checks if the searched item has already been processed, and, if not, calls the decorated class to perform the base operation.

    public class CachedFeedReader : IRssFeedReader
    {
        private readonly IRssFeedReader _rssFeedReader;
        private readonly IMemoryCache _memoryCache;
    
        public CachedFeedReader(IRssFeedReader rssFeedReader, IMemoryCache memoryCache)
        {
            _rssFeedReader = rssFeedReader;
            _memoryCache = memoryCache;
        }
    
        public RssItem GetItem(string slug)
        {
            var isFromCache = _memoryCache.TryGetValue(slug, out RssItem item);
            if (!isFromCache)
            {
                item = _rssFeedReader.GetItem(slug);
            }
            else
            {
                item.Source = "Cache";
            }
    
            _memoryCache.Set(slug, item);
            return item;
        }
    }
    

    There are a few points you have to notice in the previous snippet:

    • this class implements the IRssFeedReader interface;
    • we are passing an instance of IRssFeedReader in the constructor, which is the class that we are decorating;
    • we are performing other operations both before and after calling the base operation (so, calling _rssFeedReader.GetItem(slug));
    • we are setting the value of the Source property to Cache if the object is already in cache – its value is RSS feed the first time we retrieve this item;

    Now we have all the parts in place.

    To decorate the RssFeedReader with this new class, you have to install a NuGet package called Scrutor.

    Open your project and install it via UI or using the command line by running dotnet add package Scrutor.

    Now head to the ConfigureServices method and use the Decorate extension method to decorate a specific interface with a new service:

    services.AddSingleton<IRssFeedReader, RssFeedReader>(); // this one was already present
    services.Decorate<IRssFeedReader, CachedFeedReader>(); // add a new decorator to IRssFeedReader
    

    … and that’s it! You don’t have to update any other classes; everything is transparent for the clients.

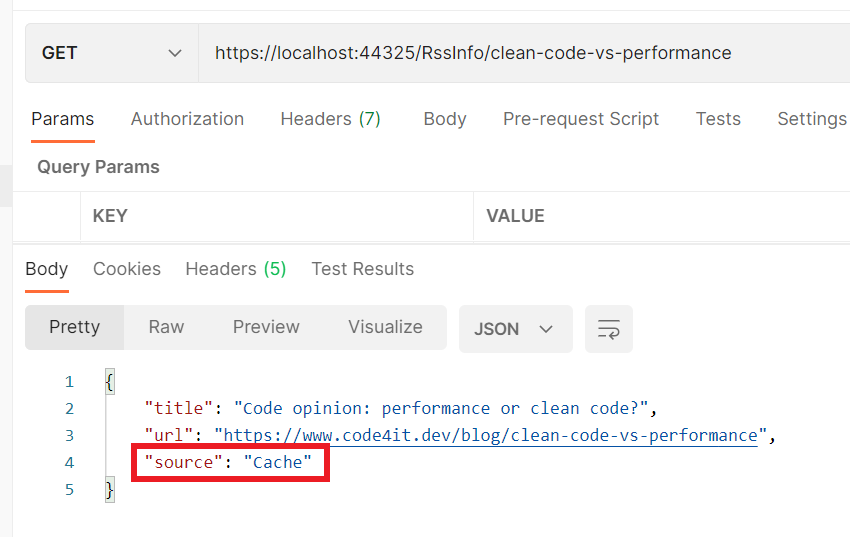
    If we run the application again, we can see that the first call to the endpoint returns the data from the RSS Feed, and all the followings return data from the cache.

    Retrieving data directly from cache instead of from the RSS feed

    We can now update our class diagram to add the new CachedFeedReader class

    Decorated RssFeedReader Class diagram

    And, of course, the sequence diagram changed a bit too.

    Decorated RssFeedReader sequence diagram

    Benefits of the Decorator pattern

    Using the Decorator pattern brings many benefits.

    Every component is focused on only one thing: we are separating responsibilities across different components so that every single component does only one thing and does it well. RssFeedReader fetches RSS data, CachedFeedReader defines caching mechanisms.

    Every component is easily testable: we can test our caching strategy by mocking the IRssFeedReader dependency, without the worrying of the concrete classes called by the RssFeedReader class. On the contrary, if we put cache and RSS fetching functionalities in the RssFeedReader class, we would have many troubles testing our caching strategies, since we cannot mock the XmlReader.Create and SyndicationFeed.Load methods.

    We can easily add new decorators: say that we want to log the duration of every call. Instead of putting the logging in the RssFeedReader class or in the CachedFeedReader class, we can simply create a new class that implements IRssFeedReader and add it to the list of decorators.

    An example of Decorator outside the programming world? The following video from YouTube, where you can see that each cup (component) has only one responsibility, and can be easily decorated with many other cups.

    https://www.youtube.com/watch?v=T_7aVZZDGNM

    🔗Scrutor project on GitHub

    🔗An Atypical ASP.NET Core 5 Design Patterns Guide | Carl-Hugo Marcotte

    🔗GitHub repository for this article

    Wrapping up

    In this article, we’ve seen that the Decorator pattern allows us to write better code by focusing each component on a single task and by making them easy to compose and extend.

    We’ve done it thanks to Scrutor, a NuGet package that allows you to decorate services with just a simple configuration.

    I hope you liked this article.

    Happy coding! 🐧


    Source link

  • small functions bring smarter exceptions &vert; Code4IT

    small functions bring smarter exceptions | Code4IT


    Smaller functions help us write better code, but have also a nice side effect: they help us to understand where an exception was thrown. Let’s see how!

    Table of Contents

    Just a second! 🫷
    If you are here, it means that you are a software developer.
    So, you know that storage, networking, and domain management have a cost .

    If you want to support this blog, please ensure that you have disabled the adblocker for this site.
    I configured Google AdSense to show as few ADS as possible – I don’t want to bother you with lots of ads, but I still need to add some to pay for the resources for my site.

    Thank you for your understanding.
    Davide

    Small functions not only improve your code readability but also help to debug faster your applications in case of unhandled exceptions.

    Take as an example the program listed below: what would happen if a NullReferenceException is thrown? Would you be able to easily understand which statement caused that exception?

    static void Main()
    {
    	try
    	{
    		PrintAllPlayersInTeam(123);
    
    	}
    	catch (Exception ex)
    	{
    		Console.WriteLine(ex.Message);
    		Console.WriteLine(ex.StackTrace);
    	}
    
    }
    
    public static void PrintAllPlayersInTeam(int teamId) {
    
    	Feed teamFeed = _sportClient.GetFeedForTeam(teamId);
    	Team currentTeam = _feedParser.ParseTeamFeed(teamFeed.Content.ToLower());
    
    	Feed playerFeed = _sportClient.GetPlayersFeedForTeam(currentTeam.TeamCode.ToUpper());
    
    	var players = _feedParser.ParsePlayerFeed(playerFeed.Content.ToLower()).ToList();
    
    	foreach (var player in players)
    	{
    		string report = "Player Id:" + player.Id;
    		report += Environment.NewLine;
    		report += "Player Name: " + player.FirstName.ToLower();
    		report += Environment.NewLine;
    		report += "Player Last Name: " + player.LastName.ToLower();
    
    		Console.WriteLine(report);
    	}
    
    }
    

    With one, single, huge function, we lose the context of our exception. The catch block intercepts an error that occurred in the PrintAllPlayersInTeam function. But where? Maybe in teamFeed.Content.ToLower(), or maybe in player.FirstName.ToLower().

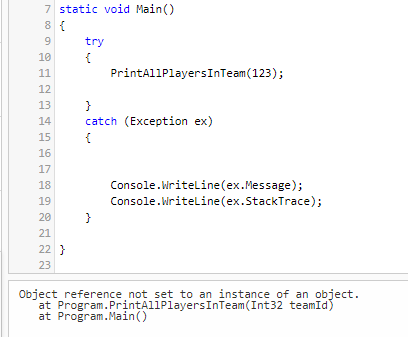
    Even the exception’s details won’t help!

    Exception details in a single, huge function

    Object reference not set to an instance of an object.
       at Program.PrintAllPlayersInTeam(Int32 teamId)
       at Program.Main()
    

    Yes, it says that the error occurred in the PrintAllPlayersInTeam. But where, exactly? Not a clue!

    By putting all together inside a single function, PrintAllPlayersInTeam, we are losing the context of our exceptions.

    So, a good idea is to split the method into smaller, well-scoped methods:

    static void Main()
    {
    	try
    	{
    		PrintAllPlayersInTeam(123);
    	}
    	catch (Exception ex)
    	{
    		Console.WriteLine(ex.Message);
    		Console.WriteLine(ex.StackTrace);
    	}
    
    }
    
    public static void PrintAllPlayersInTeam(int teamId)
    {
    	Team currentTeam = GetTeamDetails(teamId);
    
    	var players = GetPlayersInTeam(currentTeam.TeamCode);
    
    	foreach (var player in players)
    	{
    		string report = BuildPlayerReport(player);
    
    		Console.WriteLine(report);
    	}
    
    }
    
    public static string BuildPlayerReport(Player player)
    {
    	string report = "Player Id:" + player.Id;
    	report += Environment.NewLine;
    	report += "Player Name: " + player.FirstName.ToLower();
    	report += Environment.NewLine;
    	report += "Player Last Name: " + player.LastName.ToLower();
    
    	return report;
    }
    
    public static Team GetTeamDetails(int teamId)
    {
    	Feed teamFeed = _sportClient.GetFeedForTeam(teamId);
    	Team currentTeam = _feedParser.ParseTeamFeed(teamFeed.Content.ToLower());
    	return currentTeam;
    }
    
    public static IEnumerable<Player> GetPlayersInTeam(string teamCode)
    {
    	Feed playerFeed = _sportClient.GetPlayersFeedForTeam(teamCode.ToUpper());
    
    	var players = _feedParser.ParsePlayerFeed(playerFeed.Content.ToLower()).ToList();
    	return players;
    }
    

    Of course, this is not a perfect code, but it give you the idea!.

    As you can see, I’ve split the PrintAllPlayersInTeam method into smaller ones.

    If now we run the code again, we get a slightly more interesting stack trace:

    Object reference not set to an instance of an object.
       at Program.GetTeamDetails(Int32 teamId)
       at Program.PrintAllPlayersInTeam(Int32 teamId)
       at Program.Main()
    

    Now we know that the exception is thrown on the GetTeamDetails method, so we reduced the scope of our investigations to the following lines:

    Feed teamFeed = _sportClient.GetFeedForTeam(teamId);
    Team currentTeam = _feedParser.ParseTeamFeed(teamFeed.Content.ToLower());
    return currentTeam;
    

    It’s easy to understand that the most probable culprits are teamFeed and teamFeed.Content!

    Of course, you must not exaggerate! Don’t create a method for every single operation you do: in that way, you’ll just clutter the code without adding any value.

    Downsides

    Yes, adding new functions can slightly impact the application performance. In fact, every time we call a function, a stack operation is performed. This means that the more nested methods we call, the more stack operations we perform. But does it really impact the application performance? Or is it better to write cleaner code, even if we lose some nanoseconds? If you want to see the different standpoints, head to my article Code opinion: performance or clean code?

    Conclusion

    Writing smaller functions not only boosts the code readability but also helps us debug faster (and smarter). As usual, we must not move every statement in its own function: just find the right level of readability that works for you.

    👉 Let’s discuss it on Twitter or on the comment section below!

    🐧


    Source link