Yield is a keyword that allows you to return an item at the time instead of creating a full list and returning it as a whole.
Table of Contents
Just a second! 🫷 If you are here, it means that you are a software developer.
So, you know that storage, networking, and domain management have a cost .
If you want to support this blog, please ensure that you have disabled the adblocker for this site. I configured Google AdSense to show as few ADS as possible – I don’t want to bother you with lots of ads, but I still need to add some to pay for the resources for my site.
Thank you for your understanding. – Davide
To me, yield return has always been one of the most difficult things to understand.
Now that I’ve understood it (not thoroughly, but enough to explain it), it’s my turn to share my learnings.
So, what does yield return mean? How is it related to collections of items?
Using Lists
Say that you’re returning a collection of items and that you need to iterate over them.
A first approach could be creating a list with all the items, returning it to the caller, and iterating over the collection:
IEnumerable<int> WithList()
{
    List<int> items = new List<int>();

    for (int i = 0; i < 10; i++)
    {
        Console.WriteLine($"Added item {i}");
        items.Add(i);
    }

    return items;
}

void Main()
{
    var items = WithList();

    foreach (var i in items)
    {
        Console.WriteLine($"This is Mambo number {i}");
    }
}
This snippet creates the whole collection and then prints the values inside that list. On the console, you’ll see this text:
Added item 0
Added item 1
Added item 2
Added item 3
Added item 4
Added item 5
Added item 6
Added item 7
Added item 8
Added item 9
This is Mambo number 0
This is Mambo number 1
This is Mambo number 2
This is Mambo number 3
This is Mambo number 4
This is Mambo number 5
This is Mambo number 6
This is Mambo number 7
This is Mambo number 8
This is Mambo number 9
This means that, if you need to operate over a collection with 1 million items, at first you’ll create ALL the items, and then you’ll perform operations on each of them. This approach has two main disadvantages: it’s slow (especially if you only need to work with a subset of those items), and occupies a lot of memory.
With Yield
We can use another approach: use the yield return keywords:
IEnumerable<int> WithYield()
{
for (int i = 0; i < 10; i++)
{
Console.WriteLine($"Returning item {i}");
yieldreturn i;
}
}
void Main()
{
var items = WithYield();
foreach (var i in items)
{
Console.WriteLine($"This is Mambo number {i}");
}
}
With this method, the order of messages is different:
Returning item 0
This is Mambo number 0
Returning item 1
This is Mambo number 1
Returning item 2
This is Mambo number 2
Returning item 3
This is Mambo number 3
Returning item 4
This is Mambo number 4
Returning item 5
This is Mambo number 5
Returning item 6
This is Mambo number 6
Returning item 7
This is Mambo number 7
Returning item 8
This is Mambo number 8
Returning item 9
This is Mambo number 9
So, instead of creating the whole list, we create one item at a time, and only when needed.
Benefits of Yield
As I said before, there are several benefits with yield: the application is more performant when talking about both the execution time and the memory usage.
It’s like an automatic iterator: every time you get a result, the iterator advances to the next item.
Just a note: yield works only for methods that return IAsyncEnumerable<T>, IEnumerable<T>, IEnumerable, IEnumerator<T>, or IEnumerator.
You cannot use it with a method that returns, for instance, List<T>, because, as the error message says,
The body of X cannot be an iterator block because List<int> is not an iterator interface type
A real use case
If you use NUnit as a test suite, you’ve probably already used this keyword.
In particular, when using the TestCaseSource attribute, you specify the name of the class that outputs the test cases.
publicclassMyTestClass{
[TestCaseSource(typeof(DivideCases))]publicvoid DivideTest(int n, int d, int q)
{
Assert.AreEqual(q, n / d);
}
}
classDivideCases : IEnumerable
{
public IEnumerator GetEnumerator()
{
yieldreturnnewobject[] { 12, 3, 4 };
yieldreturnnewobject[] { 12, 2, 6 };
yieldreturnnewobject[] { 12, 4, 3 };
}
}
When executing the tests, an iterator returns a test case at a time, without creating a full list of test cases.
The previous snippet is taken directly from NUnit’s documentation for the TestCaseSource attribute, that you can find here.
Wrapping up
Yes, yield is a quite difficult keyword to understand.
With Log4J’s vulnerability, we’ve all been reminded that systems are vulnerable, and OSS are not immune too. What should we do now?
Table of Contents
Just a second! 🫷 If you are here, it means that you are a software developer.
So, you know that storage, networking, and domain management have a cost .
If you want to support this blog, please ensure that you have disabled the adblocker for this site. I configured Google AdSense to show as few ADS as possible – I don’t want to bother you with lots of ads, but I still need to add some to pay for the resources for my site.
Thank you for your understanding. – Davide
After the Log4J vulnerability, we should reflect on how open source impacts our projects, and what are the benefits and disadvantages of using such libraries.
The following article is more an opinion, just some random thoughts about what happened and what we can learn from this event.
A recap of the Log4J vulnerability
To give some context to those who have never heard (or forgot) about the Log4J vulnerability, here’s a short recap.
Log4J is a popular Java library for logging. So popular that it has been inglobed in the Apache ecosystem.
For some reason I haven’t understood, the logger evaluates the log messages instead of just treating them as strings. So, a kind of SQL injection (but for logs) could be executed: by sending a specific string format to services that use Log4J, that string is evaluated and executed on the server; as a result, external scripts could be run on the server, allowing attackers to access your server. Of course, it’s not a detailed and 100% accurate description: there are plenty of resources on the Internet if you want to deep dive into this topic.
Some pieces of evidence show that the earliest exploitation of this vulnerability happened on Dec 1, 2021, as stated by Matthew Prince, CEO of Cloudflare, in this Tweet. But the vulnerability became public 9 days later.
Benefits of OSS projects
The source code of Log4J is publicly available on GitHub
This means that:
it’s free to use (yes, OSS != free, but it’s rare to find paid OSS projects)
you can download and run the source code
you can inspect the code and propose changes
it saves you time: you don’t have to reinvent the wheel – everything is already done by others.
Issues with OSS projects
Given that the source code is publicly accessible, attackers can study it to find security flaws, and – of course – take advantage of those vulnerabilities before the community notices them.
Most of the time, OSS projects are created by single devs to solve their specific problems. Then, they share those repositories to help their peers and allow other devs to work on the library. All the coding is done for free and in their spare time. As you can expect, the quality is deeply impacted by this.
What to do with OSS projects?
So, what should we do with all those OSS projects? Should we stop using them?
I don’t think so. just because those kinds of issues can arise, it doesn’t mean that they will arise so often.
Also, it’s pretty stupid to build everything from scratch “just in case”. Just because attackers don’t know the source code, it doesn’t mean that they can’t find a way to access your systems.
On the other hand, we should not blindly use every library we see on GitHub. It’s not true that just because it’s open source, it’s safe to use – as the Log4J story taught us.
So, what should we do?
I don’t have an answer. But for sure we can perform some operations when working on our projects.
We should review which external packages we’re using, and keep track of their version. Every N months, we should write a recap (even an Excel file is enough) to update the list of packages we’re using. In this way, if a vulnerability is discovered for a package, and a patch is released, we can immediately apply that patch to our applications.
Finding installed dependencies for .NET projects is quite simple: you can open the csproj file and see the list of NuGet packages you’re using.
The problem with this approach is that you don’t see the internal dependencies: if one of the packages you’re using depends on another package with a known vulnerability, your application may be vulnerable too.
How can you list all your dependencies? Are there any tools that work with your programming language? Drop a comment below, it can help other devs!
Then, before choosing a project instead of another, we should answer (at least) three questions. Does this package solve our problem? Does the code look safe to use? Is the repository active, or is it stale?
Spend some time skimming the source code, looking for weird pieces of code. Pay attention when they evaluate the code (possible issues like with Log4J), when they perform unexpected calls to external services (are they tracking you?), and so on.
Look at the repository history: is the repository still being updated? Is it maintained by a single person, or is there a community around it?
You can find this info on GitHub under the Insight tab.
In the following picture, you can see the contributions to the Log4J library (available here):
Does this repo have tests? Without tests (or, maybe worse, with not meaningful tests), the package should not be considered safe. Have a look at the code and at the CI pipelines, if publicly available.
Finally, a hope for a future: to define a standard and some procedures to rate the security of a package/repository. I don’t know if it can be feasible, but it would be a good addition to the OSS world.
Further readings
If you’re interested in the general aspects of the Log4J vulnerability, you can have a look at this article by the Wall Street Journal:
This was not the usual article/tutorial, it was more an opinion on the current status of OSS and on what we should do to avoid issues like those caused by Log4J.
It’s not the first vulnerability, and for sure it won’t be the only one.
PostgreSQL is a famous relational database. In this article, we will learn how to run it locally using Docker.
Table of Contents
Just a second! 🫷 If you are here, it means that you are a software developer.
So, you know that storage, networking, and domain management have a cost .
If you want to support this blog, please ensure that you have disabled the adblocker for this site. I configured Google AdSense to show as few ADS as possible – I don’t want to bother you with lots of ads, but I still need to add some to pay for the resources for my site.
Thank you for your understanding. – Davide
PostgreSQL is a relational database characterized for being open source and with a growing community supporting the project.
There are several ways to store a Postgres database online so that you can use it to store data for your live applications. But, for local development, you might want to spin up a Postgres database on your local machine.
In this article, we will learn how to run PostgreSQL on a Docker container for local development.
Pull Postgres Docker Image
As you may know, Docker allows you to download images of almost everything you want in order to run them locally (or wherever you want) without installing too much stuff.
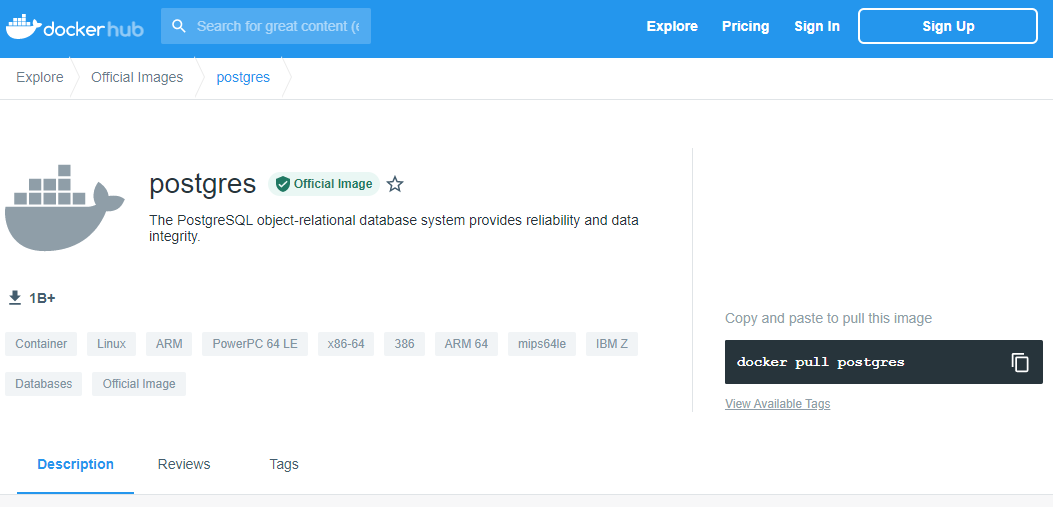
The best way to check the available versions is to head to DockerHub and search for postgres.
Here you’ll find a description of the image, all the documentation related to the installation parameters, and more.
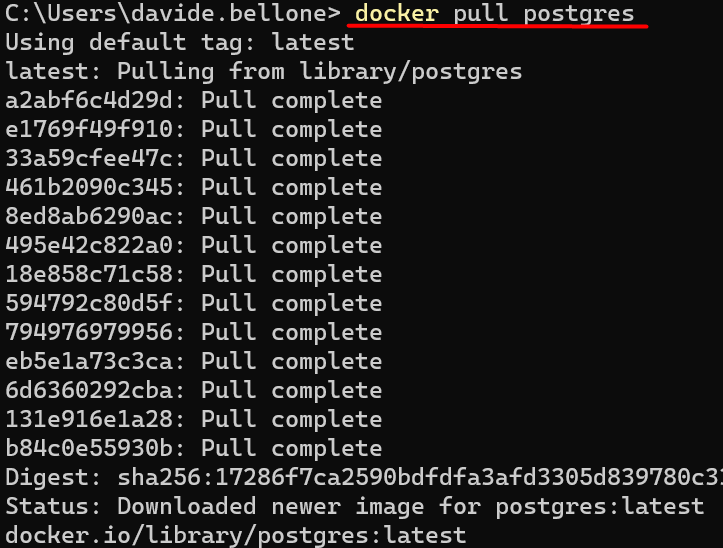
If you have Docker already installed, just open a terminal and run
to download the latest image of PostgreSQL.
Run the Docker Container
Now that we have the image in our local environment, we can spin up a container and specify some parameters.
docker run is the command used to create and run a new container based on an already downloaded image.
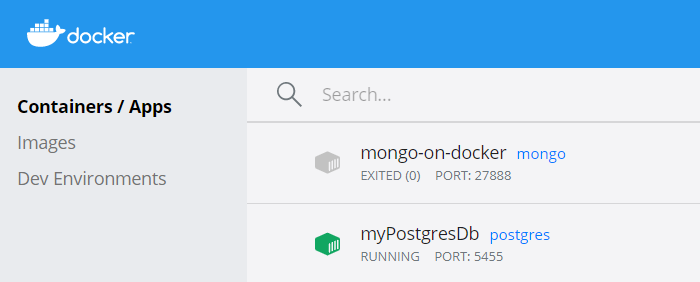
--name myPostgresDb is the name we assign to the container that we are creating.
-p 5455:5432 is the port mapping. Postgres natively exposes the port 5432, and we have to map that port (that lives within Docker) to a local port. In this case, the local 5455 port maps to Docker’s 5432 port.
-e POSTGRES_USER=postgresUser, -e POSTGRES_PASSWORD=postgresPW, and -e POSTGRES_DB=postgresDB set some environment variables. Of course, we’re defining the username and password of the admin user, as well as the name of the database.
-d indicates that the container run in a detached mode. This means that the container runs in a background process.
postgres is the name of the image we are using to create the container.
As a result, you will see the newly created container on the CLI (running docker ps) or view it using some UI tool like Docker Desktop:
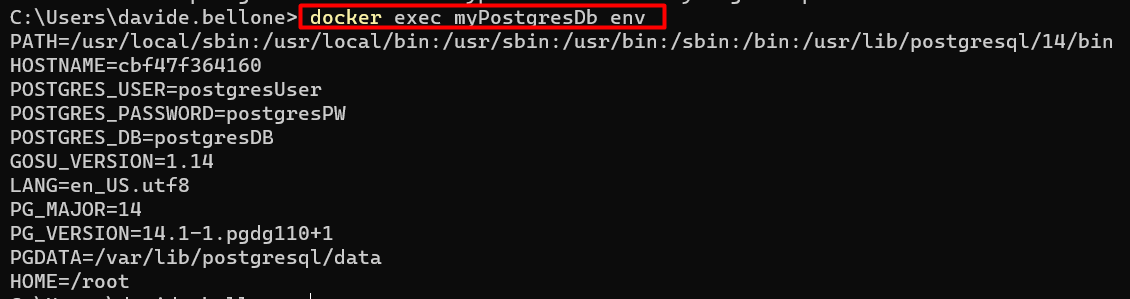
If you forgot which environment variables you’ve defined for that container, you can retrieve them using Docker Desktop or by running docker exec myPostgresDb env, as shown below:
Note: environment variables may change with newer image versions. Always refer to the official docs, specifically to the documentation related to the image version you are consuming.
Navigate the DB with PgAdmin
Now that we have Postgres up and running, we can work with it.
You can work with the DB using the console, or, if you prefer, using a UI.
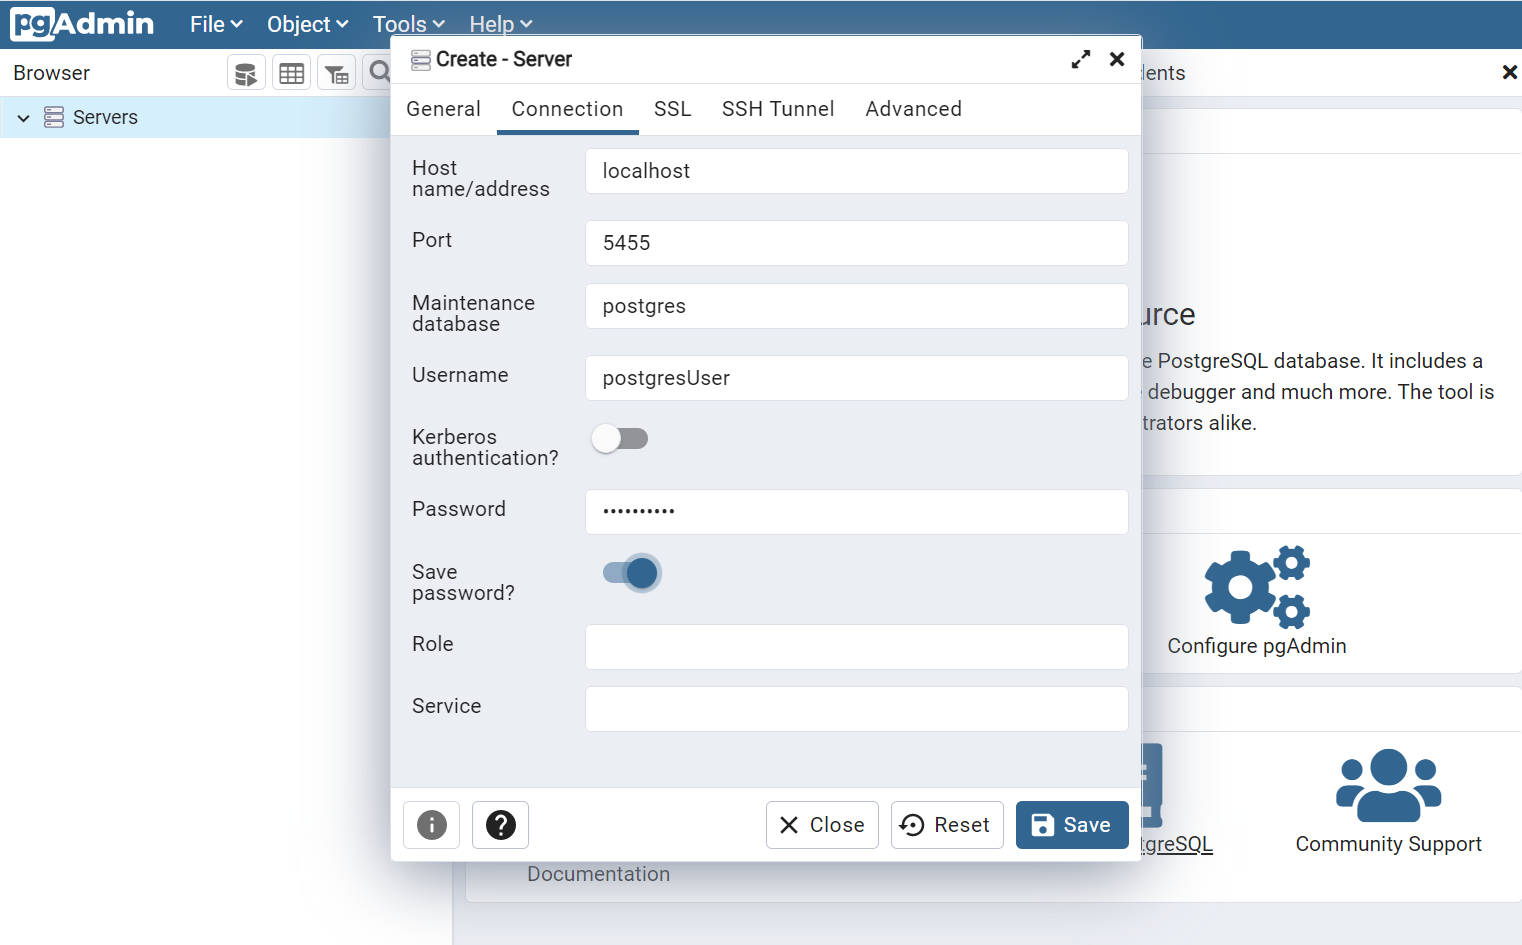
I prefer the second approach (yes, I know, it’s not cool as using the terminal, but it works), so I downloaded pgAdmin.
There, you can connect to the server by using the environment variable you’ve defined when running docker run. Remember that the hostname is simply localhost.
And we’ve finished! 🥳 Now you can work with a local instance of Postgres and shut it remove it when you don’t need it anymore.
Additional resources
I’ve already introduced Docker in another article, where I explained how to run MongoDB locally:
Finally, a special mention to Francesco Ciulla, who thought me how to run Postgres with Docker while I thought him how to query it with C#. Yes, mutual help! 👏
Just a second! 🫷 If you are here, it means that you are a software developer.
So, you know that storage, networking, and domain management have a cost .
If you want to support this blog, please ensure that you have disabled the adblocker for this site. I configured Google AdSense to show as few ADS as possible – I don’t want to bother you with lots of ads, but I still need to add some to pay for the resources for my site.
Thank you for your understanding. – Davide
Every name must be meaningful and clear. If names are not obvious, other developers (or your future self) may misinterpret what you were meaning.
Avoid using mental mapping to abbreviate names, unless the abbreviation is obvious or common.
Names should not be based on mental mapping, even worse without context.
Bad mental mappings
Take this bad example:
publicvoid RenderWOSpace()
What is a WOSpace? Without context, readers won’t understand its meaning. Ok, some people use WO as an abbreviation of without.
So, a better name is, of course:
publicvoid RenderWithoutSpace()
Acceptable mappings
Some abbreviations are quite obvious and are totally fine to be used.
For instance, standard abbreviations, like km for kilometer.
Once we have a Postgres instance running, we can perform operations on it. We will use Npgsql to query a Postgres instance with C#
Table of Contents
Just a second! 🫷 If you are here, it means that you are a software developer.
So, you know that storage, networking, and domain management have a cost .
If you want to support this blog, please ensure that you have disabled the adblocker for this site. I configured Google AdSense to show as few ADS as possible – I don’t want to bother you with lots of ads, but I still need to add some to pay for the resources for my site.
Thank you for your understanding. – Davide
PostgreSQL is one of the most famous relational databases. It has got tons of features, and it is open source.
In a previous article, we’ve seen how to run an instance of Postgres by using Docker.
In this article, we will learn how to perform CRUD operations in C# by using Npgsql.
Introducing the project
To query a Postgres database, I’ve created a simple .NET API application with CRUD operations.
We will operate on a single table that stores info for my board game collection. Of course, we will Create, Read, Update and Delete items from the DB (otherwise it would not be an article about CRUD operations 😅).
Before starting writing, we need to install Npgsql, a NuGet package that acts as a dataprovider for PostgreSQL.
Open the connection
Once we have created the application, we can instantiate and open a connection against our database.
private NpgsqlConnection connection;

public NpgsqlBoardGameRepository()
{
    connection = new NpgsqlConnection(CONNECTION_STRING);
    connection.Open();
}
We simply create a NpgsqlConnection object, and we keep a reference to it. We will use that reference to perform queries against our DB.
Connection string
The only parameter we can pass as input to the NpgsqlConnection constructor is the connection string.
You must compose it by specifying the host address, the port, the database name we are connecting to, and the credentials of the user that is querying the DB.
If you instantiate Postgres using Docker following the steps I described in a previous article, most of the connection string configurations we use here match the Environment variables we’ve defined before.
CRUD operations
Now that everything is in place, it’s time to operate on our DB!
We are working on a table, Games, whose name is stored in a constant:
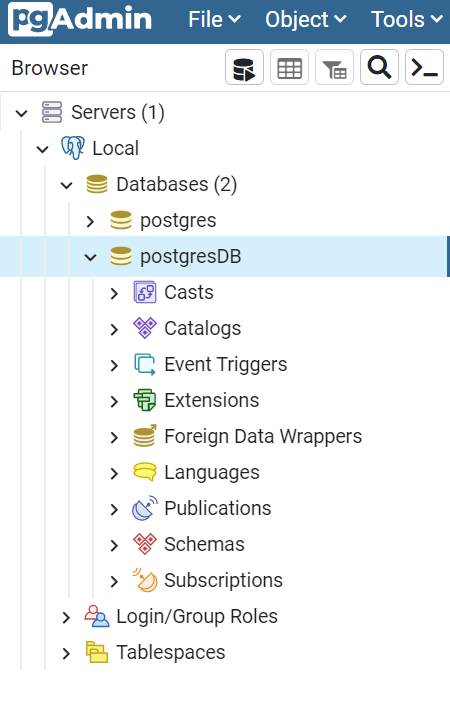
To double-check the results, you can use a UI tool to access the Database. For instance, if you use pgAdmin, you can find the list of databases running on a host.
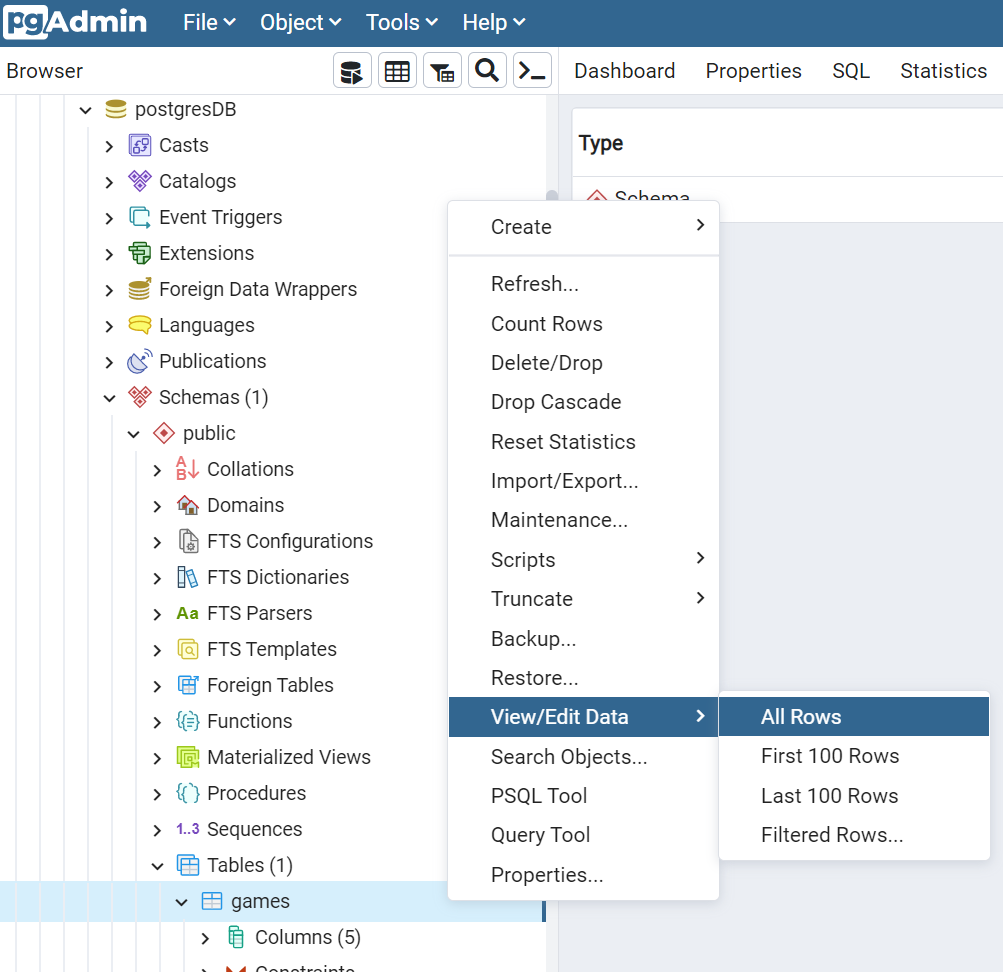
And, if you want to see the content of a particular table, you can select it under Schemas>public>Tables>tablename, and then select View>AllRows
Create
First things first, we have to insert some data in our DB.
The commandText string contains the full command to be issued. In this case, it’s a simple INSERT statement.
We use the commandText string to create a NpgsqlCommandobject by specifying the query and the connection where we will perform that query. Note that the command must be Disposed after its use: wrap it in a using block.
Then, we will add the parameters to the query. AddWithValue accepts two parameters: the first is the name of the key, with the same name defined in the query, but without the @ symbol; in the query, we use @minPl, and as a parameter, we use minPl.
Never, never, create the query by concatenating the input params as a string, to avoid SQL Injection attacks.
Finally, we can execute the query asynchronously with ExecuteNonQueryAsync.
Read
Now that we have some games stored in our table, we can retrieve those items:
publicasync Task<BoardGame> Get(int id)
{
string commandText = $"SELECT * FROM {TABLE_NAME} WHERE ID = @id";
awaitusing (NpgsqlCommand cmd = new NpgsqlCommand(commandText, connection))
{
cmd.Parameters.AddWithValue("id", id);
awaitusing (NpgsqlDataReader reader = await cmd.ExecuteReaderAsync())
while (await reader.ReadAsync())
{
BoardGame game = ReadBoardGame(reader);
return game;
}
}
returnnull;
}
Again, we define the query as a text, use it to create a NpgsqlCommand, specify the parameters’ values, and then we execute the query.
The ExecuteReaderAsync method returns a NpgsqlDataReader object that we can use to fetch the data. We update the position of the stream with reader.ReadAsync(), and then we convert the current data with ReadBoardGame(reader) in this way:
privatestatic BoardGame ReadBoardGame(NpgsqlDataReader reader)
{
int? id = reader["id"] asint?;
string name = reader["name"] asstring;
short? minPlayers = reader["minplayers"] as Int16?;
short? maxPlayers = reader["maxplayers"] as Int16?;
short? averageDuration = reader["averageduration"] as Int16?;
BoardGame game = new BoardGame
{
Id = id.Value,
Name = name,
MinPlayers = minPlayers.Value,
MaxPlayers = maxPlayers.Value,
AverageDuration = averageDuration.Value
};
return game;
}
This method simply reads the data associated with each column (for instance, reader["averageduration"]), then we convert them to their data type. Then we build and return a BoardGame object.
Update
Updating items is similar to inserting a new item.
publicasync Task Update(int id, BoardGame game)
{
var commandText = $@"UPDATE {TABLE_NAME}
SET Name = @name, MinPlayers = @minPl, MaxPlayers = @maxPl, AverageDuration = @avgDur
WHERE id = @id";
awaitusing (var cmd = new NpgsqlCommand(commandText, connection))
{
cmd.Parameters.AddWithValue("id", game.Id);
cmd.Parameters.AddWithValue("name", game.Name);
cmd.Parameters.AddWithValue("minPl", game.MinPlayers);
cmd.Parameters.AddWithValue("maxPl", game.MaxPlayers);
cmd.Parameters.AddWithValue("avgDur", game.AverageDuration);
await cmd.ExecuteNonQueryAsync();
}
}
Of course, the query is different, but the general structure is the same: create the query, create the Command, add parameters, and execute the query with ExecuteNonQueryAsync.
Delete
Just for completeness, here’s how to delete an item by specifying its id.
publicasync Task Delete(int id)
{
string commandText = $"DELETE FROM {TABLE_NAME} WHERE ID=(@p)";
awaitusing (var cmd = new NpgsqlCommand(commandText, connection))
{
cmd.Parameters.AddWithValue("p", id);
await cmd.ExecuteNonQueryAsync();
}
}
Always the same story, so I have nothing to add.
ExecuteNonQueryAsync vs ExecuteReaderAsync
As you’ve seen, some operations use ExecuteNonQueryAsync, while some others use ExecuteReaderAsync. Why?
ExecuteNonQuery and ExecuteNonQueryAsync execute commands against a connection. Those methods do not return data from the database, but only the number of rows affected. They are used to perform INSERT, UPDATE, and DELETE operations.
On the contrary, ExecuteReader and ExecuteReaderAsync are used to perform queries on the database and return a DbDataReader object, which is a read-only stream of rows retrieved from the data source. They are used in conjunction with SELECT queries.
Bonus 1: Create the table if not already existing
Of course, you can also create tables programmatically.
publicasync Task CreateTableIfNotExists()
{
var sql = $"CREATE TABLE if not exists {TABLE_NAME}" +
$"(" +
$"id serial PRIMARY KEY, " +
$"Name VARCHAR (200) NOT NULL, " +
$"MinPlayers SMALLINT NOT NULL, " +
$"MaxPlayers SMALLINT, " +
$"AverageDuration SMALLINT" +
$")";
using var cmd = new NpgsqlCommand(sql, connection);
await cmd.ExecuteNonQueryAsync();
}
Again, nothing fancy: create the command text, create a NpgsqlCommand object, and execute the command.
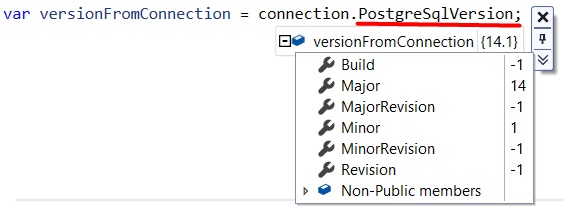
Bonus 2: Check the database version
To check if the database is up and running, and your credentials are correct (those set in the connection string), you might want to retrieve the DB version.
You can do it in 2 ways.
With the following method, you query for the version directly on the database.
publicasync Task<string> GetVersion()
{
var sql = "SELECT version()";
using var cmd = new NpgsqlCommand(sql, connection);
var versionFromQuery = (await cmd.ExecuteScalarAsync()).ToString();
return versionFromQuery;
}
This method returns lots of info that directly depend on the database instance. In my case, I see PostgreSQL 14.1 (Debian 14.1-1.pgdg110+1) on x86_64-pc-linux-gnu, compiled by gcc (Debian 10.2.1-6) 10.2.1 20210110, 64-bit.
In this article, we’ve learned how to perform simple operations on a PostgreSQL database to retrieve and update the content of a table.
This is the most basic way to perform those operations. You explicitly write the queries and issue them without much stuff in between.
In future articles, we will see some other ways to perform the same operations in C#, but using other tools and packages. Maybe Entity Framework? Maybe Dapper? Stay tuned!
Just a second! 🫷 If you are here, it means that you are a software developer.
So, you know that storage, networking, and domain management have a cost .
If you want to support this blog, please ensure that you have disabled the adblocker for this site. I configured Google AdSense to show as few ADS as possible – I don’t want to bother you with lots of ads, but I still need to add some to pay for the resources for my site.
Thank you for your understanding. – Davide
From C# 6 on, you can use the when keyword to specify a condition before handling an exception.
Consider this – pretty useless, I have to admit – type of exception:
publicclassRandomException : System.Exception
{
publicint Value { get; }
public RandomException()
{
Value = (new Random()).Next();
}
}
This exception type contains a Value property which is populated with a random value when the exception is thrown.
What if you want to print a different message depending on whether the Value property is odd or even?
You can do it this way:
try{
thrownew RandomException();
}
catch (RandomException re)
{
if(re.Value % 2 == 0)
Console.WriteLine("Exception with even value");
else Console.WriteLine("Exception with odd value");
}
But, well, you should keep your catch blocks as simple as possible.
That’s where the when keyword comes in handy.
CSharp when clause
You can use it to create two distinct catch blocks, each one of them handles their case in the cleanest way possible.
try{
thrownew RandomException();
}
catch (RandomException re) when (re.Value % 2 == 0)
{
Console.WriteLine("Exception with even value");
}
catch (RandomException re)
{
Console.WriteLine("Exception with odd value");
}
You must use the when keyword in conjunction with a condition, which can also reference the current instance of the exception being caught. In fact, the condition references the Value property of the RandomException instance.
A real usage: HTTP response errors
Ok, that example with the random exception is a bit… useless?
Let’s see a real example: handling different HTTP status codes in case of failing HTTP calls.
In the following snippet, I call an endpoint that returns a specified status code (506, in my case).
try{
var endpoint = "https://mock.codes/506";
var httpClient = new HttpClient();
var response = await httpClient.GetAsync(endpoint);
response.EnsureSuccessStatusCode();
}
catch (HttpRequestException ex) when (ex.StatusCode == (HttpStatusCode)506)
{
Console.WriteLine("Handle 506: Variant also negotiates");
}
catch (HttpRequestException ex)
{
Console.WriteLine("Handle another status code");
}
If the response is not a success, the response.EnsureSuccessStatusCode() throws an exception of type HttpRequestException. The thrown exception contains some info about the returned status code, which we can use to route the exception handling to the correct catch block using when (ex.StatusCode == (HttpStatusCode)506).
Just a second! 🫷 If you are here, it means that you are a software developer.
So, you know that storage, networking, and domain management have a cost .
If you want to support this blog, please ensure that you have disabled the adblocker for this site. I configured Google AdSense to show as few ADS as possible – I don’t want to bother you with lots of ads, but I still need to add some to pay for the resources for my site.
Thank you for your understanding. – Davide
Things that depend on concrete stuff are difficult to use when testing. Think of the file system: to have tests work properly, you have to ensure that the file system is structured exactly as you are expecting it to be.
A similar issue occurs with dates: if you create tests based on the current date, they will fail the next time you run them.
In short, you should find a way to abstract these functionalities, to make them usable in the tests.
In this article, we are going to focus on the handling of dates: we’ll learn what the TimeProvider class is, how to use it and how to mock it.
The old way for handling dates: a custom interface
Back in the days, the most straightforward approach to add abstraction around the date management was to manually create an interface, or an abstract class, to wrap the access to the current date:
Easy: you then have to add an instance of it in the DI engine, and you are good to go.
The only problem? You have to do it for every project you are working on. Quite a waste of time!
How to use TimeProvider in a .NET application to get the current date
Along with .NET 8, the .NET team released an abstract class named TimeProvider. This abstract class, beyond providing an abstraction for local time, exposes methods for working with high-precision timestamps and TimeZones.
It’s important to notice that dates are returned as DateTimeOffset, and not as DateTime instances.
TimeProvider comes out-of-the-box with a .NET Console application, accessible as a singleton:
staticvoid Main(string[] args)
{
Console.WriteLine("Hello, World!");
DateTimeOffset utc = TimeProvider.System.GetUtcNow();
Console.WriteLine(utc);
DateTimeOffset local = TimeProvider.System.GetLocalNow();
Console.WriteLine(local);
}
On the contrary, if you need to use Dependency Injection, for example, in .NET APIs, you have to inject it as a singleton, like this:
Now, how can we test the ItsVacationTime of the SummerVacationCalendar class?
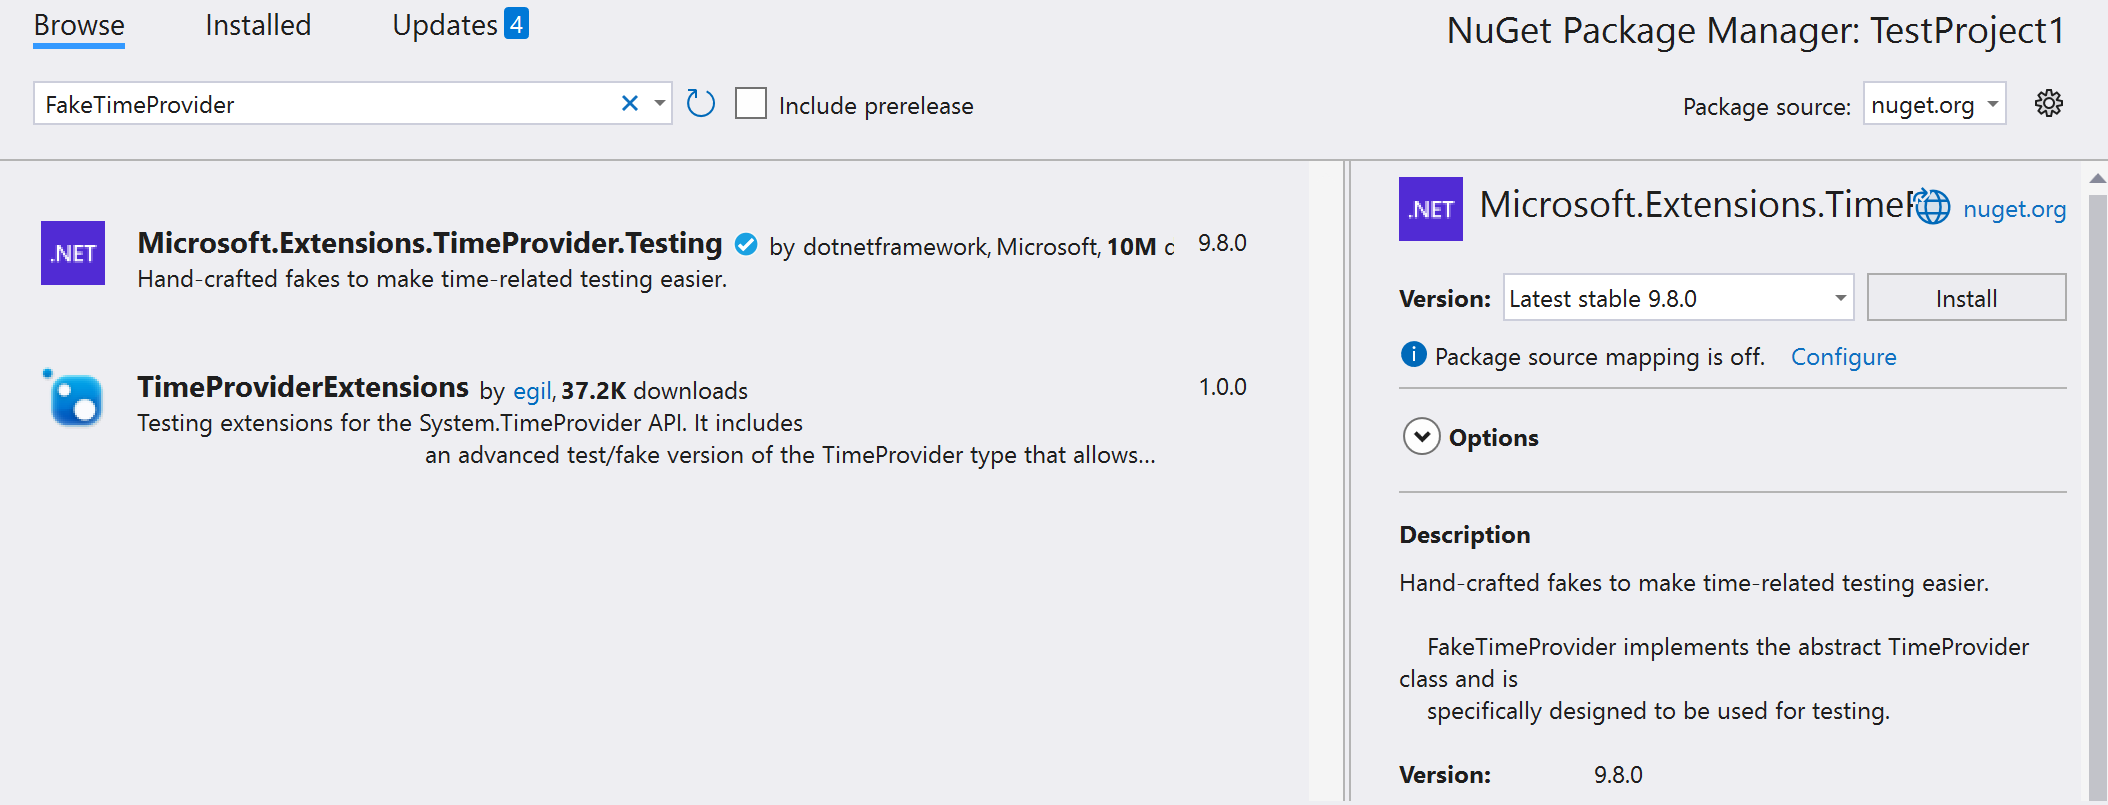
We can use the Microsoft.Extensions.TimeProvider.Testing NuGet library, still provided by Microsoft, which provides a FakeTimeProvider class that acts as a stub for the TimeProvider abstract class:
By using the FakeTimeProvider class, you can set the current UTC and Local time, as well as configure the other options provided by TimeProvider.
Here’s an example:
[Fact]publicvoid WhenItsAugust_ShouldReturnTrue()
{
// Arrangevar fakeTime = new FakeTimeProvider();
fakeTime.SetUtcNow(new DateTimeOffset(2025, 8, 14, 22, 24, 12, TimeSpan.Zero));
var sut = new SummerVacationCalendar(fakeTime);
// Actvar isVacation = sut.ItsVacationTime();
// Assert Assert.True(isVacation);
}
[Fact]publicvoid WhenItsNotAugust_ShouldReturnFalse()
{
// Arrangevar fakeTime = new FakeTimeProvider();
fakeTime.SetUtcNow(new DateTimeOffset(2025, 3, 14, 22, 24, 12, TimeSpan.Zero));
var sut = new SummerVacationCalendar(fakeTime);
// Actvar isVacation = sut.ItsVacationTime();
// Assert Assert.False(isVacation);
}
Further readings
Actually, TimeProvider provides way more functionalities than just returning the UTC and the Local time.
Maybe we’ll explore them in the future. But for now, do you know how the DateTimeKind enumeration impacts the way you create new DateTimes?
However, always remember to test the code not against the actual time but against static values. But, if for some reason you cannot add TimeProvider in your classes, there are other less-intrusive strategies that you can use (and that can work for other types of dependencies as well, like the file system):
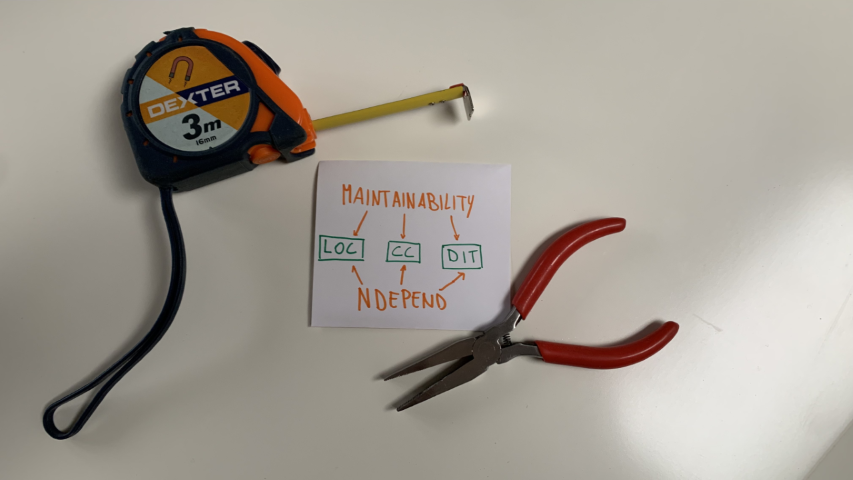
Keeping an eye on maintainability is mandatory for every project which should live long. With NDepend, you can measure maintainability for .NET projects.
Table of Contents
Just a second! 🫷 If you are here, it means that you are a software developer.
So, you know that storage, networking, and domain management have a cost .
If you want to support this blog, please ensure that you have disabled the adblocker for this site. I configured Google AdSense to show as few ADS as possible – I don’t want to bother you with lots of ads, but I still need to add some to pay for the resources for my site.
Thank you for your understanding. – Davide
Software systems can be easy to build, but hard to maintain. The more a system will be maintained, the more updates to the code will be needed.
Structuring the code to help maintainability is crucial if your project is expected to evolve.
In this article, we will learn how to measure the maintainability of a .NET project using NDepend, a tool that can be installed as an extension in Visual Studio.
So, let’s begin with the how, and then we’ll move to the what.
Introducing NDepend
NDepend is a tool that performs static analysis on any .NET project.
It is incredibly powerful and can calculate several metrics that you can use to improve the quality of your code, like Lines of Code, Cyclomatic Complexity, and Coupling.
You can use NDepend in two ways: installing it on your local Visual Studio instance, or using it in your CI/CD pipelines, to generate reports during the build process.
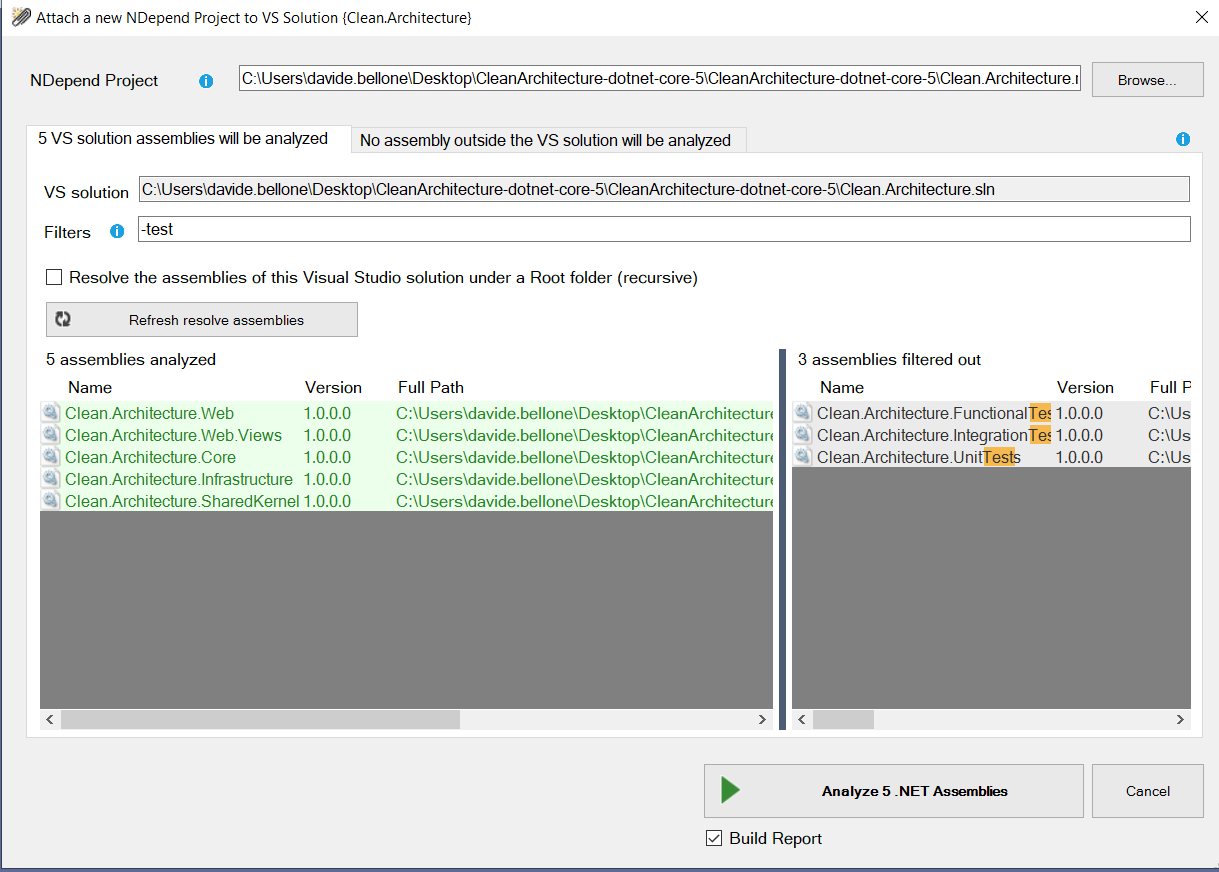
In this article, I’ve installed it as a Visual Studio extension. Once it is ready, you’ll have to create a new NDepend project and link it to your current solution.
To do that, click on the ⚪ icon on the bottom-right corner of Visual Studio, and create a new NDepend project. It will create a ndproj project and attach it to your solution.
When creating a new NDepend project, you can choose which of your .NET projects must be taken into consideration. You’ll usually skip analyzing test projects.
Then, to run the analysis of your solution, you need to click again on that ⚪ icon and click Run analysis and generate report.
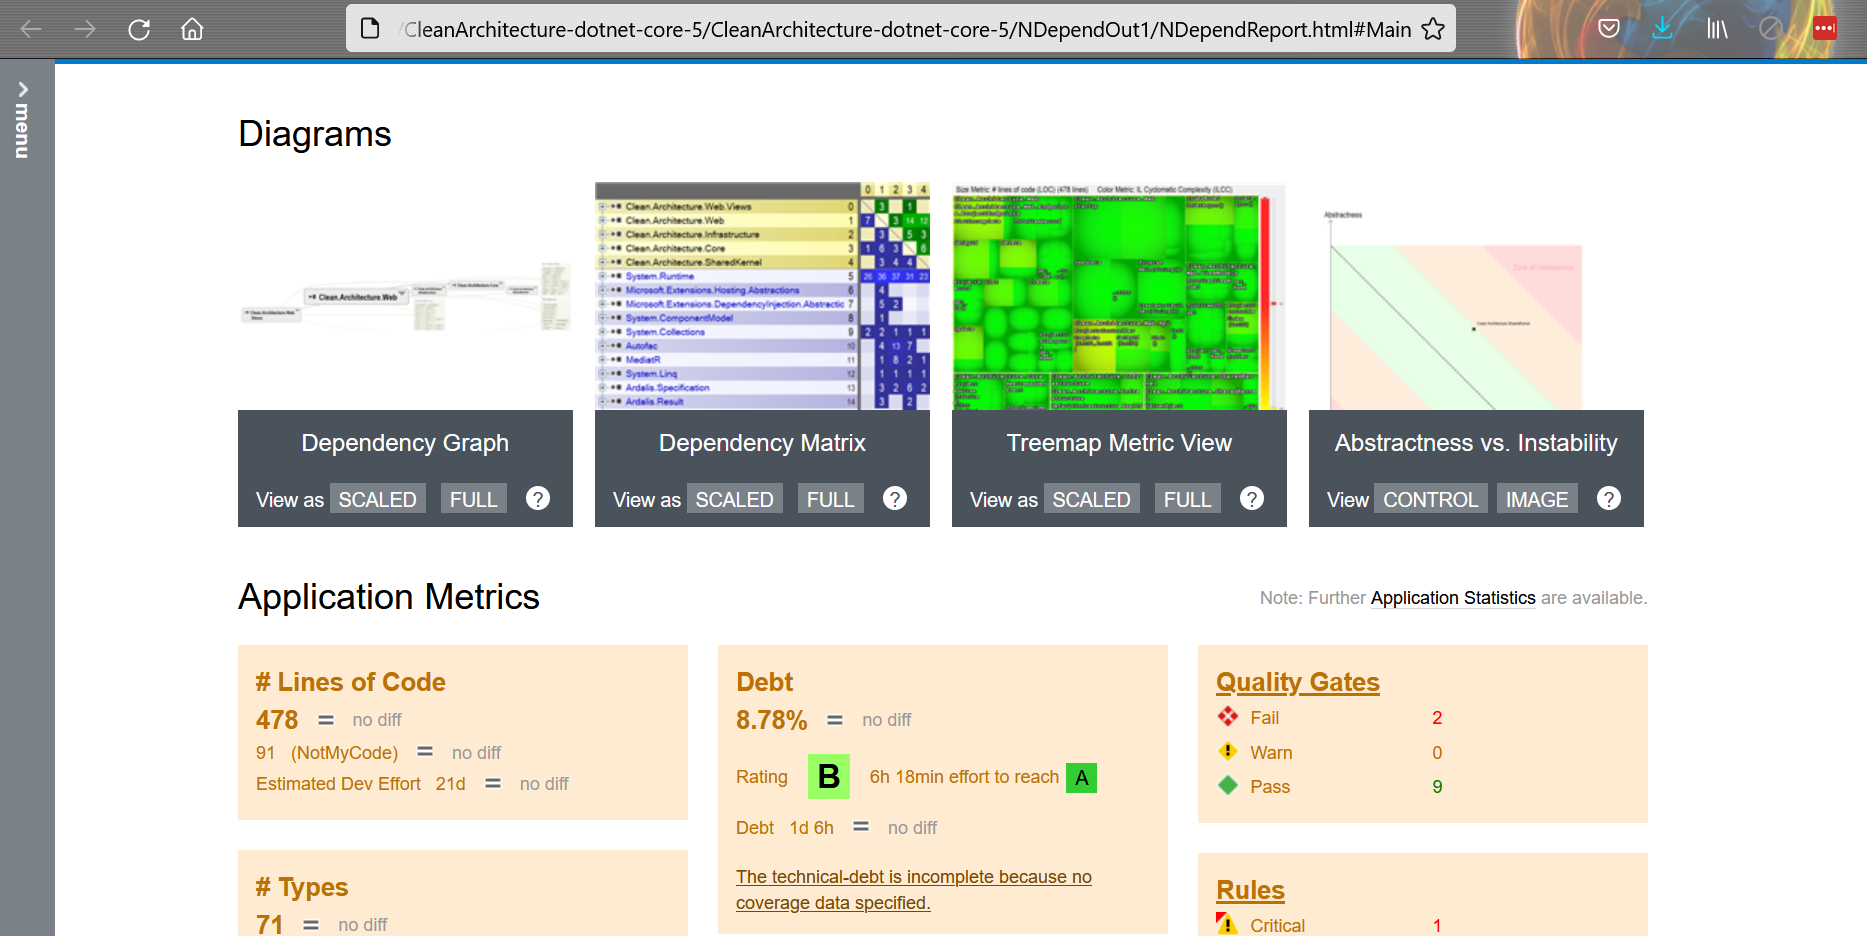
Now you’ll have two ways to access the results. On an HTML report, like this one:
Or as a Dashboard integrated with Visual Studio:
You will find most of the things in the HTML report.
What is Maintainability
Maintainability is a quality of a software system (a single application or a group of applications) that describes how easy it is to maintain it.
Easy-to-maintain code has many advantages:
it allows quicker and less expensive maintenance operations
the system is easier to reverse-engineer
the code is oriented to the other devs as well as to the customers
it keeps the system easy to update if the original developers leave the company
There are some metrics that we can use to have an idea of how much it is easy to maintain our software.
And to calculate those metrics, we will need some external tools. Guess what? Like NDepend!
Lines of code (LOC)
Typically, systems with more lines of code (abbreviated as LOC) are more complex and, therefore, harder to maintain.
Of course, it’s the order of magnitude of that number that tells us about the complexity; 90000 and 88000 are similar numbers, you won’t see any difference.
Two types of LOC can be calculated: physical LOC and logical LOC.
Physical LOC refers to the total count of lines of your code. It’s the easiest one to calculate since you can just count the lines of code as they appear.
Logical LOC is about only the effectively executable lines of code. Spacing, comments, and imports are excluded from this count.
Calculating LOC with NDepend
If you want to see the LOC value for your code, you can open the NDepend HTML report, head to Metrics > Types Metrics (in the left menu), and see that value.
This value is calculated based on the IL and the actual C# code, so it may happen that it’s not the exact number of lines you can see on your IDE. By the way, it’s a good estimation to understand which classes and methods need some attention.
Why is LOC important?
Keeping track of LOC is useful because the more lines of code, the more possible bugs.
Also, having lots of lines of code can make refactoring harder, especially because it’s probable that there is code duplication.
How to avoid it? Well, probably, you can’t. Or, at least, you can’t move to a lower magnitude. But, still, you can organize the code in modules with a small LOC value.
In this way, every LOC is easily maintainable, especially if focused on a specific aspect (SRP, anyone?)
The total LOC value won’t change. What will change is how the code is distributed across separated and independent modules.
Cyclomatic complexity (CC)
Cyclomatic complexity is the measure of the number of linear paths through a module.
This formula works for simple programs and methods:
CC = E-N+2
where E is the number of Edges of the graph, while N is the number of Nodes.
Wait! Graph?? 😱
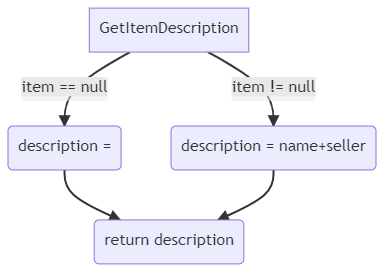
Code can be represented as a graph, where each node is a block of code.
Again, you will not calculate CC manually: we can use NDepend instead.
Calculating Cyclomatic Complexity with NDepend
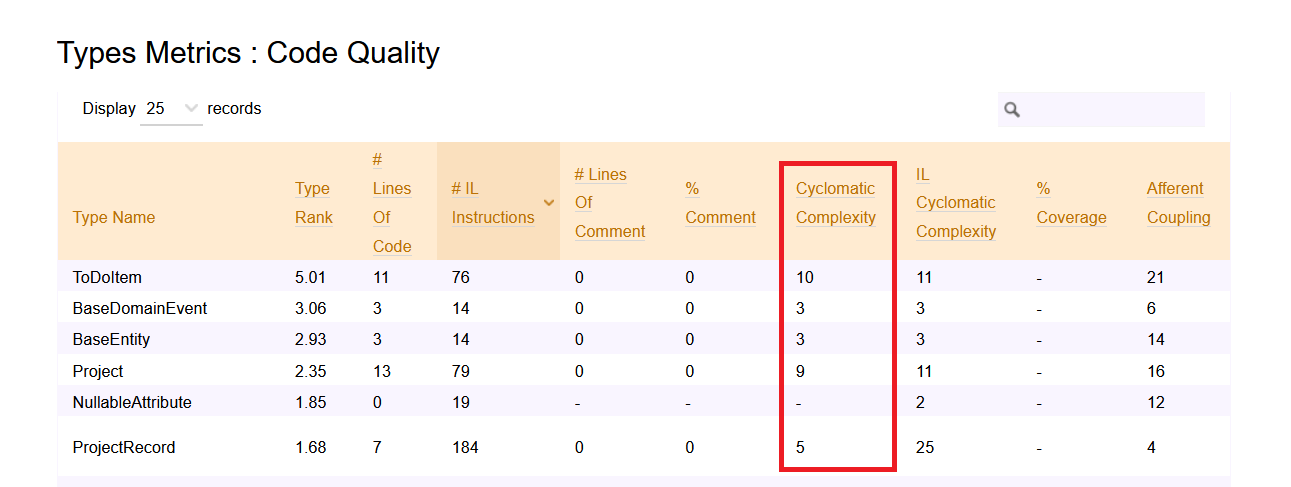
As described before, the first step to do is to run NDepend and generate the HTML report. Then, open the left menu and click on Metrics > Type Metrics
Here you can see the values for Cyclomatic Complexity for every class (but you cannot drill down to every method).
Why is CC important?
Keeping track of Cyclomatic Complexity is good to understand the degree of complexity of a module or a method.
The higher the CC, the harder it will be to maintain and update the module.
We can use Cyclomatic Complexity as a lower limit for test cases. Since the CC of a method tells us about the number of independent execution paths, we can use that value to see the minimum number of tests to execute on that method. So, in the previous example, CC=2, and we need at least two tests: one for the case when item is null, and one for the case when item is not null.
Depth of Inheritance Tree (DIT)
Depth of Inheritance Tree (DIT) is the value of the maximum length of the path between a base class and its farther subclass.
Take for example this simple class hierarchy.
publicclassUser{}
publicclassTeacher : User { }
publicclassStudent : User { }
publicclassAssociatedTeacher : Teacher { }
It can be represented as a tree, to better understand the relationship between classes:
Since the maximum depth of the tree is 3, the DIT value is 3.
How to calculate DIT with NDepend
As usual, run the code analysis with NDepend to generate the HTML report.
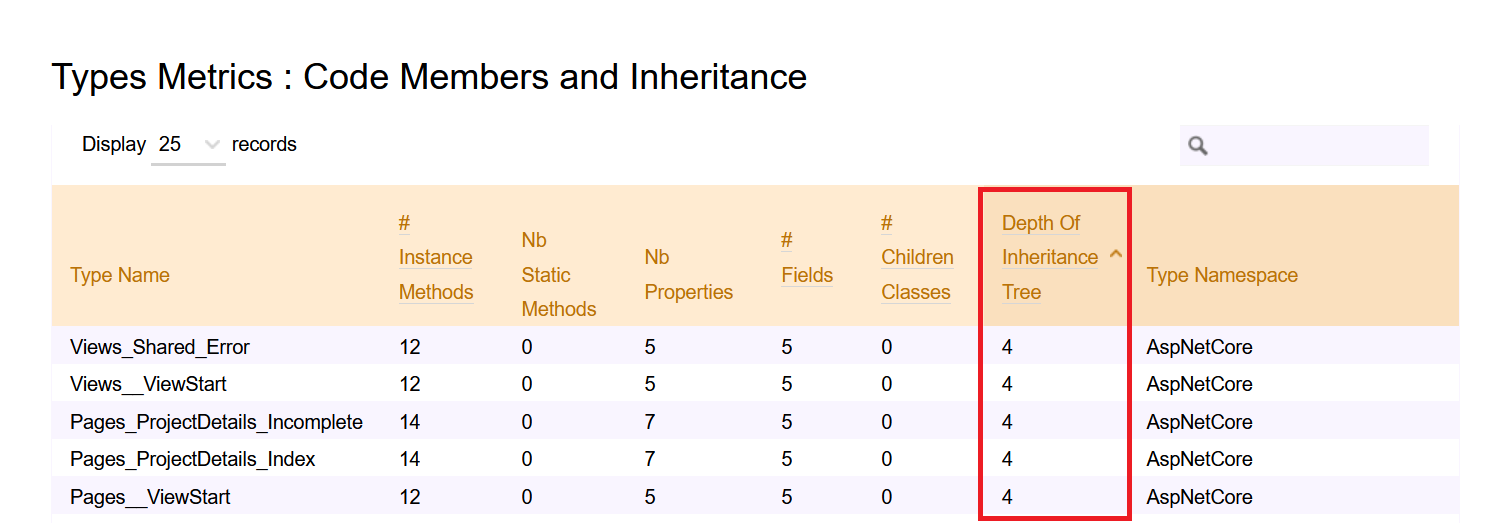
Then, you can head to Metrics > Type Metrics and navigate to the Code Members and Inheritance section to see the value of DIT of each class.
Why is DIT important?
Inheritance is a good way to reduce code duplication, that’s true: everything that is defined in the base class can be used by the derived classes.
But still, you should keep your eyes on the DIT value: if the depth level is greater than a certain amount (5, as stated by many devs), you’re probably risking to incur on possible bugs and unwanted behaviors due to some parent classes.
Also, having such a deep hierarchy may cause your system to be hard to maintain and evolve. So, if possible, prefer composition over inheritance.
Two words about NDepend
For sure, NDepend is an amazing tool for static analysis. All those metrics can be really useful – if you know how to use them. Luckily, not only do they give you the values of those metrics, but they also explain them.
In this article, I showed the most boring stuff you can see with NDepend. But you can do lots of incredible things.
My favorites ones are:
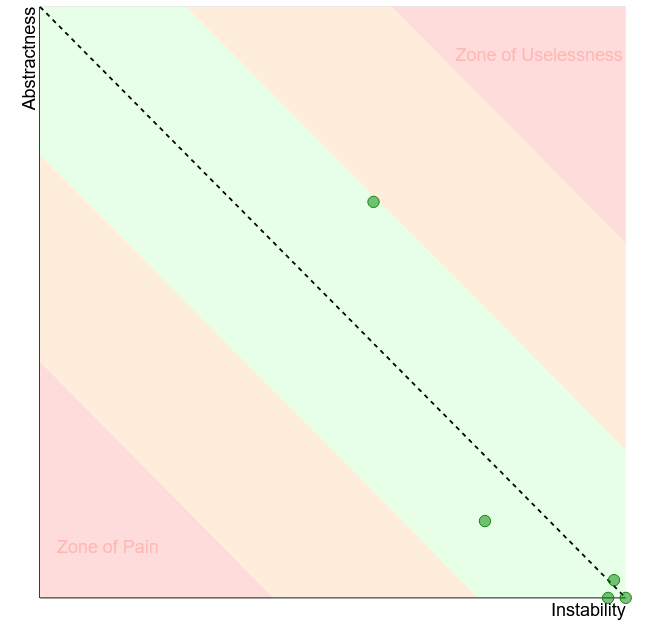
Instability vs Abstractness diagram, which shows if your modules are easy to maintain. The relation between Instability and Abstractness is well explained in Uncle Bob’s Clean Architecture book.
Assemblies Dependencies, which lists all the assemblies referenced by your project. Particularly useful to keep track of the OSS libraries you’re using, in case you need to update them for whichever reason (Log4J, anyone?)
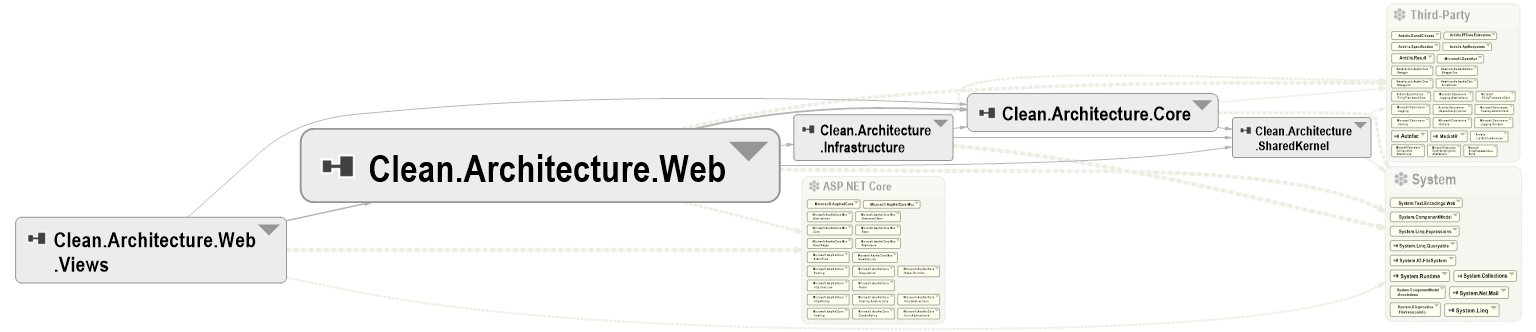
Then, the Component Dependencies Diagram, which is probably my fav feature: it allows you to navigate the modules and classes, and to understand which module depends on which other module.
and many more.
BUT!
There are also things I don’t like.
I found it difficult to get started with it: installing and running it the first time was quite difficult. Even updating it is not that smooth.
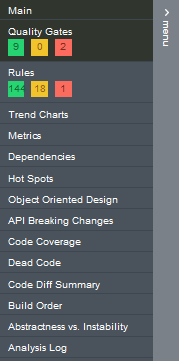
Then, the navigation menu is not that easy to understand. Take this screenshot:
Where can I find the Component Dependencies Diagram? Nowhere – it is accessible only from the homepage.
So, the tool is incredibly useful, but it’s difficult to use (at first, obviously).
If the NDepend team starts focusing on the usability and the UI, I’m sure it can quickly become a must-have tool for every team working on .NET. Of course, if they create a free (or cheaper) tier for their product with reduced capabilities: now it’s quite expensive. Well, actually it is quite cheap for companies, but for solo devs it is not affordable.
Additional resources
If you want to read more about how NDepend calculates those metrics, the best thing to do is to head to their documentation.
As I said before, you should avoid creating too many subclasses. Rather, you should compose objects to extend their behavior. A good way to do that is through the Decorator pattern, as I explained here.
In this article, we’ve seen how to measure metrics like Lines Of Code, Cyclomatic Complexity, and Depth of Inheritance Tree to keep an eye on the maintainability of a .NET solution.
To do that, we’ve used NDepend – I know, it’s WAY too powerful to be used only for those metrics. It’s like using a bazooka to kill a bee 🐝. But still, it was nice to try it out with a realistic project.
So, NDepend is incredibly useful for managing complex projects – it’s quite expensive, but in the long run, it may help you save money.
Just a second! 🫷 If you are here, it means that you are a software developer.
So, you know that storage, networking, and domain management have a cost .
If you want to support this blog, please ensure that you have disabled the adblocker for this site. I configured Google AdSense to show as few ADS as possible – I don’t want to bother you with lots of ads, but I still need to add some to pay for the resources for my site.
Thank you for your understanding. – Davide
Even though many developers underestimate this part, tests should be written even more clearly than production code.
This is true because, while production code is meant to be executed by the application, good tests allow you to document the behavior of the production code. So, the first consumers of the tests are the developers themselves.
So, how can we write better tests? A simple trick is following the «Arrange, Act, Assert» pattern.
A working (but bad) example
As long as the tests pass, they are fine.
Take this example:
[Test]publicvoid TestDateRange_WithFutureDate()
{
var diff = (new DateTime(2021, 2, 8) - new DateTime(2021, 2, 3)).Days;
Assert.AreEqual(5, diff);
}
Yes, the test passes, but when you need to read and understand it, everything becomes less clear.
So, it’s better to explicitly separate the sections of the test. In the end, it’s just a matter of readability.
AAA: Arrange, Act, Assert
A better way to organize tests is by following the AAA pattern: Arrange, Act, Assert.
During the Arrange part, you define all the preconditions needed for your tests. You set up the input values, the mocked dependencies, and everything else needed to run the test.
The Act part is where you eventually run the production code. The easiest example is to run a method in the System Under Test.
Finally, the Assert part, where you check that everything worked as expected.
[Test]publicvoid TestDateRange_WithFutureDate()
{
// Arrangevar today = new DateTime(2021, 2, 3);
var otherDate = new DateTime(2021, 2, 8);
// Actvar diff = (otherDate.Date - today.Date).Days;
// Assert Assert.AreEqual(5, diff);
}
You don’t need to specify in every method the three different parts, but personally, I find it more readable.
Think of tests as physics experiments: first, you set up the environment, then you run the test, and finally, you check if the result is the one you were expecting.
This is a really simple way to improve your tests: keep every part separated from the others. It helps developers understand what is the meaning of each test, and allows for easier updates.
Mapping every SQL result to a data type can be a pain. To simplify our life, we can use an ORM like Dapper to automatically map the data.
Table of Contents
Just a second! 🫷 If you are here, it means that you are a software developer.
So, you know that storage, networking, and domain management have a cost .
If you want to support this blog, please ensure that you have disabled the adblocker for this site. I configured Google AdSense to show as few ADS as possible – I don’t want to bother you with lots of ads, but I still need to add some to pay for the resources for my site.
Thank you for your understanding. – Davide
In a previous article, we’ve seen how to perform simple CRUD operations on a Postgres database by using Npgsql, a library that allows you to write and perform queries to be executed specifically on a PostgreSQL database.
In this article, we will take a step further: we will perform the same operations using Dapper, one of the most popular ORM for .NET applications, and we will see how performing those operations becomes easier.
Introducing the project
For this article, I will reuse the project I used for the previous article.
This project performs CRUD (Create, Read, Update, Delete) operations on a Postgres database with a single table: Games. All those operations (plus a bunch of other additional ones) are executed by a class that implements this interface:
This allows me to define and use a new class without modifying too much the project: in fact, I simply have to replace the dependency in the Startup class to use the Dapper repository.
But first…
Dapper, a micro-ORM
In the introduction, I said that we will use Dapper, a popular ORM. Let me explain.
ORM stands for Object-relational mapping and is a technique that allows you to map data from one format to another. This technique simplifies developers’ lives since they don’t have to manually map everything that comes from the database to an object – the ORM takes care of this task.
Dapper is one of the most popular ORMs, created by the Stack Overflow team. Well, actually Dapper is a Micro-ORM: it performs only a subset of the operations commonly executed by other ORMs; for example, Dapper allows you to map query results to objects, but it does not automatically generate the queries.
To add Dapper to your .NET project, simply run this command:
dotnet add package Dapper
Or add the NuGet package via Visual Studio:
Dapper will take care of only a part of the operations; for instance, it cannot open a connection to your DB. That’s why you need to install Npgsql, just as we did in a previous article. We can say the whole Dapper library is a set of Extension Methods built on top of the native data access implementation – in the case of PostgreSQL, on to op Npgsql.
Now we have all the dependencies installed, so we can start writing our queries.
Open the connection
Once we have created the application, we must instantiate and open a connection against our database.
private NpgsqlConnection connection;

public DapperBoardGameRepository()
{
    connection = new NpgsqlConnection(CONNECTION_STRING);
    connection.Open();
}
We will use the connection object later when we will perform the queries.
CRUD operations
We are working on a table, Games, whose name is stored in a constant:
So, the main task of Dapper is to map the result of the queries performed on the Games table to one or more BoardGame objects.
Create
To create a new row on the Games table, we need to do something like this:
publicasync Task Add(BoardGame game)
{
string commandText = $"INSERT INTO {TABLE_NAME} (id, Name, MinPlayers, MaxPlayers, AverageDuration) VALUES (@id, @name, @minPl, @maxPl, @avgDur)";
var queryArguments = new
{
    id = game.Id,
    name = game.Name,
    minPl = game.MinPlayers,
    maxPl = game.MaxPlayers,
    avgDur = game.AverageDuration
};
await connection.ExecuteAsync(commandText, queryArguments);
}
Since Dapper does not create any queries for us, we still need to define them explicitly.
The query contains various parameters, marked with the @ symbol (@id, @name, @minPl, @maxPl, @avgDur). Those are placeholders, whose actual values are defined in the queryArguments anonymous object:
var queryArguments = new{
id = game.Id,
name = game.Name,
minPl = game.MinPlayers,
maxPl = game.MaxPlayers,
avgDur = game.AverageDuration
};
Finally, we can execute our query on the connection we have opened in the constructor:
When using Dapper, we declare the parameter values in a single anonymous object, and we don’t create a NpgsqlCommand instance to define our query.
Read
As we’ve seen before, an ORM simplifies how you read data from a database by automatically mapping the query result to a list of objects.
When we want to get all the games stored on our table, we can do something like that:
publicasync Task<IEnumerable<BoardGame>> GetAll()
{
string commandText = $"SELECT * FROM {TABLE_NAME}";
var games = await connection.QueryAsync<BoardGame>(commandText);
return games;
}
Again, we define our query and allow Dapper to do the rest for us.
In particular, connection.QueryAsync<BoardGame> fetches all the data from the query and converts it to a collection of BoardGame objects, performing the mapping for us.
Of course, you can also query for BoardGames with a specific Id:
publicasync Task<BoardGame> Get(int id)
{
string commandText = $"SELECT * FROM {TABLE_NAME} WHERE ID = @id";
var queryArgs = new { Id = id };
var game = await connection.QueryFirstAsync<BoardGame>(commandText, queryArgs);
return game;
}
As we did before, you define the query with a placeholder @id, which will have the value defined in the queryArgs anonymous object.
To store the result in a C# object, we map only the first object returned by the query, by using QueryFirstAsync instead of QueryAsync.
Comparison with Npgsql
The power of Dapper is the ability to automatically map query results to C# object.
With the plain Npgsql library, we would have done:
awaitusing (NpgsqlDataReader reader = await cmd.ExecuteReaderAsync())
while (await reader.ReadAsync())
{
BoardGame game = ReadBoardGame(reader);
games.Add(game);
}
to perform the query and open a reader on the result set. Then we would have defined a custom mapper to convert the Reader to a BoardGame object.
privatestatic BoardGame ReadBoardGame(NpgsqlDataReader reader)
{
int? id = reader["id"] asint?;
string name = reader["name"] asstring;
short? minPlayers = reader["minplayers"] as Int16?;
short? maxPlayers = reader["maxplayers"] as Int16?;
short? averageDuration = reader["averageduration"] as Int16?;
BoardGame game = new BoardGame
{
Id = id.Value,
Name = name,
MinPlayers = minPlayers.Value,
MaxPlayers = maxPlayers.Value,
AverageDuration = averageDuration.Value
};
return game;
}
With Dapper, all of this is done in a single instruction:
var games = await connection.QueryAsync<BoardGame>(commandText);
Update and Delete
Update and Delete operations are quite similar: just a query, with a parameter, whose operation is executed in an asynchronous way.
I will add them here just for completeness:
publicasync Task Update(int id, BoardGame game)
{
var commandText = $@"UPDATE {TABLE_NAME}
SET Name = @name, MinPlayers = @minPl, MaxPlayers = @maxPl, AverageDuration = @avgDur
WHERE id = @id";
var queryArgs = new {
id = game.Id,
name = game.Name,
minPl = game.MinPlayers,
maxPl = game.MaxPlayers,
avgDur = game.AverageDuration
};
await connection.ExecuteAsync(commandText, queryArgs);
}
and
publicasync Task Delete(int id)
{
string commandText = $"DELETE FROM {TABLE_NAME} WHERE ID=(@p)";
var queryArguments = new { p = id };
await connection.ExecuteAsync(commandText, queryArguments);
}
Again: define the SQL operation, specify the placeholders, and execute the operation with ExecuteAsync.
Further readings
As always, the best way to get started with a new library is by reading the official documentation:
Dapper adds a layer above the data access. If you want to go a level below, to have full control over what’s going on, you should use the native PostgreSQL library, Npgsql, as I explained in a previous article.
How to get a Postgres instance running? You can use any cloud implementation, or you can download and run a PostgreSQL instance on your local machine using Docker as I explained in this guide:
In this article, we’ve seen how to use Dapper to simplify our data access. Dapper is useful for querying different types of RDBMS, not only PostgreSQL.
To try those examples out, download the code from GitHub, specify the connection string, and make sure that you are using the DapperBoardGameRepository class (this can be configured in the Startup class).
In a future article, we will use Entity Framework to – guess what? – perform CRUD operations on the Games table. In that way, you will have 3 different ways to access data stored on PostgreSQL by using .NET Core.